
Likes
Comments
Share


Likes
37
Share


@Roberts
Follow
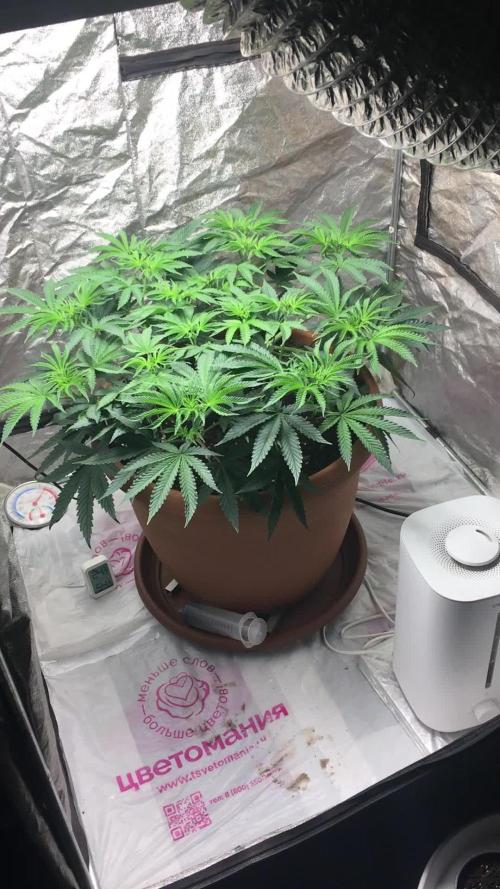
AMS Supreme is doing really good with the Athena Nutrition, under the Mars Hydro FC4800 light. She is stacking nicely , and starting to develop a aroma. She is due for a solution change very soon. She has been drinking a lot, she should be a nice harvest if she stays on current path. Nothing else to report at this time. Thank you Athena, Mars Hydro, and Amsterdam marijuana seeds. 🤜🤛🌱🌱🌱
Thank you grow diaries community for the 👇likes👇, follows, comments, and subscriptions on my YouTube channel👇. ❄️🌱🍻
Happy Growing 🌱🌱🌱
https://youtube.com/channel/UCAhN7yRzWLpcaRHhMIQ7X4g


Likes
15
Share


@Dillon1550
Follow
Hey guys and gals
Lots of growing!!! Lots of training.
Looks like the northern lights might be a go, witch is exciting.
Another week of bending and probably some more topping. Until next week!!
Happy growing


Likes
14
Share


@mheat
Follow
Buds are fattening and smells sweet. I love her color. In a few days will begin flushing. I am EXCITED!


Likes
2
Share


@Shefman93
Follow
Took them out the tent so I can clean the grow room & tent. The ladies look amazing in natural light.will flip to flower in 7 days. Transplanted into a 25 gallon bag, lollipops and placed under a scrog. I also had to super crop some branches for it to fit below the scrog.

Likes
62
Share


Likes
6
Share


@GoldenWeedGrower
Follow
Legend
Timestamp: 📅
EC - pH: ⚗️
Temp - Hum: 🌡️
Water: 🌊
Food: 🍗
pH Correction: 💧
Actions: 💼
Thoughts: 🧠
Events: 🚀
Media: 🎬
D: DAY, G: GERMINATION, V: VEGETATIVE, B: BLOOMING, R: RIPENING, D: DRYING, C: CURING
______________
📅 D22/V18 - 07/05/24
⚗️ EC: 0.7 pH: 5.3
🌡️ T: 22 °C H: 50%
🌊
🍗
💧
💼
🧠
🚀
🎬 1 TL video
______________
📅 D23/V19 - 08/05/24
⚗️ EC: 0.7 pH: 5.3
🌡️ T: 22 °C H: 50%
🌊
🍗
💧
💼 Topping and LST
🧠
🚀
🎬 1 TL video of grow and one of the topping
______________
📅 D24/V20 - 09/05/24
⚗️ EC: 0.9 pH: 5.4
🌡️ T: 19 °C H: 50%
🌊
🍗
💧
💼
🧠
🚀
🎬 1 TL video
______________
📅 D25/V21 - 10/05/24
⚗️ EC: 0.9 pH: 5.4
🌡️ T: 19 °C H: 50%
🌊 12 L
🍗 Calmag, Grow A-B, B52, Hydroguard, Rhino Skin, Bud Candy
💧
💼
🧠
🚀
🎬 1 TL video
______________
📅 D26/V22 - 11/05/24
⚗️ EC: 0.9 pH: 5.4
🌡️ T: 19 °C H: 50%
🌊
🍗
💧
💼
🧠
🚀 Out of Home
🎬 1 TL video
______________
📅 D27/V23 - 12/05/24
⚗️ EC: 1.0 pH: 5.3
🌡️ T: 20°C H: 50%
🌊
🍗
💧
💼
🧠
🚀 Out of Home
🎬 1 TL video
______________
📅 D28/V24 - 13/05/24
⚗️ EC: 1.0 pH: 5.2
🌡️ T: 20°C H: 50%
🌊
🍗
💧
💼
🧠
🚀 Out of Home
🎬

Likes
3
Share


@Ieiogrow94
Follow
Eccoci qui...
Tutto va per il meglio, questa settimana si inizia a vedere la resina e ora si inizieranno a formare le cime, per questo aggiungo Sugar Shot di @xpertnutrients vedremo l'evoluzione settimana prossima.
Odore intenso, sta recuperando dalla carenza presentata è davvero molto bella e sembra anche pesante.
Grazie a tutti per il supporto🔥🌲❤️

Processing
Likes
29
Share


@Grey_Wolf
Follow
Ginger Nut Cookies & Aussie Music Videos
Fastbuds GSC x Barneys Red diesel
6 weeks of flowering completed
9th April 2020
Hi Everyone I hope you are all feeling well and keeping busy during the lockdown.
It's raining cats and dogs here (lucky there's no chinese around LMFAO)
and the humidity is 100% so today Ive chopped this little lady down and she is now drying up in my shed with fans going 24/7.
I was quite pleased with the amount of bud I got off her and it's smelling fantastic and is very sticky.The trichomes were very milky with a few amber as well. 😍
very easy to grow no fuss and no problems but we'll have to wait and see as to whether she is a good smoke or not .
Now for this weeks Aussie Music videos 👊
Because we are almost at the end of this grow I thought I had better add a few extra songs this week to make sure I get a decent selection of Diffrent music videos for you all to check out.
So for this weeks selections I chose
Empire of the Sun 👊
Walking on a Dream
https://youtu.be/eimgRedLkkU
Big Pig 👉 (from Bill n teds excellent adventure) 👊
I can't break away
https://youtu.be/f_rfXVdYelA
Peking duk 👊
Reprisal
https://youtu.be/4GboBAg2Syo
The white stripes 👊
Seven nation army
https://youtu.be/0J2QdDbelmY
Grinspoon 👊
Chemical Heart
https://youtu.be/58mXxWuUqYw
The hilltop hoods 👊
Leave my lonely
https://youtu.be/yKifJ4Q5ph0
And Silverchair 👉Not bad for a bunch of 16yr olds which they were at the time this video was made
https://www.youtube.com/watch?v=RZD982yrmx4
The Next update will be the Final harvest update with the dried n trimmed buds etc. I will also have to add another heap of tunes in that I had wanted to play ,
so keep an eye out for my next Update of Ginger Nut Cookies & Aussie Music videos .😀
Until then Stay safe and Keep lit And we'll all get thru this Together 🙏 👍


Likes
2
Share


@lozaa111
Follow
Germinated in paper towels…
Most popped no problems…
In house genetics came with 1 of 3 seeds having a clear deformation still tried to germ 🤭
Put into root riot and placed in cups of coco for extra space to root…
Lightly misting plane water…
In a heated humidity propagator with a 125w cfl above on 18 hours with 4 hours off.
When plants have more structure while getting moved to my veg room.


Likes
Comments
Share


Likes
16
Share


@HegauHillsFarmers_M11
Follow
Die Pflanze wurde Mitte letzter Woche an Tag 66 geerntet. Getrocknet wurden die Blüten 6 Tage lang bei einer Luftfeuchtigkeit von 53% bevor sie nun ins Glas kommen.
Getrimmt wurde die Pflanze trocken.
Likes
101
Share


@TOTEM
Follow
Almost done here! What a journey. I’m gonna flush her tonight, even if the soil is still wet. I’m sorry I don’t have one extra week (2 weeks with Overdrive would be better), but the buds are big and fat now. Definitely time for a big flush. You can see trichomes maturation on the two videos I uploaded.

Likes
11
Share


@LaughingDragon
Follow
A friend had a chance to take some photos for me, also continued with some defoliation as well. Nutrients are doing well, hopefully buds really take off this week.

Likes
27
Share


Processing
Likes
5
Share


@FlyHighhh
Follow
Gaat goed ga volgende week in de bloei zetten . Heb wel 2 achterblijvers maar dat groeit wel bij hoop ik 🤔🤔
Likes
11
Share


@Bthumb
Follow
Well, I was wrong about the stretch. Afraid I'm running out of height in my tent.
Likes
14
Share


@danwho
Follow
8/21/2024
Added two fresh gallons with week 4 nutrients to bring the reservoir up to 750ppm. Will plan to do a more substantial water change in the next few days. Both plants are booming! Added the trellis netting to begin training the plants to fill the tent! This week should be interesting.
8/24/2024
Both plants are looking good up to this point. Have continued to add fresh nutrient water as they are drinking much more now. I have a second trellis net on hand as I believe it will be required for an aditional layer of support as they stretch into pre-flower. Looking like a 4.5 or 5 week veg before flipping.
8/25/2024
Noticed Plant B water level was only a few inches in the bottom of the bucket. Had a pump flow rate issue with most of the feed from the reservoir diverting to the closer bucket. Working to rectify the issue, but Plant B is definitely stunted, unfortunately.
8/27/2024
The water level issue was remedied by putting a separate pump and feed line in place for each plant. Continuing to defoliate as I prepare to take clones. I will likely run this week of veg a few extra days to allow Plant B to recover a bit from the water issues. Additionally, after taking clones I will give 1-2 days of recovery for the plants before switching to 12-12 and starting pre-flower!
8/29/2024
Raised the lights to drop DLI to about 30. Continuing to monitor water level issues.
8/30/2024
Did a final pruning on both plants before flipping to flower tomorrow. Started topping reservoir with bloom nutrient blend. Shortened light cycle by 2 hours to not shock the plants into flower. Added a second layer of trellis netting. Plant A (larger of the two) is absolutely thriving, plant B (smaller of the two) is bouncing back from the water level issues earlier this week! Both plants are looking ready for flower.