
Likes
Comments
Share


@drzoidberg
Follow
tent smells so nice these things are really filling out i am so happy with the shorty that i thought was a goner she pulled through and so much more

Likes
5
Share


@Bombtofu
Follow
Every other day I'm checking to make sure none of the fan leaves are blocking light. If I find a leaf that is, I have trimmed it. So far I think I've trimmed 6 or 7 fan leaves. Buds are starting to pop up just about everywhere. I've kept to the same watering regimen, and nutrient amount. I can sure smell her now tho, and I love it.

Likes
5
Share


@therealgrowmie
Follow
Alrighty, the fun part’s over—now it’s time to dial things in.
The plants seem to have used up the nutrients in the soil and now require a different feeding approach for the flowering stage.
But hey, you’ve got to grow to know, and the fix is simple.
From now on, I’m fertilizing once a week with BioBizz organic nutrients, following the provided feeding schedule. I’m sticking to the basic components only.
I’ve also added some calcium and magnesium, as the lower fan leaves are showing signs of deficiency.
Since the plants have become quite bushy, I pruned the lower third over a few sessions—spreading out the stress and avoiding cutting too much at once.
Lastly, I’ve set the oscillating fan to medium intensity to prevent stagnant air. The duct fan is now tuned to maintain a VPD between 0.7 and 0.8 kPa.

Likes
Comments
Share


Likes
39
Share


@AestheticGenetics
Follow
4/1/25
Welcome to another week and Thank you to @Zamnesia and @Plagron for the genetics and the chance to participate in the contest.
These are beautifully tall plants. I have had to spray with lost coast plant therapy and some Safer brand insecticidal soap because of creepy crawlies such as mites of some sort.
4/7/25 i shoved everysingle plant into my main tent. it has a humidifier and controls and all the goodies. the plants that have been struggling were in a separate tent without a humidifier or even an exhaust fan. and i think that may have had something to do with the issues. im really hoping that it isnt something that can spread to other plants because ive shoved 5 - 5 gallon pots in 2.7x2.7 grow tent. but hoping the environment is more friendly for them during the last half of
The pistils have changed colors because of the spray but everything else is looking nicely.
Super tall and super thin leaved plants but the buds are very tight and i imagine will be fairly dense.
some of the plants have decent cola stacking of maybe 6+ nodes
Today i top dress with 3tsp of Bloom, 1Tsp of Microbe Charge and 1Tsp of Bloom Booster.
4/6/25
R3 is producing some giant buds. The lower buds are twice as big as some of runtz plants. They all smell super fruity

Likes
8
Share


@Gardens_of_Of
Follow
5th week of Flowering is over. Still observing some darkening on the tips of the Yellow Orange. On the other hand, the plant seems still very healthy and it’s growing frosty flowers. Its smell is dominating the tent with a citrus scent. It is smelling more citrus than a real lemon…
Target VPD is still set to 1,5 with 23 Celcius Target Temp.
Top Left: Wonder Pie (GHSC)
Top Right: Lemon Orange (GHSC)
Middle: Mimosa Evo (Barney’s - Clone)
Bottom Left: Runtz (Barney’s - Clone)
Bottom Right: Exotic Runtz (Exotic Seed)


Likes
20
Share


@Chubbs
Follow
420 Fastbuds
FBT2305 Week 5
These two girls are starting to transition into flower very nice. Don't mind the dropping in the leafs my lights just came on. Over all haven't done really much besides another defoliation and lollipoped them taking off the lower 3 nodes. Should allow them plenty of light through flower and air to prevent moisture build up at pot level. All in all Happy Growing

Likes
22
Share


@J_diaz420
Follow
Muy olorosa genética, me encantó mucho, termino de engordar al 100% los cálices absorbiendo los postilos de las flores y eso para mi es muy importante, muy agradable al fumar con un efecto inmediato apto para el día a mi pensar ya que su efecto se nota mucho pero no es para dejarte tumbado si no que con mucho ánimo en fin muy agradable para conectar tu mente a la música que es algo que me encanta al fumar, en fin muy fácil de cultivar, crece mucho así que procura dar poca vegetación, creo que yo me excedí un poco, y no olvidar alimentar a tiempo ya que beben mucho.
Realmente contento con esta experiencia
Muchas gracias por pasar y felices cultivos!!

Likes
51
Share


@kansasscott725
Follow
Little bit of a delay. Wanted to get climate perfect before the flip. Upgraded ventilation and have the tent dialed in well at 74 degrees and 60% humidity during day and 70deg/ 55% at night.
Started a second scrog on Day 42. Nervous about the stretch but hopefully I can maintain it (I wish T5 lights could flower...)
Did extensive trimming underneath clearing pretty much anything that will never reach the ceiling of green above it.
Day 45 marks last day of Veg
Day 46 marks first day of flower
AND.
HERE.
WE.
GO.


Likes
1
Share


@Maxximillia420
Follow
Hi
Like u all saw I deleted my mix max the finest diary, due problems and not being able to give each strain enough space and time on here !!
So now Iam concentrating on just a few selected strains
This diary is about the
Trainwreck by Humboldt seeds
Infos :
Trainwreck is a mind-bending, potent sativa with effects that hit like a freight train. Mexican and Thai sativas were bred with Afghani indicas to produce this Northern California staple, passing on a sweet lemon and spicy pine aroma. Trainwreck begins its speedy hurtle through the mind with a surge of euphoria, awakening creativity and happiness. Migraines, pain, and arthritis are mowed down by Trainwreck’s high-THC content, and many patients also use it for relief of anxiety, ADD/ADHD, and PTSD. Trainwreck flowers tend to finish early when growing outdoors, while indoor gardens are ready for harvest after 8 weeks.
I got the cutting at the 03.12.2019 due too stress due transport and time issues it stand in the shadow for almost 10 days and there wasn’t much growing going on ! The motherplant is about six month old and it was selected by a friend between
20 regular seeds !!
This pheno Type it’s growing really bushy and doesn’t strech too much about a 1/3 of original starting highs
When well trained and cut
Day 1 - is 16.12.2019 and I count that after I took cuttings from the top and transplanted the freshly rootet plant from a 1/2L into a 4 L pod !!
Day 2 - still boring stuff going on for about a week no water today
Day 3 - no water
Day 4 - no water
Day 5 - no water
Day 6 - no water

Likes
6
Share


@Nune2021
Follow
Hey Leute die Pflanzen machen sich sehr gut wie ich finde ich muss nur die unterschiedlichen Größen Händeln aber das passt schon duften tuen sie auch schon

Likes
70
Share


@MrJones
Follow
Sky Walker
~~~~~INDOOR~~~~~
DAY 141 Above Dirt
💬SUNDAY 01.13.24 - So this is the update that I did not have time to do over the weekend, the girls are bouncing back from the hard time I put them through last week, and the flowers are starting to chunk up along with more foliage, however, there will be no more defoliation until we are close to completion, for now, its just water, and wait, allowing the Gaia Green to do its thing, the light is at 100% and the girls love it.
~~~~~~~~~~~~~~~
🌱Sky Walker
👨🌾🏽Sativa Jones
🌤️@Medicgrow420
SeedBank Seeds
📝@gaiagreenorganics
📝Bokashi Biochar
~~~~~~~~~~~~~~~
📝 Skywalker OG Strain is a top-shelf Indica dominant hybrid. It is a cross of Original Amsterdam Blueberry, OG Kush, and the indica strain Mazar from Afghanistan, and is best known for its super potent effects and sky-high THC levels.
Likes
15
Share


@Mcdiggley420
Follow
Great growth In the last week sf1000 finally arrived and got nutrients sorted


Likes
7
Share


@Hexus
Follow
Days 78-84 - Been lax in updates, but I still log every week to completion. Back injury in addition to The Nineteen, Rona Style, has been a bit of a pain in the posterior. (That means ass) Plants are gigantic and sassy. Had Dangergirl come out and defoliate/lollipop the bottoms out of the girls, saving me painful labor and increasing my yields, so yay for her! Plants are happy, pompoms are getting thick, and everything looks good. Switched FF01 to flower on day 84.

Likes
9
Share


@Goldbud
Follow
Week 5 flowering just ended. See the nice time lapse movie of the last 10 days.


Likes
2
Share


@aquaMan
Follow
End of Week 7 and finally the 2nd 250W Lamp is here!!!
Tropicana Cookies going strong, the Skittlez seem to wanna grow a little more before coming into flowering. Will change the Lightning to 12/12 if it doesnt get better.
Plants drank wel over 40L of Nutrients this week.


Likes
6
Share

@connormcleod47
Follow
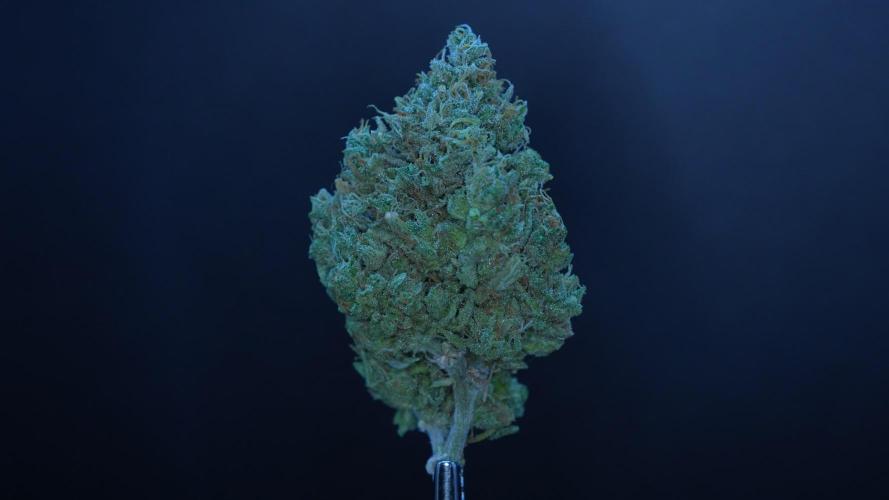
83 days from seed, soil was hot from day 1 & I ended up stunting the plants this run... Low yield at 14g but still enough I will at least be able to test, stunted this one & it was pulled early, could have used another 2 weeks, prone to thrips!
Candy/Gas/Hash on the nose, would make for an excellent concentrate!
Grown in Black Swallow living soil with Cronks PUUR Organics line!
Photos taken with the new Sony A7 V + 28-75mm F/2.8 Tamron Di III VXD G2 zoom lens, images are heavily cropped & could have been better, am still learning how to use the camera :P

Likes
6
Share


@FumateAlgoo
Follow
🌱 Finalizando la semana 3 y con buenas noticias 🌱
Efectivamente, esa carencia que venía notando estaba relacionada con calcio y magnesio. Después de añadir Calmag, las plantas empezaron a mostrar más vigor y mejor desarrollo.
Hace unos días realicé el trasplante a macetas de 11L, probablemente las definitivas, aunque esto dependerá de cómo avancemos en las próximas semanas. 💪
A partir de ese trasplante, también comencé a incluir BioGrow en el riego, para potenciar el crecimiento.
📝 Dato útil: Antes de trasplantar, esperé a que el sustrato estuviera un poco más seco y compacto, lo que facilitó muchísimo el proceso. Luego, en ese primer riego post-trasplante, aproveché para aplicar fertilizantes.
¡Seguimos avanzando y viendo los cambios día a día! 🚀🌿