
Likes
Comments
Share


@cmstacker01
Follow
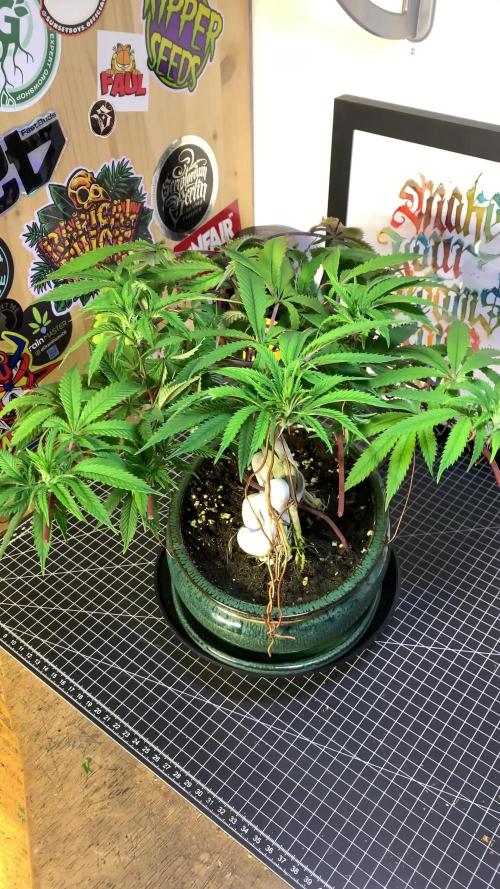
aprox 4 weeks to go before chopping time
Going good,buds fattening up and all healthy


Likes
48
Share


@Wackytabacky_420
Follow
Hey fellow growers week 3 update of my Blue Dream grow. Not a lot of change since last week but growth! I switch both blurps to full power tonight to get these ladies rocking!! Well I did feed twice this week. Do remember that I'm not feeding the plants large amounts of water yet as I don't wanna drown my ladies. If I had to guess I would say maybe an 1/8 gal per plant. This is what the ladies were fed....
12/31/2021
1ml micro
1ml gro
1/2ml bloom
Ph 6.34
335 ppm
Solution temp 73.2F
1/2/2022
1ml micro
1ml gro
1/2ml bloom
Ph 6.34
335 Ppm
Solution temp 73.2F
Not sure I will do any lst training as none of these ladies are ready for clips yet. Grow is moving along smoothly at this point and I'm satisfied with where my ladies are at this stage of life. Well till next week thanks for stopping by. Best of luck and Happy Growing!!😎🌱💚💪💪


Processing
Likes
4
Share


Likes
18
Share


@Mastr
Follow
Northern light auto I recommend to all biggener grower she so easy to grow and respond well on hst and lst training honestly she grow so much different everyday that's why I try pic daily happy growing friends
Update day 30 she streching alot and I can see lots branch double my last grow so happy for 10l pot
Update day 33 I reduce amount off nitrogen to 1.5 ml per litre and next week I reduse to 1ml coz my last grow bud but airy so I want go se gently with nitrogen and see what's different

Likes
2
Share


@ElegantBuds
Follow
Hello growers
This week was a good week. The plants are still growing good. Good color. Happy.
In a week i will switch!
See you

Likes
361
Share


@Ju_Bps
Follow
Hello my friendly growmies 👩🌾👨🌾🌲🌲,
Nothing special this week, the cute ladies continue their maturation, and start to be completely purple 💜😍
I'll be so sad when I'll chop them 😞 , but probably happy when I'll try this beauty 🙂🙂🙂😋😋😋.
Smeel fruity and frosty 😋 ❄️ 🍌
💦 2 watering this week 2.75l/plant
Water + Cannazym + Sugar Royal
Water + RQS Bio Flowering Booster
@PH6
RQS Bio Flowering Booster - Week 7
THICKER 1. 2 ml/l
BIGGER FLOWERS 1 ml/l
SWEETER FLOWER 0.8 ml/l
Probably the last nutes watering.
The RQS liquid kit, look doing the job, not overfert or deficiency sign for the moment.
Trichromes look milky, end probably in one or 2 week,
Next watering will be flush.
Lamp @100% and start to be really close to the plant, but not burning sign for the moment.
Thanks community for follow, likes, comments, always a pleasure 👩🌾👨🌾❤️🌲
Merry Xmas to the community 💜👨🌾👩🌾🎅
Mars Hydro - TS1000 💡💡
https://www.mars-hydro.com/ts-1000-led-grow-light
Mars Hydro - FC3000 💡💡
https://www.mars-hydro.com/fc-3000-samsung-lm301b-led-grow-light
RQS - Fat Banana Auto 🍌🍌🌲🌲
https://www.royalqueenseeds.com/autoflowering-cannabis-seeds/487-fat-banana-automatic.html


Likes
10
Share


@savvage61
Follow
well im at the end of week 2 flower everything is going Great not a lvl as I hoped but every Bud is getting a lot of light Things look promising I belive this will be a decent harvest. I will change some things next grow I got a new 4x4 Gorilla grow tent with a NEW SET OF 5 Gal Air pots and another batch of living Soil AKA SUPER SOIL Ill explain how come living soil makes a huge difference when using a soil medium. Ill dump a lot of up comning changes and why next time till the
Stay Safe Stay Stoned
Day 20 flower off to a awesome start the bottom is leafless with good air flow dropping tempts down now trying to Draw out the purple and other colors I cleared out everything with low pistil put out to allow air and room for the hearty buds


Likes
28
Share


@HydroHerb420
Follow
All 6 chopped after 48 hours dark. The old rainwater brought some wicked Col ours out and there’s plenty of buds bleeding purple. Loved these and they’ve been nice and straightforward. I did give them a bit of a hard time with under and over feeding but there still looks a decent amount of really dense bud there. Will add some better pics and weights when it’s ready. Now hanging at 55F and 65RH not the temps and humidity in the video 😂. Happy New Year 💚
Likes
31
Share


@Pedrojuan
Follow
Bueno arranca la semana con pocos cambios en la disposición de las cosas, se ve el rostro de la floración… una crece y se desarrolla más que la otro, se ve que la izquierda siempre inspira más… mantendremos la solución a 1.2 EC el PH siempre a 5.9. Por el resto todo va igual, dejaré el filtro de carbón activo para las últimas 4 semanas. Esperemos no haya mucho olor por ahora.
Iré actualizando novedades en un par de días.
Likes
4
Share


@TwinExotics
Follow
Lemon Cherry Pops are in it’s own 4x4 along with the Smile now Cry Laterz x 1
FX3 is in its own 3x3 now. Topped


Likes
13
Share


@greenAF
Follow
Lights Main: 40% Lower 100%
Feed: Listed Above then ec/ph adjusted
D91
Nothing much new, still and ugly duckling but the part that counts is looking good, and there's a lot of it lol. Buds are starting to fill and there coming from everywhere. Its a shame i had issues here and there, she could have looked so much better but all that counts is what in the jar at the end, Pretty much all the issues are feed related, I already ordered jacks for the next run, im done trying to decipher the fox farm matrix.
D93
I stretched her out some more today, a lot of new fast growth 😁😁😁
===============================================================================================
Weekly Power Usage:
C02 Controller: 0.03 kWh
Lower Circulation Fan: 1.83 kWh
Upper Circulation Fan: 1.04 kWh
Inline Exhaust: 1.12 kWh
Inline Intake: 3.69 kWh
Dehumidifier: 14.5 kWh
Lights Main: 17.0 kWh
Lights Lower: 1.99 kWh
Total 41.20 kWh
===============================================================================================

Likes
58
Share


@nonick123
Follow
Bienvenidos a la semana #6 😑 😀 🙏 😂
Día 39 (19/06)
Medio día en interior por las lluvias torrenciales 😑
Se detectan algunas puntas quemadas. Voy a esperar a mañana y lanzo grow question en función de la evolución...
Día 40 (20/06)
Riego a CC & RB con 250 ml H2O pH ajustado
CC muestra una deficiencia que no sé identificar... 😑
Día 41 (21/06)
OF1 #1 muestra repentinamente una deficiencia. ¿Bloqueo de nutrientes? (Ver grow question)
Decido regar con 250 ml de agua doble osmotizada con pH ajustado
Espero que se recupere... 🙏
Día 42 (22/06)
OF1 #1 Tras 24 horas el tema está controlado: las puntas no están más quemadas y el color general de la planta es mejor (más verde)
😀
¡Parece una quemadura y bloqueo de nutrientes! 😀
Decido golpear todas las plantas con los siguiente:
- Relleno la capa superior del sustrato (2 - 3 cm) con la siguiente mezcla: Sustrato light mix + 10% humus de lombriz + 10 gr / litro de Tierra de Diatomeas
- Riego con agua pH ajustado + 2 gr / litro MicroVita + 10 ml / litro de melaza
=> OF1 #1 y OF1 #2: 250ml
=> CC & RB: 500 ml
=> NL: 1 litro
Creo que me voy a alejar de los abonos de BioBizz y pasarme a lo orgánico...
Gracias maestro @deFharo !
https://growdiaries.com/diaries/134104-grow-journal-by-defharo/week/739884
Día 43 (23/06)
Las puntas quemadas están controladas
CC ha reaccionado muy bien
OF1 no tanto...
Día 44 (24/06)
Inicio el camino del Organic Rebel con la ayuda del gurú y maestro @deFharo
Gracias amigo por tu inestimable ayuda en mi inicio en este camino
Me he puesto a fabricar mis propios biofertilizantes líquidos y esto es solo el principio!
Os dejo las dos recetas que he realizado pero que son mérito de @deFharo
Té de Hummus
Ingredientes:
- 250 g Humus de lombriz
- 1 litro de agua (osmosis o grifo reposada)
- 2,5 g de hidróxido de potasio
Pasos
- Mezclar el agua y el humus de lombriz
- Disolver el Hidróxido de Potasio en un poco de agua y lo añades al anterior
- Revolver o agitar varias veces
- Esperar mínimo 24 horas (mejor 3 días)
Humato PK (Muy bueno para floración)
- 125 gr de leonardita ó 250 g Humus de lombriz (yo he usado Hummus)
- 1 litro de agua (osmosis o grifo reposada)
- 25 g de hidróxido de potasio
- 25 g de harina de huesos o roca fosfórico (yo he usado harina de huesos)
Pasos
- Disolver el Hidróxido de Potasio en 500 ml de agua
- Añadir la leonardita (o hummus) y remover
- Añadir harina de huesos o roca fosfórica al anterior
- Revolver o agitar varias veces
- A las 24 horas añadir el resto del agua (500 ml) a 40 - 50 ºC
- Revolver varias veces al día durante al menos 3 días (alargarlo hasta 6-7 días si no hay prisa)

Likes
4
Share


@TheSurfBud
Follow
Nice sweet smell... could say what strain it is because its from sweetseeds sweet auto mix 10 pk of the best..
Definitely going to enjoy this one ...
Grow went well and fast 62 days flat...


Likes
14
Share


@BruWeed
Follow
🍀Estuvo bien en toda su etapa, no tuve ningún problema. Los resultados fueron muy buenos, se encuentra muy resinosa y con aroma a dulce.
🍀En total saque 143g de una sola planta.
🍀En total estuvo 105 días de vida desde su germinación.
🍀Recomiendo esta genética, por el momento son cocos Premium, ya quiero probarlo para saber que sabor tiene.
🍀Ahora se encuentra en etapa de secado, cuando ya estén para la etapa de curado subiré más imágenes.
🍀🇦🇷Podes seguirme en Instagram como @bruweed_arg🍀🇦🇷
Likes
27
Share


@adam_pawloski87
Follow
This week went really great! Plants are looking super healthy today at day 22 from seed!! Today they got a dose of just pure water phd at 6.5 ! Temperature an humidity has been staying pretty stable everyday, staying around 70-75 degrees and 58-61 % humidity!! Can’t wait to see what these girls do this week ! Hope you all enjoy , an had a great safe weekend! Peace love an positive vibes to y’all Cheers 😶🌫️💨💨💨If there’s any questions, please ask me 🙏🏻
Likes
15
Share

@tsf_homegrow
Follow
🇩🇪
14.2. Tag 97 sie macht sich weiterhin ganz ok, es könnte besser laufen hier und da hab ich sie ein paar mal zu spät gegossen, weswegen sie zwischendurch zwei mal die Blätter recht stark hat hängen lassen. Ein paar Wochen muss sie noch durchhalten bevor es in die Blüte geht. Happy growing.💛✌️
🇬🇧
2.14. Day 97, She's still doing okay, though it could be better here and there. I watered her a few times too late, which is why her leaves drooped quite a bit twice. She just needs to hold out for a few more weeks before she starts flowering. Happy growing! 💛✌️
Likes
43
Share


@PEAKYPLANTERS
Follow
it's always a pleasure to do business with Barney's Farm!!!
They have never let me down even once!!
Even in the worst situations and conditions they have always been able to bring out the best for me!!
I really enjoyed forcing these plants to see their reactions, but I wouldn't do it again as a technique because it only serves to keep the canopy low but not to increase the yields...or...at least in my case I didn't find it of fundamental importance....maybe a simple cut of the apical top and that was it! but that's fine!😋