
Likes
Comments
Share


@BruceBlack
Follow
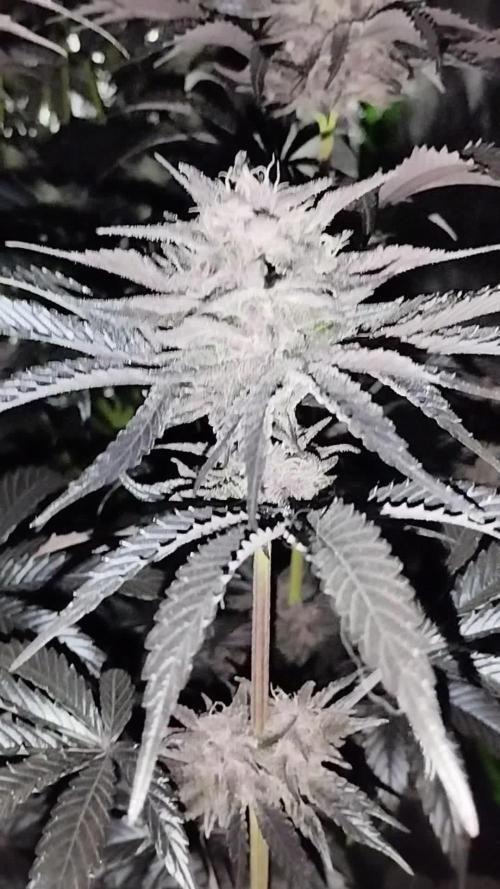
During this week I was feeding only water.
Leaves are turning yellow and buds are not growing that much. so i might use PK 13/14 last time and some of my blooming products.
I've checked trichomes but still haven't seen any of them turning brownish, they look milky in one of them.
As far as I see they will need at least one more week to be ready then I'll use plain water for one more week
Kinda nervous on this last stage cause I saw a lot of changes
Cya next week! Thanks

Likes
12
Share


@Rodamis_Prime
Follow
The light has been turned down to 50% for the last week and now She's on her last week of flushing and and starting to get alot of yellowing on the leaves . The bud has frosted up pretty nice now . The buds are rock hard and I am hoping after drying that it will still have alot of weight to it . Not a huge amount of smell to this plant even late in flower. It smells very earthy when you open the tent up but if you touch a bud it smells like lemon citrus with a very strong fuel smell . But it really smells tasty 😋. The next 3 waterings will have a cleanse added to the water I just really want to make sure it's as clean as I can get it since it is my first harvest and I dont want to fail lol . Can't wait to smoke my own weed lol .


Likes
92
Share


@DogDoctorOfficial
Follow
🌟 Welcome to the TrolMaster Chronicles: Seed to Harvest Adventure! 1st run🌟
Hey, Grow Fam! It’s DogDoctor here, and I’m thrilled to kick off this exciting new series with you. Today marks the beginning of our journey through the TrolMaster sponsorship, and we’re diving right into the heart of the action with germination and unboxing. 🌱✨
We’re starting strong with the Germination Station by @thecannakan, a game-changer for this process. I’ll be showing you all the details as we delve deep into every aspect of our grow adventure.
Here’s today’s lineup for the germination extravaganza:
1️⃣ Mandarin Squeeze - Terpyz Mutant Genetics. 🌈 One seed germinated.
2️⃣ Punch Pie RQS and Tyson 2.0 Genetics. 🍰 One seed germinated.
3️⃣ RS11 by Kannabia Seeds. 🚀 One seed germinated.
4️⃣ Green Papaya by Super Sativa Seed Club. 🍍 Tester unreleased seed, one germinated.
5️⃣ Gorilla Mellon by Fast Buds. 🍉 Two seeds, one germinated (the first one didn’t make it).
6️⃣ Tropical Smoothies - Tried all seeds from the pack, but unfortunately, none germinated. 🌴
We’re also using the complete organic mineral line from @aptusholland, which includes top-notch nutrients to ensure our plants get the best start possible. 🌿✨ Plus, we’ve got the new ProMix Mycorrhizae soil, which will help create a thriving root environment. 🌱
Throughout this journey, I’ll be breaking down every step, sharing tips, and keeping it real with both the successes and challenges. I’m excited to share this adventure with you, and there’s so much more to come!
For more in-depth coverage and exclusive content, make sure to check out my YouTube channel and subscribe—where you’ll find full video breakdowns, detailed insights, and more. 🌟🎥 Follow me on Instagram for additional exclusive updates and behind-the-scenes peeks that you won’t find anywhere else! 📸✨
Your support means the world to me, and I can’t wait to have you along for every step of this amazing journey. Let’s grow together and make some magic happen!
#TrolMasterChronicles #SeedToHarvest #GrowDiaries #GrowJourney #TrolMaster #TheCannakan #GrowLife #PlantAdventure #HighFrequency #PositiveVibes #GrowWithMe #SubscribeNow #ExclusiveContent #AptusHolland #ProMixMycorrhizae
P.S. 🌟💚 I want to take a moment to express just how honored and grateful I am to be the first TrolMaster Maverick. This opportunity is a dream come true, and I’m beyond excited to embark on this journey with all of you. Being a part of this incredible community and pushing the boundaries of indoor horticulture with TrolMaster and ThinkGrowLED is a privilege I don’t take lightly. 🙌
A massive shoutout and thank you to the entire TrolMaster and ThinkGrow team for believing in me and supporting this adventure. Your trust and support mean the world to me, and I promise to give it my all to make this journey as amazing as possible. 🌟🙏
Thank you, Grow Fam, for being here from the start. Your encouragement and enthusiasm fuel my passion and make every step of this journey worth it. Here’s to making magic happen together and to many more incredible milestones ahead. Let’s grow, learn, and shine! 🌱✨
With all my heart,Growers Love and thank you. 💚
#FirstMaverick #TrolMasterFamily #ThinkGrowLED #GratefulHeart #GrowTogether #MakingMagic
Lets Play a game , FB Gorilla Melon Jump in to the future, can you guess the week ? Let me know in the comments before we get there , this is just for fun Lets Grow 💚💚💚 Growers Love everyone 💚💚💚


Likes
81
Share


@UnorthadoxDude
Follow
Hello there and welcome to week 12, or the beginning of it anyway. Week 11 is now complete so please check that out!
We start the week with 5l fertigation and some nice photos. Now that Bertha is gone the tent smells Karenish. See you tomorrow!
Day 78: Added several more carnivorous plants to the budding collection. Enjoy!
Day 79: Fertigated 5l. She's starting to mature now. Frost developing slower, buds fattening and ripening faster. Were maybe two weeks away here.
Night 80: Added tent photo and vid. Day 81 update later today.
Day 81: Added a lot of media. Got a cheap digital microscope to try and get better micro shots. As you can see Karen is nowhere near yet.
Day 82: Things are moving very fast, just look at the difference today. I am certain were with 2 weeks of harvest. Does anyone have advice on flushing/not watering. Fertigated 5l.
Day 83: At the current rate of maturation I think the end of next week maybe be harvest time. Height 51cm
Day 84: Karens smell is really strong now it washes across your face when you open the tent.
End of week summary: A full week of nothing but bud swelling and maturation. I still think she needs another 2 weeks. Unfortunately my living situation has rather abruptly changed and now I have a tough choice to make: harvest/destroy or move plants.
There is a strong chance I will chop Karen at the end of next week if she is ready or not.


Likes
4
Share


@Ageddd
Follow
Nice colour, she liked the nutrients, was increasing in vigorousity all week long..
Perfect moment to test some Topping and later LST :)

Likes
9
Share


@tytynoixmapoule
Follow
Le séchage n'étant pas terminé au complet l'odeur n'est pas encore présente comme il faut mais très beau bourgeons


Likes
4
Share


@CityFarmer
Follow
Hello everyone,
Been busy but I shoot a little video for yall to see, also if growing is something you guys intended to do, I suggest you guys get yourselves a Digital Microscope or a jewlers loop.
I just got myself a Digital Microscope for under $20.00 on Walmart.com, I got me a cheap one to start with so I can learn how to use it properly. But for under $20.00 this one brings 8 led lights, a adjustable mount, comes with 3 different connection choices build in, magnifies from 50-1000x, can take pictures and also videos and my favorite part, it connects right to my mobile device, you download and install a Google app and your ready to go, ill work with it and add pictures next week...
See you guys soon 👊👊👊
Likes
7
Share


@Nikkov
Follow
well, another week and just watering as needed, it should have yielded a lot more this strain is also not known from a local seed bank but no problem. I think the temperature, because I spent most of it being very hot, didn't let them grow, well, but I'm already starting another cycle and soon I'll start posting more here in another grow =D
Likes
26
Share


@Ukfarmer420
Follow
Hi guys
So wer on week 9 of flower and I have just started ripen by general hydroponics GHE, never use this before but herd good things about it, I just want it to get a early fade as I don't want the trichomes degrading.
Pheno 1 is starting to fade natraul and is well on its way, buds are dense sticky and are falling over due to weight.
Pheno 2 has started its fade and buds are just as dense there just bigger and the same with pheno 3 its just lacking the fade to be harvested for my liking.
Humidity and temps are good and all is going well.
I will update in few days once the ripner takes affect 😁
Happy growing guys 👌💪💚
Hi guys just and update....Next Wednesday is chop day! FINALLY chop days come around 🙈🤣🤣🤣 i really can't wait now, buds flopping over here n there, swelling, stinking, stickiness everywhere lol.
Thanks for all your comments and likes 💚💚💚 i cant wait to impress you with my next run and diary, I got something special for you guys, a limited edition, only 500 packs released 😊. Message for more info on my next run. Full nutrient line up, genetics and light and equipment to be confirmed.
Day 59 of flip and day 5 of ripner.
Hi guys the ladys are doing really well as you can see and starting to show me there true colours 💜💚💜💚.
This is not a sponsored grow in anyway, I paid for everything for this set up. I am giving you a personal review as a customer who got these things to use.
I highly recommend everything I used and as a first time photo seed grower and scrogger I have done brilliant and if it wasn't for good quality products I think I would of struggled lol so shout out to @marshydro @acinfinity @biobizz and @simplysouvenirs @ghe
Your products produce good quality and nice environments for growing top quality meds 👌👍

Likes
19
Share


@CanabisLoverHobbyGrower
Follow
Really packing on the size now, start of week 10 today, smells are amazing like literally amazing, strawberry banana stinks of foam banana sweets, pink lemonade smells just like a glass of lemonade, blackberry's again just like blackberries, gorilla cookies lovely strong gassy but sweet smell and stardawgs look like they've been snowed on they are that frosty,.. cannot wait for these to be done honestly, I've done quite a few grows now indoor and out and the smell of these have amazed me, hats of to fastbuds as usual, roll on next week 👌
Likes
17
Share


@mrbigbong
Follow
ahora hemos llegado al final, unos días más y todo está recogido, olores fuertes e intensos, variedad lista en 50/65 días de floración para mi gusto de madurez, no muy resistente al estrés pero sigue siendo una buena genética
🍁🍁🍁🍁💪👽👍🍁🍁🍁🍁

Likes
26
Share


@Manis
Follow
Hell guys 👋 ☘️❤️🔥😊
- 1st day of flowering for Lava Cake (26/8)
- Expect Critical all the other flowers show their genders with the first white hairs.
- New pot 10lt for Ak
- Day 24 and LLST (Lazy Low Stress Training)
- No nutrients Biobizz at all so far.
- 1st day of flowering for Frosted Guava (31/8)
Cheers everyone ☘️❤️🔥😊


Likes
4
Share


@AUTOBUDDHA
Follow
Transplant day!!!!
Transplanted my 5 Purple lemonade ladies from solo cups, to 5 gallon grow bags! Today is day 14 and they had a fantastic root system. (Attached a photo).
I am running FFOF this run, with 20% perlite added to the mix. I will not be running any nutes until probably week 5, as fox farms comes ready to go. This will be my first run with Ocean forest. My normal medium is Cocoloco by bushdoctor.
I top dressed these girls with around 2 inches of cocoloco from a previous grow, to keep the gnats and bugs down. They dont mess with the cocoloco, I'm in Hope's that the couple inches of that on top will help with this also.
They will veg under a 4ft, 8 bulb T5 Light.
Likes
31
Share


@Chubbs
Follow
SuperSativaSeedClub
Purple Punch OG Auto
So one out of the two got the chop this week and hung to dry. The other will be getting the chop this week as I'm just starting to see some amber on the trichs. The one that was chopped is super super sticky and smells really pungent. Definitely had more weight than I'd thought but hard to tell until we get a dry weight. All in all highly recommended strain and will definitely not be the last from them that'll grow. Especially if they turn out the way these two did. Trimmed up the second plant and yet again it really surprised me at how heavy the flowers are. I'd have to say for doing a little LST training, I didn't do anything to spectacular to get such an amazing outcome. The smell is super pungent and just as sticky as the first that was chopped. All in all Happy Growing
Likes
27
Share

@BudBrewerz
Follow
Tis Fruit Tartare has grown on some pretty buds by now and waaaaauw the colour she's got is amazing. The purple has gotten even more darker and intense , she's a real beauty. I'm guessing she has got another two to three weeks to go, so Im hoping for her buds to get a little thicker and denser before she goes.

Likes
20
Share


@Inhomerhizome
Follow
Pretty happy with the grow and the harvest, the drying went well also!
Each grow highlights changes for the next and this has been no different! I'll be making more training adjustments in the next runs to try and refine the vertical scrog and get to the point where it's a wall 1 bud thick! I know it will get there in the end it's just like relearning how to do a horizontal scrog! I just need to predict the way the plant will respond when the light is from the sides! Bravery and brutality during pruning I think is the key! 😂✌️💚
Likes
32
Share


@Borberad
Follow
Für Pheno2 (B2) hat die letzte Woche begonnen bei Pheno 1 bin ich mir noch nicht ganz sicher. Hoffe immer noch das mir viel Müsli erspart bleibt. Die Blüten glitzern jedenfalls herrlich und duften sehr streng fast wie ein cheese. Oder evt. extrem überreife Bananen?
Gelernt habe ich aus diesem Grow:
Temperaturen über 50°C finden die Keimlinge nicht so nett!!! 🙄
Es könnte sein, daß sie es sich bis in die Blüte gemerkt, und aufgrund dessen auch ein paar männliche Blüten gebildet haben.
Likes
101
Share

@DogDoctorOfficial
Follow
Week 7 here we go
They starting to show some colors as they are getting frostier and frostier 😇
tricomes still all very young and clear but getting there 🤫😈
Day 46 update : selective defoliation, they needed more air and light going around. It smells like candy’s store mixed with pine trees and the minty fruit salad that as all that exotic and exquisite aroma in it I’m loving this round and loving all the new learning that came with it 🙏❤️😈🤫🤓😇
As for the geek department 🤓 I’m currently:
- VPD - 1.03 kPa
-PPFD - 725.38 umol/s/m2
-DLI - 28.71
Loving this LED Tec 😍
Girls:
1-BlueBerry
2-Alaskan Purple
3-Poyote Gorilla
4-Hindu Kush
5-Whitw Mango
6-Super Glue
7-Badazz Cookies
8-S.A.D.
tent -8x8 / 2.4x2.4 but i'm only using 1/2 so 4x4 / 1.2x1.2
Led - Lumatek 465w Compact Pro at 75%
All i Grow is medicine for myself,
Stay safe, stay tuned and B Happy
Peace out
D


