
Likes
Comments
Share


@MichaelNoob
Follow
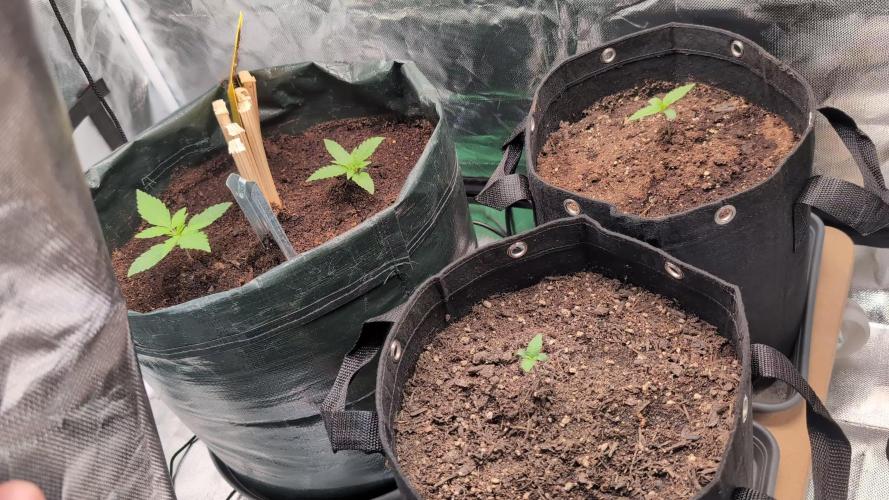
They are strong. The no4 girl is huge, had to top her, no lst and going to flip her at young age with the rest of her sisters

Likes
1
Share

@Dr_Green_Thumb87
Follow
No issues so far, dope soil is legit
6/20 Topped the first Gelato of Advanced Seeds


Likes
27
Share


@Ganjagrandaddy
Follow
Day 76 Flowering: Ir seems we have a longer flowering pheno of the mimosa Lemon !!.
She is a huge bushy, heavy calyx laden monster!!.
It has been a roller coaster so far with this pheno of the strain. Watching the huge explosion of growth in the stretch period was amazing and I expected huge thick donkey dick colas like grows of others had shown so i was dissapointed for the majority of the flowering period with how she was progressing. Loose, Berry like patterns were all over the long stems so i knew it would be a "wait and see" ending but I now see the potency and beauty of these ripening classy looking queens. Up close ,her colours are really varied and bright with purples, reds, greens and the ripening fire brown pistils. I do not begrudge her another week flowering now and expect she will benefit from it .
Her smell is potent lemon/fuel now and very strong. Hopefully she will finish soon.
Be safe and well ..


Likes
18
Share


@DogDoctorOfficial
Follow
Hey fellow green thumbs! 🌿💚 It’s harvest time for our Auto Fat Pete’s Cookies from Super Sativa Seed Club! After an exciting journey, we’re thrilled to share the details of this unique plant’s final stage. Let’s dive into the harvest report!
🌟 Harvest Details:
Day 75: Harvest Day
• Harvest Date: Day 75
• Harvest Method: Our Auto Fat Pete’s Cookies was harvested yesterday. While the flowers turned out less dense than expected, the amazing smell has us super curious about the final product. 🌿🌸
• Preparation: Before hanging, we meticulously cleaned the plant, removing all leaves without trichomes to ensure a smooth drying process and to enhance the quality of the final product. 🌿✂️
Current Drying Process:
• Method: The entire plant is now hanging upside down to dry. This method helps maintain moisture levels within the buds, allowing for a slower and more even drying process. 🌿🔄
• Environment:
• Temperature: 18-22°C (65-72°F)
• Humidity: 50-60%
Maintaining these conditions is crucial for achieving a perfect dry and preserving the plant’s aromatic and flavorful profile. 🌡️💧
🌟 Plant and Bud Characteristics:
Auto Fat Pete’s Cookies:
• Bud Structure: The buds are not as dense as we’d hoped, but they are still sticky and resinous, showcasing a beautiful array of green hues with hints of purple and orange pistils.
• Aroma: The aroma is incredibly strong and delightful, filling the grow room with a sweet, cookie-like scent that hints at the strain’s name. 🌿🍪
• Trichomes: A generous layer of trichomes covers the buds, promising a flavorful and aromatic final product. 🌿✨
🌟 Care Tips:
• Drying Process: Patience is key. Allowing the plant to dry slowly will enhance the final quality, preserving both flavor and potency. Ensure good airflow around the hanging plant to prevent mold and mildew. 🌬️💧
• Trimming: Once the drying process is complete (typically 10-14 days), it will be time to trim the buds. This is where we’ll shape the final product and get it ready for curing. ✂️🌿
• Curing: After trimming, curing the buds in jars for at least 2-4 weeks will further enhance the flavor and smoothness. This final step is essential for achieving the best possible smoking experience. 🍁
🌟 Genetics Spotlight:
Auto Fat Pete’s Cookies:
• Characteristics: Known for its sweet and cookie-like aroma, this strain has shown remarkable aromatic qualities throughout the grow. Despite the less dense flowers, the strong scent and generous trichome coverage promise a high-quality final product.
• Harvest Expectations: Sweet, aromatic buds with a rich flavor profile. The slower drying process will ensure the best possible preservation of cannabinoids and terpenes.
🌍🌿 Fun Fact:
Did you know? 🌿✨ The aroma of a cannabis plant can be a strong indicator of its final flavor profile. Strains like Auto Fat Pete’s Cookies, with their unique and strong scents, often translate these aromas into delicious, flavorful buds.
For a detailed grow guide and to see this strain in action, head over to my YouTube channel! 🎥✨ I share tips, tricks, and in-depth reviews to help you get the best results from your grow. This week’s harvest has been particularly intriguing, and I’ll be explaining the reasons behind the less dense flowers in detail.
👉 Join me on YouTube Link in my profile 👈
🌟 Conclusion:
Harvesting Auto Fat Pete’s Cookies at Day 75 has been an interesting and rewarding experience. While the buds are not as dense as we hoped, the strong aroma and generous trichome coverage give us high hopes for the final product. With the plant now drying, we’re eagerly awaiting the final outcome.
Stay tuned for updates on the drying, trimming, and curing process, and get ready for a sweet and aromatic harvest!
Happy growing, and see you next time! 🌿💚✨
#SuperSativaSeedClub #HarvestReport #FatPetesCookies #PlantMagic #GardeningJoy #NatureLovers #PlantPower #InspireGrow #YouTubeJourney
Germination method 🌱 @thecannakan
Genetics @supersativaseedclub_official
Nutrition
@aptusholland 🌿
@aptus_world 🌎
@aptus_es 🌍
@aptusbrasil 🌱
@aptus_thailand 🌿
@aptus_portugal 🌳
@aptususa_official 🍀
@aptusplanttechnz 🌺
@aptusplanttechaus 🍃
Ambient controls🎮
@trolmaster.eu @trolmaster.eu.support @trolmaster.support @trolmaster.agro
Soil @promix_growers_eur @promix_cannabis
LED - @lumatekeu
Watering- @autopot_usa @autopot_global
Love and attention- @dogdoctorofficial
As always thank you all for stopping by, for the love and for it all , this journey of mine wold just not be the same without you guys, the love and support is very much appreciated and i fell honored and so joyful with you all in my life 🙏
With true love comes happiness 💚🙏 Always believe in your self and always do things expecting nothing and with an open heart , be a giver and the universe will give back to you in ways you could not even imagine so 💚
More info and complete updates from all my adventures can be found ⬆️link in the profile description ⬆️
Friendly reminder all you see here is pure research and for educational purposes only
💚Growers Love To you All 💚
Discount Codes :
@thecannakan DOGDOCTOR 15% off
@theneutralizer PORKIT7-DOGDOCTROSO 17% off
@kannabiaglobal DOGDOCTOR 30% off
@seedsmangenetics DOGDOCTOR 10%off
@terpyz.mutant.genetics DOCTOR 15% off

Likes
30
Share


@Stkz420
Follow
No more upwards growth. Buds fattening up now very dense already.
Has a little smell to it at this point its quite fruity and sweet not the usual gassy smell just yet.
Likes
170
Share


@nonick123
Follow
Día 90 (15/04) Gorilla Cookies FF empieza colorear todos sus pistilos de color naranja / dorado 😍
Día 91 (16/04) Riego 1 Litro H20 sin nutrientes. TDS 225 PPMs - pH 6,6
Día 92 (17/04) Estas plantas están muy sedientas en la fase final!
Riego 1,5 Litro H20 sin nutrientes. TDS 225 PPMs - pH 6,6
Día 93 (18/04) El olor empieza a ser tan intenso que sale a través del armario a pesar de tener un potente filtro de carbono 😍😍😍
Día 94 (19/04) Mañana la cosecha! Ultimo riego con 0,5 Litro H20 sin nutrientes. TDS 225 PPMs - pH 6,6
Día 95 (20/04) Fiesta de la cosecha! 💪 🚀 🎉 😍💥💨😁
💦Nutrients by Gen1:11 - www.genoneeleven.com
🌱Substrate PRO-MIX HP BACILLUS + MYCORRHIZAE - www.pthorticulture.com/en/products/pro-mix-hp-biostimulant-plus-mycorrhizae
Likes
14
Share


@Concision
Follow
This was my first grow, so I was happy to get anything to harvest. Ended up with just about a half ounce of some pretty amazing bud.
I initially started growing with Miracle-Gro, mainly because I'm dumb, which led to pretty bad nutrient burn and stunted growth around week 4. After some suggestions by the users here at GrowDiaries, I switched to Advanced Nutrients, and followed TaNgs EASY Auto Feeding Schedule that incorporated pH Perfect Sensi Grow Part A &B, Overdrive, and Carboload. My plant bounced back really well after this, but didn't add much growth.
This was my first grow, and GSC was very forgiving and survived me messing up many times along the way. The final product smells and tastes delicious, and packs quite a punch. Very euphoric and uplifting feelings, with a moderate amount of dry mouth.
I still have a few more of these seeds, so I'll probably be starting another grow in the near future.
Likes
6
Share

@Garden-of-weeden
Follow
We’re day 42-ish on this journey. This last week I was lowering ph of water from 6.5 to somewhere between 6.2-6.3 ph based on last weeks feedback to my ph question. This morning I watered and tested run off for the first time. Run off was 7.24ph. Not sure what todo with that information. I suppose this next week I will further lower ph of watering to 6.0 - 6.1?
Still very little issues with the grow. May have slight tip burn on some of the plants and leaves. I guess this tracks, as I fed for the first time 14 days ago. I either fed too much, too early (week 4), or a combination of both? I’m finding it challenging to figure out exactly what the correct inputs should be. Seems to be a lot of fuck around and find out…..
Day/iight temp - 80/78 degrees
Day/night humidity- 63/60%
Largest plant is now 22 inches tall.
PPFFD 635
Light distance - 12 inches
18/6 light schedule
Still using the spider farmer G4500 light.
This week was just water and used recharge 1 time. Watering about a half gallon per plant every 2-3 days. I’m finding this peat soil prefers to be wetter than something like Fox farms ocean forest.


Likes
6
Share


@CanadianFillmore
Follow
Start of week 2 of flowering. Week 1 went well, but she showed signs of deficiencies and as such she got an extra 2 liters of nutes + water. Shit ton of bud sites on this girl!

Likes
5
Share


Likes
28
Share


@Trickybis82
Follow
Hello growmies,
Quick update the girls are doing fine and are loving life at present everything is going well and they are starting to really bud up.
Not alot more to add at this time. :)
Adios amigo

Likes
1
Share


@Sjake72
Follow
First week in buckets doin well i think but dont know for this is just my first grow

Processing
Likes
6
Share


@w00tGrow
Follow
Plant is growing good, put scrog a bit higher and waiting for its flowering, it has showed it's sex and hopefuly starts flowering at least after a week. HPS lamp is doing its job perfectly, can't wait to switch it to yelow Sodium.


Likes
29
Share


@eldruida_lamota
Follow
Que pasa familia, aquí va la 1 semana de floración de estas Titan f1 de RoyalQueenSeeds ya han marcado y ya tiraron las primeras preflores.
Tener tienen muy buen color, y bueno si me preocupa en altura ya que no están estirando como me gustaría lo demás de lujo.
Añadimos flash root, tucan ,gold Joker y la base de crecimiento de Agrobeta , (Blue line).
Próxima semana ya aplicó todo lo de floración y cambiamos ya la alimentación también.
Agrobeta:
https://www.agrobeta.com/agrobetatiendaonline/36-abonos-canamo
Mars hydro:
Code discount: EL420
https://www.mars-hydro.com/
Hasta aquí es todo , espero que lo disfrutéis, buenos humos 💨💨.