
Processing
Likes
Comments
Share


@AgroCultiveta
Follow
Son fotos y videos de múltiples cultivos debido a que nunca e realizado un seguimiento como tal, espero realizar uno ahora!
Nutrientes Utilizados en general Trybac y Trypack biobizz.
Las criticas siempre serán bien recibidas!😋
Espero les guste el contenido!


Likes
7
Share

@DogDoctorOfficial
Follow
# LSD Zamnesia Tripping 🙂 | Harvest Day — Week 14 From Seed
Well…
This one became something special.
Week 14 from seed, harvest day officially arrived for our LSD girls, and honestly, standing in front of these plants during harvest felt a little surreal. The entire room had that strange mix of excitement, silence, stickiness, exhaustion, curiosity, and gratitude growers probably know very well.
This run taught us a lot.
Before diving into the harvest itself, a quick recap for everyone joining now:
These plants were grown under 12/12 from seed. No traditional long vegetative phase. No giant bush-building period. No months of shaping before flowering. The idea behind these runs has always been curiosity:
- observing morphology,
- understanding structure,
- exploring how genetics behave under flowering conditions from the beginning,
- and learning how much expression comes naturally when we interfere less.
And honestly?
The morphology on these LSDs became fascinating.
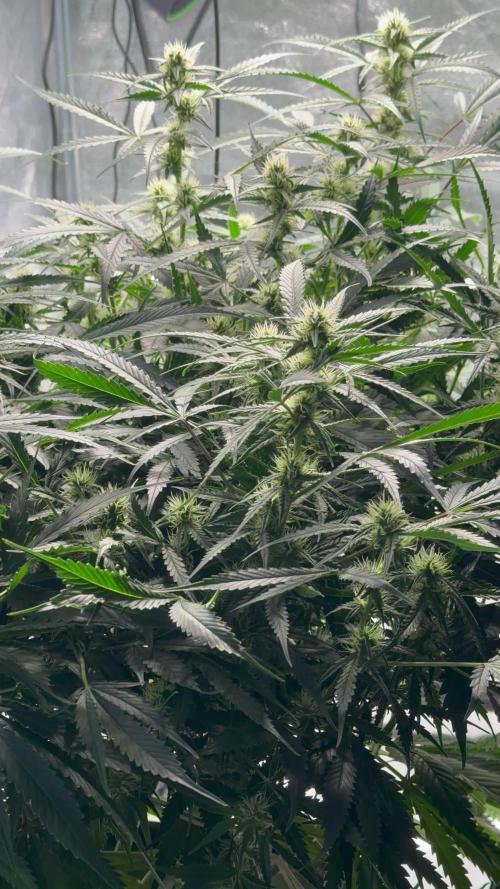
For a mostly indica-leaning hybrid, they absolutely did not develop the way many people would expect from a classic “indica structure.” Instead of short dense bushes, these girls built massive central colas with strong vertical expression and incredible flower stacking all the way through.
Not the tallest plants in the world…
…but the flower mass?
Serious business.
You can actually see it clearly in the photos where I’m standing beside them, holding them, comparing them to speakers, equipment, and studio gear. The scale becomes obvious immediately. The plants may not dominate a room vertically, but the density and flower production are honestly impressive.
Huge colas.
Heavy structure.
Beautiful stacking.
Outstanding resin production.
And the closer harvest came, the more unreal they became.
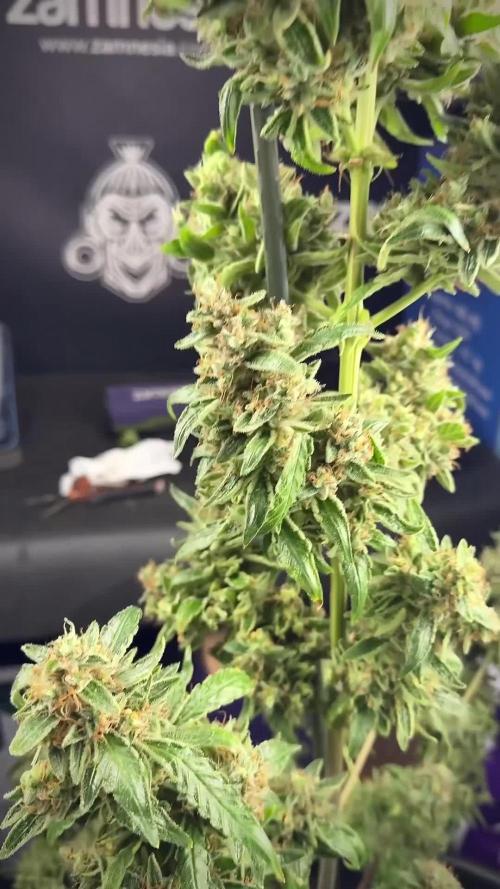
Of course, before chopping everything down, we had to bring them into the studio one final time. Some plants deserve proper portraits before the end, and these girls definitely earned that treatment.
The studio sessions were incredible:
- dramatic lighting,
- macro photography,
- behind-the-scenes moments,
- live videos,
- giant cola shots,
- resin closeups,
- and all the tiny details that are impossible to appreciate properly with the naked eye alone.
This is also where macro photography becomes something really special.
Macro photography is not just “zooming in.”
It’s about revealing another world hidden inside the flower:
- trichome heads,
- resin texture,
- pistil coloration,
- gland development,
- frost layering,
- microscopic color changes,
- tiny resin rivers running across sugar leaves.
And harvest time is honestly one of the most beautiful phases for macro work because the plant is at peak expression:
- swollen calyxes,
- mature trichomes,
- fading leaves,
- curling pistils,
- oily resin everywhere.
The flowers almost stop looking real under proper magnification.
And speaking about resin…
Oh my God.
The finger hash during harvest was absolutely insane.
Or technically, since we are talking about live fresh material, this would be closer to charas than classic dry-trim finger hash.
And there is actually a difference.
Traditional finger hash usually comes from handling dried or partially dried flowers during trimming, while charas is collected directly from fresh living material. The resin profile, texture, aroma, and even effects can feel noticeably different because the compounds are still fully alive and fresh inside the plant material.
This sticky dark resin has been used traditionally for centuries, especially in places like India, where charas still holds cultural, medicinal, and spiritual importance today. Even Lord Shiva is historically associated with charas in many traditions.
And honestly, after handling these plants during harvest… it becomes very easy to understand why humans have respected this resin for such a long time.
The flowers were unbelievably oily.
Not dry frost.
Not sandy frost.
Not airy resin.
Proper greasy, sticky, living resin.
The kind that coats your gloves instantly and keeps building layer after layer while working. At some point during harvest, you stop trimming and start realizing you accidentally created little resin sculptures on your fingertips. 😄
We also froze around 800 grams of fresh material for future washing and extraction work.
And this is only the beginning.
Future reports will cover:
- washing,
- ice water extraction,
- separating grades,
- drying techniques,
- collection,
- curing,
- and the entire process from fresh frozen material into final concentrate.
So definitely stay tuned, because that part of the journey is going to be incredibly interesting too.
The remaining plants are now hanging whole for drying.
Instead of aggressively breaking everything down into tiny branches immediately, we chose to dry the plants mostly whole to slow the drying process naturally and preserve quality as much as possible.
Current expectation:
- around 7–12 days drying,
depending on how each plant behaves individually.
Because at this stage, patience matters.
Drying too quickly can destroy weeks and months of work surprisingly fast:
- aroma loss,
- harsh smoke,
- terpene degradation,
- uneven curing,
- brittle flower texture.
Harvest is not the finish line.
Drying and curing are part of the grow too.
And honestly, some people underestimate just how important these final stages truly are.
Now let’s talk trichomes for a moment, because this is always an important conversation.
For me personally, harvest timing is all about trichome maturity.
This run was harvested with:
- the majority cloudy,
- a small but important touch of amber,
- and a few still transitioning.
That is personally where I believe the plant reaches peak balance.
Cloudy trichomes usually represent peak cannabinoid maturity and expression for the type of effect I personally prefer:
strong,
complex,
alive,
euphoric,
full-spectrum.
Amber absolutely has value too, and I encourage people to experiment with later harvest windows if they enjoy heavier, more sedative effects. But in my experience, once too many heads become amber, part of the energetic complexity starts shifting toward degradation pathways and more CBN-heavy expressions.
That can be wonderful medicine too.
Just different medicine.
This is why harvest timing becomes deeply personal for every grower eventually. There is no universal “perfect harvest day.” There is only observation, intention, and preference.
And these girls felt ready.
The fading across the leaves confirmed it beautifully too:
- yellows,
- pale greens,
- orange pistils,
- swollen flowers,
- fully expressed resin,
- end-of-life coloration everywhere.
The plants looked alive and dying at the same time in the most beautiful possible way.
Mr. Baggy, of course, stayed with us throughout the entire process helping along the way 😄 and we included a few behind-the-scenes moments because honestly, those moments matter too. Sometimes the chaos around the grow becomes part of the story itself.
And next week?
Next week becomes another important chapter:
- trimming,
- curing updates,
- smoke review,
- washing process,
- extraction updates,
- and the final transformation of everything we have been nurturing for all these weeks.
This harvest actually happened a while ago already, which gave us enough time to let the drying and curing process evolve properly before discussing final quality. We wanted the next report to feel complete instead of rushed.
And finally…
Thank you.
To Zamnesia for the genetics.
To Plagron.
To F.O.G.
To the LEDs and all the gear involved.
To GrowDiaries.
To the community.
To the longtime followers and OGs.
To the new curious visitors.
To the supporters.
To the skeptics.
To the silent viewers.
To the people who stayed since day one.
To the people who just discovered this run now.
To the lovers and even the haters 😄
If someone spent even a few moments here sharing this journey with us, then they deserve some gratitude and positive energy in return.
Wishing everyone healthy plants, peaceful minds, sticky fingers, beautiful harvests, and a little curiosity on their own journey too. 🌱
📡 DELETED @ 1K Please stay tuned.we never quit https://www.youtube.com/@TheDogDoctorOfficial NEW 🙏 Thank you for your patience and continued support.
FOR DISCOUNT CODES AND MORE JUST FOLLOW THE LINK https://website.beacons.ai/dogdoctorofficial
📲 Don’t forget to Subscribe and follow me on Instagram and YouTube @DogDoctorOfficial for exclusive content, real-time updates, and behind-the-scenes magic. We’ve got so much more coming, including transplanting and all the amazing techniques that go along with it. You won’t want to miss it.
GrowDiaries Journal: https://growdiaries.com/grower/dogdoctorofficial
Instagram: https://www.instagram.com/dogdoctorofficial/
YouTube: https://www.youtube.com/@dogdoctorofficial Deleted by Youtube - https://www.youtube.com/@TheDogDoctorOfficial NEW
Vimeo : https://vimeo.com/dogdoctorofficial Under construction stay tuned ⸻
Explore the Gear that Powers My Grow
If you’re curious about the tech I’m using, check out these links:
🔆 Lighting & Environmental Control
• Future of Grow — Advanced LED lighting technology
https://www.futureofgrow.com/
DISCOUNT CODE: DOG20
• Lumiflora — Under-canopy LED lighting
https://lumiflorade.com/
• TrollMaster — Environmental controllers and automation gear (past collaboration)
⸻
Genetics
• Zamnesia Seeds — Genetics used in this project
https://www.zamnesia.com/
⸻
🌱 Soil, Substrates, Boosters & Root Support
• Plagron — Substrates, bio mixes, and supportive products
https://plagron.com/en/
⸻
🎒 Storage, Curing & Preservation
• Grove Bags — Curing and storage solutions
https://grovebags.com/
⸻
📸 Photography Equipment & Tools
(Not sponsors, but part of my creative toolkit)
• Sony A6700
• Sony full-frame macro lens + few more
• Stacking photography workflow - learning
• iPhone (for behind-the-scenes shots)
We’ve got much more coming as we move through the grow cycles. Trust me, you won’t want to miss the next steps, let’s push the boundaries of indoor horticulture together!
As always, this is shared for educational purposes, aiming to spread understanding and appreciation for this plant. Let’s celebrate it responsibly and continue to learn and grow together.
With true love comes happiness. Always believe in yourself, and always do things expecting nothing and with an open heart. Be a giver, and the universe will give back in ways you could never imagine.
💚 Growers love to all 💚
📸 P.S. – The Eye Behind the Lens
All photos in this diary (for now — except for the ones showing the camera, which I took with an iPhone) are taken with a Sony A6700 paired with a Sony full-frame macro lens and a few more.
Photography is part of the story — it’s how we share the fine textures, the glow, and the quiet details that words can’t always capture.
I’ve also started experimenting with photo stacking — a technique where multiple images, each taken at a slightly different focus point, are layered together to create one perfectly sharp image from front to back.
It’s not digital enhancement or AI; it’s pure photography — a way to reveal the plant’s beauty in microscopic depth, from trichome to petal.
You’ll even see a few shots of "ghost me" capturing the shots — camera, lens, setup — because every grow deserves not just to be cultivated, but documented like art.
FOR DISCOUNT CODES AND MORE JUST FOLLOW THE LINK https://website.beacons.ai/dogdoctorofficial
NEW DISCORD - Official Server Invite Link : https://discord.gg/ksjAkA5T74

Likes
37
Share


@MrJones
Follow
MrJones Pink Sugar Breath F2 by VMAN - ViparSpectra XS2000 240W Infrared Full Spectrum LED Grow Light
´🌿⊱╮🌿╰⊰🌿 WEEKLY GOALS 🌿╰⊰´🌿╰⊰´🌿
🏡Indoor - 3"x4"x8" Custom Built Grow Closet
🌞Environment - 80F and 55% Humidity
🌾This strain likes to stretch during flower, so a heavy training regiment will be needed.
⚱️3-Gallon 📊5.8 / 6.4 PH
💧 Feeding / Dry Amendments using Mr. B's Green Trees ORGANIC BLOOM 2-8-6
🌞ViparSpectra XS2000 240W x2 Infrared Full Spectrum LED Grow Light
🕷️ IPM - We will be using Green Cleaner" 1 OZ per Gallon, and CannControl from Mammoth alternating between products each month for Integrated Pest Management.
🌿╰⊰´🌿╰⊰´🌿 PLANT UPDATES 🌿╰⊰´🌿╰⊰´🌿
📝 Notes - A good friend of mine gave me some of his crosses to test, please read below for his amazing details, I am very excited to see what I can accomplish with these genetics and my cannabis gardening approach.
╰⊰´🌿 ╰⊰´🌿 ╰⊰´🌿 ╰⊰´🌿 ╰⊰´🌿 ╰⊰´🌿 ╰⊰´🌿
🗓️ Sunday 11/20/22 Had a small problem with Fungus Gnats, used some Mosquito Buts to fix it, made a soil drench and and issue resolved. The plants are in their final weeks, and all that is left is for them to ripen, continue to fatten up, I have 3 purple Phenotypes and they look amazing!
🗓️ Wednesday 11/23/22 Lowered the H2O PH to 5.8 / 6.2, over did the last top dressing, wrong time for a little Nute burn, but the ladies are doing great!
🗓️ Friday 11/25/22 - Watered the plants last night, and tonight took a few pictures of few of the buds, they are looking amazing, the smell in the closet is just intoxicating!
╰⊰´🌿 ╰⊰´🌿 ╰⊰´🌿 ╰⊰´🌿 ╰⊰´🌿 ╰⊰´🌿 ╰⊰´🌿
Breeders Notes by VMAN
Pink Sugar Breath is a creation of Platinum Kush Breath x Pink Sugar cookies originally Bred by UFO Genetics.
Pink Sugar Breath F2 is the second filial Generation that was hunted and creates by Visions.
The vigorous cultivar takes 63 to 75 days to flower with various phenotypes. These phenotypes can express terpene profiles ranging from Bakery Dough, Sugar, Og Funk, Fruity, Gas, Dank, Chemical Floor Cleaners, and much more. Expect Purple and Pink Phenotypes to pop up fairly easily. Color starts to show within 7 to 8 days of flower for the purple and pink phenotypes. Green phenotypes have more of an OG Funk/Floor Cleaner presence
╰⊰´🌿 ╰⊰´🌿 ╰⊰´🌿 ╰⊰´🌿 ╰⊰´🌿 ╰⊰´🌿 ╰⊰´🌿
Likes
22
Share


@Chucky324
Follow
Hello. This is the end of week 7 and the beginning of week 8 of veg.
I took another look at the males and found them to be average. Not that smelly or resinous. So, no good for breeding.
That's ok though. Let see what these females can do.
They are topped already and ready to be repotted and put in the tent.
There's still 1 plant undecided. Has small male looking flowers. I'll leave it for a few more days before deciding.
Man, there are lots of large female orb weaving spiders around here this year.
Huge webs, when you walk into them in the dark, they don't break off like the little webs.
What a difference in design though. These spiders are all in my yard.
I find them fascinating to look at.
Hope your enjoying the comics.
Keep Growing Straight.
Chuck.
Likes
27
Share


@Dunk_Junk
Follow
Wow she's grown 24cm this week.
I'm getting excited about her! I think she's looking to be a fab plant.
Doing well in her fabric pot.

Likes
40
Share


@valiotoro
Follow
The smell waouw😳you know its gonna be a strong one!
Citrus,pugnent & exotic fruit🍋🍍
Im happy with the result the buds are less dense but its due to the sativa genetics🚀
Trichomes 90% milky.


Likes
1
Share

@Hitthejuan
Follow
6-7-2026 velvet moon
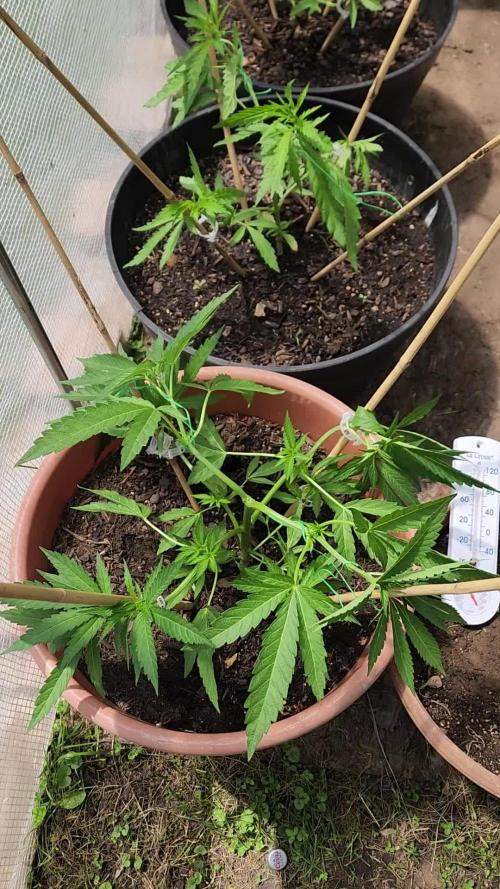
Sorry I miss last week and didn't get any pictures of the grow. The plant is in great shape. Very green and healthy. In the green house right know so I can give them more light. I get to much shade around 5pm to 8pm so I set up a light in the green house for more light. Will bring the plane out when I switch to flowering. Its around 14 to 16 inches tall getting around 3 to 5 cups of rain water depending on the soild if its dry or still moist. I plan on getting some clones out of this planet. Ive started to train the plant for more yield. First time doing these so its a learning stage.
Likes
30
Share


@coyote2thick
Follow
I hung dried for three days and then bagged them up in brown paper bags for two days due to the low temps and humidity before jaring them.

Likes
5
Share


@JerMeds
Follow
Well these girls are really starting to hulk out. Buds are really stacking and smelling very exotic.
They have been pretty hungry. I hit 880 ppm in there tank early in the week but I have slacked off on nitrogen so no more Floralicious Plus and I lowered all my nutrients later in the week to 650ppm
I will give them some more time to swell before I switch too Overdrive. This could be a pretty massive harvest.
I have been getting alot of condensation in the grow room and its sending my humidity threw the roof.
I have a humidifier and it bring it too 60-70% on full blast. I'm sure these girls can handle it.
I do need to be careful and not touch the buds so I don't contaminate them. Lets hope I can avoid bud rot.

Likes
8
Share


@Squaregrouper
Follow
Super fruity and sweet way more sweeter Outdoors takes on a different odor.. it reeks of sugary Bubblicious bubble gum the pink kind but with pineapple Dum Dum lollipop heavy odor on fingers and clothes.


Likes
12
Share

@TrickzGrowz
Follow
Servus Moin!
Die Sun of a Peach ist mittlerweile sehr groß geworden und wurde heute endlich getoppt. Ich habe bewusst eine Nodie weiter oben getoppt als bei meinen anderen Ladys, weil die Triebe schon so stark ausgewachsen sind.

Likes
11
Share


@BudBeezy
Follow
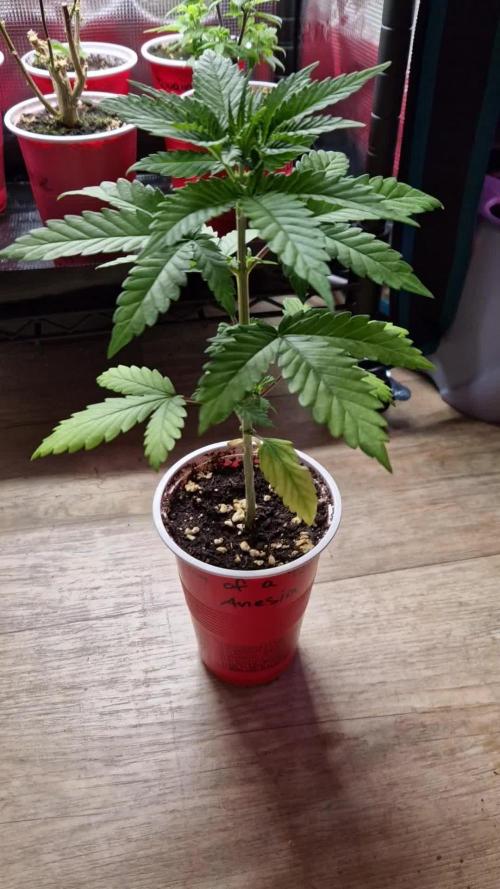
This week I decided to top the plant. It's the first time I've topped a plant and applied LST. It hurt to just cut the plant down but hopefully it will be worth it in the end. It tolerated it well. I have tried to make cuttings from the topped part. We'll see if they make it. The amount of watering remains unchanged for now as the soil stores enough water. I will water every 3 days from now on. This week I used the nettle manure in a mix with rainwater in a ratio of 1:20.
Unfortunately, the weather has got a bit worse this week. The daytime temperature fluctuated between 18 and 21 degrees.


Likes
2
Share


@TheBudWhisperer
Follow
Week 9 in the books and still waiting on ripening. The hardest part about this project is having to do the testing in such small batches due to my space restrictions.
Still no issues with the grow and we’re getting some great pheno variation amongst them all. The consistent quality of them all is the slight pink hue in the buds which is characteristic of the Skywalker parent. The scent is unmistakably sweet like the strawberry parent. All told - we’ve got a good hybrid here that still needs refinement before we try to breed out S1s.
P1 - still staying green, resilient, lower yield but best genetic specimen of the lot.
P2 - winner pheno but needs to be grown out under perfect hydro conditions to be sure we didn’t have any deficiencies baked into the strain genetics. Best combo of the 2 parents and some awesome deep purpling of the fans.
P4 - another winner pheno with prominent strawberry characteristics and heavy yield. A little bit of the purple has bled through to this pheno and it remains a more resilient specimen than P2. Again, worth testing in a better hydro medium like dwc or dutchies.
Well chop and freeze the whole lot for bubble and pressing once the run is complete and trichs have fully matured.
Likes
19
Share


@Chubbs
Follow
420Fastbuds
TrainWreckAuto
Week 4
What up grow fam. Weekly update on these 2 wonderful ladies. This week I did introduce some nutes and the plants seem to respond amazing. Starting to see little pistols so guessing this will be the last week of veg before the transition into flower. All in all Happy Growing
Likes
7
Share


@Krissci
Follow
Haven't done much with this...
Shee look lovely..
All others done..just this strain left..
Onlyaugar water going forward
Likes
65
Share


@biggreens420
Follow
She's getting on well nice bud production a bit behind the zombie but has been from start nodes a stacking well she seems more bushy than the zombie not quite at the net yet will raise her on something if she doesn't make it removed a few leaves every now and then keep a nice air flow and light penetration she's stinking up the place really nice sweet smell looking forward to tasting her lol thanks for reading happy growing guys

Likes
85
Share


@BarrieGrower
Follow
Seven weeks of flower done and another three or four left.
The plants are drinking lots and the buds are starting to fatten up. I see amber hairs and new white hairs continuing to grow out of the sides and top. Bud building is not over, more happy days.
Did a bit of leaf trimming, just to get a bit more light in.
Added molasses to the mix and everything seems to be going well.
Thanks for looking.
Cheers

Likes
15
Share


@Hashy
Follow
1st week has been OK. Not really much to report on. This plant is where I would expect it to be at this stage.
Fan controller set so max temp should be 26deg and max humidity 80%
Day 1 did nothing
Day 2 did nothing
Day 3 did nothing
Day 4 rigged up autofeed system and watered this weeks nutes.
Day 5 autofeed this weeks nutes.
Day 6 did nothing, 102ppfd 6.6 dli
Day 7 increased mars ts1000 power. 157ppfd 10.2dli.
Back in a week.
Take it easy.
