
Likes
Comments
Share


@GreenGuerilla
Follow
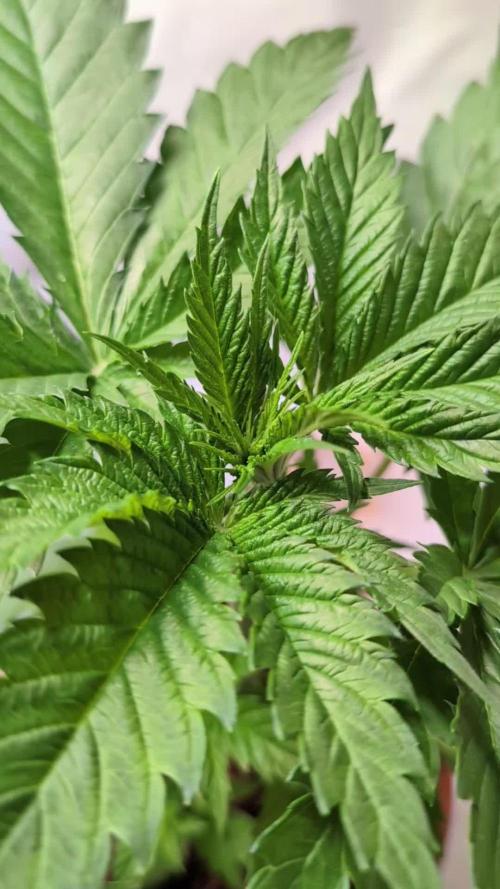
29/06
Day40
Height 83cm
Noticed that on one of the plants that approx 70% of the leaves look exaggeratedly rough with a dusting of orangey brownish markings. This came after the bug episode I remedied with Eccofective Bug Spray (Organic)
Fed each 2L of Solution
Inoculated the rims of their pouches with Peppermint Oil. The creepy-crawlies hate it😈
07/06 Day 47
The one plant looks decidedly miserable. Weird rough leaves with slight discolouration and droopy. They're not being over or under watered.
They both receive the exact same nutrient ratio and mix.
It's been suggested to me by Bloombuster that it's heat-related. This makes sense as it was over 30c when I moved them outdoors.
They're also showing Indica genetics more than the Sativas they're meant to be. I'll make mention of this to Lineage Genetics.

Likes
17
Share


@HowtoBubatz
Follow
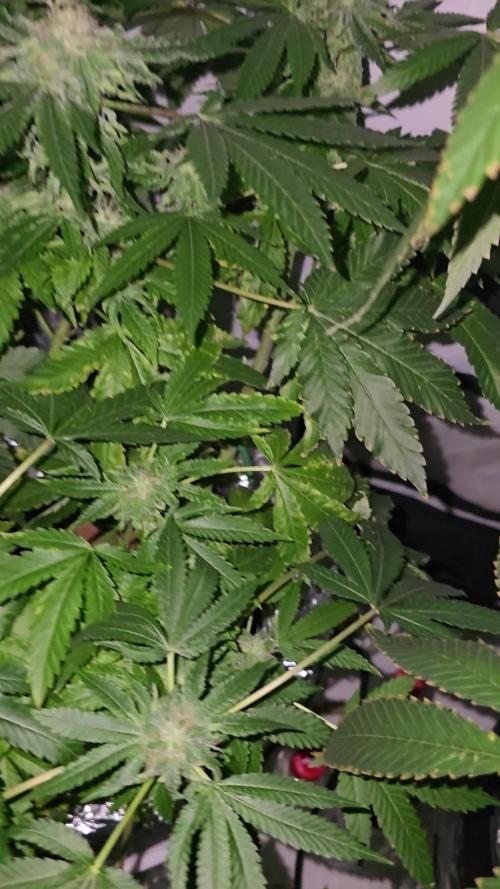
We’ve hit week five of flowering, and things are getting really exciting! 🌸
The plant is now covered in trichomes, and many of them are already turning a milky color—such a great sign that things are progressing perfectly.
The buds are starting to look really frosty. ❄️✨
I’ve been following the BioBizz week 6 feeding schedule, as it’s almost time to flush the plant—just 2-3 more weeks to go! 💧
I’m getting more excited each day as we move closer to harvest. Can’t wait to see how everything finishes up! 😁🌱

Likes
3
Share


@GanjaFarmerGrow
Follow
Dispite a heavy few weeks She managed to recover from the harsh conditions...
BIG seedbank gave us some solid genetics..
I am feeding her as planned and she is responding well..
hope she goes good untill the end..
fingers crossed..
🙏

Likes
80
Share


@Roberts
Follow
Pure Ice cream clone is growing great. She is stretching great, and I have been doing hst on the branches to keep them out of the light. Everything is going really good at the moment. She is eating and drinking a lot. Looks like she is going to produce a good yield if everything stays going good. Thank you Pure Instinto, and Spider Farmer.
🤜🏻🤛🏻🌱🌱🌱
Thank you grow diaries community for the 👇likes👇, follows, comments, and subscriptions on my YouTube channel👇. ❄️🌱🍻
Happy Growing 🌱🌱🌱
https://youtube.com/channel/UCAhN7yRzWLpcaRHhMIQ7X4g

Likes
5
Share


@AUTOBUDDHA
Follow
Very good week! First two space mangos got the chop.
Still have 3 more to go. One of which will definitely be chopped this week, the other two, may be next week before they finish up.
These girls smell like fruit loops! Amazing frosting, and density. Very much looking forward to the dried and cured product!! Straight PH water. Not a flush per say, but juat water. No more nutes for these pretty ladies.
Loving the fade!


Likes
2
Share

@GoodTimesOrganics
Follow
Hi liebe Community and Welcome Back! 💚🌱 We proud to present the second Strain from Good Times Genetics!
Die Wuchsform der Pflanzen wirkt bis jetzt sehr homogen, es ist zu beachten, dass natürlich die einen etwas schneller wachsen, wie die anderen.
Auch die Stielbreite unterscheidet sich etwas.
Insgesamt wirken die Jungpflanzen allerdings sehr kompakt, was eine gewisse Indica Dominanz vermuten lässt.
Das ist auch so gewollt.
Ich werde immer wieder verschiedene Pflanzen der gleichen Zucht dokumentieren und nach der Geschlechtsbestimmung dann Herausfiltern, welche zwei Pflanzen für die Fertigstellung des Diaries in Frage kommen.
Die Wachstumsbedingungen im Growzelt sind weiterhin am Optimum und Stabil:
———————
🌞 Temp: 23°C
🌚 Temp: 20 °C
💨 RH: 58%
VPD: 0,86 kPa
😎PPFD: 330 mqm
———————
Stay Tuned! 💚
Likes
151
Share


@PEAKYPLANTERS
Follow
Hello, fellow growers
I thank you for having dedicated your attention to my garden and I hope that the contents are to your liking and help for your growth.
These Barbies are tall, beautiful and firm
I can't wait to put my mouth on it

Likes
13
Share

@Stork
Follow
Day 84 Mon
Add Water
PH 5.8
EC 0.7 - 0.6
DLI 12h
PPFD
Water 22c
Day 86 Wed
PH 6.0
EC 0.5
DLI 12h
PPFD
Water 18c
Day 87 Thu
PH 5.9
EC 0.5
DLI 12h
PPFD
Water 21c
Day 87 Thu
Add Water
PH 6.1 - 5.9
EC 0.7 - 0.4
DLI 12h
PPFD
Water 18c
Day 87 Fri
PH 5.9
EC 0.6
DLI 12h
PPFD
Water 18c
Day 88 Sat
Add water
PH 5.9 - 6.0
EC 0.6 - 0.5
DLI 12h
PPFD
Water 18c
Likes
2
Share


@Greenbean420
Follow
One of the plants grew massive! However the smoke wasn’t the best until a good 4 weeks cure. Very hairy buds too which was interesting 😂 Still a nice smoke
Likes
2
Share


@Saintvicious
Follow
Just keep watering as it drys. Supporting buds along the way that are getting too heavy. Smells like skunk and gas. Little fruit but not much. Trics still getting thick. Look forward to it finishing. Tricomes still cloudy. Little amber on sugar leaves but it's still going strong. Some leave fading finally to fall colors.


Likes
41
Share


@HollowSource
Follow
My first grow. It's been a long time coming.
This grow is 4 plants, 4 strains in a 90x90x200 with a 440w LED.
Bruce Banner #3
Gorilla Zskittles
Amnesia Haze
Blue Gelato 41
The Banner and Skittles broke the soil successfully this week but unfortunately the Amnesia and Gelato didn't cut the mustard. Successfully germinated on second attempt however this means they are a little behind the the other 2 for now.
I have the light dimmed to around 20% as the ladies were showing signs of having too much light, a slight yellowing to the ends of the leaves on the Skittles? This was with the light at around 50%. Will ramp this up slowly over the next couple of week once the other 2 break soil.
UPDATE
The Blue Gelato and the Amnesia Haze broke the soil a couple of days ago so they shouldn't be massively behind the other 2. Looking forward to seeing these ladies grow!

Likes
2
Share


Likes
27
Share


@CannbellFarms
Follow
I’m overjoyed with the phenos this strain is producing, strong vibrant purples with some serious flavour profiles!
Scent Profiles we have:
Candy Lemon Sherbet 🍬🍋
Sweet & Piney Diesel 🍭🌲⛽️
Sweet & Tangy Tropical Punch 🏝️🥊
Alongside this, these beauties are the frostiest and the most insanely dense koala looking nugs I’ve ever produced!
Likes
14
Share


@TherealNICOGREEN
Follow
Er VIRKELIG BLEVET SÅ OVERRASKET 😱. Den er jo virkelig en god lille stærk pige med stor potentiale til at kunne leve op til sit mål om at få en top 10 placering bare ;) 🙏🏼💚
Likes
11
Share

@Growfather1
Follow
Hello everyone,
The amnesia fast is doing okay and will go into flower in the coming days.
I gave her a reservoir change removed and many leaves and internodes.
To prevent rootrot building up again i filled the bucket full and gave the roots a good hydrogen peroxide treatment including the main stem, i think there is or was some rot near the main stem that kept causing rootrot.
Let's see how she looks next week.
Best regards,
Growfather

Likes
4
Share


@Albargina
Follow
Otra semana mas, y sigo enamorandome cada día, las Blue Elite no paran de sacar resina blanca, y las Rica CBD estan hermosisimas, con grandes y gruesos cogollos, empiezo a notar las macetas de 3L y que la lámpara está ya para el retiro😬, aun así estan saliendo unas piedras con forma de cogollos muy interesantes😂

Likes
7
Share


@Unpluggy
Follow
Hi there Friends🕊️
Last week the Banana‘s left Stem snaped. I covered it in tape and it didnt dry out. The i removed it Like 2-3 days later because i wanted to cut the branch off, to let the plant spend her Energy in the healthy ones. But the i saw how strong it got and decided to even LST the broken stem even more because it strenghtened the left over parts.
Now it recovered really good and got a defoliation. Maybe i will Cover up the Open Crack🤷♂️