


Likes
7
Share


@TerpyTears
Follow
Hey friends of good grow😊✌️
This week was relaxed the AK OG looks good . they Smell and look good💚
This week there was again Enhancer from Ghsc and the ladies love it 😊👌
Thanks for your time and see you soon 💚
Stay high and grow up✌️

Likes
7
Share


@Zuppler
Follow
Vegetation Phase - Week 2
Shoutout to Cannapot, the Austrian plug who came through with the genetics from Humboldt Seed Company. The 10 Donutz plants are pushing through their second week of veg, and while the majority are thriving, a few challenges are starting to show — all part of the game when experimenting with new soil, pots, and nutrients.
Updates & Adjustments:
Lamp Adjustment: Raised the light to reduce stress and give the plants more breathing room as they stretch and develop.
Watering: Keeping it relaxed and minimal with reverse osmosis (RO) water. No overwatering here — slow and steady wins the race.
Nutrients: If deficiency will further ill add more fertilizer.
Observations:
9/10 plants are growing steadily, with vibrant green leaves and visible progress in height and structure.
1 runt: One plant is struggling hard — stunted growth, ugly leaves, and generally looking like it’s fighting for its life. Still, it’s got a spot in the tent, and we’ll see if it can bounce back.
Some minor issues spotted on a few plants, likely nutrient deficiencies as they adjust to the new setup. It’s not surprising, given the new gear and methods, but nothing alarming yet.
Next Steps:
Staying the course with low-stress management. Let the plants adjust to their environment and dial in any issues over time. The Donutz are strong genetics, so they’ll likely power through. Even the sickly one gets a chance — no plant left behind! This sea is still on track to make waves.

Likes
17
Share


@Naujas
Follow
She is much prettier than she was a week ago :) I remembered that I have my first grow light, which is more compact and it will give me more space, so I changed my light, now the girl's side branches get light too:) I add a lot of video memes, because I really want to win Iphone16 pro ;) and those who don't take risks don't drink champagne:) good luck to everyone.
Likes
26
Share


@Mrs_Larimar
Follow
2022-12-22
If you can grow a Solocup, you can grow everything.
I love Solocups, growing with Limited Resources ( Growmedium),
shows the true Mastery of Growing.
I always have so much fun in growing into small Cups
This grow was a solocup with around 0,5l.... so every easy to me with so much Growmedium
Plants turned out Happy, and well formed Buds

Likes
6
Share


@Floryx
Follow
-Gorilla Zkittlez is turning purple :)
-its getting a little cold in my room :(
-bought a magnifying lense to check for trichomes but i think they still need a while

Likes
8
Share


Likes
34
Share


@Bluntblazer66
Follow
April 26th
Started yesterday to feed straight Dense Bud compactor @ 1400 PPM
I am feeding this for 2 days then switching to nutrients posted
April 27th
Switched to the nutrient schedule posted this week.
April 28th
OS#1 and OS#2 are both turning a lighter colour of green some. Hopefully I didn’t shock them to much with the straight(K)
Willy be keeping an eye on this situation.
Likes
15
Share


@38PLAN
Follow
Abbiamo tagliato a metà 3 piante,farò il raccolto scaglionato,le lascerò ancora per un pò cercando di evitare le cime popcorn,l'odore é fortissimo e la quantità incredibile,fino ad ora la miglior pianta mai fatta,e da tagliare rimane ancora molto....BUON ANNO!!
Likes
93
Share


@PEAKYPLANTERS
Follow
Hello, fellow growers
I thank you for having dedicated your attention to my garden and I hope that the contents are to your liking and help for your growth.
My central zkitt is about to explode


Likes
4
Share


@Zugzug
Follow
No food just Water (Grow Dots)
Day 22 Transplant to 3gal pots
Day 23 start of LST
Likes
82
Share


Likes
12
Share


@Canakine_Skygrower
Follow
Enfin ma première récolte de fini. Je suis assez fière de la qualité des bourgeons et de l’arôme des plantes. Je vais finir le curring gentiment mais je suis très satisfait de la Sweet tangerine tango auto

Likes
15
Share


@Luv2Grow
Follow
Day 57 - Starting week 9 and she’s doing good from the feeding of nutes yesterday and she really seems to like the second AGLEX light on, she’s already plumped up a ton overnight. Went and did a very light defoliating tonight as well and will continue with a little each day.
Day 58 - Nothing much to speak of today, she’s fattening up nicely and frosty as hell. The way things are looking, she’ll probably be harvested in two stages unless some of the middle and lower stuff really start filling in.
Day 61 - She was all dried up today and needed a good shot of water, pretty droopy, so gave her a full 2 gallons of plain water today. It’s looking like her pistils are shriveling up and might be coming to an end, just a couple weeks left. From here on out, I’ll start monitoring her trichs and probably start flushing her next watering.
Day 62 - Did a pretty heavy defoliation today since she doesn’t have much more time left. Buds are nice and fat and only getting frostier and fatter. Might end up doing a little more in a few days depending on how she reacts to today’s work.
Day 63 - Ending week 9 today and buds are amazing right now. She’s not gonna get any more nutes other than what the schedule calls for and that’s Magical and Sugardaddy for the flush. First time using the Technaflora nutes from start to finish and impressed so far. Removed a few more leaves today as well. The trichs are mostly cloudy right now with still a few clear but hopefully they’ll amber up in the next 2 weeks or so.
Likes
11
Share


@goeser
Follow
I am not doing anything at all ,
this plant is just staying arround in my garden.
i just tried topping technic the first time and it worked well.
now i just have to hope that this plant will be a lady, then i think i will get a good harvest
in september/october.
Likes
16
Share


@ButterfliesLittleFarm
Follow
Hello Diary,
Epsilon F1 is the fifth hybrid F1 strain from the Royal Queen Seeds lab that grows on my small farm.
This time, all three plants on the farm are Epsilon F1, but the soil mix in which they grow is different.
But before I describe the preparation, a few words about the strain itself.
EPSILON F1:
Epsilon F1 is the fastest of all of our F1 cannabis seeds, and combines genetic traits from some of the most notable cannabis varieties of the last decades, including Blue Dream, Blueberry, Amnesia Lemon Haze, and Black Domina.
She boasts delicious aromas, plenty of cannabinoids, and, like all RQS F1 seeds, unrivaled stability, resulting in a uniform crop that consistently produces buds of unwavering quality.
Plus, her autoflowering trait and extra-fast flowering time make Epsilon F1 an ideal choice for growers focused on getting to harvest as quickly as possible.
Epsilon F1 features a rich aroma that combines hints of fresh herbs and citrus with full-bodied earthy notes and touches of blueberries and lavender.
Epsilon F1 is a mid-strength variety, consistently producing solid levels of THC and a terpene profile dominated by myrcene, farnesene, ocimene, and limonene.
Not only do these terpenes impact Epsilon F1's delicious aroma, but also its effects,
endowing it with a long-lasting, physically relaxing stone that soothes the entire body (predominantly courtesy of myrcene, linalool, and farnesene), mixed with an uplifting, motivational kick (from limonene).
SET-UP ON MY LITTLE FARM:
Box - Secret Jardin DS120W 120x60x178
Lights - MIGRO 200+
Ventilation - TT Silent-M 100
Filter - Primaklima filter PK 100/125
Fan - Oscillating Koala Fan X 2
Humidifier - Beurer LB 45
Soil - BioBizz Light - Mix
Pot - 11L Air pots
Seed - Royal Queen Seeds
Nutrition - RQS Organic nutrition
Let's officially start the diary:
02/08/2023
Planting. I prepared a total of three pots, as usual.
And this time I used AirPots, which proved to be the best option. I've been using them since the beginning.
I used the soil from BioBizz Light-Mix.
Pot #1 - I first put Easy Boost Organic nutrition in the form of pellets into the ground, then I added SeaWeed and Mycorrhiz in the recommended doses and mixed everything well.
Pot #2 - I also put in Easy Bosst Organic nutrition, Seaweed and Trichoderma. Also in doses according to instructions.
Pot #3 - Along with Easy Boost Organic nutrition, I put Bat Guano and Trichoderma.
After I prepared the soil, I soaked all the pots well with water and made small holes in which I placed the seeds.
I then placed the pots in the Grow Box where the temperature was around 28 degrees and the humidity was around 55%.
05/08/2023
I sprinkled a little water on the surface of the soil. Not too much.
06/08/2023
All three plants sprouted.
07/08/2023
I watered the plants with a little water. Approximately 0.5 liters per each plant.
10/08/2023
Watering. Each 0.5 liters of water.
That's all for this stage, see you soon and thanks for your support.

Likes
6
Share


@PoshGrow
Follow
Welcome to Auto Alaskan Purple Grow by PoshGrow!
🍀 Week #7 2020 September 3th - 10th.
General Info:
When planted: 2020 July 23th.
Week: 7
Days: 42 - 49
Last Update Day: 2020 September 8th.
Plants: 5 Alaskan Purple Auto.
Equipment:
Tent: MarsHydro 1mx1mx2m or 39"x39"x72".
Light: HLG 260w V2 Rspec QB Kit.
Exhaust: 4" 322 CFM fan + Viper Carbon Filter.
Intake: 4" 100 CFM Inline Fan.
Oscillating Fan:
Lower: 4" Ram Fan.
Upper: 9" Voxon Box Fan.
Humidifier: Taotronics TT-AH001.
Dehumidifier: Pavlit MD750.
Soil: NPK soil 40% Compost, 50% Peat Moss, 10% Agroperlite.
Pot: 7 gallon Fabric Pot x 5pcs.
Nutriens: Fox Farm Trio.
PH Correcton: Chemoform pH-Minus Granulat.
PH Pen: Cheap Chinese one, I callibrate it every time I use it.
Water pump:
Digital microscope: cheap Chinese USB X4, 1600X.
Comment
This week not going to do any training at all, I will let them just be happy lol 😆✌️
Watering every 2 or 3 days, every other watering I use nutritions.
Everything going as planed, these girls going to be massive!
Likes
1
Share

@Ketamine
Follow
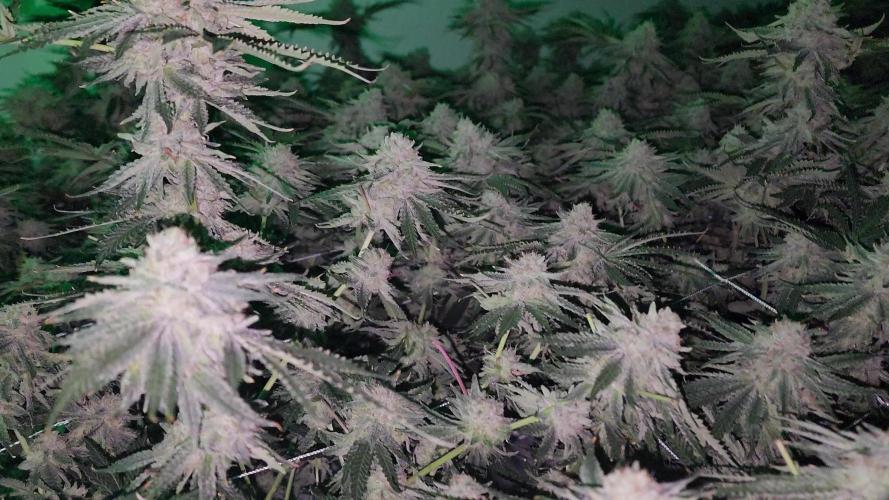
Coming to the flush soon, this strain known for being a low yielder and has done better than expected. Buds are compact, and dense. I have noticed some really nice flowers underneath, so the Under canopy lights seem to be worth it, will know more at harvest.
Likes
39
Share


@AestheticGenetics
Follow
4/15/25 Things are progressing nicely. Some plants dont seem to be doing too much but 3 of them or so that are really standing out.
Im curious if some of these are going to be longer flowering time than anticipated with the very obvious sativa dominant plants.
