


Likes
43
Share


@biggreens420
Follow
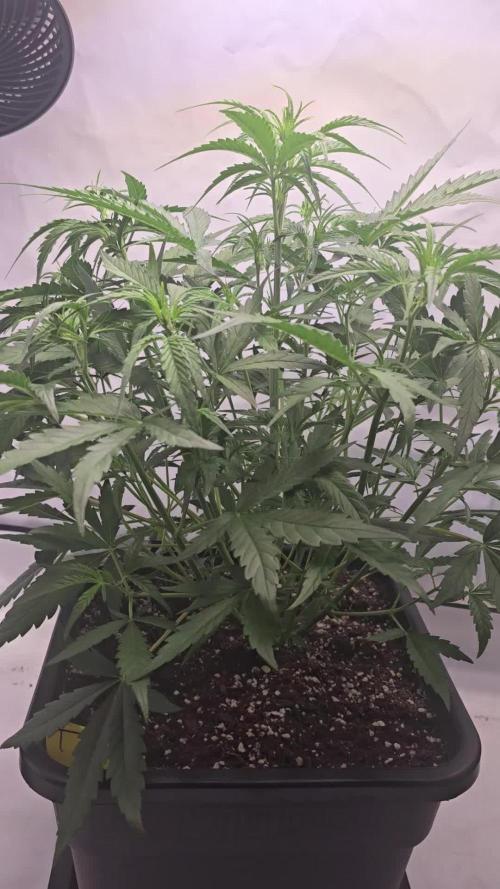
dawgstar is in full flush still not ready just yet buds are huge and heavy the branches have gone weak and started to need support she's started to mature more over the last few days so should be within the next week for the chop scent is very strong but hard to describe not one iv smelt before should be interesting to try once finished not much else to say thanks for reading happy growing guys

Likes
6
Share

@ThatsmyGrow
Follow
A another great fastbuds strain. i love the another cookies strain, so i hope this plant will be great like the other.
She is getting wide and short i think 👀

Likes
13
Share


@Rob691
Follow
D-15 : Repotting girls from a 1L hard pot to a 11.8L smartpot, turned light to 100%.
D-16 : Feeding with Biobizz, stop humidifier.
Everything is ok right now. Leaves are growing fast. They have a beautyful green color, I love this color !
D-20 : Everything seems to be ok.


Likes
13
Share


@Mrs_Larimar
Follow
2022-10-30
It was pure Joy to Grow them again.
In the Beginning of Flower i was not so happy with them,
but after another Week in the Floweringroom and some Nutrients, they packed up.
Plants loved the Setup with god Temp,VPD, Wind, Nutrients and Light!!
They are colorful and absolutely Pleasing.
a Big Role in this Grow were the new Lights Playing
All the Plants loved the Spectrum of the
HYPHOTONFLUX HPF-4000 (2x)
Plants were growing vigor, looking superhealthy
Harvest was an easy Job!
Bringing me well formed thick and dense Buds with alot of Frosting on them
Just look at the Pictures


Likes
18
Share


@TheCannaProphet
Follow
~ FASTBUDS TESTER #2206 ~
Well friends, here we go on another 'canna-venture' together!
The grow room has had a complete remodel and some upgrades done to it including brand spanking new 4x8 and 4x4 tents and a Trolmaster Hydro X controller along with a new Control Panel.
This tester strain is one of six tester strains that FastBuds has graciously provided me with and I'm looking forward to seeing what this girl has to offer when she's grown to her full potential!
One drawback of 'testers' is I have little to no information on it other than its number and that it's an autoflower... 🤪 But, it's ALWAYS a blast growing them for me because not knowing a lot allows me to just concentrate on the essentials: Light, Environment, Water, Nutrients and possibly a bit of LST... not complicated, just basics like keeping a constant temperature and RH in the tent at a level that gives a good VPD, watering when almost dry and maintaining proper light levels according to their stage of growth.
____________________________________________________________________________________________________________________________________________________________________________________________________________________________________________________________________________________________________________________________________________________________________________________________________________________________________________________
~THE SETUP~
~Initially seeds were lightly scuffed, then soaked for 3 hours in 78℉ distilled water after which they were transferred to moist paper towels laid out in a Jiffy Pellet plastic starter tray with lid. Underneath the tray was placed a Vivosun Heat Mat with Controller that was set to 78℉ where they stayed until their tap roots emerged.
~Planted into Jiffy Peat Pellets that were hydrated with distilled water warmed to 78℉ with a 7.0 ph.
~Once roots emerge from the Jiffy Pellet they're transferred to their fabric pots.
~Grown 100% organic in a 4g Gronest fabric pot and a 3g fabric pot by Wraxly filled with Mother Earth 70/30 Coco/Perlite medium and initially amended with Dr. Earth 4-4-4 / Earthworm Castings / Dr. Earth Flower Girl 3-9-4 and Coast of Maine Stonington Blend Organic Plant Food 5-2-4.
~19/5 light cycle for the entire run with supplemental UVA added during flower. Lights are controlled by a Trolmaster Hydro X controller set for a 15min Sunrise/Sunset simulation.
~Top dressing every 3-4 weeks with slow release dry amendments and Earthworm castings.
~Straight water ph'd @ 6.2-6.8 when needed and bi-weekly Compost Tea's.
____________________________________________________________________________________________________________________________________________________________________________________________________________________________________________________________________________________________________________________________________________________________________________________________________________________________________________________
Weekly Updates:
12/15- Here we go into the second week of veg for the FastBuds Tester #2206 girls and they're on a roll! When I checked on them today they both were still moist so I let them go until I check them tomorrow. Basically at this point in the run all I have to do is make sure they don't dry out, fill the humidifier and watch them grow!
12/17- Yesterday I watered them both and increased the amount to roughly 0.25g each of de-chlorinated water with 3ml/g of Botanicare Silica Blast (added to begin to help strengthen their branches) and then ph'd to 6.4 @ 74℉.
I've also increased the output of the HLG 650R's to 35% which equates to about 230w at the wall which, of course has raised the temp's in the tent so I've also begun to run the A/C unit in the grow room which is keeping the temp's now at 75℉ in the tent. The RH is running around 75-78% RH giving a VPD of .67-.74 which I'll take! 😁👍
Other than what I've mentioned above, all I did was fill the humidifier with distilled water and watched my girls grow! 🤩
12/19- Today I watered them each with 0.25g of de-chlorinated water to which I added 3ml/g Fish Head Farms Fish Sh!t and 1 tsp/g Unsulfured Molasses which I then ph'd to 6.3 @ 74℉. I'm now watering through the bottom, filling the drip pan and letting the plant draw up the water into itself. I am also watering from the top, but only just enough to moisten the medium.
They're really starting to take off now, a sure sign their roots are beginning to get well developed. Their 4th set of leaves have emerged and I'm thinking over topping them in the next day or so.
12/21- Well, yesterday I went ahead and topped the #1 Tester #2206 taking off the 5th leaf set. Hopefully she won't stress out over this and starts shooting out those secondary branches. I left the #2 alone as she's not quite as tall as the #1. I may not top the #2 as a sort of comparison to see how each grows out.
Today I watered them both with 0.25g of straight de-chlorinated water each which was ph'd to 6.3 @ 74℉. I gave about 3/4 of it into their drip pans so they can draw it up into their medium, the rest I applied to the top of their medium just to moisten it.
Well there's two weeks of veg behind us now, Week Three of vegetation is beginning and they should really start to take off! 😍👍
😎💚 Thank you for checking out my passion in life! Please visit as often as you wish and I hope you enjoy this journey as much as I know I will! Grow Strong! 💪😎🤙
Likes
3
Share


@Grow_Mate_de
Follow
[DE]
Tage sind an den Bildern angegeben
- Video Update vom Schrank und Pflanze
- Pflanzen entwickeln sich sehr gut
- kleinere Mängel sind sichtbar EC-Wert wird angepasst
- circa eine Woche noch, bevor ich auf Blütedünger umstelle
- BT 19 wollte ich gerne ein wenig Entlauben, um die Luftfeuchtigkeit zu reduzieren
[EN]
Days are on pictures
- Video Update of GrowBox and Plants
- Plants are developing very well
- Minor deficiencies are visible EC value is being adjusted
- About one more week before I switch to flowering fertilizer
- I wanted to defoliate BT 19 a little to reduce the humidity


Likes
19
Share


@adam_pawloski87
Follow
What a fun run this was ! These Ogreberrys finished up from 81 days to 102 days with nice hints of gassy , sour purple , sweetness and glistening with frost! These ladies will cure up for a month an will be ready to test out ! So much fun , I highly recommend this strain if your looking for some oooy gooohy resiny grape smelling nugs !

Likes
262
Share


@Ju_Bps
Follow
Hello my friends 👨🌾👨🌾🌲🌲,
All was fine thiw week, Buds are more and more fat!
I've continue to give pk 13-14 this week, I'll probably give one more time this new week after back to canna boost accelerator.
Humidity was nice all the week between 45_55%HR, this Sunday back to 60%.
Hope will down again with nice weather.
I've given
2.7l water/plant
-Water + rqs bloom tabs + sugar royal
-Water + pk 13-14
-Water only
Ph@6
Thanks for like, follow, good vibes, let me really happy, for suport my friends ❤️👨🌾🌲,
With your all positives vibes I've been contacted by mars hydro this week, I'm so happy,
Thanks to @marshydrococo 😘😘
And thanks to @royalqueenseeds for all this nice seeds 😘😘🌲🌲
Likes
4
Share


@GmansGarden
Follow
JUL 15- so she needs some defoliation and some general maintenance because she is starting to lean over, but im out of town for another week. She had some nutes given to her this week. Also, her trichombes are very frosty this girl puts out alot of zap. The one in front is a Mexican Sativa strain which I set to flower a day after her.
Also have some Habaneros in the Tent they are awesome they love the Nutes
Likes
7
Share


@CanadianFillmore
Follow
Fed and defoliated to start week 7. The plant looks good, with a bit of yellowing, but the buds are on point and look as expected at this stage.

Likes
18
Share


@The_Lonely_Farmer
Follow
Tropicana cookies fast flowering just hit the paper towel ✌️ usually within 7 days she'll be popping out the soil 🌱 excited for this one from fastbuds 💚
Likes
7
Share


@El_Bottanico
Follow
Somehow I counted weeks in a silly way, so I thought this was week 8 but it's still week 7. LoL.
Plant is doing great anyway,
She's big, exceeding 70 cm diameter, With so many colas at canopy level I expect her to yeld very big fo an Autoflowering strain,
The training succesfully shaped her resulting in 10 branch reaching the top canopoy level. To me the key to a good training is timing, much more than continuous adjustment. This plant was bent just one time on main stem and one another time little later the branches.
We had rainy days so I used a dehumidifier for a day or two, now it's dry again outside so no need for it anymore.
She's still thirsty like a bitch as she drinks 5 liters of water every two day. Maybe I'll make a drip sistem for my next grow, watering has been boring lately.
I'm not giving her anything to the end now, she's doing fine like this. The humus coupled with slow release fertilizer is doing a great job.
She has some nitrogen excess to me, but she's the only plant to show it in a batch of 6. The issue seems very small to me anyway.
Day 48 checked trichomes, some is turning milky already, can't wait for the buds to ripen :)
Ciao Bottanico
Processing
Likes
7
Share


@gablmo
Follow
Finally flower. They are 4 feet now. What am I going to do? I don't want them to burn into the light.

Likes
36
Share


@nonick123
Follow
Día 37 (08/07) Ajustes de LST en todas las plantas! 🚀
Día 38 (09/07) Ajustes de LST en todas las plantas. Las ramas inferiores están creciendo como un cohete! 🚀😍
Riego con 250 ml H2O pH 6,5
Día 39 (10/07) Las plantas se muestran sedientas! Creo que el cepellón está lleno de raíces y piden el trasplante!
El crecimiento no se ha visto afectado de momento
Riego con 500 ml H20 pH 6,5
Día 40 (11/07) Paso a regar con 500 ml / día, ya que hace mucho calor (30 ºC) y efectivamente las plantas ya han copado la maceta de raíces
Las ramas de nodo inferior se han quedado enanas tras el entrenamiento, de modo que las elimino y aplico canela en polvo en los cortes
Riego con 500 ml H20 pH 6,5
Día 41 (12/07) Riego con 500 ml H20 pH 6,5
Clones! Mi experimento vuelve a demostrar que NO necesitas complejos productos de clonación ni sistemas para obtener clones!
Hace 15 días puse 2 clones con el tallo sumergido en miel durante 5 minutos en una maceta de 400 ml con PRO-MIX HP BACILLUS + MYCORRHIZAE
He mantenido la humedad alta con una cúpula de humedad casera hecha con una botella de agua PET de 5 litros cortada por la mitad y pulverizando a diario.
Han estado los 15 días en mi terraza con luz indirecta, y temperaturas que rondan los 30 - 32ºC durante las horas centrales del día
Hoy los he trasplantado a una maceta de 1 litro porque ya habían formado raíces y empezaban a formar nuevas hojas!
🐥🐥🚀🐥🐥
Día 42 (13/07) Riego con 500 ml H20 pH 6,5
Día 43 (14/07) Trasplante a maceta definitiva de 21 litros de ROOTPLUS Pot de GSKOREA GLOBAL!
Estas macetas son una maravilla!
Proceso de trasplante:
Se prepara con 17,85 Litros (85%) de sustrato PRO-MIX HP BACILLUS+MYCORRHIZAE + 1,05 Litros de Humus de Lombriz (5%) + 2,01 Litros de Insect Frass (10%) + 210 gramos de Earth Vibes Super Soil (10 g/L substrato)
Se llena la maceta de sustrato con las manos (limpias) y rompiendo los trozos más gruesos, para que el sustrato esté aireado y esponjoso, sin presionar
Se coloca una maceta vacía de 6,5L para que quede la forma perfecta de la maceta donde están actualmente
Se espolvorea la parte proporcional de la probeta de microorganismos sobre el agujero de trasplante
Se saca la planta de su maceta actual (bonitas raíces 😍) y se coloca en la maceta final
Se riega muy lentamente hasta percolación profunda con H2O EC 0,5 pH 6,5
Una vez asentada, complemento con un riego de 500 ml con 25 ml/L de Humus de Lombriz Liquido
Se coloca mulch (acolchado) de paja para evitar traspiración excesiva y cuidar a los microorganismos del suelo
A ver como reacciona al trasplante!
Aplicación foliar Kelp hidrolizado de Lurpe Solutions a 0.25 ml/l
Realizo ajustes de LST aprovechando el trasplante a la nueva maceta. De momento tienen una canopia muy bien formada!
💦Nutrients by Lurpe Solutions - www.lurpenaturalsolutions.com
🌱Substrate PRO-MIX HP BACILLUS + MYCORRHIZAE - www.pthorticulture.com/en/products/pro-mix-hp-biostimulant-plus-mycorrhizae

Likes
6
Share


@Naujas
Follow
it grows perfectly, it hasn't received any food yet, only clean 6.3 ph water with biobizz heaven :)also starting today I start using more wires :)LST.