
Processing
Likes
Comments
Share


@eltiiocultiveta
Follow
27/07/20 se podaron y se hizo lst. Mañana riego con ferti bien cargado porque están mostrando falta de potacio y fósforo ya. Últimas dos semanas de vege y a florar
28/07/20 se fertilizó foerte


Likes
4
Share


@SaFiyaFarms
Follow
Planted directly in soil came out of the dirt in 2 days, The picture is week 1 out the dirt


Likes
15
Share


@MrJones
Follow
Mr. Jones Fast Buds Moby Dick
╰⊰´🌿 ╰⊰´🌿 ╰⊰´🌿 ╰⊰´🌿 ╰⊰´🌿 ╰⊰´🌿 ╰⊰´🌿
🏡Indoor - 3"x4"x8" Custom Built Grow Closet
🌾This strain likes to stretch, so a heavy training regiment will be needed.
🗓️Germenation - Soaking in Water Strait into Amended Soil.
⚱️3-Gallon Pots 📊6.4 / 6.8 PH
💧 Feeding - Gaia Green Grow / Bloom
🕷️ IPM - We will be using Green Cleaner" 1 OZ per Gallon, and CannControl from Mammoth alternating between products each month for Integrated Pest Management.
🌿╰⊰´🌿╰⊰´🌿 PLANT UPDATES 🌿╰⊰´🌿╰⊰´🌿
🗓️SUNDAY 10.29.23 - Going to leave the light cycle alone for another week, these ladies are blowing up pretty well, don't want to mess with the MoJo :)
╰⊰´🌿 ╰⊰´🌿 ╰⊰´🌿 ╰⊰´🌿 ╰⊰´🌿 ╰⊰´🌿 ╰⊰´🌿
📝 Notes - Original Moby Dick Auto is a world-renowned Sativa-dominant giant created from two of the most popular strains ever, the White Widow and Haze cannabis strains which are known for the huge delicious aroma, huge size and yields; It’s an extremely easy-to-grow variety highly recommended for growers of all levels seeking for maximum yields with minimum effort as this strain grows up to 150cm and yields up to 650 g/m2 in 10 weeks without extra maintenance. Thanks to its 23% THC, this marvelous hybrid is all about happiness as it will melt your worries away while boosting your mood, leaving you with a big fat smile on your face and ready to get things done as soon as you take the first hit, making it an excellent choice for social scenarios and busy workdays. The Sativa effect comes hand-in-hand with a mix of lemony, piney, and woody terpenes that translate into that classic aroma every stoner loves.
╰⊰´🌿 ╰⊰´🌿 ╰⊰´🌿 ╰⊰´🌿 ╰⊰´🌿 ╰⊰´🌿 ╰⊰´🌿


Likes
4
Share

@grimm420
Follow
Opinions on this strain: That damn smell and frost! I always get compliments about how it smells when people come over. It smells like artificial grape, imagine smelling the color purple 🤔 and tootsie rolls combined. As for the frost, it’s more frosty than the things you forgot all the way in the back of your freezer lol! 😆 I wonder what the results would be if I make concentrate from this! This plant is a heavy feeder! Super easy to grow, did no training and she came out beautiful! No purple yet, and I think I’m gunna wait about a week or three to chop. Now the cons. The bud development is a little slow and these buds do fall on the shorter side, it might’ve been a growers mistake, it might swell up the last couple weeks, I’m not sure. But imma record it and keep you guys updated!
Likes
19
Share


Likes
23
Share


@frogDUDE
Follow
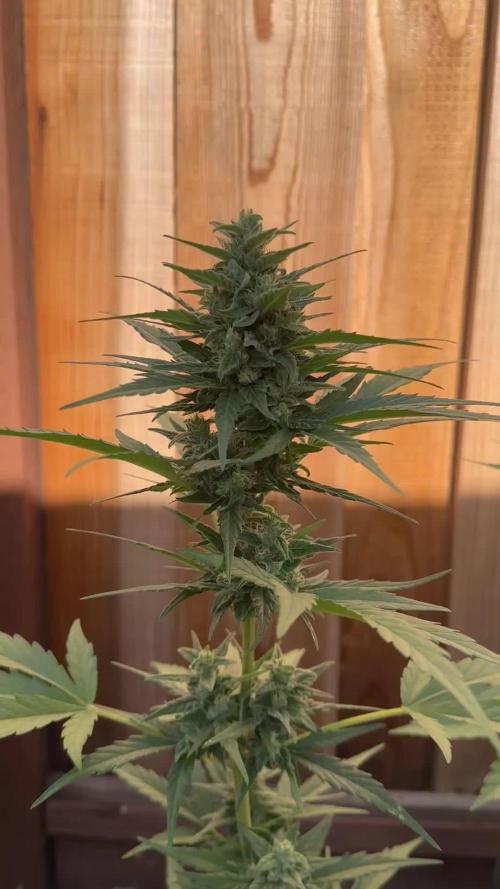
Terps are coming alive as she is taking on a delicious fruity smell. Still going very light on defoliation as I feel like the big fan leaves are still doing their job to boost photosynthesis and feed the buds.
She is starting to turn purple already!!!
I’m going to allow night temps to continue to drop below 10 degrees C at night, hoping for an amazing color show at harvest!

Likes
10
Share


@Shefman93
Follow
Defoliated to improve airflow and re tied branches down to create a more even canopy. Will re ammend the medium with 2 cups of worm casting, 1.5 tbps azomite and Gaia Green 4 4 4 on the last day of week 4. Recharge in every watering during veg.
Likes
2
Share


@BetterBud
Follow
This week is full of stretch, and unfortunately didn't train early enough. Instead of toping now, used Budclips to bend the main cola but didn't seem to do much. Yellowing on lower leaves so increasing nutrient dosage a bit. The Gorilla strains seem to always be more hungry for nutrients
Likes
Comments
Share


@PrinceOfHerbs
Follow
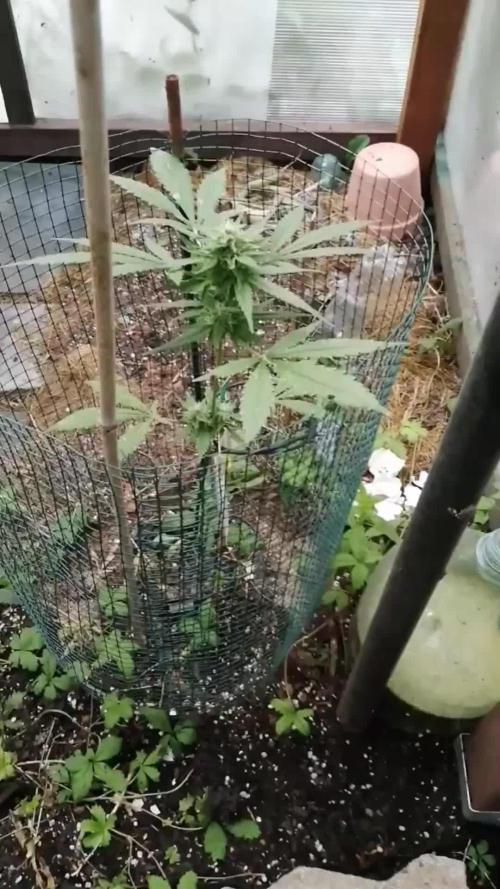
The plant looks quite healthy.
It is stretching a lot, so a net will be stretched over it next week.
Day of flowering: 5
Likes
24
Share


@Newbiegrower420
Follow
Update: Day 1 of week 11 - Thursday 29th October
I am soooooo fucking pissed! I don’t know whether watering the girls from the bottom has made the girls more thirsty or just that they are generally more thirsty due to needing more Nutes during flower but one of the ladies has wilted quite terribly. The other girls seem ok, slightly more thirsty and the leaves slightly droop a little more than usual at feeding time but one girl has defo been through the thirst wars.. She’s bounced back after a good water but the buds looks shrivelled and feeling very sorry for them selves. I’m not sure she will be as good a smoke now if she makes it at all..
Other than that moved the LED up slightly more to keep a good distance between the light and the girls.. I really haven’t got anymore space now so fingers crossed this all works!
Super vex this has happened in the final weeks.
UPDATE: Day 2 of week 11 - Friday 30th Oct
The wilted lady has made a great recovery but the buds still seem a little dishevelled. But considering what’s happened to her I’m happy so far.. Let’s see how she goes🤞🏼
UPDATE: Day 3 of week 11 - Saturday 31st Oct
All looking good and buds seem to be fattening up a little now ❤️
Nutes in as normal and happy the wilted lady has made a good recovery..
UPDATE: Day 5 of week 11 - Monday 2nd Nov
Nutes in and all looking good.. They don’t seem to be stretching much now and I’m hoping that means the buds will fatten up nicely from here on in..
UPDATE: Day 7 of week 11 - Wednesday 4th Nov
Nutes in and another week done.. Come on ladies it’s time to fatten up for me please 🤞🏼🙏🏼
Happy Halloween everyone 🎃 👻

Likes
250
Share


@Ju_Bps
Follow
Hello my friends 👩🌾👨🌾,
Week was good, nice weather, some days too much hot 🔥, but no rain .
I've removed several leaved burned by heat, they was all dried.
I've given 1.5l per plant,
#1 and #2
1x 1.5l water + canazym + sugar royal
#3
2× 1.5l water only
1x 1.5l water + canazym + sugar royal
PH @6
Harvest is very close ✂️✂️🌲🌲,
I had not yet check trychrome, and as usually I'm in late lol...
(See videos)
I'll start my flush this week, weather would be nice for the last week, under 30*C with nice sun 😎🌞🌞 and low humidity.
See you soon for harvest my friends 👩🌾👨🌾💕
Thanks for likes, comments and follows 😘

Processing
Likes
8
Share


@Gs_13
Follow
During this week the plant start stretching more and more every day at the end of that week reached 76cm,she had a nutrient lock this week but I flushed her with PHed water to clean the soil from salts and unused nutrients ,seems that that worked, also pre-flowering signs shown ,I am going to change on flower nuts next week.


Likes
13
Share

@All_our_small_plants
Follow
Bewässerung: 1000 ml jeden 3 Tag in der zehnte Woche
pH-Wert: 6
EC-Wert: 1.2 mS/cm
Temperatur: 20ºC
Luftfeuchtigkeit: 65%
Schädlingsbekämpfung: im Moment haben wir keine Anzeichen von befall wir haben nur mal zur Prävention etwas Sand gegen die Schnecken um die Pflanze gemacht, dies verhindert das diese sich nähern. Wir haben aber auch Raubmilben ins spiel gebracht zur vorsorge gegen Spinnmilben und andere Schädlinge 😷
PPFD: Direktes Sonnenlicht
DLI: Direktes Sonnenlicht
-Tag 63 bei der Space Cookies #2 werden die Blüten immer dichter 😍

Likes
2
Share


@Albanymedicinalgarden
Follow
Everybody is looking happy and healthy. Applied cover crop to Glueberry OG and regret not doing the rest now. No signs of stress


Likes
Comments
Share

@jeffbudger
Follow
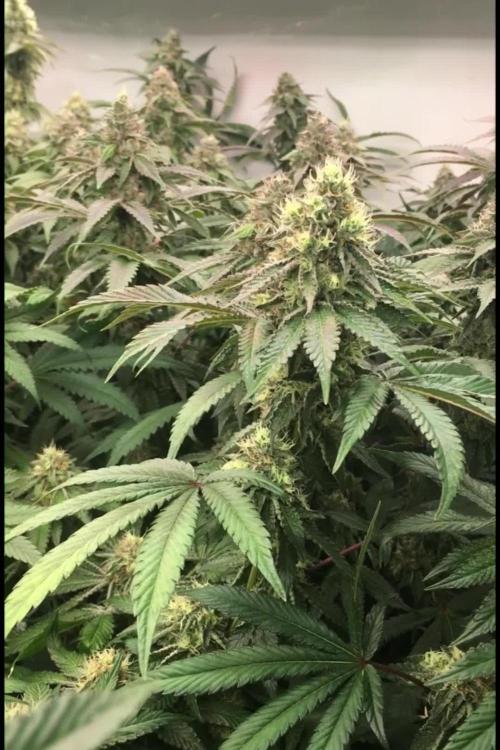
Week 7, the smell is super strong and the nuggs are hard as rocks, they are not too big they needed more P and i failed to supply it at the right time thats totally my fault but they suerly are more beautiful each day that passes, im glad they are good

Likes
24
Share


@Canaryweed_tf
Follow
Estoy super satisfecho con los resultados,se la recomiendo al 200% esta maravillosa variedad de Kannabiaseeds 🙏😍
