
Processing
Likes
Comments
Share


@Newbiegrower420
Follow
UPDATE: Day 2 of week 10; Friday 23rd October:
Nutes in with some LST and defoliation again.
Diatomaceous Earth going onto the soil tops today to beat this thrips problem.. Sticky traps to catch the live ones. Glad I caught them fairly early as the girls still look ok.
Raised my LED slightly today to give the girls a bit more room to grow and tonight I’m making my dehumidifier in a cardboard box solution to get the dehumidifier out of the tent to bring down the temps to a sensible level to deal with these thrips. I had no probs with thrips until the dehumidifier went in and raised the temps too much. So hopefully these small tweaks with get me back on track.
Update same day: dehumidifier in a box method built, my handy work is in the pics, will update again tomz with humidity and temps checked to see if this shit worked! 🤞🏼🙏🏼
UPDATE: Day 4 of week 10; Sunday 25th October-
Dehumidifier in a box idea was total shit lol but... I found that just rigging up the ducting to the dry air outlet and leaving the rest of dehumidifier in the open rather than in a box and then pumping that into the tent works much better than having the dehumidifier inside the tent. The plants have soooo much more room, fresh air and temps although slightly higher are not as crazy..
After careful inspection, I couldn’t see one thrip today and my sticky traps have lots of little bugs stuck on them 💪🏼🙏🏼... I’m pretty sure I’m not out of the woods yet, so to not disturb the Diatomaceous Earth in the soil bed I’m going to water them via the bottoms of the fabric pots for a few waterings to really ensure I cut those bad boy thrips to shreds 🤞🏼😎 Nutes will be going in too late tonight when I water them via the bottoms for the first time..
UPDATE: Day 6 of week 10 - Tuesday 27th Oct
Girls looking good and the watering via the bottoms went better than expected.. So the Diatomaceous Earth can still do it’s job. Can’t see any thrips but I know they’re still there but no way near as many as before. Buds are still really small and in some areas look like they are beginning to turn orange already, I hope my LED is not burning them. I don’t think it’s that as some of the lower buds under foliage seem to have the same. Will keep an eye!
Happy days 💚🍃🌱🙏🏼

Likes
15
Share


@Drgreenthumb627
Follow
what can i say, the smell of this girl is taking over the whole tent. she’s gorgeous and from the looks of it will be the fastest finisher in the tent. truly excited to try this one

Likes
Comments
Share


@ShiokaraiGenetics
Follow
Day one of flower for the London Pound Cake and Purple Shah. I moved the Blueberry Muffin into another veg tent for a week or two. They’re early finishers so when I move them back everything should harvest around a similar timeline. Fed them all with an Organic Alf Alfa seed sprout fermentation. The triacantanol in the Alf Alfa makes these things go crazy if you don’t overdo it. Add some coconut water and aloe and youve got yourself organic plant steroids. The growth rate will cause you to have an increased need for ca mg and nutrients which in organics may not be readily available. Top dress or feed ahead of the curve.

Likes
30
Share


@Dunk_Junk
Follow
She is growing very well! Very fast growth. Each second of video is 1.5 hours real time.

Likes
69
Share


@Mimi420
Follow
Hi guys!
The girls streched out I think.The tallest is Blue Kush with 95 cm,and the shortest is Mataro Blue with 85cm.Some leafs on the botom are yellowing,becouse of bad air floow,need to upgrade ventilation for next grow!They started to produce nice buds.I started to feed them with green sensation.The smel is geting strong.Cookies Kush have such a amazing sweet smel.They on FD 26.I'am falling in love with them 😍


Likes
56
Share


@Master_weeda
Follow
Merci à tous les padawans et maîtres jedis qui m'ont apportés force conseil et gentillesse pour ce diarie 🙏 @philosopherseeds
@Williamsii @Castafunk @greenhousefeeding

Likes
28
Share


@MadeInGermany
Follow
Info:
Unfortunately, I had to find out that my account is used for fake pages in social media.
I am only active here on growdiaries.
I am not on facebook instagram twitter etc All accounts except this one are fake.
Have fun with the update.
Flowering day 33
since time change
to 12/12 h.
Hey everyone 😃.
Another wonderful week goes by :-).
The lady is developing very well.
The flowers begin to develop properly and already smell very nice 🙂.
The day before yesterday was the last time 1 g of GHSC Powder Feeding per L substrate was added :-).
That should last to the end now.
Of course, she continues to receive GHSC enhancers 👍 every 14 days.
The tent was cleaned every day just like the humidifier was refilled every day.
I am very curious how it will develop in the coming week and until then I wish you a lot of fun with the new update.
Stay healthy 🙏🏻 and let it grow 🍀🙏🏻
You can buy this Strain at :
https://www.royalqueenseeds.de/feminisierte-hanfsamen/115-amnesia-haze.html
Type:
Amnesia Haze
☝️🏼
Genetics:
Original Amnesia Haze
👍
Vega lamp:
2 x Todogrow Led
Quantum Board 100 W
💡
Bloom Lamp :
2 x Todogrow Led
Cxb 3590 COB 3500 K 205W
💡💡☝️🏼
Soil :
Canna Coco Professional +
☝️🏼
Fertilizer:
Green House Powder Feeding
☝️🏼🌱
Water:
Osmosis water mixed with normal water (24 hours stale that the chlorine evaporates) to 0.2 EC. Add Cal / Mag to 0.4 Ec Ph with Organic Ph - to 5.5 - 5.8 .
Likes
59
Share


@GMSgrows
Follow
Cloudy here today. Girls are taking on some nice colors due to the colder nights now. Went down to 2 here a couple of nights ago. Buds are starting to bulk up now. Had to fight a little PM I seen, so I sprayed them down with 60 parts water and 40 parts homogenized milk. All gone now., have to keep my eyes open for any more to start. If so, another blast will do them and that will give them enough time to finish up, without worrying any further...Thanks for all the looks and likes. People here are the best in the world.
Thanks AMS for the opportunity to grow the best strains in the world...🙏

Likes
2
Share


@MinimalAnimalGrower
Follow
Thicker and thicker, defoliation,no sign of overnutrition,may add more next feed

Likes
1
Share


@SweedDreams
Follow
Woche 6 meines Indoor Cannabis Anbaus:
Pflanzen: 2x Lemon Cherry Cookies, 1x Strawberry Banana, 1x Mimosa Cake , 1x CBD Auto
Diese Woche lief eigentlich ganz gut. Ich hatte ein kleines Problem mit Trauermücken, aber dank meiner Klebefallen und etwas Neem Öl, habe ich das wieder im Griff.
Die Strawberry Banana habe ich gut runtergebunden. Das hilft, damit das Licht besser verteilt wird und die Pflanze besser wächst.
Die Lemon Cherry Cookies sind noch nicht so weit, weil ich sie später eingepflanzt habe. Ich habe sie noch nicht runtergebunden, aber das mache ich in den nächsten Wochen.
Die Mimosa Cake und die CBD Auto entwickeln sich gut. Besonders freue ich mich über die CBD Auto. Sie hat sich wieder verbessert und die Blätter sehen wieder normal aus.
Ich bin gespannt auf die nächsten Wochen und hoffe auf eine gute Ernte.

Likes
7
Share

@MADMANk
Follow
Big defoliation, the amount of nodes that sprout on this genetic is craZY, i dig it! Just quite a bit of maintenance!
Taken 2 clones - these clones will be grown out, one crossed with a FastBuds - Gorilla Cookies AUTO for a "fast" cross!!!
The other, might be selfed or if i find a male of value, crossed with BBQ C GPP or Ethiopian landrace for a new "F1"!

Likes
18
Share

@LueRootsGrowGermany
Follow
Bisher läuft alles ruhig. Sie wächst sehr gut und sieht stabil aus. Die Blätter entfalten sich wunderschön, die Blütenstempel schreiten hier schneller voran.
Zum Gießen: Sie trinkt sehr gut und nimmt mit der Zeit immer mehr Wasser auf. Anmerkungen: Noch immer gibt es tägliche Fraß Schäden! Neemöl habe ich bereits eingesetzt! Aber ich muss sagen, dass ich meine Frustration darüber deutlich reduziert habe. Insgesamt bin ich zufrieden! Ich wünsche euch allen eine schöne und erfolgreiche Woche! Beste Grüße, LueRootsGrowGermany

Likes
24
Share


@EBxAH
Follow
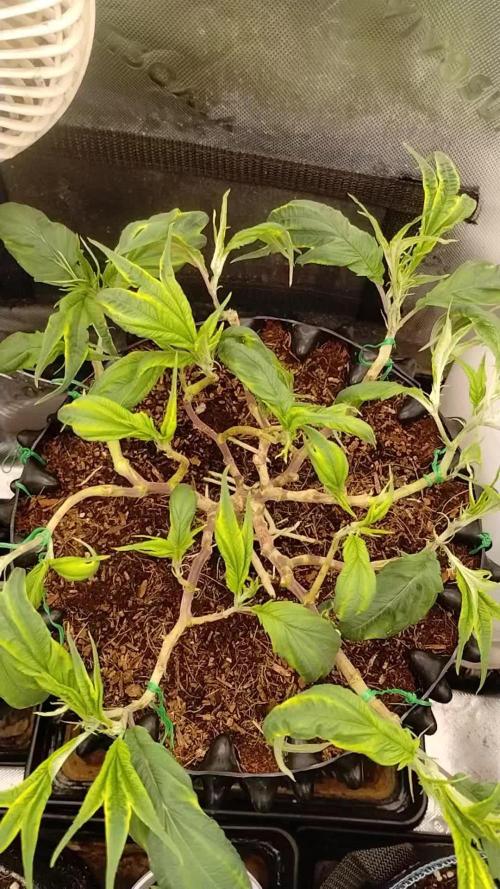
Hey there everyone! Today the reapers are 33 days old!!! I love cultivating peppers! Everything is going GREAT so far!!! Today was their first day outside and they are LOVING it! Again, it's peppers so this will be a long journey, lol. I'm thinking about doing some clones though. Well, that's about it for now. Thanks for stopping by and Happy Growing Everyone
✌️❤️😁🍀🎶👽
EB
Likes
24
Share


@EBPbyEVD
Follow
Hi guys,i have some news for you and of course we are celebrating 👻🎃
1)Now the lamp works at 50% plus we are testing the sunset/dawn function. In fact, it simply reduces the power by 25% two hours before turning off and the same with turning on. I don’t know what this will give us, but the understanding that we are closer to nature warms the soul☺️.
2) It turned out that all the time I pour increased psh 6.4-6.8. The point here is that I prepare the compote in advance, respectively, I also lower the psh in advance, and for some reason in my sick head I was completely confident that Plagron ph down would keep the psh at the value I needed, but I was wrong. (Now it’s worth thinking about which of us is still down). Because of this jamb, we have a couple of unpleasant things, the first and most unpleasant thing is a delay in development, as well as all sorts of dirty tricks on the sheets, which they kindly told me that I was doing something wrong. Photos are attached.
3) Changed the composition of the compote. StartUp was removed. It was replaced by the Plagron Coco a+b and Fish Force base.

Likes
1
Share

@Cannarich
Follow
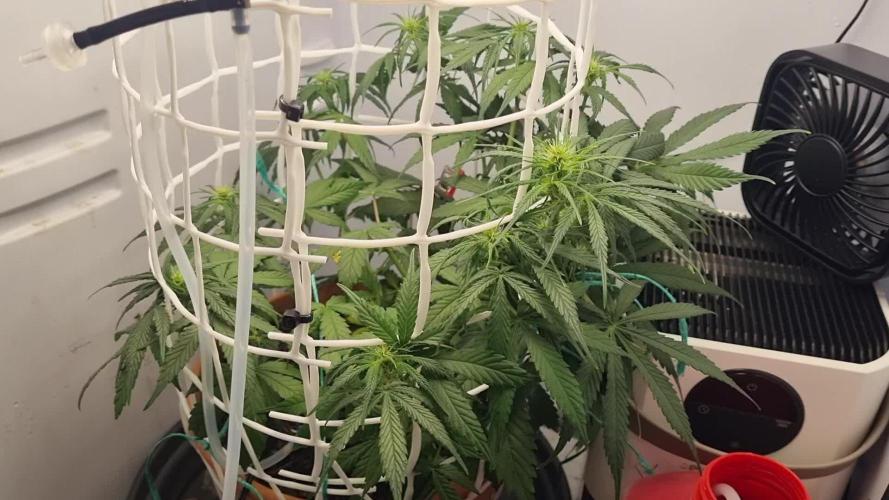
Growth spurt slowed. Starting to fill. Less worried about it getting out of control now. I should have used a more conventional training and topped it. The one advantage I'll have, because it's never been topped, is the shortest time to harvest the way I have done it. Accidental HST on one branch yesterday, so it'll be interesting to see what that brance does now.


Likes
3
Share


@I_Identify_As_A_Dan
Follow
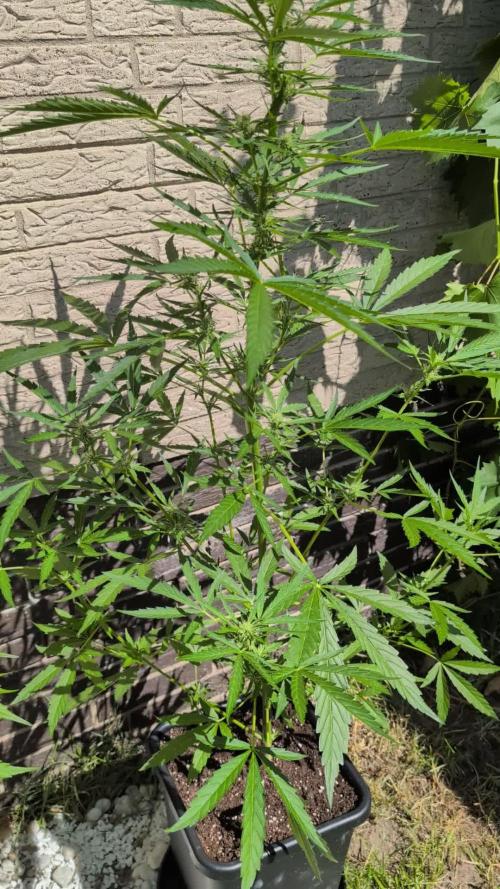
Week 7 for Fuel D.OG by seedsman
One of my favourites of this season... so much so I've decided to flower her indoors instead of putting her outdoors as planned. She will probably get 2/3 more weeks of veg before going into flower anyway.
Shes being fed a heavy watering every 2 days. She's also got 26 tops ATM, don't think ill be topping again unless i have space to do so. Will still be pulling her apart more just letting these tops grow up a little & when i transplant her to 25L ill pull her sideways.
Have a new LED light coming in this week to handle the temps of the summer better. No more yellowish looking photos 😂

Likes
69
Share


@nonick123
Follow
Día 44 (15/07) Wow! No hay shock de trasplante! 😍💥😁
Todas las ramas se han estirado hacia arriba tras el ajuste de LST y se están formando nuevos nodos rápidamente
Esta combinación de nutrientes de Lurpe + substrato de PRO-MIX HP es una maravilla 😍
Día 45 (16/07) Ayer tuvimos ola de calor (37 ºC) y han aguantado muy bien!
A última hora de la tarde (cuando ya no había sol directo) les apliqué H2O en spray foliarmente para refrescar los estomas
Hoy parece que vuelven las temperaturas estándar para esta época del año: 29 - 30 ºC en las horas centrales del día
Riego con 1 litro de H20 pH 6,5
Día 46 (17/07) Pequeños ajustes de LST
Hay algunas ramas inferiores que no se han formado / estirado mucho
Lo más probable es que haga una buena limpieza este domingo, 7 días después del trasplante, para dejar solo los brotes por encima del 4º nudo
Día 47 (18/07) Riego con 0,5 litro de H20 pH 6,5
Este domingo (día 50) haré limpieza de partes bajas y tal vez también de nuevo topping en las 4-6 ramas principales 😁
Día 48 (19/07) Día de muchísimo calor con 37 ºC. A ver como lo llevan!
Riego con 0,5 litro de H20 pH 6,5
Día 49 (20/07) Para ayudarles a llevar mejor el calor de las horas centrales del día, coloca una malla de sombreo (70%) sobre el invernadero
Lo cierto es que se nota que baja mucho la temperatura debajo de la malla! Van a estar más fresquitas! 😍
Riego con 0,5 litro de H20 pH 6,5
Día 50 (21/07) Training session!
Hago limpieza del tercio inferior de la planta, de todas las ramas y nudos que no superan la línea del dosel marcada por el 4º nudo (1er topping)
También hago topping (2º) a todas las ramas principales
La idea es tener 12 ó 14 colas principales para que no se hagan muy altas
De paso saco unos cuantos clones de las ramas inferiores eliminadas 😁💥
Para superar el estrés, hago las siguientes aplicaciones y riego:
- Riego con 1 Litro de Té Vegetativo de Lurpe Solutions. Preparación: 24 horas con bomba de aire (oxigenación) con ingredientes:
Green Sunrise 8 ml/L + Insect Frass 16 ml/L + Hummus Lombriz 8 ml/L + Melaza 1 ml/L + Kelp Hidrolizado 0,25 g/L
- Aplicación foliar Kelp hidrolizado de Lurpe Solutions a 0,25 ml/l
💦Nutrients by Lurpe Solutions - www.lurpenaturalsolutions.com
🌱Substrate PRO-MIX HP BACILLUS + MYCORRHIZAE - www.pthorticulture.com/en/products/pro-mix-hp-biostimulant-plus-mycorrhizae
Processing
Likes
10
Share


@Certifyed252
Follow
GG is takin off...TG decided to join the party late on account of my ignorance 🤦♂️🤣...great healthy retard strength growth...starting nutes in a couple days, sure wish sm1 could help me with my soil PH lol

Likes
Comments
Share

