
Likes
Comments
Share


@Divs_darkroom
Follow
I can't want to vape/smoke the rest of it in a couple weeks. I have another blue toof germinating so we will run her again

Likes
4
Share

@Emiliano87
Follow
Tuve que cambiar a otra carpa más grande porque crecieron demasiado en esta semana y aún así la carpa le queda pequeña, y es de 1 metro por 1 metro

Processing
Likes
12
Share


@Tazard
Follow
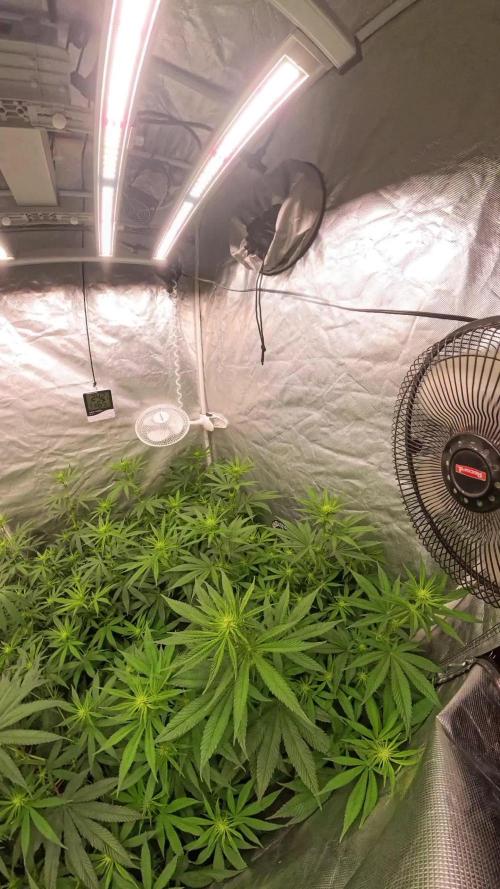
I supercropped the tall Enemy of the State branches that were in the light. As you can see In the video there was no light burn! We also have about 30” of light penetration even though I’ve not performed any defoliation! Loving these lights.

Likes
6
Share

@Michijardinero
Follow
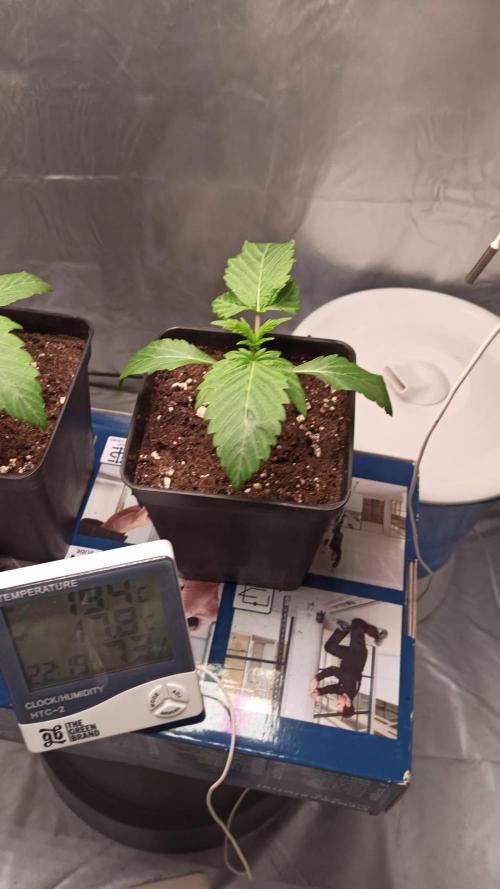
Muy buenas familia damos cimiento a la 3° semana no es por que sean mías pero estas muy lindas 🤣🤣🤣🤣🤣pues na familia contarles q después del trasplante le e regado con rootfast y en el siguiente riego sólo agua con un pH 6 con el humidificador estoy entre los 70 y 75% de humedad ahora como todavía esta un poco frío donde vivo la temperatura ronda entre 20 y 21° c y pues nada familia muy contento jeje en este iré subiendo más fotos y más videos de las hojas tallos y de todo para que lo vean mejor y me puedan ayudar con consejos y tips para mejorar en cada cultivo muchas gracias por sus visitas familia un abrazo muy fuerte nos vemos la semana que viene buenos humos paz familia


Processing
Likes
10
Share


@yaron
Follow
Week 8!After a rainy week and a half with some sunlight and alot of clouds and 20 degrees celsius the girls look like this.
For the coming week we have more sun so they are going to love it.
Cheers!
Once again to little sunlight these past few days and it is going to rain this weekend so that's a bummer.
Hopefully its getting sunnier
Cheers!


Likes
12
Share


@Luv2Grow
Follow
Overall this girl was an amazing grow. I screwed up with her early on and she looked like she was on deaths bed. The soil was too packed and I didn’t put enough perlite in the soil mix so she was re-potted twice within a couple days and once I got the soil broke up a bit, she bounced back like nothing ever happened to her. Definitely looking forward to growing this strain again.
Likes
58
Share


@PEAKYPLANTERS
Follow
happy day, weed masters!
my girls get fat and enjoy the light!
this week we are going to add a key element in the fertilization program that it is advisable to use in the second half of flowering as in this phase it develops a continuous growing need for phosphorus and potassium
Fosfor Plus is able to provide the right nutrients at the right time for optimal bud development and rapid nutrient transport ----
stay on track to stay up to date
best regards

Likes
15
Share


@Uwish
Follow
I'm spending a few days earlier than expected in bloom! The plants look ready to me.
I set my LED's to 50% which is about 800-850 PPFD
I was still bothered by the pythium and I think it will bother me on the rest of the crop, but we keep it in cage with preventive treatments, evolution to follow closely...
I stay at an EC of 1.9
Osmosis water : EC 0
Root rot X 1ml/L : EC 0.2
Sensi Bloom A and B 3ml/L : EC 1.7
TOTAL EC 1.9
The temperature of the water is ideal, 20°, thanks to the more clement outside temperatures.
I'm not going to hide, I can't wait to restart the run to start a session without pythium 😅, I'm going to finish quietly and I'm thinking about the next strain I'm going to put for the next run, I won't do any more multistrain with this too complicated system. I will possibly add air stones inside each pot to have more oxygenation.
For the strain I hesitate between :
Sour diesel Riri Cut
Pianono Rico Cut
A preference that you want to see in the next culture journal?

Processing
Likes
10
Share


Processing
Likes
12
Share


@GrowGuy97
Follow
Have seen a lot of good diary’s on these had to get some for myself to see how it goes! Hopefully we get some super purple buds! Stay tuned & happy growing friends!🤙🏼✌️🏼🌱
Day 1 - Finally got them planted & water with fox farm big bloom (6tsp per gal)
Day 2 - all 5 have sprouted & doing great!
Day 3 - 2 out of 5 seeds have fallen off but they are all still growing & looking good! Watered them a little more this morning👍🏼
Day 4 - Looking great🙏🏼
Day 5 - Grow babies Grow!!
Day 6 - Plain PH water 6.4
Likes
9
Share


@TeaTime
Follow
today with more experience. I see that I made some mistakes, about nutrients and some techniques, but as I repeat this was my second crop. it did not yield as much income as it should, but it was worth it, cultivating and learning.

Likes
88
Share


@CBD_Sweden
Follow
The growing cycle it self worked out as expected, except that the pH-level was way off from where it should be, and I found out a bit too late. Because of this the outcome of the harvest didn't say much about the potential of this strain, but as soon as I got enough time and space, she will get a new chance to shine.
2018-03-01.
This is my review / smoke report of this lovely cbd flower.
There are rock hard buds and almost no give at all, even in those smaller buds.
When you grind it the scent will appear more than just smelling on the buds.
It smells a little weak of grass, wood, bark, sweet, lemon, honey, skunk and some kind of spice.
The taste is orange, mandarin, honey, bark, popcorn and pepper.
The effect is directly, the thc feeling above the eyes and in the forehead, it fells like its a higher thc levels in this strain compered to the cbd strains i tried before.
A little light ringing in the ears and a slight dry mouth.
After 10 minutes, the cbd kicks in and and balance the thc high.
The neck and shoulders begin to relax and the feeling continues down over the back and chest down to the stomach.
A calming, relaxing, and slightly energetic feeling.
After 15-20 minutes it is down in the legs and feet, and you can feel a vibrating feeling in your muscles, joints in a pleasant way.
It reduces my tense muscles and some of the nervpain i got.
Its a good strain for releasing stress and get you in a relaxed and satisfied mood.
It is a very well-balanced strain and it fits in all sorts of contexts.
If you take this in the morning or mid day it will give you a small energy boost and get you in the mood for doing something.
I think this is a lovely strain and I highly recommend it to everyone but especially for more inexperienced people that dont like the high thc strains and want to have a good relaxant, pain controlling, anti depressant medication that also can give energy or help with getting to sleep.
This is a must try strain.


Likes
57
Share


@Kmikaz420
Follow
En voilà une de moins se n ai pas la plus grande du jardin mais c été la plus rapide !! 8 semaine demain.
Autrement je passerai remplir le journal quand la plante sera sèche avec le poids etc etc..
Voilà la gorrila x purple punch à sécher et à été mis en bocale j ai recolter un petit 40g sec (pas mal vue la forme de la plante et ces branches toutes fine )
Par contre l odeur est magnifique sa sent le chewing gum fruit des bois sur un fond de canelle , café,très sucrée vraiment une odeur forte mais très agréable (je pense donc refaire cette strain très vite mais cette fois si avec toping .lst etc histoire de gonfler les chiffre;)
Processing
Likes
16
Share


@KcKoolaidMan
Follow
Well I’m pretty excited about this being my first auto grow. These things are really doing awesome I’m pretty impressed I don’t have any experience with them but I feel like they’re all pretty big for their size all of them are really starting to stack up bud. One of the jacks seems to be a few days behind the others in the flowering process. The jacks are both a lot Bashir and flatter the bubblegum and OG a really stretching out nice I love that shape of plant.
Soil pH and everything keeps testing good no big issue so far I think one of the plants may have had some small nutrient lockout last week but I flushed it out good.
I’ll update this week again soon or maybe not I don’t know thanks for stopping bye be safe ✌️.

Likes
13
Share


@TheMightyHermit
Follow
Unfortunate Week...
Honey cream had a couple of "budrot" spots forming due to droplets of water dripping into the flower and not drying (99%humidity nights)...
Thankfully those buds were cut down and she doesn't seem to be producing any more "budrot"..
Apart from that, the smell is amazing on her.
Power Flower is going nicely too, but seems to not have too much smell...
Likes
79
Share


@Salokin
Follow
Hello again, Growmies,
As we proudly step into week 10 with our Epic Buzz, the symbiosis of nature and technology in our garden is truly flourishing. The dedication of TrolMaster's automation system is reflected in the thriving state of Epic Buzz #1, #2, and #3, which are burgeoning with vitality and promise.
Epic Buzz #1 is a spectacle, adorned with clusters of dense flowers that are bursting with trichomes—each bud a sparkling testament to the perfect environment we've provided. The light frosting is spreading across the foliage, foretelling the potent harvest that awaits us.
In our controlled ecosystem, the average Vapor Pressure Deficit (VPD) has been right on target, ensuring optimal transpiration without stressing our beloved plants. This careful balance optimizes their uptake of water and nutrients, fostering the luscious flowering we're observing.
Siblings #2 and #3 are not to be outdone, with their own dense, sticky flowers reaching for the heavens, eagerly soaking in every ounce of light. Their robust health and vigour are clear indicators of the success of our environmental stewardship.
Our environmental graph this week is a testament to our commitment to stability. The temperatures and humidity have held within the ideal range, if we discount the outliers, maintaining a conducive atmosphere for the Epic Buzz family's development.
The steadfast nature of the EC and pH of our nutrient solution has played a pivotal role in this week's triumph. This unwavering supply of nutrition has been crucial, providing our Epic Buzz plants with the sustenance they need to thrive.
As we look to the coming weeks, it's with a sense of eager anticipation. The Epic Buzz trio, with their hedgehog-like buds and early frost, are not just plants but representations of cultivation mastery. They are a living tribute to the precision of our environment, lovingly controlled and monitored for their benefit.
And so, as we anticipate the final stretch of this grow cycle, we remain captivated by the daily progress and the nearing harvest. With each day, we're reminded of the beauty and strength found in diversity and balance.
Stay lifted,
Salokin
Likes
12
Share


@2Stones1Bird
Follow
Checkout my Instagram @smallbudz to see the Small budget grow setup for indoor use, low watt, low heat, low noise, step by step.
25/10/2019 - First feed I gave her 0.25ml on 250ml of water of Biobizz-Grow, with 6.5ph.
26/10/2019 - Leafs looking a bit crooked, and some pale spot lets hope its not fungus. (gave her 100ml of just PH 6.5 water)
27/10/2019 - Feeding day, gave her 250ml water with 0.25ml Biobizz Grow, 6.4PH (changed feeding to once every 2 days with a plain water interval)
28/10/2019 - Started LST
30/10/2019 - Feeding day, gave her 250ml water with 0.25ml of each Biobizz - Grow,Bloom and Max, 6.3PH, added carbon filter and it raised the temps to 29c
31/10/2019 - A tad too much of nuts, little burn tip. (Sensi Seeds warned me but I still goofed it)
