
Likes
Comments
Share


Likes
6
Share


@Silverback_Guerilla
Follow
THURSDAY 7/18:
I FIM'd her today. She's growing quickly now.. but looking at her, I'm still not so sure it wasn't really a spinach seed😂
But seriously, I'm thinking that I used too much Mycotrex or Great White while she was still too young or something. Her roots were looking awesome when I transplanted her, but she's got some weird-looking foliage..
FRIDAY:
Inspected for pests and repositioned her in a spot that gets another half hour of sunlight per day. I sprayed the area with Ortho again and bought a little air bubbler to aerate water for compost tea.2
SATURDAY:
She put on a couple of inches since Thursday. I mixed up a fairly weak batch of Big Bloom and Grow Big plus some Kelp Me Kelp You and douched her with about a half-gallon right as the sun was coming up. I also prepared a foliar feed using Big Bloom and Kelp Me Kelp You and sprayed her well as the sun came up, and again after it was going down. I also started aerating 4 gallons of water today...will add the compost tea tomorrow morning and let it cook for 24 hours.
SUNDAY:
I foliar fed her and sprinkled little more Silicium Flash on top of the soil of all my plants and mixed about 4 grams of Bactrex into a jug with 3/4 gallon of bottled water and douched all my plants with about 2 pints each. That should really get the beneficial bacteria and fungus kicked into overdrive.
I started brewing a 4 gallon batch of compost tea today. Since I don't have any Orgatrex, I am using a little Big Bloom, Kelp Me Kelp You, and Grow Big in the tea in addition to the PK Compost Booster tea from Bi Tabs. I'll add Mycotrex to it about 2 hours before it finishes and thoroughly dowse them all tomorrow morning.
MONDAY:
She got about a a liter and a half of freshly brewed compost tea and a foliar feeding right after the sun came up. She's a happy camper.👍

Processing
Likes
20
Share


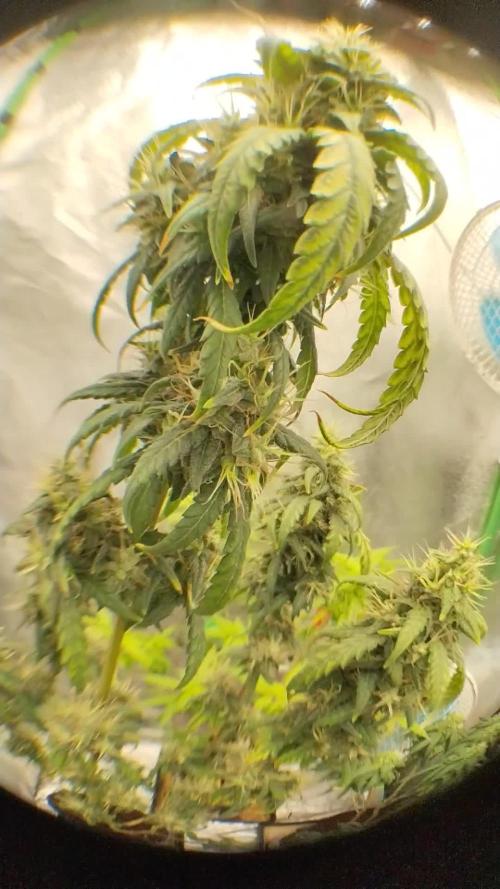
@Cannibalgardens
Follow
She has been growing fine a little bit on the slower side but the container is small and I burned her in the beginning. The genetics are strong and she is pulling out all the stops .The growth and side shoots are starting can't wait to see how she does by week three I've got high hopes ...Cheers canna family ..


Likes
29
Share


@Smokwiri
Follow
Welcome to week 4 of my Runtz gum diary by Original sensible seeds.
Growth of the side branches had started, planning to top it in the coming week. Plant is doing fine on organic nutes...
Viparspectra discount:
Amazon: http://url-9.cn/0y9i
Amazon US: https://amzn.to/3e0P2bk
Amazon CA: https://amzn.to/3bTnEJC
Amazon discount Code:
it10smokwiri XS1000 10%
XSsmokwiri XS1500 8%
it20smokwiri XS2000 5%
it40smokwiri XS4000 5%
ViparSpectra 8% DISCOUNT CODE on the viparspectra websites (.com/.eu)
RUFFSELEKTAH

Likes
223
Share


@Tropicannibis_Todd
Follow
💩Holy Crap We Are Back At It And Loving It💩
Growmies we are at DAY 42 and she's just killing💀it👌
The Gorilla Punch Is Amazing 👏
👉We are in full flowering mode for the stretch 👈 OG 👍 GP 👍 the AF was the hold out but shes finally went into Preflower 👈
So Shit , I gave them just a tad to much nutes at the start feeding 👈 But I have since fixed it
So I'm still doing some low stress training 🙃 and some defolation 😳
Lights being readjusted and chart updated .........👍rain water to be used entire growth👈
👉I used NutriNPK for nutrients for my grows and welcome anyone to give them a try .👈
👉 www.nutrinpk.com 👈
NutriNPK Cal MAG 14-0-14
NutriNPK Grow 28-14-14
NutriNPK Bloom 8-20-30
NutriNPK Bloom Booster 0-52-34
I GOT MULTIPLE DIARIES ON THE GO 😱 please check them out 😎
👉THANKS FOR TAKING THE TIME TO GO OVER MY DIARIES 👈
Likes
7
Share


@MrRaid
Follow
She had a simple life little lst but thats about it she looked small as a plant but ended up being my highest yeild plant over 100 grams dry flower had couple problems with me feeding to much but sorted out just fine overall its a nice plant to grow very quickly and easy just don't get carried away with food my experience less additives the better grow simple with autos from fastbuds especially 2 or 3 additives is plenty or your gonna run the risk of buring them 😤 grow for this plant was 10/10 hardly any effort needed 70 quick days
Likes
4
Share

@Antarctic
Follow
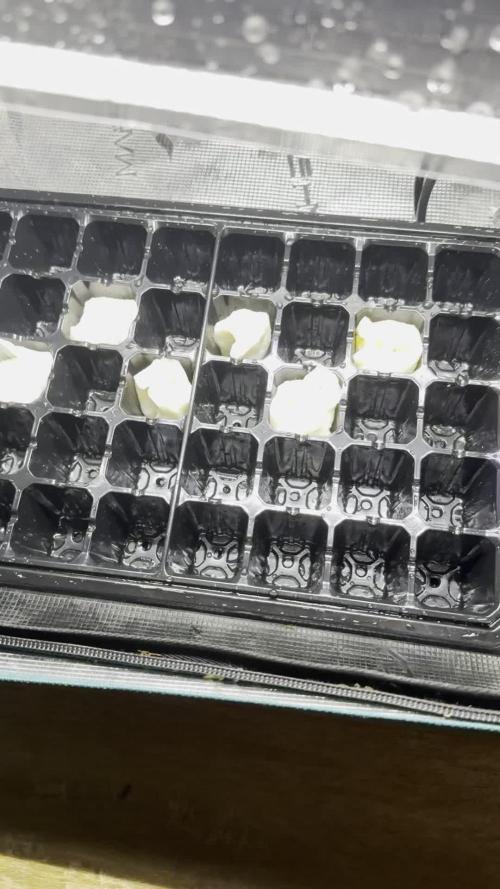
🇺🇦 Укр: Пророщував у серветках, але надто перезволожив. Деякі насінини буквально втопилися. Це був перший урок — не заливати вату/папір занадто сильно.
🇬🇧 Eng: Germinated in paper towels but overwatered them significantly. Some seeds drowned. First lesson learned: avoid excess water during the popping stage.

Likes
54
Share


@Roberts
Follow
Gorilla Cookies is 13 days into flowering times. She started showing her fisrts pistils. There is 1 top that's has me worried. I am likely paranoid from my battle with HPLVD. She is due soon for a lollipop of the plant, and a good defoliation. Likely next update I will do a heavy training. She is growing great under the Spider Farmer G3000 light. Thank you Spider Farmer, and Pure Instinto Seeds. 🤜🏻🤛🏻🌱🌱🌱
Thank you grow diaries community for the 👇likes👇, follows, comments, and subscriptions on my YouTube channel👇. ❄️🌱🍻
Happy Growing 🌱🌱🌱
https://youtube.com/channel/UCAhN7yRzWLpcaRHhMIQ7X4g
Spider Farmer G300w: https://amzn.to/3S2zvsd
Spider Farmer 10X20 Heat Mat Kit - https://amz.fun/lsa0J
Spider Farmer Amazon Store: https://www.amazon.com/spiderfarmer
Spider Farmer Official Site: https://spider-farmer.com
Discount code: saveurcash (stackable)


Likes
34
Share


@yomi23
Follow
Many colas and hard buds here! Hope to get good results, even if i got some deficiencies. One of the three had some issues and didnt flower properly, the buds are airy and there is little resin production, while the other 2 have frosty and well stacked buds. I think they will need an extra couple week to finish off. As soon as i see 100% milky trichomes with 10/20% amber i will cut them down. Gonna keep u up to date

Likes
14
Share


@Rangaku
Follow
Mad max is madness in a bud , beautiful looking phat and sticky and the sneaky bud I smoked was the fuel . Another week or two maybe and I’ll be in the thunder dome 😂

Likes
49
Share


@masterofsmeagol
Follow
IVE MADE MORE VIDEOS BUT THEY JUST DON'T SEEM TO UPLOAD AND IT'S FAR TO SLOW TO DO IT FROM HOME
6/27 Made last week a five day week to get back on track. It's still overcast and rainy. It's not raining a lot bit it's consistent. Despite the weather the plants are doing phenomenal. I'll update later. It's 1pm. It's been raining consistently since 11. Just a sprinkle but it's steady. I'm going to begun uploading the weeks weather on my diary. I may start a new diary for the plants I light depped as they are flowering pretty good. Rain stopped and it's just overcast for now. I looked at some videos and did a comparison of videos one week ago and videos today and HOLY SHIT! WHAT A DIFFERENCE. Especially the light depped 10th planet. Well everything but that was the most significant difference. I'm astonished at the health and growth despite the crummy weather. Continued to rain. Just got harder. Plants are taking it but it's flooding underneath the pallets a little but it will be fine. The light dep however has me concerned. The 10th planet is looking spectacular. The bigger purple punch I'd looking good too. The smaller one though looks to have a pollen sack coming off one of the branches. Considering its not on the otherside I assume it's not just a swollen calyx. I don't mind chucking it especially if that means I don't hurt my other girls so I want to make sure. I sent videos to a few other growers and I'll add a question on here. Those three plants have been isolated from the rest for a few days due to rain. I have the suspect isolated alone until I can confirm. It sucks cause the light Depp was going good and the6ve all got little flowers.
6/28 Well that fucking sucks. ALL THREE plants I tried to light depp hermed on me. I could see male flowers. Luckily I had been keeping a really good eye on them and it was preflowers mostly. At least I caught it. One or two stamines on each plant. Would've been really easy to miss. Only one had STARTED to elongate into a stem so I think I caught it early enough. Plus since all this rain they've been kept in a different location then my big girls. Glad I did that now. Boy the roots looked good on those plants. I just grabbed the stalk and lifted and it came right out of the pot. I held it there admiring it for a minute. This sucks. At least the real plants are doing good. As far as I know. No male preflowers that's for sure. I've got some feedback from other growers and the videos are a little blurry but I had found a light leak and I'm certain these plants hermed. I know I could've tried to save them but I didn't want to risk it. I compared what I was seeing with Google photos and other websites. Aside from the larger ball with its stem, there were also several little bumps besides developed calyxes that were weaving into little buds. Trust me that I wouldn't cut down my plants if I wasn't 110% sure. I might've been able to "save them" but to me it's just not worth the risk.
6/29 I was second guessing myself pretty hard last night due to some responses I got on my light dep and messages I got from other growets. Made my anxiety horrible but I looked on several video's I'd taken again and I know what I saw. I felt better after that. This was after I researched and waited THREE days until I saw the ball on the stem and the groupings of small nubs under a fresh yellow flower. These plants were flowering good and it sucks to lose them. One MAY have been ok but one was a runt and had all the characteristics of a true hermaphrodite. They were only in 3's and I couldn't risk my harvest for an experiment. Still sucks. Oh well. Sun is starting to come out. Plants seem to be doing fantastic. I have one spot on a leaf that looks like a pillar munched on a leaf so I'll probably get the bt out soon as I have a dry day that I can apply it. I'll have to check the weather. I need to start a nute regiment but the plants aren't telling me they need anything yet.
6/30 I fucked up dates or dodnt do it yesterday or it didnt save right so I'm leaving this blank today is the 1st.
7/1 I have still only watered s couple times and I haven't had to feed. This week I'm going to start nutes. I had some external ersonal situations that have kept me from my plants. I'm hoping to get back on track. I noticed some pillar damage so I'll need to dig out the BT. This morning I saw this giant ground hog by my cage. Hated too but had to get rid of him. Of course some of the blowback landed on the leaves of one of my plants. I tried to clean it as best I could. Better than that fat bastard eating everything in one night. I broke a branch either falling around it or bulling through when I was pissed or I LST it the wrong way and the wind broke it against the tomato cage. Nice big branch too on top. I tried to fix it with duct tape but we'll see. The plants need me to spend sometime with them. I need to clean them up. Apply bt and give them their first feeding. I'll update as I go. They don't seem nutrient deficient by any means but I don't think it would hurt to start the nutes.
7/2 Bags were lighter today and if it wasn't going to rain tonight and tomorrow I'd he watering. Plants look great so soil isn't depleted yet I guess. They're growing rather rapidly. The branch I broke didnt make it. Had an idea it wouldn't but I had to try. I waited on the BT on account of the rain. I may go back over and change my mind and water with silica or a mild nute solution or maybe apply the BT. Depends what time I get back. I have some work I need to do over there. There's a few that I need to clean up the bottoms on. Pest damage is minor and limited to one or two plants and a leaf or two only.
7/3 More rain. It was supposed to rain this morning too but it didn't. We got .33in yesterday and through last night so I thought that was ok. Looking back on my previous diaries I'm doing things significantly different than before. I had used a lot more nutes earlier on. This morning I mixed two gallons of 2tsp of big bloom and fed it to the 9 plants in smart pots leaving the container plants as they have much more water in them. Looking back at other diaries I previously had, WPM and septoria by this time not to mention a shit ton of other pests I was fighting by this time. Since I poisoned where the cagexwas multiple times and sprayed the cage before it was moved I luckily don't have that problem yet knock on wood. I'm planning to apply BT tonight to deal with the moth larvae if there are any. I'm looking at plants around this area and im seeimg SOME septoria and pm on raspberry bushes and burdock so it is around. I made sure my cage is not by any other vegetation this year and is sitting on asphalt with the bags on raised pallets. Good thing I did or I guarantee they'd be flooded by now. I've been seeing multiple complaints from maine growers online (AND THEY HAVE HEALTHY PLANTS!) saying this is the worst year ever. Maybe they need a dose of fusarium oxysporum to keep them humble. This is maine. If you don't like the weather just wait five minutes. Meanwhile I'll be doing my sun dance hoping for sun. "Hard to grow cannabis with no sunlight" said another grower on my forum.


Likes
46
Share


@SirSmokeALot333
Follow
Week 6
Day 36
Ladys doing good just trainwreck showing some signs of stress, maybe the soil is to hot. She got twisted leaves on the top. Light is back at 100% again cause the other lady's are healthy, I thought it was Lightstress but now, I think it's a root problem or a pH. I am watering with just pH water since last week. They should got enough nutes till harvest.
Right now I can't do anything, and this is boring 😅. Can't wait to test this Bluedream 😍 my favorite strain.
But also the Cinderella Jack from Dutch Passion, she is extremely bushy but the smallest right now. She's started flowering since 3 days, I hope she gonna stretch and get big
Day 38
Trainwreck is a monster she's so huge, but got that stress with the twisted leaves on the top.
All lady's showing a little sign of mute burns but it's OK. This should be gone in 2 weeks when the buds starten to fat up.
Day 42
Dimmed the light at 60% again and raised her 20 cm up
All lady's showed signs of lightburn or the soil is really to hot. But trainwreck recovered a little bit.
Stretching is over just Cinderella starting now she's a late bloomer but she gonna be huge, her mainstem is the thickest.
Day 45
Ladys fatten up the buds now next.
Cinderella stretched so much in the last 3 Days, I think she gonna be the biggest. Unfortunately I haven't enough place for her to get the most potential out of her.
Likes
5
Share


@0xcrlt
Follow
- June 25 - Day 16 - Today she will be topped. Watered with 800 ml of water and about 1.5 ml of Bio-Grow.
-
Likes
13
Share


@FlavoursUk
Follow
Welcome back,
Day 23, everything is on track, and I'm able to leave the system to run, although I still check on the girls 2 times a day and foliar feed Remo cal-mag.
pH sweet spot seems to be around 5.8/5.9 upto about 6.3. EC has been gradually dropping which let's me know the plants are uptaking the nutrients.
Roots are now getting very established hence the faster growth. I am due a RO water change in the next day or so.
Plant training - I plant to do some LST and Topping soon. Withing the next week for sure. Stay tuned until then!
Day 28 - Things are looking good, some decent growth the past few days. Everything is luscious green and looking healthy. Occasionally foliar feeding cal-mag as I use RO water.
Taken off 2 fan leaves off each plant as they were pretty big blocking light. The rest I've just leaf tucked. Trying to open up the lower shoots without causing too much stress to the girls. The LST and topping will start properly soon. Let the fun begin

Likes
31
Share


@Slimm
Follow
Stretch is well under way, growing really fast now. Not much to report just tying branches down, all going well... onto the next week 🙂
Likes
17
Share


@Hashy
Follow
Week 9
Light cycle=12/12
Light Power=170w
Extractor controller settings
High temp=24c
Low temp= c
Temp step=0c
High Rh= 50%
Low Rh= %
Rh step=0%
Speed max=10
Speed min=1
Smart controller settings (during lights on).
Lights on=10.01-21.59
Radiator on= below 22.0c
Radiator off= above 23.0c
Smart controller settings (during lights off).
Lights off=22.00-10.00
Radiator on= below 18c
Radiator off= above 19c
Fri 16/2/24
💧💧💧💧💧💧💧💧💧💧💧💧💧💧💧💧
Method= automatic
Feed=bloom nutes.
Neutralise=0.1ml/L
Silicon=1.0ml/L
Calmag=0.75ml/L
Terra Bloom=4.0ml/L
Sumo Boost=2.0ml/L
Roots=0.2ml/L
Easy Ph down=0.11ml/L
Ec=1.85 PH=6.4/6.6
Time start=12.00pm
Finish time=13.45pm
(11×5 minute runs with 5 minute gaps)
Total flow rate=190ml/min
Flow rate per plant=47ml/min.
Total volume made=13L(13.5L)
Total volume left=3L
Total volume used=10.5L
Volume per plant=2.6L (Est)
Runoff.
Total runoff=1.2L
Ec=2.13 PH=6.1/6.3
💧💧💧💧💧💧💧💧💧💧💧💧💧💧💧💧
#1 (Day 57)(Day 19 flower)
📋 she is starting to show signs of light stress. Lowered light power from 180w to 170w. New DLi=65.0
Sat 17/2/24
#1 (Day 58)(Day 20 flower)
📋 H=96cm D=17cm DLI=67.8
Sun 18/2/24
#1 (Day 59)(Day 21 flower)
📋 Lowered light power again as they are showing a bit of stress from the light. Power was 170w now 160w. I'm going to have to have a think about my next grow, either I stick with this tent and hit the plants hard with light when I flip to flower to keep them small, or try and cram a slightly bigger tent in the space allocated for it. This tent is 61×76×150cm with the option to extend it to 173cm. Mine is configured to the 150cm height, but because its extendable the top 30cm is inaccessible at the best of times let alone when the plants reach a decent height. Extending this tent will be pointless because that's another 23cm of inaccessible space. Besides I only have a max head room for 160cm where the tent is.
Mon 19/2/24
#1 (Day 60)(Day 22 flower)
📋 H=96cm D=17cm DLI=67.8
HST
Tue 20/2/24
💧💧💧💧💧💧💧💧💧💧💧💧💧💧💧💧
Method= automatic
Feed=water
Neutralise=0.1ml/L
Easy Ph down=0.01ml/L
Ec=0.2 PH=6.2/6.2
Time start=12.00pm
Finish time=13.45pm
(11×5 minute runs with 5 minute gaps)
Total flow rate=190ml/min
Flow rate per plant=47ml/min.
Total volume made=13L
Total volume left=2.4L
Total volume used=10.6L
Volume per plant=2.6L (Est)
Runoff.
Total runoff=1.25L
Ec=1.33 PH=6.4/6.4
💧💧💧💧💧💧💧💧💧💧💧💧💧💧💧💧
#1 (Day 61)(Day 23 flower)
📋
Wed 21/2/24
#1 (Day 62)(Day 24 flower)
📋
Thur 22/2/24
From today I'll have to pull out the front 2 plants to get any pictures of the back 2.
#1 (Day 63)(Day 25 flower)
📋 H=97cm D=15cm DLI=67.8
Lowered runoff rack. Pots may be sat in runoff slightly.
Lowered light power from 160w to 150w.
H=97cm D=18cm DLI=60.0
She is developing quite quickly, because of the short distance between the light and the tops I'm seeing a bit of light stress, I'm going to keep my eye on that and push it as much as possible.
Back soon.
Take it easy.
Likes
14
Share


@ConspiracyFly
Follow
Gorilla Glue #4
Week 15
3 week of blooming
It looks like you stopped growing and started getting fat...get fat my pretty
Two Amnesia Autoflower
Week 3
The same soil the same fertilizer the same light ventilation etc.
Two seeds germinated with a difference of 3 days ...
One has 15 centimeters and the other has 7 centimeters
We will see who will succeed


Likes
2
Share


@velouria
Follow
Week 6! This is a seed from this mix (https://www.dutch-headshop.eu/auto-rainbow-mix-private-label-5-cannabis-seeds), and I started the others about two and a half weeks before this one. I can see the others started flowering this week, but this one seems content to keep vegging out. The others had smaller pots and shared resources, so this makes sense.
It's going to be very hot and bright here this week, which is terrible for me, but lovely for the weedlings.
The shape is like a lovely squatty Christmas tree. I'd grow it again so it'd be at this stage for the holidays, but we'll be back to sunup at 10AM and sundown at 4PM by then :/


