
Likes
Comments
Share


@Unkraut
Follow
Only ph'ed water this week
I have to add a few days till harvest...many plants still produce alot of bud...


Likes
3
Share


@BossDean81
Follow
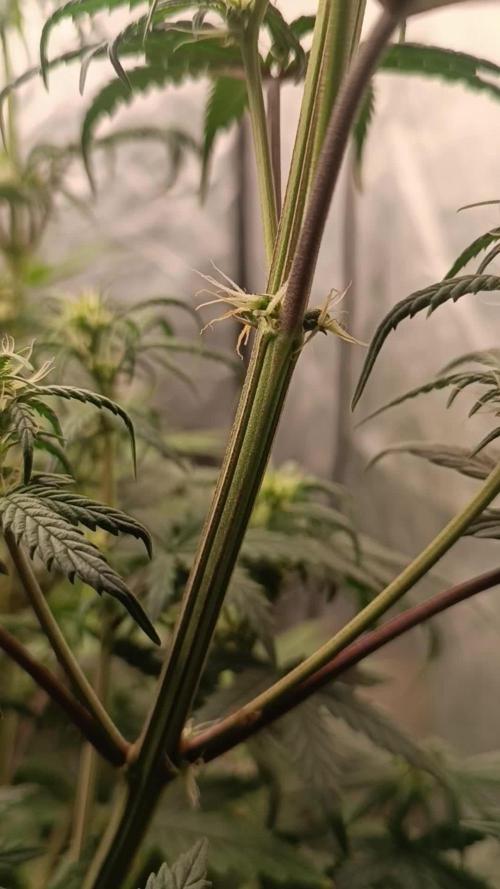
Day 22- She stopped putting on height due to one night of a dramatic temperature drop. It's a cooler fall this year plus a freeze came through the night before. That night, I was up doing some studying when I noticed the reading on the remote display. N o telling how long it had been in the very low 60's. The problem was fixed simply by adding a heater to the room. Now, the temp is only in the 68 degree range for the final 2 1/2 hrs. before the lights are cut back on.
Day 26- Her bud branches hav grown at least 2 -5 innches in length and have at least 2-4 bud sites already. Instead of Defoliation, I decided to actual two different types of LST. The first is simply bending to fan leaf branches under to expose the bud branches to more light. The main benefit is that you still keep the ability to absorb more of the light energy with them. I look at the fan leaves as your plant's " Personal Sun Panels". Since they store energy in the day and use that reserve to grow at night, why would you take something away for her that is meant to help her? Also, the second method I used is something I like to call" wind thickening". The technique is using wind resistance to train your plant's stem and branches to become more rigid by growing thicker to stablize itself. So, instead of a gentle breeze, I use a three speed box fan at varies distance. I started doing this on Day 22 and the results are definitely showing. The main stem went from 1/16 in. to a nice 3/8 in.
Processing
Likes
12
Share


@Silverback_Guerilla
Follow
7/6:
Heavy thunderstorms last night and half the day today, so they won't be ready to eat again for a few days. I went out to the site about an hour after it quit raining today and saw HUNDREDS of tiny little green grasshoppers feasting on my girls!!! I immediately sprayed them all down with pyrethrins, and did it again right before dark.
I've got the fan blowing across the pots to try to dry them out faster.
I started using TPS One (one part nute solution) the other day, and the plants seem to love it. Really growing well, but I'm glad I amended their soil with some happy frog fruit and flower granular fertilizer this time. They get fed whether it's too wet or not.
7/7:
Sprayed for grasshoppers again this morning...hungry little fuckers...👺
It was a very cloudy day...but these girls are also just a couple of feet beneath 470w of 3000k LED's all day/every day, so it's always sunny.😎

Likes
7
Share


@GYOweed
Follow
It grew a bit in the 3 weeks from last pics. I'm sure indoor growers with 18hr+ light can do better.
She could care less about 2 weeks of around 110f weather.
I hope one is a female. Stem rub is oily and pungent already.
Did a good trim job too.
Likes
3
Share


@Selfsupply420
Follow
Amazing strain, very easy to grow and hope to do do more Royal gorilla auto in the future and see what else RQS have to offer. Absolutely solid buds and potent asf. Taste is 9/10. thc I would say 20%+. I also used terpinator in weeks 7 and 8 at a rate of 4ml/l which I didn't list in my diary. I'm sure this contributed to the density of the buds. I will use terpinator alongside advanced nutritions range for all future plants.


Processing
Likes
26
Share


@DoomedSoulz
Follow
whit pre flowerinnng i use bloom stimulator, B.A.C and delta 9 alternates and delta 9 foliar, 3 times inn 1 month

Likes
17
Share


@Hawkbo
Follow
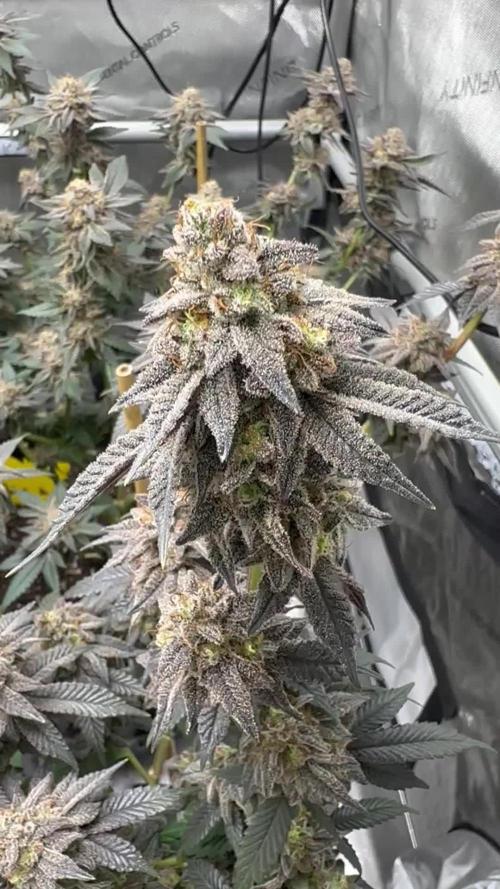
Gave it some water yesterday with some herculean harvest, clean fruits, terpinator and grozyme and kinda flushed it out just to try and prevent build up. It's starting to fatten up a little bit now. All the purples are Putang crosses or mandarin cookies R1V2 #2.


Likes
5
Share

@MrGrOH1008
Follow
Just water to bring em home!
Day 59: should be their last watering, then let em dry out before harvest


Likes
24
Share


@Samsemilla
Follow
Die vierte Woche der Blüte hat begonnen.
Der Platz im Zelt ist mehr als ausgeschöpft und die Pflanzen küssen fast die Lampe.
Ich denke der Stretch ist vorbei, ich hoffe es zumindest. 🙏🏻
Diese Woche startet mit etwas Bio PK 5-8 von Biotabs.
Die Blüten und die anliegenden Blätter fangen an zu glitzern. 💎
Ich habe dem Wassertank meines Autopot Systems einen Luftstein hinzugefügt.
Wird das einen großen Effekt bringen? - keine Ahnung.
Kann es schaden? - ich denke nicht.
Likes
31
Share


@LockDownGrow
Follow
Everything has gone really well up till now ,
She is start too show the beginning of pre flower , I wasn't expecting that for a couple of weeks so not sure if this is normal ? But she is growing fast and strong ,
I picked of a few select large leaves that where coving the side branches , but very minimal , mabey one or two leaves of each plant , and also pulled down the branches too help with light getting down into the center of the girl ,


Likes
12
Share


@UK420hydrogrow
Follow
Ok so had a bit of a bad week ph was way out causing problems at 6.4 so had to flush and get ph back to 5.8 also had big problems with high humidity like 80 90 % even when lights are off so I've decided I've upgraded to a 2.0 x 2.4 x 1.2 so hoping the more space and also upgrading to the black orchid 6 inch fan n filter along with the 4 inch fan and carbon filters plus clip on fans but big things to come I've also purchased a 4 pot auto pot system for the next grow so keep eye out guys

Likes
11
Share


@emeraldlabs
Follow
Progressing nicely. Topped on day 30. LST to shape her for flower tent. Plan to be pretty aggressive with the LST, first time I’ve bent the main stem.
Video/photos taken 35 days after breaking soil.

Likes
31
Share

@LockDownGrow
Follow
this lady has stayed very short but bushy , she is drinking the least out of the rest and bud production has been minimal so far , i gave her a light / last defoliation this week and she has already recovered , purely too open her up too the available light ,
i really do hope she very soon steps up a gear with bud production otherwise i dont think there will be very much on the scales at the end ,
again have had absolutely no issues with this plant at any stage and she certainly has had more than enough light on her too produce , so lets watch this space and see what she can do ,
Likes
11
Share


@Cannibalgardens
Follow
Man another great strain from Divine seeds . The germinating was fast and they were into the soil in no time , within a few weeks I had a great looking female plant . She was topped and trained well giving me 4 solid main branches . The bud development was fast and by the end they were very dense and sticky . I was doing organics for the first 2 months and then synthetic just to go and finish it on the brand Dutch science "bloom" . I was so impressed with the smells and growth that I went and popped another strain at home .. The consistent results made me want to try a other one and so I did . I'm hooked now ..

Likes
3
Share


@King_Kush86
Follow
I will be running this again and literally anything from In House Genetics.

Processing
Likes
6
Share


@Jack_Greenstalk
Follow
3 Plants. 3 citrusy phenos!
#1 : First to sprout rapid rooter. TASTE: Pure Lemon front end into hashy cakey afghani. refer to this as the "lemon hashcake" phenom very dense, beautiful nug structure. Yielded 24.5 dry grams of primo smoke. Uplifting more cerebral sativa high with some punch in body as well. happy stress reliever for sure! has some "gassy" or fuel notes to it but very subtle
#2 Tangerine pheno: I orginally thought sour 76 was sour diesel x 76 Afghan til i read hso marks post on uk420 forums saying its cali sour d x 76 afghan. cali sour d is cali orange x sour d x mexican sativa. and it shows in this pheno which smell and taste pretty similar to tangie my friend grows which is cali orange x skunk 1 (mexican sativa x Colombian sativa x afghan indica) pretty similar genetics roots! Smell: Sweet tangerine 🍊
Taste: Just like tangerines 🍊
Medical Effects: Hybrid feeling effects felt both in body and mind. Stimulating mentally, relaxing in the body. Mild pain relief generally with amazing relief improving feeling in joints (reduced swelling or irritation in otherwise aching areas, loosened tension at joints)
Notes: After breaking up or grinding the sweet tangerine open jar/bud smells turns more sour tangerine with very subtle gas aroma. This one is scary strong! I am an all day regular smoker of the most potent buds I can find, and I never make it thru 1 bowl of this without long breaks after each hit. Starts off strong and creeps to EXTREME psychoactivity. Not for the faint of heart this one might not be best for "new smokers" 😎🔥🔥🔥 yielded 26.1 grams if id have taken clones this woulda been the keeper of the batch, but I got more to check out in future run :) and I got a cloner and veg chamber to start keepin the keepers now I know i like the strain!
#3 Lime Fuel pheno: Smell: Lime🍈 and gas ⛽
Taste: lime
Medical Effects: Cerebral uplift. Creeper. thought it was weakest on initial smoke but 10 minutes in it end up being strongest high of all 3. super wicked sativa, buzzy uplifting all similar to Cinderella 99 or strong jack herers this has almost a "scary high" first few times but once you get used to it or microdose, it is a super fun creative medicine. Helps my arthritis pains and gives me the clean up the house kind of high
Notes: Foxtailed, lowest yield of 3 sour 76's likely because its place directly under the light (perhaps didnt like too intense direct light) but is the most potent of the 3 as well. yielded 22.5 grams of dry
Likes
5
Share


@mobbly
Follow
"Hi, I received my pH meter this week, so from week 6 onwards, I'm aiming for a pH value of 6.0 - 6.5. This week, I noticed that the plant in the small pot received too much fertilizer. The other two 7.5-liter fabric pots also received double the recommended amount according to the feeding schedule, but they don't show any signs of over-fertilization."