
Likes
Comments
Share


@KcKush
Follow
*Increased ppm from 850 to 950
*Week 3 of flowering.
*Did some defoliation will leave it as if and see how it turns out.
*Smell is weak. Just a piney smell to it.
*left one with out lolipopping.

Likes
21
Share


@Hashy
Follow
********************************************
Growdiaries Grow 22
********************************************
Welcome to my 22nd grow on growdiaries. I'm going to be stricter on this grow as i have been a bit lax on the last few and let them get out of control.
My plan is no more then 12 colas between the 2 plants. I'm going to have a shorter veg period to keep them at a reasonable height. I'm also going to try to keep them away from the sides of the tent more then I normally do.
Because I may be going away shortly I'm going to start in the final pot because sods law I'll be away when they need potting up.
I'm running 2 photoperiods again, they are both from the MSNL catalogue. Plant #1 Lemon cherry gelato will be on the left looking in the tent and #2 Zoap will be on the right.
This diary is focusing on
#1 Lemon cherry gelato
Nutrients.
Ecothrive Neutralise
Shogun Katana roots
Plagron Terra grow (3-1-2)
Plagron Terra Bloom (2-2-4)
Plagron green sensation (0-9-10)
Plagron power buds (0-0-0)
Equipment on Smart plugs.
1. Light= Viparspectra Xs2000
2. Feed= water pump.
3. Extractor= Ac infinity
4. Oscillating fans= 2 on ext.
5. Cameras= 2 on ext.
6. Humidifier= ram 5L
7. Dehumidifier= 2L
8. Radiator= 1KW
Tent settings.
Light cycle=24/0
Light Power=100W (42%)
Photone app has been Calibrated, and I have done a ppfd map over a 40cm×40cm area.
Extractor controller settings
High temp= 26c
Low temp= c
Temp step=0c
High Rh= 69%
Low Rh= %
Rh step=0%
Speed max=10
Speed min=1
Smart controller settings (during lights on).
Radiator on= -20c
Radiator off= +21c
********************************************
Germination/Prepwork.
********************************************
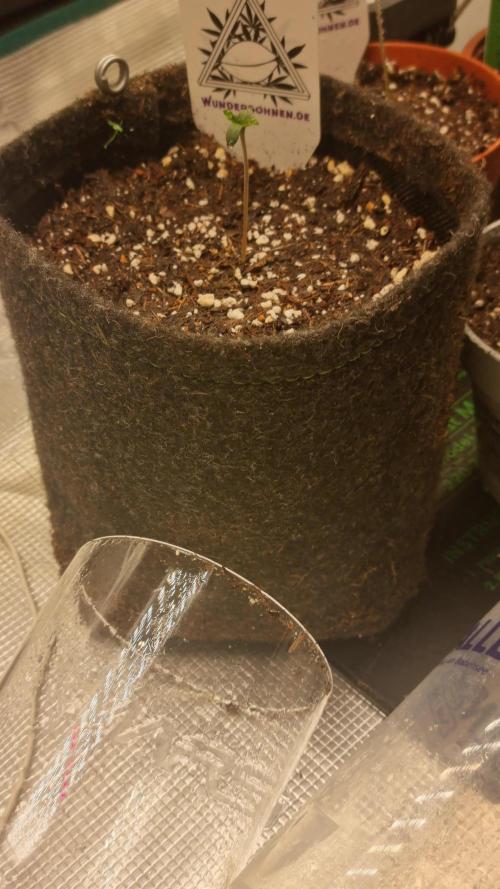
📅1/10/24 Tuesday
📋 Prepared 12L fabric pots, filled with biobizz lightmix, then gave 2L water Ec=0.25 PH=7.0/6.7. Then 1L water with katana roots @5ml/L Ec=0.3 PH=6.3/6.3
No runoff.
Placed pot into tent with no light on.
📅2/10/24 Wednesday
📋 Dropped the seed into 40ml of water with 5ml/L katana roots and 0.1ml/L neutralise at 5.00pm.
5.00pm turned light on @ 100w 80cm above the soil, Ppfd=197, 24hr DLI=17.0
10.00pm placed seed into moist paper towel.
📅3/10/24 Thursday
📋 7.30pm tap root breaking through the side of the shell so put the seed into 12L fabric pot, and placed in the tent under constant light. Can't recall ever having a tap root coming through the side before.
📅4/10/24 Friday
📋 9.00pm looks like movement.
📅5/10/24 Saturday
📋 9.00pm not broke ground properly but cotyledons are visible and looks stuck in part of the shell casing. Day 0
********************************************
Germination summery.
📋 Didn't take that long for the Lemon cherry gelato to start breaking ground, she seems to be struggling to open up at the moment and is a funny yellow colour. I'll give her a few more days and see if I need a backup seed..
Back soon.
Take it easy.
********************************************

Likes
7
Share


@OwlGang_Uk
Follow
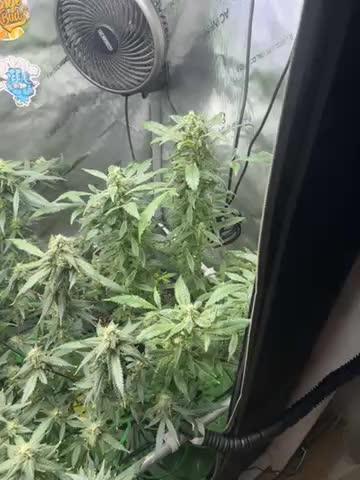
Week 12 - Mehn Oh Mehn - The Purple Is Really Starting To Come In Now I Think Last Week’s Cold Temp Situation Really Unlock The Purple Characteristics. The Scent Is Very High And The Trichomes Are Mostly Clear With A Few Cloudy Showing. I Am No Longer Using Nutrients Because I Will Start The 2 Weeks Now Because You Don’t Want The Weed Getting Over Ripe Thats When The Scent Would Start To Face. So In Two Weeks Time I Will Have Mostly Cloudy With A Few Clear Or A Few Amber With Strong Aurora At It’s Peak. Tell me What You Guys Think In The Comments.

Likes
6
Share

@GoodKarmaCannabis
Follow
27.02 - 20Uhr: Samen wurde in Wasserglas eingelegt
01.03 - 10Uhr: 2cm Wurzel, wurde in Erde gesetzt


Likes
15
Share


@Insaniac_0
Follow
Flower Week 6 Day 42 to 48 - 3/26 to 4/1
Stepped up my attention with these this week and hope I didnt let them go too far for a decent harvest. I defoliated for the last time this week and spotted more purple leaves. The buds are super dense so I have higher hopes than I did last week
Feed this week was 1.25 gallons 2 times. 700ppm total before add-ins. I used 400ppm Bloom concentrate mix (recipe week 5). Then I added 1ml/gal of CaliMagic (General Hydroponics 1-0-0) PH balance this week was 6.6
I plan to feed 1.25gal 2 times with 6.6ph and half nutes. This will also be the same for all remaining feeds before harvest. From this point Im simply watching for signs to harvest in the pistils, calyx, and trichomes
Likes
24
Share


@MadeInGermany
Follow
Hey everyone 😃
The time has come , On flowering day 69 the harvest was carried out 😍.
After spending two days in the darkroom at 62% humidity, they were now harvested cleanly by hand 😃.
After harvesting, they were laid out on the net as usual, where they can now slowly dry again for about 7-10 days at 62%.
Then they come with 62% in jars for 2-4 weeks, and then the 58% boveda packs are put in 👍.
Of course, I will come to the phenotypes themselves in detail in the last update.
Until then, I wish you all the best, stay healthy 🙏🏻 and let it grow 🍀👋
You can buy this Strain at
https://www.amsterdamgenetics.com/product/kosher-tangie-kush/
You can buy this Nutrients at
https://greenbuzzliquids.com/
Type:
Kosher Tangie Kush
☝️🏼
Genetics:
Kosher Kush
X
Tangie
👍
Vega lamp:
2 x Todogrow Led
Quantum Board 100 W
💡
Bloom Lamp :
2 x Todogrow Led
Cxb 3590 COB 3500 K 205W
💡💡☝️🏼
Soil :
Canna Coco Professional +
☝️🏼
Fertilizer:
Green Buzz Liquids :
Organic Grow Liquid
Organic Bloom Liquid
Organic more PK
More Roots
Fast Buds
Humic Acid Plus
Growzyme Big Fruits
Clean Fruits
Cal / Mag
Organic Ph - Pulver
☝️🏼🌱
Water:
Osmosis water mixed with normal water (24 hours stale that the chlorine evaporates) to 0.2 - 0.4 EC. Add Cal / Mag 2 ml per l water every 2 waterings . Ph with Organic Ph - Pulver to 5.8 .

Processing
Likes
11
Share


Likes
4
Share


@kokkin666
Follow
Nous sommes maintenant en fin de stretch début de floraison.
J’ai fais une petite erreur d’arrosage pas assez arrosé les plantes j’ai récupéré ça aujourd’hui 👍
Sinon tout vas bien premier engraissage avec terra bloom de plagron.
L’odeur est super forte mais qu’est-ce que j’aime ça 😍🙏


Likes
4
Share


@Forrbiddenterpz
Follow
Moved the rest of my autoflowers to my 4x4 tent on 3/21/23 they will be under a 12/12 light schedule until my last photo period plant finishes up


Likes
5
Share


@Aleks555
Follow
42 Fast Buds – Test FBA 2506 | Day 72
The result exceeded all expectations!
The main cola of this beauty reached 27 cm in height and nearly 25 cm in circumference!
Dense, resinous buds completely covered in trichomes. The plant structure is compact but productive — the side colas are not far behind the top.
Grow details:
• Nutrients: Xpert Nutrients
• Light: Mars Hydro FC-3000 EVO
• Pot size: 11 L
• CO₂: used during veg and for 4 weeks of flowering
• Stage: 72 days, with ~15% amber trichomes
• Aroma: very strong and pungent, reminiscent of chemicals — sharp and powerful
Strain: Test FBA 2506 (Fast Buds)
Type: Autoflowering (exact genetics still unknown)
Harvest and trichome check coming soon!
Likes
19
Share


@ArtisticGrown
Follow
Today is week nine 60 days flower. This is super exciting! I have been trying not to stress cause even tho the bottled nutrients give you the feeding schedules your plant reacts to said nutrients one ways or another. I am excitied beacuse I am learning about mychrozia, beneficial bactiera how they coenside with each other and can replace fertilizer etc but thats a whole worm whole haha
I have been giving this plant, flawless finish, and bud candy these last few days.
How ever now I am giving her just water. Ph irrated always!
MUch love lets root her on too the finish!
Few More weeks LETS GO GUAVA she is smelling so so so fruity berries melons and sweet lets go
Processing
Likes
5
Share


@AgroCultiveta
Follow
Holaa, empezaremos este seguimiento desde la 4ªsemana. (ya que lo comencé y no fotografíe desde el principio, servirá para aprender)
Son dos esquejes que me regalaron los cuales no estaban identificados.
Estamos en invierno en mi país por lo que tengo problemas con la temperatura, ahora cambie mi iluminación led y está aumento la temperatura a 20ºC cuando esta prendida que es algo mas aceptable en comparación a los 16º o máximo 18ºC que se llegaba con el anterior. Ahora falta corregir la temperatura con el led apagado, estoy pensando que haré. Esa será la principal dificultad de este cultivo.
Si alguien tiene alguna recomendación será bien recibida!


Likes
224
Share


@Ju_Bps
Follow
Hello growmies 👩🌾👨🌾🌲🌲,
👋 Flowers continue maturation, Buds are big, a bit aero for the moment, we'll see on the last weeks, Harvest maybe in 2 or 3 weeks.
Still happy 😊
💧Give water each 2 or 3 days
1,5l Water + Nutri NPK Bloom + Nutri NPK Cal Mag
PH @6
- Nutri NPK
Calmag
1/8 tsp for 1 gal.
Bloom
1/2 tsp for 1 gal.
💡Mars Hydro - SP 3000
100% 43 cm.
🔥 Thanks community for follow, likes, comments, always a pleasure 👩🌾👨🌾💚🌲.
Mars Hydro - SP 3000 💡💡
https://www.mars-hydro.com/sp-3000-samsung-lm301b-greenhouse-led-grow-light
NUTRI NPK 💥🔥
https://www.nutrinpk.com/product/npk-mix-pak-for-4-to-5-plants-cannabis-fertilizer/
Pure Instinto - Strawberry Shortcake Auto🌲🌲
https://pureinstinto.com/product/strawberry-shortcake-autoflower/

Processing
Likes
6
Share


@StickyFruits
Follow
flowering day 15 - plants began to drink very actively.
flowering day 18 - sugar started to build up and a very tart smell appeared and defoliation add 1100 ppm
Likes
24
Share


@MrPott
Follow
Really surprised with how everyone turned out! Everyone is starting to flower but Kayla definitely got the lead in terms of pistils and bud sites. These ladies still need to be LST every other day. Looking forward to an early harvest!

