
Likes
Comments
Share


@Snooziecheesecake
Follow
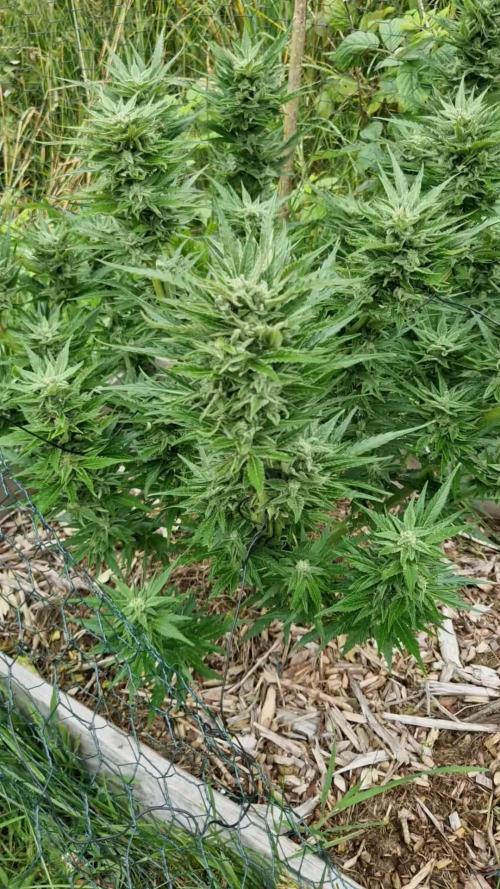
I have decided to chop the most mature plant of the three, even though it could go longer I was originally going to be chopping all three because I am about to leave on a trip, however a friend of mine is able to take care of the other 2 less mature ones. I was planning on just saying fuck it and chop them all but the less mature ones have still mostly white pistils and I can’t bring myself to do it, they started putting more weight on these past few days and I know if they just could get a few more weeks they will really be amazing with a lot of weight. Interesting that one matured faster than the other 2, although I think this corresponds with the size of the buds as the mature plant’s buds are not particularly big, hoping to pull 25 grams at least from it.
The less mature plants are beginning to bulk and as I stated earlier, I just can’t chop them and ruin all their potential yet. The calyxs are swelling a lot and looking super tasty.
Will continue to add updates for the other 2 plants

Likes
Comments
Share

@JNSGenetics
Follow
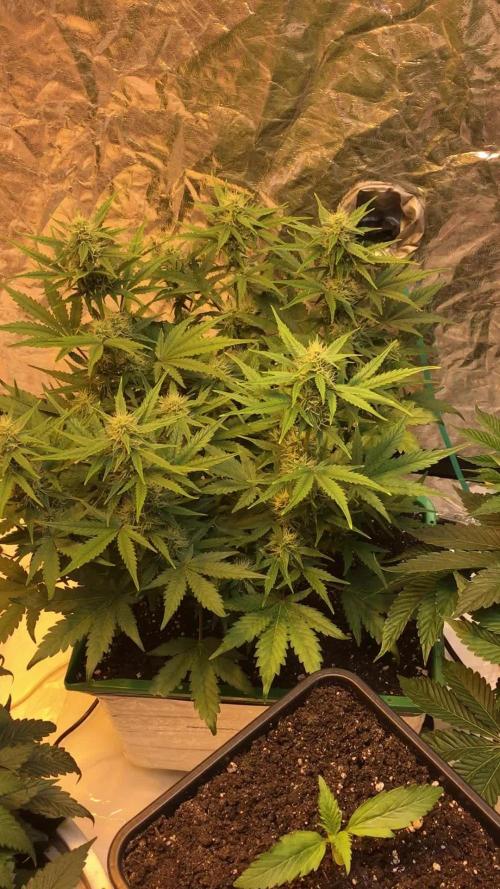
Starting to swell up really nicely. Delicious rounded sweet smell mixed with a sour diesel and a earthy smell. Pretty frosty and sticky. It still needs atleast 10 to 14 days to finish up in my estimation, maybe 20 days. Light defoliation happened on july 1st. Its very leafy

Likes
10
Share


@Lodzik
Follow
Maybe next week a 14-day flush will begin. The G13 smells very interesting ;).

Likes
5
Share


@doobieandthedutchess
Follow
Another week down. The timer is fully switched back to 12/12. It took a week to get there but the ladies don’t seem to mind. The gruntz is still queen of the show, or the biggest. She seems to want to take over the whole tent. Amazing how big she is getting. The Bruce is a close second. Only a few inches shorter. The widows are there and are nice but they aren’t reaching for the stars like the gruntz. They are all beautiful, what can we say, we love all our ladies. There isn’t any smell off them yet, you can get a whiff rubbing the stalk, but not strong yet. We did a defoliation this week, but I don’t think it shows. We also took a few more clones off the bottom branches. The first try of the gruntz didn’t do so well. Try ,try again. Otherwise it’s been a good week. The Dutchess and I thank you for stopping by, if you see anything we can do better let us know. Otherwise spread some love and share some bud!

Likes
5
Share


@killerjoint
Follow
8th days/Flowering /little change
10TH DAYS OF FLOWERING
DUE TO RAIN HAD TO TRIM BOTTOM -LITTLE EARLY
MY HUM WAS HEATING 70 TO 76 BLOWING FANS....
AND CHECKING FOR SEX
POP 9 SEEDS 100% SUCESS
AND ALL FEMALE
THANKS TO COPY CAT GENTICS.
11TH DAYS -FLOWERING
RAINING SEASON HAD TO TRIM BOTTOM FOR AIR VENTILATION
MY HUM HITTING 72%.......T T DUE TO RAIN RUNNING EXTRA FAN FOR AIR VENTILATION.
EVERYDAY PLANTS GROWING ABOUT 2 TO 3 INCHES
LET'S GO GOOMIES


Likes
101
Share


@Mrs_Larimar
Follow
April, 5th
I was shooting millions of Pictures from this graceful Queen.
She got the Right Name Iam soo in Love with her
The Ladies are sitting into 15l Smartpots filled with my Soilmixx
the Soilmix was amended with EASY BOOST ORGANIC NUTRITION
from RQS
Additional they geetBeneficals and Bloom Fertilisers from @GreenBuzzzLiquids
The Fruits are maturatingl very well, buds are swelling, Pistils are changing to Orange
and she is smelling very Flowery, fruity
Its a Pure Pleasure to open the Tent
Likes
6
Share


@KivzBudz
Follow
Die Woche startet mit dem dritten Blütetag, ich hab das Licht am letzten Samstag umgestellt auf 12-12. Heute (03.06) kamen die ersten kleinen Härrchen und sie beginnt sich zu strecken. Ich update Bilder im Laufe der Woche :)


Likes
9
Share


@TheWeedPimp
Follow
She’s still a little burned.
But growing very slow. Not much sun... cold, wet and windy Weather 👎🏻 Close to - 1 this morning... Think i gonna chop her Down before the rainy weather or the cold one kills her...
But the buds are still so tiny
Need a least 1 month😕
Any inputs guys?

Likes
3
Share


@Mismatas
Follow
APROXIMADAMENTE CUARTA SEMANA EMPEZAMOS POR PRIMERA VEZ NUESTRO LST Y UNA LIGERA PODA DE BAJOS.
SEGUIMOS CON EL CABLE DE CALOR PUESTO Y TAMBIÉN AÑADIMOS UN CALEFACTOR PARA MINIMIZAR LAS BAJAS TEMPERATURAS
Likes
3
Share

@Black_Widow
Follow
Привет садоводы и огородники !!!
Это последняя неделя вегетативного роста
крона растения сформирована растение готово к стадии зацветания
сегодня я поменял раствор и сделал его чуть крепче
PH я отсавил без изменений .как в водопроводной воде PH 6.8-7.0
на нейтральном ph растение хорошо приспособилось .хорошо растет и чувствует себя вроде не плохо
продолжу дальше этот эксперимент.


Processing
Likes
4
Share


@PotentiallyPotent
Follow
Slowly growing out some more leaves. I'm guessing it's still putting out most of it's energy in to roots. The leaf growth has sped up a little bit though.
Chopped the cover crop again.
Drilled drainage holes in the side of the container to insure proper drainage.
Added a compost tea. It had worn castings, kelp meal, insect frass, mycorhyzae powder, bacillus powder, em1, some leafy green material, and some high carbon peat moss. Was brewed for 24 hours and applied liberally.
Identified some knotweed in my container and promptly plucked it out. This stuff spreads rapidly and overwhelmed the whole garden in years past. I'm definately gunna have to keep an eye out for this ones return.

Likes
2
Share


@7circleshg
Follow
Como ha mostrado a lo laargo de estas semanas y meses, algo fuera de lo comun y en floracion no se queda atras. El color y grosor de tallos ya esta demas decir lo bien que andan, el olor (que es algo caracteristico de esta etapa de la planta) es muy fuerte y frutal. Estos pre-cogollos tienen una produccion de resina que esperemos se mantenga hasta el final....

Likes
24
Share


@Grey_Wolf
Follow
HIGH LEVEL From EVA SEEDS 6th Jan 2020
** Hi all I have done a couple of alterations since my last update , firstly I erected a greenhouse to cover all of my photo girls and I finally ended up transplanting plant number 2 . I ended up deciding to put her straight into the ground as I had nowhere else to put her to be honest. Since the transplant the new growth looks different than it was
prior to the move. It could be completely unrelated to the transplant but if you look at pics 3&4 you will see the new growth I'm referring to.
Plant 1 is really getting stinky even tho it's still in veg , just an accidental brush past her omits an incredible skunky smell which means she'll be very stinky during the actual flowering ( well that's what i reckon anyway) Plant 1 is a big girl and will almost certainly get much bigger once the flowering stretch begins next month.
Thankyou for checking in and reading my latest update see you next week 👍

Likes
5
Share


@liliarose
Follow
Starts to pick up just a bit of purple. Some leaves drying but I don’t think it is any deficiency/overfeed but just late flower and putting all of the energy to the buds🙂↔️ Baby looking great, still stay pretty impressed she grew a real big ass 🐋

Likes
17
Share


@connormcleod47
Follow
***UPDATE 03/26/25***
Gave each plant 350ml of dechlorinated tap water at a PH of 6.0
Rearranged the plants so they are directly underneath the bars of light above!
The Strawberry Dawg Pie is looking much better at the start of week 3, hoping no more issues with water & light!
Temps & RH have been good so far today, RH is on the climb to 70%!
***UPDATE 03/27/25***
Plants responded fairly well to yesterdays watering! Little bit of droop but should perk back up over the next 12 hours or so, 350ml next feed will be best vs jumping right to 500ml, am gonna wait until they have completely dried out before feeding again!
Will keep an eye on all 4 plants over the next couple of days, want to remove large fan leaves prior to mainlining!
Temps & RH have been pretty good so far today as well!
***UPDATE 03/28/25***
Not much needed to be done today, will probably defoliate in the next day or two & begin mainlining!
Temps & RH have been good so far today!
***UPDATE 03/29/25***
Pots are still saturated & I will not have to water for another day or two, some clawing on new growth even at 350ml per plant!
Should be able to defoliate & begin LST tomorrow afternoon!
Temps & RH have been good so far today, RH will slowly climb back up to 70% over the next hour or two now that the door to the tent is closed!
***UPDATE 03/30/25***
Nothing needs to be done today, will be feeding tomoroow afternoon alongside defoliation & LST!
***UPDATE 03/31/25***
Gave each plant 250ml of dechlorinated tap water mixed with nutrients listed above at a PH of 6.2
All 4 plants have been clawing so I decided to dial it back a bit water wise for now
Defoliated, topped & have started LST!
RH has been good today but temps have been quite low!
***UPDATE 04/01/25***
Plants responded well to yesterdays feed! Still a bit of clawing but pots are drying up much quicker at 250ml will probably need to water again tomorrow!
Some more LST today, had to pinch to soften tissue in order to get the plants anchored down properly!
Noticed a couple hairs on the Gravely Ghost, am hoping I still got a bit of time to train & top before flower!
RO system showed up today! Got that mounted to a cutting board with L brackets for feet so I can move it around! 5 Gal bucket is currently filling up but is quite a slow process.. Gonna double check with other people who own the unit to see if it's is a normal speed! (Aquatic Life RO Buddie 4-Stage Reverse Osmosis, picture & video above)
Checked TDS & is looking like 300ppm ish straight from the tap, RO filtered water is sitting at 4ppm which is good!
Temps & Humidity have been pretty good today!


Likes
29
Share


@nonick123
Follow
Día 13 (06/05) Nos acercamos al final de la fase plántula. A ver si ahora empiezan a crecer de forma explosiva!
He sido muy estricto con los riegos, dejando que el top hasta el nudillo se seque completamente!
Día 14 (07/05) Hago una mejora en la tienda. Hasta ahora tenia intracción pasiva, pero ahora he instalado una turbina para que impulse aire fresco dentro de la tienda
Día 15 (08/05) Con el calor que hace me sorprende que las macetas sigan aguantando la humedad, pero al hundir el nudillo sigue húmeda. Mañana haré un riego de nuevo
Día 16 (09/05) Relleno el top con sustrato para compensar la compactación y dar mas soporte a las plantas
Riego con 300 ml solo H20 - pH 6,2
Día 17 (10/05) Baño de sol de dos horas.
Día 18 (11/05) Baño de sol de dos horas
Día 19 (12/05) Riego 750 ml H2O + Regulator 0,15 ml/l + CaMg-Boost 0,25 ml/l + Startbooster 0,25 ml/l - pH 6.2
💦Nutrients by Aptus Holland - www.aptus-holland.com
🌱Substrate PRO-MIX HP BACILLUS + MYCORRHIZAE - www.pthorticulture.com/en/products/pro-mix-hp-biostimulant-plus-mycorrhizae
Processing
Likes
6
Share

