
Likes
Comments
Share


@eecc_photo
Follow
Hello people...
So heres the new strains Gellato 41 by SEEDSTOCKERS.
New setup with Heavengrowlights 320w, lets see hoy they do.
left a couple of timelapses for the germination process
cheers feel free to coment

Likes
13
Share


@Lfuego22
Follow
Very good week, got some low stress training going on, some netting a little bit of defoliation happen this week.
Likes
18
Share


Likes
7
Share


@Salgeezi
Follow
Weight on the first two Charlottes Angels are 33g and 25g. Grown about ten of these seeds and can't seem to get a decent yield with them.
Day 102 Malana Bomb harvested. Weight on her is 72grams. Happy with that. I was thinking around 2ozs. Really tight buds liked the extra wattage I was giving at around 200watts
Day 105 Orange Bud harvested weight is 48grams. Was expecting more but still some nice buds
Just feeding the last 2 plants overdrive, bud candy and drip Clean at 550EC


Likes
2
Share


@Ultraviolet_
Follow
Wakíŋyaŋ, I am who I am, the salt of the earth.
Thunderbird is an allegory; his conflicts with other forces in nature are then an attempt to allegorize relationships observed in the natural order, such as the changing of the weather. He is essentially an attempt to represent the patterns of activity of a powerful, mysterious force in a way that can be understood simply and easily – sort of the way in which a weather map functions today.
Moving from18x60x60 = 64,800 seconds in 18 hours.
64800x860(ppfd) = 55,728,000 umol per daylight.
Into Flower
12x60x60 = 43,200 seconds in 12 hours.
43200x1145(ppfd) = 49,464,000 umol per daylight.
It's asking a lot of Rubisco regeneration to maintain 50 DLI in the 12 instead of 18. Raised the ambient CO2 to 1200 to 1500 ppm to achieve efficient gas exchange.
Not particularly recommended, but adding sugar to an indoor growing medium is a highly effective way to stimulate microbial activity, which rapidly breaks down the sugars and releases CO2 through cellular respiration. You can safely capture this CO2 to fertilize indoor crops and boost photosynthesis. While this process works, the setup requires precise understanding and management to avoid common indoor growing hazards.
The plant Carbon to Nitrogen C:N ratio defines the balance between structural carbon (sugars/cellulose) and nitrogen (proteins/enzymes). It acts as a master regulator of plant health, growth, and metabolism.
Rubisco (Ribulose-1,5-bisphosphate carboxylase/oxygenase) is the engine of photosynthesis responsible for fixing atmospheric CO2 into sugars. It is intimately tied to the C:N ratio for three primary reasons. It is the Plant’s Biggest Nitrogen Sink, Drives the Carbon Side, and it is the Nitrogen Control Knob. Understanding this relationship allows you to predict how plants respond to environmental stress or fertilizer.
Rubisco acts as the primary storage sink for leaf nitrogen, accounting for up to 30% to 50% of a C3 plant's soluble protein. Deep Green Leaves signal a rich abundance of both chlorophyll and Rubisco proteins. The plant possesses the heavy enzymatic machinery required to handle 1145 PPFD. Pale or yellowing leaves indicate a nitrogen deficiency. The plant is actively breaking down its own Rubisco to salvage nitrogen for newer growth, drastically reducing its light-tolerance threshold. Subtle difference, but understanding is important in order to be able to judge when to dial light intensity up and light intensity down, when to push, and when to back off. An extra dose of magnesium is vital if a plant is going to push through the growing pains of high-intensity lighting.
Foliar application of magnesium is an excellent and rapid way to assist with Rubisco regeneration within a plant, so long as it is applied correctly.
Spray strictly in the early morning or late evening, mixing your magnesium with a little fulvic acid or chelator, but only when she gets a little limey on top.
This, for me, is the experience of growing, akin to "riding the surf" maintaining efficient Rubisco regeneration through visual identification of the shade of green. Surf a razor-thin wave when balancing light intensity, nutrient availability, and transpiration to maximize Rubisco enzyme efficiency. Keeping the Calvin cycle fully charged without tipping into nutrient toxicity, light stress, or the dreaded chlorosis requires paying close attention to the visual cues the plant provides. By monitoring these subtle shifts in color, turgor pressure, and leaf posture, you adjust your environmental controls and surf that exact razor-thin wave.
Nute recycling acts as the vital execution mechanism for autophagy, which defines senescence. Natural senescence is a genetically programmed developmental stage aimed at nutrient recycling, whereas triggered autophagy is a rapid survival response activated by environmental stress. While both processes utilize the vacuole to break down cellular material, their triggers, selectivity, and overall goals are entirely different. Cannabis plant senescence is not separate from nutrient recycling protocols; rather, nutrient recycling is the primary physiological purpose of senescence, and autophagy serves as the core switch mechanism executing both processes.
Takes about 24 to 48 hours to notice visible changes once the signals have initiated the autophagic response. Not too late at all. A little bit of fade from senescence 2 weeks from harvest is normal and genetically expected. Send the C:N 32:1 signal 1 week from harvest for the best effect in your organic grow.
Understanding what makes leaves fade is not always senescence, but also strongly linked to Rubisco regeneration. That's a whole other subject. Vital to understand the differences if you want a correct diagnosis and to transition from hobby grower to master stoner, differentiating between a true genetic fade and a decline in photosynthetic proteins.
Nitrate is nitrate, whether it oxidizes or not is not up for debate. If it's not sunk by the plant you are smoking some if not all of, it's regardless of what your feelings are on the matter. Senescence is highly critical. It is the natural end-of-life stage where the plant redirects energy to ripen flowers. Properly managed, it breaks down harsh chlorophyll, allowing the terpenes (which provide taste and aroma) to peak. Harvesting outside this window leads to an "unripe" or degraded flavor comparable to going without.
To initiate the response you seek, you can trigger it multiple ways, when growing synthetically its triggered by nutrient starvation, generally when the entire medium is flushed. This is more to do with N starvation than being entirely empty. Nonetheless. PK boosters are N starvation through maximizing P and K. (Generally only works for synthetic grows)
Normally, a medium only holds 10-30% of its nitrogen as ammoniacal ta part boosts this to 50% as it triggers the "ripen" signal, but you don't want to keep ammoniacal above 30% for more than 7-10 days if you can help it. Its a trigger mechanism no more.
PK BOOST with 50% ammoniacal N signals floral maturation.
PK BOOST with N starvation signals nutrient recycling/sinking.
Because you are using organic nutes and you want to maintain the rhizosphere, what you want to do is add carbon in the form of sugars (powdered molasses). It's almost impossible to empty a medium enough when microorganisms are constantly releasing nutrients into the direct EC. Very difficult to initiate starvation responses with ammoniacal nitrogen. Manipulating the C:N ratio is the key to triggering an autophagic response and resulting nutrient recycling in the last days using organic nutes and without having to flush.
Generally not recommended for new growers. So do what you want. But if you don't trigger the plant to dump its nitrates into root zones, you will smoke nitrates as NO3- does not oxidize during the dry and cure no matter what you do or how long you dry or cure. Doesn't matter what anyone "feels" about it, how many grows they had with no fade.
"Clover steals valuable nutrients."
Crop and drop the clover come flipping to flower, its benefit comes from creating an airy and porous rootzone. I don't need to crop and drop once the plant fills the canopy, she blotches out the light, and the clovers die. This is the nitrogen the microorganisms use to convert carbon for respiration throughout the flowering stage.
Likes
82
Share


@BigBadLion
Follow
Another fast update! 😃
Hey guys! I hope everything is going well for everyone. This is the 2nd week of flower and I'm here again to share what happened last week!
My babies now get thirsty really easy, nothing like how it used to be (and you can actually see them stressing over it in my photos) but gladly nothing that some water can't fix. The main colas are also starting to grow more and they are full of small developing flowers (they look super pretty! 😍)
Some side stems are also outgrowing the main branches... and I'm kinda unsure what I want to do (or if I should do anything). Maybe LST or supercrop them? (I might screw things up by doing it in flower and I have never done it before 😭) I don't know. I also want to trim some leaves away since the foliage is very dense but I fear I might end stressing them! I will probably make a grow question to know what others think.
I'm back on a normal nutrient schedule. I'm no longer "overfeeding" them and I water them 4 times a week (but with little water). Next week I'll try doing 3 but with more water and see if they like it more that way.
So far I love how the plants are developing! The small flowers look great and they look bigger everyday! 😃
Thanks everyone! See you all next week! 👋


Processing
Likes
6
Share


@Ferenc
Follow
Day 61: I left them in darkness for 3 days and just switched on the lamp for 12/12 with today the foirst day of the 9th week.
Fertilization goes on the same days with the nutrients above and water intake approx 250 ml per plant per day.
Nice green color comes they always look nice after darkness :) Lets' go.
Day 66: Growing growing growing...


Likes
41
Share


@BOMbolenath
Follow
The girl is progressing well.
She is receiving around 25 DLI of light.
I did a topping.
Likes
24
Share


@TheGreenLeopard
Follow
easy enough week. added dehumidifiers in both tents as i really have them packed and its best we take care of that now than run into diffs later. nutrients all good, much the same. harvested bday cake auto 45g wet weight. maybe was hard on her at the start but whatever.. looks good, hopefully tastes as good. 3rd week in and these girls are massive.. like really impressive. no hype.

Likes
74
Share


@XII_XII_MrGreen
Follow
With this grow coming to an end I'm very satisfied, I've just cut the last girl down and they are hanging to dry now. The girls showed good vigor through out the whole grow feeling pretty comfortable in the organic soil mix I've made at the start. Later in flower I started giving the whole Plagron line from time to time to give them that little bit extra power throughout their flower cycle.
I've took the two most different (looking) phenos I got and try to make some nice pictures, but in week 15 you can find the photo session I did with the nicest pheno in my eyes.

Likes
10
Share

@The_outdoor_guy
Follow
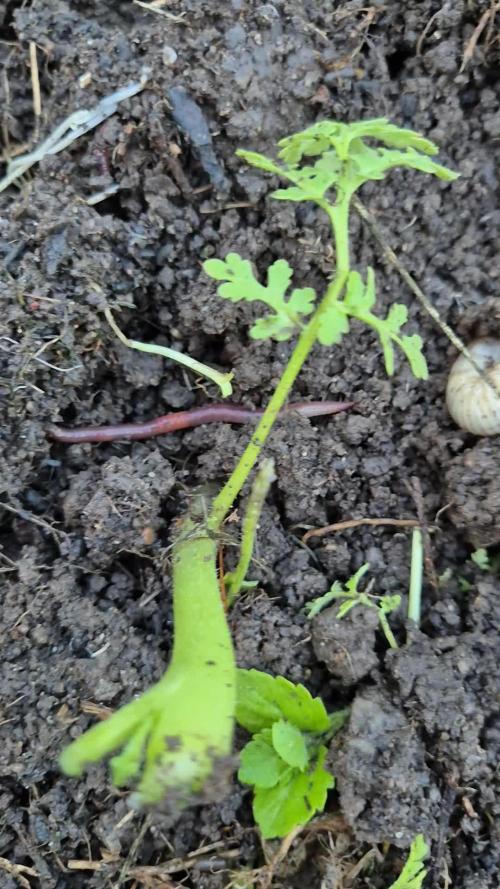
Chapter: Garden bed, going all out for the healthiest soil ever!
Finally finally.
The first chapter is finished! And now my favorite the outdoor chapter begins 😊.
The cosiest soil for thw beauties has been created, so they shall never lack of anything precious to them 💪.
I prepared the plots as good as it gets.
-Added loads of compost and sheep manure from my neighbour. The soil already had unbeliavably high number of earth worms, now even more to come 🙏.
-Added a 24hour compost tea from my own compost, to turn up the microbial activity to maximum.
-Sprinkeled in some redclover seeds, for later soil cover and nitrogen fixation.
-And put some strawmulch to decrease evaporation and keep soil tempreture steady.
-And added more microrhizae, just to be sure🙏
Now for the next weeks only thing to do is to water and wait for the plants to flurish! 😊
Last year i made a little mistake, i grew the plant like an indoor weed plant, mainlining... etc. Because of this the plants were quite small.
This year i do it like i did in 2024, i top the plant after the 5th node, so it has 10 sidebranches to start with. An then we see where that goes.
I really hope for at least one decent "Tree" this time😊.
Now lets see what the next weeks will bring us💪.


Likes
9
Share


@Garamantes
Follow
After 4 days of heavy rain, the first mold appeared...
So I spent about 18 hours searching for plants and picking out mold with tweezers
After last year's experience with another seed bank, I expected the plants to be very affected by mold, but I have to say that Fast Buds genetics coped very well! Mold appear mainly on blisters to which the stem of the leaf leads water, which then collects between the stem and the blister
I trimmed the plants more so that the air flows better and that water does not stick to them
The plants look healthy and the flowers are gaining strength
Especially the dark purple phenotypes look very dense and hard. it also looks very resistant to mold
Very pleasant sweet fruity scent
I haven't seen my children for 3 days, it's raining extremely ... the last time I was chased out by swarms of ants in the early evening, I've never experienced this before, there were maybe a million of them and they sat on me and on the plants
I'm finally going to visit them tomorrow, I expect I'll have a lot of work to do with mold and I hope the swarms of ants haven't harmed them in any way
Likes
13
Share


@CanarianGrow92
Follow
Banana Jelly has a very nice bushy shape, she responds good to LST and doesn't stretch a lot when turned into flowering.
Good resistance as we performed some HST and even during flowering defoliations, no sign of stress or delays in growth.
The bid smell is almost like nuts, fresh almonds with a sweet but slightly gassy background, a true gem to explore. We will definitely repeat this one!!!
Likes
7
Share


@GrownyStark
Follow
I made a concoction of living soil using ingredients I could find of subcools formula. Theoretically all i need to add is ph balanced water. And a tea once I decide to flower. I'm waiting for some gadgets[ph and moisture meters]to come in before doing any extensive watering.


Likes
10
Share


@stoneyroneyjr
Follow
Been too busy to update the last few weeks, but they’re surviving longer then I expected. When I received my new light I did not take in consideration of the heat output and within the first night of use the tent reached a scorching 88 degrees


Likes
2
Share


@ChiTaN
Follow
The girls are doing great, Wedding Cake seems to be the most mature.Apart from the girl just mentioned, I'm betting the harvest season is about two weeks away.💪


Likes
24
Share


@OGOZHigh
Follow
Denn Ladys geht es bis jetzt hervorragend.
Die Buds werden jetzt so langsam dicker 🎊✌️
Processing
Likes
3
Share


@CharasKush
Follow
The plant is doing great! These days the temperatures are up to 33 and the plant is liking it a lot!
I have posted a video to show the developement of buds, will keep on recording once a week
Can't wait to see how big the nugs will be!
