


Likes
12
Share


@Ned_Grows
Follow
I decided to do a two stage harvest because this plant is very dense there's alot of under growth that hasn't fully matured yet so I've taken off all the top buds first to allow for the under growth to mature a bit more before harvesting. POWER PLANT is a excellent anytime of day smoke the high is outstanding I love to wake 'n' bake with this strain, this is a high yielding plant with pungent and dense buds that have a powerful high.


Likes
3
Share


@Cysolja
Follow
Growing it was straight forward. Very resistant to temp changes, loved every bit of nutrients I gave her. Buds have turned out beautiful and harvesting 4.5 ounces dry on one plant is always nice


Likes
30
Share


@EuphoricDiaries
Follow
Soooo week 10 :)
These girls are looking reeeeaaal nice SS1 (on the left) is <25 days from harvest and SS2 has still a while to go id say 😄 But all in all things are looking super good buds are looking super nice and frooosty with SS1 starting to shift its energy into budding whereas SS2 is still throwing out some wild pistols :)
The smell is super strong which I’m happy about, some staaaanky skunkalicious bud🤤
I have stopped giving SS1 nutes, giving her only water after her flush in week 9and she’s doing awesome! SS2 I’m still giving biobizz grow and bloom 0.5ml/l ea. And she is also loving her environment
Got some mushies growing in the one pot though 😄 pulled them out just to be safe still have to do some research :) might have something to say about the enviroment at the surface of the soil. ??


Likes
49
Share


@masterofsmeagol
Follow
8/1 Took another video but didn't upload either videos when I was in town. I'll have to upload later. I have a lot going on and I need to consult my diary more often. The Temps dramatically changed. I watered yesterday just a few that were light but then it poured all night. This morning things looked SUBSTANTIALLY better. I think as long as I can get some sunlight the next few days things will be alright. That streak of weather in the 100s really did a number on me and my plants. Everytime I go they seem to be looking better so I hope that they bounce back and I don't lose anything after all this work. Plants seem "strong" though. They appear very healthy. This just seems like a mistake I made that was substantially worsened by severe thunder storms we weren't supposed to get. If they don't come back before rain I may move the plants that haven't recovered yet inside the barn for the night. It really depends. I want them to dry out. I'm thinking of going and putting a fan in the cage on the smart pots. I just need to keep an eye on them.
UPDATE: I was worriedly watching my plants from the cams and got a message from my father saying my plants were "REALLY DROOPY." I got there and noticed they were WAY worse then earlier and it was sunny and 70's. I got my dude on the phone and sent him several pictures. Luckily I had a second opinion also from my father. A 3cu ft bag of 707 is 22 gallons. These pots were light like that. They just have a seven foot plant in them lol. I'm so happy. I was planning on bringing them Inside tonight in case of ANY rain, luckily I was able to ascertain THE REAL problem, consult my diary and askother growers. Things are looking good. I'm so happy I'm not overwatered.
8/2 Thank the Lord! And my father for his constant vigilance and my commercial buddy for always being there for me. I went over this morning and everything is back up. Plants definitely got stressed though. I think I was OVER and UNDER watering during those days where it was 100 degrees. It'd 68 today. I say this because as soon as I watered the plants they started picking right back up. Luckily I had a dry bag of 707 to pick up and compare with my 20 gallon grow bags and had my father check the weight as well. He's a forester and told me the weight was about tge same. I gave the big blue cheese in the back closer to 2 gallons until I saw some water coming out the bottom. The reason I think I may have overwatered is that the water evaporated as i had watered during the day or at night but not the 10% that they needed. I didn't QUITEgive them all their 10% last time more like I split the difference and did a gallon amd half. Some did get two though. I noticed some light yellowing going up one of the plants that I've watered the most. These plants are transitioning fast to flower. I think I've got the watering schedule down better and that's "don't water them on a schedule". I'll have to individually take note of the plants. Also on that plant and a few others I see minor nute deficiencies so as soon as I can feed I'm going too. I'm going to show my buddy all my info and ask his advice before i take the next step though. I can't believe they made it through this. Talk about anxiety. Wow.
UPDATE: Talked to my commercial buddy. He advised to pick off any of the dead leaves, (which I mostly already have there weren't many) and to wait until next water to feed. He broke it all down in a way i could understand. Then he broke the feeding down further for me so I now know where to start. He did say he thinks my only problem this year will be, "finding a place to store it" lol. I thought he was joking but he went out back and brought out five gallon buckets with screw top lids lol. This back and forth dialogue (with a professional) is seriously lowering my anxiety and giving me confidence that im doing the right thing. Hes never led my wrong and hes always been there. So has my dad. He said to take the old man out for coffee because he saved my ass! I opted for the bottle of whiskey instead. I'll be checking them later. I'm waiting to feed until next watering and I'm waiting to apply BT. I don't want to do anything to a plant that has been that stressed. I'm giving them a few days to chill. Then the twenties will get a quart of grow big, big bloom and calmag and I'll convert that measure to the same amount for the 30's, and 50's. I'm not sure EXACTLY how big that tote is but I think it's closet to 30 than to 40. So I've got a solid plan for the week. I think what I'll be looking to do next is get my supports up. The wind has been crazy but these plants (even when stressed) seemed super strong! Still no fungal stuff knock on wood.
UPDATE: Had to take the car to the mechanic and snag my wheeler to make it home. I sefoliated quite a few bog yellow fan leaves and some smaller leaves down low. Plants went through some stress thats for sure. I HAD to leave my phone with the wife as she had a telehealth appointment so I couldn't take pictures. I wish I could've because things are looking great. I can't wait until things dry out a bit and I can feed! I'm STILL in awe of how my plants look RIGHT NOW and how the looked yesterday. Another buddy said If I didn't see it (and I didnt know you) I wouldn't have believed it was even the same garden! I'll check AGAIN later if my car is ready. I'm anxious to feed and get my supports up. Plants are STRONG though.
8/3 Plants looked great this morning. I did notice what looked like nute deficiencies on the plants I've watered most. After speaking with a few local growers I decided to water. I watered everything a gallon. The containers got more. The 10 got less. Then i mixed up a feeding solution of 1 tsp grow big 2 big bloom and .5 calmag and fed the 20s approx 1.5 pints. A little less for the 10 and a little more for the bigger pots. I'm going to go back over and if I see no negative effects from earlier I'll use the rest of the solution. I'm hoping this was the right decision. It hasn't been enough time but the bags were light. Not SUPER light but last time I waited it didn't work out well for me. Two local growers have told me theyve been watering daily and they have plants in raised beds and right in the ground. I want my watering to be in the morning anyway. Hopefully this works out. I'll update.
UPDATE: Went back over and everything was standing up nice. They loved that water and the small dose of nures hasn't burned them so ill be able to use more next time. I used a Gatorade bottle thats 1.25 pints amd went from there. A total of two gallons was used on the garden. Things look amazing. Things are changing on the daily. I'm losing some leaves now. Well they aren't dropping off but I'm plucking them before they yet that far. I need to water in larger volumes I think. Plants are drying out too quick. Others are saying they are watering much more often as well. It really hasn't been raining and these plants are huge. I have lush green leaves but this transition and the added watering I think has leeched a lot of the nutrients from the soil. Since I have the fox farm that's what I'll be using. I still have a couple leaves that are destroyed by a fourkined plant bug. It's very identifiable so theres another I need to find. Also seeing chunks missing from leaves. I need to up my ipm game. I don't want to do more than one thing at a time though so I know what happened if anything goes wrong. Since i did the nutes today the spraying of BT or captain Jack's I'd going to have to wait. Despite losing these old fan leaves my plants are dense. Defoliating really helped with airflow. I also noticed some chlorosis on a few leaves. That's why I'm going to start doing the 10% minimum. I'm waiting until they are real dry then I'll give everyone (but big blue) their 10%. I got run off from big blue just from like a gallon amd a half today. I hope my 2 minute video uploaded. It says it dis but u bet it didn't. I'm trying again and I'm at 12%. Let's see if my patience lasts. Looks like it doesn't want to upload
8/4 Thunderstorms and heavy rain all night. It's supposed to rain steadily all day. Plants werent drooped or blown around looking or anything after this storm and I only have minimal supports up. I defoliated anything that needed it. Just a few yellow leaves on the bottom interior. More like nitrogen deficiency. I am watering to frequently though. Im noticing some chlorosis (minor) on old far leaves. Could just be that the soil is getting depleted but "if the brown surrounds your plant is drowned" and I noticed a few leaves like that. Just a couple bit i know what to look for. I hate to say it but i think ive almost got things dialed in for this grow. I will need to put up further supports. These are some STRONG plants. I shook them all off today. The seemed to love the nutes. Plants looked way better this morning than I was expecting. I need to up my watering volume to 10% everytime. I DID fine more pillar damage when defoliating and a four lined plant bug mark on the purple punch in the ten.
8/5 It's not raining right now but it Rained all day and night. Plants really seemed to likecthise nutes. I'll up it to a quart next feed. I defoliated what needed it. Found my FIRST totally yellow leaf of the season. Big old interior leaf i must've missed earlier. Smell has greatly increased. Seeing that these plants seem to have no ill effect from all this water I feel more confident about my ability to fully water them their 10%. Especially since they are massive plants. I have one daln near 8ft and it's damn near as wide. Real good airflow. I think this is gonna be my year. I certainly hope so. I need to get rid of that fourlined plant big but more importantly I need to deal with pillars proactively so next nice night I'm going to treat with bt. Super proud of myself so far.
8/6 Didn't rain much yesterday. In fact I stepped out my door and the sun was fully visible and bright while rain poured down around me. It wad a cool experience but the plants dodnt get much for water. I checked the weight this morning (heavy) and shook off the plants and did my normal morning inspection. I news to remove a pallet so I have more room. Plants are really trying to flower. Next week I'm gonna yet them with a stronger dose of nutes. Last year this was about the time I lost my crop. Knock on wood but this is the healthiest crop I've ever had. I MAY apply BT tonight. Haven't decided yet. I'll keep the diary updated.
UPDATE: Went over to check the plants that were WET and HEAVY this MORNING because of the windstorm. If dried the bags out completely. Everything but the 10 was drooping right over like before. Good thing I've got some pretty good intuition. I took two videos. I gave everything their 10% 2 gallons each and for each container plant. Plants were back up by the time I was done adding supports.
8/7 Sunny this morning. Plants looked good. Had to defoliate some dead leaves. I can't believe those grow bags dried out so fast yesterday! Its just the wind was so strong! Plants were right sideways! They got some syrong roots thats for sure. One of them (my canary) seemed light this morning! But we are getting an inch and a half of rain starting tonight into tomorrow so im not watering ANYTHING. I'm not sure what I'm going to do IF anything. I added to my supports. I COULD put EVERYTHING in the barn where we put heavy equipment. I'll probably at least bring a couple inside in case something horrible happens. Things arecreally doing good. Flowering up nice. Found a cicada on one yesterday. First time I've ever seen one. I'll update with what I decide to do.
UPDATE. My canary seems a little light and is losing lots more leaves im not sure if it's because of the transition to flower but I assume that has something to do with it. Plants still have MORE than enough leaves. Found a couple pillars and killed them. Took a video. I have one blueberry cheese that I hope doesn't have a fungal infection as it's losing more leaves. But it takes more water and is greener and fuller up top. I think I'm just worried because of last year. I've done what I can gor the storm so let's see what happens if I NOTICE it get too bad I can bring some indoors.

Likes
6
Share

@all_about_420
Follow
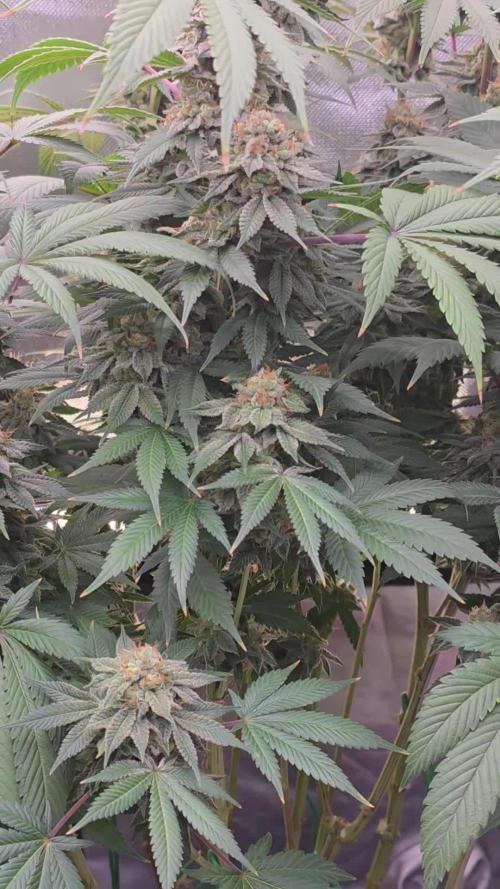
Das Finale rückt unaufhaltsam näher: Die Permanent Marker von Traphouse Genetics befindet sich nun kurz vor der Ernte und zeigt ein beeindruckendes Reifestadium. Aktuell wird die Pflanze intensiv gespült, um Nährstoffrückstände aus dem Substrat zu lösen und so das volle Terpenprofil sowie die Reinheit des Endprodukts zu maximieren. Ein genauer Blick auf die Trichome offenbart bereits die gewünschte milchige Trübung, während wir nun geduldig auf den perfekten Bernsteinanteil von 10 bis 20 % warten, um den idealen Erntezeitpunkt abzupassen. Die Buds sind massiv angeschwollen und verströmen ein Aroma, das die außergewöhnliche Qualität dieser Genetik ein letztes Mal unterstreicht, bevor dieser erfolgreiche Run seinen Abschluss findet.
Likes
22
Share


@TechDCo
Follow
16/08/2024
Lights On!
Mid-day! Looking very colourfull!
17/08/2024
Lights On!
I think my 'plants' are turning gay as they mature! Being very colourfull!
Mid-day check: Took some photos of all the colours 😍 👌 📸
"Daydream; I feel asleep amongst the flowers for a couple of hours on such a beautiful day!" 🎶
18/08/2024
Lights On!
They're Sprouting new pistils!
Going to just judge harvest by what the trichcomes are saying because the buds are still growing! Might be able to push to week 10-
Night time before sleep check!
#Night time before sleep check video! video!
19/08/2024
Lights On!
All is swell!
I've inserted colour coding within all my diaries of/for prior events vier the title for predictions.
I planted On the 1st.
Pablo Pisasso X The Future X Monkey Slapz
The Future = Yellow/Green {Warning!)
Bubblegum GPP = Blue {Blue Lipz)
Monkey Slapz = Yellow {Yellow Fever) SlaPped with a diagnosis of proxy!
Red - Pablo Picasso = Red {Alert! Dangerous Art Show of Chemicals)
20/08/2024
Lights On! I can see some more colours coming through on Peyote Wifi CBD 2:1
Overall; the colours seem more vibrant this evening!
20/08/2024
Mid-day:
Early try cut; just over 1'ounce wet.
"Mind I have been smoking the leaves and the very very early buds underneath, I kept a few branches I could nibble at as I wait! Smoking leaves and very early buds, doesn't get you stoned in that way! But it's very spacey feeling with no buzz! Defdo gets rid of anxiety smoking the leaves alone! FHC is one of my best I've grown in euphoric-wise highs".
21/08/2024
Lights On!
PB is sprouting new pistils and still phattening up! I've dimmed light to 333watts21/08/2024
Lights On!
PB is sprouting new pistils and still phattening up! I've dimmed light to 333watts for the last two weeks; unless they ask and show they csn handle more! They need a rest to mature a little!
21/08/2024
Lights Off!
You can Zoom right into the trichcomes and see that they're all mostly cloudly and clear! 75%25% - I would like about 15-20% Amber
23/08/2024
Lights On!
23/08/2024
Some little FHC early nugs to try! Very colourfull!
23/08/2024
Little early nugs to try!


Likes
6
Share


@Dieselnutz
Follow
Pheno number 3 looks like it’s gonna b the frostiest so far, it’s the shortest buds seem to b a bit bigger on her as well. Not a lot of difference on 1 2 and 4 yet but we will see how things develop.

Processing
Likes
45
Share


@LovelyT
Follow
Killer purps is growing great! This plant suprises me everyday with more and more new growth. This plant gives off a really skunk type of diesel smell combined with a fruity maybe blueberry sort of smell. Alot of resin on the sugar leaves. Some of the pistils are already turning orange. Happy growing everyone. Hoping for atleast 2.5 ounces but fingers crossed what do you think my yield would be.???🤔


Likes
17
Share


@Naujas
Follow
She is much prettier than she was a week ago :) I remembered that I have my first grow light, which is more compact and it will give me more space, so I changed my light, now the girl's side branches get light too:) I add a lot of video memes, because I really want to win Iphone16 pro ;) and those who don't take risks don't drink champagne:) good luck to everyone.
Likes
11
Share


@Sadhus
Follow
C'est reparti pour un tour de lemon blanco V3 khalifa genetics, 20 clones en ebb and flow ,bille d'argile expansé, dry part organic terra aquatica, 7 clones en pot terre plagron engrais organiques Madame grow

Likes
52
Share


@MeaCulpa
Follow
Half time in bloom.
I made a video with and one without flash. This is always a bit misleading.
I set Josefine a bit higher. I should have done this much earlier as she was already the smallest the whole time.
I defoliated a tiny bit. Should be.
A few leaves are turning yellow, but I think I watered a little too much, or gave too much fertilizer.
However, it doesn't look alarming to me at the moment. They'll catch themselves again.
Otherwise, I'm looking forward to the first week of April.

Likes
2
Share


@Munchiesfrommars
Follow
I DIDNT EXPECT THIS WILL GROW SO FAST
AMAZING OPORTUNITY
ERROR UPLOADS PHOTOS
ALL THE TIME
PLEASE
HELP
8 DAYS ALREADY ERROR PHOTOS

Likes
31
Share


@Reaper
Follow
week 2 flowering.
no calmag issues so far the one i transplated in the 20L pot looks much better than the one left in 12L. the pot with 20L was filled at the bottom and around the edges of the old soil with 3 month fertilized soil. flowers already showing on both plants
they were both vegged for 5 weeks
august 20th: day 14 flower
see last video of this week
Likes
28
Share


@Bongman
Follow
Hi Guys,
Week 9 of flowering. I've harvested usually in week 8 but I am holding back this time and really let her do her thing until I see more Amber Tris. Right now it's mostly milky and maybe 5% amber only so a few more days to go.
***Mid-week update***
Day 3 of Week 9 of flower - I think they are ready to be cut down very soon. So I went in today and did a quick defoliage. Am waiting for the new moon to come in a day 6 of wk 9 so 3 more days then they are coming down. Am going to flush on the 5th day wk9.
That's all for now.
Happy Growing.
BM
4TweentY
Likes
19
Share


@GrownwithLED
Follow
My favorite method to germinate seeds is the 'SERIOUS' method promoted by Serious Seeds. I have almost always a 100% success rate with. Check out the video above for the process. If you hang up the seeds inside a wet paper towel inside a plastic bag, the roots will grow out STRAIGHT instead of being curled when they lay on a plate. Make sure the tip of the seed (=pointy end) is facing downwards inside the bag, so they can open up and grow straight down towards the floor. This makes its easier to transplant the germinated seeds into soil. When you plant the seed make sure the top of the seedshell still peaks out of the soil..this make an easier start for your seedling. They will grow right out of the soil the next day.


