
Likes
Comments
Share


@Platinouuu
Follow
No han habido muchos cambios en cuanto a la nutricion. Añadimos un poco de Recharge, agua y estare añadiendo un producto para engordar las flores. Los mantengo al tanto, buenos humos!

Likes
51
Share


@XoticGROW666
Follow
Couple weeks after Toppin
Trainin branches to get these girls in shape

Likes
58
Share


@Rap_a_cap
Follow
Great climate, ideal. After careful consideration, valued the considerable size of the plants, the flowering stage and the yellowing of the bottom canopy , I decided to feed one last time with veg nutes at half dose. This will be followed by 2 waterings of water only and then a boost of flowering nutrients.
She's one week later in flowering than Royal Gorilla and is very different in flower pattern from her sister, fewer pistils but more vegetative structure, the buds appear to be more massive. Let's see. Expected harvest time: 1st week of October.
Thanks for following, I ❤️ you

Processing
Likes
3
Share


@Tryhard1988
Follow
Uploaded a video of all my strains together she in the left back corner and did a separate video of her by her self this is my favourite smelling plants she's phenomenal she really is


Likes
223
Share


@GERGrowDesigns
Follow
Welcome to Flower Week 6:
-Sweet Seeds Grow -
6 x Tropicana Poison F1 6-7Weeks Flower
4 x Gorilla Girl F1 7Weeks Flower
2x 720w Lights
-Each Plant gains 1-3 Liter Water every Day
-Shoutouts To my Partner Narcos Seeds which Sponsoring This Sweet Seeds Grow with theyre Amazing Narcos Nutriets
Day Temp: 27
Night Temp :19
Humidity: 45-50%
Shout Out to Narcos Organic Nutriets since Day one . They have Everything from Organic to Hydro or Coco and i cant Complain to my dutch Friends !
The Sweet Seeds Phenos doing Amazing and im looking forward for the last weeks .
Shout out to Apollo and Sweed Seeds aswell !
The tropicana Poison is changing Bud Coloure and Leaves .
Both Smell Amazing . Tropicana like berrys and the gorilla like Zypressen/zitrus .
The buds are Stacking up Each day .
I dimmed the light today at day 69 to 400w in a total of 800w . This will be straight to the Last harvest .
Also were going for 4 days No Water concept at the Last Days with another 2days Complete Darknes before harvest .
Loving This Coloureful Paradise :D
Stay tuned and Keep up Growing Everyone !


Likes
12
Share


@Naujas
Follow
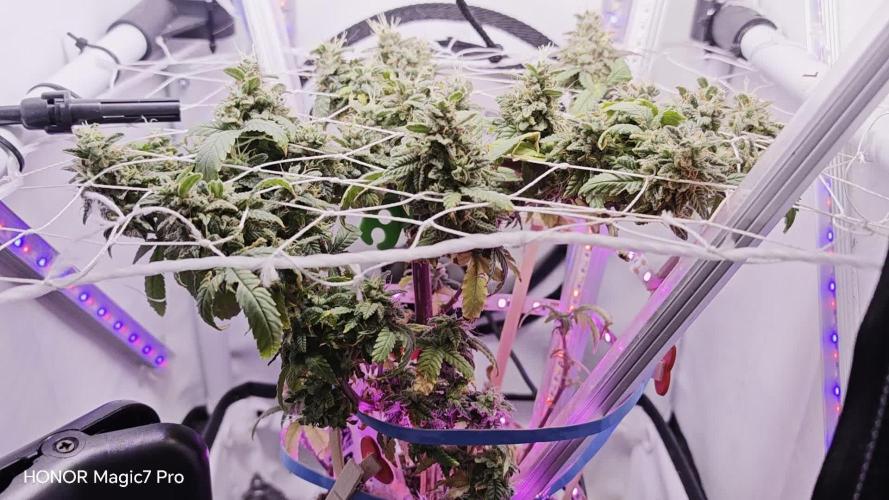
The girl's upper leaves look terrible :( I didn't manage to give her more potassium in time :( Well, the flowers bloomed really well, they are not small, and there is definitely a lot of sugar on them :) the smell is also amazing :) apart from the upper leaves, everything looks pretty good :) when I cut her, her image will change :) I think she has max 2 weeks left ;)

Likes
20
Share


@CanadianFillmore
Follow
Start of week 4, day 22. The girls grew tremendously during the last week, very nice branch growth, internodes and overall plant size. No trimming this feeding, just removed 2-3 dying leaves from the lowest branches. One of the girls is clearly shorter than the others, I think I will keep her in veg after this week and flip the other two to flower.

Likes
20
Share


@RunWithIt
Follow
I mean, overall this was an extremely painless grow. The test of whether we should or shouldn't top autos is still TBD imo. Our topped candidate produced denser, frostier buds, but weighed slightly less, at 14 grams of bud total. And our lst plant produced 18 grams of bud, not as frosty, and almost as dense as our topped girl. I'll be topping autoflowers from here on out only under the circumstance I have 4+ to grow at the same time. Seems like it could be used to speed up the autoflower grow cycle if done properly, like with right. Since I'm doing a perpetual cycle, it's still a viable option for me in the long run. A few tips I have for anyone growing this strain in organics:
Start feeding bloom nutes a little bit prior to flower transition - this makes the transition more seemless. From weeks 1-3 flower, I slowly dropped the grow dosage until I cut off grow nutes week 3 flower.
Starting the flush around week 6 flower seemed to really bring out this plant's potential. But I think you could get away with starting the flush around week 5. I hope this helps anyone trying this strain out. It's a good one, I hope to see more journals of it, eventually.
Cheers everyone! Time for me to take a well-deserved puff. :) ☁️ 🌼
Likes
11
Share


@NidoR420
Follow
Doing amazing :))) missing a lot of picture lately, overwhelmed with work
Likes
6
Share


@Brookillinit
Follow
I started the week super cropping. Each of these babies is looking great now.


Likes
14
Share


@BoboLacetti
Follow
It's slowly coming to an end. I check the trichomes every 3 days. Most are still glassy. I think the first two plants that are ready to harvest will be RedHotCookies #2 and Ayahauscapurple #1
The buds are slowly getting thicker^^
I got an upgrade. The AC Infinity fan. Great impression so far. In the future I will get the complete AC infity set. Exhaust air, controller, humidifier so that I can set the VPD correctly in the future.


Likes
4
Share


@Elguacho420
Follow
Buenas a tod@s... Otra semanita de floración para estas hermosas.... Han crecido bastante, las veo muy bien, riengo generalmente cada 2 días, el pH perfecto, absorben muy bien los nutrientes, el sustrato muy bien desde q lo eh cambiado este cultivo... Esty muy contento y el resultado va tomando forma, trabajando duro se obtienen buenos resultados a la larga, hay algunos fallos para mejorar pero de momento las niñas están bien y van creciendo y engordando favorablemente... Me gustaría tener más espacio y más material tecnológico para el cultivo, pero de momento es lo q hay y nos apañamos bien... Buenos humos para todos 🏻💨💨
😎💀
🇦🇷🤝🏻🇪🇦
Likes
6
Share


@MadeInGermany
Follow
COMMENTED BY
MadeInGermany MadeInGermany 3 hours ago
Flowering day 7
since time change
to 12/12 h.
Hey guys :-)
The flowering started last week because otherwise the space in the small tent would end up being too narrow :-)
Cuttings were taken from each phenotype beforehand.
To change the flower, I rinsed it very lightly with clean fruits.
With the next watering she gets a mix of grow liquid and bloom liquid before she only gets bloom.
The heating mat works perfectly in the small tent and the parameters are all in the optimal range 🙏🏻👍.
Now we hope that everything stays that way and that the cold days will slowly pass :-) .
Everything was cleaned and checked.
have fun and stay healthy 🙏🏻
👇🏼👇🏼👇🏼👇🏼👇🏼👇🏼👇🏼👇🏼👇🏼👇🏼👇🏼👇🏼
You can buy this Nutrients at :
https://greenbuzzliquids.com/en/shop/
With the discount code: Made_in_Germany you get a discount of 15% on all products from an order value of 100 euros.
👇🏼👇🏼👇🏼👇🏼👇🏼👇🏼👇🏼👇🏼👇🏼👇🏼👇🏼👇🏼
You can buy this Strain at
https://pcg.international/shop/pcg-int/
Water 💧 💧💧
Osmosis water mixed with normal water (24 hours stale that the chlorine evaporates) to 0.2 EC. Add Cal / Mag to 0.4 Ec Ph with Organic Ph - to 5.8 - 6.5
MadeInGermany


Likes
17
Share


@RDWCGrowing
Follow
Week 1 Day 1 - 8/12/2023
1st Water change Day! Such a special time it is when you remove the little bit of Nutes that you gave them as an appetizer and you give them their first real meal.
Added
39 Gallons of Water to my system
SILICA= .5mil/Gal = 19.5 = 20mil
Root Drip = 1mil/Gal = 39mil
Cal Mag= .25mil/Gal = 9.75 = 10mil
FLoraMicro= 3.0mil/Gal = 114mil
FloraGro = 2.0mil/Gal = 78mil
FloraBloom = 2.0mil/Gal =78mil
ORCA= .5mil/Gal = 19.5 = 20mil
Week 1 Day 2 - 8/13/2023
Everything is looking good the roots are making their way to the water and the new grow is looking nice and green.
Week 1 Day 3- 8/14/2023
Everything is right on track, they are looking beautiful and in the praying position all leaves happily lifting towards the light.
Week 1 Day 4- 8/15/2023
A little worried today her birth Twin the BA I am growing out is looking great and is raised towards the light and this one is just slightly under.. Will keep an eye on Her.
Week 1 Day 5- 8/16/2023
Walked in and the humidity was under 60.... ohh noooooo.. So I added 2 humidifiers to the tent and attached them to my InkBird controller which is set to 62.
Also looking at the roots and she has some poking out the bottom but just not in the water yet.. Luckily we are set for 14 days before next water change so the system will stay stable and her sister already has roots in the water so she should only be a day or two behind.. we will just keep tracking but she is delayed.
Week 1 Day 6- 8/17/2023
Roots in the Water!!! Huston, we have a successful launch. This grow is on!
Humidity was a little low this morning so I refilled the humidifiers. Other than that the temp looks great, the PH looks good, the PPM looks good the plant is in the praying position and all damage from the little drowning from over filling the cloning machine seems to have been fixed. Happy Happy.
Week 1 Day 7- 8/18/2023
Yay.. week 1 in the books, roots in the water growth has started. Everything for growth and environment is looking good and on track, there are a couple of mutations with this Lady will keep an eye on those leaves.
IMO this grow is going A lot during this week 1 then week 1 of the last grow when I had them drowning.
Really excited on how this grow is going to come out.
Likes
31
Share


@Chubbs
Follow
SuperSativaSeedClub
PurplePunch OG Auto
These girls are doing good after the transplant. I did loose one. Both the others seem to be bouncing back. Still some crispy leafs but overall it looks like more healthy are growing. All in all Happy Growing.

Likes
2
Share


@CannaIGrow
Follow
Plant seems to be growing well, she’s has some nice fans. I’ll be transplanting some time next week. Topped her this week too.
Likes
39
Share


@BudsBanditUK
Follow
A nice stocky little plant. She is starting to get that nice smell. Taking heavy feeding nicely and also now fattening up. Still no purple colours yet. I love this strain.
