
Processing
Likes
Comments
Share


@CultoCannabiss
Follow
En esta primera semana mantuve las luces muy alejadas lo que provocó un estiramiento prematuro lo que a mi gusto no me gusta mucho a sí que para la siguiente prepararé un transplante.
In the very first week I kept the light so far so the it create a early grow on the structure but for me its not so good so I prepare a transplant for The next week.


Likes
8
Share


@Mr_nugs_lover_David
Follow
Very good journey to me, she has responded very well to the lst training, providing me beautiful colas, enough for me to have nice clean organic nuggets to smoke. I would definitely would run this Ak420 by seedstockers again, the sweetest phenotype was the number #2 which you can take a look at here in my page!
Likes
14
Share


@MrReeferMadness
Follow
Thought I'd show you guys some root growth. The 3 plants in the video are all gorrila zkittlz.... Non of which look the same or are growing the same way lol. No complaints its just interesting too see such difference characteristics from the same strain.
GS#3 The tallest isn't as busy but has huge root growth and strong branches (thinest leaves darkest green)
GS#1 The smallest the probability the most symmetrical but shortest in root growth (widest leaves and lightest green leaves)
GS#2 The Mid size plant is basically a mix of both all round


Likes
5
Share


@Sugahmama
Follow
Hello, its week 12 and we are still in this lol
I think 3-4 more weeks and I can finally harvest wohoo.
I had a little Problem with gnats. Had to remove 20~25% of the plants.
Has anybody more good advice besides sticky traps and not water to often? Thanks
See you next week lol
Likes
203
Share


@HirdoWeirdo
Follow
This summer is full of surprises! That's why I'm proud to introduce you to part of my new grow in collaboration with the amazing @Exotic_Seed 🙏
This adventure begins with Malasaña Gelato, a cross between (Gelato33 X Do-Si-Dos) X Malasaña Cookies that looks really good and yummy. 😛😛
I was really curious to try a new variety of Gelato, a strain that I have been in love with for a year now and I finally have the chance to expand my knowledge.
The seed germinated in 24 hours directly in the soil, in the next few days I will transplant it into its final pot. 💪
The Malasaña Gelato will grow under the powerful light of my new Mars Hydro TS1000 for which I thank @MarsHydroLED and @SallyZou415 😘
A tasty summer is on the way!😍


Likes
6
Share


Likes
4
Share


@GizaWRZ
Follow
Plants looks nice and heathy after some defoliation but they are still pretty small 🤔 dont know what is the reason, hopefully they gonna get bigger 🙏
Likes
154
Share


@CBD_Sweden
Follow
@FAST_BUDS,
Hi all the happy people here in GrowDiaries.
This is my second cultivation ever and it will be fun to try a bigger space than my closet grow.
First, I'm just going to say I'm done with the construction of my new growroom.
I put some pictures on the construction here in week one.
The room is 2.14 meters by 1.7 meters and has a ceiling height of 2 meters.
It provides a floor area of 3.6 square meters.
I use a 54 Watt Lightwawe T5 for germination and 2 Pcs 400 Watt HPS lamps.
I have a channel fan that replaces the room air about 40 times an hour to get a comfortable environment in the room, the air enters a fresh air intake from the outside.
The air is purified through a carbon filter to then leave the room to the rest of the basement.
Then I use that heat to heat the rest of the basement.
I will use 8 pcs 15 liter Autopots to grow with and a 100 liter water tank that supplies the pots of water and nutrition.
I will grow completely organically in soil and will watercure my buds to get the best possible medicine for me.
--------------------------------------------------------------------------------------------------------------------------------------------------
2017-09-18. Week 5 starts. Added new video. Girl Nr 1 is 46 cm high and Nr 2 is 33 cm.
---------------------------------------------------------------------------------------------------------------------------------------------------------
2017-09-19. 2 new fans is installed in the grow room. Added pic and video.
-----------------------------------------------------------------------------------------
2017-09-20. Kl 10.00. New video. The Nr1 girl is 52 cm high and Nr 2 is 32 cm.
Kl 23.00. Did some massive defoliation, added video and pics
------------------------------------------------------------------------------------------------
2017-09-22. The girls have recovered well after my massive defoliation. Girl number 1 is now 56 cm tall and number 2 is 35 cm. They have received 6 liters of water and nutrition today.
--------------------------------------------------------------

Processing
Likes
6
Share


@Jack_Greenstalk
Follow
platinum yeti 3 finally stopped stretch at 34 inches and its closest to bulb at 18 inches from closest top. rest are about 20-22 inches from the bulb
Likes
38
Share


@Master_weeda
Follow
Une petite bombe a ne pas mettre entre toutes les mains
Un régal olfactif une palette d'odeur exceptionnelle une plante très résineuse
Je me languis le moment de la dégustation
A très bientôt

Likes
42
Share


@GanjaReaper
Follow
Welcome back
This week i did some more LST as you can see,
Gave them water with enzymen and gave them water with nutrients.
They grew a little but not that much.
I really want to repot them but the outside temperature is still 12-15 degrees at night so i don't want to do that.
The plant i didn't want to keep has been outside for a week now, gladly it still grows but not that fast as the other ones so i was right to not put them outside yet.
I will keep an eye on the outside plant if it still wants to grow for another 1-2weeks, if she does, i might put all the plants outside and risk it.
Why? Because the plants already start to stretch futher away then the size of the pots, i dont like that. Also if they have more space to root, the plants will grow faster and bigger.
The color of the leafs look a little light but that because they are in full sun light. They are perfectly green in my opinion and so far no burned tips so my feeding goes well.
They start to drink more as well.
I will spray them again today when the sun goes down with Canna Cure!
I can't say it enough how much i like the product, it keeps insects and molts away and even keeps my leafs nicely green.
ps, when i bended the brances after topping a few weeks ago, i didn't kept the upper brance for a few centimeters intact, most of the times i do that( to give it more support) but this time
i decided not to, just to see what happens. Well indeed you get some cuts into your brances, but when you are carefull you will be fine and you get really strong brances from it, therefore i like it this way.
Enjoy :)

Likes
Comments
Share


@TheCalyxLaboratory
Follow
Karel's Herer Haze - Flower Update 🌿
It’s been a highly productive week in the tent! We’ve made some major moves, and the remaining canopy is looking absolutely fantastic.
📊 Current Stats:
EC: 1.8 💧
pH: 5.8
Light (PPFD): 800 ☀️
✂️ The Boys Are Gone
Mission accomplished! After successfully harvesting the pollen we needed, the male plants have officially been removed from the tent. This frees up all the space, airflow, and resources for the rest of the run.
🌸 The Ladies Take Over
Now that the males are out of the way, the female plants are really stepping into the spotlight. They are doing exceptionally well, looking super healthy, and finally showing what they are truly made of. The bud sites are developing beautifully under the 800 PPFD, and they are loving the current EC and pH levels.
Really excited to see how these ladies swell up and pack on the frost in the coming weeks! 🔥✨


Likes
5
Share


@JohnnyBlaz3
Follow
Another week without any big issues! I am still figuring out this light though, I started lowering it now and it is at 100%. I am surprised how little heat it is putting off. I haven't had to remote mount the driver.

Likes
31
Share


@LockDownGrow
Follow
Ok so I'm going too only feed pH water from here on out too force the plants too use up all that's in the soil , I am hoping I can carry them on now for the next 2 weeks like this before they are ripe ,
Likes
24
Share


@Nicoweed10
Follow
Germinadas al 100% 8/8.
Trabajaré con la línea quemanta, aplicamos red roots aportando micorrizas al sustrato y directamente a la radicula de las semillas.
#2 dark de Royal life
#2 sweet mango de Royal life
#2 gelatos
#2 zkittlez.
Les dejo los primeros 7 días.
*Buenos humos
Likes
4
Share
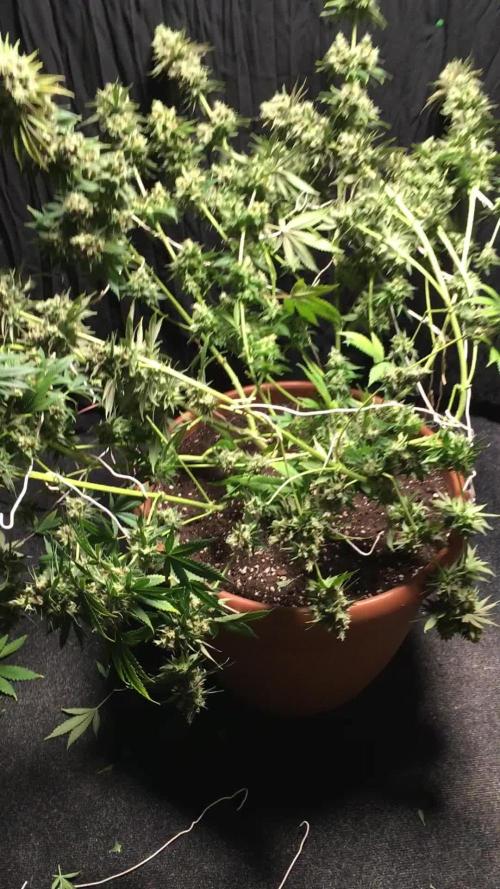

@Black_Widow
Follow
Хороший вырос цветок
к сожалению не получилось сфотографировать ее во всей красе
завалились ветки вся конструкция не устояла под тяжестью цветов
всем удачи всем красивых цветов !!!


Likes
12
Share


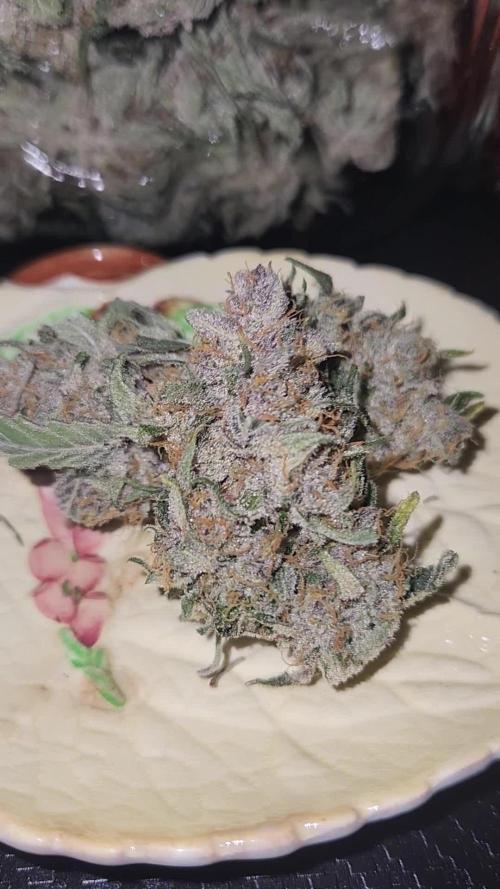
@Bryankush
Follow
Giorno 6 Lei sembra matura ed è molto profumata
In tutto ci ha messo 9 settimane a maturare niente male. Le cime a causa del freddo a settembre non si sono espanse molto ma sono sicuramente gelide e profumate
