
Likes
Comments
Share


@Brendanfromtherose
Follow
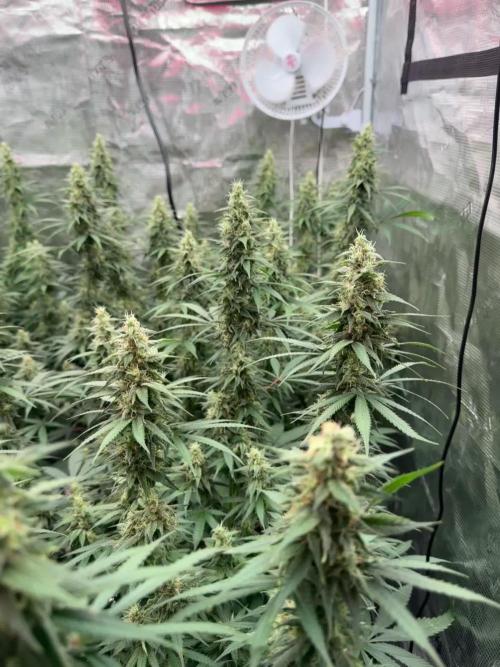
I've brought the PPM down again and kept the pH at 5.7-5.8, plant looks great first grow so very happy, Alot of Trichomes and don't know if I should be getting ready to flush and harvest, buds still getting fatter and she's still thirsty and drinking water but a lot of amber pistils and not sure if the crystals are clear or Milky but plant looks Great, just unsure when to harvest,
I've reduced nutes a little more and calyxs still fattening up, gonna hopefully start flushing at end of this week for about 2-3 days in my 4gallon bucket

Likes
9
Share


@Roberts
Follow
Fast version B is doing good. She had a solution change today. She us just vegging along. No issues at the moment. Thank you Medic Grow, Dutch Passion, SSSC, and Athena nutrition. 🤜🏻🤛🏻🌱🌱🌱
Thank you grow diaries community for the 👇likes👇, follows, comments, and subscriptions on my YouTube channel👇.
❄️🌱🍻 Happy Growing 🌱🌱🌱
https://youtube.com/channel/UCAhN7yRzWLpcaRHhMIQ7X4g.
Likes
5
Share

@ibbzy
Follow
Jesus! Smells like pineapples and some sort of exotic juice. Amazing. Definitely coming from the purple afghani lineage side
They’re chugging along nicely, will switch to the 10/14 next week and see if that helps with the ripening phase.
Sticky as hell, just brushing against them will feel like glue on your skin. Sticky, frosty and stinky!

Processing
Likes
4
Share


@TegridyCal
Follow
She has been the queen of the family since the first week, she stood out above all for speed, reaction to toppings and beauty. Truly a super strain for Zamnesia has managed very well every time we have raised it even in difficult conditions. It has a heavenly smell, one of the strongest ganje like smell, very sweet, caramel that very much reflects the original essence of one of the most classic strains found in California.

Likes
13
Share


@GanjaFarmar
Follow
To be honest overall this strain done good so as the others. Reflecting back on how i started with just a tent and light, and slowly buying the fans and filters whiles the plants were growing.
But i did want these plants to grow naturally without topping and Low Stress Training. I regret not removing the lower branches becuase i did get alot of small airy buds down there. But it was all trial and error. All i done was remove some fan leaves when good to do so every now and then. Not on a mad level tho, i did have alot of sugar leaves which i will be making some stuff with!
At veg the plants had deficiencies due to out of date Biobizz bottles. But that got sorted with the magic of Algimac and Calmag.
Overall
Next time I will definitely train the plants and maybe top a few.
Final Yield:
Plant #1 21.88 Grams
Plant #2 33.36 Grams
Plant #3 56.06 Grams
Which yield exactly 110 grams! Ounces come out very fat with these light buds
Not bad for the conditions they were brought up in, and with no training!
Thanks for everyone who has followed this diary throught out the journey! I hope this diary will help people out.
And thank you to Seedstockers for very cheap and quality seeds.
And special thanks for the GrowDiaries Team for providing the best platform for growing journals! I couldnt explain how much this Diary helped me. Its like a dream come true finding a site like this! And if you do see this message, i would love to see a Iphone app coming soon!
Kind Regards!
One love!

Likes
77
Share


@SooSan
Follow
Dans l'ordre:
1) Afghan Peach x Blue Monkey
2) Gelato Cake
3) Fast Critical Poison
4) Tropical Fuel
5) Hindu Kush
6) (Blueberry x Black Domina) X (Kosher Kush x Mk-Ultra)
7) Blueberry
8) Herz OG
9) (Blueberry x Black Domina) X (Kosher Kush x Mk-Ultra)


Likes
32
Share


@GODSGIFT_2005_JM
Follow
🍼Greenhouse Feeding BioGrow & BioBloom
⛺️MARSHYDRO
The ⛺️ has a small door 🚪 on the sides which is useful for mid section groom room work. 🤩
☀️ by VIPARSPECTRA (models: P2000 & XS 2000)
🌱 DUTCH HEADSHOP SEEDS:
www.dutch-headshop.eu
www.dutch-headshop.nl
ONE STOP SHOP
. 100% germination success on first try! with HUGE seed selection!
. Very friendly customer service
. Best bio-seed packaging
. Sells other products @ best prices:
. Nutrients
. Vaporizers
. Smoking accessories (grinders, cones)
. CBD Tinctures
. Resin Extracts
. Boveda humidity packs
. Ziplock bags
. Other health supplements such as:
. Lion’s Mane Organic Capsules
. Hemp Seed coffee

Likes
2
Share


@Ninjabuds
Follow
My Soaptini plant is still pretty small, but it's got these beautiful, unique leaves that I absolutely love. I've noticed some of the new growth is coming in a little light, but I'm not too worried about it. I'll keep an eye on it and see how it develops. It's definitely a slow starter, but I've got a feeling it's going to be a real showstopper once it gets going.
This past week has been a whirlwind of work, leaving little time for anything else. My phone's camera roll is sadly neglected, with only a few snapshots to show for it. But finally, I'm finding a moment to catch up on my grow diaries. It's been exciting to see the progress, even if it's just through photos. I'm looking forward to documenting the next stage!
Likes
40
Share


@Peeman
Follow
I’m watering the 7 girls (minus Trainwreck 1) every other day with 15+ gallons of R/O water & week 4 bloom nutes between 6.2-6.5 PH and 1100-1500 ppm. Every third feeding is just water with molasses
Sept.. 7 the day started with 15+ millimeters of rain and wind gusts over 50 km/h. A couple of girls got blown over but luckily no broken branches. Time to start tying down these pots geez.
I was checking up on Super Skunk auto #2 while she’s been drying and unfortunately bud rot has taking over most of her so the entire plant has been trashed. FAK!😢😢😢😢😢
Sept. 8 it's been overcast and humid all day and noticed some more powdery mildew on some of the girls. 😩 Unfortunately temps overnight have been in the mid to low teens celsius which is not helping
Sept.9 mixed a new concoction of 3 teaspoons baking soda & 1 teaspoon vegetable oil to 500 ml of water and carefully sprayed fan and sugar leaves trying best to avoid bud sites.
Sept.10 powdery mildew seems to be under control although the baking soda concoction burned some of the white hairs on a few buds.
Trainwreck 1 is on her final week of nutrients followed by a long flush.
Sept.12 the last couple of days have been cooler than average and somewhat breezy. The girls are looking healthy and the colas are starting to put on some serious weight so I added a few more bamboo stakes and a bunch of ties for more support. 👌😁👍
Sept.13 started the day with almost 15 mils of rain (that's about 1 inch for you non-metric peeps)😄 Colas are getting way heavy😲 A couple more branches snapped on Blue Fire 2. Man I can't catch a break. I hope it doesn't stress her out too much. 🙏
Thanks for stopping by, hope to see ya next week👉
Cheers and happy growing👍


Likes
5
Share


@Foxtrotoscar
Follow
Small harvest but was due to the over feed of CAL-MAG I had quite early on but still pulled through and flowered almost and OZ. Really nice Sativa from Barneys Farm.

Likes
2
Share


@PalmaGrow
Follow
22 - 28 septiembre
En mitad de la 7ta semana de floración olor crítico delicioso
El banco recomienda de 7 a 8 semanas esperaremos a observar su mejor punto sin pasarnos

Likes
25
Share


@Hawkbo
Follow
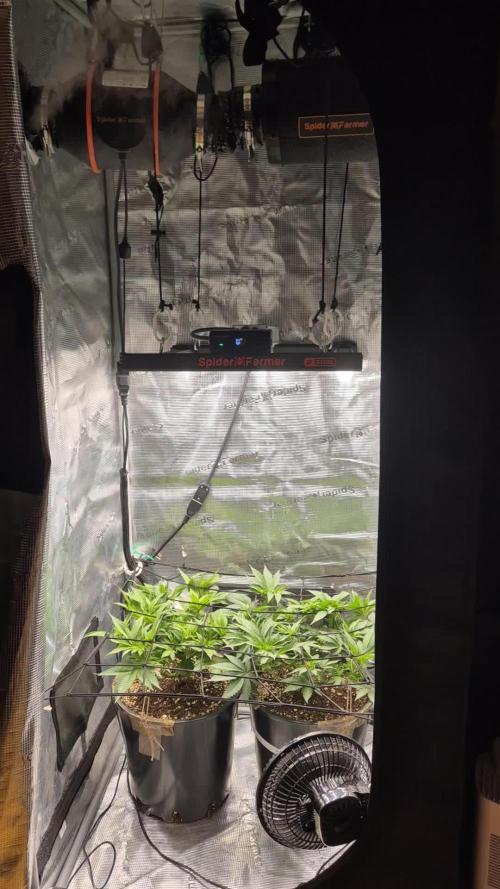
Finally got my buddy to come out and add in a 20 amp outlet so I can fire up a better light. Still using quantum boards but with a 4500k spectrum. Got in a foliar with the Growzyme from green buzz liquids. Fed them right before I took the pics they look a little sad but hopefully they bounce back quickly. Not much else going on.
The code bangdang will get you discounts at..
Gorillagrowtent.com
Rainsciencegrowbags.com
KindLEDgrowlights.com and more (see Instagram Bio for @bangdangbuds)
Also check out my Instagram if your interested in entering a giveaway for a green buzz liquids starter kit including some living organics, fast plants spray and some seeds of the winner choice.
Likes
6
Share


Likes
72
Share


@DreamIT
Follow
🐩👤Sirius Black👤🐩 by 🌍🌱WeedSeedsExpress🌱🌍
👤 22.3 ...
👤 23.3 ...
👤 24.3 ...
👤 25.3 beautiful plant, large and vigorous, I hope it takes a dark / red color, it would be fantastic. but I'll try with other seeds eventually 😀 the lamp is really cool, the plants look just fine under Viparspectra
👤 26.3 ...
👤 27.3 All very well, I can't wait for it to start releasing perfumes
👤 28.3
__________________________________________
👀Are you looking for a good lamp to start?👀
Viparspectra in my opinion has something more than the others, take a look at their site.
➡️ http://bit.ly/pro-seriesproductspro-series-p1500
⏩Use " GDVIP " for an extra discount💯
____________________________________________________________________________________
📜👀 A look at the details of what I'm growing 👀📜
🐩👤Sirius Black👤🐩 by 🌍🌱WeedSeedsExpress🌱🌍
📋 Details 📋
⚧ Gender
▪️ Feminised
➰ Genes
▪️ 70% Indica / 30% Sativa
🎄 Genetics
▪️ Sirius Black
🚜Harvest
▪️ 450 g / m²
🌷Flowering
▪️ 63 - 70 days
✨THC
▪️ 25.0%
✅CBD
▪️ 0.5%
🏡Room Type
▪️ Indoor
🌄Room Type
▪️ Outdoor
🕋Room Type
▪️ Greenhouse
🎂Release Year
▪️ 2020
____________________________________________________________________________________
👀📷 Follow the best photos on instagram 📷👀
https://www.instagram.com/dreamit420/
🔻Leave a comment with your opinions if you pass by here🔻
🤟🤗💚Thanks and Enjoy growth 💚🤗🤟

Likes
12
Share

@DreamIT
Follow
Sponsored by:
⭐GREEN HOUSE SEEDS⭐-💡VIPARSPECTRA💡-💐GREEN BUZZ NUTRIENTS💐-🛠️WEDRYER🛠️
🏁🏁8/8 I start today with these delicious test seeds from the legendary Green house seeds. I just put them in the jiffies and wait for the magic
12/8 I decided to divide each seed into a different diary. it is healthy and ready for the transfer that will take place tomorrow. yeah!
__________________________________________
Personal advertising (contains affiliate links)
__________________________________________
🦄 The Green House Seed Company is the most successful cannabis business in the world.Winner of many international awards (40 High times Cannabis Cups, 17 Highlife Cups, and many more private awards in many countries), it is a leader in cannabis genetics.
✅ bit.ly/GreenHouseSeeds420
__________________________________________
Did you know that Green Buzz Liquids fertilizers are 100% vegan? A complete line of products ready to give the best to each of your plants! Visit the site and see my journals to see how they work 🦄
🤯 And with the code "dreamit" you will immediately receive a 15% discount on your purchases
✅https: //bit.ly/GreenBuzzLiquidsPro
__________________________________________
👀 Are you looking for a good lamp to start with? 👀
🌞Viparspectra has something more than the others, take a look at their site.
⏩ Use "GDVIP" for an extra discount or "DREAMIT3" for an extra 5 %% discount
👀 Search for it on Amazon
✅Amazon USA: https://amzn.to/30xSTVq
✅Amazon Canada: https://amzn.to/38udUVe
✅Viparspectra UE: bit.ly/ViparspectraUE
✅Viparspectra USA: bit.ly/ViparspectraUS
______________________________________________
🌈 Tired of blowing on your weed hoping it dries quickly? Check out the Wedryer website! You will find a well-made accessory that will help your weed dry in just 8-10 days without the annoying risk of finding mold or other annoyances! (no affiliate links)
✅https: //bit.ly/Wedryer_
______________________________________________
📷🥇Follow the best photos on Instagram 🥇📷
https://www.instagram.com/dreamit420/
Backup
https://www.instagram.com/dreamit4200/
🔻🔻Leave a comment with your opinion if you pass by here🔻🔻
🤟🦄💚 Thank you and good growth 💚🦄🤟


Processing
Likes
10
Share


@CanadianFillmore
Follow
Start of week 5! Plants are doing great! Still some P & K deficiencies showing, but overall the bud development is phenomenal on the blueberries and is coming along nicely on the super lemon haze. I am still feeding an extra 2 liters to the Slh, this time at full dosage of part A & B, this seems to have helped with this past week (4). The blueberry are super sticky and smell amazing!
Likes
35
Share


@hornato420
Follow
Week 3 the ladies had an exceptional growth spurt. The nodes on each lady are starting to become more defined with every passing day.
I kept the feeding relatively the same however towards the end of week 3 I slightly increased the big to 1.5 tsp per gallon and the grow big to 1 tsp per gallon. I wanted to keep it simple with feedings until they get another week of growth than I’ll incorporate the tiger bloom in a small dose and also start some LST.
Today is the final day of week 3 so I decided to Carefully top the girls. I didn’t completely take the top off cause I didn’t want to completely stress them out. I think they should be fine considering I waited day 19-20 to do it.
The bigger girl(#1) of the 2 is really starting to spread out. Her leafs are touching the top of the pot. The smaller girl is not to far behind her. I’m curious to see once they start to go Into flower if this size difference will stay the same or change.
There isn’t any smells coming from these girls yet but I did a gentle stem rub and I’m getting a tropical musty citrus smell 🍍🔥😍.
I have to admit it has been such a pleasure to finally get to experience fast bud genetics. The last time I got a chance to experience a Pineapple Express high was in 2008. Let’s just say the dispensary I got it from was always out. So this grow is going to be a treat once I complete this grow.
Would like to thank each and everyone of you for viewing my diary. This is my first one. I was extremely nervous and intimidated to start one, but it’s a new year so we have to do new things ‼️💯💚.
Thank you fast buds for creating this strain cause without you I wouldn’t have been able to have this experience 💚💯.
