Likes
Comments
Share
@NONSENSE
Follow
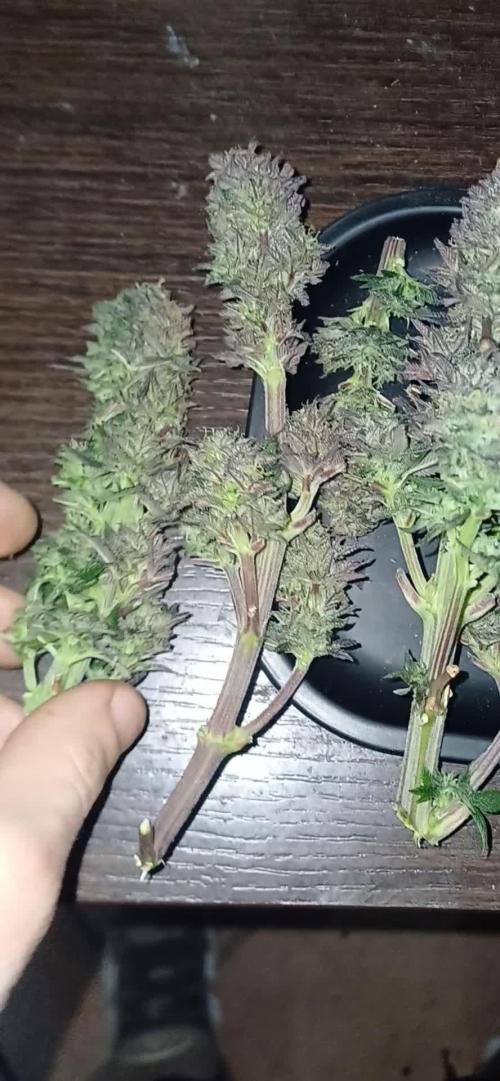
Good harvest and excellent buds. Buds are loaded with a lot of THC, which provides a powerful multifaceted effect, combining daytime high and relaxing evening stone. I like to smoke this kind and relax while watching TV or playing cards. This strain is easy to grow and I have not had any problems or overdose of fertilizers. In the fourth week, the plant has more than doubled its growth - up to 30cm. I did not change the main indicators of the microclimate, but again slightly corrected the nutrition scheme: I added NESY KOKO 20ml to 5 liters of water. The bush looked healthy, strong and the first signs of pre-blossom began to appear on it. Flowering began on the 45th day. The plant was stretched out at a frantic pace - almost 4 centimeters a day. Thus, by the end of the 7 week, its size was already 45 centimeters. With the beginning of the eighth week, the elongation of growth stopped. The final height (along the center line) was 60cm. I decided to shorten the light period - now it was 12/12. I started use HESI PK 13/14 HESI BOOST.( once a week) At 9 weeks, I started to gradually defoliation. The bumps were very heavy and dense, so I gently pulled them to the center cola, as the side branches might not be able to handle the weight. From the 11th week on, I stopped feeding the plant, giving it exceptionally clean water for flushing. The trichomes began to turn cloudy and signaled that it was time to harvest. By this point, I had completely removed the foliage from the bush - everything was ready for harvesting. I dry cut buds in the same grow box where they grew. I haven't tried these buds yet. I was pleased with the quality of the strain. The center kola, as well as the side branches, gave me an excellent harvest. As for growing, I did not experience any difficulties. I recommend using a charcoal filter when growing - the variety is very aromatic. After drying and curing, I will take a sample from the finished product. On the way out, I got a first-class, top-quality IndiCA. The taste is dominated by pine woody notes. The effect has a powerful relaxing effect and awakens a brutal appetite in me. I like to smoke this kind and relax while watching TV or playing cards. Thanks to sponsor HESI for nutrients I got this report. I am very pleased with the result. The whole cycle I had no problems with the growth. In the future, I ll sure to use their further line of fertilizers. I added fertilizers according to the table from NESI. 1. The level of PPM is relatively low and it is large 2. The PH level was corrected automatic and I have a video about it. 3. Due to the content of B vitamins and natural sugars, the flowers grow naturally and fast. 4. NESI complex was enough for full grow cycle. I did not add any extra food. 5. The end product is easier to clean as the PPM level is low.
Likes
92
Share
Week 9 - First Week of Flowering 🌸 The dark period has ended, and these ladies came back into the light fully energized and ready for action! It’s just the first week of flower, and they’re all praying, stretching, and absolutely thriving—filling up every inch of the tent. This grow space is officially packed from wall to wall, with each plant competing for its share of light and showing off some of the biggest, healthiest leaves I’ve seen yet! 🌱 A few strategic plucks here and there have kept airflow smooth and light penetration balanced. Those big leaves? They’re a sign of happy, healthy growth. Large leaves help the plant capture maximum light energy, essential during this stage, especially as they start focusing on developing those flowers. When plants grow huge, vibrant leaves like these, it means they’re well-nourished and content in their environment—a true testament to the well-balanced conditions we’ve got going in the tent! Flowering Parameters 🌡️ Room Environment: • Temperature: 26.7°C • Humidity: 63.3% • CO2: 960 ppm • VPD: 1.29 kPa (prime zone for flowering health!) Lighting: • Light Intensity: 835 PPFD (ideal for boosting flower growth) • Solution: pH 5.96, TDS 460 ppm, temp 21.1°C • Medium: Moisture: 100%, TDS: 520 ppm, Temp: 21.6°C Carbon Filter Installation & Smell Management 🌬️🌱 With the transition to flower, the scent profile is already starting to kick in—crazy for the first week, right? 🌸 To keep everything fresh and under wraps, I’ve set up a carbon filter system. Here’s how it’s working: I’ve connected the filter to my Aerofan, which pulls air directly from the tent. This air is cleaned by the filter and released into the main room, where it then passes through another filter before exiting my space. This dual-filter setup means no scent escapes into the wild, keeping things stealthy and the grow room a peaceful, scent-contained environment. Perfect for anyone concerned about keeping their home free from that telltale aroma! 🕶️🌬️ Enhanced Lighting with Emerson Effect 🌞 This week, I’ve introduced an extra 15 minutes of red light at the beginning and end of each light cycle. Why? Well, this red boost taps into the Emerson effect, enhancing photosynthesis efficiency, especially during the flowering stage. By stimulating a little extra wake-up and wind-down light, we’re mimicking the natural sunrise and sunset experience for these plants, which can help reduce flowering time. Not only does it encourage smoother transitions into day and night, but in theory, it’ll help these ladies finish a bit faster, while giving them a little nudge to build more substantial, quality flowers. 🌇 Nutrient Adjustments 🌱 Now that we’re in flower, I’ve swapped out the Start Booster for P-Boost and TopBooster to specifically support flowering needs. Here’s why: • P-Boost brings in additional phosphorus, vital for energy transfer and cell division as the plant channels more resources into budding sites. • TopBooster supports the flowering phase by improving flower quality and density, helping to build those big, aromatic buds we’re after. These changes bring the nutrient mix in line with what’s most beneficial at this stage. All this precise dialing in is easy to manage thanks to the TrolMaster system. From pH to nutrient scheduling, the TrolMaster ecosystem and ThinkGrow LEDs have been the ultimate teammates in this grow journey, giving me real-time data, fine control, and peace of mind. 💯 (Not introducing UV light just yet, but stay tuned as that’s coming soon for an added boost!) Looking Forward 🌟 Next week, we’ll be upping the reds, giving us an even greater chance of activating those flowering signals for a smoother, faster transition through the cycle. I’ll keep tweaking and fine-tuning every parameter to make sure these ladies get exactly what they need to thrive. Big thanks to the TrolMaster system for keeping everything in balance and optimized, along with the supportive Grow Fam following this journey! Your enthusiasm, advice, and support are a huge part of this grow’s success. Keep following for more updates, and stay tuned for what’s next! 🌿✨ P.S. Deep Dive: TrolMaster’s MBS-S8 CO₂ Sensor & Smoke Detector 🚨 The MBS-S8 CO₂ Sensor from TrolMaster is a powerhouse for growers, especially when it comes to optimizing plant growth and efficiency in a controlled environment. This sensor continuously monitors CO₂ levels and integrates directly with the TrolMaster ecosystem, giving you real-time data on CO₂ concentration. Ideal levels of CO₂ can significantly boost growth and yield during certain stages, so understanding and managing CO₂ is key. With the MBS-S8, I can control CO₂ levels precisely, keeping them within the optimal range for photosynthesis. This sensor is a game-changer because it adjusts CO₂ delivery automatically, giving plants exactly what they need without any extra monitoring from me. Meanwhile, TrolMaster’s Smoke Detector is an essential safety device, especially in spaces with electrical equipment, lights, and heat-generating components. This detector can be set up to alert me instantly via the TrolMaster app if any smoke is detected, allowing me to respond immediately to any potential issues. Fires and smoke are rare in controlled grow setups but having this safety measure provides peace of mind and lets me focus on the plants without constant worry. It’s an incredible tool for any grower prioritizing safety and proactive monitoring. Discount Codes so you can save big on your next check out 💚💚💚 Kannabia - DOGDOCTOR 30% off SeedsmanSeeds - DOGDOCTOR 10% off CannaKan- DOGDOCTOR 15% off terpyz.eu - DOCTOR 15% off The Neutralizer - PORKIT5-DOG 15% off As always thank you all for stopping by, for the love and for it all , this journey of mine wold just not be the same without you guys, the love and support is very much appreciated and i fell honored and so joyful with you all in my life 🙏
 With true love comes happiness 💚🙏 Always believe in your self and always do things expecting nothing and with an open heart , be a giver and the universe will give back to you in ways you could not even imagine so 💚 Friendly reminder all you see here is pure research and for educational purposes only Growers Love to you all 💚💚💚
Likes
10
Share
@Elpicor
Follow
Buds are ready afer a couple of months
Likes
107
Share
@Natrona
Follow
Auto Purple Hulk Auto by MSNL Outside 👉Sponsored Grow👈 W11F7 8/24-30 After the hurricane, I decided to finish growing Auto Purple Hulk inside the tent. I watered twice this week, once at the beginning and today at the end. CalMag 10ml/g Green Sensation 4ml/g Recharge 2,5ml/g PPM 826, PH 6.2 temp 69.8. I brought Purple Hulk on August 19, 2 days before the hurricane. Let me warn you right here. First, do not be so anxious to grow outside. Before moving four outdoor plants into a tent, they were inspected for pests and mold, but none were observed initially. After relocation, the heat and lights in the tent created conditions for caterpillar eggs to hatch. Caterpillars began to appear gradually over several days, with 20 to 30 found during one inspection. Caterpillar coloring matches the parts of the plant they consume, making detection difficult. As a result, Purple Hulk will be harvested due to significant pest activity; trichomes are mostly milky with few amber tops. Second, it is also advised not to bring plants indoors without proper quarantine procedures, as caterpillars can migrate to neighboring plants via webs. This was observed with Tropicanna Poison XL, which was next to Purple Hulk in the tent. Finally, for plants grown outdoors at any stage, bud washing at harvest is suggested, as demonstrated in Jorge Cervantes's video: https://www.youtube.com/watch?v=kkEYz8-YeUA. The proximity of Purple Hulk to other garden vegetables such as broccoli, cauliflower, and cabbage—primary targets for white cabbage moths—may have influenced the number of eggs found. Previous outdoor growing seasons did not experience similar caterpillar issues, though bud rot has been common due to humid summers in Virginia. Auto Purple Hulk buds developed beautiful purple hues from mauve to purple. They are big, dense ands sticky. Thank you all for your continued support and encouragement. Your likes and comments motivate me to keep sharing my journey. Let’s continue to learn to grow together! Stay green, growers love 💚🌿, 💫Natrona💫
Likes
9
Share
@Unnamed
Follow
This is the start of my second grow and also second Northern Light Auto from RQS, the goal is to hit #1 in g/plant for that Strain. I didn't take as many notes as in the last grow but there are timelapses, some photos and metrics from probes. Started with 3 Seeds and then picked the 2 strongest. The System is a NFT System but due to the size of the tube and root growths the solution with submerge the roots ~70% later on. To combat that I use 3 small 1.5w air pumps, these are super silent, if one dies I got 2 more running and to be honest air pumps used in DWC systems are often oversized and rely on Broscience. In my Salad/Herb NFT Systems I don't use any air pumps and the plants are just fine and grow great. This time I added sprinklers to humidify the air inside the tube, slightly moisturize the Rockwool and speed up root growths. Spoiler: Was a great success :) The ratios for the fertilizers are not accurate in the following weeks, I have a 120l Reservoir that is filled 90-110l I top it up once or twice a week to sustain PH and EC, if you want to copy it just go by the EC and use the B (Calcinit) and A (Kristalon Blue/Orange) 50/50. I mix the solution myself with dry salts that I bought in bulk 25kg bags. 4l Water(distilled/RO preferably, tap water is OK) + 1kg salts mixes just fine, keep the solution dark and cool and it will stay stable for months. Dry salts don't expire if kept cool and dry so only mix what you need and keep the rest stored as dry salts. 40ml A + 40ml B is about 2EC and 6PH with my tap water, very similar to Canna, Plagron etc. isn't it? just with the twist that I pay ~20% of the known brands. P2O5, K2O, MgO etc. are always the same as long as they are produced by a good manufacturer, Yara is a world leader in fertilizer production just not to be found in you general hydroponics or hardware store. Any other known manufacturer is fine as well, pick the cheapest. Check Hoocho on Youtube to see a guide on how to mix your own solutions, it ain't that difficult trust me. From week 5 onwards I also use Oxygen granulate (KMPS, CAS-70693-62-8, 2KHSO₅ * KHSO₄ * K₂SO₄) if you want to use this check pool supply stores and buy the cheapest. Keep this one dry, cool and dark. I used a old pill bottle to keep some ready to go because it came in a 1kg container and I only need 2-4g per serving + the bottle has a silica pack in the cap. From week 6 onwards I used Haifa Grow Clean for Details check week 6, I use this one as dry salts and add it directly to the tank, it does not interact in a bad way with the solution. For meassurements I use a generic 8in1 Meter "PH-W218" branded by many companies, as usual, check stores and buy the cheapest. (Check week 1 for an image of it) I got mine from Aliexpress for ~70€ it uses the Tuya app so you can always check your metrics and export them aswell. The PH and EC probe are accurate and are giving me stable results for almost 1 year now, I re calibrate the PH probe once in a while and it is tops 0.15 off after a month, always double check your results with PH drops/paper. Bluelab is... A LOT more expensive for less value. For the timelapses I use 2 Tappo C210 2k Cameras, these have the ability to make the stream available trough RTSP so that you can access it trough a link in a browser and that way I snap a Screenshot with a raspberry pi :) after that I just render it with blender to a timelapse. Sadly they seem to have trouble with the bright lights and I get image trouble over the course of the day, if you have a recommendation hit me up :) The script I use to take the Images: #!/bin/bash ########################################################################################################################################## ##### A script to save images from a rtsp capeable IP cam, Tapo C210 (2k image quality) for example in my case. ##### Images are saved in a directory named "2024_01_01" for example, it uses the "date" command within the system it is running on. ##### You can then render the images to a timelapse, I use blender for that. ########################################################################################################################################## RTSP_URL_LEFT="rtsp://:@:/stream1" #sets the variable for cam LEFT access RTSP_URL_RIGHT="rtsp://:@:/stream1" #sets the variable for cam RIGHT access while true; do TIMESTAMP=$(date +"%Y_%m_%d_%H_%M_%S") #sets the timestamp variable DIRECTORYLEFT=/$(date +"%Y_%m_%d") #sets the directory variable with current day for LEFT DIRECTORYRIGHT=/$(date +"%Y_%m_%d") #sets the directory variable with current day for RIGHT mkdir -p "${DIRECTORYLEFT}" #makes a directory for each day if it doesn't exist for LEFT mkdir -p "${DIRECTORYRIGHT}" #makes a directory for each day if it doesn't exist for RIGHT ffmpeg -y -i "${RTSP_URL_LEFT}" -frames:v 1 -vf "format=yuvj420p" "${DIRECTORYLEFT}/${TIMESTAMP}.jpg" #captures a frame from the RTSP stream and save it as a JPEG image for LEFT ffmpeg -y -i "${RTSP_URL_RIGHT}" -frames:v 1 -vf "format=yuvj420p" "${DIRECTORYRIGHT}/${TIMESTAMP}.jpg" #captures a frame from the RTSP stream and save it as a JPEG image for RIGHT ################################################################################################################################ ##### Waits for 180 seconds, change that depending on how precise you want the timelapse to be, less waiting = more images ################################################################################################################################ sleep 180 done Hope you like my diary, leave a comment and a like if you like it :)
Likes
18
Share
@Ageddd
Follow
She is starting to getting fat, at the begginning of this week, it was raining, but in the middle of the week, sunny days are appearing, and she is loving it, drastically increased eating levels, in 1-2 days, lower leaves started to yellow, but i noticed soon and gave a good dose with 4ml/l Top BLoom + some carbohydrates, Top Candy 2ml/l, and now she is lovin it. That purple colours appearing...no words... Simply a blessing, even more beautiful :D Last videos are about what i think are Chemtrails, like ie said before, the week started with rainy days, but when the sun came, this kind of biodegradable material appeared again like it is usual, it could be identified as spiderwebs if you dont look closer, but when you touch it is like soap and disappears... Guys and Ladies, let me know what you think if you want to stick a comment :) Take Care GD !!!
Likes
6
Share
This week I topped each main cola at the 3rd node as usual and performed a selective defoliation to improve light penetration and airflow. From now on, I won’t be doing any more apical cuts. In a few days, I plan to introduce a scrog net to start guiding the branches and prepare for an even canopy 🌿💪
Likes
12
Share
week seven flower everything looks crazy so far :D buds are filling out & terps going crazy!! the fade comes through!! I water them with 1.5l every 48h the light I use was set to 100% and it hangs 80cm away from the tops GorillaGlue 1: smells woody and fresh GorillaGlue 2: smells more woody and less fresh like a tree
Likes
1
Share
. 🌱 : test harvest on day 86, 40,3g, day 88 44,5g, day 90 54g, day 92, 60,6g 💧 : 💡 : 🤔 :
Likes
27
Share
@MrJones
Follow
OSS Cheese XXL 🔹⊱╮🔹╰⊰🔹 GROW Started 03.10.24 INFORMATION 🔹╰⊰´🔹⊱╮🔹 🌞Environment - Maintaining 80F and 65%Humidity 🌾Training - These ladies are Pruned and Defoliated and ready for flower. ⚱️2-Gallon 📊6.2 PH 💧 Feeding - Using Horti Grow 8-11-21, Bloom 5-15-26, Late Bloom 0-24-26, Cal 12-0-0 🌞Medic Grow Smart 8 760 Watts 🕷️ IPM - CannControl from Mammoth and Mosquito Bits as needed 🔹⊱╮🔹╰⊰🔹 GROW Started 03.10.24 INFORMATION 🔹╰⊰´🔹⊱╮🔹 🌞Environment - Maintaining 80F and 65%Humidity 🌾Training - The girls are recovering from last week's Pruning and Defoliation, ⚱️2-Gallon 📊6.2 PH 💧 Feeding - Using Horti Bloom and Horti Cal 12-0-0 🌞Medic Grow Smart 8 760 Watts 🕷️ IPM - CannControl from Mammoth and Mosquito Bits as needed 🔹⊱╮🔹╰⊰🔹 PLANT UPDATES 🔹╰⊰´🔹⊱╮🔹 📝 Notes - I am still not getting the vertical growth that I want before I flip, so I changed my light cycle to 18/6 and will be doing another defoliation and pruning of a few side branching - remember I am looking for tall plants with little horizontal growth. 📝Fertigation injects fertilizers into an irrigation system to supply dissolved nutrients to crops. 🗓️04.20.24 Today, I flipped the ladies into flower. I Have let them veg out as much as I feel the grow space can handle. I am sure there will be a bit of pruning and super cropping in the near future. These girls will grow untouched other than the 2x daily fertilization, but I am switching out the Horti-Grow with the Horti-Bloom, feeding at Hort-Bloom @ 2.7 GRMS Per Gal and Horti-Cal @ 2.5 GRMS Per Gal. 🗓️04.21.24 Today fed with Hort-Bloom @ 2.7 GRMS Per Gal, and Horti-Cal @ 2.5 GRMS Per Gal. 🗓️04.22.24 Today fed with Hort-Bloom @ 2.7 GRMS Per Gal, and Horti-Cal @ 2.5 GRMS Per Gal. 🗓️04.23.24 Today fed with Hort-Bloom @ 2.7 GRMS Per Gal, and Horti-Cal @ 2.5 GRMS Per Gal. 🗓️04.24.24 Today fed with Hort-Bloom @ 2.7 GRMS Per Gal, and Horti-Cal @ 2.5 GRMS Per Gal. 🗓️04.25.24 Today fed with Hort-Bloom @ 2.7 GRMS Per Gal, and Horti-Cal @ 2.5 GRMS Per Gal. 🗓️04.26.24 Today fed with Hort-Bloom @ 2.7 GRMS Per Gal, and Horti-Cal @ 2.5 GRMS Per Gal. ╰⊰🔹╰⊰´🔹⊱╮🔹╰⊰🔹╰⊰🔹STRAIN INFORMATION🔹⊱╮🔹╰⊰🔹╰⊰🔹╰⊰🔹⊱╮ Cheese XXL cannabis seeds are a special blend of Afghan Kush x Super Skunk producing the most pungent dank weed. Cheese XXL is the third commercially available edition released by Original Sensible using and developing these Afghan and Skunk genetics. The first release of these genetics was their Skunk Afghani. The second improved version was Stinkin' Bishop which had an improved and more potent THC content and was more pungent in terms of smell. Now the third and improved release on a similar theme is this Cheese XXL which has a similar THC content but with an improved heavier yield. The smoke is incredible with an outstanding flavour of pungent skunk and spicy, extra strong mature cheese created by the dominant terpene myrcene with its strong earthy scent accompanied by caryophyllene and pinene which combine to create a peppery acrid cheesy odour. THC levels are exceptionally high in this Cheese strain and the effect is well-balanced creating mental and body relaxation with a remarkable alleviation of stress and depression. The strong pungent aroma starts early in the flowering period, if you're growing Cheese XXL indoors you'll need plenty of ventilation to disperse the stinky "road kill" aroma of these babies! Cheese XXL is a Cheese strain particularly suited to indoor setups but also thriving well outdoors these feminised marijuana seeds are incredibly resistant to mould and disease and produce a substantial harvest that both the professional and amateur growers alike can easily achieve. These Cheese weed seeds are outstanding, break open the buds ready for use and you'll see why, the stench will make your eyes water! Cheese XXL from Original Sensible Seeds is a great choice to break into the commercial market of growing cannabis so if you're looking to buy something special with extreme yield, potency and flavour then Cheese XXL cannabis seeds are simply the best choice
Likes
28
Share
Likes
12
Share
@Preston22
Follow
Nothing special.. just giving it a lil spray at the top of the soil every time it goes dry
Likes
7
Share
Things are still looking good, being aggressive with the hydroguard
Likes
14
Share
@Swiftgrow
Follow
Started LST on 3/6 of the plants. Having no issues at all so far👌 Gave her some nutes twice so far at a very low dose. Currently feeding once a week. Soil holds enough nutes as is already. Low dose Cal-Mag in every watering - missed week 2 so I just started week 3
Likes
7
Share
Hello growers day 83 the buds are in the jar what can I say it’s been a joy growing the Zkittlez a nice little producer didn’t give me no jip through out the grow and my o my she has given some fat dank buds nice and crystaly I also made some bho wax check out the pics it’s 🔥 so so happy with the hole turnout I gave her water from my tap for the first ten days then gave her bio grow/bloom until I see her first pistols then gave them bio grow/bloom/top max/bio heaven up to day 61 then flushed her until day 75 then gave her the chop they had a 20/4 light cycle from the start definitely recommend this strain look after her with a bit of feed and she will look after you I only used the dry trim for the Zkittlez to make the bho and the return was incredible could not believe how much wax I got just from trim until next time be safe and happy growing 👌🏻✌️
Likes
8
Share
Top Gun #2 finishing up nicely, checking for mold every day, humidity is back in the 50s. I just trimmed up Top Gun #1 yesterday. 9 day dry, humidity started dropping into the 40s the last couple of days. Only one other tip of the buds had some mold on it. I’m smoking it idc🤷. Total dry weight was 50grams minus the molded buds, I’ll make butter with those. Small plant but smoking it right after drying it was one of the best things I’ve tried, very proud.
Likes
17
Share
Animal Mints — Legends of the Frozen North Part 2 — Drying, Trimming & Preserving the Harvest Before we begin, once again, we want to apologize for dividing this harvest into multiple reports. We know it can feel like a long journey to follow week after week, but honestly, this is the only way we can properly document everything in the level of detail that these plants deserve. Harvesting, drying, trimming, curing, resin collection, storage methods, smoke reviews… all of these stages are part of the final medicine. And instead of rushing through it in one giant post, we prefer to slow down and share every step in the most educational and transparent way possible. So welcome back to the frozen north. This is Part 2. ⸻ Ten days later, the room had completely changed. The giant living plants we harvested in the previous report had now transformed into hanging medicine. Slowly drying in darkness, at around 18–20°C and roughly 60% humidity, allowing the moisture to leave the flowers gradually instead of forcing them dry too quickly. For the first couple of days, humidity was brought slightly lower to help remove excess external moisture, but after that, conditions stabilized again for the slow dry we love so much. And then came that moment every grower knows. That little click. That beautiful snap in the branches that tells you the plant is finally ready. Not too wet. Not too dry. Just right. And honestly… after seeing these girls hanging there for days, fully intact, massive branches swinging slowly in the dark, it was finally time to begin the next ritual. Trimming day. ⸻ Gloves on. Scissors ready. Trim bin prepared. Medicine beside us. Mr. Baggy supervising operations as always. One branch at a time, we carefully broke the plants down by hand, slowly removing each flower from the stems before shaping every nug individually. No rush. No machine trimming. No shortcuts. Just patience, resin, and respect for the plant. And these Animal Mints girls absolutely covered everything in trichomes. The moment trimming started, the gloves became sticky almost immediately. Thick resin building layer after layer until eventually it rolled naturally into small dark hash balls directly from the fingers and gloves themselves. This is one of those little moments we genuinely love about harvest season. That sticky resin coating the gloves is essentially concentrated trichome resin — cannabinoids, terpenes, waxes, oils, and all the aromatic compounds that make the plant what it is. With a little warmth from the hands and gentle pressure, it naturally rolls together into traditional finger hash. Simple. Ancient. Beautiful. And of course… we also continued our little Moroccan-style “drums” with the trim. By gently agitating the dried trim across the screens, we collected an absolutely beautiful amount of dry sift. Bright golden-yellow resin, soft and sandy, full of aroma and life. No exact scale numbers this time — this was more about enjoying the process than chasing statistics — but the quality spoke for itself immediately. Honestly, this type of hash is one of our favorite ways to enjoy the plant. A little inside a joint, slowly melting together with the flower, enhancing both flavor and depth without overpowering the experience. Pure magic. ⸻ Now let’s talk numbers. And honestly… these girls performed beautifully. Plant A gave us: 127g Plant B gave us: 247.8g Plant C gave us: 287.9g For dense, compact, heavily resinous flowers grown 12/12 from seed, this is an outstanding result in our eyes. Especially considering the morphology of these plants. This style of growing continues to impress us more and more every single run. The plants remain relatively compact vertically, but the flower production becomes incredibly efficient. Tight node spacing. Massive bud stacking. Heavy trichome production. Strong support structure. Dense flowers without absurd plant height. The frozen north delivered once again. And standing there in the studio holding entire branches in both hands… honestly, it was impossible not to smile. Happy grower moment. ⸻ Once trimming was complete, the next mission began: Preserving the terpenes. Because harvest means nothing if the cure is bad. So this time we decided to test multiple storage methods side by side. Some flowers went into traditional glass jars — still one of our absolute favorite methods for long-term curing. Stable, simple, reliable, and something we continue to trust deeply. Some flowers went into vacuum-style Zamnesia metal containers, where air can be partially removed while maintaining stable conditions inside. Others went into vacuum plastic containers with pressure-sealed lids. And finally, part of the harvest also went into Grove Bags, since the yield was simply too large not to use multiple preservation systems. Inside several containers we also added 62% humidity control packs. These packs are not “magic terpene creators” or anything like that — they simply help stabilize relative humidity inside the container, preventing flowers from becoming either too dry or too moist during curing. The flowers themselves were already dried correctly before storage. That part is important. Humidity packs are not there to fix bad drying. They are there to help maintain stability afterward. And honestly, one of the most exciting things now will be revisiting these exact same flowers months later to compare how each storage method affected aroma, texture, smoothness, and terpene expression over time. Because curing is alive. Medicine changes. Terpenes evolve. And that journey is part of the magic too. ⸻ One thing we also want to mention is how much easier trimming became with the curved point Zamnesia scissors. It might sound like a tiny detail, but those curved tips genuinely help reach deep into dense flowers without damaging structure, allowing cleaner trimming while preserving the natural shape of the buds. Small tools. Big difference. ⸻ By the end of this session, trays were full, jars were packed, hash was collected, gloves were destroyed by resin, and the studio smelled absolutely unreal. pine, diesel and earthy. Animal Mints is looking amazing. And honestly… looking at those giant trimmed branches in the studio lights, it was one of those moments where you simply stop for a second and appreciate the entire journey from seed to harvest. Because this is more than growing plants. This is preservation of flavor. Preservation of resin. Preservation of time, patience, and intention. ⸻ But we are still not done. Not even close. The next report will be the final chapter of this frozen journey: the smoke review, terpene breakdown, curing evolution, flavor analysis, effects, and our complete final thoughts on Animal Mints from seed to harvest. And trust us… This girl still has a lot to say. ⸻ Huge thanks once again to everyone following this journey: Zamnesia for the genetics, Plagron,FOG Lighting, the gear sponsors, the community, GrowDiaries, the growers supporting from day one, the silent followers, the commenters, the critics, the legends, the OGs… And of course, thank you to everyone taking the time to read these reports week after week. The frozen north continues. 📡 DELETED @ 1K Please stay tuned.we never quit https://www.youtube.com/@TheDogDoctorOfficial NEW 🙏 Thank you for your patience and continued support. FOR DISCOUNT CODES AND MORE JUST FOLLOW THE LINK https://website.beacons.ai/dogdoctorofficial 📲 Don’t forget to Subscribe and follow me on Instagram and YouTube @DogDoctorOfficial for exclusive content, real-time updates, and behind-the-scenes magic. We’ve got so much more coming, including transplanting and all the amazing techniques that go along with it. You won’t want to miss it. GrowDiaries Journal: https://growdiaries.com/grower/dogdoctorofficial Instagram: https://www.instagram.com/dogdoctorofficial/ YouTube: https://www.youtube.com/@dogdoctorofficial Deleted by Youtube - https://www.youtube.com/@TheDogDoctorOfficial NEW Vimeo : https://vimeo.com/dogdoctorofficial Under construction stay tuned ⸻ Explore the Gear that Powers My Grow If you’re curious about the tech I’m using, check out these links: 🔆 Lighting & Environmental Control • Future of Grow — Advanced LED lighting technology https://www.futureofgrow.com/ DISCOUNT CODE: DOG20 • Lumiflora — Under-canopy LED lighting https://lumiflorade.com/ • TrollMaster — Environmental controllers and automation gear (past collaboration) ⸻ Genetics • Zamnesia Seeds — Genetics used in this project https://www.zamnesia.com/ ⸻ 🌱 Soil, Substrates, Boosters & Root Support • Plagron — Substrates, bio mixes, and supportive products https://plagron.com/en/ ⸻ 🎒 Storage, Curing & Preservation • Grove Bags — Curing and storage solutions https://grovebags.com/ ⸻ 📸 Photography Equipment & Tools (Not sponsors, but part of my creative toolkit) • Sony A6700 • Sony full-frame macro lens + few more • Stacking photography workflow - learning • iPhone (for behind-the-scenes shots) As always, this is shared for educational purposes, aiming to spread understanding and appreciation for this plant. Let’s celebrate it responsibly and continue to learn and grow together. With true love comes happiness. Always believe in yourself, and always do things expecting nothing and with an open heart. Be a giver, and the universe will give back in ways you could never imagine. 💚 Growers love to all 💚 📸 P.S. – The Eye Behind the Lens All photos in this diary (for now — except for the ones showing the camera, which I took with an iPhone) are taken with a Sony A6700 paired with a Sony full-frame macro lens and a few more. Photography is part of the story — it’s how we share the fine textures, the glow, and the quiet details that words can’t always capture. I’ve also started experimenting with photo stacking — a technique where multiple images, each taken at a slightly different focus point, are layered together to create one perfectly sharp image from front to back. It’s not digital enhancement or AI; it’s pure photography — a way to reveal the plant’s beauty in microscopic depth, from trichome to petal. You’ll even see a few shots of "ghost me" capturing the shots — camera, lens, setup — because every grow deserves not just to be cultivated, but documented like art. FOR DISCOUNT CODES AND MORE JUST FOLLOW THE LINK https://website.beacons.ai/dogdoctorofficial NEW DISCORD - Official Server Invite Link : https://discord.gg/ksjAkA5T74
Likes
11
Share
6/30 I messed up and put 8 days last week so I'll have tp do a six day week to get back on schedule. Pounded rain last night I guess. Very intense but very brief. As you can see in the video the plants are found great. A few have revegged so I'll need to defoliate the middle. I could make a TON of clones but it's pretty late for that. I might clone a couple outstanding plants to keep the genetics. Still seeing some pillar damage. Might do bt tonight. I'll keep this updated. 7/1 Super hot yesterday. Reached 90°. We are getting SOME rain today and thunder showers day after tomorrow. Bags still had some heft and everything looked good. I went back aroundcand found about half were at the point of needing water. He'll, they probably all did. My watering can is 2 gallons not 1.5 as advertised. So that means I used 5 gallons on the garden (not watering the 50) focusing the more water on the lightest bags. That tenth planet I'm seeing more septoria like leaves. This makes enough for me to be fairly positive ill need to treat it. I have plant doctor but I think copper works better. I also see more pillar damage so I've gotta apply something. I also need to lst more and I keep to clean put the interior of the plants so they don't get pm. EDIT: IT WAS 80° and no rain at 6:30. Humidity close to 100% bit plants look AMAZING! I'm hoping this may be my best year yet! I won't grow a bigger plant than tjat blue cheese in the 50 but so far everything is looking good. I may add some nutes to the pink kush in the 50 due to tje slightly less green color. I assume it's just because the other soil is all New amd this was a mix. I defoliated lightly to prevent pm but I have more to do. I just wanted to get a video of the girls looking good. 7/2 82° at 9am. Glad I decided to water even thoughvi watered yesterday. I need to up my volume. Thirty degree temp swings don't help much either. I said I used 4 gals but I used 5. I had one phed already. I'm hoping this will be one of my best years. IT looks like it! I won't have that MONSTER blue cheese in the 50. It was the smallest plant anyway and shows the difference between using NEW soil and mixing old soil WITH new soil. It's a much lighter green. Still need to apply bt and do a little more defoliation. EDIT: IT'S 90° WITH LIKE 100% RH. PLANTS LOOK A LITTLE HEAT STRESSED BUT OTHERWISE PRETTY DAMN GOOD. EVEN MY FATHER MENTIONED (KNOCK ON WOOD) "THAT I DONT HAVE ANY SHOT ON THEM THIS YEAR." LOL. I UPLOADED A VIDEO TO SHARE. HOPE YOU GUYS ARE HAVING AS MUCH FUN AS I AM! 7/3 83° at 9:40a.m. I need to increase my watering volume so I don't need to water every day. I used 5 gallons to water everything but the 50. I think I'm underwatering. However it was supposed to be severe thunder storms with torrential rain, high winds and hail. I'll gratefully take this hot sunny day instead. However in the future I think I'm not goingvto add in the predicted rainfall in my schedule. Unless it's a torrential down pour obviously. Everything g is still looking good and I've still got some work to do. EDIT: ITS 5PM AND NO "GOLF BALL SIZED HAIL. WE GOT A BRIEF RATHER INTENSE SHOWER. AT LEAST THE GIRLS GOT SOME WATER. IM GERY GRATEFUL THAT WE DIDNT GET THE STORM AND HAIL THAT WAS EXPECTED. 7/4 Didn't even get a chance to inspect the plants this morning as the wife had a medical emergency. My father called me (as I was about 5 mins away in route) telling me my plants were drooping and one was "really bad." I figured that since i had watered consistently the past few days and it was only 70 not 90 that they would be OK until noon. Boy was I wrong. I've upped my watering volume. I watered EVERYTHING with at least a gallon. I may have only given the tens 3/4s. Everything was back up by the time I left but the one on the end. I had forgotten flat I hadn't watered that one and needed to mix another gallon to water that plant. Thats why that plant looks worse on the video. I think my watering is going to need to increase to more than a gallon but it's a good start. I'll keep this updated. 7/5 Had to leave early again but I'll be back before noon. The wind is still whipping! I DID go around the cage and lifted every pot to make sure they were heavy. Even with the heavy wind the bags still were heavy. I really need to get some shit done this weekend. Last day of this week. Still haven't applied bt or done the pruning that needs to be done. I'll update as I go.
Likes
10
Share
Black Muffin Harvest Report The Black Muffin Monster really impressed me. She grew into a beautiful and strong plant with dense, resinous buds and an amazing aroma. Unfortunately, I suspect she developed a fungal infection, probably Fusarium, which forced me to remove about four side branches. Still, the rest of the plant stayed healthy and finished strong. Overall, I’m very happy with the results and excited to see how she turns out after drying and curing. It was a great experience despite the challenges.
Likes
72
Share
@BodyByVio
Follow
Beginning of week 8 and seems like a long way to go. Most of the hairs still white. Hopefully the buds will fill in more! As right now I’m planning to take it 10+ weeks. This week I will lower the CO2 slowly 50 PPM every day until I will reach 800PPM. Also I will lower the light intensity by 2% every day. This week I lowered the day temp to 79 degrees and next week I’m playing to lower it every further to 76 degrees Fahrenheit. Water temp is at 68 degrees and probably from week 9 I will lower it to 66. Beginning of week 8 TDS is at 550PPM. I sent adding the Late bloom enhancer from Current Culture! End of week 8 : lowered the TDS to 470ppm , she seems that it not eating so much nutrients anymore. She still drinking 3 gallons of water every single day.