Likes
Comments
Share


Likes
12
Share


@GREENPHOENIX6262
Follow
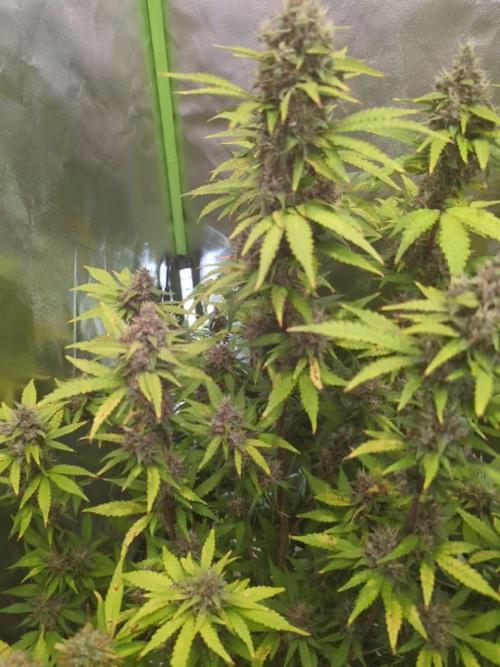
*Week 4 Flower 09/24*
Both Mimosa girls appear to be running fine with Mimosa (1) running a little behind but is catching up accordingly. Small oversight in early growth resulted in a minor stunt but she is improving dramatically.
Water Feed has increased by half a gallon ( 1gallon clean - .5 gallon nute feed)
*Week 4 Flower 09/28 - Mid week update*
Both plants are flowering accordingly - Mimosa (1) is a bit taller then Mimosa (2)
Buds are becoming dense and covered in trichomes.
No deficiencies - No areas of concern - Potassium and Phosphate feeds continue
*Week 5 Flower end of week recap - 09/30*
Both Mimosa's are flowering nicely - Budsites covered in frosty trichomes.
Mimosa (2) looks shorter but that is because her COLA was tied down to expose bottom budsites.

Likes
4
Share


@m0use
Follow
***Sponsored Grow*** = Medic || https://medicgrow.com || Grow = ***Sponsored Grow***
Plants still looking good from last week, the yellowing has seemed to stop spreading, still some dull green in some leaves, I think I was under feeding them, but runoff says otherwise. Noticed some more pink/purple stems on the plants and decided to increase the phosphorus content in the feed by mixing in half grow and half bloom from the nutrient lineup. I'd use the PK booster I have but its to high in K for my liking. The entire lineup is very high in K. mixing grow and bloom gives a NPK ratio of 7-7-14 then done 1:1 equal parts.
Grow=8-4-15
Bloom=6-10-14
Boost=1-15-30
Run off was a bit high for my liking but only seeing minimal signs of nutrient burn. Still watering once with feed and runoff and then later in the week with water and no/little runoff for my watering cycle.The number in the nutrient section are wrong but the EC and ratio are correct. Also impressed the roots have started popping out the bottom of the container already after only being transplanted for a week. Good root growth on these ones.
Lights doing well. The V1 spectrum is good on the medic grow mini sun-2's 240w. No issues so far, dimmed at 80%
.
Till next week.
***Sponsored Grow***
Official Website:
https://medicgrow.com/
+
https://seedstockers.com/
Facebook:
https://www.facebook.com/medicgrowled
+
https://www.facebook.com/SeedstockersBarcelona/
Twitter:
https://twitter.com/medicgrow
+
https://twitter.com/seedstockersb
Instagram:
https://www.instagram.com/medicgrow420/
+
https://www.instagram.com/seedstockers_seeds
YouTube:
https://www.youtube.com/channel/UCNmiY4F9z94u-8eGj7R1CSQ
+
https://www.youtube.com/channel/UC4GiFYrIWeNtwtXjcivCmfw
Growdiaries:
https://growdiaries.com/grower/medicgrowled
https://growdiaries.com/grow-lights/medic-grow
+
https://growdiaries.com/grower/seedstockersofficial
https://growdiaries.com/seedbank/seedstockers

Likes
25
Share


@pifflestikkz
Follow
Day 106
16/10/24 Wednesday (Start of week)
No watering today.
But picture and video update 📸 💚 to start the week off 🤩
- just noticed I missed out Auto Kabul... I'll add her tomorrow.
Day 107
17/10/24 Thursday
De-chlorinated tap water pH 6 with flawless finish today
Day 108
18/10/24 Friday
I have moved them!! Now in the cleaned down 1.2m x 80cm. Under 660w to finish this week off 💚
Day 109
19/10/24 Saturday
De-chlorinated tap water with flawless finish pH 6. Only 300ml
Day 110
20/10/24 Sunday
Another de-chlorinated tap water with flawless finish pH 6.
Day 111
21/10/24 Monday
De-chlorinated tap water and flawless finish ph 6 again. Again 300ml.
Will upload pictures and videos tonight ✌️💚
Day 112
22/10/24 Tuesday (End of Week)
Edit:
Changed my mind, doing one last flush with de-chlorinated tap water and flawless finish pH 6.
She can finish the week then go dark🌑 mode wednesday morning 😁✌️


Likes
1
Share


Likes
23
Share


@HideAndFly420
Follow
Day 43 (15 of flowering)
stopped top max. Added 2 ml more of bio grow, Let’s see what’s going to change.
Stretching is visible every day more. Now just waiting to big bud increasing.
Next week i’ll add Carbon Filter to ventilation set up.
I think other 6 weeks left.
Day 45, added Rhino skin, let’see next change.
Day 46, i think streching is finish. Now just waiting to get that bud big and fat.
Removed top max 4 days ago, and added 2 ml of rhino yesterday just to improve stem and branches, i added cause i tought to a nutrients déficience but at thé end after reading answers to my question i fixed air ventilation that was increasing too much the temperature in the up per side of the grow.
Soil Ph is 6,8.
Day 48, i just moved my ventilation that was causing some issue to the highest bud of orange. Rhino by adv increasing stem health is visible now and color are great. I think orange will take at least 2/3 weeks more than Blue dream auto
Any suggestion is accepted :)
Let’s go.
Likes
6
Share


@GrowIT
Follow
this week I wanted to add a wire mesh between the pot and the saucer, to make the roots breathe more and not to sediment the nutrients on the bottom. I increased the ventilation because in flowering it needs less humidity and decreased the nutrients after noticing a yellowing in the tips of the leaves. we are almost there 😍😍


Likes
8
Share


@Easygrower
Follow
Hello growers day 14 with the blue monster ok I’m have troubles the poxy stinking police have been raiding people on my estate great (it’s illegal we’re I live)now my wife has told me it’s got to go so what do you do I packed them all up And put em in the in-laws garden 😂 there not doing to bad the weather has been banging lately there just getting a bit of a bashing from the wind so I’m going to finish the blue monster outside now hopefully she does well until next be safe and happy growing ✌️

Likes
56
Share


@Vince_Van_Grogh
Follow
Can’t be a Central European summer without hiking up some 🇨🇭 mountains! The scenery is just majestic at times… and of course the doggo is loving those cowbell sounds!
Likes
60
Share


@Drgreenthumb627
Follow
This strain grew tall and lanky, with very compact and beautiful nugs. the frost that came out is quite incredible and the fruity sweet and piney smells coming off the plant are lovely. i would definitely grow this plant again, it was easily trainable and the node spacing allowed light to penetrate deep into the canopy, maximizing my grow surface area
Likes
13
Share


@NanoLeaf
Follow
Week 8 and week 3 of flower!
The terpenes are making my mouth water and the ladies are fluffier than ever and stacking up nicely.
Due to weather changes recently I was able to keep lower over all temperatures and the humidity has increased slightly but it’s right where I want it (50% RH).
Purple Lemonade is fading nicely and her colours are becoming more and more vibrant - she has about 2 weeks left. Terps are insane!
All the other strains are happy as can be and also showing slight fade on leaves here and there. Very impressed with my Divine Seeds pheno’s and definitely recommend giving their strains a try very strong and easy to grow. Ethos Zweets literally smelling like candy canes. Dutch Passion Colorado cookies definitely giving off hues of a bakery.
Overall it was a smooth week and I can’t wait for the smooth smoke!
Organics is the easiest way to grow with minimal effort and great results. Shoutout to Green House Feeding Bio Line 😎

Likes
64
Share


@SmokingTiki
Follow
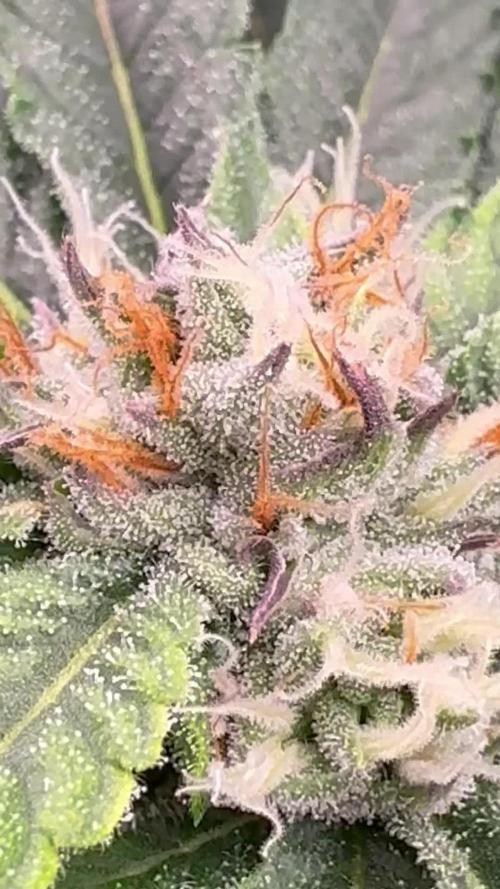
- The trichomes photos have been taken just before the harvest.
- Drying was made at 20°C and around 52% of humidity (4 days).
- Curing done with humidity in jar between 60-63%, temperature around 20°C (2 weeks).
Veg time : 46 days
Flowering time : 51 days
Total time from seed to harvest : 101 days
Height : 108cm
Pot size : 26l
Likes
6
Share


@masterofsmeagol
Follow
4/27 I'm fairly certain that I watered everything. If not I only would've held off on a smaller plant that was about 17 grams over dry weight. Pretty sure I did them all though. Having a scale makes watering in these cups SO much easier. Had a rough few days with a lot going on so i uavent been writing as much. Transplant will be happening soon. Most plants have or are close to having there fourth node. I'm not going to top/FIM until after transplant and they've settled in nicely. The Kush plants are getting close to needing that transplant. I'm waiting for the leaves to go beyond the edge of the cup. Despite the fact that some havecthree fingered leaves hanging on their own stem. The transplants will go into 1/2 happy frog half ocean forest. All in all things are going good. Some plants will probably be transplanted this week. Plants in this diary are different ages.
4/28 I watered what needed it by the scale. A few were close but within range so I left them alone. I'll check later in the day and water when they are within range. It sucks sometimes because I need to make that decision over just a few points sometimes. I usually do it based on plant size and response. Oh well, these girls are out of seedling stage thats for sure. Realistically this week is closer to week one of veg then the seedling emerging on day one when i started this. I just wanted to get this diary started. Then I had to get replacement seeds as some didn't germinate. These girls are looking pretty good so ill probably save the other beans i have for next year. I MAY do a lilac/diesel auto from Ethos when it gets warmer but we'll see. I am wicked excited for this season. Planning to clean and sanitize grow area and wash pots today. Everything seems to be doing amazing.
4/29 I watered a few but many weren't in range yet. I'll be there later this afternoon and check again. Boy things are going good. Planning to grab the rest of my soil this morning. Things are popping off. Transplants will be coming soon. I just want that big rootball first before they go in the 1 gals. I picked up my soil but they shorted me 3 bags of haply frog. It was like a war zone there. Construction everywhere and people hollering at each other over the mechanical racket. Only the drive through was open. I did some quick calculations to reach what I needed for soil bit after they told me to go back in because "they didn't have it." I stop and get out and it went back on my card. Apparently they were hassling my legally blind disabled wife to move the car. She offered them the opportunity to do so but they would need to deal with me after. I wasn't in anyone's way. The car behind me went around me just fine. Anyway I remembered the little local store one town over. Ten minute drive and they have a deal where if you buy 5 bags of hf you it's only SLIGHTLY more than 3. I headed out that way but had to come home due to an emergency. They've got a bunch and they aren't in the city. I'll make it over there this afternoon or in the morning and pick up the rest of my happy frog. No roots organic 707 this year. It's the same price as ocean forest and I really like ocean forest. Lots see how they do with just happy frog and ocean.
4/30 Watered the front row of the aerogarden. Others seemed to be within range. Pretty sure I watered everything under the L.E.D. Things are moving forward. I've got a lot of work to do. I'm going to pick up my remaining soil. I need to clean and sterilize grow bags and the 1 gallon pots and I need to clean and sanitize the grow cage itself and do any little repairs that may need it. So far I'm pretty happy. I don't want to make a mistake and transplant to early. I think we may have an early season this year. It's been nice the past few days.
5/1 It's been hot the past few days. It's looking like we are going to have an early season which is totally OK with me. I WATERED TODAY. I think I did the entire aero garden. I watered the majority under the l.e.d as well. I think when it gets that close (weight wise) it doesn't REALLY matter whether they get that shot glass or not. As long as the weight is like 217 or something. Some plants have leaves going over the sides of the cup. I transplanted to early last time with seeds. Not REALLY to early but they could've stayed in the cups longer. And they take up less space that way but within a week I bet these girls will be transplanted and spending some time outside. I'm looking forward to it.
5/2 Plants are looking great. Watered everything I think. Some weights were high (e.g. 216) but I watered them anyway. I'm starting to be able to squeeze the cups and feel the roots. After I run these few errands and bring wife to the soctors I'll get the rest of my soil and I'll clean my 1 gal pots. The past few days they could've gotten some sunlight. It's been really nice out. Raining today.
EDIT: PICKED UP THE REST OF THE SOIL FOR THE SEASON. PLANTS ARE DOING GOOD. SINCE THE FIRST BATCH WAS A LITTLE STUNTED SOME OF THE OTHERS ARE IN SIMILAR STAGES. I "COULD" TRANSPLANT NOW BUT ITS EASIER DEALING WITH THEM IN THE SOLOS. AS SOON AS I TRANSPLANT THEY'LL JUMP IN SIZE. I'LL NEED TO PUT AT LEAST ONE HPS LIGHT UP AS WELL. HOWEVER, IT'S BEEN NICE ENOUGH HERE THAT THEY'LL BE ABLE TO SPEND TIME OUTSIDE DURING PART OF MOST DAYS. LAST TIME I DID SEEDS I WENT WITH 3 GALLONS BUT IM GOING INTO 1'S THIS YEAR WITH FINAL GROW BAGS RANGING FROM 20G-50G. I USIALLY USE A MIX OF FFOF, FFHF, AND ROOTS ORGANIC 707 IN EQUAL PARTS. THIS YEAR I'M USING ONLY THE FOX FARM SOILS. IVE DONE THIS BEFORE WITH GOOD RESULTS.
5/3 WATERED EVERYTHING BUT ONE TENTH PLANET AND THE ONE BEHIND IT WHICH I BELIEVE IS CHEM DOG #4. I'M FAIRLY CERTAIN I WATERED EVERYTHING UNDER THE L.E.D. These girls are ready for a new home. There's a couple that I Gould hold off on but some are at the point where they NEED A transplant. IT would be much easier to light and carry around in these cups but I want to veg indoors and on nice days bring them outside to harden off. There's only a COUPLE slow starters that could wait but only a couple. I have this year's soil. Just need to wash the pots and mis the soil and transplant. Today is busy but tomorrow is open so I'll be playing it by ear.


Processing
Likes
2
Share


@smokeycropping
Follow
6 SEMANA (3 FLORACION)
- ESTA SEMANA SE A HECHO UNA LEVE DEFOLIACIÓN PARA EVITAR MAS HUMEDAD
- LAS PLANTAS SIGUEN SANAS Y SALUDABLES
- YA NO PRESENTA PROBLEMAS DE CALOR NI FRIÓ

Processing
Likes
20
Share


Likes
52
Share


@Roberts
Follow
FBT2403 is about half way through bulking. She has a fruity, sour, herbal smell at the moment. She has a nice layer of frosty goodness on her. She has been growing well. Thank you Medic Grow, Agrogardens, and Fast Buds. 🤜🏻🤛🏻🌱❄️🌱
Thank you grow diaries community for the 👇likes👇, follows, comments, and subscriptions on my YouTube channel👇. ❄️🌱🍻
Happy Growing 🌱🌱🌱
https://youtube.com/channel/UCAhN7yRzWLpcaRHhMIQ7X4g
If anyone needs to purchase fastbuds here is a link for my affiliate program
https://myfastbuds.com/?a_aid=60910eaff2419


Likes
7
Share