
Likes
Comments
Share


@Mikado
Follow
04/28 - Seeing a nice amount of stretch, don't think i'll have a problem with height, but they're bushy. Waiting another week to see what I'll prune off before bud starts stacking.

Likes
12
Share


@CheeRz
Follow
The girls got some calmag deficiency and the last few times I didn't adjust PH. As a result u can see the leafs of Cookies Kush turned light green or yellow. This happens when u neglect ur ladies 🤣🤣🤣. I guess in a week the ladies lookin' vital again. So stay tuned guys.

Likes
8
Share


@Uzi420
Follow
111g de buds secs et d'une qualité vraiment supérieure, un goût très fruité et sucré sur fond terreux 😋😍
De petits buds mais en grosse quantité, incontournable, je conseille vraiment cette strain même aux débutants !

Processing
Likes
73
Share


@Fibro_Witch
Follow
Blue Shark is looking fab! Still a darker green than everyone else.
There are 2 videos this week, one where I explain how my plan for a tomato roof using materials I already had didn't work out, and the 2nd being about the rogue who grew in my pea bed (whom I affectionately call "Rogue One") who has been raised almost exclusively on my homemade compost.
I had people who were concerned last year when I made my own compost tea from the compost in my pile. People were concerned about bacteria, nutrient profile, etc. I feel like a lot of people get really regimented in their feeding, and they sort of forget that these are plants and they can adapt. They take what they need if it's available.
I moved away from using mineral salts this year because you have to be careful with so many of these fertilizers so that you don't burn the plant, you have to flush it so you don't get a harsh smoke, mineral salts causing lockout, etc.
If you stick with products that are natural you don't really have to worry about nute burn. You don't have to flush for an extended period of time before harvest. You don't have salts building up in the soil that are detrimental that you have to periodically flush and then add beneficial microbes back in.
There is another way.


Likes
1
Share


@Dailydabs420
Follow
Growing well so far. This week I added some LST to encourage outward growth. Things started to get a little wonky towards the end of the week bit once she starts to stretch out i think she will look a little neater.
Likes
7
Share


@BiggBloom
Follow
I did a few things differently than I usually do since I’ve been having problems with germination lately. I’ve grown strawpicanna before, so I know it’s not exactly an easy cultivar. Still, I experimented, and sometimes experiments fail. I’m not crying over it though - things happen in the garden you just gotta grow with the flow. 😝😝 I still have some things in the works. Just got a 10 pack of Blueberry Rose from Lovin In Her Eyes so I’ll be back with a fresher and hopefully far better diary in a few days.


Likes
226
Share


@Kitties_and_Colas
Follow
~_~_~_~_~_~_~_~_~_~_~_~_~_~_~_~_~_~_~_~_~_~_~_~_~_~_~_~_~_~_~_~_~_~_~_~_~_~_~_~_~_~_~_~_~_~_~_~_~_~_~_~_~_~_~_~_~_~_~_~_~_~_~_~_~_~_~_~_~_~_~_~_~_~_~_~_~_~_~_~_~_~_~
9/10/21
😺 It's official, I need a better camera lol but that aside the plants are looking great (maybe a little hungry)..we've started giving just the Big Bud a dash of nitrogen solution of.. this strain eats a lot, our Kush could never handle this type of feeding ...and thank god the stretch is over lol, the mainline in the 6.5gal is almost to my shoulders in height.. I'm still not a huge fan of the node spacing, it's much wider than we like, especially near the base, i'm not sure if full intact colas are in our future but these may surprise us.. the main stalks have really toughened up and should be able to handle any weight they put on in the coming weeks..thanks for reading if you made it this far and happy harvests friends! 💡🌱❤️😽💨
~_~_~_~_~_~_~_~_~_~_~_~_~_~_~_~_~_~_~_~_~_~_~_~_~_~_~_~_~_~_~_~_~_~_~_~_~_~_~_~_~_~_~_~_~_~_~_~_~_~_~_~_~_~_~_~_~_~_~_~_~_~_~_~_~_~_~_~_~_~_~_~_~_~_~_~_~_~_~_~_~_~_~
9/13/21:
😺the plants are looking especially healthy atm, we started adding a little bit of grow solution with bloom about a week ago when their color started to fade, they're now the most perfect shade of green, however we noticed a little clawing on the smallest of the 3 Big Bud..we plan to go back to our regular feeding schedule for flower now that everyone looks good.. there's actually a good amount of nitrogen in our bloom supplement but I guess these are just really hungry plants.. I included a gallon container in one of the pics to provide scale❤️..thanks for reading friends!!
~_~_~_~_~_~_~_~_~_~_~_~_~_~_~_~_~_~_~_~_~_~_~_~_~_~_~_~_~_~_~_~_~_~_~_~_~_~_~_~_~_~_~_~_~_~_~_~_~_~_~_~_~_~_~_~_~_~_~_~_~_~_~_~_~_~_~_~_~_~_~_~_~_~_~_~_~_~_~_~_~_~_~

Likes
2
Share


@DrBud420
Follow
What can I say about this plant, it spent most of the day in the shade, if it had the same conditions as dos si dos, it would eat it for breakfast in terms of yield... 450 g of dry matter and some popcorn... I am very satisfied with but the plant didn't get nearly as much sun as it needs...it didn't fill up, but it wasn't empty either, the heads are nice and fleshy...when I picked it, it smelled like lemon or KeyLime as Barney says...but no on citrus, but really lemon combined with some heavy stench, I can't wait for this miracle to work for some time in the jar...
Next year we will see it in its full glory, so let's try to get a one kilo and a half dry from it alone, that's a bit of a challenge for me...but with this kind of genetics and this kind of variety, I don't think it will be a problem in 100-150 liters of soil for this kind of monster... this year my plants were in 40 to 50 liters of soil and almost each of them produced from 450 to almost a kilogram of dry grass
Likes
Comments
Share


@FrenchMister
Follow
Starting to Low Stress Training and super cropping some secondaries

Likes
3
Share


@CaptonianMoneymaker
Follow
Had little issue with under feeding but up all doses by 10ml per 2 litres
Likes
8
Share

@viejo
Follow
June 1st
A lot of indecision regarding when to take her down to begin drying, so I haven't updated for a little longer than usual. I thought I'd be updating this grow with drying/harvest photos by now, but the trichomes just aren't there yet.
The plant is beginning to look a little worse for wear, especially thanks to the main cola drying out and dying after being found to be full of mold. That's another reason I've felt ready to take her down, but after some thought I realise that just means I'm ready, not that the plant itself is.
We're still turning final, but I'm dialing things in for the final spurt of trichome development. Light schedule is now 11 on 13 off. Watering is still frequent, which apparently indicates a plant in full production. I'm going to take care to let the pot dry out completely while avoiding a big droop, and I've also decided to remove nutes and water without anything other than pH amendment.
According to a little research larger plants operate slightly differently when it comes to the maturation process, meaning a longer term to fully mature. While the RQS data sheet suggests something like 65 days for flower, in reality it might look something like 90. Patience is the thing here, so it's all down to the trichomes at this point, which are still mostly clear, with a small percentage of cloudy/amber.
As soon as we're in an obviously milky majority, she's coming down. Fingers crossed as always!

Likes
4
Share


@Lazuli
Follow
She got weak last week, so i feed her now like a coco plant, water everyday untill runoff lol and she bounces back hard, budsites everywhere.
I remember i mixed the soil with a good amout of coco (i think 1/3)
The feeding is 900ppm and 800comes out so shes gooood

Likes
28
Share


@GIR139
Follow
Good week. Lots of rain, OG shot up 6" to a whopping 68". Everybody happy and well hydrated. I used to have a perspective on how big these will get but now I have no idea whatsoever, lol. I know they'll fill out during flower but will they just keep going up indefinitely?
Thanks for looking
Happy Growing!


Likes
22
Share


@NanoLeaf
Follow
End of Week 16 (9th week of flower)
Final week of flower.
Turned the lights wattage down at the end of this week to 400W to mimmic the sun moving further away from the earth during Autumn and Winter seasons. This also creates an overall cooler temperature signalling to the ladies that the end is in sight. This also protects the trichomes and ensures they don't get damaged and also dropped the
The ladies are fading more and more into their vibrant autumn shades. With hues of pink and purple that makes me so excited!
Feeding just PH correct water until harvest, which is around the corner. We are currently on day 63 of flower and checked the trichomes - just a few specs of amber and the cloudy trichomes are more prominent although there are still some clear ones.
We will push to harvest within the next couple of days, around day 67-69
Pest Report: None
Smell Report: Staaaaanky!

Likes
Comments
Share

@AlpenZilla
Follow
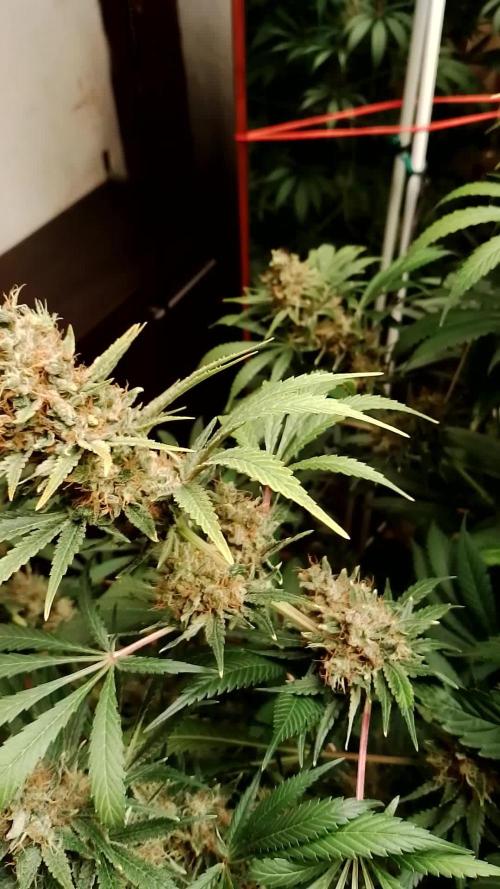
🗓️ Week 11 – Flower Week 7 ✅
Things got interesting this week:
After raising the input EC to 2.0, the runoff jumped to 2.2–2.6 EC – a clear sign of salt saturation in the medium ⚠️
pH remained stable at 6.2–6.3, and no visible signs of overfeeding so far.
Starting next watering, I’ll reduce the input to 1.6–1.7 EC to restore balance between uptake and residuals in the substrate 🌱
Despite the spike, Cherry MAC Muffin is handling it well – no signs of stress or lockout.
The buds are getting noticeably frostier and denser, resin production is in full swing ❄️🔥
📸 Visual update – Cherry MAC Muffin
She’s still stretching slightly, but the buds are stacking beautifully – covered in trichomes, with purple highlights showing in the sugar leaves 🍒💜

Likes
Comments
Share


@803AutoGrower
Follow
Really seeing a lot of strong growth out of Jehovas witness. This plant is going to be huge. Can’t wait to run this lady outside in full sunlight. Really feeling like if I had the space each of these ladies would be massive easily pushing the 1lb potential yield envelope to its max the golden gun are different. Started out strong but have since slowed up and the one that was slow is exploding. Really feel like I did these a disservice by not waiting for warmer weather outside.


Likes
1
Share


@BasedBuds_89
Follow
Having an easy time with this baby, I love the genetics from Autoseeds, can't wait until the final yield. Definitely one of the biggest plants I've grown indoors.
