
Likes
Comments
Share


Likes
17
Share


@HowtoBubatz
Follow
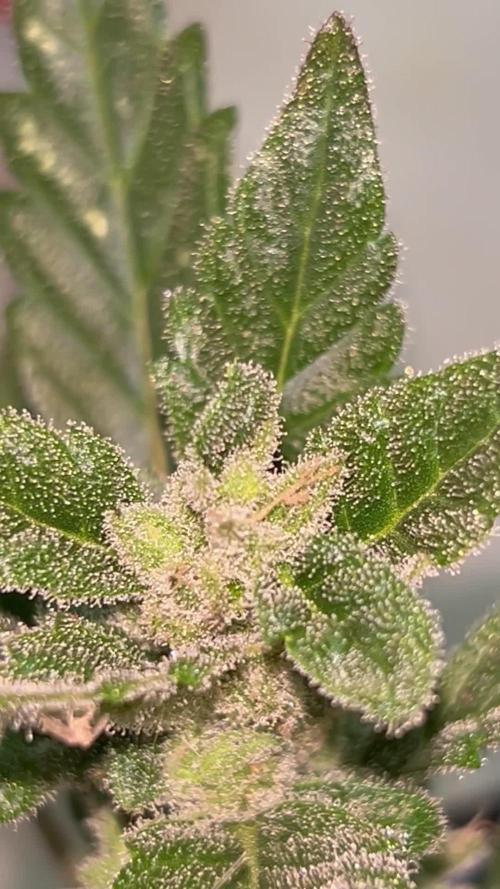
We’ve hit week five of flowering, and things are getting really exciting! 🌸
The plant is now covered in trichomes, and many of them are already turning a milky color—such a great sign that things are progressing perfectly.
The buds are starting to look really frosty. ❄️✨
I’ve been following the BioBizz week 6 feeding schedule, as it’s almost time to flush the plant—just 2-3 more weeks to go! 💧
I’m getting more excited each day as we move closer to harvest. Can’t wait to see how everything finishes up! 😁🌱
Likes
11
Share


@Nicogreen
Follow
Hhhar lige 6 dagbøger til der skal laves dagbog på. Det bla frø fra Barneys farm sweet seeds og mafia seeds cphseeds.dk fastbuds og zamnesia. 😉 Er meget begejstret for især zamnesia og barneys farm indtil videre

Likes
16
Share


@Esoteric_growing
Follow
Potted up yesterday and a little lst, this will probably be the last time I run the strawberry lemonade cuttings and hoping to find a decent pheno from the orange punch to keep for at least another run or two.


Likes
128
Share


@Tropicannibis_Todd
Follow
💩Holy Crap We Are Back At It And Loving It💩
👉SHES READY TO BE CHOPPED IN THE NEXT DAY OR TWO👈
Growing in a 11 ounce pot 👈 👀 👀 👈
Growmies we are at DAY 63 and she's just killing💀it👌 TALK ABOUT FROSTY 👈 Amazing results thus far for the Tiny Pot 😀
👉Added straws within the Tiny pot to help watering in week 4 👈
So I'm starting to see she needs watering every single day and now need nutrients 🙃
Lights being readjusted and chart updated .........👍rain water to be used entire growth👈
WATERING SINGLE TO TWICE DAILY 😋
👉I used NutriNPK for nutrients for my grows and welcome anyone to give them a try .👈
👉 www.nutrinpk.com 👈
NutriNPK Cal MAG 14-0-14
NutriNPK Grow 28-14-14
NutriNPK Bloom 8-20-30
NutriNPK Bloom Booster 0-52-34
I GOT MULTIPLE DIARIES ON THE GO 😱 please check them out 😎
👉THANKS FOR TAKING THE TIME TO GO OVER MY DIARIES 👈
JUST KNOW EVERY COMMENT AND OR LIKES IS MUCH APPRECIATED
Likes
26
Share


@GrowGuy97
Follow
Harvested on day 66, overall very happy with how these ladies turned out & will definitely be growing them again! Wish all 3 could have put off buds like 1 of them did but the other 2 had some small issues & I feel like that’s why the didn’t produce as well! Will be updating soon with more pictures of dry weight & smoke report! Thank you to everyone for following & happy growing friends🙏🏼✌️🏼🌱


Likes
17
Share


@Bobo_Zion
Follow
This is the first week of the plants being above soil, we did lose one but we are germinating another to replace that. I think the one we lost was due to heat stress, the others are holding up pretty well, there is another one that showed signs of heat stress, we just moved it a little deeper in the tent and it seems to be doing okay.
Likes
2
Share

@DanisgrowD
Follow
Hi Growmies!
This two lil ones look like ready to me, im bout to harvest them and probably in a couple of weeks ill share my review with u, them and probably las papaya alive is thriving, but im still a lil concerned about those low branch buds, they look less ready than the center. What you guys think?
💨🏻
Likes
58
Share


@pifflestikkz
Follow
Day 85
Day 35 Flower
26/07/24 Friday
Big feed again today, using de-chlorinated tap water pH 6. 😁 I noticed slight nute burn on leaf tips so I have dialled back all base nutrients by 1ml.
Day 86
Day 36 Flower
27/07/24 Saturday
De-chlorinated tap water pH 6 only today full 5L a little run off.
Did it outside in the sunshine again today 🌞📸💚
Updates 📸
Day 87
Day 37 Flower
28/07/24 Sunday
Feed again today, De-chlorinated tap water pH 6.
She took the full 5L with about 10% run off.
She really is stacking now 💪
Day 88
Day 38 Flower
29/07/24 Monday
Just de-chlorinated tap water pH 6 today. Noticing pistils starting to mature.
Video update
Day 89
Day 39 Flower
30/07/24 Tuesday
Nice feed again today, de-chlorinated tap water pH 6.
Really throwing out trichomes now, density is getting better as well.
Day 90
Day 40 Flower
31/07/24 Wednesday
De-chlorinated tap water pH 6 only today. Full 5L again she's taking this daily now ,😅💚
Day 91
Day 41 flower
01/08/24 Thursday
End of week
Feed today using de-chlorinated tap water pH 6 added nutes brought it up to 6.2.
She just keeps stacking, think I got a fast flower... Or the heat is a little high and just prolonging her process.
May start flushing next week we will see.


Likes
43
Share


@Ju_Bps
Follow
Hello my friends,
All was fine this week, I think I'll up fertilizer, she look to like it.
Buds are biggest each days,
More and more pollen 😝
I hope to be continued like that.
Have a scared Halloween week end.
😱😱😱🤡🤡🤡🤡
Likes
21
Share


@MG2009
Follow
11/24/2021
First true leaves are showing, transplanted 7 jiffy pellets into their first pots. Should be good for a couple weeks.
Interesting to see how all the single finger leaves are developing differently.
11/25/2021
Transplantation complete #8 potted up into a small pot temporarily, Will start feeding next week Mirimichi 901C One ounce (7.8ml) to a gallon.
I am guessing (prediction) #2,#6 might be male.
(Both are vigorous girls) But time will tell.

Likes
4
Share


@DaisyNabis
Follow
primero hidrato mis semillas con el bio potenciador por 4 horas mas menos, luego las paso a un taper hermetico con papel absorbente hidratado con la misma solucion hasta que mis plantulas tengan 3cm app.

Likes
18
Share


@Barcelona_Farmers710
Follow
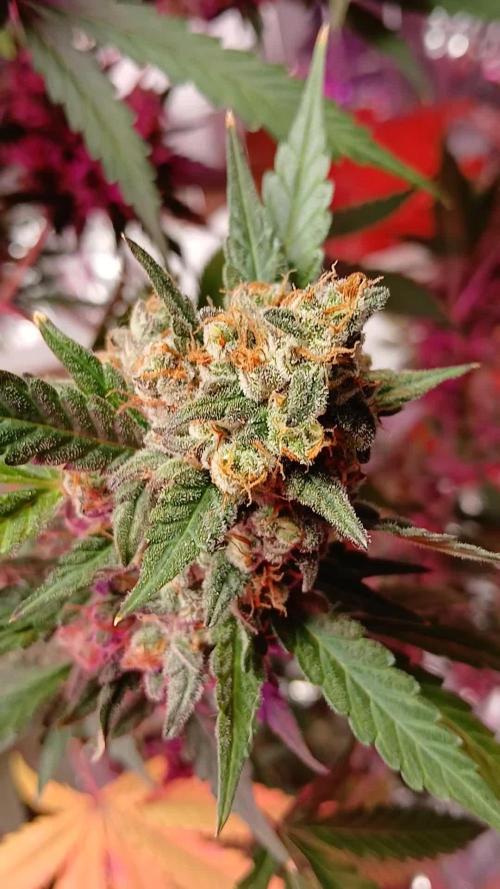
La Runtz tiene toques leves de color rosado supongo que de la Gelato, tenemos dos phenos que pinta. Muy bien farmers Pcg de momento nunca me a fallado!💪🏻

Likes
11
Share


@AtticGrowing
Follow
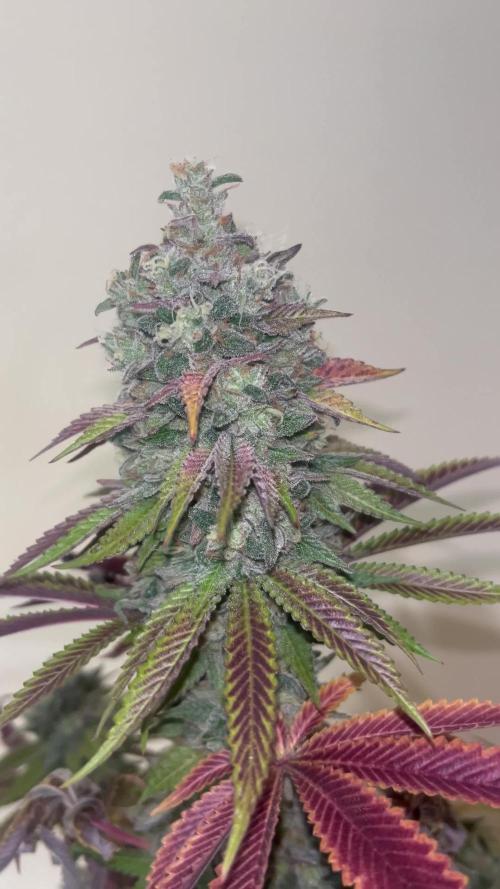
Very strong genetics on this one, I would definitely grow it again for those dense buds fully covered in trichomes.
Thanks to the FastBuds team for the seeds!
Likes
37
Share


@Vegetoo420
Follow
Hey hey ! I left my girls during 4 days without watering due a hospitalization !
I discovered this girl like this when I opened the room and she exploded !!
Day 3 : floweeeers comin !
Day 6: little defoliation and 🍭 lollipop on this girl : she’s clean now !

Likes
3
Share

@kdifiori_
Follow
It's harvest week for Pineapple, Skunk, and little Gorilla Strawberry, which I put in the room together for two days of darkness before harvesting. Cheese is getting heavier and heavier due to its stem, and unfortunately one flower has broken, but luckily it won't be long for her either. Bubblegum has been a wonderful surprise given how it started, and it too is a little monster. I'm really proud of my girls!
Likes
11
Share


@Papastroumf
Follow
Day 58 : She is fattening her buds as f@@@ck. CO2 stopped for all ladies. As you can see trichomes still are in cloudy period. So she needs 1 week or 2 until chop chop. The first for sure. She is the most mature.
Edit (Day 62) : I watered again with nutrients. She is very stinky and is a heavy smelling lady. I cant identify her smell. After curing it will be more clear. She is full of resin everywhere. Even the pop corns are bathed with resin.
Likes
2
Share

@eldruida_lamota
Follow
Que pasa familia, vamos con la cosecha de estas Gorilla Melon de FastBuds.
Por dónde empezar, las flores son bien compactas y van repletas de resina son muy pegajosas, tienen tonos verdes bonitos, y tiene unos aromas dulces y exóticos bastante marcados con toques terrosos.
Es muy sencilla de cultivar, es de ciclo de 2 meses y medio, pero bien agradecida, tiene buenos satélites, de las que plante de fastbuds, podría decir que mi favorita hasta el momento.
Hasta aquí todo, Buenos humos 💨💨💨