Likes
Comments
Share
May, 29th 
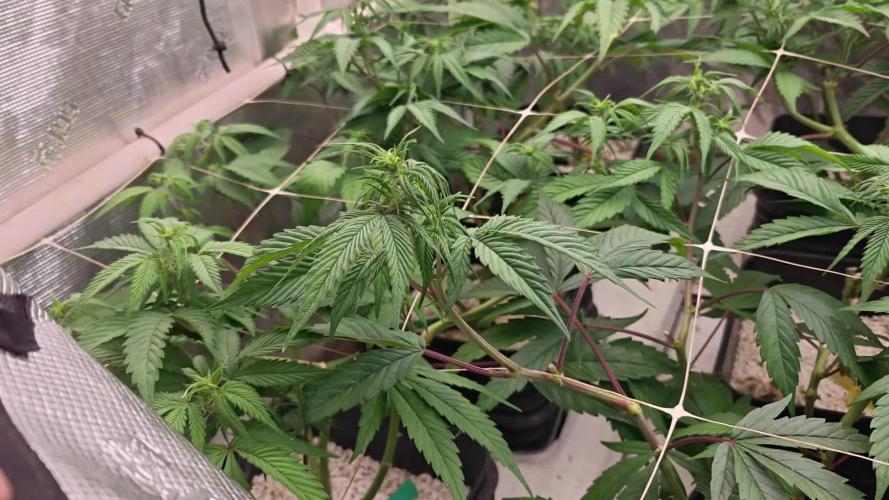
If I open the Tent ist apure Peasure to see and smell them The Girls are very Thirsty like @FC_Cultivars said. Easy strain to grow...... They are sitting in 2 Different Growspaces, 2 are into my HAZELBOX, and one sits in the Big Floweringtent Watering every Day, Feeding nearly every other day
Likes
20
Share
Week 8 done! Harvest is right there! The countdown begins! 🤤💚👊
Likes
31
Share
Chop week. Space Jam could go longer but I’m not letting one linger.. I’m gonna get em all down at once Space jams a savage yielders probably get 50-75% more than everything else here. POTG pheno 1 that was used for SJ was a bit fluffy. Well the BB made them buds rocks on this SJ Thanos has two distinct phenos for sure. Not unexpected in some F1s Waiska is a total Pure Indica leaner, if you got Check out my other diaries you can see the newer pure indica diary I used for the mom. Just like this waiska. Stacks so wonderfully on the branches! 9/17 Pulled waiska and Thanos fluffy pheno. Still needing to take Thanos rock pheno , space jam, and blue AF
Likes
220
Share
Week 1 : Six Shooter Biotabs running 3 six shooters one of them is in the biotabs line up, so far very easy although you do have to prepare a bunch of stuff, for the next four weeks it's nothing else so there's that which i nice. Basically, mixed everything acording to the label, i think i didnt add enough orgatrex but hopefully that's fine, just been struggling to keep the seedlings at the right humidity so i've been spraying them. Since i had the boom boom spray i decided to use it, and since i had so much of it left i decided to keep using it as a humidifier. so basically the seedlings oscillate from 20°C and 66RH to 23 and 63RH. giving a vpd of 0,5 to 1.1 depending on the wetness of the medium. the biotabs strains are all moist not wet (like the other pots) after one day , going to let it dry out then 2 more L per biotabs pot basically. i wonder how this little thing can grow into a plant sometimes 😂 that's it 🚀 Was a bit worried about this on as it really didnt like the wet medium and overwatering, doing much better now, main thing is don't panic and don't water before the medium is actually dry. 🚀
Likes
42
Share
Welcome back, my fellow plant enthusiasts, to the final chapter of our enchanting journey with our beloved Lavender Auto from Seeds Mafia. We have reached Week 10, a milestone where the culmination of patience and dedication unfolds in all its splendor. So, let's savor this moment and celebrate the breathtaking beauty that our Lavender has become. As I gaze upon our Lavender Auto, my heart fills with sheer admiration. She has blossomed into a magnificent sight, exuding an aura of pure elegance. Her once vibrant green foliage has transformed into shades of autumn, with gentle hints of yellow and amber, mirroring the changing seasons. It's a visual masterpiece that truly captivates the soul. And let me tell you, my friends, the aroma that now fills the air is nothing short of a divine symphony. The unexpected twist our Lavender Auto brought us earlier has taken a delightful turn. The skunk-like fragrance has gracefully evolved into a heavenly fusion of lavender and sweet floral notes. It's as if she heard our desires and decided to gift us with her own interpretation of perfection. Mother Nature, indeed, works in mysterious and awe-inspiring ways. With a heavy heart, yet brimming with excitement, I must share that the time has come to bid farewell to our Lavender Auto. She has reached the pinnacle of her growth, displaying trichome-laden buds that glisten like tiny crystals, beckoning us to partake in their euphoria. The moment of harvest has arrived, and I assure you, my friends, it was a sight to behold. I would like to take a moment to express my utmost gratitude to the creators of this Lavender strain, thank you Seeds Mafia for this . Your dedication to developing such a remarkable plant is truly commendable. The Seeds Mafia team, you have crafted a masterpiece that has enchanted our senses and nurtured our passion for cultivation. Thank you for sharing your expertise and allowing us to embark on this extraordinary journey. I also want to extend a heartfelt shout-out to the wonderful platform at Grow Diaries, where we documented our Lavender's progress week after week. The community of growers who have supported and shared their wisdom throughout this journey, you have made this experience even more fulfilling. Let us continue to inspire and learn from one another as we nurture our green companions. As we close this chapter of our gardening tale, let us remember the invaluable lessons we have learned. Our Lavender Auto has taught us to embrace the surprises that nature offers, to find beauty in the unexpected, and to celebrate the uniqueness of each plant's journey. She has reminded us that true greatness lies not only in meeting expectations but also in surpassing them with her own remarkable twists. So, my fellow cultivators, let us bid adieu to our Lavender Auto with hearts filled with gratitude and admiration. May her legacy live on in our gardens and inspire future endeavors. And as we move forward on our botanical adventures, may we continue to nurture our plants with boundless affection, never-ending enthusiasm, and an unwavering belief in the wonders that nature bestows upon us. As always thank you all for stopping by and for supporting me on this journey, i am super passion about growing and fell blessed to have you all with me on this new journey <3 <3 <3 Genetics -Seeds Mafia Lavender Automatic Light - LUMATEK ZEUS 465 COMPACT PRO 
Food - APTUS HOLLAND 
 
All info and full product details can be find in can find @ https://seedsmafia.com 

https://aptus-holland.com/
 
https://autopot.co.uk/ 

https://lumatek-lighting.com/ <3 <3 <3 Growers love to you all <3 <3 <3 Auto Lavender Feminized is a very popular type of cannabis, whose strong therapeutic effects are highly appreciated. It has a flowering period of approximately 9-10 weeks and can be grown both indoors and outdoors. It is a resistant variety which can be cared for easily. This variety is mostly appreciated because it produces strong, durable and resistant plants. Its branches and stem usually grow vertically rather than horizontally. It reaches heights of 120 cm and the harvests amount to 90 grams/plant. In addition, it contains high levels of THC- up to 20%. As their name suggests, the plants that grow from Auto Lavender Feminized seeds have a smell and taste similar to those of lavender, also comprising mint and rosemary tones. This is a variety of cannabis that is usually appreciated for its pleasant fragrance and high productivity, seeing as its buds and stem produce an impressive quantity of resin. If you’re looking for another kind of feminized, autoflowering variety, Auto Lavender Feminized will not disappoint you for sure! auto Lavender Feminized is a feminized, autoflowering variety, obtained by crossing the Lavender and Lowryder 2 species. The plants that grow from this variety have a very specific structure: they are tall, vigorous, and have large branches. At the end of the flowering period, the plants acquire an orange-gold shade
Likes
47
Share
Likes
22
Share
Day 11: Watered each plant with 0.1l with nuts 465 ppm, 987 us/cm, 0.9 EC Lights at 35% The strawberry banana seedlings was very late in coming out of the ground, I had to give the helmet a hand to get it out, through 2 or 3 drops of water. One of the seeds is not good, it grew poorly, I put a Gorilla Cookies to replace it, also from fadtbuds. Let's see how it goes Day 12: The strawberry bananas are recovering well, one of the seeds is starting to get normal leafs, sounds perfect Day 13: Watered each plant with 0.25L with nuts 480 ppm, 1027 us/cm, 1 EC Lights at 50% Day 16: Watered each plant with 0.3L with nuts 668 ppm, 1423 us/cm, 1.4 EC Performed foliar callmag while the lights were off
Likes
34
Share
Last days. Harvest after 65 days of flowering.
Likes
176
Share
Posted a day later than usual 🌝 Nice and easy week again, some early signs of senescence showing on a few leaves. Quite dry in there this week so a few leaves are looking a bit crispy but all in all they’re looking good with no signs at this stage that bud rot appeared on other bud sites other than the one I cut off two weeks ago. The 18w Migro UVB will be installed next week, ready to be turned on two hours per day for the final three weeks. 🌱
Likes
8
Share
Ar first when she sprouted grows slowly and in early veg i made many stress and techniques in little pot before transplanted in big pot she grow really faster and get many inside stems whick i cut them all and stay only big n top ones it was very hard to make lst and somethimes i needed to make hst her stems are wildly hard as steel and not easy to give her nice bodybuilding she had many wound and cuts on stem. Flowering phase was amazing beautiful at first it was full white stretching so long middle stems nonstop growing whole 6week and only at last weeks she get many trichomes flavors and starting yellow pistils visually looked pineapple
Likes
18
Share
Did some topping and switched up nutrients and light cycle they are now in flowering. 2 weeks or so ganna do another major defoliation to boom the buds. Well try to get no light on pics next week.
Likes
14
Share
Likes
22
Share
@NanoLeaf
Follow
End of Week 14 (7th week of flower) Cruise control still on. Smooth sailing till the end. Because this is a fully organic grow there is no need for a leaching flush, all I'm doing is giving the ladies PH correct water from now until harvest to naturally deplete the soil from nutrients and flush out the soil slowly this will help bring out some colours as the ladies use up the remaining nutrients stored in their leaves as they reach the end of their life cycle. I have been keeping a cooler average temperature - and also keeping the relative humidity lower. Pest Report: None
Processing
Likes
5
Share
@Ensign420
Follow
Week 02 Introduction This week has been a bit of a struggle. Had my first experience dealing with slime and brown algae. But I think adding enzymes and increasing the beneficial bacteria helped to fix the issue. Also experienced nutrient burn for the first time. My nutrient solution strength got as high as 671 PPMs. So backed it down to about 430 PPMs during the end-of-week reservoir change. Also cut Hydroguard (expired?), CaliMagic, and Superthrive from this grow. Now she's still stunted, but is starting to recover. Hopefully... [START OF WEEK 02] Day 01 - Monday - 08/10/20 - Total Days: 008 ----------------------------------- - [0830]: Still looks a bit yellow. But getting larger! --- Solution strength was at 248 PPMs. --- Just topped off with a bit of distilled water --- PH went up to 6.1 so PH'd down to 5.8 --- Ran the top feed for a bit to wet the hydroton. - [2130]: She's looking even more yellow now. --- Even the new leaves are really yellow. --- Decided to add more base nutes. --- Added 4ml of Sensi A --- Added 4ml of Sensi B --- Now at about --- Solution Strength went up to 304 PPM. --- PH was at 6, --- Also raised the water level a bit more. --- I really hope it's a nutrient deficiency and not an over-watering issue. --- Please live! Day 02 - Tuesday - 08/11/20 - Total Days: 009 ----------------------------------- - [0830]: Looking less droopy. But still yellow. --- Decided to do a reservoir change. --- 4.5gal of distilled water --- 8ml of Sensi Grow A --- 8ml of Sensi Grow B --- 8ml of Voodoo Juice --- 4ml of B-52 --- 4ml of CaliMagic --- 4ml of Hydroguard --- 4 drops of Superthrive --- PH'd down to 5.8 --- Solution strength: 302 PPM --- Since I didn't want to risk over-watering the rockwool, I did not to do a top feed, may do one tonight after the sleep cycle (lights are still set to go off at 10am and back on at 4pm). --- As I was doing a reservoir change, I noticed that the tubes and bucket were a bit slimy. Didn't really stink or anything. Is this normal? Maybe due to the Hydroguard and Voodoo Juice? --- I hope she gets better soon! - [2215]: Getting larger! But still yellow. --- Also can see a root growing through the net pot! Tiny little thing but it's there! Will have to start dropping water once more appear. --- After looking over a few DWC diaries using AN nutes, seems like my solution strength is still too low. Most around this stage average around 500 PPMs with about 4ml per gallon. --- Top fed for a minute to wet the top of the hydroton. --- Solution strength went down to 263 PPM. --- Added 8ml more of Sensi A --- Added 8ml more of Sensi B --- Now base nutes are at 16ml for 4.5 gal of water. --- PPMs went up to 411. --- Still lower than 500 PPMs, but that's okay. --- PH was at 6. Not sure if I should adjust PH using AN nutes. So going to not ajdust unless PH goes above 6.1. Day 03 - Wednesday - 08/12/20 - Total Days: 010 ----------------------------------- - [0830]: Looks like more root growth! --- She still looks yellow. But leaves are perky. --- PH was at 6.2 so lowered down to 5.8. --- Solution strength was at 394 PPMs --- Since roots are still growing, I decide to lower the water level a bit. Now water level is a bit below the net pot. - [2200]: Root is getting longer! --- Slime is returning. Not sure why. --- Solution strength: 357 PPMs --- PH: 6.1 --- Decided to add an enzyme along with more beneficial bacteria to hopefully cure the slime. --- Added 16ml of Sensizym --- Added 5ml of Hydroguard --- Added 8ml of Voodoo Juice --- New solution strength: 430 PPMs --- New PH: 6.1 --- Top fed for a minute. --- This slimy residue is really freaking me out! I hope the added enzymes will help eliminate the slime. --- Going to do a full reservoir sterilization/nutrient change over the weekend. Please survive until then girl! Day 04 - Thursday - 08/13/20 - Total Days: 011 ----------------------------------- - [0930]: I think the enzymes worked! There is little to no slime now! --- Although I think the root was also dissolved in the process. It's now just a little stub sticking just below the net pot. The enzyme is also suppose to dissolved dead roots too but guess that root was too weak? Not sure what happened there. But I think the slime is cured! --- Solution strength went down to 395 PPMs. Decided to add more base nutrients. --- Added 8ml of Sensi A --- Added 8ml of Sensi B --- Added 4ml of B-52 --- Solution strength went up to 598 PPMs. --- PH was at 6.1 --- As long as the PH is between 5.5 and 6.3, I'm not going to use PH Up or Down. But still will monitor PH levels. - [1715]: Checked up on her after her nap and shes looking alive but stunted. But no slime! --- Decided to add some sugars to help maintain the enzymes and beneficial bacteria. --- Solution strength was at 587 PPMs. --- PH was at 6.2 --- Added 8ml of Bud Candy --- Solution strength went up to 671 PPMs. --- PH also went up to 6.3 --- Lowered water level a bit to hopefully promote more root growth. --- Top fed for a minute. --- She is getting bigger, but still looks yellow. Day 05 - Friday - 08/14/20 - Total Days: 012 ----------------------------------- - [0915]: Leaves look a little burnt on the tips. Still no slime. --- Going to back off on the PPMs to hopefully fix the nutrient toxicity. --- Solution strength was at 632 PPMs --- PH was at 6.3 --- Added/Removed water until PPMs were at 536. --- PH was still at 6.3 --- Raised water up a bit, then top fed for a minute. - [2200]: Looking better. Still yellow though. --- Solution strength: 514 PPMs --- PH: 6.5 --- Added PH down. --- New solution strength: 518 PPMs --- New PH: 5.2 --- PH was kind of high. So decided to PH down. Had to use quite a bit to bring it down. But eventually got it to drop down to 5.3. A little low, but so far, the PH has always gone up so wanted to start it really low. --- Ran the top feed for a minute to re-saturate the top of the hydroton. Day 06 - Saturday - 08/15/20 - Total Days: 013 ----------------------------------- - [0830]: She looks stunted. leaves are still yellow. --- Solution strength: 514 PPMs --- PH: 5.6 --- Top fed for a minute. --- Not sure what to do at this point. Going to do another reservoir change soon. Hoping she lives until then. - [2145]: Looking pretty much the same. --- A bit of slime has returned. Since I've been diluting the nutrient solution, the enzyme ratio has dropped. So I guess this is expected. --- Also noticed that slime build up was on the air-stones. Never really checked the stones so not sure how long that has been there. Looks brown too, which can't be good. --- Going to do an H202 sterilization of the system (minus the net pot) tomorrow so did not add anything. --- Lowered the water level to below the net pot. --- Then top fed for a minute. Day 07 - Sunday - 08/16/20 - Total Days: 014 ----------------------------------- - [0900]: STERILIZATION DAY! --- Decided to skip today's night cycle for a deep clean. --- I'm hoping that skipping a night cycle won't be too stressful. --- Temporarily moved her to a new bucket. --- Used about a half of gallon of straight distilled water to flush out the net pot. --- Drained the system and wiped up all the brown sludge. Also removed the air stones and cleaned up all the goo. --- Filled the system with 2 gallons of distilled water and at least 30ml of food grade hydrogen peroxide (35% strength). --- Yea its a lot, but since I'm not going to sterilize the system overnight, I went with a really high doseage. Basically I kept adding until I started to see little bubbles start to form. --- Then I ran the water pump. - [0915]: Boiled the air stones in tap water for about 10 min. Then reconnected them to the airlines. --- I let the air stones and hose soak in the sterilization solution for about 5 minutes so the peroxide can absorb into the stones. Then ran the air stone to help mix and agitate the solution. --- Occasionally, I'd repeat the process of turning the air pump off for a few minutes to let the stones soak. - [1000]: Covered the top two row of holes of the net pot with some aluminum tape. Hopefully this solves the light leaking in through the hydroton. - [1200]: Used an old toothbrush and scrubbed the pump clean. Then drained the system. --- Refilled with more distilled water and peroxide. Again added a lot. --- Ran system again to sterilize even more. - [1530]: Drained the system and refilled with distilled water to rinse. --- Ran the system for a few minutes, then drained and rinsed again. --- Did this a few more times over about an hour. - [1630]: Added 4 gallons of fresh distilled water. --- Added 15ml Sensi Grow A --- Added 15ml Sensi Grow B --- Added 12ml of B-52 --- Added 16ml of Voodoo Juice --- Added 16ml Sensizym --- Solution strength was at 430 PPMs --- PH was at 5.6 --- I was going to add Hydroguard, but I think the bottle is expired. Since 2017 or 2018!? I think Hydroguard is good for up to 2 years from the date on the bottle or 6 months after opening. So not going to use from now on. I wonder if this could have contributed to the slime build up. --- Also removed the CaliMagic and Superthrive too. Going to only use AN products to eliminate the chance of incompatible nutrients. --- Placed her back in the bucket and top fed for a minute. --- Here's hoping for the best. Going to let it ride until morning! Please feel better! [END OF WEEK 02]
Likes
86
Share
@CANNASIM
Follow
------GENERAL COMMENT------ Girls are moving forward, a lot of growth for the week, the two strains are absolutely different in terms of structure. Unfortunately the three Candy Kush did not sprout, so I will run only this two girls for this cycle. Down a bit the watering mainly doing a feed every other day, trying to manage the root mass to expand. Choose to do natures candy also in veg since i'm using recharge regularly, is 0-0-0 not noticing a lot of EC raise with it, velo kelp came in to play also. One dose of sensi Cal Mag this week since i notice some paling going on, my medium is inert by the way. ------GG.AK COMMENT------ This strain is going slower compared to her sister, looks good though, less foliage, stretching more, I see more sativa elements taking over.