
Likes
Comments
Share


@DaddyPrime
Follow
6/1 topped all of the mains(about 5 or 6). Shes so fucking bushy its crazy. Each main is branching out more and more at each node. Shes gonna be a huge bush by the end of summer. Also attempted to defoliate some of her more crowded areas
6/2 Shes looking super happy after a good feed yesterday. Responded super well to the topping on most of the mains. Slightly concerned its gonna make her even more thick and bushy
6/6 fed some recharge and slf100

Likes
25
Share

@GreenEldritchGardens
Follow
The great stretch has ended.
The frantic upward race that consumed the garden for weeks has finally subsided. No longer do they seek the heavens above. Their energies have turned inward, toward the ancient purpose hidden within their genetics.
The pots empty with alarming speed. Day after day, the roots draw vast quantities of water from the darkness below, feeding a process that seems almost unnatural in its intensity. The soil rarely remains moist for long before being drained by the relentless thirst of the garden.
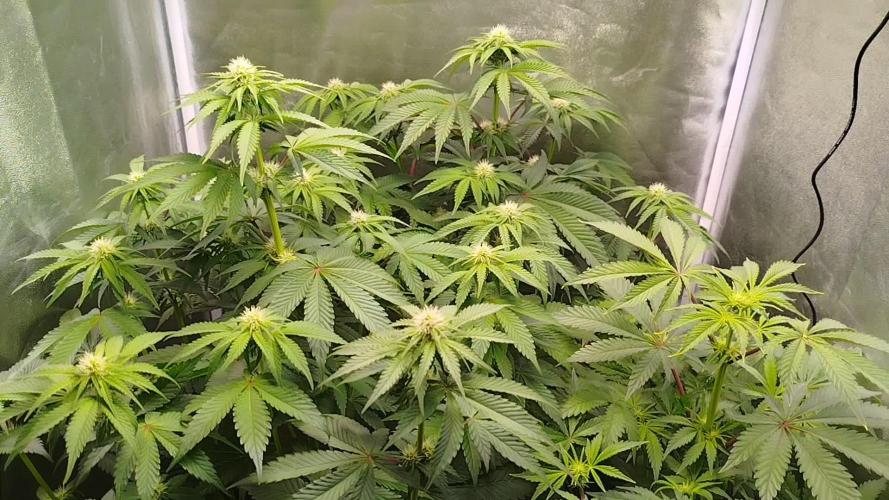
Plant #1 — The Fat One — remains a magnificent specimen. Its tremendous stretch has given way to expansion, transforming it into a broad and imposing presence beneath the false suns. Massive branches now support swelling clusters of flowers that seem to grow larger with each passing cycle.
Plant #2 — The Battered One — has quietly claimed dominance through sheer volume. Now the tallest inhabitant of the chamber, it has become the largest overall presence within Eldritch Gardens. Its naturally bushy structure has transformed into a sprawling kingdom of flowering sites, each branch crowned with developing clusters.
Then there is Plant #5.
The strange one.
The mutant.
While its companions pursue conventional paths toward abundance, Plant #5 continues to reveal peculiar characteristics that defy expectation. Its leaves remain noticeably lighter in color than the others, carrying hints of deficiency despite every effort to satisfy its needs.
Every corner is occupied.
Every beam of light contested.
Likes
19
Share


@Mzsnoop2001
Follow
Está en si es la semana 11 pero colgué una semana en publicar.
Ya coseche a principio de semana la whithe widow y dejé los bajos para principio de esta semana que entra y cosecharla junto a blue moby que está hermosa, moby Dick empezó a remontar vuelo y avanzo muy bien y está formando lindas flores gordas


Likes
2
Share


@SurSideCrew
Follow
Ogkz f2 encontrada y guardada por THC_CANNARIAS con una gran estabilidad en phenotipo, siempre super resinosas y de las mas potentes que puedas tener en tu jardin!


Likes
26
Share


@darb35
Follow
Day 14 - no water today, the girls seem to like their new pots (10 cm)
Day 15 - 300 ml water with Acti+Heaven+Grow (Ph 6.8)(11 cm)
Day 16 - litttle bit water (Ph 6.6)(13 cm)
Day 17 - 300 ml water with Acti+Heaven+Grow+Calmag (Ph 6.7)(14 cm)
Day 18 - 400 ml water + LST (Ph 6.6)(15 cm)
Day 19 - no water (16 cm)
Day 20 - 660 ml water with Acti+Heaven+Grow (Ph 6.5)(17 cm)
Day 21 - no water (starting to show preflower pistils)(20 cm)

Likes
2
Share

@ReinDeer
Follow
The plants are growing nicely and small preflower pistils are emerging slowly and it seems all of them will be female 😀
I've started adding them Cal Mag solution as an addition to my existing package as the leafs were showing a slight signs of deficiencies but nothing major.
We'll be in the flowering stage next week for sure, until then wish you all a nice week😉
Likes
5
Share


@Klausi_J
Follow
I tried stress training on 1 Plant and got rid of some big leaves on the tops which shadowed the
Likes
17
Share


@JuicyFruit
Follow
dried the top off this plant after cutting it and it was a nice little buzz, decided to leave the rest to finish flowering :) mango and floral smells coming from this plant. need tograb myself a jewelers loupe as soon as possible, until then does anyone have any suggestions as to when to harvest this, its quite sticky but i think it could need another few weeks.
Day 65 - 11/11/19
Flushed the plant with Phed tap water at 140ppm. used 3.2 liters to achieve runoff. ive decided to harvest this plant next week. considering it was an experiment to see if i could sprout a seed and went through its many issues along with average conditions im glad to get any harvest off this plant. its very sticky, smelly although the buds are small.
Im going to trim the plant and then dry it by hanging them in a box and placing the box in the tent near the intake for fresh air.
any suggestions please comment below. id say il learn a thing or two while harvesting :)
Day 67 - 13/11/19
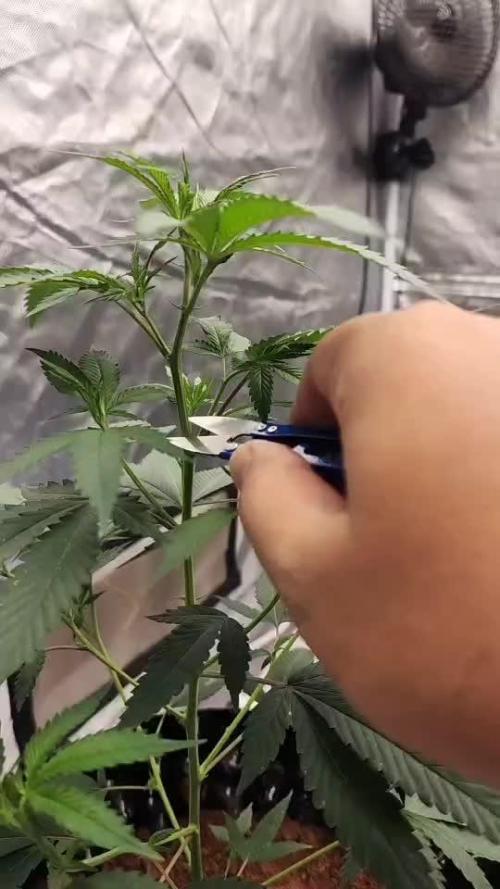
Decided to take the main cola from this plant today. its got stunted throughout the grow as this was the first plant i have ever germinated and grown :)
I will upload some pictures!
Il leave the lower parts of the plant to fatten up in the next days as they dont look matured enough yet. exciting harvest times haha.
After harvesting the top:
smoked a few of the pods that grow pistils out of them in a bong and it hit me nicely :) added some pictures of a few small buds and i was impressed. loads of trichomes all over! for a rough first try i think this turned out good. will harvest the rest of the plant in about 10 days when my pruning shears get here :) (used scissors this time :D)
Someone told me to watch out for harvesting these plants at different times. i didnt pay enough attention and now the drying process is slightly awkward. i cut a cereal box to allow fresh air in and hot air out the top and to minimize light degrading thc on the buds while drying. i spread the buds and trim out and left it near the passive intake on my tent. will probably be 3-5 days to dry. cant wait to sample the dry buds!
and ive seen people online saying the Rhino Pro filters were garbage but i havent had one single issue, mine blocks all smells just incase anyone was thinking on buying one. i got a size larger than i needed as i have heard is more effective :)
Day 68 - 14/11/19
i have been drying a few buds for 18 hours in the tent now and decided to test them. a nice head high. wasnt quite matured enough yet and wasnt fully dried or even cured but very nice :) cant wait to harvest fully in a few days time!
Likes
7
Share


@Kali420Autoflower
Follow
Lemon AK Autoflower - 420 Fast Buds
Tercera semana de cultivo.
La planta se adapta al cambio de dosis de nutrientes. Además, esta creciendo vigorosa, frondosa y claramente destaca su fenotipo principalmente Sativa.
Como se puede apreciar en las fotografías, tomadas a principio de semana tiene unas hojas estrechas y largas representativo del genotipo proporcionado por la Ak47.
Se aprecia una zoña internodal más amplia y sus pequeñas ramas largas. Estoy disfrutando este ciclo de cultivo con tres verdaderas joyas.
Sin embargo, veo que esta planta me va a dar algo de problema en mi pequeño armario.
Likes
2
Share

@NoProbation4Weed
Follow
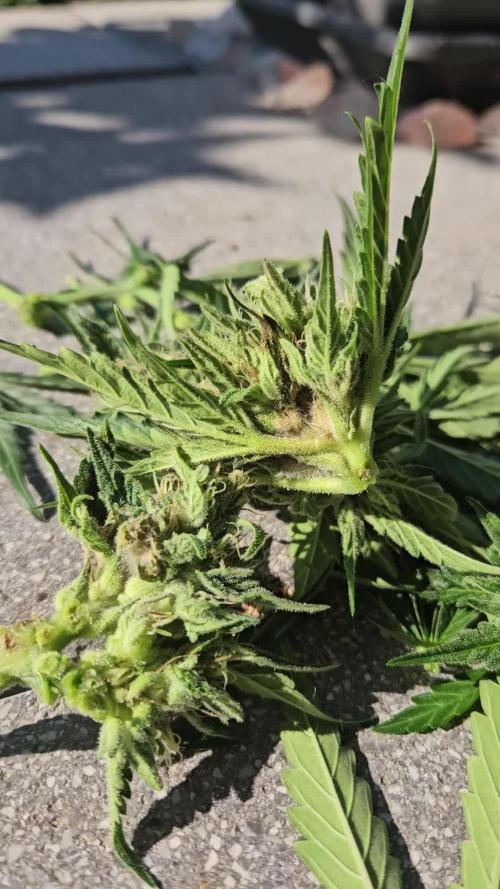
A brown leaf revealed the moldy core of the bud. Based on this sign, I harvested most of the plant.
otherwise the Plant did grow well and has some terps leaning to the sour, limone side.
had to throw away about 8G modly stuff from main colar. Seems to be about 30-40g left without mold.
Processing
Likes
12
Share


@ThatoneAKguy
Follow
Now this side of the tent seems to be doing great. At first I thought it was the air circulation with the other side so I’m still digging into that. Either way this is about these two ladies and I see the forming of pistils and can’t wait to see what kind of stretch they get into in the upcoming weeks. As for the coco vs. the rockwool way I’ve done it in the past I’m leaning towards the rockwool way. It’s easier and thus far the plants I get from it are larger. It consumes about the same amount of water although less nutrients.

Likes
36
Share


@TaterheadJohnson
Follow
Been a minute growmies but I’m back with some updates. This week I realized I was going to have to get a new tent ASAP. Was really trying not to have to but it is inevitable. She is huge now! Even tried throughout this week and next to do some tie down with string to fabric pots. Sorry for wait…. I know she was sad towards the end of the week 😞.
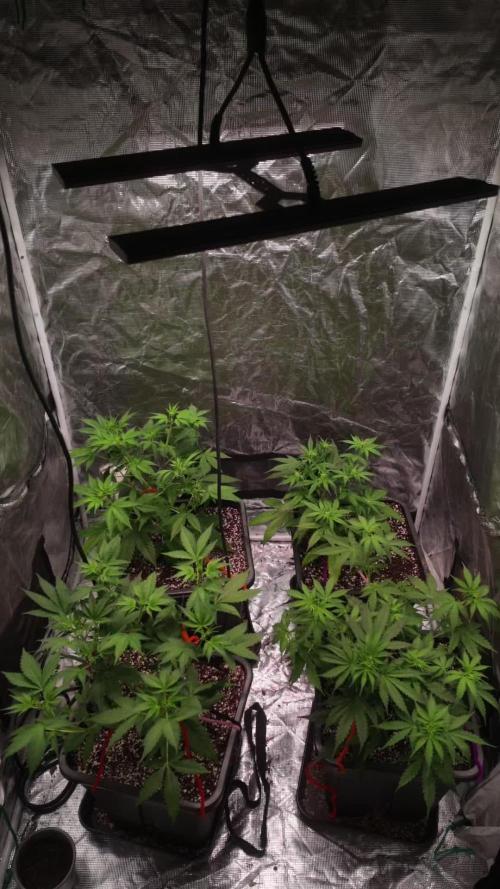
8/31: Started new batch of nutes. Did a massive defoliation today as well! A lot more light through the canopy now. Cut dying bottom branches.
9/1: Did a lot of defoliation today. Even removed some of the lower branches not getting sufficient amount of light.


Likes
5
Share


@pzwags420
Follow
On week 5 of actual flowering the plants are coming along nicely and HSC GSC is looking the best so far but its still early :) WW is slow to start flowering just small amount of pistils so far small buds looks more like week 3 or 4 as far as flowering progression.


Likes
12
Share


@mikemobes
Follow
I am pleasantly surprised with this grow. This is my second time growing Cream Cookies and my yields have increased by 400%. Cream Cookies #2 was the heaviest yielder coming in at 224.04 grams wet. Coming in at almost a quarter POUND for one plant just makes me grin from ear to ear. Im so extremely happy with how ive been taking care of them. It seems that proper and methodical defoliation is the key to massive yields. Cutting fan leaves which block out a significant portion of the available light to the lower and developing bud sites proved to be a great choice. The plants look a little 'skinny' after defoliation, but the newly exposed bud sites explode into the canopy. Im just so very happy with how everything went.
Haven't smoked yet its curing now, will update in two weeks!
Likes
2
Share

@REDSTUMPZz
Follow
*** SS.3 WEEK 4
- RS 11 # 1
- RS 11 # 2
- GRAPE SLURRI (CLONE) # 1 TOPPING 1
- GRAPE SLURRI (CLONE) # 2 TOPPING 1
- GODFATHER * PLCG S1 SHE SO BEAUTIFUL


Likes
9
Share


@Firsttimer1
Follow
Everything is going great really starting to bush out and pop with smell n pistals, very happy with crop king seed . The smaller more bushy teenies are the gdp. Very pretty plant overall starting to smell ☺️ Happy growing

Likes
17
Share


@TAXFR33
Follow
This week was all about preparation & making sure i got enough of everything at the spot
Likes
10
Share


@yaron
Follow
So week 10!we have a 9 day heat wave on our hands so things are getting tricky i guess.lets see what happens!
Its hot over here with temps of 34 degrees Celsius!After a nearly sunless month we have a heatwave that will last for 6 more days.Checking for water 2 times a Day.
Cheers!