
Likes
Comments
Share


@Grindlife219
Follow
Getting ready to take clones and flip them into flower in the next few weeks


Likes
9
Share


@Luckydope69
Follow
Ich habe nun zu beginn der Woche 4 allen Ladys noch Form verpasst mit HST und LST. Die ganze Sache wächst sehr stabil und ich bin begeistert von der Entwicklung.
Likes
13
Share


@Yiyis_Grow
Follow
Test Mr Hide seeds / LM301B Bestva Quantum Board
Estas Marías automáticas se han hecho enormes, tienen en promedio 1 metro de altura y a mi parecer no es porque se hayan estirado por falta de nutriente en la etapa vegetativa (me encantaría saber su opinión sobre esto al verlas).
Aumenté la potencia del ventilador para que tengan más movimiento y potenciar el fortalecimiento de las ramas. El hecho que se hayan hecho tan altas, me hace pensar que con las flores pueda llegar a necesitar estar más robustas en las bases.
Se ha utilizado agua llovida, que leyendo un poco indican que no tiene mayor beneficio si se almacena para utilizarla posteriormente (se convierte en agua dulce común), sin embargo he seguido utilizando.
Les agradezco sus observaciones para logra identificar así los errores que cometo.
Buenos humos y buenas vibras

Likes
22
Share


@420DeepGrow
Follow
Gracias al equipo de Anesia Seeds y Marshydro, sin ellos esto no seria posible.
🍁💐 Indigo Sapphire:
Entra en el reino de la potencia sin igual con Indigo Sapphire. Esta belleza celestial es el vástago de la poderosa Imperium X y la encantadora Violet Fog, creando una cepa feminizada que está realmente fuera de este mundo. Con una composición genética 60% Indica y 40% Sativa, Indigo Sapphire es tu billete a una galaxia de felicidad y creatividad sin límites.
Su linaje de Imperium X aporta una serie de efectos positivos, eufóricos y de expansión sensorial, junto con una intensa relajación y una inyección de energía creativa. Por su parte, Violet Fog aporta un subidón brumoso y embriagador, perfecto para relajarse en una profunda sedación física y mental.
Prepárate para una cosecha abundante con la Indigo Sapphire, que produce hasta 600g/m² en interior y unos astronómicos 900 - 1200 g/planta en exterior. Esta cepa se dispara desde la germinación hasta la floración en sólo 60 - 65 días, con un tiempo de cosecha al aire libre a principios de octubre. Tanto si cultivas en interior como en exterior, la Indigo Sapphire alcanza alturas impresionantes de 100-140 cm en interior y 160-220 cm en exterior, lo que la convierte en una opción versátil para cualquier espacio de cultivo.
🚀🌻 Consigue aquí tus semillas:
💡FC6500: Eficiencia líder en el mercado: la lámpara de cultivo LED FC-E6500, que ostenta un estatus líder en el mercado, es una solución rentable con un PPE de 2,8 µmol/J y un rendimiento máximo de 2,5 g/vatio. Ofrece un PPF alto de 2026 umol/S y es adecuada para una cobertura de vegetación de 1,50 m x 1,50 m y una cobertura de flores de 1,20 m x 1,20 m.
Iluminación versátil y uniforme.
https://marshydro.eu/products/mars-hydro-fc-e-6500-730w-commercial-led-grow-light/?gad_source=1&gclid=Cj0KCQjw1qO0BhDwARIsANfnkv9IIrYSbmJqz8PqpJOIyWwJfp5bc3SGJgUV68USLQ4tjmXDYwoBuAsaAue3EALw_wcB
🚥 MarsHydro ADLITE UV/IR/RED:
Para lograr un crecimiento óptimo de las plantas y maximizar los rendimientos es un arte simple que depende en gran medida de las condiciones ambientales adecuadas. Reconociendo las limitaciones de la iluminación natural y las soluciones de iluminación tradicionales para satisfacer estas necesidades únicas, lanzamos ADLITE. Estas luces especiales UV, IR y roja están diseñadas para llenar áreas del espectro, proporcionando las altas longitudes de onda que las plantas necesitan para un crecimiento y desarrollo óptimos.
Consigue aqui tu Adlite:
https://marshydro.eu/collections/adlite-supplemental-lights/
🏠 : Marshydro 1.50 x 1.50 x 1.80, carpa 100% estanca con ventanas laterales para llegar a todos los lugares durante el grow
https://marshydro.eu/products/diy-150x150x200cm-grow-tent-kit
🌬️💨 Marshydro 6inch + filtro carbon para evitar olores indeseables.
https://marshydro.eu/products/ifresh-smart-6inch-filter-kits/
🍣🍦🌴 Xpert Nutrients es una empresa especializada en la producción y comercialización de fertilizantes líquidos y tierras, que garantizan excelentes cosechas y un crecimiento activo para sus plantas durante todas las fases de cultivo.
Consigue aqui tus Nutrientes:
https://xpertnutrients.com/es/shop/
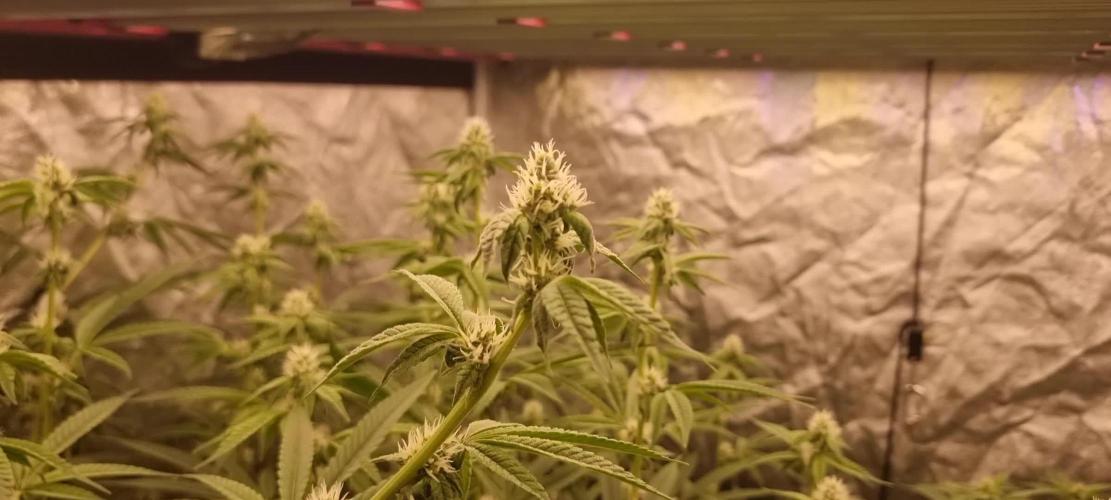
📆 Semana 5:
Una vez terminada la fase de estiramiento dedican todo su esfuerzo a crear nuevos pistilos y resina, es hora de engordar estos futuros cogollos.
La carpa esta totalmente cubierta gracias al FC-6500 y los Adlite de Marshydro, se nota la floración mas avanzada que otras veces y con una mayor densidad.
Continuo con las dosis de nutrientes recomendadas por XpertNutrients

Likes
3
Share

@Nonem420
Follow
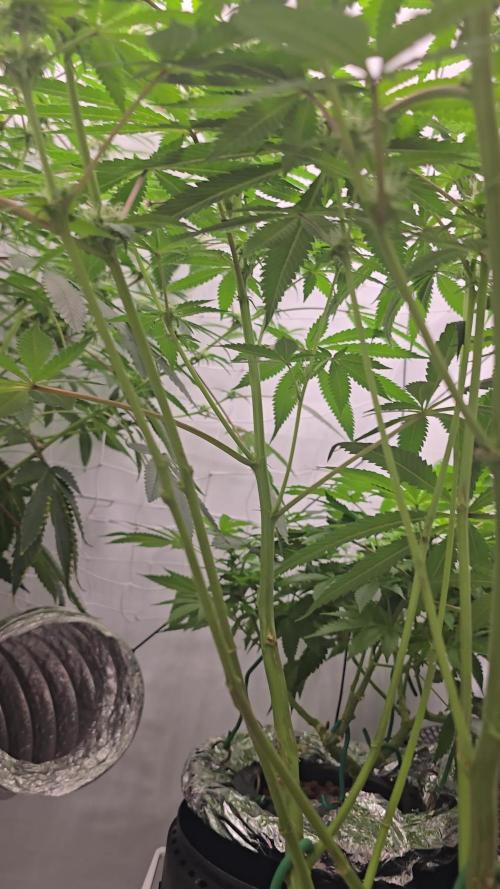
Day 77
I'm running out of vertical space for pinus contorta, this weekend i will open the box to move the leds higher and will try to do some decent photos.
At this point i've added the Pinus purple matcha to the diary because she's huge and impossible to not notice, should be around 1,5m² almost 150cm tall. Had to do a very risky move and "soft crop" 2 apicals because of burn risk, too close to the leds.
I wasn't expeting a freakin' tree like that!
Day 79
Jeez plz stop growing in height!! After this shaky video i raised the leds 10 cm, now i'm for real out of space.. I'm adding 10 to 12 liters every day, alternating ro with only silica one day and the other with nutrients.


Likes
13
Share


@Corwinism
Follow
So it has begun... I've had to start utilizing string to hold up branches by tying them to the ceiling rods and surrounding equipment. These plants are healthier and happier than my first grow, so I wasn't quite expecting them to blow up like they did, therefore my single-layer screen was not enough to support the branches. Not to mention the net used was store-bought and kind of sucks. I prefer my double-layer from the first harvest.
The Mimosa is packing on some major frost, followed closely by the Glookies. American Pie trichomes seem to appear and ripen much closer to the ending stages of flower.


Likes
37
Share


@Cheeba_Inu
Follow
As of day 50, the plant is pretty much just putting on flower weight and developing terpenes. It is starting to smell of citrus and blueberries which gives me high hopes for it's final taste.
It is also starting to heavily produce trichomes, even on fan leaves and stems. This is beyond any autos I have grown in the past, so I have to give credit to the genetics and the hydroponic grow method.
As long as nothing horrible happens in the next few weeks this plant is going to produce a really nice harvest. Thanks for reading! 🌱👍
Day 53: it has developed a strong and distinct smell of blueberries.

Likes
25
Share


@JonnyKush
Follow
hey guys sorry for the absence but in this period I have had a lot to do with my work and I have not been able to bring a good detailed diary, but finally now the holidays will start and I will be able to dedicate myself 110% to a new crop and new ones diaries. having said that, I think I will leave him a week at the most and finally reap the benefits 💚🌳💚🌳maybe my fault the RQS slow release nutrients did not perform as much as the ADVs in my tent, you can see it from the video of 27/07/22 where you can see that 2 out of 6 plants are visually leaner and less compact to the touch , I wanted to try on the same varieties in order to have feedback. I think it could also be caused by the crowding of the tent but with the ADV I have not encountered any problems. I will definitely try them again, giving them much more attention.

Likes
3
Share


@Krautbauern
Follow
The seeds germinated after 1-3 days, 1x runtz unfortunately did not germinate.
3 Days after the germination the plants were growing too quickly so I repot them them in deeper and increased the light intensity to 50% = 100 watts.
When repotting in biobizz light mix, the plants were also given a load of Mykorrizah from Great white premium.


Processing
Likes
11
Share


@A1420
Follow
Plant is 6 weeks from seed tomorrow, I have upped nutes to 3ml per litre of both A +B Canna coco nutrients for a couple of waterings but she's soon started showing nute burn again so i've lowered to 2.75ml . Stretch has slowed right down and I'm hoping will stop very soon

Likes
14
Share

@Stork
Follow
Day 77 Mon
PH 5.7
EC 0.9
DLI 12h
PPFD
Water 20
Day 78 Tue
Add bloom B and ph up
PH 5.0 - 5.9
EC 0.9 - 1.2
DLI 12h
PPFD
Water 22
Day 79 Wed
Add Ph Up
PH 4.4 - 6.0
EC 1.2 - 1.3
DLI 12h
PPFD
Water 20
Day 80 Thu
Refresh water and nuts
PH 6.0
EC 0.6
DLI 12h
PPFD
Water 26c
Day 81 Fri
Add Ph Down
PH 7.0 - 5.9
EC 0.6 - 0.7
DLI 12h
PPFD
Water 24c
Day 82 Sat
Add Ph Up
PH 5.5 - 5.9
EC 0.7
DLI 12h
PPFD
Water 23c
Day 83 Sun
PH 5.9
EC 0.7
DLI 12h
PPFD
Water 23c
Likes
58
Share

@420DeepGrow
Follow
Gracias al equipo de AnesiaSeeds, Marshydro y XpertNutrients sin ellos esto no sería posible
💐 🍁Pink Matcha Slush: es un híbrido con una ligera dominancia índica (60% índica) que ofrece altos niveles de potencia y un aroma increíblemente delicioso. La cepa tiene el subidón perfecto de efectos índica y sativa, y trae consigo una gran potencia que puede dejarte completamente anonadado si no tienes cuidado con la dosis.
El subidón es rápido y potente, con una euforia cerebral vertiginosa. Te sientes concentrado, sociable y lleno de energía.
Es una planta de crecimiento veloz cuando empieza a florecer, llegando a alcanzar una altura de 100-120cm en interior, las plantas pueden alcanzar hasta 2m de altura en exterior, proporcionando una gran cantidad de rendimiento
Los efectos energizantes y el increíblemente alto contenido medio de THC del 31% hacen de Pink Matcha Slush una valiosa variedad terapéutica para su uso contra el estrés crónico, los cambios de humor, la depresión, la fatiga crónica y el TDA/TDAH.
🌻 🚀 Consigue aquí tus semillas:
https://anesiaseeds.com/es/product/pink-matcha-slush/
💡 Mars Hydro TS 3000, como la lámpara de cultivo LED más grande de la serie TS, ofrece suficiente cobertura para un área de 4 × 4 pies con un precio asequible y rendimientos de calidad; a cambio, se puede aplicar tanto al cultivo doméstico como al cultivo comercial.
Potencia - 450w
Cobertura Vegetal – 5×5 pies
Cobertura de flores - 4 × 4 pies
La opción abrumadora para la mayoría de los productores que la aplican en tiendas de campaña.
Consigue aqui tu lámpara:
https://marshydro.eu/products/mars-hydro-ts-3000-led-grow-light/
📆 Semana 11:
Esta siendo una floración un poco mas larga de lo esperado por factores ambientales y por una mudanza inesperada, por lo demás todo bien, planta sin ninguna flor macho ♂️, cargada de resina y sin exceso de nutrientes, a partir de ahora agua has el final.
Likes
18
Share


@Changman
Follow
I have chosen to transplant both plants as their roots have began breaking the bag. One i have dug a half a meter hole which i topped with my bag soil and then placed the bag ontop of the hole and deep watered the entire pot. Same with second plant except she has been placed into another grow bag with a larger width and depth giving her an extra half a meter to grow all round. Lets see if she takes as well as her sister the fruity pebbles next to her, time will tell

Likes
16
Share


@TheCannaProphet
Follow
7/5- All getting 1-1 1/4 gallon of straight well water ph'd to 6.5. Day temps are in the mid to upper 70's F, nighttime temp's 60-62 F. CO2 dropped to 600ppm for final week of flower. Supplemental UV continues from 11a-3p daily and it really shows in the trichome production and terp profiles as they're all absolute FIRE! BD is just about ready, showing 5-10% amber.
7/7- Daily regiment continues including checking trichomes, BD is ready and going to put her in the dark tonight for 48hrs.
7/9- All three remaining ladies are looking fine as hell! All getting frosty and really stacking especially, to my surprise, the Grapefruit Sour Dream Ol' Lady. She has gone crazy, stacking multiple cola's, pouring on the tricomes and has a terpene profile that is gonna be a winner! Chopped and hung BD...she's smelly very 'hashy' probably the Afghani coming out.
7/11- trichomes on the 3 remaining ladies are 90% milky/5% clear/5% amber...gonna send them into 48 dark in the tent in two more days, then chop & hang them on 7/15.
7/15- PP & GSD finished their 48hrs in the dark. Chopped and hung! Black Domina is drying well and is probably gonna be ready to trim & jar in the next 3 days for sure. Drying room is on point- Air temp: 68degF RH: 60%


Likes
27
Share


@adam_pawloski87
Follow
This week went really well ! Today we are at day 79 from seed an looking beautiful! One Forbiddin Runtz got chopped an hung to dry out an the rest are still flushing out through the rest of this week! Very nice looking fades coming along on the fan leafs from purple to green , so beautiful ! So happy with these genetics from @fastbuds_genetics! Super sticky an smell is so amazing, room full of purple punch’s an Forbiddin Runtz the smell you can’t beat, so many berries!!! Well stay tuned for next week! Cheers y’all
Likes
38
Share


@Tropicannibis_Todd
Follow
👉Alrighty Then👈
👉Cherry Punch F1👈 week 4 of flower
We had some real nice growth this , had to do a little leaf management👈 We be in full flower mode .....
Everything is looking good 👍Having issues due to using my well water , it's hard so I'm having slight issues but I am on it .....
So ive up'd the nutrients to accommodate pre flower .....
Soil by Promix
Nutrients by Cronks
Lights by MarsHydro.ca FC4800 X UR45 X Adlite Deep Red And Blue
Tent 4x4x6.5 & Equipment by MarsHydro.ca
High reflectivity inner mylar
Thick Oxford fabric
Smooth heavy duty zipper
Sturdy metal frame
Zipper blackout cloth
Good anti light leakage performance
The 6in Inline kicks ass moves alot of air
●Blue Light Effect:
Blue light shortens internodes, resulting in shorter, stronger plants, ideal for supporting fruit development later. During vegetative growth, blue light promotes lateral branch development effectively.
Well this should be fun 🙃
Thanks to all my growmies out there for stopping by its much appreciated 👈
👉Happy Growing👈
Likes
7
Share


@Adam22
Follow
Flushed for 3 days so far so good. No yellow tips on the leafs yet but I may just have to pull this plant down today I have just 1 plant in the tent it doesn't seem worth running this just for 1 plant so I will pull down later today I think and upload pics and remember where I went wrong for next time. I have some new seeds just been delivered I think next time I will try to have an additional tent slightly bigger so I can have 2 different strains growing at the same time. Definitely using feminised seeds also as don't have time to waste vegging for 6 weeks a plant to just end up with balls. Next run will be:
4 x cookie dawg
3 x velvet moon
1 x sherbert punch
I will be looking for a decent led light for the next tent also I would like to run the same strain in both tents and see what the difference in the results are using my hps light vs led
Harvested plant 1
5oz budd
14g popcorn buds and leaf trim
Likes
7
Share


@NorthernFrostCannabis
Follow
Day 51, Its looking good. The leaves are turning yellow and purple and lot of buds are turning blue. Very colorful, you can tell the bag appeal is going to be a 10/10 as its frosting up very nice as well. Only issue I'm having is the buds weight so much their falling everywhere, I'll do my best to tie them down and hold up the branches best as possible with what I have. Tuesday I'll get more stakes.
Tomorrow will be my last day feeding MagnifiCal and I'll start giving them a lighter solution right till the end as I don't flush unless my PPM runoff is very high. You can't take nutrients out of plants after its taken it in. Your flushing your medium. I did want to run it to 70 days, but with everything already falling over and the fall colors. Its looking like 65 days. Any questions please don't hesitate. I'll add more pics right after lights out.