The Grow Awards 2026 🏆 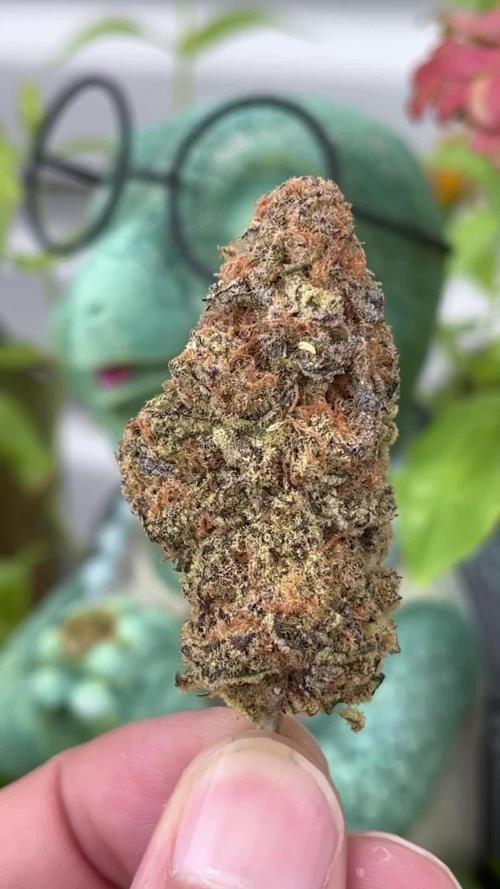


Likes
6
Share
@TerpTurtle
Follow
12 day dry @ 58-63RH & 60-66F in blacked out dry tent | Glass Jar Cure with Inert gas
Early taste test and I actually love this bud, is the best in house strain I've grown so far & the second Platinum cross. Flavorful Funky Sweet Orange cream cereal terps, the texture of the bud is buttery smooth, fluffy and pink/orange color when ground up. Bud has deeply potent effects that is IMO the perfect amount of heavy on the body but still euphoric and creative.. it makes you calm and happy! is checking off so many boxes not even cured, just smelling this batch makes a true connoisseur grin and bag appeal is insane

Processing
Likes
7
Share
@Kushizlez
Follow
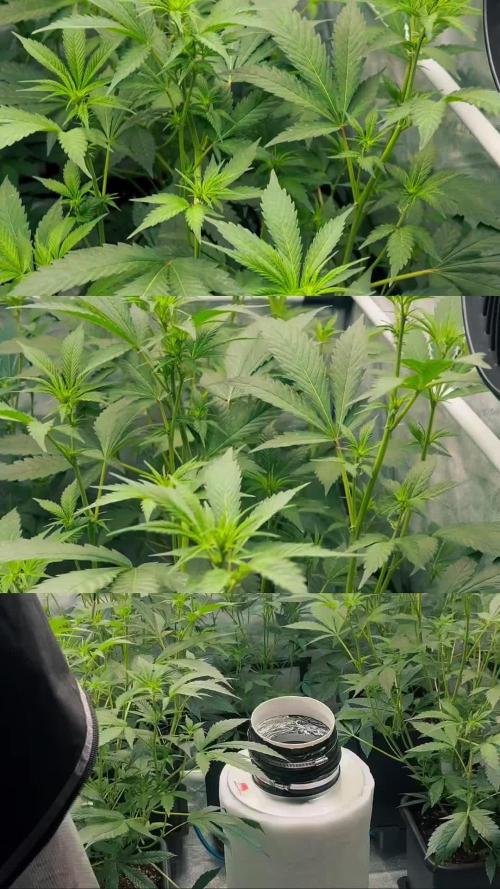
Day 17F-24F
(Day 19) Man it’s such a shame that bbb#1 stunted out. It was so damn vigorous until it’s most recent feeding. I will make sure to cut back on teas next round as they can be a wild card sometimes.
All 5 plants are packing on some serious early frost. But I’m not seeing too much chunk to the buds yet. My other grow that was flipped on the same day has almost no frost yet so that’s a good sign.
(Day 21) Big strip today. I will pull off as many leaves as I need to ensure nearly all bud sites are exposed to adequate light.
I’m still seeing excess N so I’m going to water in 2 gallons each until I get some runoff. The plants seem to be up taking water pretty decently so I’m going to push it a little with a heavier watering.
Wow do the plants look amazing after that strip and flush! Everything is praying up beautifully, including #3 in the back. Let’s hope that gets it back on track now.
(Day 22) I want to give a PK boost but all my bloom nutrients have way too much N and I don’t really want to risk it toxing anymore. I could give it a little bit of 0-18-0 bat guano and some 0-0-15 kelp extract but it could be completely unnecessary. I can’t see any signs of deficiencies but a small surplus couldn’t hurt either.
(Day 23) I like how the ladies responded to the thorough watering. I will up my watering to 1 gallon every 48 hours from now on.
It sucks to see how short bbb#1 is. I was expecting such a huge stretch but it never came because of that fucking tea! I should have leached the medium as soon as I saw stunting. It’s too bad because it definitely had the most potential for yield.
(Day 24) I’m starting to think the main problem with bud size this round is all the topping I did early on. Not to mention they were vegging for nearly 3 months. I will try to pick off most of the larf before it wastes anymore energy.
I think the ideal style of growing for bud size and veg time is a semi sea of green, or 6-8 plants per 25 square feet. I’m not a big fan of these giant plants as it’s a lot of wasted veg time and smaller bud size overall.
The smell is really ramping up!
Likes
11
Share
@Badassxwar
Follow
OKAY!!! I followed everything I had learned from others I know, and studying non stop for months to do this right. I saved up money to get my equipment and I decided to give it a try. I found this site looking at pictures of amazing buds from so many different people and watching so many grow videos and always dreaming of having a good grow like I've seen people can do.(just never in person) I had no idea how this was gonna turn out. But.....
It's looking killer!!! Honestly best looking smoke I've ever seen!(in person) And I cant wait to see if it can live up to its aromas and mouthwatering looks!

Likes
12
Share
@BB_UK
Follow
Lemon pie chose to pop up later than the others (2days) I won’t be topping any autos this run! I will be only low stress training until scrog and then I’ll high stress train if necessary! I’ve given the first feed today of biobizz (doing fastbuds organic the other 3 synthetic) my aim is to keep the veg period vigorous! As a great veg equals great bloom!

Likes
40
Share
@CAMOGROWN
Follow
Watch my video it explains more. Gunna be giving them water on the next three feeds then back on the bloom, I this k there's enough fertilizer in there for them as I don't RTW
Thanks for having a nosey :) any tips advice welcome!!
Update. Levelled out the middle. Everythings good. Tallest now 42 inches lol still growing.

Likes
2
Share
@MistaOC
Follow
27.01. F8
Day 8 of flower and the plants are absolutely taking off. The stretch has clearly started, and they’re growing fast and vigorously — almost like salad shooting upwards overnight. Overall plant health is excellent, with no signs of stress despite the recent issues.
One very positive sign: the plants are slightly praying, which usually means they’re feeling comfortable with the environment and light intensity. The nematodes applied earlier this week should begin showing their effect over the next few days, and I expect the thrips population to be pushed back significantly.
Apart from that, everything is running smoothly and fully according to plan. If this momentum continues, the coming weeks should be very promising.


Likes
1
Share
@Bones_1986
Follow
Day 50.
Very annoyed at myself as 2/3 plants needed a strong feed, but the other one didn’t but forgot and fed the strong feed to all 3. As a result the 1 what was already thriving has now foxtailed on the main cola. Such a shame, but lesson learned.
That plant will have just a water feed for the next week, and PH run off was also high at 6.8 also contributing to the foxtail I’m guessing so next few feeds will be PH at 6.0.
Another 15 - 20 days to go I’m guessing, I will soon be swapping big bud out for overdrive, really make these swell to the finish line.
Day 52
25% feed, ph 6.0.
Day 54
Plant 1
Just water and calmag, this one will finish first yellowing fast now
Plant 2
Best of all 3 plants, 50% nute feed
Plant 3
Weakest of all 3 very low dose feed

Likes
10
Share
@ZweetZkittlez
Follow
Unos días más y ya pasamos a florar. Realizada un poco de la defoliación y saqué los esquejes. El día que pasemos a florar, haré una nueva defoliación más “violenta”, conocida como Schwazze o Schwazzing.
Veremos qué sale de este cultivo, viene todo muy bien 👍 😎💪


Likes
49
Share
@DogDoctorOfficial
Follow
Mentha De Croco | Week 16 from Seed – Week 5 of Flower
Welcome to the wild side of the garden, where structure meets soul and every leaf has a story to tell. We’re deep in flower now, and our Mentha De Croco mutants are showing us what it truly means to be one-of-a-kind.
Each girl in this tent is a canvas — some broad and expressive, others tight and intricate, and all of them thriving under the rhythm of precision care and the flow of intention.
Feeding This Week | Aptus Holland Clean Program (Mineral Line):
This week, we bring power and push, dialing in both structure and development with a nutrient stack designed for the mid-flower leap. Here’s what’s going into the mix and why:
Regulator 0.15 ml/L
Sets the tone for the mix. It improves nutrient uptake, strengthens cell walls, and enhances resistance to stress. Always added first for best results.
System Clean 0.25 ml/L
Sterile and safe. Keeps the root zone clean and oxygen-rich, no room for pathogens, only healthy, vigorous growth.
RO Water Conditioner 0.8 ml/L
Balances and stabilizes RO water by buffering it and making minerals more bioavailable.
All-in-One Liquid 2 ml/L
The backbone of the feed. Full-spectrum minerals in perfect balance, calcium, magnesium, nitrogen, P & K, all instantly plant-available.
Breakout Powder Low-dose booster for bloom phase
We reintroduce Breakout Powder this week to gently push the flower sites into their next stage of development, not overloading, just guiding with finesse. This formulation boosts phosphate and potassium uptake, critical for stacking flowers while keeping internodes tight.
Reservoir Stats:
pH: 6.23
EC: 1.58
Water Temp: 18.8°C
Environment & Vibe:
They’re under the Future of Grow LED lights, bathing in full-spectrum glory, all managed and finely balanced by the reliable Trolmaster system. It’s a controlled jungle in here — beauty meets data.
Plant Notes:
Each plant continues to grow as its own universe. The flower formations are odd, beautiful, twisting, and stacking in ways that only mutants can. This is where form meets fascination — a pure expression of what cannabis genetics can be when you let go of expectations and allow nature to do her freaky, flawless thing.
Shoutouts & Infinite Gratitude:
To @terpyz_genetics for blessing us with this bouquet of mutant magic
To @aptus_holland, the clean science behind the healthiest roots and biggest smiles
To @trolmaster , for mastering the environment with ease
To @futureofgrow, the light at the center of this visual storm
To the Grow Diaries platform, the community, the silent readers, the loud learners, the lovers, the haters, we’re all growing together 🙌
Let’s never forget:
Beauty isn’t uniform. Strength isn’t standard. Magic isn’t always predictable.
And that’s exactly why this journey is worth it.
#MenthaDeCroco #Week5Flower #MutantGenetics #AptusHolland #TerpyzMutants #GrowDiaries #FutureOfGrow #Trolmaster #GrowWithIntention #GrowersLove #UniqueCannabis #FloralMutants
Genetics - Mentha De Croco
Nutrition - @aptusholland
https://aptus-holland.com/
Led Power @ F.O.G. Future Of Grow
https://www.thefuturofgrow.com/en/online-store/BLACK-SERIES-600-p489093171
Controls @ TrolMaster
https://www.trolmaster.eu/tent-x
Let’s see what next week brings! 🚀
As always thank you all for stopping by, for the love and for it all , this journey of mine wold just not be the same without you guys, the love and support is very much appreciloved and i fell honored with you all in my life
With true love comes happiness Always believe in your self and always do things expecting nothing and with an open heart , be a giver and the universe will give back to you in ways you could not even imagine so
As always, this is shared for educational purposes, aiming to spread understanding and appreciation for this plant. The journey with nature is one of discovery, creativity, and respect. Let’s celebrate it responsibly and continue to learn and grow together!
Growers Love To you All 💚

Likes
10
Share
@DeepRootsGrowTrees
Follow
MIMOSA ZKITTLEZ FF/
GANJA FARMER
WEEK #9 OVERALL
WEEK #8 FLOWER
This week she continues to grow and just get bigger she's really a big plant strong genetics she's handled topping without any issues as well LST and she really responded with new growth. Stay Growing!!
Thank you for stopping by and taking a look it's much appreciated!!
Thank you GANJA FARMER!!
MIMOSA ZKITTLEZ FF/ GANJA FARMER

Likes
6
Share
@IvanPalma
Follow
En la segunda semana de floracion le he sujetado un par de hojas muy grandes a la rama porque estan tapando las demas plantas, ahora solo utilize el engordador de cogollos, he tenido que dejar el calentador encendido porque con las 12 horas de luz la habitacion se esta enfriendo mucho y las temperaturas han bajado hasta los 16 grados, prefiero no estresarlas pero por lo demas van bien. He notado tambien que algunas hojas grandes de abajo, como que se pudren o se ponen muy debiles y se caen solas.

Processing
Likes
25
Share
@BudHaks
Follow
I am now flushing her with plain Brita filtered water PH'd with lime juice to lower her PH.
I initially first flushed her with 42L of water and now I am flushing her once a day for 8 days and then I will put her in for darkness for 3 days and then I will harvest her and dry her for 9 days and then cure her for 28-48 days.


Likes
34
Share
@LockDownGrow
Follow
I was told this is a 1:1 CBD strain but feels more like a 2:1
Ok so this plant yelded large , thick and dense flowers that are completely covered in sugar ,
The flavour and smell is fantastic even without a cure ,
I've been using this in the vapourisor and the flavour is incredible ,
A very thick and heavy gas that does not make you cough at all , and for me it's a very heavy head high and then you get a very pleasant feeling in your lungs and chest ,
The effect is very relaxing and claiming ,
For me it's all you expect from cannabis without the head f*CK
It's a really nice smoke indeed ,
Too the point that I think I will not be turning this plant into oils as in the decarbing temperature you need too choice ether the CBD or the thc at they both decarb at different temperatures CBD needing alot higher temp too activate than thc does , so you ether burn off the thc too get the CBD , so I think this will be my night time chillax smoke as it's real nice ,

Likes
44
Share
@MadeInGermany
Follow
Info :
Unfortunately, I had to find out that my account is used for fake pages in social media.
I am only active here on growdiaries.
I am not on facebook instagram twitter etc All accounts except this one are fake.
Flowering day 37
since time change
to 12/12 h.
Hey guys :-)
Fortunately, she stopped her stretch this week 😅.
The lamps would soon not have gone up any further 😂.
Now she can concentrate completely on the production of the flowers, which makes her beautiful 👍.
I went down with the Ec to 1.2 because I am on the road for two days and it rises well after one day with a slightly higher Ec value.
By the time I get back we should be 1.4 - 1.6 Ec :-).
PK 13/14 was added to the water which will be completely changed again next week.
Otherwise it was cleaned and the health of the plant checked as always.
Have fun with the update and stay healthy 🙏🏻
You can buy this Strain at
www.Zamnesia.com
Type:
Runtz
☝️🏼
Genetics:
Zkittlez
X
Gelato
👍
Vega lamp: 2 x Todogrow LED CXB3590 COB 55 W
1 x Sanlight S2W 62 W
💡
Flower lamp : 2 x Todogrow LED CXB3590 COB 55 W
1 x Sanlight S2W 62 W
💡 ☝️
Grow Aero System : Growtool 0.8
☝️
Fertilizer:
Canna Aqua Vega A + B , Canna Aqua Flores A + B , Rizotonic, Cannazym, CANNA Boost, Pk 13/14, Canna Cal / Mag, Canna Ph - Grow, Canna Ph-Bloom
☝️🌱
Water:
Osmosis water mixed with normal water (24 hours stale that the chlorine evaporates) to 0.2 EG. Add Cal / Mag to 0.4 Ec Ph with ph- to 5.2- 6.2
💦 💧

Likes
12
Share
@WestToEastBerlin
Follow
English:
I decided to switch to 12/12 after week 6. The risk of the plants becoming too big for the tent was too great for me.
Since switching to 12/12, I have also reduced the amount of water and am trying to push the EC in the substrate further in the 3.5-5 direction. I am still giving the full dose of Grow A & B and will continue to do so until week 3 or 4, depending on how they develop.
I will also increase the PPFD from 500 to 900 within the first 3 weeks of flowering.
Everything seems to be working well so far, the ladies are growing and also got their next defoliation at the end of the 1st week of flowering, as it was getting very dense.
New updates coming next week :)
Deutsch:
Ich habe mich doch dazu entschieden nach Woche 6 auf 12/12 zu switchen. Das Risiko, dass die Pflanzen zu groß für das Zelt werden, war mir zu groß.
Seit dem Switch auf 12/12 habe ich auch die Wassermenge reduziert und versuche dadurch den EC im Substrat weiter in die 3.5-5 Richtung zu pushen. Ich gebe weiterhin die volle Dosis Grow A & B und werde das auch weiter bis Woche 3 oder 4 tun, je nachdem wie sie sich entwickeln.
Außerdem werde ich auch den PPFD Wert innerhalb der ersten 3 Blütewochen von 500 auf 900 hochfahren.
Scheint so weit auch alles gut zu funktionieren, die Ladys wachsen und haben am Ende der 1. Blütewoche auch ihre nächste Defoliation bekommen, da es doch langsam sehr dicht wurde.
Nächste Woche kommen neue Updates :)

Likes
6
Share
@Happy_Roots
Follow
Pretty cool....i have two males of each cultivar to choose from as well as a female from each. The 3 females will get there own diaries.
Males-
-Koffee F8
#2 is just dumping pollen like crazy. Way more then #3 and has a fatter "Flower" structure
#3 has thinner "Flower" structure but is showing more purple then the #2.
I have plates colleting the pollen the best i can. Ive never grown a male plant past 3 weeks. This is exciting.
-Clover Shake
#1 male is very thin
#3 male is now showing sex and will go into the male tent
-Candy Master Star Dawg
#2 male
#3 male
Both going into the male tent