
Likes
Comments
Share


@SuperSmoker
Follow
Added 2nd grow light
Check out YouTube video
SuperSmoker for more!


Likes
22
Share

@Brotanical
Follow
🌱(BT 40) 🌱Es sind verschiedene phenos zum Vorschein gekommen aber sie entwickeln sich bisher super 👍
Es gibt keine großen Veränderungen in den zusätzen☕ es geht weiter mit @Hesi_Official Dünger und die rlf Passt auch wieder wie gewünscht mit der ich zwischenzeitlich etwas zu kämpfen hatte aber das ließ sich gut gegensteuern mit der Infrarotmatte 👍
AKF von @VIVOSUN lässt Geruch durch ohne Ende auch bei 50% rlf 😄schon der zweite nagelneue 150mm akf ✅ bis vor zwei Wochen war noch alles top
Links die XS 1500 pro mit 36 cm Abstand und 85% Leistung derzeit✅
Rechts die M100 Pro von Wizard of Bloom mit 31cm Abstand und 100% Leistung ✅
Mir persönlich gefällt Spektrum und Vitalität sowie Performance unter der M100 etwas besser der Wuchs ist bedeutend kompakter und die Blüten gehen fast bis zur Erde das ist echt Wahnsinn 👍✅☣️
Die Research Reihe von @SensiSeeds läuft bisher ohne große Probleme und es ist eine Freude zuzusehen 😁

Processing
Likes
7
Share


@Cogollo_eu
Follow
**Encontrarás la traducción a español al final de la descripción**
From/Desde: 09/06/18 || To/Hasta: 15/06/18
From day/Desde día: 8 || To day/Hasta día: 14
-----WEEK SUMMARY-----
12/06/18: Video 0 & Photos 1 & 2
13/06/18: Photos 3 to 10
15/06/18: Photos 11 to 14
As you can see in the video compared with the other 2 strains, the only Think big that germinated is growing very weird (Next week you will see it better in the photos). The day 15 i maded a root semi-washing to it to see if it helps to the thinky, I don't know if it helped or not, but my feelings where that the plant didn't go better or worst after that washing, just weird vegetation growing, it's going to became a trully Dwarf plant.
The day 13th, the second Think Big shows it's cotyledeos, this plant is going to grow very weird too.
----APROXIMATED WATERING CALENDAR----
09/06/18: Draught
10/06/18: Draught
11/06/18: Draught
12/06/18: 0.5l solution with all week nutrients @ 0.8 EC PH6
13/06/18: Draught
14/06/18: Draught
15/06/18: Root semi-washing (4l water)
*****ESPAÑOL*****
-----SUMMARIO SEMANAL-----
12/06/18: Vídeo 0 & Fotos 1 & 2
13/06/18: Fotos 3 a 10
15/06/18: Fotos 11 a 14
Como podéis ver en el vídeo, comparado con las otras 2 genéticas, la única Think Big que ha germinado está creciendo muy muy rara (se verá mejor en las fotos de la semana que viene. El día 15 le realicé una semi limpieza de raíces por si era cosa de nutrientes, no se realmente si ayudó o no, mi impresión es que la planta no fue mejor ni peor después del lavado, simplemente siguió creciendo de manera muy muy rara. Está planta se convertirá en una auténtica planta enana.
El día 13, la segunda Think Big ya mostraba sus cotiledones, esta planta va a crecer muy muy rara también.
----CALENDARIO DE RIEGO APROXIMADO----
09/06/18: Sequía
10/06/18: Sequía
11/06/18: Sequía
12/06/18: 0,5l de agua con todos los nutrientes semanales @ 0.8 EC PH6
13/06/18: Sequía
14/06/18: Sequía
15/06/18: Semi lavado de raíces (4l de agua)

Likes
34
Share


@MrJoint
Follow
✌️🎃 Thank you for checking my cultivation.
🌺 They seem to have liked defoliation.

Processing
Likes
5
Share


@EKWCR
Follow
I will try again, i know that is not the full potential of the Crtical +


Likes
14
Share


@Nookandplant42o
Follow
Water rainwater + epsom salt and diluted nutrients with more total water of 180 ppm ph 6.2 temperature of the 20 ° solution, gradually using more water due to the 10% runoff temperature, slightly relieving the roots without much removal, sprayed with water without ppm complement due to perspiration and water loss when it's hot, more soil around the stem "I made some abrasions around the stem that is now covered with soil in order to create more quick roots, added more mycorrhizae around to heal and root and stretch with mycorrhizae. Always covered with coconut fiber so it doesn't dry quickly without absorbing enough, I really need one more exhaust fan to pull in fresh cold / fresh air from the outside in, and limit one little use of fans since air conditioning is not part of my plans at the moment.

Processing
Likes
33
Share


@Ganjagrandaddy
Follow
Flowering Day 3: This lady has been continuing to impress with her fight to be top dog. Her flowering is well underway now and i am hopeful she will produce better than her mother. I fed her too much N as she was part of a res supplied feed that i couldnt lower for her finish as i still had too many that needed full strength. Seeing her structure after the quad has already given her a better chance of more mains and the node spacing is way better than her mom.
The actual Flowers are a nice ball shape emerging from the tops too. These should hopefully become the baseball bats advertised in the sales patter !
Surely One of us on here will get a good pheno of this strain?????

Likes
4
Share


@Trinidad
Follow
Day 32. Plants have begun preflower. Things are progressing nicely. 1 plant still struggling. Defoliation applied to keep things tidy in growtent. Still there is quite alot of growing to be done so hopefully everything fits. 😀

Likes
38
Share


@Crownlaura
Follow
12 weeks / 84 days old today.
So my first grow journey is coming to an end!
Not a lot to report this week. Been using my jewellers loupe daily to keep an eye on the trichomes and can definitely see a big difference. (Sorry, pictures are crap - don’t have enough hands to get a good one!)
Still watering with plain water but they’re taking a lot less and only been watered every 4 days or so.
Sticky orange has lots of cloudy trichomes and starting to get a few Amber. Her leaves are drying off so she is getting harvested before the weekend.
Purple skunk is a bit behind so I think I will wait and see how she goes for another week or so. I always thought she’d be the one to finish first too.
I think I will be drying in the garage. We are consistently getting 18 degrees outside now but with the temperature drops at night, I am not sure whether to bring the buds inside overnight. I’ll be drying in a hanging ‘herb’ dryer and I have my curing jars all labelled and ready to go. Thinking of wet trimming roughly then going in for a final dry trim later once dry to neaten them up. Drying advice welcome!
I did think I’d have to harvest in stages and chop the lower buds later on. But even the bottom buds look like they’ve caught up this week.
I have honestly enjoyed every second of this grow and I’m almost disappointed it’s nearly finished. But at the same time, I can not wait to see (and taste) the final result!


Likes
22
Share


@BlumenBot
Follow
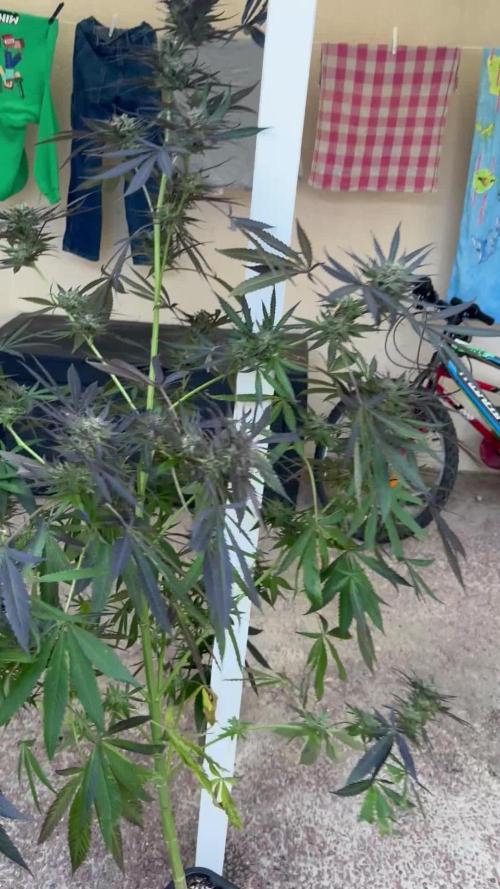
3/28 - I moved her up to the flower chamber to give her more space to grow height. I think 1 week in here with veg schedule and then I can flip over to flower. I will be removing some shoots crowding things up and probably a good deal of fan leaf cleanup as well
She got watered, I think moving here up made her jump back to life
3/30 - flush feed
4/1 - flush feed

Likes
16
Share


@Northern_Ent
Follow
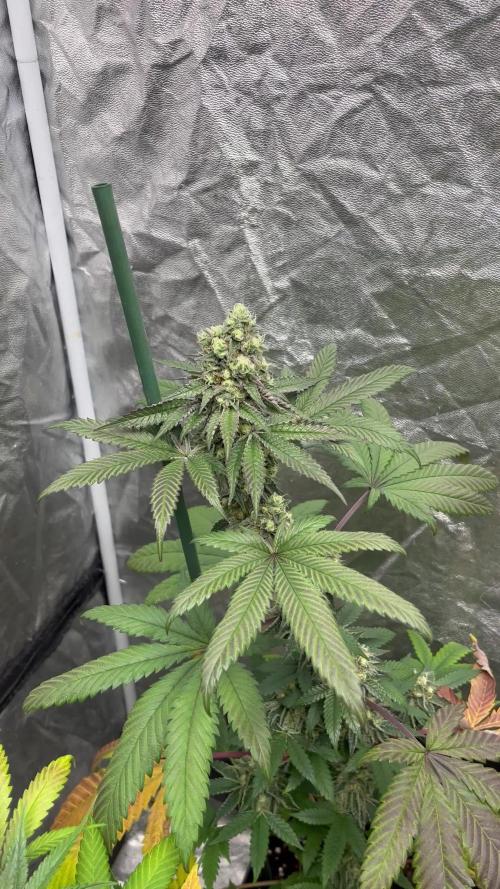
Aug 17: she is looking happy at the start of the fifth week since I started force flowering. Buds are forming and everything is on track.
Very nice plant.
Aug 18: nice enough day after a small bit of rain early. Tops are progressing nicely.
Aug 20: hot and sunny so extra water again despite some rain last night.
Aug 23: added another Scrog layer. This seems like a really good way to stabilize the plant while holding things in place for maximum sunlight exposure.

Likes
2
Share

@eldruida_lamota
Follow
Vamos familia, actualizamos la sexta semana de floración de estas Gelato 44 de RoyalQueenSeeds.
La temperatura que estuvo entre los 24-26 grados y humedad dentro de los rangos correctos.
En cuanto a las plantas las veo verde sano, estiraron bien y ensancharon bastante también.
Se nota que los nutrientes de la marca Agrobeta cubre todas las necesidades de cada ejemplar, empecé añadir el mega pk y el Thor.
Hay que reivindicar que en este armario no tengo trips ni plagas.
Las flores empezaron a engordar, por el momento todo correcto, os dejé también alguna novedad y un cambio en la sala, agradecer al equipo de Mars hydro por el nuevo TSW2000. (los últimos 5 años cultive solo con los leds de esta marca) los cuales probé, TS600, TS1000, TS3000, TSL2000.
- os dejo por aquí un CÓDIGO: Eldruida
Descuento para la tienda de MARS HYDRO.
https://www.mars-hydro.com
Hasta aquí todo, Buenos humos 💨💨💨
Likes
17
Share

@eldruida_lamota
Follow
Vamos familia, estamos en la séptima semana de floración con estas Purple Og Kush de DutchFem.
Las vemos con un buen color, bien sanas y van engordando y progresando correctamente.
A subido un poco la altura pero no afecto tanto, ya imagino que seguiré dándole de comer porque pedir piden, una semana más por lo menos.
Agrobeta:
https://www.agrobeta.com/agrobetatiendaonline/36-abonos-canamo
Mars hydro:
Code discount: EL420
https://www.mars-hydro.com/
Las maximas de temperatura no superan los 26 grados y las mínimas no bajan 20, así que no me puedo quejar.
Los niveles de humedad también son los correctos van entre 50%/55% de humedad relativa.
Por supuesto el Ph lo estamos dejando alrededor de 6.
Hasta aquí es todo, buenos humos 💨💨💨.

Processing
Likes
54
Share


@RastaGrow
Follow
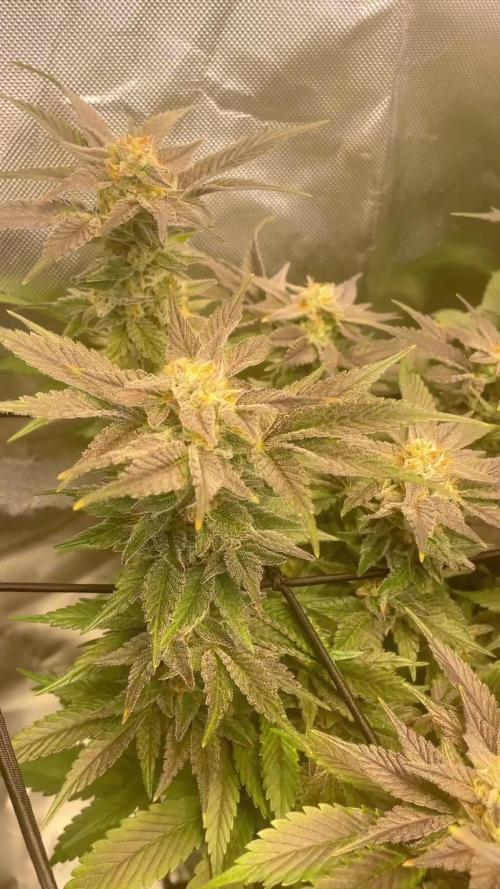
Привет друзья, уже 57-58 день цветения , шишки маленькие смолистые и очень очень тяжёлые . Ветки опускаются вниз и за веса мне приходится привязывать обычной проволоками так как у нас в стране представители гроу магазинов ориентированы на продажах витаминов, а вспомогательных инструментов не продают , приходится делать всё самому ;)
Likes
14
Share


@Paultemp
Follow
Hi all! 😊👊
Week 1 flower
Og kush
7 gallons pot
Hp promix soil
Remo nutrient
Aelius led 300gh
1 gallons water every 2 days
Start nutrient for flower 2 days after flipper 12/12
Likes
5
Share


@Enemy61390
Follow
They smell great. Not a hard grow, but not stabilized genetics. 4 different phenos all with differing flowering times. Make it tough when you use your grow tent as a dry tent to contain smell. Had to buy another tent just to dry the ones that were finished instead of risking them herming. 5.8 oz dried and trimmed bud. Didn't weigh larf/trimmings but will be dry sifting it for the press.


Likes
19
Share


@hooolian
Follow
the plants have really grown this week and are on 250ml of filtered water every other day. nodes are looking nice and tight together and foliage is really taking shape. they seem to be growing at different speeds. Humidity can rise to 65% during the night may need to invest in a mini dehumidifier when flowering.
Possibly will switch to 12/12 light cycle and initiate budding at the end of next week which will be November 21st.

Likes
6
Share


Likes
12
Share

@eldruida_lamota
Follow
Que pasa familia, vamos con la cosecha de estas Lemonpaya de FastBuds.
Por dónde empiezo, fue una variedad que me resultó complicada cultivar y a nada que alimentada lo marcaba las flores son bien compactas y van llenas de resina, tienen tonos verdes bonitos, y tiene unos aromas afrutados bastante marcados con toques citricos.
Es muy complicada a mi parecer, es de ciclo de 2 meses y medio, pero bien agradecida aún así.
Hasta aquí todo, Buenos humos 💨💨💨