The Grow Awards 2026 🏆 


Likes
5
Share
@Drtomb
Follow
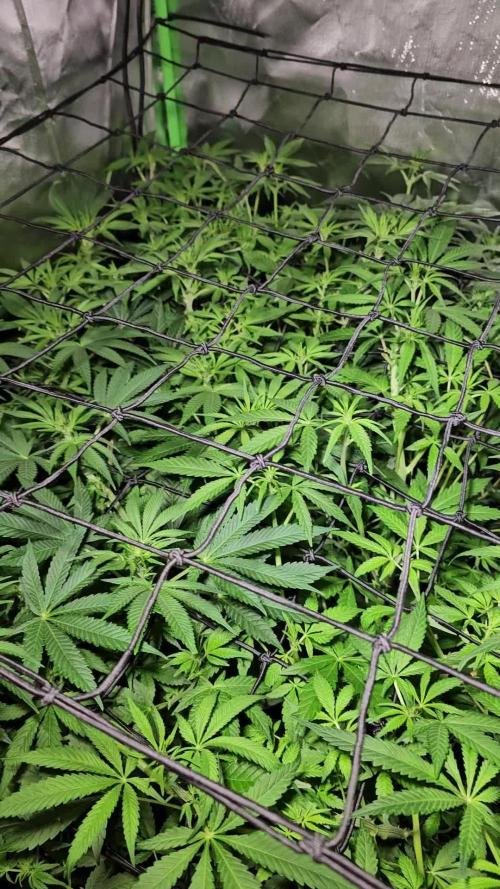
Just hit day 10 of flower this net has about 20% touching the 2nd trellis. And about 70% almost touching.
The Saskatoon Berry plants are very close node spacing. The bud formations are already prevalent.
Likes
Comments
Share
@BruWeed
Follow
08/05 - Comenzo su primera semana en etapa de floración.
Se encuentra perfecta sin ningun problema hasta el momento.
Pase las luces a 12/12 y ademas subi un poco la potencia ya que entra en floración.
Se encuentra muy tupida, los cortes que le realice funcionaron y se desarrolló muy bien.
Ya se puede sentir un poco de aroma a planta.
En estos dias estare publicando mas imagenes de como viene.
Podes seguirme en Instagram como @bruweed_


Likes
Comments
Share
@BeHappyNtoke
Follow
Last week of pre flower girls are doing great can’t believe they’re clones

Likes
7
Share
@Minuteman_Organics
Follow
Another boring week in flower. One of the indigo childs is fading to yellow. Checked the trichomes and I'm starting to see some ambers. Will probably wait till 7.5 week. The rest of the indigos will probably go 8-8.5 weeks.
The medipak needs a lot more time. Not a resinous as I would have liked to see at this point. But I have a feeling that it might be my fault with not providing them proper environment for a sativa. I also suspect there might have been a fungal issue from the medipak tent as one suddenly died. Classic fusarium. We shall see with the others.

Likes
262
Share
@Ju_Bps
Follow
Hello mate growers 👨🌾🌲,
All was fine this week,
Humidity continu to down a bit, in this end week we are 50%, weather are hot, so 27*C average day and 22*C night.
Buds continue to be more fat ❤️🌲👨🌾,
I think harvest will be in 2 weeks around, plants start to drink less water, that's one of maturity sign.
So I'll give nutrients again one week, after I'll start my flush.
This week I've given
Water + pk 13-14
Water + rqs bloom tabs + sugar royal
Water only
PH@6
Have a good week my friends ❤️❤️👨🌾🌲


Likes
14
Share
@UnorthadoxDude
Follow
Week three of flower is here and the pistils are popping out all over the place now.
The final tuck was done on day 14, two days ago. From here I am just letting them grow out, the second net is just to support the colas as they develop and pack on weight.
Day 16 of flower: Photographed and took a video.
More updates to come later in the week.
If you are on X, please follow me @Unorthadoxdude

Likes
101
Share
@Ferenc
Follow
Day 73, 25th of November 2020:
Hi! Well they are getting nice maturing buds getting bigger and all good.
I love the red colour of the Red Hot Cookies. Unfortunately, Tropicanna Poison and Red Mandarnine does not show any signs of purple or red colour.
Kalini Asia neither albeit, the bonsai version gets purple.
Gelato is little beauty. So yes, basically not much to say.
Fertilization is still the same every second day with the ratio and mixture above stated.
The lamp is on 11.15 min and off 12.45 min.
Last week was 15 min longer light cycle....
So every week 15 min shorter light cycle until the 5th week. So far -45 min. It switches on at 6 am and off at 17.15 pm.

Likes
2
Share
@SecretC8keSociety
Follow
Let say I don’t even know where to begin or how to say this but it more of a challenge w/ the fans leave. I’m like dang but of course got to keep the girls manicure and clean for they can strive to their full potential. I may have or may have not stress the girls out by cutting too many fans leaf off. Regardless I hope they don’t hermies on me . If did no sweat 😅 still will run this back . I only see em at the bottom bottom. For sure have to trims on the regulars… or every time open grow tent. According to Premium Cultivars.. the problem to look out for is trimming & pruning . Humidity Sensitive and mold/mildew. Sorry for late post or update. Outside of that working new 9/5 and doing my best to stay on top LPC. Will see harvest… stay tune!

Likes
17
Share
@SkunkyDog420
Follow
Hallo zusammen 🤙.
Habe sie heute geerntet.
Wir hören uns in 3 Wochen mit dem Erntebericht.
Rabattcode für den BIOTABS-Webshop https://biotabs.nl/en/shop/ GDBT420, damit erhalten Sie 15 Prozent


Likes
7
Share
@Huntress007
Follow
I am pretty happy for this being my 1st grow ever! Nice looking buds and lots of fun! I did expect the nugz to be bigger but I an happy with the experience!
Likes
98
Share
@CBD_Sweden
Follow
My second growroom is built and the girls have moved in.
This new strain combines two well-received parents, Juanita la Lagrimosa (Spanish for "Juanita the Tearful") and Royal Highness, which are themselves genetic hybrids of other precursor strains: Juanita the Tearful from Queen Mother and a Mexican-Afghan blend; Royal Highness from Dance Hall and Respect 13. On and on the strains date back in agricultural time, each new variety with its own unique smell, taste, color, high and medical benefit. However, in the past decade, a goal of all this tinkering has been what some producers are starting to call “Royal Respect” with the soul of marijuana's benefits going toward both body and mind.
Painkiller XL is notable for its near-equal representation of 6 percent tetrahydrocannabinol (THC) and 7 percent cannabidiol (CBD), achieved by a seed that's 70 percent sativa and 30 percent indica. While the sativa variety of cannabis is widely known for producing more of a mental, cerebral high, and indica has a reputation for contributing more toward its physical high, other factors are more important to consider: THC is the compound given most of the credit for that head high, with CBD takes the credit for marijuana's many proven medicinal benefits, which range vastly from relieving pain, anxiety, migraines, fibromyalgia and even mad cow disease to easing many of the most deleterious symptoms of AIDS, diabetes, epilepsy and Parkinson's disease. These are just a handful of the dozens of ailments marijuana is being prescribed to combat by doctors across the globe and in more than a dozen U.S. states. Cooperatives at medical marijuana dispensaries have been at the forefront of providing CBD-rich cannabis buds and oils for their patients, who undoubtedly appreciate being able to purchase the strain best-suited to ease their particular ailments.
This new strain joins others rich in both CBD and THC like Euphoria, Royal Medic, Medical Mass and Danceworld that seek to actually not necessarily downplay cannabis' psychoactive effects in favor of optimizing its healing role, but instead equalize the two. According to the California-based Steep Hill Cannabis Analysis Laboratory, this equalization brings to the cannabis user not just the physically healing aspects, but also the spiritually and psychologically healing benefits as well. There are other strains with very little THC and more CBD than Painkiller XL , but rare are such splendid balances. Producers of this strain say it produces a considerable amount of pain relief, with a mild, relieving mental euphoria.
With a flowering time of eight weeks, the Painkiller XL seed can produce 525 to 575 grams per plant indoors. Inside, the dried yield is 400 to 450 grams per plant. Inside, the plants average in height at about 31.5 inche (80 cm); outside, the average height is about 53 inches (135 cm), with harvest time at the end of September.
THC: 9%
CBD: 9%
Yield Indoor: 500-550gr m2
Yield Outdoor: 500-550 grams per plant dried
Height Indoor: 60 - 100 cm
Height Outdoor: 120 - 150 cm
Flowering time: 8 weeks
Harvest month: Late September
Genetic background: Juanita la Lagrimosa x Royal Highness
Type Sativa: 75%; Indica: 25%
Effect: Physical, clear high.
----------------------------------------------------------------------------------------------------------------------------
2017-12-25. Week 16, day 3. The girls starts to look better now and the buds are growing. Had to support the branches and did a defoliation and rearrange some of the buds so they get more lights. Added pics and video.
Likes
8
Share
@R1pp3r
Follow
Esta semana tocó defoliar.
Una defoliacion bastante agresiva y dejando solo brotes que tienen cierto potencial, ya lleva unos 40x40 cm cubiertos

Likes
25
Share
@pifflestikkz
Follow
Day 22
25/07/24 Thursday
Still no Feed/water since Tuesday.
Been a humid and overcast two days so not as much evaporation as normal.
All plants happy and healthy 💚
Video updates
Day 23
26/07/24 Friday
De-chlorinated watering pH 6 with 5ml calmag to 5L water.
Watered each with 250ml and had small run off.
I will continue to feed/water with small run offs to help prevent salt build ups.
Video update.
Day 26
29/07/24 Monday
Nice feed today, using de-chlorinated tap water pH 6.
They each had 300ml with small run off.
All looks incredibly happy and healthy!
The Auto Kabul that was mutated and twisted has pulled herself through and is just a bit shorter than the others.
Day 28
31/07/24 Wednesday
End of week😁
De-chlorinated water pH 6 today with Plagron pk13-14 5ml to 5L
Plagron power buds 5ml to 5L
Used 300ml of the 5L solution.
I will be using these on water days from now on as they are advised to be used every irrigation.
We'll see how they perform 💪💚


Likes
5
Share
@MadeInGermany
Follow
Flowering day 34
since time change
to 12/12 h.
Hey guys :-)
The buds have developed incredibly nicely this week.
The smell is getting more and more extreme :-) .
The growth has slowly stopped as the full energy goes into the production of the buds.
Watering was done twice this week, each time with 1.2 l (nutrients see table above)
They were individually inspected and checked for their health.
Osmosis water for the coming week was refilled in a 100 l tank 👍.
Have fun reading the diary and stay healthy 💚🙏🏻
👇🏼👇🏼👇🏼👇🏼👇🏼👇🏼👇🏼👇🏼👇🏼👇🏼👇🏼👇🏼
You can buy this Nutrients at :
https://greenbuzzliquids.com/en/shop/
With the discount code: Made_in_Germany you get a discount of 15% on all products from an order value of 100 euros.
👇🏼👇🏼👇🏼👇🏼👇🏼👇🏼👇🏼👇🏼👇🏼👇🏼👇🏼👇🏼
You can buy this strain at :
https://gardenofgreenseedbank.com/candyland/
Water 💧 💧💧
Osmosis water mixed with normal water (24 hours stale that the chlorine evaporates) to 0.2 EC. Add Cal / Mag to 0.4 Ec Ph with Organic Ph - to 5.8 - 6.5
MadeInGermany

Likes
17
Share
@Stick
Follow
Growing bushy! She was topped for the 2nd time and received a canopy ring. I'm building the manifold and planning to reach 8 main colas in a few weeks. Thanks for stopping-by! 😎
Likes
6
Share
@GERGrowDesigns
Follow
Welcome to Flower Week 7 of Divine Seeds Auto Fractal
I'm excited to share my grow journey with you all as part of the Divine Seeds Autoflowering Competition 2025. It's going to be an incredible ride, full of learning, growing, and connecting with fellow growers from all around the world!
For this competition, I’ve chosen the Feminized Automatic strain: Auto Fractal
Here’s what I’m working with:
• 🌱 Tent: 120x60x80
• 🧑🌾 Breeder Company: Divine Seeds
• 💧 Humidity Range: 50
• ⏳ Flowering Time: 60 Days
• Strain Info: 23%THC
• 🌡️ Temperature: 26
• 🍵 Pot Size: 3
• Nutrient Brand: Narcos
• ⚡ Lights : 200W x 2
A huge thank you to Divine Seeds for allowing me to be a part of this amazing competition and Sponsoring the Strains. Big thanks for supporting the grower community worldwide! Your genetics and passion speak for themselves!
I would truly appreciate every bit of feedback, help, questions, or discussions – and of course, your likes and interactions mean the world to me as I try to stand out in this exciting competition!
Let’s grow together – and don’t forget to stop by again to see the latest updates!
Happy growing!
Stay lifted and stay curious!
Peace & Buds!