
Likes
Comments
Share


@NatureSolutions
Follow
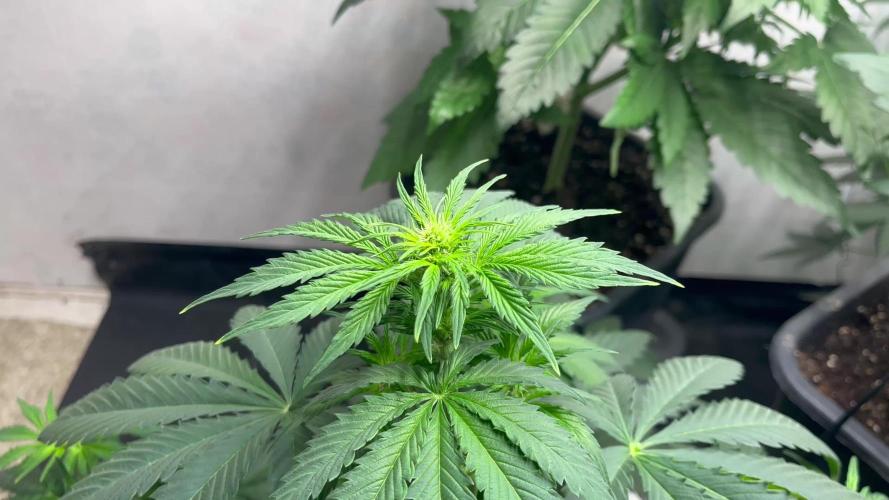
Final stage of vegetation. Few more weeks left before flowering starts. Cant wait to have that Hazelicous smell around. Anyone ever had dream machine?its one of her parents and I have never smoked it and im very curious about the taste especially!

Likes
6
Share


@Rinna
Follow
The ladies are stacking hard and smelling insane. The nicest pheno has some amazing bud structure with big icy buds and perfect node spacing. Smells like fresh zoap, sweet, fruity, gassy and parfume/soap-like. Incredible. She is by far the biggest plant, which is nice as she looks like the most productive one. My second favorite is looking beautiful. The structure on her is not so great and looks like a small producer. Very nice fruity/candy terps though, and incredibly icy. The stretchy tall pheno is looking great too. She smells more like a mix of #1 & #2, very icy as well. She stretched a lot so the top buds are very close to the light, and very foxtaily. The buds at 40-70 cm distance are looking more compact and dense. The least favo pheno looks very weird and small, bud the buds are pretty icy and smell very sweet.


Likes
22
Share


@BlumenBot
Follow
2/20 - finally got all of the top spread out across the edge of the pot. Also defoliated all of the older fan leaves. I'm not sure if I need to take off the lower shoots that are starting around each top...
2/21 - flush feeding, tops are starting to point up except for one weakling which I took the binds off of to let her get her strength back
2/23 - things are looking great so far, the one top that was weak regained strength and is back to bindings. This is the cleanest training I've done so far I think!
2/25 - week 9 nute feeding, same as week 8 minus the Kelp and the normal amount of Terpinator. I will be taking off some shoots starting on each top.

Likes
56
Share


@WEEDOOR
Follow
hello!
We are nearing the end, the flowers look good and feel like they are getting fatter towards the end.
I'm still fighting the heat and trying not to exceed 30 degrees in the closet.
Compared to the previous plant I harvested, the current plant has less pollen but is more compact .. I wonder how the differences will feel to me.
The pH of the water ranges from 5.8-6.2 and in addition to relieving the heat I cool the water to 20-25 degrees.
The lighting is on maximum (250W) and I lowered it to a distance of 45 cm from the top.

Likes
5
Share

@JVKdopegrow
Follow
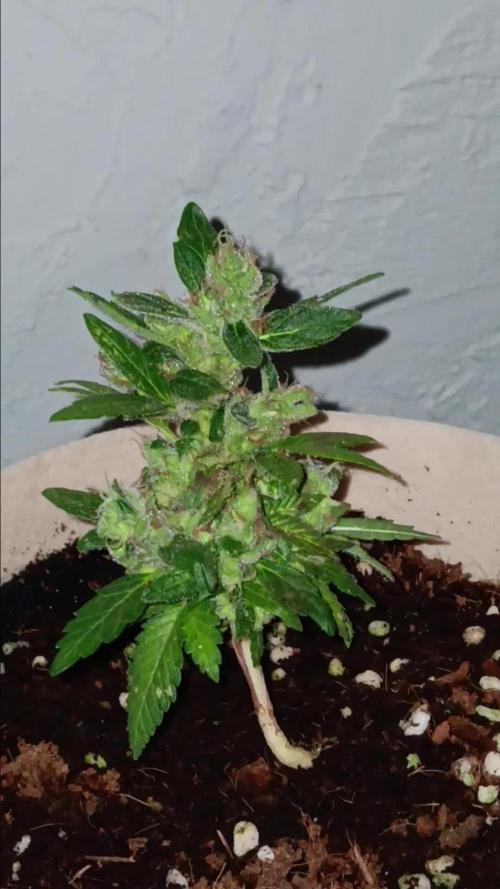
For a couple of runts I think I'll end up with a couple of blunts! Tight little buds. Lots of resin and great scent. I kind if wish I could just keep them going but they are nearing the end.

Processing
Likes
2
Share


@GaliforniaWeeds
Follow
Día 13/10/20 día 37 de floración
Nuestras nenas continúan estables, el único cambio es la bajada de temperaturas, sobretodo de noche aunque con la ayuda de un calefactor la mantenemos en 23 grados. Poco a poco los días pasan y se va a cercando el lavado de raíces, por lo que ya no subiremos demasiado la ec de las niñas, no te lo pierdas!!
Día 15/10/20 día 39 de floración
Continuamos vigilando las nenas, hoy ha tocado una inspección detenida y un aspirado de la sala para minimizar riesgos. Por otro lado la nutrición sin cambios, sigo con el riego por goteo programado para riegos de 1,5 min cada. 6 horas durante el día. Ahora solo falta seguir controlando a espera de cosechar los resultados, te lo vas a perder??
Día 17/10/20 día 41 de floración
Hoy rellenamos el tanque de nutrición, al final se queda con 1.85 ec y 6.1 de ph, esta será la ec más elevada que utilizaremos en nuestro cultivo. La mantendremos así durante unos días hasta que toque hacer el lavado de raíces para asegurarnos de cosechas unas flores con un aroma y sabor sin contaminantes (algo de lo que ya nos aseguramos desde un principio al utilizar zyco)
Likes
3
Share


@Promi
Follow
Cleaned out the lower part of dry leaves.. nothing more. Don't disturb Autos ^^


Likes
5
Share


@Insaniac_0
Follow
Veg Week 4 Day 28 to 34 - 4/24 to 4/30
A lot more to talk about this week. It's time to start the AutoPot resevoir feed, 2nd Topping, and Wire Training
I waited until I saw 3 new nodes of growth (day 29) and then I topped those branches back to the first node leaving a stump for the new nodes to grab as they swell in growth. The branches are quite more stretched than I am used to, so a break is required on the Y branches as they thicken up. I tried not to break the skin and used knitting needles to smash the branches where I wanted them to bend. All went well. I then used ties to the soil to hold them down while they turn back up to the lights. By the end of the week I moved the wire ties to anchor on the main stem instead of the soil
Feed this week was a reservoir feed of 200ppm total before add-ins. I used 200ppm Veg concentrate mix (recipe week 2) and then added 1ml/gal of CaliMagic (General Hydroponics 1-0-0). I then also added 1ml/gal of CaliMagic (General Hydroponics 1-0-0) and ph balance this week was for 6.1
Feed plan next week will be a another ph decrease and nute increase. I will also Intro BloomMix - Intro AirDome Air Line - 3rd Top/Train
Videos:
Just an end of week spin
Likes
39
Share

@Cyrusdavirus
Follow
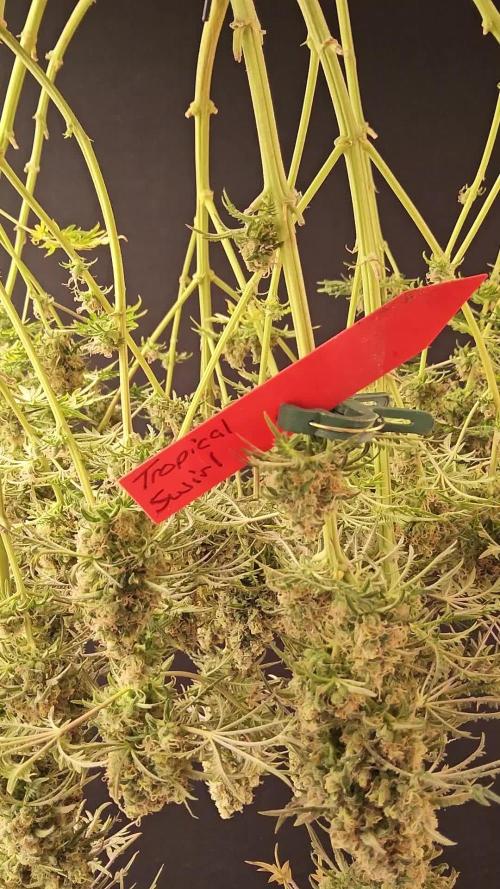
This is final harvest week in the growroom
Plants are coming down all around me. As always I strip the plants down and put them back under the lights for a few days then I cut them down a hang them by the toes until around 20% humidity which is still a little wet but I like to start the sweating early so it slows the drying down a little and starts the cure
Thanks for stopping by and for following along with me on another grow... Cyrus


Likes
Comments
Share

@Elron_mc_Bong
Follow
Netz entfernt
Entlaubt
Pflanze unter dem Netz neu positioniert.

Likes
117
Share


@StarLorr
Follow
Welcome to my autø Møøn Røck 1 Diary.
In this Diary:
Seeds: Sponsored by Ðivine Seeðs
Media: Pro~Mix HP *•ns
Nutrients: Remo Supercharged Kit *•ns
*•not sponsored
___________________________
Feeding:
Tue 22Oct: 2L Remo/Recharge pH'd 6.5
Thu 24Oct: 2L Remo/Recharge pH'd 6.5
Sun 27Oct: 2L Remo/Recharge pH'd 6.5
___________________________
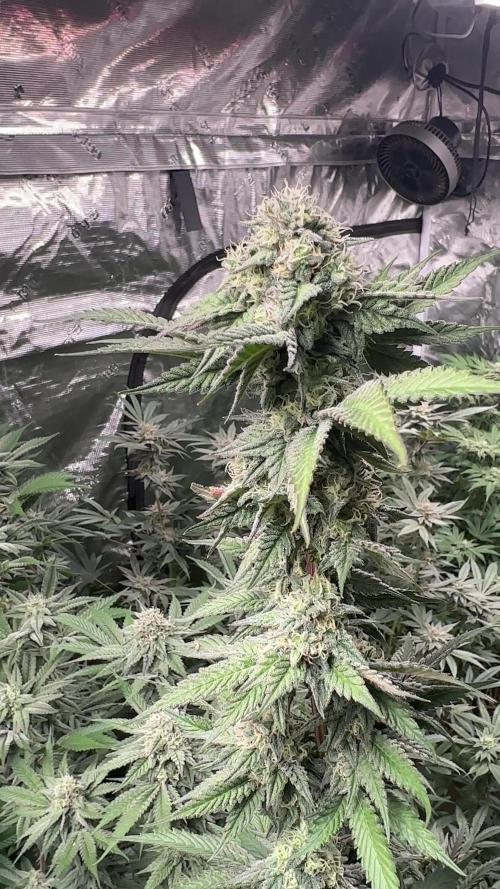
Buds are fatting up.
Senescence occurring on lower leaves.
Had to jack her up on a pedestal as moon rock2 is hugging all the lights😄
___________________________
Thanks for stopping by, likes and comments are appreciated!👊🏻😎
Keep on growin!
Keep on tokin!!!
😙💨💨💨💨💨

Likes
7
Share


@Athos_GD
Follow
D22. Defoliated, gave plain RO water and dimmed the light. Next is auto irrigation.
D23. Finally received all of the Athena nutrients and fed for the first time.
D25. Removed the small runt plant with the twisted stem. The plant started growing pollen sacks.
D26. Raised light as much as I could without using zip ties. PPFD now 650-790. EC tonight 2.4.

Likes
6
Share
@Growverse420
Follow
Week 6 of flower has come and gone, and right now, the tent is pretty much on cruise control. The environment is pretty dialed and the Blumat Blusoak drip tape automatic watering has been a dream! It literally eliminated 90% of tent work. And the plants seem to be loving life! 😎
The four Chicken n Waffles on the left side of the tent are pretty giant at this point, and I’m definitely getting a savory, I guess sort of fried chicken smell, which is so fun! But my favorite in the tent right now is my Jelly Donutz, second row and second from the right. She is really smelling of strawberry candy, finger-licking good! Once a week I’m giving them all a hand water with a fermented Pumpkin Exract, Rootwise Bio Phos, BuildaBloom from Buildasoil, Organics Alive, and Quillaja extract. Hopefully, we don’t run into anything unexpected and can ride this momentum out through the end!

Likes
1
Share

@Elron_mc_Bong
Follow
Woche 6 – Stretch des Todes & Kontrolle behalten
Diese Woche hatte es richtig in sich. Der Stretch ist komplett eskaliert – vor allem bei der Blueberry und der GMO. Beide haben in nur einer Woche rund +40 cm hingelegt. Direkt dahinter kommt die Hyperion, die ebenfalls ordentlich Gas gibt.
Runtz und Purple Punch bleiben dagegen ihrem Stil treu: kompakt, buschig und kontrollierbar – perfekter Kontrast im Raum.
Trotz des starken Wachstums konnte ich das Canopy sauber ausgleichen. Alle Pflanzen stehen jetzt auf einer Höhe und laufen stabil bei etwa 40 cm Abstand zur Lampe, was aktuell perfekt funktioniert.
Beim Gießen zeigen sich klare Unterschiede:
Die Blueberry ist weiterhin extrem durstig und zieht den Topf schnell leer, während Purple Punch deutlich weniger braucht. Das Handling der 15L Töpfe läuft inzwischen richtig präzise.
Untenrum habe ich weiter aufgeräumt, damit die Energie gezielt in die Tops geht. Die Struktur ist jetzt schön luftig und fokussiert auf die Hauptbuds.
👉 Fazit:
Massiver Stretch, saubere Kontrolle und eine sehr homogene Fläche – genau so soll’s in der Blüte aussehen
Likes
8
Share


@Pauwela
Follow
These little girls seem to be moving along as their mother plants did on day 7 in 4" pots of soil, the average clones is 3" to 6" tall, I will try to stretch these girls to 12-14" by next Sat to get ready to transplant to 3gal grow bags as the 4" pots should be root bound by then, will update on next transplant


Likes
28
Share


@ThatoneAKguy
Follow
I’m doing this week a day early for everyone because I have to leave for work for a few days and I just got back from 3 days of being gone. This is the first and second time I’ve ever left them. Usually this late in the game I can get a little longer out of the reservoir though. I cleaned it when I got back and started fresh to get these ladies down the home stretch. One is obviously ahead of the other by about a week which is normal for me and she’s getting a fade and some foxtailing on two of the top sites which there isn’t much I can do since the lights are all the way raised up.
I’m going to just cruise into the finish with moderate nutrients and bounce the ph from 6.4 until they drop to 5.6 so they get all the nutrient uptake. My calendar shows this as the beginning of week 6 compared to the diary but we’ll keep watching as the purple bleeds into the trichomes.
Thanks for looking!

Likes
2
Share


@TeesTrees
Follow
Day 22 - The plant looks really good today and there is more space on internodes so will start LST on this soon.
Day 23 - She looking magnificent and thick.
Day 24 - Watered the plant today with nutrients and i tried to control the PH and i don't think it worked. The plant had a bit of LST she has grown well and is looking ready for it.Also we done some seriouse decore change today so the whole place looks like a bud box we got the other plants from my diaries featuring in a the video.
Day 25 - Must say the plant is a strong and very bushy is very hard to work with it. Will defoliate her in the next few days. Growing just perfectly to not give me headache.
Day 26 -Was to busy running around didnt take a pic its a shame but its okay.
Day 27 - The baby looks beautiful she is growing well. She will need to be defoliated soon she is very bushy and has allot of shade leaves. I watered her today with nutrients. I raised the light but i also raised the plant as well so its sitting at around 30cm - 45cm.
Day 28 - This beauty of a plant has not yet given me any headaches she just grows by her self in her own time. Looks allot thicker and wider.