


Likes
16
Share


@Ladyblazed
Follow
Pre flower formed, starting to smell a bit more than the last week, keeping grooowing 💚

Likes
29
Share


@Hasard
Follow
Starting week 6
Tent is being slowly full
A little bit too hot for the next days as the weather outside will climb to 36-38°C, I thnk I will bring them some CO2. I will check with the growshop. Any idea is welcome.
The stretch is really impressive, 1 of them get 20cm in 7 days
Waiting for the buds 😁
Day 39 I have now added CO2 with an organic boost, it is linked it to the fan. Should be a little bit better with that temperature

Likes
47
Share


@MadeInGermany
Follow
Info:
Unfortunately, I had to find out that my account is used for fake pages in social media.
I am only active here on growdiaries.
I am not on facebook instagram twitter etc All accounts except this one are fake.
Have fun with the update.
Hey everyone 😀.
Another nice week goes by with a great development :-).
Next week it will be placed in the flower chamber with a time interval of 12/12 hours.
1 g of GHSC enhancer was added per liter of water.
I sprayed neem oil again as a preventive measure, hence the dark shine :-)
The tent was completely cleaned and the humidifier was refilled.
I wish you all the best 🙏🏻
You can buy this Strain at :
https://www.exoticseed.eu/
Type:
Herz Og
☝️🏼
Genetics:
Larry OG X Kosher Kush
Indica 60 % / Sativa 40 %
👍
Vega lamp:
2 x Todogrow Led
Quantum Board 100 W
💡
Bloom Lamp :
2 x Todogrow Led
Cxb 3590 COB 3500 K 205W
💡💡☝️🏼
Soil :
Canna Coco Professional +
☝️🏼
Fertilizer:
Green House Powder Feeding
☝️🏼🌱
Water:
Osmosis water mixed with normal water (24 hours stale that the chlorine evaporates) to 0.2 EC. Add Cal / Mag to 0.4 Ec Ph with Organic Ph - to 5.5 - 5.8 .

Likes
5
Share


@cowstick
Follow
01/06/24 Transferred plants to their final home. DIY Aeroponic system.PH 5.6
01/08/24 Gentle bend LST, Having both lights on caused my breaker to trip. Temp in tent dropped to 40*F for 8ish hours.
01/09/24 LST and leaf tucked each plant.
01/10/24 Found out the hard way to keep an eye on water volume. Added 2.5 gallons of water with 40ml each of Sensei Bloom A+B, 20ml Voodoo Juice, 20ml B-52.
01/11/24 Plants bounced back. No lost ladies.

Likes
41
Share


@Growing88
Follow
For now I'm happy with the germination,Even the transplant in the organic coco hydro growth modules all right yesterday✌️🏿


Likes
2
Share


@Kayanesta
Follow
All going well…I had 11 in total but had to give some to a friend to finish off in a tent because I’m afraid they won’t make it before the bud rot sets in!
I may take them back off him depending l!

Likes
56
Share


@Ultraviolet
Follow
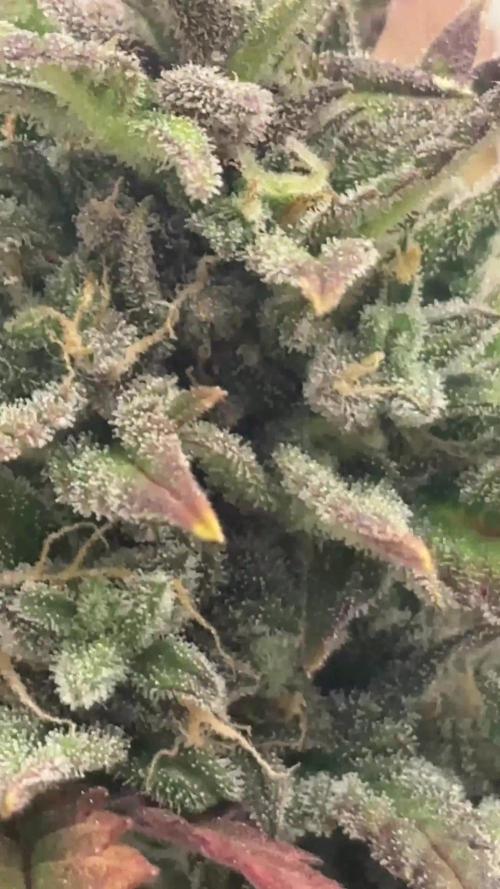
Hello 👋, Gratitude.
Sugars UP.
Nitrogen Down.
24:1 carbon-to-nitrogen (C:N) ratio is widely considered the ideal or optimal ratio for rapid and efficient nutrient recycling and decomposition by soil microorganisms. This balance ensures vigorous microbial activity without tying up excess nitrogen (immobilization) or losing it as gas or through leaching (mineralization).
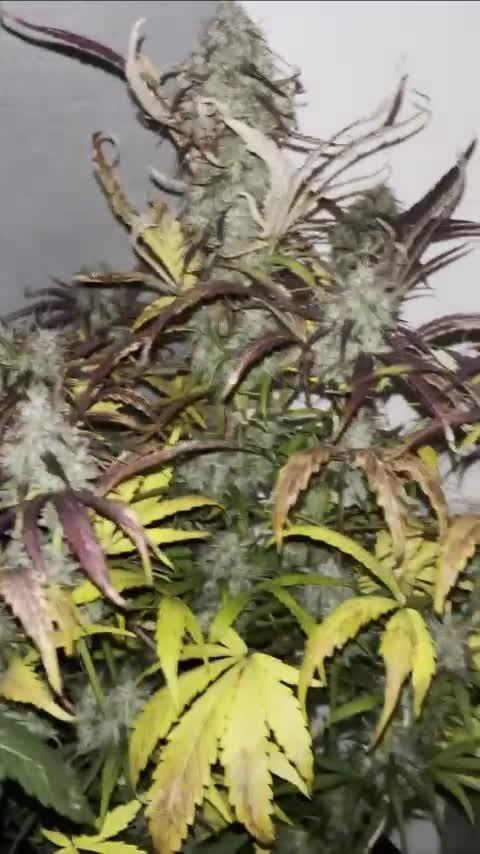
Anthocyanin production significantly increases in plants experiencing nitrogen shortages. Low nitrogen conditions trigger the up-regulation of both structural and regulatory genes involved in the anthocyanin biosynthesis pathway. Carotene is a pigment responsible for the yellow and orange hues in leaves. Chlorophyll is the engine of photosynthesis, while carotene acts as a supporting system that expands the engine's fuel range and prevents it from overheating. Without carotene, the photosynthetic system would be far more susceptible to light damage, but without chlorophyll, the process of photosynthesis as we know it would not occur. Anthocyanin synthesis is a visible marker of a plant's response to unfavorable growth conditions, including low nitrogen, phosphorus deficiency, high light exposure, drought, and low temperature. Every box ticked except P deficiency.
Dropping night temps to 65F.
Likes
9
Share


@ThePifferyAndCo
Follow
Week 1 of 12/12 light cycle. Hit the plant prior to the flip with a top dress of all purpose/power bloom 50/50 and 2 tbsp of basalt rock dust. Seeing a lot of activity on the top layer of soil. The microbial life is THRIVING. End of week 1. Slowly dropping RH to 50%. Already seeing a decent bit of stretch. May need to figure out a way to get my light level with the top of the tent in the event I run out of headroom. Not sure how much of a stretch to expect with the holy communion being it is my first run with them but the blue dream I should be more than okay as I flipped last run with them way taller than this time around.

Likes
17
Share


@HowtoBubatz
Follow
It’s the third week of vegetation, and both plants are growing like crazy! 🌿
They’re super healthy and pushing forward with lots of energy. I’ve been feeding them with the BioBizz nutrient schedule for veg and adding Root Juice to boost their root development. 🌱💧
I’m trying different LST (low-stress training) techniques with both plants.
For one, I’ve applied LST to the entire plant, bending the main stem to get more light exposure across the canopy. 🌿🔄
The other plant is a bit different—I’ve only used LST on the lower branches to encourage better side growth while letting the main stem do its thing. 🌱📈
Both plants are responding really well, and I’m excited to see how these different techniques impact their development. Things are looking promising! 😁✨

Likes
112
Share


@Dunk_Junk
Follow
She actually grew ANOTHER 31cm this week!
She is totally out of headroom now, her top cola will be above the lights in a couple of days 😂
Fastbuds do say it can reach 1.4M... 😁
She is also looking quite bushy, I'm guessing this is a result of the earlier FIMing/topping on multiple sites. This may also have lengthened her veg time, but that's ok. I like to grow monsters 😁 😜
Nothing else to the report as I'm just letting her do her own thing.
For nutrients I'm using 15g of 20-20-20 mixed with 10L of water. Also added 4ml/L of both Cannazym and Terpinator. This brings it to around 1600ppm including ~300ppm for my clean water.
Timelapse Sequence:
*** Pineapple Express ***
Blue Dream
Auto Jack (Not in shot)
*** Pineapple Express ***
CBD Compassion


Likes
11
Share


@madlangs
Follow
Dehumidifier in lung room been going all week to help with temps
All going extremely well. Not one leaf has any burn or deficiencies. Purple punch at the back looking a bit light green could just be the pheno. Flower sooner next time. They are taking over the room. Finally stopped stretching now.
Mont Blanc 61cm
Blue sherbet 97 +86
Purple punch 99+ 102
kush mints 110cm
Lights
465w 26cm
Dli 800ish
300w 21-32cm
Ppfd 750-950
Dli 32.4-41
Pineapple chunk outside
All going well with it. Putting it in the shed at 8.30pm and taking it back out 8.30am
Giving plain water every day in the tray
31.3.23
1L
10ml pk 5-8.
Ec4.5
5ml bio heaven
Ec4.7
3ml Acti Vera
Ec 4.7
3ml Alg a mic
Ec4.9
Ph 5.9
Added another 0.5L water
Ec 3.5
Ph5.9. Brought up to 6.3 8ish drops
Gave 1L bottom and half litre top watered


Likes
17
Share


@scharpmeister
Follow
Not much to do at this point but sit and wait. Rocking and average ppfd of like 1000 at the moment and plants haven’t shown any signs of stress, even though some of the higher cola are only like 4 inches from the 300w led panel

Likes
17
Share


@JohnnyBarrel
Follow
Week 18
Middle August : weather is changing. Return of heat and humidity: 28 degrees, a little bit rain. A heat wave is coming but near the ocean the maximum will be around 32 degrees.
It’s good to grow in greenhouse during this period :
-ventilation control: I adapted the rythme: for now it’s around 18h/24h intermittently
-pests and diseases control: insect’s traps natural and artificial, less heat
-humidity control: no rain problem
Daylight 14h: 7h/21h
Flowering time 😁. Healthy plant, beautiful green color, just a few yellow leaves on the base.
More watering: 1,5L every 60 hours
Same cocktail: Calmag (0,5ml/L)+ FloraGro (2ml/L), FloraMicro (2ml/L), FloraBloom (1ml/L) + Root booster + Cannazym
Feeding soil with guano bat (NPK 3/6/10) for a slow dispersion + dried horn and blood (NOK 13/0/0) for nitrogen add.
Protecting plant: sprayed Neem Oil, added diatomaceous earth on soil. I found signs of thrips attack.
I will make a defoliation soon.


Likes
1
Share

@psychonaut420
Follow
Lemon cherry cookies auto first 2 in video and last one is frozen face auto they iall in 2nd week of flushing and they thickening up and has pretty much stoped stretching and just been focusing her energy on thrichome production and filling out the buds
Likes
4
Share


@The_Projexx
Follow
Welcome to week one of flower!!! This should get super interesting super quickly! With all the males pretty much weeded outta the room we got left with 9 plants that im 99,99% sure are female. I will be adding some nets in a few days after I ensure everyone in the room is female.
Huge shout out to Hidden Vault Genetics for all their great work with genetics! Huge shouts also to @MarsHydroLED for making such great gear to grow with!
MASSIVE shout outs go to all my followers and those who stop into the diary alike! Keep inspiring to grow!
-The Projexx
Day#1F Pictures N/A. Ladies are going to start displaying some growth now! Watered 3.5L each at 550PPM
Day#2F Ladies are praying and starting to react to the light change.
Day#3F Ladies are praying and changing , so far only 1 plant left im not sure what it is in terms of sex.
Day#4F Pictures N/A. Organs on plants are getting more pronounced won't be long till where in full stretch. Watered ladies at 3.5L each at 550 PPM
Day#5F Pictures N/A Ladies are starting to really pick up now!
Day#6F Going to look to install the nets in a couple days just giving one plant a little more time to display sex before I lock the ladies into place.