


Likes
Comments
Share


@Laundry22110
Follow
Harvest tomorrow. In the dark for 24hrs. First time growing an auto flower under the CO sun. Tomorrow will be day 70 from seed. Easy to grow.


Likes
43
Share


@DaSofaSurfer
Follow
I've been able to keep my environment on point. I'm on track to harvest some very special bud 🙏🤗

Likes
38
Share


@LittleBigTrees
Follow
I've been pulling the top small fan leaves to allow the side's to catch up.
One plant is really tall and stretchy ,
One plant is very short and compact .
The other 4 plants all look very similar to each other at this stage .


Likes
4
Share


@SEGA_Y_Griega
Follow
13.3.23 verschüttetes sauberes Wasser 150 (ppm) hervorragende Entwicklung im Moment
Do-Si-Dos-OG-Cannabis-Samen sind ein weiteres von der US-Westküste inspiriertes Meisterwerk. Es war nur eine Frage der Zeit, bis Girl Scout Cookies mit unserer Colorado Ghost OG kombiniert wurde, die beide das Rückgrat unseres Strain-Sortiments bilden, um diesen potenten, indicadominanten Hybriden zu kreieren, der nach nur 60 bis 65 Tagen Blütezeit erntereif ist. Gönn deinem Körper und Geist eine entspannende, stimmungsaufhellende Behandlung mit diesem Raucherlebnis par excellence, das mit dem Geschmack von süßem Gebäck und vollmundigen, sahnigen Aromen deinem Gaumen schmeichelt.
Alle schriftlichen und visuellen Materialien sind nur für Informations- und Bildungszwecke bestimmt.
Diese Woche habe ich mich entschieden, ein großes Zelt Mars Hydro 120•120 zu installieren, für eins und eine Lampe mit großer Reichweite FC E4800. Ich habe die Klimaanlage eingerichtet, jetzt liegt die Temperatur bei etwa 24, ich habe zwei Lüfter installiert, um den Secret Jardin Monkey Fan 20w zu blasen, ich wollte sie schon lange kaufen. Die Heizung funktioniert auch! Hoffe es wird bald wärmer 😅

Likes
5
Share

@Pblc_10
Follow
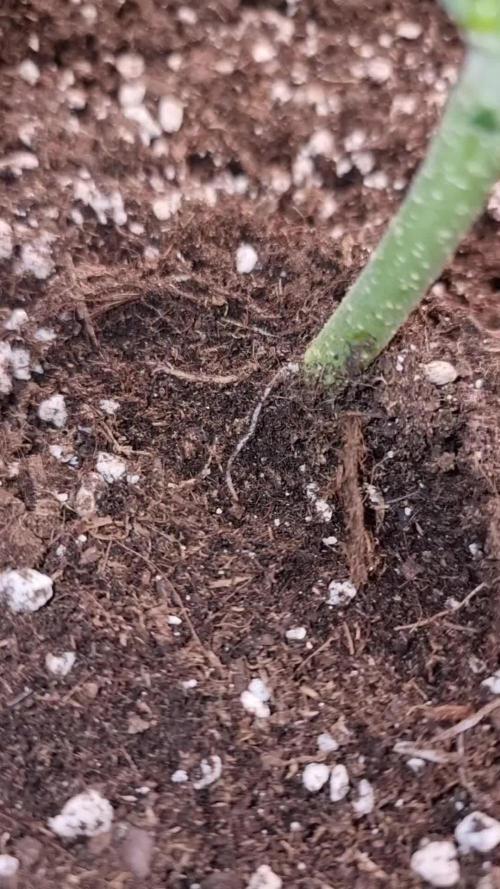
Hab nochmal ordentlich entlaubt und heute oder morgen entferne ich die letzten großen Sonnensegel. Die Pflanzen sehen sehr vital aus und wachsen gut vorallem die Wurzeln wachsen bis an die Oberfläche. Jetzt noch ca 2 Wochen warten in der zeit gibs noch co² bags und eventuell noch n paar Seitentriebe wegnehmen und denn geht's ab in die blüte🍀

Likes
15
Share

@jellyjelly
Follow
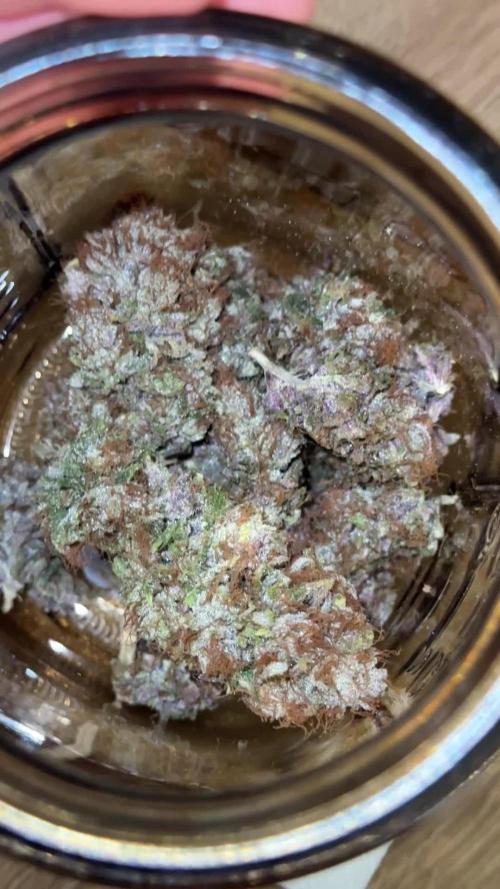
Super tropical vibes in this bunch!!
Each one has such a unique smell and flower structure. I really neglected the hell our most of these plants given the tiny 3 gallon container and arid conditions - however these plants were resilient.
Crystal Light x Pelee Sword stands out as gassy pungent strain covered in trichomes.
(Purple Haze x Malawi) x pelee sword was also very note worthy. Very citrusy/floral notes, airy bud structure but surprisingly very resinous.
Super stoked and thanks again DaDankSeed bank for the genetics and pointers!

Likes
6
Share


@DutchFarmer
Follow
Week 4
Topped plus applied some LST training
Seems like Pheno 1 has better structure and growing alot faster
Pheno 2 started to slow slight fade on the lower leaves
But lets push her through!
Processing
Likes
9
Share


@JakeTheButcher
Follow
It was an interesting week...nice to have something to keep my mind occupied on these girls during this covid-19 epidemic.
2 days after water change last week, my roots started to turn brown and have appeared to stop growing, I first was concerned that it was root rot, but the plants didn't seem to be affected. So I added more UC ROOTS to the solution in hopes that it would help, I noticed white roots shooting out about 24 hours after. I think it may have been the increase in the coco cal that did the damage. They are filling the net nicely and I will be flipping them to flowering this week I think.

Likes
16
Share


@GreenMunchkin
Follow
Week 7 let's go !
Day 152 - 04/11 : The plant symptoms have seemed to slow down. The soil is also starting to dry out a bit more which might have been a problem.
Day 155 - 07/11 : She was flushed in the morning with about 4L of water and 2L of a 30% strength microbial+trichoderma tea to innocculate the soil in case the microlife took a hit. The run off was 1L.
I also switched the 400W MH for a 400W HPS to finish off with a little extra boost of light + different spectrum and see if it makes any differences.
The light were moved up by approximately 20-30cm. They are now at about 70cm from the plant. I wondered if the light were maybe too close and caused all those strange symptoms. Let's see if there is any change in their behaviour.
Day 156 - 08/11 :
It seems the plant is a lot happier. It has only been a day but I feel like she is fattening up faster suddenly. Or it could be that she has recovered from the slight chock from a few days ago.
Day 158 - 10/11 :
Yep she is definitely happy again. I am convinced it was the light or at least it was part of the problem, I am seeing a lot of growth all of a sudden, on all plants and not just this one. Trichome are up, pistilles are up, calyxes swelling, everything is running smooth again. She is looking ready already, from a bud general appearance I could almost harvest now, but the trichomes are still mostly clear and I have a feeling she has a little more in her. I suspect the reason for such large amount of already brown trichomes might have been the light excess they went through.

Likes
69
Share


@DogDoctorOfficial
Follow
Eternity Grow Cup - Week 11 VEG Report
This is a pivotal week in our Eternity Grow Cup journey as we wrap up VEG and prepare to transition into FLOWER. Our goal has been to ensure that the plants are thriving and optimized for the next phase. This report will detail everything that took place during this crucial week.
Mass Defoliation & Structural Training
We began the week with an extensive defoliation session. Every leaf with a stem was removed to clear space for optimal light penetration and airflow. This process was done mostly by hand, clicking them off in the opposite direction of growth, while some stubborn ones were snipped with scissors. By the end, it felt like we had taken out nearly half a kilo of leaves! The room now looks clean, structured, and ready to fill out the ScroggNet.
To further enhance the plant structure, branches were attached to the pots, allowing for better horizontal growth. This technique helps maximize canopy exposure and prepares the plants for even light distribution once flowering begins. Defoliation before flowering is a key step as it reduces overcrowding, improves airflow, and sets the plants up for efficient energy use in the next phase.
Light Schedule & Adjustments
This week, we introduced a subtle but effective light adjustment. While still maintaining an 18-hour light cycle, we initiated a 15-minute delay with the whites, allowing the reds to start first. This gradual shift signals the plants that a change is coming. Similarly, at the end of the light cycle, the whites turn off 15 minutes earlier, leaving the reds on for an extended period. This strategy mimics natural sunrise and sunset, helping the plants transition more smoothly into flowering.
Additionally, at the end of the week, we will be implementing 48 hours of darkness before the official flip to flower. This method has worked exceptionally well in past grows, helping plants recognize the transition and encouraging a strong start to flowering. However, it's important to emphasize that this is a personal technique and not a universal rule. Every grower should experiment with different methods to find what works best for their specific environment.
Environmental Conditions & Challenges
Currently, our temperature is at 27°C with 60% humidity, resulting in a VPD of 1.50. While slightly higher than the ideal for VEG, our CO2 levels are over 1000 ppm, and the light intensity is at 570 PPFD, making it a manageable balance. The solution pH is 5.79 (essentially 5.8), EC is 1.38, and water temperature is 17.7°C.
One challenge we are facing is maintaining optimal reservoir temperatures. Currently, it's a bit low at 17.7°C, and we are exploring solutions to raise it slightly. However, the medium temperature sits at 22.2°C, which is a good range. The humidifier is still in use, though it struggles to increase humidity further, so we are working with what we have to keep the VPD in check.
ICL-300s Integration
The ICL-300 lights are now fully active. Unlike the last grow, where we introduced them later, this time they are on from the start of flowering prep. This adjustment is an experiment to see if the plants respond better to an early introduction. Learning is at the core of this journey, and each grow offers new insights. Whether this proves to be the optimal strategy or not, it will be a valuable lesson for future grows.
TrolMaster Hub & Data Monitoring
Throughout the week, we have been closely monitoring our grow using the TrolMaster App TM+. We are displaying some of the collected data for everyone to see the details. Stay tuned as we explore this further in the next report!
As always, we want to extend a huge thank you to our sponsors and the amazing community. Special thanks to Aptus, Groovebags, Cannakan, Promix, Ziggy Papers, TrolMaster,and Plagron, Zamnesia and Grow Diaries for making the Eternity Cup possible.
I apprecilove the support from all sides—lovers, haters, competitors, and fellow growers. The competition continues to push us to improve, and i am thrilled to see the incredible reports from others. This is a challenging yet rewarding experience, and i couldn’t be happier to be part of it.
For those following along, we invite you to check out our YouTube channel, where we upload full 4K episodes showcasing the entire journey. Some episodes are too large to be uploaded directly to Grow Diaries, so YouTube is the best place to catch everything in high definition.
This marks the end of VEG, and we are officially ready to flip to FLOWER. Next week, we will dive into the TrolMaster System in action, check the data insights, and monitor how the garden adapts to the shift. Stay tuned!
Growers Love to all, happy growing, and best of luck to all competitors!
See you all in the next update!
Genetics - Runtz https://www.zamnesia.com/6000-zamnesia-seeds-runtz-feminized.html
Nutrients - Plagron https://plagron.com/en/hobby
- Aptus Holland https://aptus-holland.com/
Controls - Trol Master https://www.trolmaster.eu/
LED - https://www.futureofgrow.com/en
LED - https://www.thinkgrowled.com
Soil - https://www.promixgardening.com/en
Germination - Cannakan https://cannakan.com/?srsltid=AfmBOopXr-inLXajXu3QFgKXCXXos4F1oEvScjMKIB5MR5dk8-GJ-F49
DOGDOCTOR 15% off
Smoking Papers - https://ziggioriginal.com/
Terpene saver - https://grovebags.com/
As always thank you all for stopping by, for the love and for it all , this journey of mine wold just not be the same without you guys, the love and support is very much appreciloved and i fell honored with you all in my life
With true love comes happiness Always believe in your self and always do things expecting nothing and with an open heart , be a giver and the universe will give back to you in ways you could not even imagine so
As always, this is shared for educational purposes, aiming to spread understanding and appreciation for this plant. The journey with nature is one of discovery, creativity, and respect. Let’s celebrate it responsibly and continue to learn and grow together!
Growers Love To you All 💚
#EternityGrowCup #RuntzHunt #GrowersLove #CannabisCommunity #AptusHolland #ProMixSoil #TrolMaster #Zamnesia #Plagron #ZiggiPapers #Grovebags
Likes
13
Share


@DieselKush
Follow
Oct.29 - We transplanted the girls into soil since they are moving into vegetation phase
Nov.4 - Watered each plant 250mL, 0.25mL of each nutrient for each girl

Likes
17
Share


@NoProbation4Weed
Follow
day 70
Light hits with around 850 - 1000 PPFD
had nothing to do this week. I just let her finish out.
Terps are already there.
Processing
Likes
3
Share


@Dunk_Junk
Follow
Day 77 - Look at this plant! Just look at it! The trichomes on her are simply amazing. I've never seen anything like it in my tent before.
View the close up photos at high res and you can see the trichomes clearly. They're EVERYWHERE!!!!
She is ridiculously sticky, and when you touch her the smell is pure grapefruit. Citrus but sour. 😍
I would love to do a lab test on this strain but geographically I cannot..... I'm estimating well over 20% THC....

Likes
Comments
Share


@GardenxManxJames
Follow
It training this week going to let he go do her thang. Light was a little to close so I raise it some
Likes
7
Share


@AestheticGenetics
Follow
3/27/25
bottom watering has roots shooting out the bottom of the pots.

Likes
33
Share


@FlavoursUk
Follow
So far things are going well. Bloom has started and already seeing purple/pink hues on the buds. Will be back to update properly just posting up a few pictures before i forget. Check out the YouTube channel.
Water change at day 31 and pH'd the water to 5.8. I also got a new RO 4 stage water filter for the best water quality for the girls so ill be using that on the next water change. The smell is sweet in the tent. All seems to be going ok.
Day 34 - The girls seem happy enough, a few colder nights than needed but all in all, happy with there progress.

Likes
5
Share


@OnlyTomatoes
Follow
[ Information ]
For all grow information, including strain and room details, please see the first week of veg.
[ Updates ]
(Flower) Day 1 - Light intensity increased to 65%. C02 increased to 1300ppm average. Day temp/humidity 85/70 (1-1.2VPD), night temp/humidity 75/65 (.8-1VPD). Fed a diluted compost tea mixture before lights on. Base water was R/O and tap water mixed lightly with silica and Tribus microbes. Tea was a mixture of Fish Hydrolysate, Bat Guano, Molasses, Fulvic/Humic, Kelp, and Earthworm Castings. 8 gallons of tea were added to 72 gallons of water mixture for an 80gal batch total. The batch was mixed for a half hour before feeding to the room. I did not PH or PPM test the mixture, organic material is hard to get an accurate PPM reading so the numbers are useless to me. I will be working to bring the lights to 100% power over this first week of flower.
Day 4 - Light intensity increased daily, currently at 90%. Will raise to full power tomorrow. C02 increased to 1800ppm average. Temp and humidity for day and night are still the same. Lights were raised slightly to maintain 12 inches from canopy height, and a few growth nodes that were above the canopy got topped. Watered today with an 80gal (1.25gal p/pot) mixture, 10% tap 90% r/o water. 6.8 PH, 2.2ec. Foliar sprayed yesterday before lights off with a neem mixture for weekly IPM. Canopies are stretching relatively evenly, though I will be adding in support nets within a few days to help maintain the even spread. I've run this strain before so I'm fairly confident that I know what to expect during these few stretch weeks.
Day 7 - Lights have been at 100% since day 5. C02 still 1800-2000ppm on average. Plants are stretching quickly into the lights, I have yet to readjust their height. The best growth usually happens when I do nothing, and I've done almost nothing the past couple days besides enjoy the unusually warm spring weather my area is currently experiencing. Watered today, 100gal (1.5gal p/pot) mixture, <1ec. Mainly an organic feeding for microbe health, also wanted a bit more runoff than normal due to the high ec feeding previously.
Likes
1
Share


@GrowMaster93
Follow
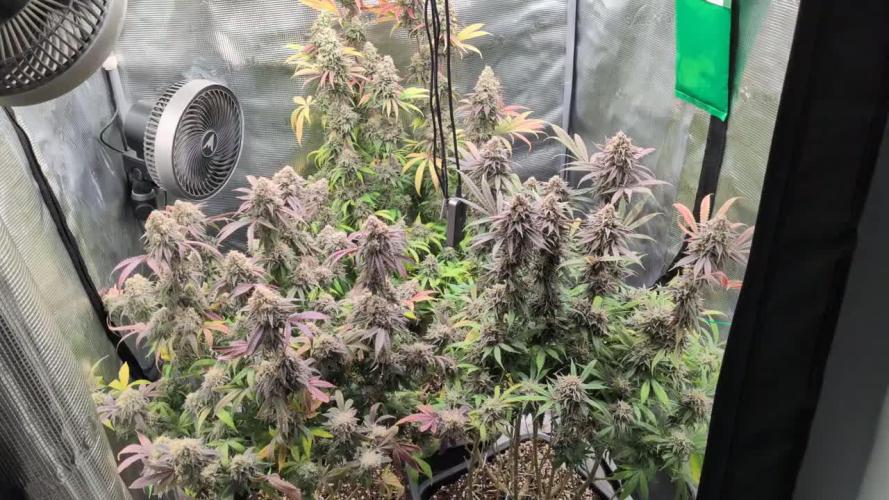
Hello dear fellow growers 😎 we are in the 2rd week of flowering and the 2 ladies are doing great! I'm going to start using Biobizz's bio bloom stimulator this week to improve cell division and nutrient uptake, I intentionally don't give too much otherwise the weed gets a very sweet taste (disadvantage of this product if you don't like it) The bloom stretch is almost finished, I reckon with a final height of 1.70m despite Lst since the beginning, the plant was also defoliated below! There are umpteen blossoms on both plants, you only have to look at a small part and you can already see around 20-30 and the thickness of the stems is crazy! Expect huge buds and a good yield 💯💯😎😎😍 HAD NO YELLOW LEAF YET, if a deficiency occurs in the 5th week of flowering, it will no longer be noticed. I hope you like my report, if you want leave a like there
Update : Hello colleagues, here is a short update: first of all sorry that you see the Runtz muffin always with puff light! Unfortunately, I don’t have the opportunity to take the plant out of its home and I don’t want to take pictures in the dark phase because otherwise seeds would arise (stress). But I promise you when the strain is ready comes a detailed report in writing and pictures without pufflicht the two plants are perfect, I had neither a deficiency or a yellow leaf on both plants, the only stress was to top, (lst I do not see as much stress) the two are still growing and many small flower sets were removed below, the leaves but calm.
Your Deutschergrower86
Hallo liebe Growkollegen 😎 wir befinden uns in der 2 Blütenwoche und den 2 Damen geht es prächtig! Ich werde diese Woche beginnen den Bio Blüte stimulator von Biobizz zu verwenden um die Zellteilung und Nährstoffaufnahme zu verbessern, ich gebe absichtlich nicht zu viel da sonst das weed einen sehr süßen Geschmack bekommt (Nachteil von diesem Produkt wenn man es nicht mag)
Der Blütestrech ist fast abgeschlossen, ich rechne mit einer End Höhe von 1,70m trotz Lst seit Anfang, zudem wurde die Pflanze untenrum noch mal Entlaubt!
Es befinden sich zig Blüten anSätze an beiden Pflanzen, man braucht nur einen kleinen Teil ansehen und sieht schon um die 20-30 und die dicke der Stämme ist irre! Rechne mit riesen Buds und gutem ertrag 💯💯😎😎😍
HATTE NOCH KEIN GELBES BLATT, falls noch der 5 Blütenwoche ein Mangel auftritt wird dieser nicht mehr wahr genommen.
Ich hoffe mein Report gefällt euch, wenn ihr wollt lasst ein like da
Euer Deutschergrower86😎
