
Likes
Comments
Share


@JUNGLE_B4RNS
Follow
Hello fellow grower
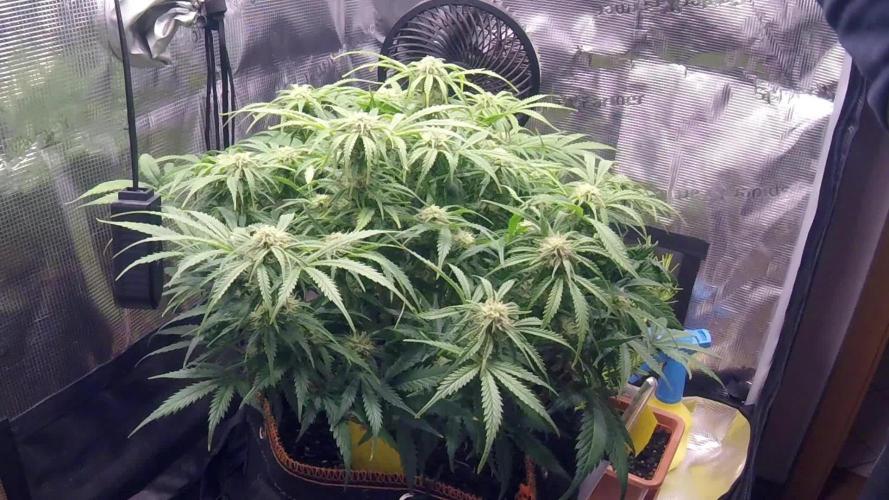
Week 2, seedlings developments are performing very well under the Mars Hydro FC6500. Raising the light just a bit, using the same distance that I was using with the Mars Hydro SP3000.
_________________________________________________
Transplanting into 1.8l pots, they will last 4-5 weeks, perfect intermediary size just to make watering easier and to keep the control on it. Cellmax BIO Soil needs around 5 days to become active and alive, seedlings can show some little deficiencies like Cal. and/or K.
_________________________________________________
One of the LEMON TREE is showing some lil deficiency, but otherwise all the others are growing very well. Got my 16 plants plan, but I have added more seeds to pop out. I got plenty enough light to grow some few more on the side.
_________________________________________________
31/08
Water + BIO RootBooster 4ml/1l
pH 6.5
03/09
Transplant
Water + BIO RootBooster 4ml/1l
pH 6.5

Likes
5
Share


@DBoogie
Follow
Hello Fellow Growers, 👻
Boogie on to week 2 with exceptional amount growth. Both of these girls are coming off strong. Not sure if its going well or not for my plants, but hey for the looks of it they seem to be doing just fine. Started my first LST after it grew a couple sets of leaves. I was really scared attempting the LST on the Tangerine Dream. I thought I did more of HST than LST.
Keep the advice coming dudes! I haven't reached week 4 yet so I am going to continue on with the normal feed of Cali-Mag, Wholly Mack, & Big Bloom. I noticed with the Wholly Mack, it lowers my PH content down to 5.0. Is this normal with this kind of product?


Likes
102
Share


@Roberts
Follow
Ztrawberriez autoflower is growing great in her perlite tub. She just shot her first pistils. I did some lst and defoliation on her today. Getting her ready for the stretching to come. She looks very healthy, and is grow strong. Thank you Fast Buds. 🤜🏻🤛🏻🌱🌱🌱
Thank you grow diaries community for the 👇likes👇, follows, comments, and subscriptions on my YouTube channel👇. ❄️🌱🍻
Happy Growing 🌱🌱🌱
https://youtube.com/channel/UCAhN7yRzWLpcaRHhMIQ7X4g
If anyone needs to purchase fastbuds here is a link for my affiliate program
https://myfastbuds.com/?a_aid=60910eaff2419

Likes
28
Share


@FatnastyzBudz
Follow
12-6 Day 43
- Watering daily now...for the most part, I get tired some days LOL
- Per Gallon: 2.5ml Cal Mag, 11ml Coco A, 11ml Coco B - 800ppm @ 5.8ph
- Gave 2000ml, Runoff was 397 @ 6.8ph
12-7 Day 44
- Same mix still - 800ppm @ 5.8ph
- Gave 2000ml, Runoff is 354ppm @ 6.9ph
- LOL She's such a big girl....I think she may want more food LOL
12-8 Day 45
- Adding a bit to the feed today, just some extras
- Per Gallon: 2.5ml Cal Mag, 11ml coco A, 11ml coco B, 2ml Royal Rush, 1ml SLF
- 796ppm @ 5.9ph
- 2000ml, runoff is 474ppm @ 6.8ph
12-9 Day 46
- Increasing a bit today
- Per Gallon: 2.5ml cal mag, 12ml Coco A, 12ml Coco B - 860ppm @ 5.8ph
- 2800ml given, Runoff is 617ppm @ 7.2ph
- * Switched light off early tonight, that's right! I finally flipped them! Will count tomorrow as Day 1 of flower.
12-10 Day 47 Day 1
- Day 1 of Flower!!!
- Same feed as yesterday - 787 ppm @ 5.9ph
- Gave 2600ml, runoff is 613 @ 6.7ph.
12-11 Day 48 Day 2
- Still sticking to the same food again - 782ppm @ 5.8ph
- Gave 2000ml, runoff is 834ppm @ 7.2ph
- Gave another 1000ml for a total of 3000ml. Did not check runoff again
12-12 Day 49 Day 3
- Same food again, may have forgotten to flush
- Per Gallon: 2.5ml Cal Mag, 12ml Coco A, 12ml Coco B
- 803 ppm @ 5.9ph
- 2000ml given, runoff is 832ppm @ 6.9ph
- Gave 500ml more for a total of 2500ml, runoff is 793ppm @ 6.7ph.


Likes
2
Share


@Ninjabuds
Follow
It's a nice change of pace to have these warmer temperatures, even if it's not quite spring yet. Low 40s during the day is a lot more comfortable than what we've been dealing with lately. Hopefully, this is a sign that spring's around
Those Bubble OG's are looking fantastic! It's awesome how two of them are starting to get that purple color – they look so cool. The third one might look a little different, but that just adds to the fun of growing them.
Processing
Likes
37
Share


@MG2009
Follow
07/12/2018
All looking healthy and happy,females everyone!. In pre-flower 15.03 min of light by August 12, it will be down to 14 hours of light an in flower.
07/15/2018 Uploaded a couple videos enjoy
Processing
Likes
8
Share


@Shellshocked
Follow
Week 8 of flowering was rough did not look in the tent for 2 days as my perimeter were all good and I watered every plant so I thought but did not water the gg4 as she felt heavy (her pot) and as I opened the tent on the second day i was shocked and very upset as she looked dead with the ph problems I already had a lot of her leaves were already damaged. Lost a lot of leaves and could probably pull off every fan leaf as all of them have damage now but were in the final week now so she should make it. The bud is not so frosty, nice size buds but with all my mess ups there was no time to create triclones. That my theory as I have gg4 clones at 4 weeks that are twice as frosty fingers crossed last week goes Smooth. Well hope it's last week blimburn seeds says 9-10 weeks so ill go 10. I'll try my jewlers loop but it's only 40× and does not work well if it don't look ready it will go to week 11

Likes
168
Share


@Tropicannibis_Todd
Follow
💩Holy Crap I Was Able To Get Them In The Ground💩
So super happy to be trying this one out , can't wait😝 .....The hope here is to do better then last summers outdoor grow ..👍
It's been a full week and she's doing great , very nice Growth, shes enjoying the sunny days 👌
No problems 😊 so far so good 👍
👉NutriNPK NUTRIENTS USED FOR FEEDING 👈rain water to be used entire growth👈
👉www.nutrinpk.com right now get 10% off using SPRING2022 as the coupon code👈

Likes
39
Share


@Mastr
Follow
Hi everyone Today day 30 and I stop feeding with silica and I take co2 bag off too due make high humidity also I reduced bio grow from 3ml to 1ml for this week next week i will stop bio grow till harvest
And I done aggressive defoliation on bottom almost take half leafs down
Update day 39 I done another defoliation and some lst to keep them separate from each other guys the orange sherbat is thirsty strain and seems she love nutrients she drank twice a day and each time 1.5L nutrients whitch is
.5 calmag
2ml heaven
2ml activera
2ml alg amic
2ml bloom
1ml top max
Because they are in small pot so I don't wanna give lots off water so I prefer to feed them twice a day
Likes
10
Share


@Undermisensi
Follow
I add a half of teaspoon of Epsom salt with every feeding because its straight coco except on days I feed plain water. I do this from beginning of veg up until the last week before harvest when I flush


Likes
44
Share


@Hempface86
Follow
Here we are in weak 8 on day 3 of flower and she's already starting her stretch... I think is going to be a good yielder, and i'm hoping for buds from wall to wall of this 2.3x2.3x63 .. Thank you as always to Zamnesia Seeds for letting me grow their genetics! From the very beginning, this has been a strong plant with great vigor.. I believe Zamnesia Seeds is low key one of the best breeder's in the game rn.. Hope everybody's doing good and so are there, ladies! God bless and happy growing ✌️.
https://www.zamnesia.com/us/35-cannabis-seeds/368-zamnesia-seeds


Likes
11
Share


@Fibro_Witch
Follow
This girl is still doing her veg thing but I'm sure she'll be flowering by next weekend. She's looking good and filling out like the other girls. It'll be interesting to see how much she stretches. She has a very lovely smell right now, lots of floral notes.


Likes
49
Share


@squalino
Follow
📝 Journal de Culture : Fin de parcours - Wham Boom Auto
Date : 13 avril 2026
Âge : J+70 (Semaine 11)
Taille : 54 cm (Stable)
🌡️ Paramètres Environnementaux
Éclairage : Pure LED 240W à 100% de puissance.
Humidité : Maintenue à 50%.
Température : 25°C le jour / 21°C la nuit.
💧 Nutrition & Stratégie Finale
Dernier apport : 0,5 Litre de thé de compost (pH 6,3).
Décision : Le thé ne vas pas permettre de rattraper l'état de la plante. À partir de maintenant j'essaiede la faire grossir au niveau des buds , elle ne recevra que de l'eau claire jusqu'à la fin de son cycle . Je pense
⚠️ Mon Analyse (Mon constat personnel)
Il faut se rendre à l'évidence : elle ne va pas mieux et ne se rattrape pas. Je suis convaincu que le problème ne vient pas de la plante ou de la génétique, mais d'une grosse erreur de ma part que je n'ai pas réussi à corriger à temps. Je vais la laisser terminer tranquillement à l'eau pour ne pas aggraver les choses.
🔍 Analyse Visuelle
État du feuillage :
Les feuilles sont très sèches, brûlées sur les bords et recroquevillées vers le haut, confirmant le blocage persistant.
Développement des fleurs :
Malgré le stress majeur du feuillage, les têtes semble gonfler. On remarque des teintes pourpres foncées très marquées au cœur des fleurs.
Résine :
La production de trichomes est bien présente sur les calices et les petites feuilles restantes, ce qui laisse présager une qualité de récolte décente malgré l'aspect général de la plante.
Note finale du cultivateur :
Je m'excuse auprès d'Anesia Seeds pour ce journal. La plante a fait preuve de force, mais mes erreurs de manipulation ont pris le dessus.
la Wham Boom Auto a réussi à produire des fleurs denses et magnifiquement colorées. Cette couleur pourpre est d'ailleurs superbe ! En finissant à l'eau claire, j'essaie de permettre à la plante de se purifier, ce qui améliorera le goût final. La génétique d'Anesia Seeds a montré sa robustesse en ne mourant pas malgré l'asphyxie racinaire.
merci e tous de me suivre et désolé de ne pas avoir pu vous démontrer la qualité de cette variété. je la referais, je n'aime pas rester sur des défaites. bonne journée

Likes
12
Share


@Siriuz
Follow
Sorry for the delay on the updates guys
I am a daddy of a newborn baby boy and it's really time consuming plus the Mary ladies but we keep on the great work nothing wont stop us we go all the way up!
Alright here you go
Day 87 Starting week 13
Day 88 Gorgeous grapefruit smells like heaven
Day 89
Again sorry for the late update but being a first time daddy leaves you without time
Day 90
She's gorgeous isn't she?
(alright guys so what happened here was that I started flushing too early and took advise from other canngrower and instantly added again all nutes, that's why I left her a lil longer until week 14 when I started to flush again, we are going to show you very well what we did, since it was our first time we were unsure if flushing at week 11 was alright but then we decided at week 12 that she could stay longer and she did)
You might say we wasted some nutes but in terms of reality we did not, because we have a full bottle of 3.7gal mix with flora nova grow and flora nova bloom in the other, measuring ppm always to make sure we got the correct amount, otherwise we add more water or more nutes depending on the plant needs but we never waste away all precious nutes are precious resources, in this part of Latin America is really hard to find anything good, so we got to bring everything from Europe or United States that's why we doing the best we can with the money we got. Hey any donations are more than welcome if you guys like what we do, yeah it's risky around here but we don't give a F.
You know that patients need their medical cannabis and Id say I'm one of them
And by the way very proud
Peace and love canna growers
We will continue to fill the grow diaries


Likes
12
Share


@Bluemels
Follow
Tag 39: Ein wenig wird es noch dauern bis die Fat Banana das Netz ausgefüllt hat. Heute habe ich sie an 3 Zweigen getoppt und ganz leicht entlaubt um das Gießen zu erleichtern 😁

Likes
7
Share


@Learntogrow818
Follow
Sorry about flower confusion, started flower way back in week 6. Some deficiencies presented but have not had time to correct, and really look into..🤔
