
Likes
Comments
Share


@MyWeedAccount
Follow
(technically, writing this on 9/19..sshhhhh): not too many updates again - still thickening up and getting foxtaily so i've decreased the light intensity.
I cut a small tester nug as you can see (ended up being about 1.5g dry) and dryed it for several days. I was too impatient so i defintetlely broke in a little early, but hey, that's what a tester bud is for, right? I vaped part of it and took one bong rip, and it's amazing y'all...the terps!!! THE TERPSSS!! I really hope I can preserve them when I cure this time. It's seriously like a watermelon candy now, and the effect was very clear-headed and relaxing - great for day vibes.
Also, can't remember if I said this or not, but I started just giving plain tap water since they're both clearly near the end. Will be chopping soon!
----
Thanks for following 🤙 Always appreciative of tips or suggestions

Likes
33
Share


@Eyeduno
Follow
This week has been one of them weeks so basically they got big and I had to make them shorter so I did this hopefully they recover 🤞🏻


Likes
Comments
Share

@GangbudsGenes
Follow
Ya comenzaron a tirar los primeros pestillos se les agregó 2cucharadas de fruist & flower de @foxfarm para prepararlas para floración riegos con agua recuperadas de 🌧️ lluvia
Likes
19
Share

@Mrs_Larimar
Follow
2025-09-26
We are under 13 Hours of Light, we had a cold and rainy Week
from Sunday on until today ( Friday) weather was cold.
it was raining heavyly-
and iam hoping some dryer and warmer days to come
for the moment everything is fine, plants are standing under the Roof and getting stabilized by 2 SCROG- nets
we will see.


Likes
17
Share


@exMoleKing
Follow
Fed the plants with Fox Farm veg nutes once this week. Still a bit early to sex them but only really concerned about the two that are growing the fastest. Hopefully be able to tell in a couple weeks. The plants that were topped for the second time are recovering well and echo new site has grown sets of leaves One of the autos started flowering and the second should start in the next 2-3 days. Did slight LST to the flowering auto to get more sun to the bud sites on the bottom.

Likes
12
Share

@Mr_Juice
Follow
Light intensity increased to 100%… the buds are getting bigger and already look pretty frosty 😉 I added some bloom nutrients for her, but as always only a minimum since she doesn’t really need much, just a little boost 😉


Likes
1
Share


Processing
Likes
15
Share


@julian100614
Follow
Empezamos la 2° semana sin cambios significantes. Vamos a mantener los mismos nutrientes para que su sistema radicular crezca lo mas fuerte posible 💪
Con el foco de sodio de 400W en un armarlo 1x1x2 en pleno verano en España 🇪🇦 la verdad se hace difícil mantener temperatura y humedad pero lo estamos arreglado con unas toallas humedecidas para mantener los valores óptimos 👌
Día 10: El sustrato seguimos manteniendolo sin regar ya que aún no pide agua y sigue humedecido con lo cuál seguiremos así hasta que veamos la capa superior totalmente seca.
Día 11: He cogido unos valores óptimos de humedad y temperatura bastante buenos y las plantas lo agradecen
-Temperatura: 25-30°C aproximadamente
-Humedad: 40-70%
Día 12: Hoy porfin la pequeña planta estaba pidiendo comida, esta vez con nutrientes 😊 He añadido 1ml/l de Deeper Underground de Top Crop para que siga con esta alimentación y pasaremos a otros nutrientes de crecimiento 💪
Día 13: La pequeña Red Poison Automatica ya alcanzó los 6cm de altura, lo que se puede apreciar que va creciendo a un ritmo bastante bueno. Mantenemos el sustrato exactamente igual ya que sigue perfectamente humedo 👍

Likes
24
Share


@nonick123
Follow
Día 94 (02/09) Aplico Insect Frass como Top Dress para ver si revierto un poco el amarilleamiento que muestran algunas hojas, ya que empieza a ascender por la planta
Riego con 500 ml H2O pH 6,5
Día 95 (03/09) Dia nublado y de temperaturas entorno a 24 ºC. NO es necesario regar!
Día 96 (04/09) Llueve que te llueve! 🌧️. Temperatura 21 ºC. Días de humedad alta por aquí!
Riego con 500 / 1000 ml H2O pH 6,5
Día 97 (05/09) Floración en progreso. No veo ni una sola oruga con el bacillus thuringiensis y espero que siga así! 🤞
Dia muy nublado. No hace falta riego
Día 98 (06/09) Riego con 500 / 1000 ml H2O pH 6,5 + 4 ml/L de BioGrow de Biobizz para tratar de parar el amarilleamiento que asciende por la planta
Día 99 (07/09) Riego con 500 / 1000 ml H2O pH 6,5 + 4 ml/L de BioGrow de Biobizz para tratar de parar el amarilleamiento que asciende por la planta
Día 100 (08/09) Riego con 1 Litro de Té Floración de Lurpe Solutions. Preparación: 24 horas con bomba de aire (oxigenación) con ingredientes:
Healthy Harvest 8 ml/L + Insect Frass 16 ml/L + Hummus Lombriz 8 ml/L + Melaza 1 ml/L + Kelp Hidrolizado 0,25 g/L
Aplico de nuevo Insect Frass como Top Dress
💦Nutrients by Lurpe Solutions - www.lurpenaturalsolutions.com
🌱Substrate PRO-MIX HP BACILLUS + MYCORRHIZAE - www.pthorticulture.com/en/products/pro-mix-hp-biostimulant-plus-mycorrhizae

Likes
2
Share

@RooftopFarmer
Follow
Guava Runtz – Week 7 (Fast Buds Outdoor 2026)
The weather has been excellent. Guava Runtz continues to enjoy lots of sun and consistent nutrients.
She has reached around 37 cm and is growing visibly bushier. You can clearly see her entering the flowering stage now. She has a nice sturdy structure and healthy green color. Really happy with how she is developing.

Likes
12
Share


@Roberts
Follow
Ze Chem Bang is growing well. I did a solution change today. I switched her light times 2 weeks ago. Sorry I missed a update. She was lollipopped, and defoliated to open her up for stretching. Nothing else is really going on yet. Thank you Terpyz Mutant Genetics, and Spider Farmer. 🤜🏻🤛🏻🌱🌱🌱
Thank you grow diaries community for the 👇likes👇, follows, comments, and subscriptions on my YouTube channel👇.
❄️🌱🍻 Happy Growing 🌱🌱🌱
https://youtube.com/channel/UCAhN7yRzWLpcaRHhMIQ7X4g.
Likes
8
Share


@NoProbation4Weed
Follow
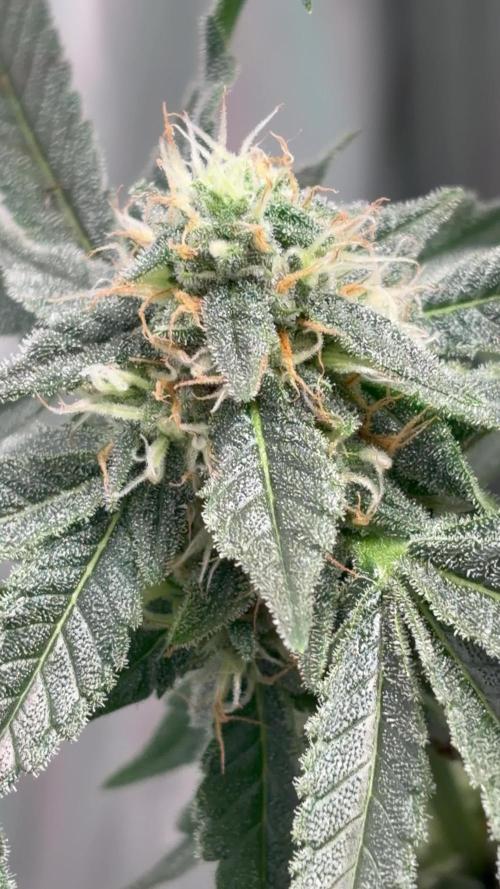
i harvested second part this week. the rest will be harvested in about a week. Buds turned out beautifully. Great Colours and great smell.
My best Autoflower so far. Terps are dark and red Berrys combined with some floral Rose aroma. Super Sticky and as you can see good producer.
Likes
3
Share


@OrganicPower
Follow
W10F and the end is near. The bud sites are small and internodes are spaced far apart. I neglected them and let the light intensity get too high during stretch. They are pretty frosty though. Fade has started and they are displaying nice colours
Likes
13
Share


@Eldorado_ed
Follow
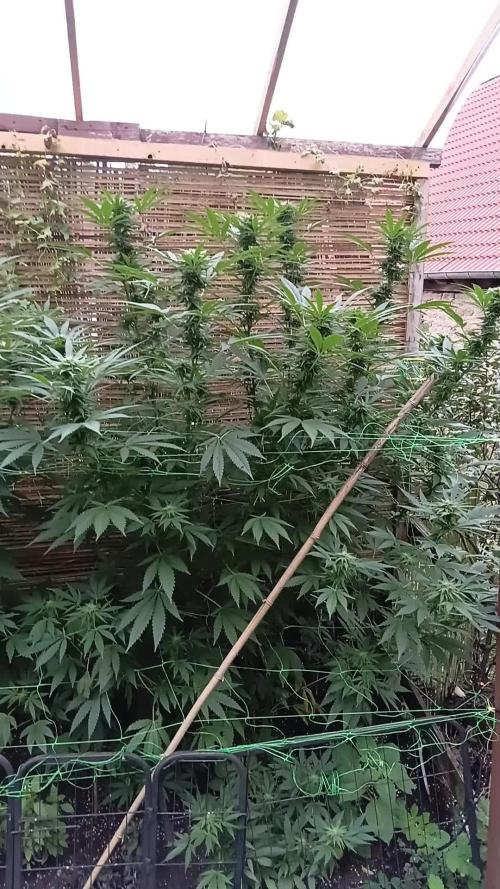
Well after splitting the Girls up due to space it’s looking like the HPS Ladies are almost ready looking we’ll ahead of LED ones also buds are fatter with HPS but would say the LED ones look healthier looking if that makes sense

Likes
120
Share


@NugLife420
Follow
Well, the ladies are definitely ladies. 😀. Hundreds of budlets are forming. The Red Hot Cookies are super ladies. As always I will update throughout the week. 😎

Likes
5
Share


@whenindoubtsmokeitout
Follow
🌿 **Green-O-Matic Grow Week 9 Update: Nearing Harvest Time!** 🌱
Greetings, fellow growers! It's time for an exciting update on the progress of our Green-O-Matic journey as we reach Week 9 of the grow cycle. With anticipation building and buds swelling, let's dive into the latest developments:
🌟 **Bountiful Bud Development**: At Week 9, our Green-O-Matic beauties are truly showing their potential, with buds swelling and resin production kicking into high gear. The once-small flowers have transformed into dense, frosty nuggets, promising a bountiful harvest in the near future. Trichome production is in full swing, indicating peak cannabinoid potency and aromatic complexity.
📏 **Final Stretch of Growth**: As we enter the final stretch of the flowering phase, our focus shifts to maximizing bud development while ensuring optimal ripening conditions. With careful attention to environmental factors such as temperature, humidity, and airflow, we aim to create the perfect microclimate for our plants to thrive and reach their full potential.
🍃 **Leaf Senescence and Nutrient Management**: As expected in the late flowering stage, some leaves may begin to exhibit signs of senescence as the plant reallocates energy towards bud production. This natural process is perfectly normal and serves as a signal that the plant is nearing maturity. Meanwhile, our nutrient management strategy remains vigilant, providing the essential elements needed to support robust flowering without risking nutrient imbalances or deficiencies.
🔍 **Monitoring Trichome Maturity**: With harvest on the horizon, we're keeping a close eye on trichome development to determine the optimal time for harvest. Using a jeweler's loupe or digital microscope, we inspect trichomes for signs of maturity, aiming for a mix of cloudy and amber trichomes to achieve the desired balance of THC and CBD levels, as well as flavor and aroma profiles.
🌞 **Preparing for Harvest**: As we prepare for harvest day, our checklist includes gathering supplies such as trimming shears, drying racks, and storage containers, as well as ensuring a clean and sanitized workspace to maintain the integrity of our precious buds. Proper post-harvest care and curing techniques will be employed to preserve terpene profiles and enhance overall quality.
In conclusion, Week 9 marks a pivotal moment in our Green-O-Matic grow journey, where patience and precision culminate in the imminent harvest of our prized buds. Stay tuned for the next update as we celebrate the culmination of months of dedicated cultivation with a bounty of premium-grade cannabis ready to be enjoyed and shared. Happy growing! 🌿✨
🚫 **Addendum: Phenotype Bin Update** 🌱
In the spirit of transparency and continuous improvement, it's important to note that we've made the decision to bin one out of the three phenotypes due to poor development. Despite our best efforts and meticulous care, this particular phenotype failed to thrive and did not meet our quality standards.
While it's always disappointing to part ways with a plant, this decision ensures that our resources and attention remain focused on nurturing the strongest and healthiest phenotypes to their fullest potential. By removing underperforming individuals, we can redirect our efforts towards optimizing the remaining plants for a successful harvest.
Rest assured, this adjustment will not deter us from our commitment to excellence. We remain dedicated to the cultivation process, learning from each experience, and striving for the highest standards of quality and consistency in our cannabis cultivation journey.
Thank you for your understanding and continued support as we navigate the complexities of plant development and refinement. Together, we'll continue to grow and evolve towards greater success in our cultivation endeavors. 🌿💪

Likes
59
Share


@DogDoctorOfficial
Follow
she performed like a champion and delivered the same way, the fruit quality is out of this world, now needs rest for full potential but i can already tell she is a winner to me!!!
As always thank you all for stoping by, for checking my journey , for the love support and for it all, i am blessed and humble with you all.
Just a reminder , all i grow is medicine for myself, for me and for my best friend with is me nothing to sell, so don’t even ask.
All info and full product details can be find in can find @
https://ganjafarmer.com
https://aptus-holland.com/
#aptus #aptusplanttech #aptusgang #aptusfamily #aptustrueplantscience #inbalancewithnature #trueplantscience #Ganjafarmer #growerslove
With true love comes happiness 💚🙏 Always believe in your self and always do things expecting
nothing and with an open heart , be a giver and the universe will give back to you in ways you could not even imagine so 💚💚💚
More info and updates @
https://growdiaries.com/grower/dogdoctor
https://instagram.com/dogdoctorofficial
https://youtube.com/channel/UCR7ta4DKLFMg2xxTMr2cpIg
💚💚💚Growers love to you all 💚💚

Likes
37
Share


@GODSGIFT_2005_JM
Follow
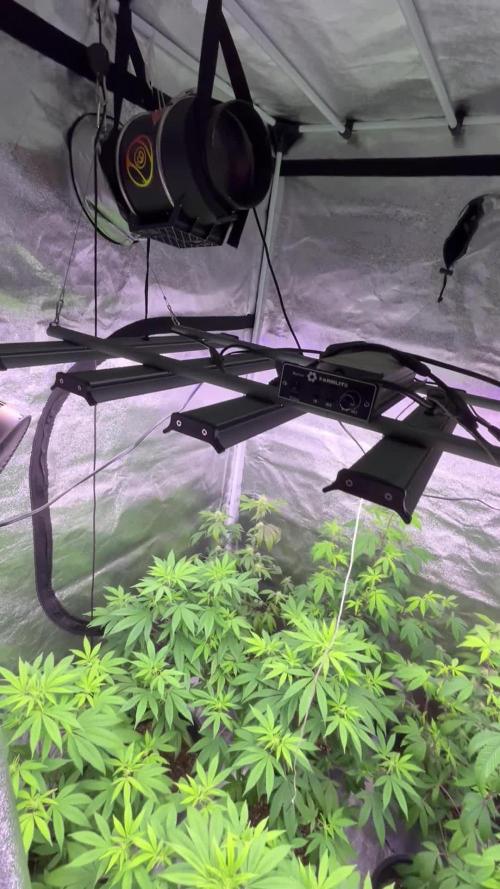
😎MARSHYDRO LED😎
Defoliation 3rd week flowering for better light 💡 penetration & air movement

Likes
37
Share


@RFarm21
Follow
11/9 - Flush 4L de água para cada. pH 6.5.
17/9 - começo das 48h de escuridão
19/9 - HARVEST DAY!