
First Grow: ‘Ophelia’ Orange Bud (Auto)


VEG
Darmai Spider Arm LED Light Emitting Diodes/40W
Darmai Spider Arm LED

Soil
Custom
Greenhouse
Room Type
LST
weeks 3-9
Defoliation
weeks 3-9
20 l
Pot Size
2 l
Watering
Start at Harvest
G
Germination5y ago


greenhousegrowgirl Germinated in between 2 cotton pads, sprayed with water. Put in a bowl and covered with cling film. Put in a dark drawer 23C and 70.6% RH.
19 Aug: Started germination process for Ophelia.
21 Aug: Ophelia sprouted. Tap root is 1cm long.
22 Aug: Ophelia's tap root has grown to 2cm and is hairy. Planted her in soil today just under the surface.
3 likes
comments
Share
Used method
Paper Towel
Germination Method
1
Week 1. Vegetation5y ago


6.99 cm
Height
20 hrs
Light Schedule
23 °C
Day Air Temp
7.0
pH
No Smell
Smell
220 PPM
TDS
71 %
Air Humidity
20 °C
Substrate Temp
23 °C
Night Air Temp
20 l
Pot Size
0.25 l
Watering Volume
10.16 cm
Lamp Distance
greenhousegrowgirl Starting the seeds off in a grow tent indoors until they hit vegetation phase, when I will move them to the greenhouse. I have a bluetooth thermostat that connects to an app so I can check the temp and humidity remotely. There is also an alert feature where you can set a temperature range and it notifies you if it goes higher or lower than this.
Using the Darmai 40w light in the grow tent on a 20/4 light schedule, set to blue spectrum.
Humidity in tent was hitting 90% so I added a small 6 inch fan and a humidity pouch to absorb some of the extra water.
Water is PH 7.5, 220 ppm and temperature 22C when watering. Only watering around the seedling.
Soil was PH 6.5 at time of planting and is now averaging 7.0 PH.
No nutrients added this week as there are enough in the soil to last the first 2 weeks.
22 Aug (day 1): Planted in a 20L airpot with Biobizz light mix soil. Ophelia had a 2cm tap root so I made a hole in the centre of the soil to accommodate the length. She still had the seed case on top, which was planted just under the surface.
23 Aug (day 2): She broke through the surface of the soil.
24 Aug (day 3): Took her out to the greenhouse today as the sun was shining. Thought some natural light and fresh air would be good for her. I've read that sunlight is still the best light for them where possible.
28 Aug (day 7): End of week 1. She is a lovely emerald green colour, healthy leaves and around 8cm high.
2 likes
comments
Share
2
Week 2. Vegetation5y ago


16.99 cm
Height
20 hrs
Light Schedule
23 °C
Day Air Temp
7.0
pH
No Smell
Smell
220 PPM
TDS
74 %
Air Humidity
22 °C
Solution Temp
20 °C
Substrate Temp
23 °C
Night Air Temp
20 l
Pot Size
0.5 l
Watering Volume
60.96 cm
Lamp Distance
Nutrients 6

Root-Juice
2 mll
Bio-Heaven
1 mll

Acti-Vera
1 mll
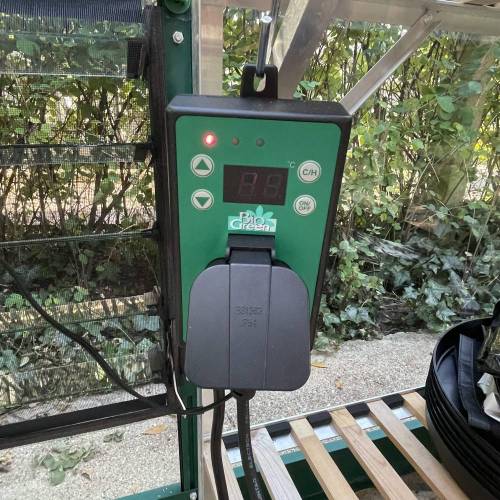
greenhousegrowgirl I've spent an inordinate amount of time prepping my greenhouse ahead of moving the plants out of the grow tent and into their new home. I've pressure washed it inside and out and thrown away a lot of old stuff and anything that could contaminate the plants. I've destroyed more spider webs than I care to count! Set-up wise, I have rigged up the two SpiderFarmer lights on timers and put in my Biogreen Palma heater. It's great as its on a thermostat and I can programme the heat to kick in at a certain temperature which ensures it won't get too cold. There is a hot and cold mode, so I can swap it over to blow cold air if the temperature gets too high. Sadly this can't be done remotely and needs to be switched over manually, but its a great feature. I've insect (and hopefully spider) proofed the entire greenhouse with fibreglass mesh, which I attached using magnetic tape, so it can be easily removed. I have auto openers on the greenhouse windows which means they open automatically when its too hot, but this also means that insects (and spiders) have free access to the greenhouse and ideally I would prefer to avoid infestations on my girls! Lastly, I have another bluetooth enabled thermometer and humidity reader which will monitor the temperature and I can view it on my phone via the app (when I am in range). To create humidity I will pour water onto the floor of the greenhouse each evening.
29 Aug (day 8): Start of week 2 and Ophelia is growing well and looking healthy.
1 Sep (day 11): She is growing ahead of schedule and now has 4 true leaves and is 14cm high. I am marking this as this as the start of the Veg phase and moving her out to the greenhouse along with Wendy (see separate diary). Sunrise is 6.30am and its dark by 8pm. I am topping up daylight hours with the Spiderfarmer 100w grow light to keep her on a 20/4 schedule, 24 inches away from the plant. Currently Ophelia and Wendy will have a light each, but when Orla and Wanda are in Veg phase and move out to join them, I will have 2 plants per light. I have a Biogreen greenhouse heater with a thermostat which is keeping the temperature at an average of 21.4C. RH average is 65%. I've been fussing like a lunatic about the move out to the greenhouse and hoping all my prep and planning will pay off!
2 Sep (day 12): So the girls survived the night despite my anxiety and everything worked as it should. The heater kept the temperature consistent and humidity was within range. The lights came on as planned, but I do have a slight problem. Two lights, even at 60% strength lit up the garden like a bloody beacon! I bought some black backed reflective plastic today and have attached it using magnetic tape. This should keep the light inside and allow me to take them down during the day (fingers crossed). The Biobizz nutrient schedule states you should start using fertilisers when the plant is 10-15cm and has 2-4 true leaves. I am only 2 days off the two week mark, but conscious there will still be nutrients available in the soil. Apparently autos would take 1/2 of the recommended dose, but I have dropped that further to compensate for nutrients still in the soil. I therefore fed her using week 1 of the Biobizz nutrient schedule at 1/4 of the recommended dose. Used 0.1ml of PH down to bring the PH down from 7.5 to 6.5. Temperature of feed I like to keep at 22C.
3 Sep (day 13): So the black backed plastic worked well and dampened the light coming out of the greenhouse. I took it down in the morning, but its a bit of a pain and an eyesore if I'm honest. The hubby had the inspired idea of using blackout curtains instead (I wouldn't dare to take the credit for his brainwave 😂). I bought some cheap ones and a load of 'S hooks' to attach them. Hung them up in the evening approaching sundown and hoping they work as they are a much easier solution. Additionally, they are less of an eyesore as well as being in black satin material (they were the cheapest - honest) so the greenhouse looks all pimped out 😳
4 Sep (day 14): End of Week 2 and looking big and healthy. Curtains worked like a dream and kept the light out of the garden nicely. They were easy to draw back this morning too so I could let the light in. She looked thirsty, so I fed her using week 1 of the Biobizz nutrient schedule at 1/4 of the recommended dose. I also added some Calmag as a preventative measure as I read that LED lights can cause deficiencies. Dosage is 0.5ml per litre, so I fed at 1/5 of the recommended dose as she is still quite young.
NOTE: Nutrient amount is the total amount of nutes given during the week.
3 likes
3 comments
Share
3
Week 3. Vegetation5y ago


16.99 cm
Height
20 hrs
Light Schedule
24 °C
Day Air Temp
7.0
pH
No Smell
Smell
220 PPM
TDS
66 %
Air Humidity
22 °C
Solution Temp
20 °C
Substrate Temp
24 °C
Night Air Temp
20 l
Pot Size
0.5 l
Watering Volume
60.96 cm
Lamp Distance
Nutrients 7
Root-Juice
2 mll
Bio-Heaven
2 mll
Acti-Vera
2 mll
greenhousegrowgirl 5 Sep (day 15): Start of week 3 and Ophelia Orange Bud is continuing to grow very well and is looking healthy.
7 Sep (day 17): Today the temperatures hit 28C and the greenhouse temperature hit 39C! Luckily I had taken her out in the morning and put her on a table in the garden so she could take advantage of direct sunlight and a breeze. The greenhouse doesn't get direct sunlight until midday, but when it did, it was far too hot anyway. She had dried up completely by the end of the day due to the heat in the garden so I fed her using week 1 of the Biobizz nutrient schedule at 1/2 of the recommended dose. Given I am approaching the end of week 1 of the nutrient feeding schedule, I increased the dosage from 1/4 to 1/2. I will start on week 2 of the nutrient feeding schedule for her next feed.
8 Sep (day 18): Going to be another hot day, so I've taken her out of the greenhouse and put her in direct sunlight and she is enjoying a light breeze. I'm conscious the humidity out in the garden will be lower than the recommended range, but she will still have 14 hours in the greenhouse at the right humidity and thats still preferable to frying her to a crisp in a 40C greenhouse!
9 Sep (day 19): Ophelia is doing well and still growing 2 sets of nodes. I have no idea whether she is on track size wise as this is my first grow. Nonetheless, I have decided to start some gentle LST today. As she has no large branch nodes, I thought it best to start gently at this stage and tighten it daily but any comments/tips welcome 😬 Its very overcast today, so I was worrying whether she would get enough light as there is unlikely to be very little direct sunlight. I asked a question and the advice given was to put the light on but decrease the intensity to allow for additional daylight. I’ve moved Wanda and Orla out to the greenhouse to join their sisters today. I’m going away for the weekend and the greenhouse is more self sufficient than the grow tent. My main worry is keeping the humidity high enough, as the dehumidifier will stop it getting too high, but won’t stop it getting too low. I’m anxious to leave them of course, but not much I can do.
10 Sep (day 20): Can’t believe how quick these plants respond to LST! I had to keep tying it tighter as the top turns upwards so quickly. I ended up removing one leaf to allow the nodes better access to the light. Today was the first day I walked into the greenhouse and the smell was prominent…very exciting! It’s been a week since I started nutes, so I gave her week 2 of the Biobizz schedule today which introduces the fish mix. Still not sure how much water to give them 🤔 it’s been 3 days since the last watering and she was now dry on top. I gave a litre of water this time, rather than 0.5l and am hoping it’s enough. I’m away for the weekend so left all 4 girls in the greenhouse and am feeling anxious. Wishing I had a remote camera to check in on them with 🤣
11 Sep (day 21): End of week 3 and away for the weekend. Hoping the girls are doing ok 😰
NOTE: Nutrient amount is the total amount of nutes given during the week.
4 likes
6 comments
Share
Used techniques
LST
Technique
Defoliation
Technique
Grow Questions

greenhousegrowgirlstarted grow question 5y ago
It’s overcast here today and I’m wondering if I should turn my grow lights on to compensate for the lack of direct sunlight. If so, should I drop the intensity to compensate for the additional natural light? Can you overdo the amount of light (not heat) a plant gets?


Solved
Setup. Lighting
likes

BraveheartGeneticsanswered grow question 5y ago
Hi fellow grower, Short answer long. Yes you can! Plants can experience light burn where the leaves are bleached on the tips where the light has been too intense. More often than not it comes with heat stress too. It will not hurt your plants to add more light and you're right to be cautious about intensity. Trial and error is the best way to learn. Set it up on 50% intensity and watch how your plants respond. Every plant is different, they all have their own characteristics and needs. I hope this helps, good luck with your grow...
greenhousegrowgirlstarted grow question 5y ago
How do you measure a plants height after you LST? It’s shorter now as it’s bent over?!

Solved
Techniques. LST
likes

MrStinkyanswered grow question 5y ago
Which ever way you prefer -
The plant I chopped 2 weeks ago was 38cm from soil to tip of cola measuring along the stem...it was about 20cm from soil to top in a straight line, It gave 60g dry which, in my opinion, is the only real measurement you need accurate 😊
4
Week 4. Vegetation5y ago


22.86 cm
Height
20 hrs
Light Schedule
23 °C
Day Air Temp
7.0
pH
Weak
Smell
220 PPM
TDS
65 %
Air Humidity
22 °C
Solution Temp
20 °C
Substrate Temp
23 °C
Night Air Temp
20 l
Pot Size
1.5 l
Watering Volume
55.88 cm
Lamp Distance
Nutrients 7
Bio-Heaven
3 mll
Acti-Vera
3 mll

Microbes
0.3 mll
greenhousegrowgirl Sep 12 (day 22): Back home now and the girls survived without me for a couple of days…PHEW! Some nice growth on the nodes. Did a bit more LST.
Sep 13 (day 23): Some good growth overnight and the new nodes are starting to fill out. Nonetheless, I am now anxious I have removed too many leaves!?! I normally feed/water every 3 days, but she is still a tiny bit damp today so will leave it until tomorrow. I’ve found that my moisture meter gives different results depending where I stick it! ‘Wet’ at the very bottom, ‘dry’ at the top left near the plant and ‘normal’ bottom right of the plant 😤 What am I supposed to do with that?! Going to go for majority rules and not enough ‘dry’ readings (as well as gut instinct of course!).
Sep 14 (day 24): Bit more growth today on the new branches. 4 days since the last watering and she looks dry enough, so watered 1.5L at 1/2 the dose. When I went into the greenhouse today the humidity was at 85% because the tank on the dehumidifier was full. I emptied it and set it off again.
Sep 15 (day 25): Some small growth overnight on the new branches, but not sure if its on track or too slow? Still paranoid that I have slowed growth due to cutting off some fan leaves. Went into the greenhouse this morning and the dehumidifier was full again and the humidity too high. I am going to need to set the drainage hose up so that the water drains out rather than goes into the tank. If its filling up this quickly overnight, I am not going to be able to empty it as soon as it gets full and the humidity will need to be even more controlled during flowering phase. I will try and do that later today. Bought some Leaf Coat from BioBizz to try and protect the plants, especially as Wendy had some white spots on one of her leaves. Also bought some odour remover as I am getting a weak scent now. Did a bit more adjusting to the LST.
Sep 16 (day 26): Bit of growth overnight and the new branches are growing nicely. I fixed the pipe outlet to the dehumidifier yesterday and this seems to have stopped the tank filling up as the humidity was a solid 65% when I went in this morning. Odour remover is doing its job.
Sep 17 (day 27): Bit more growth overnight and she is looking good and a rich green colour. Continuing with LST and trying to get the new branches and nodes as much light as possible and they are growing. I am tucking the fan leaves covering the nodes underneath, rather than defoliating them.
Sep 18 (day 28): End of week 4 and some excellent growth overnight. Looking a lovely colour and branches are getting big! Did some more LST to try and allow some more light through to the younger nodes. It’s getting quite bushy though and actually hard to LST. I’ve damaged a couple of baby leaves whilst doing it, but can’t be helped. Tucked some bigger fan leaves underneath rather than cut them off. Fed and watered with 1.5L of water with BioBizz week 2 nutes at 1/2 strength.
NOTE: Nutrient amount is the total amount of nutes given during the week.
3 likes
3 comments
Share
Used techniques
LST
Technique
Defoliation
Technique
5
Week 5. Vegetation5y ago


22.86 cm
Height
20 hrs
Light Schedule
23 °C
Day Air Temp
7.0
pH
Weak
Smell
220 PPM
TDS
60 %
Air Humidity
22 °C
Solution Temp
20 °C
Substrate Temp
23 °C
Night Air Temp
20 l
Pot Size
1.5 l
Watering Volume
55.88 cm
Lamp Distance
Nutrients 7
Bio-Heaven
2 mll
Acti-Vera
2 mll
Microbes
0.4 mll
greenhousegrowgirl Sep 19 (day 29): Start of week 5. More good growth overnight and I did some more LST. Not sure I am doing it right as there is a lot of new growth and she is looking rather bushy now 🤔 The branches are too fragile to LST properly and I don’t want to defoliate any more, so going to leave her for now.
Sep 20 (day 30): More growth overnight. Looking a healthy green colour with lots of new shoots and leaves.
Sep 21 (day 31): More growth again, she is really going for it! Spent ages trying to LST some of the new shoots and get light to the baby nodes. She is so bushy now it was VERY fiddly, but I tried to be as gentle as possible. Had no choice but to remove a couple of the bigger fan leaves as I didn't even have room to tuck them underneath. I think she has enough leaves now to miss them though 😂
Sep 22 (day 32): Good growth again and she has moved about after the LST yesterday evening. Some of the new nodes are bigger, so hopefully its working. Watered her with 2L and week 2 of the BioBizz note schedule at 1/2 strength. Bought a new watering can as I had lost the rose attachment for my old one. I wanted to try and ensure she gets an even distribution of water, which seems to have worked.
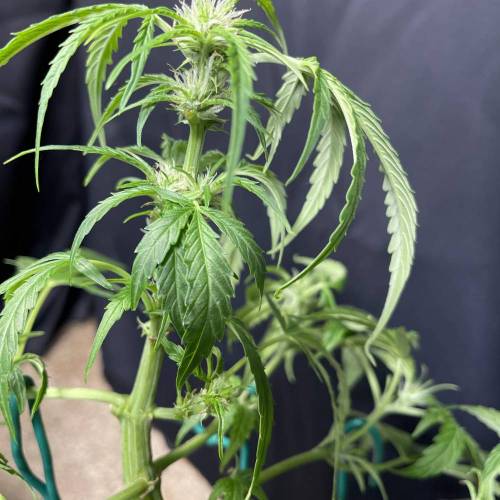
Sep 23 (day 33): ITS A GIRL 👏 I have pistons!!!! At least I know for sure it’s a girl and she is getting ready to pre-flower. So happy! Shes looking great this morning and lots of explosive growth from leaves and nodes. Did a bit more LST to try and distribute the light to all areas. Had no choice but to remove some leaves as I can’t tuck them all underneath now, she’s just too bushy!
Sep 24 (day 34): Lots of new growth again and she’s looking gorgeous.
Sep 25 (day 35): End of week 5. So bushy and compact now! Did a bit more LST to try and open her out. Trying to get the humidity down to 50% but struggling as the water from the dehumidifier drainage pipe creates more humidity! Have put it out of the side vent so the water flows outside and will see if this improves matters. Cranked the heater up to 24 as well.
NOTE: Nutrient amount is the total amount of nutes given during the week.
4 likes
4 comments
Share
Used techniques
LST
Technique
Defoliation
Technique
6
Week 6. Vegetation5y ago


22.86 cm
Height
20 hrs
Light Schedule
23 °C
Day Air Temp
7.0
pH
Weak
Smell
700 PPM
TDS
47 %
Air Humidity
20 °C
Solution Temp
21 °C
Substrate Temp
23 °C
Night Air Temp
20 l
Pot Size
2 l
Watering Volume
50.8 cm
Lamp Distance
Nutrients 9
Bio-Grow
6 mll
Bio-Bloom
8 mll
Top-Max
6 mll
greenhousegrowgirl Sep 26 (day 36): Start of week 6 and she responded well to last nights LST. Growing constantly. I emailed Biobizz to ask when I should start on the bloom schedule as I had read so many different things. They said I could start at the first signs of flowering. They also said, that I don't need to halve my doses for auto flowers! The only exception is to feed 1ml of Bio Grow per litre maximum. Very interesting. So I have upped the nutes as per their guidance. So I watered her today with 2L and Week 3 which is the first week of the bloom schedule at a full dose, with the exception of Bio Grow. Interested to see if it makes any difference, but not sure she could be growing any quicker!
Sep 27 (day 37): More growth, still responding well to LST so did some more today.
Sep 28 (day 38): More explosive growth, so many new leaves and nodes coming through. Am doing LST pretty much every day now. She was thirsty again and the pot felt light, so I watered her again today with 2L and Week 3 of the note schedule at a full dose, with the exception of Bio Grow.
Sep 29 (day 39): More explosive growth, more LST.
Sep 30 (day 40): More explosive growth, more LST.
Oct 1 (day 41): More explosive growth, more LST. I'm struggling to get the top cola down to the same canopy height as the rest of the plant as she is just so strong. I've tried to get it as low as I can with the fear of breaking her!
Oct 2 (day 42): End of week 6 and looking brilliant. So much growth this week and constant LST required to get light to the new sites. All looking healthy I think.
NOTE: Nutrient amount is the total amount of nutes given during the week.
4 likes
comments
Share
Used techniques
LST
Technique
Defoliation
Technique
7
Week 7. Flowering5y ago


22.86 cm
Height
20 hrs
Light Schedule
23 °C
Day Air Temp
7.0
pH
Weak
Smell
1020 PPM
TDS
47 %
Air Humidity
20 °C
Solution Temp
21 °C
Substrate Temp
23 °C
Night Air Temp
20 l
Pot Size
2 l
Watering Volume
45.72 cm
Lamp Distance
Nutrients 10
Bio-Grow
2 mll
Bio-Bloom
4 mll
Top-Max
2 mll
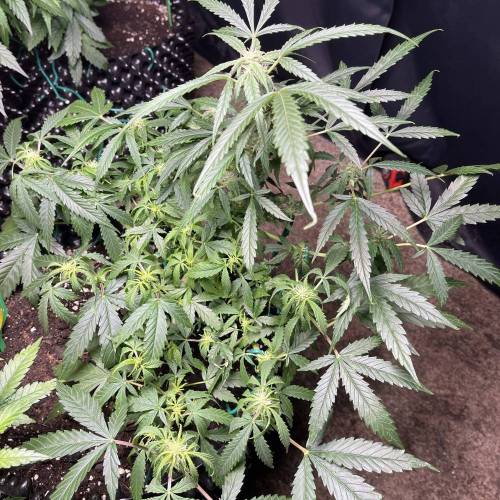
greenhousegrowgirl Oct 3 (day 43): Start of week 7 and whilst she is still in (what I think) is pre-flower, I am labelling this a "Flowering" week in the diary. She's grown so much and there are sooooooo many bud sites breaking through. Its amazing! I'm still doing LST and defoliation to try and get as much light as possible to the bud sites. I assume they will start stretching soon.
Oct 4 (day 44): So she is big and bushy and lots of flowers are covered. Did more LST and defoliated a load of leaves to allow light to the bud sites. She really is a beast, I’ve spotted over 25 sites already and still going. I’m trying to get light to them, but it’s hard with new nodes sprouting EVERYWHERE! I’m sure there are more experienced growers on here laughing at me and wondering why my plant looks like a flattened Christmas tree, but oh well. I’m just doing what I think is right and learning from videos and diaries as I go. There’s no substitute for experience right?! Anyway, I am sure she will stop growing new nodes and stretching soon?!
Oct 5 (day 45): Bouncing back from the LST today as always, but I’m going to see how she goes. Hopefully I won’t need to do too much more now until she starts stretching? I’m not holding my breath 🙈🤣
Oct 6 (day 46): Still doing well post the last round of LST and defoliation. Lots more growth everywhere! Flowers continuing to grow and still more coming! Think I am beginning to see signs of the stretch 🤔
Oct 7 (day 47): Good growth, flower sites are appearing EVERYWHERE and growing bigger. Looking healthy.
Oct 8 (day 48): Good growth all round and still looking healthy. Did a small bit of LST adjustment.
Oct 9 (day 49): End of week 7. Good week all round, she's got so many flower sites now and they are all growing. Pistols are starting to look orange at the ends and wondering if this is normal - have raised a grow question. Fed her week 4 of the nute schedule with 2L of water.
NOTE: Nutrient amount is the total amount of nutes given during the week.
2 likes
comments
Share
Used techniques
LST
Technique
Defoliation
Technique
8
Week 8. Flowering5y ago


22.86 cm
Height
20 hrs
Light Schedule
24 °C
Day Air Temp
7.0
pH
Weak
Smell
800 PPM
TDS
46 %
Air Humidity
20 °C
Solution Temp
20 °C
Substrate Temp
24 °C
Night Air Temp
20 l
Pot Size
2 l
Watering Volume
40.64 cm
Lamp Distance
Nutrients 8
Bio-Grow
4 mll
Bio-Bloom
8 mll
Top-Max
4 mll
greenhousegrowgirl Oct 10 (day 50): Start of week 8. She's looking good and I have trichomes! How amazing they look. Noticed that the pistils are turning orange at the ends, so raised a grow question. As always, the wealth of conflicting information is ridiculous. One grower responded and said that it was likely overfeeding and I should drop to plain water for a bit, then 1/2 a dose of food. However, BioBizz themselves told me not to reduce the dose for autos as its organic and very difficult to overfeed. I also saw some articles online, one from RQS on what to expect from your auto week on week. It said I should expect to see the pistils turning now. Confusion level 9/10 😑
Oct 11 (day 51): Still looking healthy and growing like mad. I am starting to worry I have TOO MANY bud sites?! I have counted over 30 now. I've read some people defoliate them to provide energy to fewer sites for bigger buds. Not sure what to do (again). Either way, she is looking fabulous despite her weird shape, but I am hoping when she stretches that will sort it. Whilst mixing up the feed tonight my PH meter read 1.5!? PH has consistently been 6.5 - 7.0 once I added nutes so this was very weird. Mixed up the calibration sachets and it was still off so I can only assume it’s broken. FFS 🤬 Bombed it down to my local grow shop and got a replacement 60 seconds before they shut. I went for a Blue Meter this time, given my cheap one from Amazon died at the most inappropriate time! Even so, it’s bloody expensive 🤯 Waterproof though, so hopefully won’t suffer the same fate as the last one. Once up and running again I fed her with week 5 of the nute schedule and 2L of water.
Oct 12 (day 52): Looking good. Smaller flowers are stretching upwards a bit. Seems fine after yesterday's feed.
Oct 13 (day 53): Looking good today and evening out with lots of stretching. Flowers seem to be doing well and growing. Gave her a litre of plain water today as some of the pistils are still darkening and the answers from my grow question seem to point towards excessive feeding. As always, there is plenty of conflicting information and signs from the plant. Yes, the pistils are browning in places but I am not seeing any other signs of nutrient excess such as the tips of the leaves turning brown. Some of her older leaves are quite a dark green (which also points to nute excess), but her newer ones look normal. Seems it is still a mystery. Confusion level 8/10 😑
Oct 14 (day 54): Doing well and looking healthy. Flowers are appearing everywhere and growing well.
Oct 15 (day 55): Doing well and looking healthy. Huge stretch happening and the canopy is finally starting to even out and get higher. The main cola is much higher still, but it's incredibly rigid now and won't take any training at all. It's making it quite hard to get the height of the light right, but I am measuring the height from the overall canopy rather than the main cola and trying to keep that out of the strongest area of light. Monitoring for signs of heat issues and burning. Fed her with 2L of water and week 5 of the nute schedule at a full dose.
Oct 16 (day 56): End of week 8. So much growth this week and lots of stretching to even the canopy out. She's really filled out and is looking fantastic. So many flowers though, she's a BEAST!
NOTE: Nutrient amount is the total amount of nutes given during the week.
1 like
2 comments
Share
Used techniques
LST
Technique
Defoliation
Technique
Grow Questions
greenhousegrowgirlstarted grow question 5y ago
Is it normal for the pistons to be going orange/brown at this stage? She is an Orange bud so not sure if its that?

Solved
Buds. Other
likes

GMSgrowsanswered grow question 5y ago
Your ph is high if your at 7. Early reddening/browning of pistols, is a sign that her food is a little high. I like to see my pistols stay white/vibrant until the 5th to 6th week of flowering. If you have your feed a little low to proper, then the pistols stay white until at least the 5th week of actual flower. In my many yrs of growing I have overfed under fed and always see the same results when overfed. Underfed will still give you big beautiful buds, but overfed, the total harvest will suffer.
9
Week 9. Flowering5y ago


22.86 cm
Height
18 hrs
Light Schedule
24 °C
Day Air Temp
6.5
pH
Normal
Smell
820 PPM
TDS
46 %
Air Humidity
20 °C
Solution Temp
20 °C
Substrate Temp
24 °C
Night Air Temp
20 l
Pot Size
2 l
Watering Volume
45.72 cm
Lamp Distance
Nutrients 8
Bio-Grow
4 mll
Bio-Bloom
12 mll
Top-Max
4 mll
greenhousegrowgirl Oct 17 (day 57): Start of week 9. WOW, so much growth. Lots of new leaves and a lot of them covering new bud sites. Defoliated some areas to let more light through and did a little bit of LST to even out the canopy. Checked in later on today and she is responding to the LST already! Fed her with 2L of water and week 6 of the nute schedule.
Oct 18 (day 58): Looking good and healthy. Lots of trichomes coming through and holding resin. The top cola is leaning towards the light, so is taking on a 'bent' appearance. Cant be helped though, as its taller than the other branches it would burn under the light as would be much closer. So have been getting round this by keeping the top cola on the far edge of the light coverage.
Oct 19 (day 59): Looking good and the smaller flower sites are stretching upwards to try and level out.
Oct 20 (day 60): Looking good, continuing to stretch in places and getting fuller all over. Top cola is really fattening up.
Oct 21 (day 61): Looking good, getting fuller and overall canopy is getting higher. Its not hugely even, but I don't want to do more LST or defoliation at this stage. Leaving them to even out on their own.
Oct 22 (day 62): Getting bigger and overall canopy getting higher. Fed her with 2L of water and week 6 of the nute schedule.
Oct 23 (day 63): End of week 9. Lots of small surges of growth from the lower branches and the overall canopy is a good 2 inches higher than the start of the week. Smaller flowers getting much bigger. All in all a good week.
NOTE: Nutrient amount is the total amount of nutes given during the week.
2 likes
1 comment
Share
Used techniques
LST
Technique
Defoliation
Technique
Grow Questions
greenhousegrowgirlstarted grow question 5y ago
Noticed these on the main stem and another branch of my plant today. Is it a hermie and what do I do if she’s been pollinated? She looks to have really big buds already too!


Solved
Buds. Other
likes

Chow_13answered grow question 5y ago
No those are calyx. That is what will make a seed if she gets polinated. The look like a teardrop with white/red hairs coming out. A male pollen sac will be oval with no hairs. The other is a "bannana" will be yellow and look like two small bannana's easy to spot as they are yellow.
Happy Growing
10
Week 10. Flowering5y ago


22.86 cm
Height
18 hrs
Light Schedule
24 °C
Day Air Temp
6.5
pH
Normal
Smell
772 PPM
TDS
45 %
Air Humidity
19 °C
Solution Temp
20 °C
Substrate Temp
24 °C
Night Air Temp
20 l
Pot Size
2 l
Watering Volume
40.64 cm
Lamp Distance
Nutrients 9
Bio-Grow
4 mll
Bio-Bloom
12 mll
Top-Max
4 mll
greenhousegrowgirl Oct 24 (day 64): Start of week 10. Looking good! Main cola is starting to fatten up and resin is thickening. Pistils on the main cola are orange and curly at the top now. Other flowers are still mainly white but with some orange pistils. It's getting dark earlier now, so I have dropped the light schedule to 18/24 from 20/24. I have read that this can benefit bud development too, so will see how this goes. Main rationale for dropping the light schedule is to keep the greenhouse as inconspicuous as possible. So the lights go out when it gets dark and then come on again at midnight.
Oct 25 (day 65): The canopy is catching up with the main cola and growing in height. Some of the other branches lower flowers are filling out and will start to join with the upper flowers soon. Fed her with 2L of water and week 7 of the nute schedule. I had laid off the calmag as my email from BioBizz said I wouldn't need it unless water was soft. However, Wendy has shown clear signs of calcium deficiency so I am adding it back in for all plants once a week. Going to do twice this week to allow them to hopefully catch up though.
Oct 26 (day 66): Looks good. Canopy height continuing to catch up to the main cola. Other flowers are starting to show more orange pistils and trichomes are appearing on most of the flowers.
Oct 27 (day 67): Good growth again overnight. I am continuing to rotate the plant to the hottest part of the light to try and even out the canopy height.
Oct 28 (day 68): All good, main cola is still continuing to fatten up. Fed her with 2L of water and week 7 of the nute schedule, including microbes and calmag.
Oct 29 (day 69): Trichome and resin production is getting much thicker and she is really starting to smell now!
Oct 30 (day 70): End of week 10. More growth on the overall canopy, it tends to shoot up and then level out. All in all a good week with lots of flower based growth.
NOTE: Nutrient amount is the total amount of nutes given during the week.
2 likes
comments
Share
11
Week 11. Flowering5y ago


22.86 cm
Height
18 hrs
Light Schedule
23 °C
Day Air Temp
6.5
pH
Normal
Smell
772 PPM
TDS
38 %
Air Humidity
20 °C
Solution Temp
20 °C
Substrate Temp
23 °C
Night Air Temp
20 l
Pot Size
2 l
Watering Volume
45.72 cm
Lamp Distance
Nutrients 10
Bio-Grow
4 mll
Bio-Bloom
16 mll
Top-Max
16 mll
greenhousegrowgirl Oct 31 (day 71): Start of week 11. Buds are really thickening up now and more pistils turning orange. Going to need to get a magnifying glass to start inspecting the trichomes more closely. Fed her with 2L of water and week 8 of the nute schedule.
Nov 1 (day 72): Ordered a jewellers loupe as I hear thats what most people use to inspect trichomes. Cant wait for it to arrive and take a look at them more closely. She's continuing to fatten her buds and even out the canopy, with some of the smaller flowers lower down catching up height wise. I continue to rotate the plant to put the lower flowers under the hottest part of the light to aid growth.
Nov 2 (day 73): Greenhouse is consistently warm, but with the humidity dropping the girls are getting thirsty quicker. I don't want to overdo the nutes and the younger plants Wanda and Orla are showing signs of potential nute burn (or something?!), so played it safe and fed her with 1L of water today. Jewellers loupe arrived. What a disappointment! Its a standard one, but they are so small and you have to get so close to the plant to magnify them that the slightest shake of the hand or gust from the fan makes it impossible!!! Can see jack shit clearly and got a face full of resin for the privilege. Going to do some research on other alternatives! Annoyance level 8/10 😤
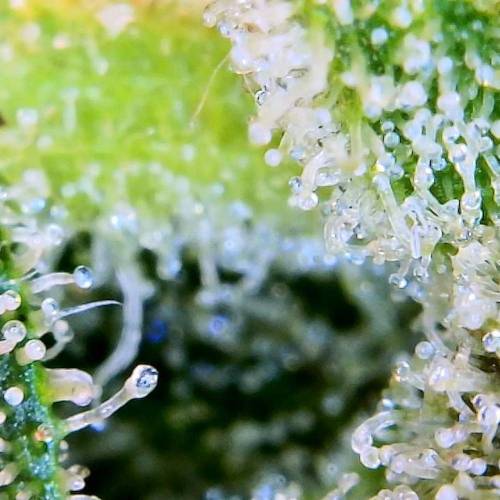
Nov 3 (day 74): Thanks to Amazon next day delivery, I now have a handheld pocket microscope device which was recommended on a few sites. It has a built in LED light and is longer than the jewellers loupe, so at least you don't need to get quite as close! Still suffer from the shaky hand and fan issues as you have to stay super still to get a good position and view of the bud. Saw some trichomes however and whilst majority are clear, there's quite a lot where the heads are transitioning to cloudy. They aren't opaque yet or fully milky, but the head has a kind of misty look. Now I need to do some research on when this means I should flush. The Biobizz nute schedule suggests that even though it is organic, you should flush for the last week before harvest. Will need to figure out my timings quite quickly. As always, every stage brings a new challenge as a newbie and I already have a list of things I would do differently with my next grow. Confusion level 9/10 😰
Nov 4 (day 75): Buds still packing on the weight. Fed her with 2L of water and week 8 of the nute schedule, including microbes and calmag.
Nov 5 (day 76): Checked trichomes again today and most buds on the top canopy are part clear, part cloudy. As before, no pure opaque ones yet, just those misty looking heads. Been doing lots of research and understand that the colour of the trichomes at the time of harvest leads to a different effect. Clear = head high, Cloudy = maximum THC levels - head and body high, Amber = couch lock. I am not a huge fan of couch lock and would prefer either the head high or in-between level. So I am looking to harvest when majority are cloudy, but still have no idea how quick they turn and when to start flushing. Confusion level 9/10 😰
Nov 6 (day 77): End of week 11. Been looking at some other diaries on here for the same strain and my plants look pretty different. They have long, full, fat colas! I know different factors come into play like the lights and feeds and environment, but I've now decided that I think she has a couple more weeks to go before harvest. Will hold off on the flush for now. A good but confusing week in all!
NOTE: Nutrient amount is the total amount of nutes given during the week.
1 like
1 comment
Share
12
Week 12. Flowering5y ago


22.86 cm
Height
18 hrs
Light Schedule
22 °C
Day Air Temp
6.5
pH
Strong
Smell
772 PPM
TDS
46 %
Air Humidity
19 °C
Solution Temp
20 °C
Substrate Temp
22 °C
Night Air Temp
20 l
Pot Size
2 l
Watering Volume
40.64 cm
Lamp Distance
Nutrients 1
PH Balanced Water
10 mll
greenhousegrowgirl Nov 7 (day 78): Start of week 12. Checking trichomes again and giving the plant a full inspection. The buds have been packing on lots of weight and the flowers joining together at different points on the branch to make those long finger type buds. Its funny as I never realised thats how they would get that long shape, that it would be lots of buds joining together. I just assumed that the bud would grow upwards to make one long bud. Such an interesting process and experience all round. Checking the trichomes up close makes you realise how strong they are smelling though...WOW 😷 The pistils on the top flowers are all amber now, but I've noticed a few smaller flowers at the bottom of the plant that still have white pistils. Not sure if this means I should wait until their pistils turn amber too?! Trichomes are 60% Clear, 40% Cloudy now. Beginning to panic that I may miss my flush window and end up with a heavily amber plant and couch lock city!!! Confusion level 10/10 😵
Nov 8 (day 79): More reading has shown that different strains have different ideal harvesting times, plus differences between Sativa vs Indica plants. I cant seem to find anything that definitively tells me when I should start a one week flush, as most people do a 2 week one. I decided to call Dutch Passion and ask them! The kind man on the phone stated that when the pistils are mostly amber, I should look to harvest. That means I am due to harvest now and have no week to flush! He did say they would probably be ok to wait another week whilst I flush though, but to start now. Went down to the grow shop to look at drying state options (more on that later) and got a second opinion off the shop owner. He said they are looking good and I should be fine to harvest in a weeks time, so I guess it is time to flush after all. So, she got to the end of week 8 on the nute schedule and will skip weeks 9 and 10 in favour of starting the one week flush now. Weeks 8-10 of the nute schedule are the same amounts anyway, so hopefully it doesn't matter too much. Prepared 2 watering cans of PH balanced water (6.4) and did the flush. I read different things on how much water to use and also about measuring run off etc. One article said 3 x your pot size.....which is 60 litres! Ridiculous, I will be here all night PH balancing water and going back and forth out to the greenhouse. Another article said to water until you get to 50PPM run off. However, I've also read that measuring run off and PPM doesn't really work for organic growing. Also that flushing too heavily (if at all) will destroy the microclimate of organic grown plants. Bloody hell, no straight answer again for a change! So I went with my gut and gave her 10 litres of the water. Given its organic and some people don't flush at all, I shouldn't end up with chemical tasting, headache inducing weed either way.....hopefully!
Nov 9 (day 80): She's looking good today after her first bath and has a number of leaves praying upwards. Makes me wonder if the 2 litres I was feeding her wasn't enough and if I should have watered until run off each time. Its really difficult with airpots though as unless you water really slowly, it all comes out of the side holes. So you have to water in the middle of the pot and very slowly. If I feed all 4 plants in the same period, it takes 30-40 minutes. Another aspect is that I have tried different ways of watering before. If I water too quickly or with the watering can shower head, a lot of water comes out of the sides of the pot. This is good in the long run as the plants won't get waterlogged, but all the excess water on the floor of the greenhouse spikes the humidity levels by at least 10%! As I don't want bud rot, I don't want that excess water causing issues. I also tried taking the plants out of the greenhouse and watering them there, so any excess water isn't inside the greenhouse. Issue with that is that its now getting really cold outside. 5 degrees or so in the evenings when I am finished with work. I think I may have caused cold shock to one of the plants (see Wanda's diary), so have knocked that on the head. I bought a huge tray to capture excess water from the flush and this worked well. Ahem - until I couldn't lift the tray full of water out of the greenhouse without spilling it all over myself and the floor that is. Humidity spiked 10% FFS. The joys of greenhouse growing eh 😰 I also decided that as I am now in the final week or two, that I would give her a little trim! I cut away a lot of old fan leaves and also a lot of new growth on the stem. It seems to me that if she has only a week left (max 2 weeks), that new flowers on the base of the stem are not going to get anywhere! I felt it would be best to trim them off and allow all her energy to focus on the existing buds. I also cut away a lot of extra leaves that were covering the lower flowers, just to get light to them for the final push!
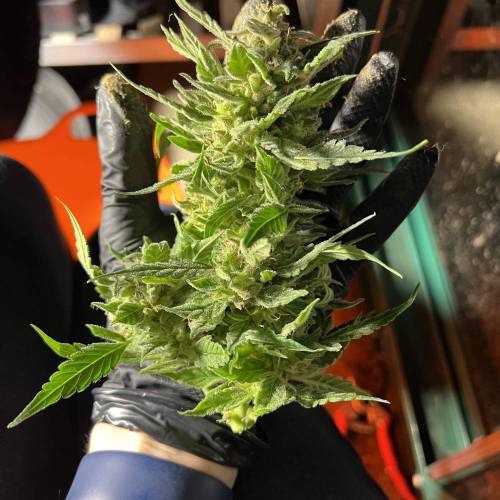
Nov 10 (day 81): She's looking good today. Still hydrated from the large watering (which I am going to call 'flush lite'), so no need for any more water yet. She also seems fine after yesterdays trim. I decided to call upon Amazon for another gadget and order a handheld microscope that connects to your phone wirelessly. The pocket microscope is way better than the jewellers loupe, but still requires a steady hand and a face full of resin 😷 This way I can take pictures of the trichomes too 😍 I've added photos today of the different buds I photographed with it. I can now definitively say she is part clear, part cloudy. A very helpful grower called KingSalomonsWeed has also given me some advice on trichomes and thinks she could go another couple of weeks! I'm going to continue with PH balanced water from now on and that way she can can be harvested with no further delays, either this weekend, or add another week on if necessary. Exciting stuff!
Nov 11 (day 82): Looking good and still hydrated, so no more water required as of yet. I think tomorrow she will be ready. I've ordered a giant syringe to collect the excess water in the tray to save myself further soakings, spillage and humidity spikes 😠 First signs of a purpling leaf on the top cola today, so she is definitely starting to look like other grows I have seen. I need to get my act together and sort out where I am going to dry her. Obviously it cant be in the greenhouse with the other plants, but where?! I still have the small grow tent where they started life, so that seems the most obvious choice. However, the heater and the de-humidifier are both in use in the greenhouse and cant be moved yet, which means more expense if I have to buy additional ones. I have put the second thermostat in the tent so I can see the current temperatures in there and it ranges from 17-20 degrees. This might end up being ok, but average humidity is 47% and when I add the branches it will no doubt shoot up. I am going to need another de-humidifier at least. I'm also worried about the smell if its moving back into the house, so would possibly need an extraction kit - more expense 😤 I may try without it first and if it gets too stinky, add the extraction kit then. My daughter has told me that if her room starts to smell of weed, she will NOT be happy. Ahem. Bad Mummy 😳Also read yesterday that some random snow may be arriving in a weeks time which has worried me! May need a heater for the drying process too and I hope the greenhouse will be able to maintain its temperature also. UGH bloody weather - its almost as unpredictable as my plants 😂😂
Nov 12 (day 83): She’s looking good still and the top of the buds are purpling now on the main cola. Gave her a good 6L watering with PH balanced water. Tried out my new giant syringe, which holds 1/2 a litre. It allowed me to suck up the water from the large tray and squirt it out of the greenhouse door 💦I also wasn’t drenched and the humidity is now coming back down to 40% finally! Took more photos with the microscope. Quite a few ambers now and majority of the remaining trichomes are cloudy. I’m not going to let her go too much longer because I want to harvest when the majority are cloudy and not too much Amber. Even the smallest buds at the bottom are mostly cloudy now. I can always let her sister Orla go longer if I decide too. I prefer the happy upbeat high where possible and don’t want couch lock. Orange bud is strong enough as it is 😵 The greenhouse is proper stinky now, I tell you that much! You can smell it on me even if I have just been in there and not touched anything! Got a plan for drying now and will be clearing a space in the cellar tomorrow to house a bigger tent with extraction kit.
Nov 13 (day 84): End of week 12. So here it is, her last full day before harvest. I’ve been clearing the cellar out today. Can’t believe how much crap we had down there, but I’ve cleared a nice big space for my new kit. It’s so dusty and musty down there, but it’s had a fair old clean where possible. My back is bloody aching, I will tell you that much Went down the grow shop and was there for a good while getting all my new kit. I will likely do my next grow down there as it’s going to start costing a fortune to keep the greenhouse warm when it gets even colder. She’ll be back in business next spring! Showed the grow shop owner my trichome and other photos. Based on my preference of high, he said to harvest this weekend. So, after much hullabaloo we managed to get all the kit into my 2 seater car 🙈 Will set it up and cut her down tomorrow. Went out to the greenhouse to take some photos and shed a little tear. I’ve grown so attached to her over the last 3 months and I feel so guilty cutting her down. Maybe it’s just because it’s my first grow and will get easier going forwards. I guess I won’t feel so bad when I’m smoking her in 4 weeks time 😰
NOTE: Nutrient amount is the total amount of nutes given during the week.
3 likes
3 comments
Share
13
Week 13. Flowering5y ago


4 hrs
Light Schedule
19 °C
Day Air Temp
Strong
Smell
58 %
Air Humidity
19 °C
Night Air Temp
Nutrients 1
Bio-Down
2 mll
greenhousegrowgirl I have come to the end of my grow diary as I am now at harvesting stage. However, I want to record the drying and curing stages too and it doesn't look like the 'Harvest' page is set up to do that. So I have decided that I will record these stages via the normal method, even if they aren't 'flowering' any more. So if you want to see how I coped with the drying and curing stages - read on, but if you don't - then wait until I am a little further down the road and check out the Harvest page 😊
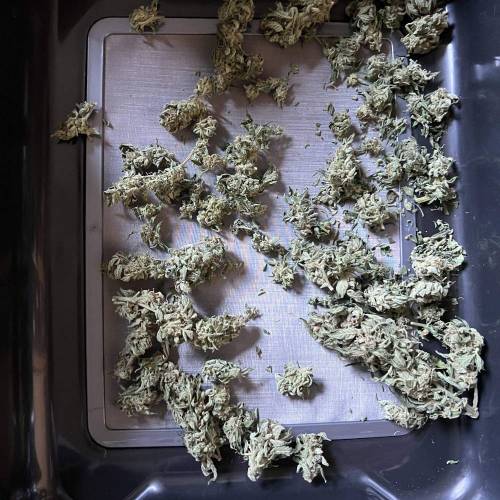
Nov 14 (day 85): So its D day. Today I will be chopping her down and doing a wet trim. I feel quite emotional, but that has been offset by exhaustion! I've spent the whole weekend clearing out, organising and cleaning (within reason) my cellar. I have also set up my new tent and equipment for drying. It worked out cheaper in the end to buy a kit, as the items individually cost almost as much as the kit and I got a Spider Farmer 400W light included 😍 which I can use for my next grow. Equipment included in the kit is as follows: Grow Tent 120 x 120 x 180, Spider Farmer SF4000 450w LED Dimmable Light, Heavy Duty Timer, Pair of Rope Ratchets, Clip Fan, Digital Min-Max Thermometer/Hygrometer, 4 Quick Release Clamps, 6” Acoustic Ducting (5m Length), Rhino 6" EC Fan (594m3/h), Rhino Pro Carbon Filter 6" 300 (600m3/h), 6" Padded Clamp. I also added: Oil Filled Radiator, Inkbird Temperature Controller, Electriq 12L dehumidifier, Trim Bin and a LightHouse Round DryNet - 75cm (30"). I started putting up the tent and realised it was too tall and I had accidentally been given the 120 x 120 x 200 one 😫 I would have kept it, but it was too tall and wouldn't fit, so I had to go back to the grow shop for them to swap it for the 180 high tent. Got that up and then started on the extraction kit. Watched some YouTube videos on how to put it together and realised the grow shop had also accidentally forgotten to give me the padded clamp 😒 I gave them a call and this time they had someone drop it round for me. All in all, they have been great so I didn't kick up a fuss and I am really relieved they are open on a Sunday!!! However, I did lose a couple of hours with the setup. Finally got the extraction kit up, which wasn't easy to do on my own, but I managed 💪 By this point it was nearly 10pm and I have work in the morning! Still, I persevered and cut her down and did the trim. So much resin OMG 😷 My pal at the grow shop had given me some tips - he said to trim into nuggets and put on the drying rack rather than hang upside the whole plant or branches upside down. He also said to cut off the fan leaves, but leave the sugar leaves so when they dry they put sugar into the buds which improves the taste. Also, when I cut them off for the dry trim, I will get a load of pollen at the bottom of the trim bin which I can then use. So I left as many little sugar leaves as possible, even if all I get from them is the pollen. I'm sure there will be many opposing opinions to this method (as always), but he has a lot of experience so I am going to take his advice. I can always use a different method for Orla and Wanda if I want to, who are about 10 days behind. I was glad I had some gloves and my trimming shears worked well. Got quite a lot off her as she was a short and stocky plant, but that is by my standards for my first grow and I think other people would be disappointed. I don't think it will tip the scales much at all. Even so, its only for me and will last me a good while and if I am honest, it was more about the process of growing rather than the end result in some ways. I also now have a complete set-up inside the house to do a grow for a comparison against the greenhouse and will definitely work better for the winter and spring when its cold. Exhaustion Level: 10/10 😴
Nov 16 (day 87): New set up is working well. Temperature is a steady 19C and humidity is 60%. I am following this advice from the Dutch Passion website “One drying tip is to start at 60% for the first few days, slowly working your way down to 55% again for a few days. After a week (max 10 days) set your dehumidifier to 50% to dry the buds a little further. As soon as the branches start to snap (or almost snap) this is a sign that the buds on those branches are just about ready to put into the jars.” They don’t stink as much as I thought they would at this stage, but I guess it’s early days and the carbon filter is likely doing it’s thing. It’s a massive difference from walking into the greenhouse and that warm sticky smell slapping you in the face. They have shrunk a bit already but all seems fine. I was told to give them a swish around the drying rack with my hand each day as they aren’t hanging and need turning. Did that and the smell hit me 😷 I have no idea how much they weigh or what my final amount will weigh, but it doesn’t look like much Never mind, it was my first grow and the experience was invaluable. I still have Orla and Wanda going in the greenhouse too. I will have more than enough for myself and that’s all that matters harvest wise.
Nov 18 (day 89): All good so far. Turned the dehumidifier down to 55 degrees. Glad I went for the ‘silent upgrade’ on my kit. The extractor is so quiet. I can’t wait to try another grow in here.
Nov 20 (day 91): All good still. Been doing a swish of the buds every day in the net to turn them over. Turned the dehumidifier down to 50 degrees.
Nov 22 (day 93): They're ready! They feel quite hard and crispy to the touch and when I snap one of the small branches, it makes an audible 'snap'. Time to start the curing process. I got my trim bin and transferred the buds from the net into it. I have bought a new pair of pruning scissors with a curved edge in the hope that it will help with this stage. I started by trimming off the leaves still attached to the bud. I had only left small sugar leaves on the buds when I did the wet trim and now they are very small and hard to cut out. The bigger the bud, the easier this was to trim. The main cola for example made the process much easier. I was however left with the question as to how much I should trim off and I was being left with quite a lot of waste. I decided to keep all the excess trim as all the leaves are covered with trichomes and I am sure I can find a use for them. Perhaps they may not be the best for smoking, but could be used to make edibles or some other derivative so I will do some research. I bagged up the buds and the excess trim separately in grove bags. My pal at the grow shop said that the bags are a very popular method for curing as they don't need to be 'burped' and maintain the right humidity for curing (no idea how?!). I probably don't need to cure the excess leaves, but it won't hurt for now until I do my research on what to do with them. I will transfer the buds into glass jars post the curing process for long term storage. I may even put Orla and Wanda into glass jars for curing as a comparison. One of the advantages of the trim bin is the amount of pollen that is captured as part of the process. I've been told that this can be used by sprinkling it on top of a vaporiser bowl, so I may give that a try. Will also do some more research on what I can use it for. Obviously I am not going to use it for its actual purpose, which is to pollenate plants. I swept the pollen up using the little brush that came with the trim bin and eased it into a little black container. I read that storage of pollen should be in an airtight dark container, so thats where I have put it. Time will tell if its a useful addition! I'm a little disappointed with the final yield, but I'm not surprised either. The plants were short and stocky, even though the buds got nice and fat. However, as I have said before it is my first grow and I have 2 other plants to harvest yet who are looking bigger. There will be more than enough for me and I have learnt a lot which is the main thing.
Nov 26 (day 97): I emptied the airpots today to look at the root ball. The roots didn't reach down to the bottom of the pot and didn't fit up the area AT ALL! In hindsight, I took my suggested pot size of 20L before I knew the difference between photos and auto flowers and I assume the 20L was recommended for photos. It was way too big for the autos and in future I will use a 9L or 12.5L airpot. It also explains A LOT! I had been waiting for the pot to get completely dry, but if the roots were not filling the whole pot, then they would have been dry earlier and I was essentially waiting for wet soil with no roots to dry before I watered again 😱 No wonder I had watering issues, they must have been so thirsty the poor things 😢
NOTE: Nutrient amount is the total amount of nutes given during the week.
3 likes
2 comments
Share
13
Week 13. Harvest4y ago
Happy Harvest Day!


9/10
Rated
Absolutely loved growing this strain. She was really easy to grow, which was very much welcome as it was my first time! She was also really hardy and when my White Widow (which I grew at the same time) was struggling, the Orange bud was powering through. She gets very large and the aroma is very pungent. Post harvest, she has an amazing citrus smell and packs a punch.
Show more
Translate
Spent 93 days
Ger Veg Flo Har
33 g
Bud dry weight per plant
1
Plants
6.13 m²
Grow Room size
Easy
Difficulty

Euphoric, Giggly, Hungry
Positive effects

Citrus, Earthy, Sour
Taste
Height
Day air temperature
Air humidity
PPM
PH
Light schedule
Solution temperature
Night air temperature
Substrate temperature
Pot size
Lamp distance


greenhousegrowgirl I am very pleased I have another one on the go already as part of my first grow. Ophelia didn't harvest very much, but I learned my lessons quickly and was able to produce a MUCH bigger plant with her sister Orla, who is 10 days behind. Even though I didn't get too much of a harvest, the lessons I learned were invaluable and thanks to her being such a hardy plant, what I did harvest was top quality and I am really pleased 😁
10 likes
1 comment
Share
Equipment Reviews


26 comments
Sort by
popularity
popularity
newest
oldest

happykat commentedweek 35y ago
Hi there! I saw you mention high heat in your greenhouse. What's your setup look like? Are you able to vent out the heat at all?
likes 3
greenhousegrowgirl commented5y ago
@happykat- pics are up under week 2 now and I have updated the commentary 😎
likes 3
happykat commented5y ago
@greenhousegrowgirl, Such a cool setup! I see what you mean about the difficulty in controlling the heat, though. How often do you find yourself in the greenhouse trying to cool it down, create humidity, etc.? Luckily, you said it was cooling down in general, so hopefully, you're not out there too often trying to turn on the cooler/heater combo unit.
likes 3
greenhousegrowgirl commented5y ago
@happykat, thank you! Yes, I’m pleased with the set up, but I draw the line at buying an air conditioner for the greenhouse 🤣
I’m out there several times a day, but it’s hardly a chore really, I love it. So once in the morning to open the curtains and the side vents, then once during the day to check on them and finally again in the evenings to put them under the lamps and draw the curtains. That’s when I take a big watering can and wet the floor, so only once a day. It’s just been bad the last couple of days as it’s been so hot. That’s why I started autos in autumn to be fair. I knew summer would be too much work with the heat.
likes 3
Show More (1)
happykat commentedweek 45y ago
Hopefully you figure out a solution to the excessive humidity. I love how much problem-solving skills come into play with gardening haha
likes 3
greenhousegrowgirl commented5y ago
@happykat, yep all good mate. Applied the exit hose to the back of the dehumidifier and now I don’t need to empty the tank 😀
Working so far and humidity is stable again. How’s your grow going?
likes 3
happykat commented5y ago
@greenhousegrowgirl, Do you think you'll have to run the humidifier as much as the seasons change and cool off a bit?
Going well! I hope that I'm addressing a potential nutrient deficiency and possible pest problems, but apart from that, everything else is good.😄
likes 2
happykat commentedweek 55y ago
Your LST looks a lot like mine! Maybe we're doing it correctly haha everything is looking great!
I haven't really defoliated the pink kush yet, since I'm still watching it recover from topping. How much did you defoliate and how did you go about that?
likes 2
greenhousegrowgirl commented5y ago
@happykat, well I started by taking off big leaves that were covering the little nodes and preventing light. Then I read it can be detrimental as it stresses the plant! They seem ok, but I’ve waited for her to get a lot more leaves til I did it again 🙈 I try and tuck the leaves underneath now instead.
likes 2
happykat commented5y ago
@greenhousegrowgirl, I've also read that cutting off half a leaf (across the vein) is another way to defoliate without causing so much stress. Might be worth a shot!
likes 2

Ganjafarmer420flowers commentedweek 35y ago
Wish you the best of luck and hope you have a great end result hoping to see big colas❤️🔥
likes 2
greenhousegrowgirl commented5y ago
@Ganjafarmer420flowers, thank you - me too!!! 😀
likes 3

DreamIT commentedweek 55y ago
Enjoy growth mate 🤘🍀🦄🦄
likes 2

420Highlifecouple commentedweek 135y ago
Hell yes!!!love your work!🌱
like 1
greenhousegrowgirl commented5y ago
@420Highlifecouple, thank you!!!!!
likes

KingSalomonsWeed commentedweek 125y ago
You can dry your Ophelia in your tent during the grow. Use your cleaned airpot. It's dark and has good airflow. Use paper or anything else as lit. I do se same, works well. If you let your ventilator the wind scratches the air pot, its good.
like 1
greenhousegrowgirl commented5y ago
@KingSalomonsWeed, you're the best, thank you!
likes

Godesskat commentedweek 85y ago
Looks soo good😍 wish u good luck😎
like 1
greenhousegrowgirl commented5y ago
@Godesskat, thank you! Always helps when people say that as it’s my first time and I don’t know what to expect or what ‘good’ looks like 😫😘
likes

Cannabeast40 commentedweek 35y ago
Wish you happy growing and best of luck 💪👌👍🙌😊
like 1
greenhousegrowgirl commented5y ago
@Cannabeast40, thank you!!! 😀
likes 2

ZoobZoob_farmZ commentedweek 134y ago
Good job Sista !!!!👌
like 1
KingSalomonsWeed commentedweek 125y ago
Super Photos.. 😛 💪
The problem with the water i know. Here is my solution. A big syringe with an plastiktube. To soak all water off.
like 1
Godesskat commentedweek 115y ago
Everything is better with a bag of weed👻 Good luck happy growing😍
like 1
Godesskat commentedweek 95y ago
In a health plant, is health soul😍 good luck😘
like 1

the end.
Enjoying this diary? Follow for more updates!


Prefer the old Diary view?
Go back to the old Diary view