DabbertGlobberfield 9/7-9/10
Hi! This is my first grow and my first grow diary here. I'm not really sure how to do this(posting and growing lol). So I guess since this is the beginning of the diary I'll start with a little information on what I'm doing and what my goal is.
I grabbed a bunch of seeds from Herbies Seeds, since this is my first time with all this I was all over the place with what seeds I wanted and I only was buying a small amount of each strain. So I figured I would save the strain I really wanted to grow for after a grow or two, to make sure I get something quality, and I started with Grandmommy Purple. I think I only got 3 seeds of this strain so I popped one as my overall plan was to grow out one plant into a mother big enough to pull clones from.
I am growing in a 4x4 tent and planned on growing 4 plants in this space. I am familiar with ebb and flow hydroponics for some reason. I think I may have tried to grow something back in high school and the concept of the system always stuck with me. But I didn't want to be working with a flood table, that design ebb and flow was not something I wanted. But I also didn't want to do DWC or RDWC or any of that. I also knew I didn't want to do soil. So I designed an ebb and flow bucket system thing and that is what will be growing the plants. Chances are in week 9 you will see photos of the system being built. I might even update this page with the system and talk about it more if I don't do it in week 9 of this diary.
As for this week, the beginning of it all, I placed one seed in glass of water for 24 hours or so and then into paper towel. Once the seed germinated it was placed in a rockwool cube on 9/7.
Please feel free to comment or ask me questions. Since this is the first time I have ever grown... well really, anything, I would love to be able to answer any questions or get suggestions or issues pointed out. Anything really. I'll try and be detailed going forward. However, these first 8 weeks are just for building up a mother to get clones. The goal is 4 clones to grow 4 plants.
======================================================================
Update 11/6 - heh, as promised here's some photos of the system and I'll do my best to give a quick breakdown. For full system discussion check week 9
I built this to be ebb and flow system contained in a bucket. The medium is just clay balls(leca/hydroton) in a 10" net pot. The res is 12 gal but I will only put 4-4.5 gallons of water in it. The res pumps into a 3.5 gal bucket that sits in a hole cut in the reservoir lid. The bucket sits on a rack in the reservoir to keep it out of the water. The pump will pump a minimum of every 3 hours for at most 2 minutes to flood the bucket completely. It drains empty usually around 5 minutes. Also, I will put an air stone in each reservoir that runs for 30 mins 12x a day. That's basically it, if I missed something I definitely didn't in the week 9 write up, lol
2 likes
comments
Share
Used method
Paper Towel
Germination Method
1
Week 1. Vegetation
3y ago
1/3
5.08 cm
Height
18 hrs
Light Schedule
25 °C
Day Air Temp
6.8
pH
No Smell
Smell
250 PPM
TDS
50 %
Air Humidity
20 °C
Solution Temp
21 °C
Substrate Temp
21 °C
Night Air Temp
60.96 cm
Lamp Distance
DabbertGlobberfield 9/11 - 9/17
Week 1
So the first few weeks, I had a few things wrong and it took me a while to correct them. Here, I was using tap water right to the cube to hydrate. But it comes out around ~7ph. I thought I needed high 6 to 7~ for ph so I thought it was fine. Other issues were light intensity and too many nutes per feeding. But this is my first grow on an ebb and flow system I totally built from scratch, so there's a lot of learning for me to do. Also, I initially had 18/6 for light cycle and somewhere along the line I changed that to 24/0. For now it was 18/6
2 likes
comments
Share
2
Week 2. Vegetation
3y ago
10.16 cm
Height
24 hrs
Light Schedule
25 °C
Day Air Temp
6.8
pH
No Smell
Smell
250 PPM
TDS
50 %
Air Humidity
20 °C
Solution Temp
21 °C
Substrate Temp
21 °C
Night Air Temp
60.96 cm
Lamp Distance
DabbertGlobberfield 9/18-9/24
Week 2
There was a gap in photo taking. No photos from 9/13-9/23. During this time I switched the lights to 24/0. Also, I hadn't figured out the feeding schedule yet, so I think I was flooding every 6 hours for 5 or so days and then switched to flooding 6x a day; every 4 hours. At this point though I have not added any nutrients.
2 likes
comments
Share
3
Week 3. Vegetation
3y ago
1/9
12.7 cm
Height
24 hrs
Light Schedule
25 °C
Day Air Temp
6.8
pH
No Smell
Smell
250 PPM
TDS
50 %
Air Humidity
20 °C
Solution Temp
21 °C
Substrate Temp
21 °C
Night Air Temp
60.96 cm
Lamp Distance
DabbertGlobberfield 9/25 - 10/1
During week 3 we were working with light and pump schedules. Still only feeding water at this point I think. Or maybe I started adding a little at the end of this week. I am not fully sure. See the problem I had was that initially I had it in my head that I would document everything and keep a log of everything I did. But somehow that didn't happen. I think it has to do with the fact that I was only growing this plant out for clones and as I type this I have the clones sitting. So I am typing up weeks G-8 from memory until we are all caught up. Either way, I know I start adding nutrients and you will be able to tell in the photos because the plant looks like it's on steroids.
I think I had read that people usually top around the 5th node. I was trying to wait. I really was. But I don't think I got that far. Once the plant developed enough for me to see a distinct top forming and it had the space to cut it, I topped it. Topped on 9/30. I took a bunch of photos of it on 9/30 and you can see during the course of the day the new shoots grew up a lot after I pulled the fan leaves apart to get more light on them.
2 likes
comments
Share
Used techniques
LST
Technique
Topping
Technique
4
Week 4. Vegetation
3y ago
1/14
15.24 cm
Height
24 hrs
Light Schedule
26 °C
Day Air Temp
6.8
pH
No Smell
Smell
500 PPM
TDS
60 %
Air Humidity
20 °C
Solution Temp
21 °C
Substrate Temp
21 °C
Night Air Temp
60.96 cm
Lamp Distance
Nutrients 4
pH Perfect Sensi Grow Part A
1.057 mll
pH Perfect Sensi Grow Part B
1.057 mll
B-52
1.057 mll
DabbertGlobberfield 10/2-10/8
This is week 4 - I definitely added nutrients to the reservoir from here going forward if not a little before. But I had no idea really what I should add as I always heard use less than it says on the bottle especially for seedlings.... Typing this makes me think I added nutes in week 2 maybe? Not sure but this is the week I started questioning what I was doing.
As you can see from the photos the plant is definitely getting N. It was at this point I reviewed notes and things and learned I was way off with the PH and I should aim for 6, well 5.5 - 6 really. I was also feeding really hot. Like I shouldn't have fed so much. I think I might have fed more than what I listed for this week. But the problem in my head was well now the plant is kind of used to this hot feeding and it was getting bigger, so I didn't lower it all that much as I figured I should have been increasing if I put in less initially... I was like the plant is going to grow into it... lol
Well by 10/8 the leaves were growing all like... mangley looking. It's hard to describe. Its like it was bursting at the seams and was causing the leaves to grow all mangley and clenched? It was like they looked too lush and were starting to twist as well. I didn't know what it was, the lights(maybe too close and too high intensity setting, high ph, or high nutes. Well I did what everyone shouldn't do when troubleshooting a problem... I changed everything.
At this point. I raised the light to as high as I could in the tent. It has to be like 36 inches but with this I had to turn up the light higher as I grabbed a ppfd reading app and can now dial in the ppfd or dli or whatever it is. Boom, checked lights off the list of issues.
Next, I now make sure the ph is high 5s at least for the reservoir and I check it all the time. It likes to rise and sit around 6.2 but I will beat it back down when it goes out of range.
Finally, I recognized I was feeding too much and reduced, but just barely as the plant is getting bigger and needs more food probably? lol
Great! On we go to the next week.
2 likes
comments
Share
Used techniques
LST
Technique
Defoliation
Technique
5
Week 5. Vegetation
3y ago
1/28
17.78 cm
Height
18 hrs
Light Schedule
26 °C
Day Air Temp
6.0
pH
No Smell
Smell
500 PPM
TDS
65 %
Air Humidity
20 °C
Solution Temp
21 °C
Substrate Temp
21 °C
Night Air Temp
91.44 cm
Lamp Distance
Nutrients 4
pH Perfect Sensi Grow Part A
5 mll
pH Perfect Sensi Grow Part B
5 mll
B-52
5 mll
DabbertGlobberfield 10/9 - 10/15
Week 5 - This was a really special week for me because I found what I think is a special branch. LOL. This is all new to me, but I have never seen this in photos and is hard to describe. Good thing I have photos of what I'm going to try and explain. The plant had really weird leaves(in my opinion) like they were in clothes 5 sizes too big so the leaves were contorting in a weird way. If you read week 4 I was trying all sorts of things to fix this and during an inspection I found a shoot or top or whatever you want to call it with 3 leaves instead of 2.
So like, you know how branches have 2 leaves and then the new growth in the middle? Well this branch has 3 leaves and new growth in the middle forming 3 more leaves. So instead of 2 it's putting out 3... just wait for week 6... because it will start putting out 4! I really don't know if this is common or not. But I have never seen it before in photos or talked about so I don't know. This is a weird plant to me. I am now totally convinced that the plant is growing way more bushy than normal... But maybe it's because I topped early? But the leaves don't really extend that far off the branch. It's such a compact and bushy plant... Not sure what to think
Also, I am pretty sure I topped the 2 new tops because I wanted 4 tops and all the shoots and new growth from that as this is a mother plant of sorts. I also fimmed a random branch to see how that went and what it felt like to do with my hand instead of shears. I don't know what date I did that. I think maybe between 10/8 and 10/10 based on the photos.
2 likes
comments
Share
Used techniques
LST
Technique
Topping
Technique
FIMing
Technique
Defoliation
Technique
6
Week 6. Vegetation
3y ago
1/25
20.32 cm
Height
18 hrs
Light Schedule
25 °C
Day Air Temp
6.0
pH
No Smell
Smell
700 PPM
TDS
65 %
Air Humidity
20 °C
Solution Temp
21 °C
Substrate Temp
21 °C
Night Air Temp
91.44 cm
Lamp Distance
Nutrients 4
pH Perfect Sensi Grow Part A
6 mll
pH Perfect Sensi Grow Part B
6 mll
B-52
5 mll
DabbertGlobberfield 10/16 - 10/22
Week 6
I am starting to notice the extreme dark green in the leaves fading and they look less marbley and less wrinkly plump like they were bursting at the seams. The tips still seem burnt on new growth. But only some of it. I think it is a mix of too hot feeding like too much nutes and or too high ph. I always catch the ph at 6.2-6.5 before I lower it. Also, this is the most nutes I've ever given... Maybe it was too much. Not sure. It was around 750ec or 1500ppm.... lol I swear my goal is to lower the amount of nutrients... I get better with this I promise.
I'm working on getting a feeding schedule and learned more about what I need to do with this type of system I built. So I have adjusted the feedings to be once every 1 and a half hours with lights on and once during lights off. It worked out to 16 feedings but I squished another in for before dark time. I mainly did this because I didn't want the hydroton (clay balls) to dry out.
So my system fully floods in 2 mins, tops. it will drain in 1-2 mins. So I am only running the pump for 2 minutes enough to completely flood and soak then it drains away. I was having too long of a dry period between feedings initially. So I upped that and the plant responded very well to this. I plan on moving to 1 feeding an hour when we really get going. At this point, though, the plant is starting to consume a gallon of water every 2-3 days if not less.
I am also starting to keep an eye on how big the branches are because I want clones. The whole point of this plant is to be a clone donor. I just need 4 as I am going to grow 4 plants in this 4x4. But I wont have the space or resources to continue its life as a mother plant so it will be chopped when the time comes. For now, though, I know for sure I am taking that special branch with the 3 leaves. ALSO IT HAS NOW STARTED PUTTING OUT 4 LEAVES! Is this normal? WTF is going on with that. First 3 leaf growth now 4 leaf growth?
Lastly, I am starting to get a lot more liberal with leaf removal. I have been cutting leaves off here and there for opening the plant up and for necessity. This, however, caused a hilarious issue for me as I accidentally cut off all the new growth from one branch. It was the branch I FIMMED. I forgot that I fimmed it. I actually wasn't even trying to FIM it, I was trying to just remove the whole shoot with my fingers but .... missed AHAHAHAHA. So when I was pruning I cut the last of the new growth shoots off and the plant like... forced a new shoot out. I read this could happen and I didn't have the heart to cut it off for good, also cause I messed up and didn't want a totally useless branch. So I let it ride.
2 likes
comments
Share
Used techniques
LST
Technique
Defoliation
Technique
7
Week 7. Vegetation
3y ago
1/36
25.4 cm
Height
18 hrs
Light Schedule
25 °C
Day Air Temp
6.0
pH
No Smell
Smell
700 PPM
TDS
65 %
Air Humidity
20 °C
Solution Temp
21 °C
Substrate Temp
21 °C
Night Air Temp
91.44 cm
Lamp Distance
Nutrients 2
water
26.417 mll
clonex gel
1 mll
DabbertGlobberfield 10/23 - 10/29
Week 7
Well this is the week we cut some clones... So I needed a cloner. I was able to put one together really easily with extra stuff laying around. Really It's just a bucket, a pump, some irrigation tubing, and the little sprayer head things. I also popped in the air stone for good measure. In one of the photos you can see the red tips stuck in a tube in the background, this is what goes in the bucket to spray the stems as well. I had used basic foam, like the foam my light came in, for the clone holding cut out things. Well a few days in I was thinking about light penetration and decided the easiest way to solve this issue at the moment was something simple like aluminum foil skirts. lol. So I basically just covered the foam with foil to prevent light going through. You can also see I put the extra cuttings just in a cup of water. When I did the foil thing I also got a sock for the cup to stop light. keep it simple right? I mean I only need this for a few weeks anyways.
Before we get to the cloning, I want to take a second to touch on the height and bushiness of this plant. Is this normal? What about the special branch? It looks like this week the special branch is throwing 4 new leaves out. I have many photos of the branch this week, so check it out and let me know.
As for the cloning, I do it on 10/26 and end up cutting every single branch off. LOL. All in all I took 14 clones. I only needed 4 and the cloner I built only holds 8.... I told myself I cut all the branches to be prepared with extras. Also, I cut the whole plant down because I was curious how it grew. Since it was so short, compact, and bushy it was really nice to be able to cut most of the leaves off and really get a good look at the structure. I swear weed should grow taller, right? I'm sure it would get taller if I put in in flower right? Is it because I topped 2x? Whatever, we will see. There is like no stretch at all on this plant. Like not even a little. Plus I have no place for a mother plant anymore.
Also, after I cut all the branches off I noticed that wherever I cut was dripping water. It was dripping pretty quick, too. Crazy to think about how much water it was sucking up. Actually, now that I cut off all the plants I was able to really inspect the roots and was able to show them for the first time. It's hard getting photos of them otherwise(based on how I'm growing). But wow, those are crazy roots. Before I did anything I dumped off the top loose hydroton to see where the roots started and to my surprise they really really started taking over the whole net pot. I bought 10" net pots that fit on top of 5 gallon buckets and was worried too much root would have escaped the hydroton and it would be a waste. But to my surprise, only like a layer 2 balls deep(lol) was loose. Otherwise, the entire pot was rooted. I had to cut the bottom section off before I could even pull the thing out of the net pot to see. I was very happy to see how the roots spread through the hydroton and that it wasn't a waste.
And wow to the roots in the bottom of the bucket. See I kind of planned for this and have a solution, or so I thought, in place for this. I was just going to use another bucket, but that's not what I'm talking about here. I figured roots would grow down like that but what I hadn't planned on is that they would clog the drain holes. So this would prevent the water from draining fulling and the plant got to steal meals. It also messed up the timing on the feeding as it would overflow a little. But the way I designed it, the overflow spills back into the res if it doesn't drain through the bucket holes back into the res. The way I tried to fix this was getting something I could put in the bottom of the bucket to act as a spacer/buffer between the roots and the drainage holes. This worked for a while, until the roots grew over the entire top and caused the whole mass to float up. I didn't know what was going on as I had to keep reducing the time the timer was on to stop overflows. But eventually I saw the roots floating with the spacer... At this point it was close to cloning so I let it ride. It wasn't until after I took the cuttings I could see the full extent of the roots. They actually ended up encapsulating the entire thing I put in the bucket. It's crazy, I've never seen anything like this. But I also have never grown before. But damn, they just wrapped that thing up. It even had one single feeder root that made it all the way through everything and was like 16inches in the res. Lol such a thirsty plant. I do plan on combating this in the future and will be very closely monitoring the root situation. I think trimming the roots so they grow down evenly will be the first step as I think part of the issue was a few long roots got all the way down and started making a nest. Then the rest of them caught up. So I'll work on that. Also, I have an idea for a better spacer buffer thing, but I'm still working that out.
For feeding this week, I backed off because I figured I was going to clone the plant and go to RO water only that there was no reason to load up on nutes. I also let the reservoir go longer than usual because of the cloning operation to come. Usually I change every week, this time I let it go for around 11 days only adding in ph'd water when the system got low. But you can really see a difference in the leaves from when there where nutrient and ph imbalances.
The clones were sprayed with RO water at least 3 times a day.
2 likes
comments
Share
8
Week 8. Vegetation
3y ago
1/11
12.7 cm
Height
18 hrs
Light Schedule
27 °C
Day Air Temp
5.7
pH
No Smell
Smell
400 PPM
TDS
80 %
Air Humidity
21 °C
Solution Temp
21 °C
Substrate Temp
24 °C
Night Air Temp
91.44 cm
Lamp Distance
Nutrients 5
clonex gel
1 mll
pH Perfect Sensi Grow Part A
0.793 mll
pH Perfect Sensi Grow Part B
1.585 mll
DabbertGlobberfield 10/30 - 11/5
Week 8 / Clone week 2
Ok, so here we are. All caught up. I say that because up until this point, I have been typing from the future. But it's 11/4 now, so this is the end of what I'm calling week 8 and is the 2nd week for the clones.
The clones are sprayed with RO water at least 3 times a light cycle. I didn't change the light schedule to 24/0. Looking back, maybe I should have for the first 5 or so days since there were no roots. I did immediately bump the temps to 80f - 83f and humidity to 80% - 85% for the clones. I did this as soon as I took them. I reduced the light intensity to just under 25%. At the distance they are from the light, this puts me at like 80-100 ppfd or whatever the light reading number we are supposed to look for is. I don't recall the exact unit of measurement for the light; lux, dli, ppfd. This was reduced from 350-400 from before cloning while in veg. Also, I should mention, I don't have a dome. I just cranked up temp and humidity in the tent. I have been backing the humidity off though and currently have it set at 70% humidity and try to keep it around 77 f as the roots grow in.
I had the cloning bucket thing raised up off the ground, as the floor is cold. But for ease of heating I put it close to the warm side off the ground. I think this made the water too warm, so I did end up putting the bucket on the floor and also away from the wall. I was messing with the pump a lot too... At first I had the pump on 24/0. Then maybe around 10/30 I changed to 1 minute on 15 minutes off. A few days later I saw first signs of roots. But also the smell that came out of the bucket when I opened the lid was not great... so on 11/1 I built a new cloner from another pump, bucket, tubing, and extra sprayer heads. This way I didn't have to clean anything and I could just wipe the lid down and switch it to the clean bucket. I also took this opportunity to add some nutrients to the water for the first time. Now that there are roots, for some reason I changed the pump to 1 min on and 8 mins off. I'll keep it here until the wind blows in a different direction.
One other thing I did, that I'm not super sure about, was cut more of the stem off some of the clones... So like some of these parts of the clone that are in the water spray had to have been going bad because of the smell. So I was squeezing and touching gently looking for mushy parts and well... I cut some pieces off. I lightly rubbed some clonex gel on the ones that got cut. Also the b-52 and part A of the nutrients i use are dark dark brown and have stuff in the liquid, so I attributed a lot of that brown staining to that when I look(both on the stems and the foam). But some of the stems themselves were brown. It was hard to see. Plus the clonex gel is purple and that stained the stems as well.
Either way, there is still some funk smell in there a few days after the clean water and all that... But roots are very prominent on 4 and are growing in on the other 4. So as long as I get the 4 and they are healthy I don't care. Although, I do not want them in here much longer. I am thinking about 11/6 for the transfer into their own systems, if the roots are long enough.
Part of me wants to cut off the stem that doesn't have roots on them. For now, I will just leave them be.
Something I figured out, and I'm not sure why this didn't occur to me earlier, but the Cal Mag xtra and Part A of sensi grow are basically the same, just the cal mag xtra is a little stronger. SO, if I use both I need to up the part B by the same ratio. So here is the first time I did something about it. I put in 3 ml of Part A and 3 ml of cal mag xtra. This would equate to 6 ml of Part B if Part A and the cal mag xtra are the same. Otherwise, historically, I would have done 3:3:3 which would have been wrong and not enough part B.
Man I'm looking forward to this next stage, basically veg again lol. But this time, I'll actually put them in flower.
Update 11/5: lol ok so.... full disclosure I messed up, but not that bad. I had a few mess ups before but this one could have been bad. To make a long story short, I turned the timer off and didn't make sure to check it when I turned it back on so the cloner wasn't running for 6 or so hours.
I woke up from a nap and almost didn't even check the plants but I'm trying to manage the PH more closely. Good thing I checked. The plants were all droopy and I felt bad. Good thing I also have an air stone in the bucket with the pump for the spray nozzles. but the water lever is not that high so it wasn't really doing much to help, but at least it was something. I didn't take any pictures because I was ashamed lololol
Also, I did it. I cut the bottom off a stem that was looking weird and not growing roots. I thought it was going to be mushier after I cut it off, but it wasn't. I couldn't help myself. I probably shouldn't mess with it like that.
2 likes
comments
Share
9
Week 9. Vegetation
3y ago
1/67
12.7 cm
Height
18 hrs
Light Schedule
25 °C
Day Air Temp
5.9
pH
No Smell
Smell
400 PPM
TDS
80 %
Air Humidity
21 °C
Solution Temp
21 °C
Substrate Temp
24 °C
Night Air Temp
91.44 cm
Lamp Distance
Nutrients 4
pH Perfect Sensi Grow Part A
0.793 mll
pH Perfect Sensi Grow Part B
1.585 mll
B-52
0.793 mll
DabbertGlobberfield 11/6 - 11/12
Week 9
11/6 - Was going to pick cuttings and put into systems but I didn't think they were ready when the day came. I wanted to do it 11/5. At this point, I'm looking at 11/7.
I am struggling with a PH issue I think. This may be what is and has been causing the tip discoloration. I actually have no idea what is causing that. I have been catching the ph in the 6s and keep ph downing the cloner. I had to keep ph downing the res in the system with the mother as well. The plant likes to bring the water to 6.2-6.3, although it does seem to constantly climb with the air stone. Either way, I am constantly fighting the rising ph.
I am going to be a lot more on top of ph now. I was using one of those crappy yellow ph meters that was like 10 dollars. Well it broke on me because I left it in the tent when it was too humid. Like it worked fine until I took the cuttings and cranked the rh% to 80-90. Then when I went to use the meter it wouldn't work. The instructions were all damp and I figure the humidity killed it. Anyways, instead of buying another junky yellow one I bought a better waterproof one. So now if there's an issue with humidity it won't kill the meter. Although, a better meter comes with all this like maintenance to keep it working properly. But whatever because the sensor in it is guaranteed to die in 1-3 years anyways.
The plants are looking good, for the most part. The tips are all yellowed. There seems to be a little yellowing of some leaves and also some yellowing of serrations on one. I do see a little bit of bright green new growth. This was very prominent on the mother plant. I thought it was a sulphur deficiency. For a time these cuttings were balanced perfectly. The backup cuttings in the cup are doing way way worse but what is interesting is that the stems look way better. That doesn't make much sense to me because those stems are just sitting in still water and the ones in the cloner looked gross before I put any nutes in. They were getting 24/0 spray at first though, but that should be way better than sitting in still water.
There are 2 clones of the 8 in the cloner that don't have any roots. There are, however, bumps starting and if left alone would probably develop roots. But there are 5 with definite roots and a good amount of them. That leaves 1. This one is a funny one because it only developed 1 root. There is only 1 single root coming straight out the side of the stem. What makes this funny is that it proves something I read about rooting hormone concentration in cuttings from different locations on the plant. I read that The tops/higher branches will have a lower amount of rooting hormone and more like growth hormone. This is in contrast to the lower branches of the plant which, apparently, are supposed to have a higher amount of rooting hormone in them. So the one cutting with the single root is actually the top; the tallest top that outgrew the other 3 tops(I topped the plant 2x so I had 4 main growing stems). Then the cutting with the most roots is the special branch which happens to be a lower branch cutting. Interesting how that worked out. Although, I don't know where the 2 that didn't develop visible roots yet were taken from. But I think something was wrong with them cause of the smell in the cloner.
===========================================================================================
UPDATE 11/6:
I stay up late and typed up the first update early in the morning. It's still 11/6 but it's like another day. Plus I did a bunch of stuff in preparation of the plantening tomorrow 👻 I put up photos of updates. Also, this is the week where I construct multiple systems to bring my total functioning individual ebb and flow bucket systems to 4. I will go through the photos and explain what's going on and where I'm at with this system.
So in the first few photos with the tubing, this is the only tubing in the system. I have the curved tube for connecting to the pump and then to the tube that is bent into a ring. I cut a bunch of holes in the ring tube with a box cutter so that water would get pumped in to the bucket evenly. The ring tubing is connected with a T connector so that the ring can go inside a bucket to pump water in and the other part sticks outside the bucket to connect to the curved tube to get water from the pump. I measured out the tubes for rings to be 32" as this is good for a tight fit in the bucket and it firmly holds its place against the walls without support. The curved tube has a quick release disconnect to make it really easy to disconnect the bucket/plant from the reservoir for removal and maintenance. All the tubing is 1/2" irrigation tubing and 1/2" T connectors. But the elbow is a 3/4" male pipe thread to a 1/2" barb. The brass disconnect thing is a 1/2 inch barb quick coupler to 3/4" GHT female garden hose adapter for 5/8" garden hose or tubing. It has this 5/8" irrigation tube hookup port with a piece that screws on over the tube to lock it in place... I guess I should have taken a photo of that. I will tomorrow when I do the transfer.
Anyways, the bucket is a 3.5 gallon bucket. I drilled 7 holes in the bottom for slow drainage. I didn't want the water to drain too fast or too slow. So I drilled a few holes and ended up with 7. I think I used a 1/16th bit? I'd have to check to be sure, but it was a smaller bit definitely... fuck I suppose I could check.
Ok, it's an 1/8th bit.
Glad I checked. Oh what I wouldn't do for you random people reading my nonsense. So 7 1/8th inch holes in the bottom of the 3.5 gal bucket and then I also drilled a hole in the side of the bucket near the top. The hole had to be big enough for the other part of the T to poke through. The net bucket is a 10" net pot and fits perfectly on standard buckets. It also has the clearance from the sides to allow the ring tube to go around it. So the ring tube is tucked in between the bucket wall and the net bucket perfectly without touching the net bucket.
Initially, I was going to put the 3.5 gallon bucket inside a 5 gallon bucket that all drained back into the reservoir. The reason was because, in my ignorance, I thought the roots were only going to grow through the first bucket and I didn't want them getting into the reservoir so I figured the 5 gallon bucket would act as a buffer and stop the roots. HA! I didn't think the roots would entirely clog the holes. I figured they were small enough to not be interesting for the roots and they would just grow and hang in the bottom of the bucket.... Though, the 5 gallon bucket did help with drainage because when the 3.5 gal bucket was too close to the surface of the water it wouldn't want to drain all the way out. I figured it was some kind of air pressure thing. But the 5 gal bucket fixed that cause the 3.5 gal would always full dump(lol) into the 5 gal. But when I put it all together something about it seemed unnecessary and awkward, so I tried the system without the 5 gallon bucket just to see. Oh, I know. I think I saw someone growing in the tote like I have with just the 10" net pot that was in a hole cut in the lid. So that's what made me think about cutting out a bucket or two.
The reservoir I just mentioned is a 12 gallon storage tote that will be filled with 4 to 4.5 gallons of water max. It cannot have more in it or the water level will touch the bottom of the bucket and the bucket won't drain. The only way to increase the amount of water in the reservoir is to get a different bucket support. The lid of the tote was cut with a jigsaw to make a hole big enough in it for the bucket to sit inside. The first lid was such a pain in the ass to cut though. I used a mix of a box cutter and a blow torch. Jigsaw is the way to go. Anyways, the reason I cut the hole in the lid like this was because, in my head, the bucket was just going to be supported by this lid with a hole in it for the whole grow. I didn't really think about it until I filled the bucket for the first time in a test and realized that the bucket is going to get heavy and relying on the tote lid for support during flooding periods was not an option. So that's where that white rack looking thing comes in. It sits in the res and lifts the bucket up and out of the water and supports it so the bucket isn't held up by the tote lid at all. It also allows for easy drainage out of the bucket into the res. Once I encountered this and due to how I have the tubing connected, I cut the lid in half. This makes working with the res really easy since I don't have to do anything special to open it up part way and it also provides a space for the pump power cord to slip out along with an air tube hose for an air pump. After the lids were cut I spray painted them with a few coats of grey primer then I hit it with that glossy bright green. This was to prevent light leakage into the res since the res is in the tent. Otherwise, light easily got through the lid from the factory.
So the system came together. But building it was interesting and I ran into a lot of like ok so wtf do I do now situations. I really would prefer to get something better than the rack for bucket support as the rack is metal and the coating on it sucks. So it will begin to rust soon. I really want it made out of plastic but what I need is so specific. Oh well, I'll figure that out. Really makes me want a 3d printer cause I'd just print what I need.
The way I will have the system working is that the pump will be on a timer cycle(on for xx hours/min/sec, off for xx hours/min/sec). Initially it will take 2 minutes 5 seconds to fill the bucket with the hydroton in the net pot all together. But as the plant grows I will need to reduce the pump on time down. I know this because in a stroke of luck, finally, the hole in the tote lid and the way it sits just a little bit off of the bucket allows for overflow drainage back into the reservoir. This was important since the pump was on a timer and as the roots grew and displaced water volume with their root mass it will took less time for the water to fill. It drains empty usually around 5 minutes. Also, I will put an air stone in each reservoir that runs for 30 mins 12x a day.
and that's the system
===========================================================================================
UPDATE: 11/7:
Wow ok, that was actually a lot of work. But it was the first time I put all the systems together. I did have to build stuff today, too. Like the cloner was using one of the buckets, T connectors, and water pumps. I needed those for one of the systems. So I put everything I could put together without that stuff and then went in. But it really came together nice. I am very pleased with the result. Everything fits, everything works, no leaks. I am having an issue with the flooding times though... It's like every bucket reaches max fill at a different rate and one of the buckets is much slower. But that is my fault cause 3 of the 4 pumps are the same. The 4th pump is like 20-30gph less than the other 3 so I figured it would take longer but not as long as it is... So I am currently in the process of flooding, timing that, draining, plugging up a drain hole, flooding, and timing again. I figure I'll just plug up drain holes until I can even out the flooding time. I am going to buy a matching pump though because plugging the holes is a ridiculous and stupid solution. Either way, the differences between the buckets is, with the exception of the aforementioned bucket, not big enough to cause me to worry but it's is something I will need to keep an eye on.
Now that we are at this stage I will get a lot more detailed. I have designated the plants -- A,B,C,D. So I will reference the plants as that when needed and for my own notes.
Light PPFD for the plants is 102
PPM was a little high and that was my fault. It ended up at 754ppm. It was my first time mixing nutes into a 20 gallon reservoir so I didn't know how it would all work out. I'm used to mixing in a 4-4.5 gallon res. The main issue was that I added epsom salts and that kicked up the ppm way faster than I expected it.
I added a pretty serious suite of juice to this for a strong start. I would update the list in the diary but I'll just keep it like it is until the next week's update. Really 20 gallons is 75.7 liters... And that translates to a lot of juice... I'll put the recommended and the amount I put. For now, here is what I added:
* Part A: @ 1ml/L it would be 75ml. For this I added 35ml *
* Cal Mag Xtra: @ 1ml/L it would be 75ml. For this I added 40ml *
Part B: @ 1ml/L it would be 75ml. For this I added 75ml
B-52: @ 2ml/L it would be 150ml. For this I added 30ml
Silica Blast: For this I added 20ml, 5ml per gallon
Piranha: @ 2ml/L it would be 151.4ml! I added 50ml
Epsom Salts: @ 1tblspn per 5 liters would be 15 tblspn, I added 10 tblspn
Great White Mycorrhizae liberally sprinkled on each cuttings roots
*These two are the same thing, just cal mag xtra is a stronger concentration. So I put 35ml weaker part A, and 40ml of stronger Cal Mag Xtra to total 75ml, then I matched this with 75ml of part B.
PH readings:
Plant A: 5.5 ph
Plant B: 5.5 ph
Plant C: 5.7 ph
Plant D: 5.6 ph
===========================================================================================
UPDATE 11/10:
I know it has been a few days since I have updated the growdiary, but I just wasn't able to get around to posting. But I have been hard at work in the garden. The annoying garden that is taking a lot of effort. I keep running into stupid annoying problems and it's wearing me down. I have actually been incredibly frustrated with everything the past few days and it's boiling over today. It peaked with some stupid quest issue or bug or some BS stopping me from progressing in the new god of war game. So I had enough and went to mess around in the garden for more frustrations. Anyways, here's what's been going on the past few days.
On 11/8 I noticed one of the plants was way taller for some reason. Maybe the others were just shorter or pushed in more. Who knows. Either way, I solved this problem and am quite pleased with the way I solved it. After thinking about it I decided to flood the bucket to the max after taking a good amount of the expanded clay out of the net pot. I took as much of it as I could without disturbing any roots. Like I stopped removing when I saw roots. I got a lot out so that the water level was going to be higher than the clay. This is important because a good amount of them float. So flooding the underfilled net pot loosened all the balls up and the plant and allowed me to shimmy the plant a little lower in the net pot. When I got to the height I wanted, I just drained and the balls fell into place and I refilled the net pot. It was perfect really. Only something I can do at this stage though, so close after transplant, because the root system has not had a chance to really develop. So that was a plus.
Otherwise, between 11/8 and today(11/10) I have been trying to monitor PH and also solve a really annoying water pump timing issue. I can't seem to get all the buckets to get to max fill at the same time without one or more of them overfilling and leaking. Over the past few days I have gotten it pretty close and with just one bucket overfilling. So today, I decided I was going to drill the holes out with maybe a bigger bit for one of the holes as well. At least that's what I was thinking. When I went to check the bucket though, for blockages or anything that may cause slower draining, I found some of the holes were a little blocked. So I redrilled the holes with the same size bit, but I also deburred them really clean. Now they really clean holes. Actually... I think all the buckets may be like this. I was really lazy with cleaning/deburring the drilled holes when I first drilled them and there were some plastic twirlies and burrs that I left or didn't fully pick off.
Well good news and bad news. Good news: the bucket drains awesome and the drainage holes are totally clear of debris. Bad news: now the bucket drains too fast and the fastest to fill and overfill now is behind the other buckets... Soooooooooooooo I plugged one of the holes. LOL. But at this point I have been flooding and draining all the buckets a few times I backed off to let the net pots drain and dry a little before I flood again because I don't want to blast the plants so much while I figure this out. I mean I could flood the buckets without the net pots/plants in but I need the clay balls to displace the water mass otherwise the time it takes to fill will be longer since it would require more water to fill each bucket without the plants in there. So I'll check again in a few hours. Same goes with the PH. I adjusted it down and instead of check it again immediately, I'll just check before next feeding.
As for the PH issue, I have been very good about not letting the ph get too high. It still likes to rise fast and seems to rise more after stabilizing a day or so after adjustments. I am finding that I use a lot of ph down. Not sure if this is common or not, but it is annoying. I am getting sick of constantly checking ph to make sure it's within parameters as I am not familiar enough with the process to predict the ph. I will need to see how it rises and falls over time to have any intuition when it comes to what the ph level is. For now, I have been documenting each time I check and what I do to correct. Here is that information(time in 24hours):
0000 11/8 - |Res A: 5.7ph | Res B: 5.7ph | Res C: 5.5ph | Res D: 5.6ph - no action taken
0900 11/8 - |Res A: 5.7ph | Res B: 5.8ph | Res C: 5.7ph | Res D: 5.7ph - no action taken
1700 11/8 - |Res A: 5.8ph/647ppm | Res B: 5.8ph/662ppm | Res C: 5.9ph/675ppm | Res D: 5.8ph/690ppm - no action taken
0100 11/9 - |Res A: 5.9ph/679ppm | Res B: 6.0ph/712ppm | Res C: 6.0ph/711ppm | Res D: 6.0ph/711
Drops added |Res A: 7 = 5.7ph
| Res B: 9 = 5.8ph
| Res C: 9 = 5.8ph
| Res D: 9 = 5.8ph
1730 11/9 - |Res A: 6.1ph/711ppm | Res B: 6.2ph/694ppm | Res C: 6.4ph/691ppm | Res D: 6.2ph/678ppm
Drops added |Res A: 75 = 5.7ph
| Res B: 75 = 5.7ph
| Res C: 85 = 5.6ph
| Res D: 30 +1.5ml = 5.7ph
1700 11/10 -|Res A: 6.0ph/762ppm | Res B: 6.1ph/761ppm | Res C: 6.1ph/739 | Res D: 6.1ph/718pph
PH Down + |Res A: 1ml = ?
| Res B: 1ml = ?
| Res C: 1ml = ?
| Res D: 1ml = ?
A couple things I noticed when taking notes instead of going off memory when testing ph/tds... 1) These testers/meters are junk. Inconsistent inaccurate nonsense. Dafuq I want with a ph meter I have to calibrate every 10 minutes or a ph meter that needs to test the water for upwards of 1 minute plus to get a reading. I shit you not, the instructions for my ph meter when reading distilled water is to wait between 1 and 3 minutes for an accurate reading LOL. I mean it explains this is due to ionization or lack of ionization of the water making it harder for the probe to read distilled water vs water with stuff in it. But this also translates to reading times of not distilled water. It like takes a while to stabilize. But even then, if you just shake off and re-test in a different part of the res you may get a different reading. This is the same for the ec/tds meter, which happens to be way way worse than the ph meter. Like this tds meter is always throwing different numbers at me I can re-dip the thing in the exact same spot and get 3 different readings. I mean all within like 10-30, but it's still like pick one. Also, wtf is up with the TDS readings of the ppm? On top of the meter shooting numbers that are +/-~ a few, it looks to be rising. This is weird because the plants should be eating... But I am rationalizing this by way of saying there is less water therefore the ppm is getting more concentrated whereas is I added the volume of water lost the overall ppm would go down. I think this is what is happening. So to get a real ppm reading I would need to always test the same exact volume of water?? dafuq? I should just stop thinking about it.
So what I started doing is just having a glass of distilled water on the side in the tent and I keep the probes in there between readings of the reservoirs. The ph meter's instructions say to rinse with "pure" water between readings anyways so that works. Either way it's really turning into a chore. Actually, this brings me to my next complaint/annoyance: how I laid out the tent. Ok, so when I first thought, "hey I'll grow 4 plants" I figured sure, put them in tent, easy, right? lol, sure. But then it's like ok so how are you going to get to them? How are you going to work on them? Is there space in there for you? Will you be able to bring them out of the tent? What about if you use a screen, what then? So I had to arrange the systems in a way that gave me space to work on them and they still had their own space. But it got way too crowded way too fast. Then with my reservoirs having a tube going through one side of the lid makes it so I can really only access the water from one side of the res. So Now I am running into issues as to hard to access res lids. I did think about this when arranging the systems. But theory is definitely different than practice. So in this situation. I did have to turn one of them. This will give me better access but caused me to have to move all the power strips and re-run the air line tubing and figure out an issue with space again. UGH just typing about it is annoying. All of this.
Oh yea, and the last thing that is also probably the most important thing is that one of the plants looks worse than the rest and I feel bad and I don't know how to make it feel better. I can't tell if the deficiencies are from the cloner stage or not. But one of the plants has yellowing leaves and yellowing serration tips. Also The plants are all rebounding and starting to look like the mother with the new growth being super light green like almost highlighter green/yellow. It's way brighter than it was before. However, the new leaves/tops always did this then once established turned into a more solid green color. I don't know if this is a sulphur deficiency or not. I think the one with the drastic yellowing is magnesium? I am not sure. I should probably ask someone.
3 likes
comments
Share
10
Week 10. Vegetation
3y ago
1/74
20.32 cm
Height
18 hrs
Light Schedule
25 °C
Day Air Temp
5.8
pH
No Smell
Smell
566 PPM
TDS
65 %
Air Humidity
21 °C
Solution Temp
22 °C
Night Air Temp
91.44 cm
Lamp Distance
Nutrients 6
Epsom salt
19.531 mll
pH Perfect Sensi Grow Part A
0.33 mll
pH Perfect Sensi Grow Part B
0.925 mll
DabbertGlobberfield 11/13 - 11/19
Week 10 (entering week 2 after cutting transplant)
11/15 - It's been a few days since I updated, so I'll do what I can to bring this up to speed. I have been documenting and all that so here comes the info. Pictures uploaded and will probably update last week with photos as well.
I think I locked down that overfilling issue for the moment. That will change as roots grow but all I have to do is reduce time on the pump and we will be good. So that's checked off. As we move forward, I will decrease the time between flooding. This week I put it down to 2h30m off before it floods again. Also, I didn't like the gaps between the buckets and the lid letting in light, so at some point I made aluminum foil collars for the holes. That seems to work for the moment. I moved a few of the reservoirs for easier access because when I first put them in I thought it would work in theory but in practice I had to rearrange a little. It's better now and easier to access each res for water testing.
So every Monday I will be changing the reservoirs out and I changed everything on 11/14. I took this opportunity to move things a little and arrange air hoses and cables and the such. While doing all this and with the constant testing I am doing(I will do less down the road most likely) I am thinking this system setup is not going to work for me long run. The maintenance or labor really involved with removing the water from each then refilling is annoying. Plus, after a while it will be hard to remove the bucket from the res due to plant size and maybe trellis mesh. Getting the water out is the most annoying part really because I can't just pump it all out into something. Because that would get too heavy. So I pump out into gallon jugs(at least I can see how much water I am taking out and what it looks like) and dump. Refilling is much easier as I just have a pump in the 20 gal mixing res and pump to each res until full. Doing this I noticed I am definitely at more than 4.5 gallons per res because after putting 20 gallons in the mixing res, I ended with half a gallon after filling the 4 reservoirs. So that's an interesting note. I mean, I'm not going to hand fill gallon by gallon to measure or I'd go crazy.
I'm going to be working out some kind of better way to do this with one res. I do love this ebb and flow style system so I just need to probably build shelving or racks to raise the plants, do just buckets, and run tubing for flooding and draining out the tent to the master reservoir. I just need to design and put that into action. Ha! But seriously, I would much rather mix, test, drain and fill just one res instead of 5(technically 4 for plants and 1 mixer).
As for the plants, the one that was looking deficient definitely started lagging behind. It is now the smallest of the four. I looked into what the deficiency could be and it may potentially be Potassium related? It seemed convincing enough to me for me to adjust the ph of this res lower than the others to help with intake of potassium. Either way, it is doing better. It even reclaimed some yellow on the cut lower leaves. So I am pleased with that. I had planned on filling this res 1/2 way with mix and then filling the rest with unmixed ph'd tap water but I didn't end up doing that. I forgot and it got a full res like the others. So we will see, it was doing better so.... Maybe it will catch up.
Putting the information into this site about what amounts were used seems to indicate I was very heavy on the epsom salt in comparison to other stuff... That's crazy cause I put in A LOT more last time. Either way, this time after I added nutes to the res I tested for ppm. The base water was 159ppm and after adding 5tbsp of epsom salt ppm was 306ppm. So that was what I was looking for... Although, after looking through, uploading, and labeling the photos here I feel like there is about to be a too high Nitrogen situation occurring. I can see the weird green color wanting to start. I lowered the amount of some nutes as well and lowered the feeding from last week almost 200ppm. Last week ended up being 754ppm and this week was 566ppm. I also added more part B overall to up the potassium and phosphorus side of things over nitrogen. Hopefully, this will be reflected in the leaves in the coming days as it has not been 24 hours since res change yet.
The one that was too tall and I reseated it lower in the pot to be shorter is now back to being the tallest and is the one in the photos with the praying leaves. I read about this and there is much debate weather or not this is good or bad. The overall consensus seemed to be that it was good, if not great, but only because you're walking the danger line and may be about to show signs of light stress. Since this was the only plant showing this, I didn't have any issues turning the light down a bit. It was at 100 ppfd but I lowered to 70-80 ppfd. The light is easily 3ft above the plants at 15-20% power. The height and speed of growth of this plant forced my hand and I topped it to it stays the same height as the others. I will do my best to keep a level canopy, but the special branch is really short and stubby as expected.
I seemed to have solved another problem by diligently monitoring the ph and not allowing over 6.2. There are no new leaves and have not been any new leaves with burnt tips or yellowing tips! I believe this was a ph issue for me and no other variable was causing this. I did, however, notice an issue with the leaves. Some of the tips on the serrated leaves were pointing up, like bent up. I think this was because for 2 or so days I let the humidity get to 30-40% as I ran out of distilled water for the humidifier. It's getting colder so I am constantly battling hitting temp and while maintaining humidity. I cannot wait until a few weeks from now when I can shoot for 55-60% rh. But, right now, since they are young and aren't big bushes yet, it takes a lot to maintain 70%. The symptoms started easing as they settled back into higher than 34% rh.
The last and most awesome thing I found all 4 clones have the double serration trait that is highly sought after in indica skunk blends. Or at least a phenotype that is hunted as it signifies skunk genetics present. At least that's what I thought was decided upon. So I have a rare whorled phyllotaxy branch and on top of that it has double serrated leaves. I actually noticed it on the special branch and I have since named it sawtooth since it looks like a vicious sawblade. I cant think of anything else for now. Well typing out the test results for this week so far I remember how much I don't really trust the meters. Also, the reservoirs seems to have shot up fast from 5.5 to 6.0 after res change and a little less than a day of feedings. Maybe runoff. Maybe its the bags I put in there... I did rinse them with tap water and they that is 7.8ph but that shouldn't really be an issue. hmmm. Either way, I added 2ml and dropped the ph right to 5.5 again. So go ahead and raise up see what happens. This is good though that it's going through the range. Although, this plant or system or something seems to like to keep ph at or just above 6. But I cannot let the burnt/yellowing tips come back. So we will see.
=============================================================================================================
UPDATE: 11/19 - Ok, so a few things. Updated week with photos and ph/ppm readings I have been taking. All plants are showing signs of female plants. I mean they were feminized seeds so I didn't expect anything less, but it is still awesome to see. Also, the bags that I thought were saviors... aren't. Well, I was hoping the holes in the "mesh" would be tight enough to prevent roots from growing through but they can grow through. So I need to find a smaller micron bag. This is actually proving very difficult. I'm working on it, but damn can't I just get a big bucket sized rosin bag to contain the damn roots so they don't grow into the reservoir? Jeez. lol.
Also, something happened with the timing across all the buckets at the same time! I think it happened after I pulled each net pot to check the root progress and the bag solution and didn't reorient the bags in a way where I had them off the bottom of the bucket(I had it like that before) and it increased the time because the bag was preventing draining. So I had to cut some time off the pump time since the drain time was longer. I wasn't going to mess with the bags much because of how they are designed. Like the bags taper a little. So, what I need or want is the bag to sit just above the bottom of the bucket. That way the roots can have as much space as possible without inhibiting draining. However, when the bags are pulled up to make this happen, it gets narrow and hugs the net pot tight. This causes a few issues. One is that it makes the bag taught/tight right at the exit of the net pot holes for the roots to just grow into. Then two, is that it kind of sheers off the roots a little when taking in and out of the bag even if the roots aren't growing through the bag. I mean, if I pull the net pot out and there are roots growing through the bag, I carefully pull but if they break or get cut by the bag oh well. I was planning on cutting roots anyways before finding the bags so this is fine. I still want a better bag though.
I need to work on redesigning the system or building a new one while this one is running and either wait or switch because these issues are just adding up. I want more.... ease I think. I need to figure out a way to ensure exact draining time every time. I have flooding down, no prob. But I need exact drain time every time without something being able to stop it. I need to corral the roots. Lastly, I really want the reservoir outside the tent and one res for 4 plants. So I don't have to test 4 diff reservoirs. Although, I do like the ability to attend to the needs of a specific plant individually. I have some things to work out, but for now it's going pretty well.
I cut a few leaves off Sawtooth. It has too many leaves. I think It's the shortest plant now but has the most leaves. I looked into it and I think it is more than that whorled phyllotaxy assessment. I think it's actually something called fasciation; "is a genetic mutation of a plant's growing tip, and it can visibly affect the stem, flowers, or fruits. It often leads to multiple extra flowers being produced on the affected stems, typically with many secondary blooms surrounding the normal, expected one.". I was reading about it because after closely inspecting the plant I call Sawtooth/Special Branch it seemed like the one stem was like 2 stems merged growing together. So I searched something along those lines to find people discussing flat stems and fasciation. It also appears that whorled phyllotaxy is related in some way to fasciation. So there you go.
Furthermore, people were talking about how it was cool as a novelty, once grown out and harvested the buds were not good compared to buds from other bud sites. Meaning I have decided to top this one. It's actually going to be an adventure to top this plant as the stem is flat like double wide and there are leaves and shoots growing in every direction. I think I found the spot and can probably find another one if I let it go a little longer. See, I keep forgetting the cuttings are pretty young. I mean I did top the other one, but that one is growing fast. Actually, that one is the closest thing to what I expected plants to look like and grow like compared to all the other growth I've experienced from this plant as a whole. So I don't know if I should just top it now or wait a little bit longer for it and other shoots and leaves to develop. I think I'm going to top it soon...
After I lowered the light to 70ppfd all the plants started praying. So I must have hit the spot. Then it started dissipating so I raised the light intensity to 80ppfd. Trying to chase the praying leaves. At this point, my plan is to raise the light to see praying leaves then hold there until they stop doing that, then raise a little bit more to get them praying again. As it seems to be just the top new growth and the other leaves are super flat, well mostly. Actually, I don't think the bent up serrated leaf tips were a humidity thing... not sure what that is. There were some wrinkly leaves starting. But this plant seems prone to that. The leaves don't seem to like to be smashed up against each other. This creates that microclimate people always talk about and it seems to morph and twist the leaves. So I added another fan to the tent to increase airflow around the plants. Hopefully, this and the more steady humidity will bust that up. Temps have been low here though so it's harder to keep perfect temps in the tent without constant observation. Once I can raise the light intensity up this will help with adding heat. I just need to hold off a little while longer. Shit I also still need an evaporative humidifier cause buying distilled water all the time sucks.
ph and ppm tests for the week:
1000 11/13 |Res A: 5.9ph/781ppm | Res B: 5.9ph/878ppm | Res C: 5.9ph/879ppm | Res D: 5.9ph/824ppm
0200 11/14 only tested Res C - 5.9 added 2.3ml ph down and tested 5.5
Res change 5.5ph / 566ppm
1030 11/15 | Res A: 6.0ph/(554/623)ppm | Res B: 6.0ph/614ppm | Res C: 6.0ph/614ppm | Res D: 6.0ph/614ppm
Drops added |Res A: 2ml = 5.4ph | Res B: 2ml = 5.6ph | Res C: 2ml = 5.5ph | Res D: 2ml = 5.6ph
1800 11/16 | Res A: 6.2ph/(531)ppm | Res B: 6.3ph/548ppm | Res C: 6.2ph/550ppm | Res D: 6.3ph/557ppm
Drops added |Res A: 4ml = 5.6ph | Res B: 5ml = 5.6ph | Res C: 5ml = 5.4ph | Res D: 5ml = 5.4ph
1000 11/17 | Res A: 6.0ph/(537/574)ppm | Res B: 6.0ph/574ppm | Res C: 6.0ph/594ppm | Res D: 6.0ph/594ppm
Drops added |Res A: 2ml = 5.5ph | Res B: 2ml = 5.6ph | Res C: 2ml = 5.6ph | Res D: 2ml = 5.7ph
2130 11/17 | Res A: 5.9ph | Res B: 5.8ph | Res C: 5.9ph | Res D: 5.9ph
11/18 All res had 6.0 so added 2ml across all res and got to 5.7
11/19 5.9 across all res, ppm between 580-540
2 likes
comments
Share
Used techniques
Topping
Technique
11
Week 11. Vegetation
3y ago
1/53
27.94 cm
Height
18 hrs
Light Schedule
27 °C
Day Air Temp
5.7
pH
No Smell
Smell
534 PPM
TDS
44 %
Air Humidity
22 °C
Solution Temp
23 °C
Night Air Temp
91.44 cm
Lamp Distance
Nutrients 5
Epsom salt
0.326 mll
pH Perfect Sensi Grow Part A
0.925 mll
pH Perfect Sensi Grow Part B
0.925 mll
DabbertGlobberfield 11/20 - 11/26
Week 11 (entering week 3 after cutting transplant)
11/20 - Had to do it. I topped Sawtooth. Hopefully the shoots will grow tall and strong like plant B. At this point I am convinced this branch had 'fasciation' as the stem was flat or like flat shaped. I'm really looking forward to see what Sawtooth does. Now I need to figure out how to slow down plant B so the others can catch up. I think I will have to start training it soon. I'm going to try not to touch the others for a little while longer. Oh also... after some research on DLI and ppfd I cranked up the light to 50% which is 300ppfd / 16DLI. Plants seem to like that but I thought they liked it before so who knows... I'll keep it here for a week. Reservoir change is due for tomorrow. I think I will hold off until 11/22 because I ordered some things to help with draining and filling the reservoirs. No harm in waiting. I have been checking the PH and PPM but not as frequently. The ph was 5.9 all yesterday and it's at 6.0 today. I'll probably adjust down later tonight or in the morning before lights out. Otherwise, everything should be fine for now. When I change the res, I will probably use the same mix of nutes, even the epsom salt since nothing adverse seemed to have happened and the plants all look really good.
===========================================================================================================
UPDATE: 11/26 - After the topping of Sawtooth, it recovered very well and the side shoots have easily taken over and the plant is gaining height. Similarly, Plant B, the tallest plant, is responding very well to the LST performed on it on 11/24 to reduce it's height and keep its top level with the other plant's tops. Plant C and D were both topped as well when they got to a good point for it. Both of those plants are recovering well to the topping. I will start training plant C and D soon. I do plan on cleaning up some of the inner/under growth of the plants soon. I have already done this on plant D today and I like how it came out. I want to observe and see how this affects growth for a few days before doing it to the other plants. But they are in need of some thinning out.
I ran into issues with the net/mesh bag I got as the roots were easily able to grow through them. So I looked around for a better stitched bag... So instead of paint strainer bags I found honey straining bags and the micron weave on them is much smaller and tighter. It reminds me of rosin press bags. I thought this would solve the problem with the roots but it doesn't. The damned little roots are able to force through and it's a small small micron... Whatever. I have a plan to deal with this. I still like these honey bags better and will keep using them as they stop 90% of the roots. So I will just put something in the bottom of the buckets to keep the bags of the bottom and away from the draining holes. Then I will pull the slack tight on the bags to hammock them over the bottom. The honey bags are shaped much better then the paint strainer bags and work better for this. I may keep looking for smaller micron'd bags or a different kind of solution for this. I mean I have seen roots grow through cloth so I don't think I can 100% stop them.
At the moment, I am putting more mental energy into figuring out how to eliminate the 4 reservoir system and make it 1 res for the 4 buckets that drain out of the tent... I have some ideas but I have to start designing..
As for environment changes and reservoir nute info I have made some adjustments. For the res refilling, I waited until 11/22 to do the res change as I ordered some things that I used and were delivered on 11/22. The tap water was 8.1ph and 134ppm. I added 50ml of ph down to get ph of 5.5. I cut out the cal-mag and went full part A. I also tried to keep the ppm down and ended at 534ppm for the res. I think this next res change I will try and up it a little bit. I have also reduced the time between flooding to 2 hours. So every too hours the plants are flooded and drained. 2 mins to flood 5 or less mins to drain. Lastly, as of today, I raised the light up to 70% which puts my ppfd/dli at 350/22 or something. I'm going off memory. Either way I pushed up the light intensity. The light is so high above the plants... I think before I raise the power on the light I will lower the light height cause its like 3ft above them... But it's fine like this for now.
Updated the nutrients to reflect what was added for this weeks res. Next res change will probably be on monday. This will be only 6 days but I want to get back on track and also up the nutes as I think the plants want that. Also it looks like I was inputting the epsom salt stuff wrong before?? This makes more sense. I put in 5 teaspoons into 20 gallons and that's .25 teaspoon per gallon. That makes sense cause I should have been adding tablespoons I think. Originally I read 1 TABLESPOON per 5 liters. I am using 20 gallon res, so that's 75 liters. 75/5=15 tablespoons. and 15 tablespoons = 45 teaspoons. I mean... that sounds like a lot. hmm mathematically this works out to 2.25 teaspoons per gallon which is 19% of the total amount of nutes. I think I'll just keep the 3% boost for now and not have any issues about putting in 5-15 teaspoons next res...
Did I mention I have no idea what I'm doing? Hah. I feel like I'm making it up as I go.
Last thing, I have been pretty lazy about the ph. I caught it on 11/24 at 6.4 across all the reservoirs. I ph downed them to 5.7, 5.7, 5.6, and 5.3. Then today they were at 6.1, 6.0, 6.0, and 5.9. So I ph downed to 5.4, 5.5, 5.7, and 5.4. I say this because I noticed some yellowed/singed tips on new growth in pictures. The ph jumped up fast after res change. I'll keep this in mind next time.
2 likes
comments
Share
Used techniques
LST
Technique
Topping
Technique
Defoliation
Technique
12
Week 12. Vegetation
3y ago
1/58
27.94 cm
Height
18 hrs
Light Schedule
26 °C
Day Air Temp
5.8
pH
Weak
Smell
625 PPM
TDS
55 %
Air Humidity
22 °C
Solution Temp
21 °C
Night Air Temp
114.3 cm
Lamp Distance
Nutrients 5
Epsom salt
0.391 mll
pH Perfect Sensi Grow Part A
1.189 mll
pH Perfect Sensi Grow Part B
1.189 mll
DabbertGlobberfield 11/26 - 12/3
Week 12 (week 4 after cutting transplant)
12/1 - Heyo. So as usual there's a lot going on here since last update. Not sure where to start. Let's start with the problems I guess. So the mesh bag for the roots is good in theory I think, but in practice it's stupid. I thought I would have solved my issue with the bag's micron hole size by seeking a smaller micron'd bag. Nope. The roots grow through the smaller micron bag, just less to. But they still do it. It actually might be worse with the smaller micron bag because the roots sheer off more easily. This is leading to secondary issues caused by the bags. As broken off root arms collect by the drain holes and start to impede draining. This leads to over filling. At this time I am not sure how to handle this... The roots sheer/break off when I separate them. I found an easier way to clean up the bags. But I cannot be cleaning roots out of the bags on a weekly basis especially when the plants get bigger and are flowering.
I am also experiencing PH issues. Well less PH issues than me just being lazy and not checking as much as I should. But damn the water needs like daily adjustments and it's starting to get to be a little much. There are several factors I think working against me here. The PH has been spiking up faster than I expected it and I caught it higher like 6.4 and 6.2. This is leading to burnt tips on my new leaf growth. I was doing so good keeping the PH in check but I just don't know. There were some issues with the aluminum foil I was using to block the light from getting into the reservoirs between the buckets and the reservoir lids. The issue is that when the buckets overfill the excess water runs out the side and back into the res. This is fine, but some gets on the foil and the way I was applying the foil it started holding water. So I had to get rid of some of the foil on each res. I was way too lazy apparently to replace it for a few days so the reservoirs definitely had major light leaks. I think the increase in light reaching the reservoir water in addition to the frequent amount of time the air stones were going off in the reservoirs contributed to a faster than expected rise in PH.
I say this because when I changed the reservoir on 11/29, I didn't dispense the new mix to the plant reservoirs for like an hour after I mixed it up. I left the air stone running in the mixed nutes during this time and when I came back the PH went from 5.5 to 5.9 after 1-2 hours of doing nothing but getting airstone air. I had it perfectly PH'd at 5.5 when I left it. So it jumped fast and that made me think about the airstone as that was the only variable I could think of that would have raised the mix like that. So I reduced the airstone time on from 30 mins 12 times per day to 30 mins 4 times a day. So reducing the airstone time in addition to being more light tight has helped in stopping the fast PH rise. I am also checking more frequently as waiting 2 days to check isn't something I am going to have the privilege of doing.
I also have been really lazy about buying distilled water for the humidifier to boost RH%. I mean, that is probably the most annoying expense for me in this whole thing. To have to constantly buy distilled water so the ultrasonic humidifier doesn't blast out calcium dust. At least the bigger these plants are getting raises the base humidity in the tent due to transpiration. So the neutral RH is around 50 and I'm technically cool with this. But I do want to raise it up closer to 70 for aggressive vegetative growth. This actually leads me to a serious question I keep asking myself... When should I initiate flowering?
I really have no idea what I'm doing. I'm just making it up as I go along and throwing stuff at a wall to see what sticks and what doesn't. It's getting to a point now that I know I can initiate flowering now. But like what is the point of doing that? Alternatively, what is the point of waiting? I'm thinking I'm going to go another 1-2 weeks and then start flowering. But I guess I am planning for a doubling of the plant's height. So I might wait until a height I am good with doubling. Should really only be another 1-2 weeks for that. I am also terrible at shaping the plants. I think half the time I feel like I'm a little over my head and this is all going to fall apart soon. This is due to the design of my system.
Like WTF is this brown slime in the reservoir every week. Wow that was hard to type without including cussing. I think I hate advanced nutrients. Part A, B-52, and Cal-Mag xtra are disgusting. The solutions are like brown with suspended material in the solution. I can tell this is what falls out of suspension and like coats everything touching water in the reservoirs. I think I'm going general hydroponics next grow cause in those bottles they look like clear normal fluid not some kind of nutrient slurry that I have to clean up all the time. I feel like I am always working on solutions to problems I am causing. lololol. I just want a perfect system with none of these stupid issues. If I could just solve the root containment issue, have light tight reservoirs, get perfect draining times every time, and make changing the reservoirs 10x easier I would be a happy man.
So all that and I have not said anything about the plants yet. The plants, with all MY issues aside, are doing awesome. Or at least I think they are doing awesome. As I have no one to tell me if I'm doing it right and no in person guidance or training. Either way, They seem to be doing great. This week I did a bunch of things to each plant. There was LST, pruning, and I tried my hand at super-cropping. I cleaned up all the plant's undergrowth and got rid of bottom shoots. Sawtooth had crazy undergrowth and I cleaned that up really nicely. The plant exploded after. I never super-cropped anything before but I would practice on leaf stems I would cut off the plant during the past 12 weeks so I knew what to expect when I tried it on a growing stem or a leaf on the plant still. I'd say I had 75% success with the failures being ones that just stood back up a little bruised. But otherwise using LST and Super-cropping I'd say I am doing a pretty good job of keeping all the plants at the same height. Although, plant B looks like it has the best structure. Since I topped it 1 week before plant C or D this changed the shape of the plant dramatically. As plant B is more of a wide bottom growing in like a candelabra shape vs plant C and D's more classical xmas tree shape. This just means plants C and D will need more LST and training to keep it in line.
I can't really think of anything else at the moment. If I do, I'll update. ---- OH, I boosted the nutes up a bit
============================================================================================================
Updated photos and updates will be in the week I'm about to post
2 likes
1 comment
Share
Used techniques
LST
Technique
Defoliation
Technique
Super-Cropping
Technique
13
Week 13. Vegetation
3y ago
1/60
40.64 cm
Height
18 hrs
Light Schedule
27 °C
Day Air Temp
5.8
pH
Weak
Smell
625 PPM
TDS
69 %
Air Humidity
22 °C
Solution Temp
21 °C
Night Air Temp
60.96 cm
Lamp Distance
Nutrients 5
Epsom salt
0.651 mll
pH Perfect Sensi Grow Part A
1.321 mll
pH Perfect Sensi Grow Part B
1.321 mll
DabbertGlobberfield =====================================================================================================================
12/4 - 12/10
Week 13 (week 5 after cloning)
12/6 - Ha! So that mesh net bag really didn't work, huh? I mean it's my fault it got like that. I got lazy about separating the roots from the bag for a few days and well here we are. The roots look awesome though. They are so white and growing evenly out of the bags. But the buckets are now full of roots. I really have to solve this root problem. I will ask for help. I have a potential solution on its way here. I ordered a much finer mesh screen but it's just a sheet of mesh and not formed into a bag. So I will have to figure something out.
The plants are getting taller. All of them are at or around 16 inches. Plant B and D are the largest with Sawtooth(plant A) behind and Plant C in last place. Plant C was the deficient one though and the amount it was held back while recovering is easily showing. I also topped all the plants at different times and that totally affected the plants' structure. Last week on 12/2 or 12/3 I topped Plant C and Plant D for a 2nd time. I cut both the main shoot tops and now there are 4 instead of 2 instead of 1. I think I did that right.
On 12/4 I begun serious LST with Plant C. All plants have LST on them. Since Plant C is the smallest and shaped like it is, I started training the branches out to make it bushier. Topping the main shoots should also push growth out so this should aid in the bushening. I do need to continue monitoring the plants and will apply more LST soon. I would have today but I did a bunch and am done doing things for right now.
I was going to change the reservoir yesterday(12/5) but something came up and I was only able to mix the nutes. After sitting for a day the PH rose on its own to 5.7 so I added 4ml and it went back to 5.5ph. Then I split it up. The plants are drinking a lot of water and I am starting to have to replace gallons between the 4 plants every few days. This is fine, but it is interesting seeing how much they drink. I am not sure if I should replace with mixed nutes or just dechlorinated ph'd water. What I am doing right now is feeding with the left over mixed nutes from the reservoir change to the reservoirs that need it until the left overs are gone. Then I use tap water(dechlorinated) as needed until the next res change.
I have decided that I am going to tough it out with this system layout until the chop. I did order tools I think will help me deal with what I think will be issues. Like I need a ZERO water level pump, that way I don't have to remove the reservoir and physically dump out the water. So I grabbed a drill pump I will use to get as much water I can out. Then I will grab my really long hose and bring that in the tent to spray clean the reservoirs in the tent and pump out the slime without having to clean it out of the tent.
I uploaded photos of the nutrients I use that are DARK and filled with particulate. Photo'd are Part A and B-52. Look how B-52 makes the water cloudy. A lot of this settles and makes this biofilm slime all over. it's gross really. This will work for now until I can fix this before the next grow.
Some other changes I made - I lowered the light because I needed to get more light energy to the plant without turning the light up so I lowered it to about ~24 inches above the plant tops. I figure they will grow into this space. I have them at ~500ppfd and ~30 DLI. I could probably lower it more. But it's fine for now. I'll raise it with them as they start stretching in flower if they get too close to the light.
I have also increased the amount of feedings to 1x every 1hour 30minutes. I had to reduce flood time because of the ROOOOOOTS. So flood time is at 1min 50seconds. But I will most likely have to reduce this more and more as the roots fill out the bucket. I need to fix this soon...
Last change was the nutes. Well, I mean I have been increasing the ppms of the feedings. the PPM for this feeding came to 769. I upped all nutrients added.
In a 20 gallon reservoir I mixed:
10 tsp Epsom Salt
50 ml Silica Blast
100 ml of each; Part A and Part B
50 ml of B-52
That's all I can think of for now. I will try and update the week with more photos and diary entries as we move into next week. I do foresee a switch to flower in the near to very near future. I am thinking either flip after next week or the week after. Like I will finish this week out and definitely do the next week. After next week though I will either start flowering or do one more week of veg. I will have to because I will run out of Part B of grow lol. But I am looking for a certain height I think. Actually.... I have no idea when I should start flowering or like what the reasons would be that someone would want to start flowering. I am expecting the plants to double in size. So I am trying to get the plants a little taller before I flip cause I want them to really fill out the tent. We will see I guess.
ok ok ok lastly lastly, I added some up close photos of some leaves with double serrations. The trait went away for several weeks after the cutting transplant. But the leaves are reemerging and the trait is dominating new growth. I was worried it would go away forever. So glad the double serrations are back.
===========================================================================================
UPDATE:
12/7 - Well I messed up. Plant B and Plant C did not get water for 12 hours and it was my fault. I caught it 30 mins before lights out and flooded. I misted them a little and I flooded an extra time for both when I adjusted the ph down. OH YEA that reminds me on plant B's reservoir when I found the no water pumping issue I ph'd downed too low like 5.3. So it was starving and thirsty and I hit it with too low ph lol.
What happened was that when I was changing the reservoirs I had the GENIUS idea to rotate the pump so the intake was facing down. It actually worked great when I did that to pump more water than usual out so I left them like that for feeding after refilling reservoirs yesterday. I did notice that 2 were not pumping water and I rotated the pumps back(Sawtooth and plant D) but I left Plant B and C with the intake facing down. Apparently they weren't feeding. I noticed this because I checked the ph before lights out after I woke up and each res was totally different all over the place. Then I checked the pumps cause I remembered the issue and yep they weren't pumping cause I'm an idiot.
This sucks cause the plants were heavily manipulated by me when I changed the reservoir and I was exposing the roots a bunch. So I exposed them probably drying out more before not feeding for at least 4 cycles. I also cut a lot of leaves off the bottom of plant B cause I wanted to clean up undergrowth and improve airflow, so it was hurting. The last thing that made it not great was that I had also lowered the light and increased the ppfd/DLI so. So I starved B and C and then blasted them with light then blasted them with full power feed right before and during lights out. They are only 2 or so hours out of lights on. I checked the roots and they are all still white and looking good. I feel so bad. I'm sure they will bounce back.... 😬
===========================================================================================
UPDATE:
Early 12/8 - Plant B and Plant C are fine and looking great. My idiocy gave me quite a scare there. The worst part was knowing I just have to wait and not to mess with them. I didn't and everything is fine. I mean I figured as much when I checked the roots and they were looking healthy and fine even after not getting flooded for 12+ hours. I think with there only being 7 drainage holes and them being a tiny size in addition to the top of the bucket being blocked by 9 inches of hydroton/leca it probably locks in moisture/humidity pretty well in the root zone. Now I just have to avoid messing up like that during flowering when it really counts... I ordered a bunch of things to try out. We will be going off.... no wait... further off the rails soon. Should be fun.
Late 12/8 - Plants are doing awesome. I went in after lights on to do LST on all the plants where needed or could be applied. I am trying really hard to grow the plants horizontally before the flip. Like I am trying to grow them wider instead of taller at the moment. I figure the will grow vertically a lot in flower. So now is the time to maintain structure and canopy. I think we are really close to flowering... Definitely thinking the week of the next reservoir change is the last week of 18/6 cycle.
===========================================================================================
UPDATE:
12/10 - Not much going on to end the week. Everything is looking good. At this point I am putting all my effort into spreading the plants wider before I flip to flower. As I expect vertical growth in flower and right now I'm working for horizontal growth. I'm also trying really hard to puff out Plant C. Since it was deficient in the beginning and behind I want to get it as close to the size as the others as I can.
On an unfortunate side note, my LST on one of Sawtooth's branches was too aggressive and I started a split or something at the base of the branch that connects to the main stem. It was one of those really bad moments. But I assessed the situation and its just a minor split starting it looked like. I mean it's not good but I propped up the branch with some foam so the split part is now pressed back up against the main stem. I'll keep it like this for a bit but... I really need to LST this branch down, lol. It's the tallest branch on the plant too. So now it's throwing off the whole canopy.
As time goes on I keep thinking more and more about when I should flip to flower and why I haven't already. I'm not entirely sure but I feel like I should stick it out and wait just a little more. However, at this point, the plants are starting to touch each other and join canopies. Sawtooth touches Plant B and Plant C touches Plant D. They would all probably touch each other if I didn't have the space in the middle to separate and work on the plants.
Today I did do a lot of defoliation on plant C as I am really trying to direct growth energy. So I cleaned up undergrowth and a lot of the bottom leaves. Like a semi-lolipopiing. Not really though. Just trimmed up. I also LST and tightened all existing ties to plant C more than any of the others as the goal is to bush that one up.
Part of me is thinking flip the lights to 12/12 at next res change... but I will stick with the plan and do that after this change. Yea I think that's going to be the plan. I need to look in to what to do to start flowering. Like I don't know when I change the nutes, if I should ease into that, or how that goes. So I will be heavily researching that before. This next week is going to be eventful because I bought a bunch of things that we are going to use to try and solve the root problem along with the refilling of the reservoir problems. I will post photos and all that next week as I use them... hopefully it works perfectly and we can get through the rest of the grow with minor issue so then I can focus on a redesign for the next round of plants.
The roots grow through the net bucket and a mesh net I use for containment. Micron size too big, roots grew through. The mesh bag was a 2nd attempt at root containment. 3rd attempt will be very fine micron mesh screen. What could be a good way to deal with this?
They're gonna grow through the micron ones, too. root hairs are outgrowths of epidermal cells between 15 and 17 micrometers in diameter when fully grown. I wouldn't bother trying to contain them, rather solve clogging issues via other means
DabbertGlobberfield 12/11 - 12/17
Week 14 (week 6 after cloning)
12/17 - I know I have taken longer than usual to update this diary, but I really just didn't want to. I think I was embarrassed for some reason to update because this week I noticed deficiencies across all the plants that I caused. It was a mix of things that caused it. Serious family stuff distracted me for several days is the main excuse I will use. But there is also laziness in there and an issue with a lost item I was getting delivered. One last thing that maybe helped the issue along was that I had, just before this happened, cut a lot of the under leaves off... like I cleaned up the branches, like a pseudo lollipop just to open it up for air flow. I pruned a lot to open plants up for airflow and went against my better judgement cutting off bigger leaves than I normally would. It sucks cause maybe it wouldn't have been what it was if I didn't cut off as much.
**** I'll try and boil this down... really what happened was the plants ate their reservoirs faster than ever and I was only replacing with ph'd dechlorinated tap water. This, in addition to multiple other factors, in and out of the tent, caused multiple deficiencies. I am pretty sure I stopped the deficiencies from getting worse and are on the way to being corrected with the res change and then supplementing Cal-Mag.
The ordered item that was lost in transit was supposed to help with the res change and I was counting on it. So I waited an extra day past when I wanted to change the res. I wasn't paying much attention to the plants leading up to this cause of the family stuff. But when the item didn't come, I couldn't delay any longer. So I noticed the deficiencies the night before I changed the res. I noticed on 12/12, the res was changed on 12/13.
I read up on it and it looks like it was a mix of many deficiencies beginning because there were no nutes for 3 - 4 days, or at least tap water nutes and very diluted maybe left over res nutes. I was thinking P and or K deficiency in all the plants for sure. Then I think I read when this happen it also causes issues with other nute intake and caused a Calcium deficiency and even Magnesium in some places as well. It looks like Cal deficiency in the lower leaves on Plant D for sure. There are multiple lower large fan leaves that have the calcium deficiency rust spots. At least I think so. Then the top leaves are thinning, light green, have burning margins and blotchy dying spots, margins are getting highlighter green outlines. There's a lot going on.
So not much I can do about this really but just feed 'em and feed 'em right and consistently. The issue causing distraction has been dealt with, so I will no longer be distracted by that. I also learned a lesson about plants this big and feeding with only water. Now I will change how I do things moving forward when it comes to replenishing the reservoirs because replenishing with just tap water no longer works on these sized plants. I will now mix up a half volume batch to be ready for use by the middle of the week. That way I can replenish with nutes until full res change and hopefully avoid any deficiencies moving forward. I also used Cal-Mag xtra in place of Part A in the half volume batch for this week. So the plants will all be getting Cal-Mag Xtra with the supplemental feedings until res change. At which point I will add in Cal-Mag Xtra to the main res change along with the other nutes, part A included.
This was very unfortunate to have happened this week. But it was all my fault really. So whatever. It's funny, though, because I was going to flip to 12/12 lighting but I changed my mind after I saw the issues. So I decided that I would flip lights on 12/19 with the scheduled res change. So something to look forward to.
Otherwise, the branch that I kind of split a little on Sawtooth has healed fine. I am no longer LSTing the plants down as they are, for the most part, as formed as I can get them with my limited experience. I think I need to put up a trellis net now to start a support system... I could probably form Plant C more since it's behind, but I'm good where the plants are.
The roots are getting out of control and on some of the buckets are hard to even pull out because they get caught on the ring that floods the buckets. The roots are forming a harder ball/root mass and it even holds water! Like I was inspecting the roots and tilted it and so much water came out but when held upright no water would leak. out. The roots built themselves little root pockets. I have half a mind to get a marker or something and poke into the roots so that the cavities in the root masses have a drain. At this point, I am starting to think making it to the end is going to be a miracle. I may have to change to DWC halfway through flowering. I don't know.
So far though I have managed the roots very well for what it is, I'd say. Since the buckets aren't overflowing and there isn't a critical complete drain blockage yet. I mean you should really see these things... I wish I could get a photo easy... I did reduce flood time on the pumps down to 1m30s but it still floods every 1h30m. I was going to increase this back to 2h because the roots are holding water, like little water thieves, but didn't because of the deficiency issues.
At this point in the grow, the plants are now too big for me to get in the tent at all. The plants are too short and everything is too low to the ground. The plants are so bushy they are each touching each other and I cant get in there. This causes some issues, but at res change I will spin Sawtooth and Plant D so that the place where the res opens is facing the door. I can access Plant B and Plant C from the window in the tent and if I spin Sawtooth and Plant D I will be able to access and test all the reservoirs in the tent from outside the tent.
I typed the breakdown below because it doesn't come through in the above nutrient breakdown above.
For the reservoir composition:
Epsom - 10tsp
Silica - 60ml
Part A - 100ml
Part B - 100ml
B-52 - 60ml
Then the supplemental reservoir composition was 1/2 and I exchanged part A for Cal-Mag Xtra:
Epsom - 5tsp
Silica - 30ml
Cal-Mag Xtra - 50ml
Part B - 50ml
B-52 - 40ml
1 like
comments
Share
Used techniques
Defoliation
Technique
15
Week 15. Vegetation
3y ago
1/57
58.42 cm
Height
12 hrs
Light Schedule
25 °C
Day Air Temp
5.7
pH
Weak
Smell
1018 PPM
TDS
52 %
Air Humidity
21 °C
Solution Temp
20 °C
Night Air Temp
55.88 cm
Lamp Distance
Nutrients 6
Epsom salt
0.977 mll
pH Perfect Sensi Grow Part A
2.972 mll
pH Perfect Sensi Grow Part B
2.972 mll
DabbertGlobberfield 12/18 - 12/24
Week 15 (week 7 after cloning)
12/24 - Ok, so a lot went on this week. On 12/19 I officially switched the lighting to 12/12 and adjusted feeding times along with some air pump adjustments all to accommodate the flip. I don't really consider this the first week of flower though. To be fair, I am confused as to when to actually mark the beginning of flower. It seems to be debated. Some mark on the flip day and others wait for a week or for signs of flowering? I don't know. In my case, and for this diary, I will be marking the first week of flower next week as the plants would have had 1 week to transition into flower and would then be in the flowering stage. At least, that is how I am going to play it. This will also come with the bloom nutrient feeding juices to be used for the next feeding and that coincides with me marking the first week of flower.
The plants are recovering very nicely. My plan to implement top offs of replacement nutes is going well. I did up the ppm to 1018 for the feedings and the plants are taking to that nicely. They have completely filled out the space of the tent they occupy. I can not really take pictures of individual plants anymore due to how they fill out the tent. Wall to wall coverage. I don't know how I feel about them touching the wall... well, yes. I know how I feel and I don't like it. lol. Full disclosure I think 59% rh was way too high for these bushy plants, so I have been trying to push the humidity down by upping the exhaust. This makes it colder in the tent though. As I am also fighting with cold basement temps. I am shooting for around 52% for now and will continue driving it down a little bit more into flower. I will most likely need to get the dehumidifier ready.
Temps at night are harder to keep in the upper 60s. I usually was able to easily maintain 69f at night but it has been dipping to 66f sometimes. Colder temps overall means colder during lights on as well. Temps now max out around 77. However, the light is not at 100% power yet. I think it's at 80% power and the plants are getting ~550 ppfd / ~32-35 dli or so and the light is around 22 inches above them with about 18 inches left to raise it. So I plan on letting them grow into and closer to the light which will increase the ppfd and dli they receive as they will be closer to the light while they stretch.
So for the problems... I uh... can no longer take the net pots out of the buckets. This has been the case for at least a week now. The roots have formed a mass that is wider than the bucket because of the ring in the bucket that delivers water from the reservoir. This causes a taper and the roots are harder and wider under the ring. I can't even really cut them because of how it is. The only way to get it out now will be to cut the short connector tube and pull it all out. This is what is going to have to happen. Unfortunately, I will have to abandon this ebb and flow design and do an emergency transfer to DWC to finish out the grow. I have come up with a plan to do this though.
Basically, I am going to buy some more buckets(ones that I haven't spray painted yet -_-), then cut out a lot of the bucket so they act as a riser for the net pot. I will be taking the pumps out and the rack in the reservoir out to put the net pot in the reservoirs. But they have to sit on something. So buckets. And to get water to be able to be all up in there... I will use a saw to cut the buckets like I did for the reservoir lids. Then I will put the net pots in those buckets which will sit in the reservoir. I'll fill the reservoirs up to an inch or so under the net pot and run air pumps 24/7 right under the roots. This way, I guess I'll just top off the reservoirs when they get low and adjust ph as needed. Maybe I'll change the reservoirs sometimes, too? I actually know very little about the upkeep of a DWC system and the finer details that go along with maintaining that type of system... lolol oh well.
I can't really think of any other problems. I mean the root thing is a problem, but I have a solution. The deficiencies are close to gone and are going away. I plan on upping the ppms of feedings anyways so we are good there. Oh, I did notice something weird... some of the new growth on the plants smell like sulphur. This was especially more prominent on the parts of the plants touching the wall. These were high humidity areas as well and goes along with the main reason I am not liking the plants touching the sides. The smell is a little bit strong. I am hoping the flower doesn't smell like sulphur like this otherwise I would just trash all the weed. lol.. but seriously I don't like that. This was the main driving factor in me pushing down the humidity and upping the exhaust.
Oh, I can't believe I didn't mention this yet. The defoliation. This is also because of the humidity and smell. I decided I needed to totally clean up and air out the plants because of how clustered and condensed the growth is. This, in addition to raising tent humidity, causes a lot of transpiration condensation buildup on leaves. Like leaves are always wet if you move the plants around since so many touch each other and overlap. So I looked into pre-flowering pruning, defoliation, and all that. I started with Sawtooth and cleaned her up just a little. I was a lot more timid cutting her up. I did that on 12/21 or 12/22 I forget. The pictures know. Anyways, every thing looked good after doing that so I really dug in on Plant D. It was closest to the door and easy to get out. This one is structured totally different than Sawtooth because Sawtooth had fasciation of the main stem and grew like a weirdo. So I went to work on Plant D pretty hard. I think I did a good job. I hope I didn't take off too much. But then again... I think about taking off more. There are so many little floppy shoots that I will watch to see if they keep up with the canopy. Plant D is kind of an experiment. I did that one yesterday, 12/23. The plan now is to do Plant B and C today. Then maybe go back to Sawtooth sometime before the next feeding on 12/26. That will depend on how Plant B and C shape up. I really want to clean them up like Plant D because I think this will greatly help with the humidity issue and help keep branches off the sides of the tent.
So the plan is this: Finish defoliation of plants B and C in preparation for flower. Change system to DWC. Then hopefully, try and put in a trellis net to help support branches in flower, even canopy, and then make final defoliation at week 3 flower easier. That is the plan.
I typed the breakdown below because it doesn't come through in the above nutrient breakdown above.
For the reservoir composition:
Epsom - 10tsp
Silica - 75ml
Part A - 150ml
Part B - 150ml
B-52 - 75ml
Cal-Mag Xtra - 50ml
Then the supplemental reservoir composition:
Epsom - 5tsp
Silica - 40ml
Part A - 85ml
Part B - 85ml
B-52 - 40ml
Cal-Mag Xtra - 40ml
=======================================================================================
UPDATE:
12/24 - I liked how Plant D turned out after defoliating her, so I did it to Plant C and B. Also, I went back and cleaned up Sawtooth to be like the others. At this point, I have the saw and the buckets. So we are good to go with the transition to DWC. Next weeks update will be somewhat interesting, I believe. At least for me.
5 likes
comments
Share
Used techniques
Defoliation
Technique
16
Week 16. Flowering
3y ago
1/26
58.42 cm
Height
12 hrs
Light Schedule
25 °C
Day Air Temp
5.7
pH
Weak
Smell
1143 PPM
TDS
49 %
Air Humidity
21 °C
Solution Temp
22 °C
Night Air Temp
55.88 cm
Lamp Distance
Nutrients 8
Epsom salt
0.651 mll
Sensi Cal-Mag Xtra
3.75 mll
pH Perfect Sensi Bloom Part A
10 mll
DabbertGlobberfield 12/25 - 12/31
Week 16 (week 8 after cloning) - 1st week of flower
12/26 - Ok, so this is a huge week. That is why I am updating early in the week. After switching the lights last week, I think I am seeing signs of flowering. So this will be the first week of flower.
Besides the flowering, the big updates are that I have changed the system to be DWC and no longer ebb and flow... I really like my original systems design / the idea behind how the original system worked. So it sucks to have to retire it. But it's for the best as now I can rebuild better, stronger and hopefully way less clogging prone. Either way, everything seems to have come together as I had no choice to do this. Otherwise, the buckets would eventually totally clog and not drain and I don't even know how I would handle that. This is because I am no longer able to separate the net pots from the buckets.
Since the bucket design I have has a ring tube going around the inside of the bucket, this causes the opening to be narrower than the bucket. The roots, over the past week, have grown into a mass in the bottom of the bucket and are no longer able to clear the ring tube. Since the tube is connected to the bucket I can't pull any of it out.
So the solution I came up with was to take 4 5-gallon buckets and cut them up. I turned them into risers to hold the net pots and put that in the reservoir. The roots are exposed in the buckets and I fill the reservoirs with water. Pop in the air stones, slap em on 24/7 and boom... DWC I think. lol. I actually don't know anything about DWC and probably should have looked into it before doing this. But after I was unable to remove the net pots from the bucket to relieve blockage, I had to make a decision before I had a catastrophic failure.
This week for the reservoir change today, I changed the nutes to the Bloom side. I will also be lowering the lights just a little to raise it up later with growth. Also, I think the plants are sitting lower now. So I'll drop the lights a bit. The last thing is that I have added a trellis net. I don't like it because the squares don't go wall to wall. But I put it up anyways. I'll go to the hydro store soon to get a bigger trellis net and put that up.
So that's it for beginning of the week update.
========================================================================================
UPDATE:
12/31 - These weeks go by so fast and so much happens. So the plants are taking to the DWC switch well. I must admit, I have barely looked into anything that has to do with DWC. lol. I did, however, somehow start looking into VPD. Only cause I was cranking my exhaust fan one day and the VPD went down. I, not having any idea what that was, thought VPD/kPa were tied to how much air is moving or something. Funny that when I looked into it, it has an interesting impact on DWC stuff specifically. So.... now I am paying closer attention to VPD cause I don't want the plants to transpire too much, take in too much water over nutrients, or take in too many nutrients and not enough water... Yep, so there's that; vpd.
The more I do this, the more complicated it can get and deeper the rabbit hole goes.
Anyways, I thought the plants would drink more of the water since they are submerged in it 24/7. But I guess not. I bring it up because immediately after changing the reservoirs to DWC and refilling them, I was a little short on one of the reservoirs. So the 20 gallon res now doesn't fill the reservoirs to the level I would want it. So I have to start adding more water to the new batches. But this made me think about how the plants will need more water. With this thought in mind, I made up a new ~20+ gallon reservoir to feed the plants during the week as they drank the water. Well they are not drinking the same! lol... maybe this in addition to the defoliation/pruning they got they drank less. I don't know. But at this rate, I will have a bunch of extra res mix that I will have to dump soon. Maybe I will hold off on res change? I actually don't even know how I'm going to do a res change now. I figured I would try and get away with topping off as long as I can... lol this is all such a mess.
Also, 2 trellis nets later... I have now obtained a trellis net style that I want to use. I have installed it in the garden... I felt weird about it cause I can see the calyxes and pistils all over the tops and I don't want to mess with them. But I had to tuck them under the trellis... I did super crop one top for science. I did leave a few others not tucked for science and yea we will see. I feel like I was way too late in using the trellis net and I should have just installed for support of branches at this point instead of canopy control. But since we are in the first week of flower still, I figured I might be able to get away with it. Although, what do I know?! lololol. Either way, it's done and the trellis is in and is not getting removed at this point until flower. This is something I'm kind of confused about; how to get the plant out of the trellis net.
I lowered the light as well. Since I changed to DWC the plants sit a little lower and with the trellis net there is a defined canopy barrier. So I lowered the lights down to about 12 inches above. They are LED so I don't think this will be an issue really... I will look for signs of issues on the leaves / tops closest to the lights. But I think it should be fine and I will raise the light as the plants get taller. I do have a fear that that plants will not stretch much more. Either way, they have very very quickly recovered from the defoliation and are getting very think with growth again. It is a daily task at this point to go in and bend down fan leaves or remove them altogether to open up light to lower bud sights and / or to declutter a little bit. I monitor the under side as well for shoots that will not make it and will, in my mind, take away energy from the top flowering branches. This is a weird process though, because I don't know what can and can't make it. So there are some lower side branches I left to see what they do. There's so much growth, it's hard to track it all. I am doing my best to not be overly attentive to the plants. I just casually pluck a leaf here or and there along with some shoots. I am waiting for around the 3 week mark for the final and last defoliation. I need to read up on this more, but that seems to be the last time to do stuff. So I am trying to let the plants do their thing and not be too aggressive as I expect to have that opportunity in the coming weeks.
I have upped the nutes being given substantially. Actually, this is causing me to think I will run out of Bloom part A/B before end of flower. So I ordered more along with some other things I either didn't have or only had 250ml tester bottles of. So I should be getting some boosters to add in soon to assist with bloom.
Last thing I can think of is that I bought some oscillating fans to replace the static fans in the tent. Now there are to oscillating fans in there. One on the top sweeping over the canopy and one underneath sweeping under the canopy.
Ok, bye. Happy new year. See you next week.
4 likes
comments
Share
Used techniques
LST
Technique
ScrOG
Technique
17
Week 17. Flowering
3y ago
1/80
76.2 cm
Height
12 hrs
Light Schedule
25 °C
Day Air Temp
5.7
pH
Weak
Smell
1406 PPM
TDS
53 %
Air Humidity
19 °C
Solution Temp
19 °C
Night Air Temp
45.72 cm
Lamp Distance
Nutrients 8
Epsom salt
0.651 mll
Sensi Cal-Mag Xtra
1.004 mll
pH Perfect Sensi Bloom Part A
3.566 mll
DabbertGlobberfield 1/1 - 1/7
Week 17 (week 9 after cloning) - 2nd week of flower
1/5 - The deeper I go, the more I think catastrophic failure is waiting for me. So far so good though, eh? I uh... think the plants are too big or... uh.. wide? It's just so much to manage and I cant reach a lot of the inner growth easily. Also, I can't spin the plants anymore cause of the trellis net and the cuts in the buckets would sheer off roots. So no spinning.
I was late with changing the reservoirs this week. Well it was the first time to do something after switching to DWC. There were a few reasons for this. Mainly, after mixing up the nutes for the res change last week along with the switch to DWC I had mentioned that I made another batch of nutes immediately. Well... the nutes lasted until 1/3. This is where a question for me comes in... With DWC, do you replace water in the reservoirs with plain ph'd water or do you top off with nutrient treated water? Well, also I waited because I ordered some more nutes and they were going to arrive on 1/4. So I figured since I still had nutes to use for topping off and I had to wait til 1/4 for my order, I would just change the reservoirs on Wed instead of Mon.
I don't really know if people are actually completely changing out reservoir water and cleaning the reservoirs every week or not. I mean it's a crazy thing to do. How do you even clean the things with the plants stuck in there? It's crazy... I feel like I do things the hard way. Anyways... what I do or have to do to change the reservoirs is as follows: I have this battery powered fluid transfer pump thing for like siphoning out fluids and I use that to get as much of the water out of the reservoirs as possible, then I take a hose and spray down the inside of the reservoir, suck up that water, then fill up with new nutes. This seems to do the job. I sprayed and removed the water a few times, it got clearer and clearer. So that was a good sign. Also, I did let the roots sit with no water in the reservoirs for a little bit to let any excess drain out to help in a total water change over. I feel like I'm just making this stuff up as I go. I should really look into DWC stuff....
The process is kind of a pain because of the time it takes to dump the water. Like the pump I use pumps out to gallon jugs. Then I have to slowly pour out or it will splash. I just started using 5 gallon buckets... but I still have to use 2 trips per reservoir because otherwise the bucket is too heavy with water. Maybe I will just rig up some kind of tubing to the toilet or something cause it really sucks to have to sit and pump out water into a container only to have to go and slowly pour out that container. Also, there is a limited number of containers so I eventually have to dump the full ones to continue draining. Otherwise, I don't want like full gallon jugs waiting for me. Also, just thinking about pouring out 20 gallon jugs in one sitting is kind of annoying lololol. I miss the old days of just turning the gallon jug directly upside down and not worrying about it.
Anyways, the plants are way way too crowded. I was trying to wait until later to do another defoliation and sucker branch removal but I feel like I have to do it now. I am constantly tucking and bending leaves and I am running out of space. It's just leaves on leaves on leaves in some spots. I have been trying really hard to manage humidity. Because as the growth fills in like that, the more humid it is in the tent. So I have been upping the exhaust power and I placed a dehumidifier in the tent to aid with taking the humidity down. So then, today, after lights on, I will do another defoliation. It will be a heavy defoliation.
Something I want to mention is that I have not really been paying any attention at all to the ppm/ec readings of the reservoirs. I have only been ph testing for daily adjustments in most reservoirs. I usually found them around 6.2 after lights on and Plant D was always at 6.4. That one also took a lot more ph down to get the ph down than the other reservoirs. But as time went on the same thing started happening in Plant B's reservoir. But Sawtooth and Plant C had reservoirs that were a lit more stable, ph wise and took way less ph down to adjust and stayed within ranges for longer. I feel like the change will do well for this issue. The point of bringing this up though, is to mention how I thought to test the ppm of the water before I dumped it and Plant D's was like 1866ppm hah. I think Sawtooth's was 16-something. I didn't really check. Also, this was before adding any water back in so it was probably more concentrated, but damn that was higher than expected. I will probably be topping off with ph'd water from now on...
I did the nutes a little different this time and I also went deeper in on the Advanced Nutrients line up... lol... I figured since I had to get more part a/b I'd get some Bud Candy and Big Bud. I also grabbed enough Nirvana to finish out the grow. I will add that next week. *********But I didn't add as much Epsom this time************. Since that always slammed up my ppm I added what I wanted of the other nutrients until I was at 1266ppm, then I added 140ppm of Epsom salt. I don't know how much that even is cause I mixed up 10tsp in a gallon jug with a 1/2 gallon of water and poured about half in. That took it to 1406 ppm. I really wanted to make sure the plants got a full feeding of the base. I had been skimping on that and I had noticed a few odd lower leaves near the end of the feeding cycle so I wanted to really boost them.
Actually, I do put the nutes into the mixing water in specific order I guess... For some reason, I always put silica in first after ph ing the water to 5.5. then I usually add any other micro nutes. Usually epsom salt next or if not right before the base. Here this will be easier, this is the order I mixed nutes into tank:
1) Silicablast
2) Big Bud
3) Bud Candy
4) Sensizym
5) Cal-Mag Xtra
6) Part A
7) Part B
8) *****Epsom salt -- added this last for reasons explained above
I usually measure, thoroughly mix in, and ppm test for each entry in the mix.
I want to give them a day before defoliation for some reason. So they got to eat and then the trim comes later today.
One last note before I go. Sawtooth, along with the others have very distinct and noticeable double serration patters on their leaves. Well I found one leave on Sawtooth that had a triple serration, lol. It was a double serration's serration. I photo'd it.
=-=-=-=-=-=-=-=-=-=-=-=-=-=-=-=-=-=-=-=-=-=-=-=-=-=-=-=-=-=-=-=-=-=-=-=-=-=-=-=-=-=-=-=-=-=-=-=-=-=-=-=-=-=-=-=-=-=-=-=-=-=-=-=-=-=-=-
UPDATE:
1/7 - So.... defoliation was a massive amount of work. So much so that I had to split it up into 2 days. This is my fault for not being hyper attentive as the plants were growing to control some of this crazy growth. I am now starting to get a much better idea of when to do things and why. Like I definitely should have defoliated prior to the 12/12 switch. Then went into flower with the structure of the plant I wanted in mind. I kind of just flipped and was like, ok here we go.
I don't like how high the trellis net is on the plants / canopy, but I couldn't push it down more because of how late I started using it. But I have pushed it down a little bit more. Kind of working it lower and moving the branches/stalks around as I do that. I'm only talking like 1-2 inches tops. I can't really lower the net any more. So it will stay at this level.
I feel like I actually am utilizing the trellis net quite well. As while I was defoliating I was able to tuck and weave branches into different sectors using the trellis netting. So I was able to spread a few branches out that needed space and I thought that was awesome.
Also, I raised the lights just a little. I think we are back to 18 or so inches above canopy. Some of the taller stalks were about 8 inches away from the light so I raised it up.
The last thing I want to mention are the problems I am having with the DWC reservoirs. The first think is more annoying than anything but also a cause for concern to me: Some reservoirs take A LOT more PH down to adjust within range. I don't understand this at all. The PH has been spiking in all reservoirs. Well.... spiking is kind of a tricky way of putting it. All I know is that everyday, since the change to DWC, when I check PH at lights on it is VERY high. I consider 6.2 high. So catching all reservoirs around 6.4-6.6 PH was alarming. This is consistent. Then it takes 10x the amount of PH down to adjust. Like I used to have to use 5ml of ph down to adjust the ebb and flow reservoirs. But now, I am putting 30+ml in to adjust down from 6.4 to 5.5. That is crazy. At first it was just Plant B and D, where plant D was by far the one that needed the most PH down with the smallest returns. But now they are all starting to exhibit this. However, Plant C is the least affected by this.
The fact that they are all different makes me think it's not something I'm doing. Part of me thinks it's because of the nutrient changes. Like I am using a lot of different nutrients for flower than I was for veg and I think the compounds in the flower stuff is causing this PH issue. I mean, I don't really care all that much as long as the plant looks good and I'm keeping it in check, but damn am I running through PH down fast. I don't know how to fix this. Part of me wants to totally flush out the reservoirs and roots. But I don't know how to do that easily. I mean, can I just use the hose and tap water to just flood and rinse the roots off? The tap will be 7.4 ph and full of chlorine... But I want to like wash the roots. Part of me wants to refill the reservoirs tomorrow with just ph'd dechlorinated tap water and let the plants sit in that overnight until Monday for the official reservoir change. I feel like this is going to be a race to the end... will I harvest before the plants implode on themselves?
Oh the other issue with the reservoirs is that in 2 of them, Sawtooth and Plant D, there is a lot of foam forming. What is up with that? The foam is weird to see and doesn't really go away. It does dissipate more readily after adjusting the PH though....
I'm sure I could research these issues listed above and get answers....
But for now.... I have resorted to checking the PH 2x a day. We will see how this has an affect on the lights on PH. I hope I can harvest before I have to buy even more ph down...
Stay tuned over the next 6+ weeks to find out if I fail or succeed. Find me on that same weed channel on that same weed day. Well I'm kind of random with the days... Oh I just remembered I turned my dab rig on two paragraphs up... I'm gonna go handle that. See you soon.
4 likes
1 comment
Share
Used techniques
ScrOG
Technique
Defoliation
Technique
18
Week 18. Flowering
3y ago
1/90
83.82 cm
Height
12 hrs
Light Schedule
24 °C
Day Air Temp
6.0
pH
Weak
Smell
900 PPM
TDS
49 %
Air Humidity
18 °C
Solution Temp
17 °C
Night Air Temp
45.72 cm
Lamp Distance
Nutrients 9
Sensi Cal-Mag Xtra
0.861 mll
pH Perfect Sensi Bloom Part A
2.642 mll
pH Perfect Sensi Bloom Part B
2.642 mll
DabbertGlobberfield 1/8 - 1/14
Week 3 flower; day 10,000,000
1/11 - So good and bad things.
Good thing - flowers look great.
Bad thing - many flowers and leaf regrowth causes hard to control high humidity.
Good thing - After monitoring ph more closely and checking 2x during lights on I noticed an improvement with ph swings and less ph down has been needed.
Bad thing - I had to change the reservoir water so hopefully this issues doesn't come back with replenished nutes cause maybe the problem went away cause plants ate all bud candy juice. ::shruggy face::
Good thing - In addition to the ph correction, I have been topping off the reservoirs with ph'd water or distilled water and that, in addition to keeping ph in check, has reduced the foam issues in some reservoirs and also helped keep the ppms down.
Bad thing - The increased amount of water in each reservoir means that my 27gallon tote for mixing is no longer large enough and I have to go and get a larger one as each reservoir is holding 7 gallons. I will need at least 35 gallon tote I think.
Good thing - did I mention the flowers look great?
Bad thing - doesn't really smell like anything yet unless I rub a frosty leaf, but even then very tame smelling. Kinda like berry gunpowder. But the gunpowder is on the front of the smell and berry is a secondary note. Looking forward to smelling this evolve.
Good thing - we are marching steadily toward the end.
Bad thing - I am losing my mind
Lol, so here we are. Week 3 of flower. Early week 3, but we are getting there. I definitely burnt the tips with too many nutes. Some leaves have the dead tippy tip and it curls up. But its only like a mm of a mm little piece of the tips of some leaves.... So with this in mind I have begun reducing the nutes and will also not be replenishing the tanks with nutes anymore unless the ppms are down. Yes, I am now checking ppms along with the ph. Probably should have done that initially but hey, what do I know? Oh, well actually nothing. I'd like to say this is easy, but it's not, and there's only more work to come. But I am really looking forward to some of the future work.....
Anyways, I am not sure if I should keep reducing the ppms either. Because, the way I see it, was the plants were getting fed more and more in the ebb and flow and that had a high ppm so I carried it over to the DWC change. Since the plants didn't immediately revolt or show terrible signs of rejecting the DWC and high ppm, I kept up with it. Granted I was also adding in new fresh nutrients and over time caused a rise in ppm to 1800-1900 which is like 3.6-3.8 ec. They were probably at this ppm level for a week before I did anything. Only week 2 did I start backing way off that and added in water to bring ppms down.
My point is, the plants seemed not tooooooo bothered by the high ppms(well burning tips and pistils turning red here and there) so I don't want to go from 1400 last feeding ppm to like 800 ppm this feed. I tried to reduce what I could and ended at 1151ppm final. This is after adding in 148 ppm as my tap's baseline ppm. So realistically I added 1003 ppm of nutes. Also, I had to count the gallons coming out of the mixing reservoir for the first time and I ended at 23 gallons. So I have been mixing in 22-23 gallons of water, not 20. I will make corrections to the nutrient calculations moving forward beginning with this update. Anyways, I had to count the exact gallons because the 27 gallon tote is no longer big enough to fill each of the 4 reservoirs with 7 gallons each. I added a lot of water to bring the ppms down and I figure I will keep the level it was at. So each reservoir can only get ~5 gallons. So what I am going to do is mix up another 12 gallons to distribute between the 4 reservoirs so I can hit ~7gallons in each res while I go out and get a bigger mixing reservoir. I will probably mix the 12 gallons weaker than the first mix to keep ppms in check.
OH, I just remembered, I deleted epsom salt from this feeding as it raised the ppm way too much and I don't have time for that.
I can't think of much else. The last thing I do want to mention / talk about is the fact that the plants have bounced back very quickly to the defoliation and are definitely beginning to crowd each other. This is causing humidity to rise and become difficult to manage. Like I put it on highest exhaust and it only took it to 46% rh during lights out with a dehumidifier as well. Although... I'm not sure how effective the dehumidifier works in a situation where the air is being replaced so rapidly. Ambient humidity outside the tent is mid 30s. The point of all this being... I am going to have to defoliate 1 last time, probably near the end of this flower week or when it becomes an unmanageable problem as I refuse to allow mold, mildew, bud rot, or any of that cabbage. That's all cabbage and I don't want none. Part of me really wants to strip the plants down with the last defoliation. We will see.... I do promise a defoliation in the future.
=-=-=-=-=-=-=-=-=-=-=-=-=-=-=-=-=-=-=-=-=-=-=-=-=-=-=-=-=-=-=-=-=-=-=-=-=-=-=-=-=-=-=-=-=-=-=-=-=-=-=-=-=-=-=-=-=-=-=-=-=-=-=-=-
UPDATE:
1/11 still - I know I updated before, but I wanted to add some photos and since I was doing that I should probably also mention what I did today at lights on and how that went. So at lights on, I checked each reservoir they were all 6.7-6.8ph after the res change yesterday, less than 24 hours ago. Also, each reservoir had the foam and a good amount of it. But it's all white foam. I guarantee it's from nutrients mixing with the air bubble at high ph cause it goes away when ph goes down. Then I checked ppms and they were 1200ish. So what I decided to do..... was just add water. Hah! Anyways, I thought each reservoir would take around 3 gallons, but they took only 2. Either way, the 2 gallons took all the reservoirs' ppms down to 850-900ppm. This is perfect. I'll keep it here I think.
I was doing the research I was trying to avoid and it seems like people keep a low ppm in the dwc reservoirs. Like 600-800ppm for flowering. So..... Ill keep it 800-900 for now and try to maintain that ppm by adding water or nutes when needed until next reservoir change. I am really focusing on this now because I don't like seeing the burnt tips and premature red pistils. Let's stick with the change and see what happens.
=-=-=-=-=-=-=-=-=-=-=-=-=-=-=-=-=-=-=-=-=-=-=-=-=-=-=-=-=-=-=-=-=-=-=-=-=-=-=-=-=-=-=-=-=-=-=-=-=-=-=-=-=-=-=-=-=-=-=-=-=-=-=-=-
UPDATE:
1/13 - Not much to report on, which feels nice. Things are starting to level out with regard to the reservoirs and issues I was having. The foaming in Sawtooth's reservoir was really... um.... voluminous. It's definitely something in the nutes. All the reservoirs had it, but Sawtooth's is always the craziest. Although, when I checked at lights on today there was way less foam in there and in all the other ones. The pHs were all not what I would call high and I didn't have to adjust a few.
Even though there is not much new activity to report on, I am documenting the tests so I can track it.
I think the plants are growing just a little tiny bit. I see them inching their way up little by little. Although, there can't be much left in the vertical tank anymore. With this in mind, I have begun starting to swing the temps, well the best I can, so there is a larger gap between lights on temp and lights off temp. Lights off I can hit a pretty low temp right now because of Winter but the average is around 62f right now. For lights on I am aiming for 75fish, no higher than 76f. I will bring this down as we move through flower. But for now we are going with that. The average is probably 74f or so and that is good enough for now. I really want to try and induce some colors on this. But I don't want to do anything detrimental. So I will swing the temps within reason and not drastically.
RH is an up and down issue, lol. But really it's about time I think, for the last defoliation. I don't really know how I would do this one though. Because all the leaves I would want to cut are, well, a lot of them are sugar leave looking leaves. I know I can grab the fan leaves off, and the seed bank even suggests removing larger fan leaves for bigger harvests, but the problem is all the little leaves sticking off the bud site stalks. Like there are so many bud sites it's super crowded. Don't get me wrong, I can, so far, keep the humidity easily under 60%. But I don't know how much farther under 50% I can keep and hold it. I think I will be fine with a lot of air flow. I have my 6inch exhaust fan at 60% power so the air is flowing. There's also the 2 circulating fans(one above and one below canopy) and I did put in a 3rd fan under the canopy blowing up from center. I am trying to prevent dead air pockets...
Part of me thinks I should cut out some of the bud sites that are right at the canopy. But it's hard to think of reasons why I would do that... other than to improve airflow and not be so crowded. I think I will just be as careful as I can and I will have to make several passes looking for larger leaves and leaves that are crashing into each other. The canopy is pretty thick in some spots again. This will be my main problem to close out the week: How to defoliate at this stage? I know I can remove the fan leaves, they will be the easiest. The problem is with all the little leaves that will probably be those sugar leaves(?). Like I don't know how close of a hair cut I can give the plants. I might just have to strip some down and see what happens... My main concern with this is reducing contact between the sites as much as possible to improve air flow and to assist in lowering humidity for later in flower. Because if I shut down the exhaust rh will spike to above 70% fast. I have never done this before, but I can tell a lot of flower is coming and I don't want any issues with that after all this.
Sawtooth:
1/12 @ 1800 - 948ppm after adjustments
1/13 @ 2000 - 5.8ph @ 940ppm - This was before replenishing with plain ph'd water - 918ppm after adding water back and I adjusted to 5.6ph to let it rise up and see how long it takes to get back to 6ish
1/14 @ 0115 - 967ppm 5.7pH
Plant B:
1/12 @ 1800 - 958ppm - 6.6 ph - downed to 5.5ph
1/13 @ 2000 - 6.4ph / 1040ppm - added water and ph down - 808ppm / 5.5ph
1/14 @ 0115 - 6.0ph / 967ppm - added water and adjusted ph - 859ppm / 5.7ph
Plant C:
1/12 @1800 - 950ppm added water - 858ppm.
1/12 @ 0200 - 945ppm - ph 5.7
1/13 @ 1700 - 5.5ph - 959ppm - added a little water but ran out
1/13 @ 1938 - 890ppm - added more water down to 828ppm
1/14 @ 0115 - 845ppm after adding water, ph was 5.4 I added a tiny little bit of ph up on this one to get to 5.6ph
Plant D:
1/12 @ 1800 - 909ppm, added water to 858ppm
1/12 @ 0200 - 952ppm - 6.2 ph, I must have just left it cause there are no notes about changing the ph
1/13 @ 1700 - 6.4ph downed to 5.6 - 799ppm - added ph'd water and some light sprinkles of nutes to 919ppm
1/13 @ 1738 - 888ppm / 5.5ph
1/14 @ 0115 - 906ppm - 6.1ph adjusted to 5.6ph
5 likes
2 comments
Share
Used techniques
ScrOG
Technique
19
Week 19. Flowering
3y ago
1/111
88.9 cm
Height
12 hrs
Light Schedule
23 °C
Day Air Temp
5.9
pH
Weak
Smell
850 PPM
TDS
49 %
Air Humidity
18 °C
Solution Temp
16 °C
Night Air Temp
45.72 cm
Lamp Distance
Nutrients 9
Sensi Cal-Mag Xtra
1.038 mll
pH Perfect Sensi Bloom Part A
1.981 mll
pH Perfect Sensi Bloom Part B
1.981 mll
DabbertGlobberfield 1/15 - 1/21
Week 4 flower; Day (19*7)-1
1/17 - I am having a hard time remembering what I did the past few days with the plants because I am heavily focused on a weird looking flower I found. You'll see it, cause I took a lot of photos of it. So I had been seeing flowers with more reddening pistils than what I would call normal based on what all the other flowers in the tent look like. But I wasn't too concerned because of how high ppm I was using. I figured maybe I stressed them and this is the result.
But I did research it and it seems like the conclusion to most of these questions was some kind of pollination or hermie event. My concern rose when I found a flower on day 28 that looked crazy with retracted pistils, almost all hairs red, and is a little lighter green in the leaves on the branch than everything else in the tent. So... what the heck is causing that? I am actively trying to find out. I may have to ask a grow question here.
Otherwise, everything is looking awesome and even better than I could have thought plants would look when I imagined growing. On top of that, they keep improving and I feel like it's directly related to me not burning them with high ppm. A lot of problems are resolving now that I am keeping the ppms down and driving them down further. I think I will aim for an end goal of between 700-900. Something like that. It seems to be working very well to reduce foaming in the reservoirs and there's no foam at all anymore in Sawtooth's res; the worst offender.
I even have started to have to use pH up for the first time ever. I was waiting for that to happen in flower because I read about it. But with everything needing so much pH down I didn't know what was going on. So I feel like I'm on the right track. It's almost over though and then I can debrief and regroup to move into a new evolved phase for the sequel. Because I have learned so much to put into use for next time...
Oh... I haven't changed the reservoirs yet... I kinda stalled out on getting a larger tote. But I grabbed one last night and its dechlorinating water now. I will change the reservoirs later tonight and update the nutrient amounts the next time I add information here. But I plan on trying to hit my numbers so we will see how that goes. It's a much larger mixing reservoir now currently holding 30.5 gallons so I can use at least 28 of them between the girls. So I will have to look back on the previous numbers to do nutrient math which, by the way, want-to-be-hydro-growers, is SO MUCH FUN 😙😊
=-=-=-=-=-=-=-=-=-=-=-=-=-=-=-=-=-=-=-===-=-=-=-=-=-=-=-=-=-=-=-=-=-=-=-=-=-=-=-=-=-=-=
UPDATE:
1/18 - Ok, so I took an extra day to change the reservoirs. It's just that it takes so long to mix nutes and do a lot this stuff. I actually ran out of time on yesterday and had to wait until lights on today to do it. It was fine though. Everyone was doing good except one. Sawtooth seems to like to spike the pH way down. I caught it at 4.9, Like wtf is that? I just made it 6.0 last night. Weird.
Hopefully with this new reservoir change it will be all good. Otherwise, the ppms in all the reservoirs are just where I want them. Or at least where I think I want them? I am not entirely sure. Lol. But I mixed up this new feeding to be 795ppm. So It should be good. I will start putting in less pH down when I change the reservoirs now because all the tanks are lowering the pH instead of raising it. This is awesome for me cause I have been using soo much pH down and no pH up. So it's nice to get use out of something I bought to use, lol.
As far as that goes, not much going on. I learned to chill out about the flowers. I should probably be find and the whole tent isn't going to get knocked up and seed. ... Probably. Come on 4 more weeks. Almost there. Oh I noticed a smell in the tent for the first time. It's light but it's something it's not super weedy yet, but it's competing with the smell of the reservoirs.
I have to say... this weed looks amazing. It's crazy I'm growing what looks like something this quality and it's my first time. But that's what proper research and investment does I guess.
=-=-=-=-=-=-=-=-=-=-=-=-=-=-=-=-=-=-=-===-=-=-=-=-=-=-=-=-=-=-=-=-=-=-=-=-=-=-=-=-=-=-=
UPDATE:
1/20 - It has to be something in the nutes that is causing the swings and foam. The water was great, ph going down instead of up, no foam, and not much adjustment needed. After res change it's like all hell breaks loose. Spikes in ph to 6.4-6.6 if I don't catch it probably higher. All reservoirs spiking like that and need pH down. Minor amounts of foam developing in all reservoirs. PPMs are trending the way they should and are 800-900. This will only get lower as we go. I am not sure how to tell if I should dilute or concentrate the reservoirs. I want to see how low it will go., Do people try and put in just barely enough and watch ppms dip far down by res change? I'll keep winging it cause that's kind of working.
Like this bud is sooooooooooooooooooooooooooooooooooooooooooooooooooooooooooooo frosty and it seems like it's very early for that to have developed. Grandmommy Purple, visually, seems to be living up to the marketed ~30% thc. Cause it still needs to really start dumping energy into thc production over the next few weeks, right? I am going to try my very best to push this plant into giving me everything it has. Then, I will do my best to get an official lab test. How could I not when it looks like this. Time is just tickin down. Almost there.
=-=-=-=-=-=-=-=-=-=-=-=-=-=-=-=-=-=-=-===-=-=-=-=-=-=-=-=-=-=-=-=-=-=-=-=-=-=-=-=-=-=-=
UPDATE:
1/21 - I didn't think I was going to update again this week. Usually nothing is that important to mention. I feel like I'm seeing really slight signs of maybe a deficiency starting? I don't know. I've been seeing random light spots on leaves, or like one rust spot here or there. The tips seem to still be burning and it looks like it might be happening on new growth? So I don't know, it can't be a deficiency with too hot feedings. Unless there's lockout...
I found a branch that has a few discoloring leaves. I am not sure what to do about it. Hopefully lowering the ppms, further helps.
Anyways, Plant D and Plant B have something going on in the reservoirs. The water is cloudy and these 2 reservoirs take the most amount of pH adjustment fluid to change the numbers. Last reservoir change Plant B's reservoir smelled strongly of eggs when cleaning out. The smell went away after the change, but as the week progressed it returned. Also, it is kind of starting in Plant D's reservoir.
I didn't really like the look of Plant D's water and then Plant B looks like there is a dark patch forming in the roots where the water line was. I cannot abide.
So I took some actions. I had 4 extra gallons of fresh mixed nutes off to the side. So I decided to siphon out 4 gallons of reservoir water from Plant D's tank. I replaced it with 2.5 fresh nutrient mixed gallons and 1.5 gallon of just tap water. Plant D's ppm ended up in the high 600s. AHHHH I DONT KNOW WHAT PPM TO KEEP IT AT! lolol
Then I went to Plant B and I took out 4 gallons of reservoir water from that tank and replaced with the remaining 1 gallon of fresh mixed nutes. But I only added 2 gallons back to lower the water level. So I removed a full gallon of liquid volume from Plant B. Additionally, I mixed in 1/4 teaspoon Great White Mycorrhizae with one of that gallons I poured in to plant B. Yesterday, I had also mixed up 1/4 of Great White Mycorrhizae and distributed that between the 4 plant's reservoirs. Just today, plant B got more.
Looking forward to some easier weeks ahead...
6 likes
3 comments
Share
Used techniques
ScrOG
Technique
20
Week 20. Flowering
3y ago
1/146
91.44 cm
Height
12 hrs
Light Schedule
23 °C
Day Air Temp
6.0
pH
Normal
Smell
727 PPM
TDS
50 %
Air Humidity
18 °C
Solution Temp
16 °C
Night Air Temp
63.5 cm
Lamp Distance
Nutrients 10
Great White Mycorrhizae
0.026 mll
Sensi Cal-Mag Xtra
0.431 mll
pH Perfect Sensi Bloom Part A
1.73 mll
DabbertGlobberfield If you know what's up with the discolored leaves let me know or drop a hint; light burn, light bleaching, potassium deficiency, pH issue, other. Also, let me know what you think about the burnt tips.
1/22 - 1/28
Week 5 flower
1/24 - It sucks to start a week like this, but here we go. There's got to be something going in here causing the discoloration in the leaves on Plant D. Also, I started finding signs of different issues and similar issues across a few other plants. The burning tips is continuing. Water in Plant B and Plant D is still cloudy. This lines up with the water smelling bad. It smells like eggs and rotten asparagus. This also lines up with how Plant B's roots were looking funky.
I tried reaching out and received some feedback on other sites. But I don't know... It was suggested potassium deficiency or light burn/bleaching. But the discoloration isn't on a tall cola and those were like 8-10 inches from the light instead of 18 and they are fine. All the plants have burnt tips, they all don't have discoloration. Some are starting to have classic margin burning found in potassium deficiency. But also found in light burn.
So because I'm, well I guess impatient, I slammed all the solutions at them. I raised the light. As it was suggested to reduce the light. I personally didn't think the light was causing an issue. But sure. I had and still have space, so I raised it a little and didn't dim the intensity.
Ok, boom. Light better. Easy.
That was the only easy thing.
As for the discoloration and possible potassium deficiency, which look like it could be the same and there are copper spots, I didn't really know what to do.
I think it's something to do with Plant B and Plant D's roots. Like Sawtooth and Plant C found harmony in and around 750ppm. pH stayed the same and within level for days. ppms barely changed with water decreases. Water in Sawtooth and Plant C's reservoirs was crystal clear and no foam formed.
However, Plant B and D's reservoirs are cloudy and smell bad. The water smells terrible. The pH climbs higher than the others and they both need more pH down to adjust.
So I started draining the reservoirs and replacing the water. Sometimes I use extra mixed nutes, so they get a fresh clean feed what I just did before this last feeding was flushed them with pH'd water, let them sit for a while, drain, and put in more pH'd water. Then drained again to fill with the feeding mix with the others. I have noticed the water has been getting less cloudy... I also added some Great White Mycorrhizae directly to the root clusters.
I will keep flushing out the reservoirs in these problem tanks when they get too cloudy or if anything like that happens. Plant D had a lot of bubbles at the roots and the water had a weird look to it. That's what started me changing it all out.
I also reduced the water level in both of what I'm calling the problem reservoirs, Plant B and D. Plant B, as shown in photos from last week I think, had a weird dark spot developing at the water level. I also noticed, that the smell really got bad when I reduced the water level past a certain point. This happened in both of the problem reservoirs. So, I decided to reduce the level and that has, visually to me, helped notably with Plant B's weird spot. So much so that in a few days I may raise the water level.
Also, while I was changing the water and being disgusted by that(I don't know how it got so gross so fast), I went an extra step in cleaning a little and pulled the air stones. In the two problem reservoirs they were gross... So I cleaned them and placed them in different locations in the tanks. Then I cleaned the others and placed them in different spots, too.
I am thinking, something funky is going on in the reservoirs that is messing with the nutrient uptake. This might also be working in concert with my HIGH AF ppm/ec feedings lol. SO I actually think it might be nutrient lockout and not nutrient deficiency cause of something with the roots. This is why I'm doing what I am with it.
As for the nutes. I have been watching reservoir ppmpH very closely and documenting it daily. I have noticed several trends. I have also found a good number for ppms/ec. At least one that works for 2 plants. I will try and apply that across the reservoirs. I have noticed that the plants, after they after they ate up a lot of the nutrients were very happy and then pH was even going down. Remember that? But then, as soon as I change the reservoir, it's like a bomb goes off. PH needs adjusting down in all of the reservoirs, most reservoirs have some amount of foam, ppms climb fast.
I guess I am feeding too high. Also, if there isn't a root issue and or there isn't nutrient lockout and it is a deficiency... that means that I'm not mixing in a good ratio. This might also be because last weeks feeding I, after adding everything, had more head room for ppms/ec and I added more supplemental things than base nutes. So maybe I added something in a bad combination that locked out potassium. I don't really know.
What I do know, is that I reduced the amount of nutrients across the board except with the base nutrients. So I put in a larger ratio of base nutes than anything. This brought my ppms to 727 for this feeding. I usually pH down to 5.5 but Sawtooth and Plant C were hovering at 6.0 pH with their feeding and I figured I didn't want to throw that too off as I was feeding less ppm than they had in the reservoirs at the time. But after a day, they all needed pH adjusting down from 6.4-6.6. Although, all the reservoirs, even the problem ones, after the feeding and my flushing on D, adjusted with minimal pH down for the first time in a long time.
Hopefully, with the raising of the light, the continued reduction in nutes to find the right ppm/ec, the increase in base nutes overall, and increased monitoring of ppms/pH to keep out of danger zones we should be back on track.
Oh, when I raised the light I tried to snag some leaves here and there. Actually, I have been trying to restrict to taking a leaf off a day and that works pretty well. But anyways, I cut a line in my trellis net by accident. I don't even know how I did that. The canopy is so thick I cant even get to it.
Speaking of the plants... lol, the plants are so sticky. I mean like if I open the tent and put my hand in, just like in the air, it gets sticky and is sticky the rest of the night. I have been interested to see how the trichomes develop after seeing how frosty the plants were early on. And it looks like they are getting longer. They look crazier now. I realize I am a new grower, but damn wtf these things are like really long. Then the leaves they are on are so coated the leaves are like hard with trics.
The smell is starting to come in and it smells super weird. The plant itself, like the resin, if you touch it on leaves it smells like weed strongly(myrcene) but also has a really berry punchy(linalool and limonene)smell. I asked Herbies for the terp profile and they were able to name the top 3. Myrcene, linalool and limonene. I have to agree with one of the comments, I can for sure smell that fruit loops smell in it. I will see how that develops. But the really weird smell is that the plants smell like DMT. Not sure how many people know what that smells like, but it smells very strongly of it. I have smelled that smell in nature before, but ooooooweeeeeee I'm looking forward to seeing what happens with this.
=-=-=-=-=-=-=-=-=-=-=-=-=-=--=--=-=-=-=-=-=-=-=-=-=-=-=-=-=-=-=-=-=-=-=-=-=-=-=-=-=-=-=
UPDATE:
1/25 - After lights on today I checked, like always, and found some good, interesting, and bad things.
Good:
Water in Plant D and B's reservoir is looking surprisingly better
I can visibly see where Great White Mycorrhizae is germinating on Plant B's roots(I really hope that is what it is)
Reduced water is doing well for Plant B and D
Interesting:
Sawtooth and Plant C's reservoirs were looking less great than usual
pH across all reservoirs is not stabilizing and within same range
ppms very close across all reservoirs
Bad:
Found another type of early deficiency starting - it looks like calcium deficiency also in Plant D
Plant D may have at least 2 different types of deficiencies
Plants look good otherwise. They seem to be bulking up nicely. I reduced the light intensity a little. So the light is not as bright. I'm not sure the light was an issue. Whatever really. I'm not sure what to do about the deficiencies popping up. I really think it was something to do with lockout and bad root zone stuff. I think it will even out, I hope. The reservoir water looked good. I want to continue flushing Plant B and D. I just remembered I should mention, I put some of Sawtooth's reservoir water in with Plant D cause I figured since it was a good biome for Sawtooth, maybe it would impart onto Plant D.
I see mycelia growing on the roots of plant B. I wasn't even looking for it, I was just taking photos of the water and spotted it. I had just split a 1/4 teaspoon of Great White again between the 4 reservoirs inoculating the roots directly. I was surprised to see this. It looks like healthy rhizomorphic mycorrhizae just freshly germinating. I wonder how this will play out.
Later tonight I am going to reduce the water in Sawtooth and Plant C. They also had higher ppms than Plant B and D and were going out of range(breeching 800). So I'm going to remove a gallon or 2 from the reservoir and put back pH'd water to lower the ppm. I will probably do this at the same time I drain Plant B and D's reservoir to refill with only water for a few hours, to then drain and replace back with nute water. Since whatever I'm doing seems to be working. I will keep making it up as I go.
=-=-=-=-=-=-=-=-=-=-=-=-=-=--=--=-=-=-=-=-=-=-=-=-=-=-=-=-=-=-=-=-=-=-=-=-=-=-=-=-=-=-=
UPDATE:
1/28 - Ehh... So whatever is going on with what look like deficiencies is progressing. I asked a question here about it. I've asked questions about it other places. So far I haven't been able to solve this.
Plant D seems to be getting worse in what looks to be its calcium deficiency. Leaves continue yellowing as well. This couldn't also be magnesium? The margins have burnt tips, so potassium? I am at a loss with this. I am thinking something might be off in the root zone, that is why I am focusing on them this week.
Plant B and D were looking good for a few days but ended up getting cloudy water again and it smells bad like before. I don't want to keep flushing because Plant D has a deficiency developing and Plant B is just starting what Plant D has. Cause it seems like it needs nutrients, but it can't have them if I am flushing it. Then I need to figure out the ppms. Cause maybe it's just deficient? But then why are Sawtooth and Plant C doing so well?
They are really doing well too. I just can't get Plants D and B's water to stabilize like Sawtooth and Plant C's reservoir. But then that will also go all over the place at water change time.
We are so close to the end. I just need to hold out until then. Hopefully, I can figure out how to stop Plant D from getting worse and stop Plant B from getting like Plant D.
I just added a mix of cal mag and part a/b to Plant D and I added a different mix of just cal mag and part b to Plant B. Hopefully this will help. I don't know, I've been making it up this whole time as I've been going and that's been working weel, but I can't fix this.
Also, I bought a digital microscope and took some shots. It looks like there's a bunch of amber trichomes, but those are on leaves. It was still enough for someone to point it out to me when I posted a photo. I don't know to what end that matters as I thought more and more thc would form as calyxes do. I don't know. There isn't much amber on the calyxes, if at all.
I did pull a few calyxes off the bottom bottom lower branches to look at under the microscope. Like those little straggler calyxes. Well I found 2 immature seeds and one was in the calyx pod with the pistils still attached! lol. If I would have let that go, would a full seed have formed? What is going on with that? Are other calyxes filled with that? I hate weed with those in it. I hope mine doesn't have that. Good thing I will process most into hash.
I have a problem developing and showing signs through this week. Looks like at least a calcium and a potassium deficiency in one plant and a another deficiency just starting in another. Not sure how to fix this. First 8 are one plant, last 2 are another. Photos taken over a week
Your pH is perfect... and even though you do seem to be giving them a lot of different nutes, I would suggest you increase the amount of your PK boosters... I'm seeing the start of a potassium deficiency... and since it's very hard to reach levels that would give you a toxicity of either potassium or phosphorus, I'd even tell you to double the amount of those...
Good luck!
DabbertGlobberfield 1/29 - 2/4
Week 6 flower
2/1 - I've decided Plant D has root rot or something with the roots causing problems. Then some leaves on Plant D are really bad. I've cut a bunch off that were done. But now it is starting to look like light bleaching. The plant looks crazy, but just in a few spots. Otherwise, all 3 other plants are fine. No light burn/bleaching. I don't want to reduce the light because one is having a hard time with it.
Anyways, now that I have decided it's root rot, I will focus on fixing that. Good thing I have already been applying Great White. I will also get and apply hydroguard to this reservoir. Hopefully that will quell the root rot and this plant can calm down.
In the mean time, I tried to reduce nitrogen where I could and increased the overall amount of P and K. I tried to hit 650ppm/1.3ec with the feeding and I think we landed around 689ppm. So not bad. This will only reduce as we go. Also, I flushed all the plants this time. I haven't done that. But based on the DWC water diagnosis thing Sawtooth and Plant C were crashing pH. Last thing, I think I reduced the water by 10 gallons, so my mixing reservoir was 20 gallons? I don't know, but that's what I'm going to put as a guess to make the nutrient math happen.
It's weird, I am noticing this cycle with feeding. It's like, while there is something in the water that the plants are eating the pH is high. As it eats it the levels normalize and the pH is stable for a few days. But then I think when the water is done, the pH will crash low, I saw 4.8 one time and I check 2x-3x a light cycle. But that is just Sawtooth and Plant C. Whereas the other two, they are the opposite, constantly rising pH. Although, I was able to get them to ride high pH, like 6.2 and stay there. So I figured as long as they were steady at 6.2 and didn't go up, fine.
Then I read that potassium has a harder time getting into the plant above 5.8 pH and the plants seem to have the potassium issue. So I will try and keep the pH lower within my acceptable range.
The roots on all the plants look ok. There was a slight smell to Plant B and D's reservoir. They got a double flush? Or just a more thorough flushing really. Like before I changed the waters, I flushed Plants B and D, then drained that and added more flush water with the other plants. Then drained and filled with nutes.
I also have been "brewing" some great white instead of instantly applying. I put 1/4 teaspoon in a gallon of water and shake it up constantly and keep it close to my heat source for the tent. This way it is germinating spores in the water prior to going into the reservoirs. Because, when I would apply great white to reservoir water I found that a good amount of it would just fall out of suspension. I think the best way will be to find an amount of water that suspends all the spores. Because even 1/4 teaspoon in 1 gallon had visible sediment at the bottom of the gallon. But otherwise the water was cloudy with the spores. So now that I have the great white like this in the jug, I applied like 100ml to each of the root masses as I was filling the reservoirs with water. 2 of the plants, D/B, have a large amount of one of the mycorrhizal fungi growing on the roots. I took a few photos. All of the roots have the growth to some extent.
Now for the worst thing and a problem I encounter constantly as a new grower asking for help on the internet. There are some photos of bracts along with ovules. I had a crash course in cannabis reproductive biology over the weekend. After I had gotten the digital microscope, I wanted MORE stuff to look at so I started plucking "bracts" off the lower branches that I didn't completely take off when defoliating. I looked in one and found what looked like an underdeveloped seed. Also, I plucked more than one and another of the bracts had a premature seed looking thing on the outside that came out when I plucked it.
When I saw that I immediately thought about the flower I found that I thought had been pollinated and was told not to worry about it. So I was like great... and pulled 8 more bracts across Plants B and C. All 8 had the premature seed things(they are called ovules). What I am talking about are those little stupid seed looking guys that are always in weed or build up in your grinder and then at some point all you see are these little seed things. Yea, those. So I needed to know, and I was wondering this at the end of last weeks post. Well I actually don't know the answer cause people on the internet are helpful until a point.
I had asked about the bract and if it would have turned into a seed and all that. I was told, Yes, it would and that there would probably be other seeds. This worried me due to the location where I pulled the bract from. Because if that was pollinated then everything was going to be. So I'm not happy at that point. Like really discouraged because I'm like what a waste of time. I mean really. That's what I was thinking. It was trash at that point to me. Garbage. I failed. But I still wasn't done digging because a lot of the other answers were dumb too. Well most of what people respond with in forums is stupid.
Anyways, I pulled 8 more bracts from Sawtooth and plant D this time. All 16 bracts across the 4 plants were taken from random locations on the plants including flowering sites. All bracts had ovules in them. Now... at this point, I was reviewing biological information on how this all works and looking for ways to determine, by using the plant's physiology, if there was a pollination event. This is when I started piecing it all together and to be honest with you... I just asked chatgpt. I asked it my basic cannabis biology questions after making sure it could speak about that unrestricted. It was way more helpful than the forum and confirmed my suspicions... ALL BRACTS AND CALYXES HAVE OVULES IN THEM. PERIOD.
This blew my mind really because I thought I would only see the "premature looking seed things" in buds here and there. I didn't think it was something that applied to every weed ever. So ok... now I'm like well this explains why I am finding ovules everywhere. But why did the forum people immediately say yep, seed yep. I went back and reread it and that's when I realized no one even paid attention. So I asked them what I asked chatgpt, they confirmed the bract/calyx ovule thing as well. So then I asked how they were able to determine that the ovule I presented in the photo of it in a bract with the pistil/stigma still attached to it. They were not able to determine for sure.
SO this means that the plants probably haven't been pollinated. It also taught me, after several instances of this, to stop asking for plant help on the internet and just use research and established fact on record to answer issues.
OH, last thing. I turned up the 2nd air pump all the way. I read how dissolved oxygen levels are depleted when there is root rot. So to aid in any kind of recovery I can, while Great White does its work and while hydroguard is on the way, I cranked it up. I say 2nd, because I am using 2 different air pumps. At first it was for fun, now it's for real. Also, I'm going to check plant D's air stone to make sure it's working well.
5 likes
comments
Share
Used techniques
ScrOG
Technique
22
Week 22. Flowering
3y ago
1/116
91.44 cm
Height
12 hrs
Light Schedule
23 °C
Day Air Temp
5.8
pH
Normal
Smell
578 PPM
TDS
50 %
Air Humidity
17 °C
Solution Temp
16 °C
Night Air Temp
63.5 cm
Lamp Distance
Nutrients 10
Great White Mycorrhizae
1.172 mll
Southern AG - GFF
0.011 mll
Sensi Cal-Mag Xtra
0.359 mll
DabbertGlobberfield 2/5-2/11
Week 7 flower
2/10 - I know I'm late with updating. I probably haven't because I am not super pleased with the current goings on with the grow and that makes me less motivated to share. It is below what I would say my standards are. It's all my fault, too; So that makes it worse. If I would have just been using Great White the whole time with the DWC switch or if I would have grabbed Hydroguard for the switch as well. But this was my first grow and it got fairly difficult. I can't wait for it to be over so I can redesign. We are actually very close to the finish. Today is day 53 flower. So this time, next week, in 7 days, we will be looking close at chopping then or after.
Either way, I think all the plants have root rot, pythium, but only B and D have it bad. Sawtooth and C have it too but either way early, being managed, or growing slow. Not sure. At some point this week I was pulling out clumps by the handful of rotting roots from B and D. I think I can make it to the end. Not many days left. I turned the light down to 70% because B and D were getting very sensitive to light. I found sun tan burns in leaves. Very weird. I don't think the plant is deficient, it was the lights. Sucks to have to turn the lights down because the other 2 plants are fine with it, but whatever. I think it's helping and staving off more burning or at least more aggressive burning. The burning has definitely slowed.
I'm reducing ppms. Hit 578 for the feeding this week. I want to reduce B and D's ppm further, because of the light burn and root rot. We will see. Plants seem to like this ppm. Also, after I started adding Southern AG's GFF, along with Great White, consistently, the pH has been real stable across all the reservoirs. This is a very odd occurrence for me. Normally, things would be spiking here and there and some would need pH up and some would need pH down. It was all over. But whatever I am doing right now has the ppm/ec hovering at the same number as water goes down and pH barely changes. Its beautiful and I think what the goal of DWC feeding is. Too bad I was feeding more than double for the first 2 weeks and then almost double for another week or so. Oh well.
Otherwise, the plants are looking good. Even the problem ones have awesome looking buds. So... I just need to stick it out another week. The plants don't really smell all that much. I get weird smells in the tent like DMT, rose, lilac, then just like a light weed smell. It's really hard to place a smell. I think all the plants might smell different. Some smell fruitier than others and some smell like pungent weed that is borderline offensive. I have exercised maximum restraint. Earlier in my grow, when I asked people on the internet about a flower that looked weird, I was accused of squeezing the bud. I have to say, I didn't want to then and that guy was stupid, but I really want to squeeze one now. The urge is fairly strong. I am happy to say I have not given in. Especially those weird looking tower buds that seem to be foxtailing. If that is what foxtailing is. It looks like the flower is growing little towers.
I have a bunch of things gathering for processing. Washer on the way, I have bubble bags, and a bunch of buckets to cannibalize. I am not sure how I am going to handle the branches that have dead leaves. I guess I will see what happens once I harvest. The plan is going to be to pretty much fresh freeze everything off the problem plants and I will dry and cure the other 2. We will see. Maybe more will be dedicated to washing. No matter what, I plan on washing for bubble hash to press into hash rosin. I am very much looking forward to this. I also grabbed a few trays to trim in that have screens. I will have a lot of things to play with. Add my rosin press in and we will be doing some things soon.
5 likes
2 comments
Share
Used techniques
ScrOG
Technique
23
Week 23. Flowering
3y ago
1/89
91.44 cm
Height
12 hrs
Light Schedule
23 °C
Day Air Temp
5.8
pH
Normal
Smell
587 PPM
TDS
50 %
Air Humidity
17 °C
Solution Temp
16 °C
Night Air Temp
63.5 cm
Lamp Distance
Nutrients 10
Great White Mycorrhizae
0.117 mll
Southern AG - GFF
0.169 mll
Sensi Cal-Mag Xtra
0.6 mll
DabbertGlobberfield 2/11-2/18
Week 8
2/18 - I find I have not been taking as many photos as we round the final corner because I feel like I messed up the 2 plants that don't look as good as the other two. I know, I know it's my first grow and I should be happy I made it here. But it's just hard to see something that you cant really fix easily or at all. Really, it's not that bad.
I am considering the option of just not processing the worst looking branches. I think it will greatly depend on what they look like when I harvest them. I think I might be able to cut of a lot of the dead leaves at the stem to remove them. It doesn't look like the bud structure is greatly effected. But it has been effected.
At this point, and up to this point, I have tried really hard not to mess with those bad looking branches.. As in I am not taking leaves off or touching them so leaves start breaking. Unfortunately, a lot of those leaves are very sugary and I think I will just have to let it go. Because I don't see many ways of stripping the trichomes off without smashing the dead leaves to bits. We will see. But I do not plan on processing any branches with dead matter on it for bubble hash to press.
I am pretty sure that I will be fresh freezing all of the harvest from Plants B and D(the ones with visible issues). I will process all that into hash for various other refining processes. I might save a bud or two off each of these plants, but they have been condemned to bubble hash making.
Sawtooth and plant C, however, will be mostly dried and cured. I will be doing a run of bubble for these plants as well, but I will try to only use the amount of material needed for a minimum wash. This way I can keep a good amount of dried flower on hand for flower rosin extraction.
I am talking about harvest a lot because we are right there. Today is day 61 of flower and I suspect harvest is going to be in the next few days. Most of the stigmas have darkened. I will be doing a very detailed microscope study of the calyx trichomes to get an idea of amber head count later today. I will be doing a few things to ensure I can get some really good photos. I will update here with those photos later once I get done with it.
Pretty sure this will be the last post before harvest. Or at least, I don't think these will go on for another week or two. Not sure how that works here when it comes to post harvest processes. Like if drying takes 14 days and curing takes months... when are you supposed to post final photos? I mean if the next update is just harvest, that's it I'm done with the journal since harvest is the end. I don't know when I will post the harvest. Like I don't know if I will post the harvest when I harvest or if I will post the harvest after I dried and trimmed... Probably when I dried and trimmed because at that point I would have already processed the bubble into something.... ok.
So if I do not have another week of flower after this week, my harvest post will come after I dry and can show dried trimmed final result.
5 likes
comments
Share
Used techniques
ScrOG
Technique
24
Week 24. Flowering
3y ago
1/54
91.44 cm
Height
12 hrs
Light Schedule
22 °C
Day Air Temp
5.8
pH
Normal
Smell
587 PPM
TDS
48 %
Air Humidity
17 °C
Solution Temp
16 °C
Night Air Temp
63.5 cm
Lamp Distance
Nutrients 10
Great White Mycorrhizae
0.117 mll
Southern AG - GFF
0.169 mll
Sensi Cal-Mag Xtra
0.6 mll
DabbertGlobberfield 2/19-2/25
Week 9
2/23 - Well, we have made it. I think that later today will be harvest right before lights come on. Today is day 66 flower. Total of 165 days growing, LOL.
This week was pretty laid back for me. I knew they were getting close and I didn't know how long they would take so I didn't really mix up a new batch of nutrients. I, while monitoring trichomes, was watching the water level drop as well. When it looked like they wouldn't be done by the start of the new week and when I change the reservoirs, I basically just mixed up 8 gallons of nutes to distribute between the 4 plants while they finished up.
I didn't go for a flush and I am not doing 48 hours of dark.
Plant D's roots are making an awesome recovery... I haven't really been taking too many photos of the roots, but I will get a bunch when I harvest. Really though, I can't wait to look under the hood on these roots to see what's really going on.
I am concerned about the amount of dead leaf material though. I'm not sure how I feel about smoking that. I don't like combustion anyways, but I am also concerned about washing or processing the buds with the dead messed up leaves. The dead leaves are very brittle, so we will see when I am cutting branches how removal of the dead stuff goes. I think I should remove all that dead stuff before drying and or freezing.
The smell of this weed is, well, really freaking weird. I mean there is the tent smell and then there is the smell when you touch the plant. The tent smell is almost offensive and smells like weed and like sour milk or cream or something. I get weird notes of like mocha toffee that mixes with the sour milk and weed smell. It's odd. But then when you touch something, the smell is really hard to describe. It's a very pungent weed/marijuana smell. I am pretty sure the "weed" smell is coming form the prominent terpene, Myrcene.
To be honest, I have no real idea if the plant is ready or not. I am just guessing at what I think is right. The micro shots I took seem to show a lot of cloudy trichomes and amber has been popping up as well. I am wanting a solid balance, so I am not too worried about many amber trichomes. I just don't want ambers to be the majority. I think we are in a good place for harvest. I want to ask people but they will tell me 2 more weeks and to boof it. lolololol. Really, I thought the plants were ready a day or two ago and I waited a little more. Today, as the last day, I am making it a cooler day, temp wise and the plants are getting 69-70f degree air. For some reason I am thinking the cooler temps might push just a little more out of the plants as they work to protect from the fall temps. I also increased the light to max for the day. I had been increasing it very minutely on a daily basis since I drastically reduced it 2 weeks ago to help stop light burn in the root rot plants. Either way, today is a high intensity light and cool weather day for the plants, and their last day left.
I guess the way the harvest update works is that I will update with a harvest after I dry the plants. Since I shouldn't just update with harvest and then update the harvest week with more pictures and information about post harvest processes. So this will probably be the last update for a few weeks. This way I can fully document the harvest, the drying process, the fresh frozen process, the washing result of the fresh frozen while I wait for the plants to dry, the pressing of bubble hash into rosin, and the final dry weight. It will be hard to get the real weight because, like I said before, I plan on committing Plant B and D, completely , to fresh frozen bubble hash making. So I won't be able to get dry weight on this. I will try and get a total wet weight, but I won't try all that hard. I will be closely documenting the weight information of the plants I do dry and cure. So there will be dried flower weight.
Anyways, very exciting stuff. I am looking forward to sharing the next update with you all as I am going to be having a very interesting next couple of weeks.
Grandmommy Purple was a kind and patient teacher for my first grow. I am glad this is what I ended up trying to grow first. I ran into all sorts of issues over the many many weeks it took to get to harvest. The plant took everything I could throw at it and more. By the end, though, she was tired and started succumbing to my lack of experience. Good thing we were done by that point.
The smell on this one, honestly, left a little to be desired. I mean, I didn't know what to expect, but I feel like the smell was very soft, if that makes sense. Like it wasn't some in your face skunk funk. But there was a strong pungent weediness to it that was soft around the edges. It was like a weird sour smell that was pungent and creamy. It was also a little fruity. The fruit smell came out more after you touched it, kind of like fruit-loops cereal but with added citrus notes here and there.
When washing for bubble hash, the smell was very pronounced. It was soo sweet, almost minty.
All in all, this was a good plant for me and I would not be against growing it again. However, I would like to grow other strains.
Show more
Translate
Spent 171 days
Ger Veg Flo Har
114.95 g
Bud wet weight per plant
4
Plants
4.88 m²
Grow Room size
Easy
Difficulty
Height
Day air temperature
Air humidity
PPM
PH
Light schedule
Solution temperature
Night air temperature
Substrate temperature
Lamp distance
1/64
DabbertGlobberfield For the Herbies contest - Grandmommy Purple is guilty of aggravated harvest in the 1st degree.
Harvest - 169 days / 66 days in flower
Well, we did it. I made it to the end. All I can think is...WOW that was A LOT of work. But I think I had very good results for a first time grower. I
For harvest, we took Plant B and D and prepared them for immediate freezing. Altogether, I ended up with 1212g wet on plant B and 1089g wet on plant D. I ended up freezing 1816g of this. There was some from each of these plants that was set aside from freezing because, for whatever reason, I thought they were not worthy of washing because of how progressed the leaf damage was from the root rot battle. So that was cut up and dried as nuggets instead of hanging like the rest. Sawtooth and Plant C were both harvested and hung in the tent to dry for 12-13 days. I think I overdried by 1-2 days because when I jarred them they struggled to raise up to 55%. So I am using rh% packs.
After drying Sawtooth and plant C, I ended up at 459.8g for dried flower and 170.8g in dried trim. So just over 1lbs between the 2 plants and 4.15lbs wet between the other 2 plants that was washed for hash.
So... are you for real with the effort involved with washing bud for bubble hash? I don't think I would do this in the warmth. I only pursued doing bubble hash cause it's cold right now and I figured that would really help. Even in the 30s(fahrenheit) stuff would stick. It's hilarious how sticky of a process this is. I hope you have a bunch of gloves, water, and ice to burn through. I went through over 60 gallons of distilled water and 80lbs of ice to wash the 4 lbs. I am envious of people in videos using a hose to collect, clean, and refill. Also, doing this as a 1 person show is the definition of insanity.
I broke the washings up into 3 parts. The first part was was the tester wash. I broke off 420g of plant D's 848gs available. I used 7 bags to see where I would end up. I used 220, 160, 120, 90, 73, 45, 25. What I determined was that if I was hunting a specific micron with a lot of material this would help find what you can get. But for the next washing I reduced the amount of bags to 4; 220, 160, 45, 25. The time, with the 4 bags, I washed with 809g. I had a much more favorable experience and return this second time but I had green fast and probably used too much ice. The 3rd wash was the remaining 631g and I found an extra 137g I added of sugar leaves and trim, brining the 3rd wash to 768g. I used 5 bags this time; 220, 160, 73, 45, 25.
By the 3rd wash I have become an expert in collection but also never want to do it again. lol.
2 of the 3 washes have dried and I have 43.4g of bubble and 2.8g of dry sift. 37.4g of that bubble is able to be pressed into rosin. I will probably press that dry sift as well. The other stuff is 25u or 160u that I will experiment with or cook with. The other stuff is drying so I can't add it all in.
I pressed a bunch of trim and some flower. The trim presses nice and the dab is decent. I am working out a good temp for the flower. But the problem with all these tests to find the sweet spot is that I have all these testers to go through but want to keep pressing and trying that! I think I will need to work on a better storage solution.
What I can say, right now, is that the high is very good. Extremely good. The first few times I got high off this I was totally drunk with highness, absolutely psychedelic experiences. But as the tolerance grew, the initial holy fuck factor eased up. But, damn, it still hits like a train. Especially that flower rosin. I can't wait for the fresh frozen bubble hash rosin pressing... I have over 20gs of bubble to put in one bag. I am really looking forward to this. But I will need to work up to that pressing since I have never pressed hash/kief/bubble before in my rosin press. So this should be really fun.
I will 100% post an update of the hash pressing once I do that and also after the 3rd wash session is done drying.
In closing, saying I learned a lot from this grow would be an understatement. I fully expect to start it back up in a few weeks after some R&R then some R&D. There's some things I will need to work on before I start again, such as: having a single external reservoir that feeds multiple plants, hard to clog and easy to use ebb and flow system, miscellaneous final run stuff like space for drying. So thanks everyone for hanging out and perusing the photos and or reading all my huge rambling updates and thanks to those for the help along the way.
Grandmommy Purple was a kind and patient teacher for my first grow. I am glad this is what I ended up trying to grow first. I ran into all sorts of issues over the many many weeks it took to get to harvest. The plant took everything I could throw at it and more. By the end, though, she was tired and started succumbing to my lack of experience. Good thing we were done by that point.
The smell on this one, honestly, left a little to be desired. I mean, I didn't know what to expect, but I feel like the smell was very soft, if that makes sense. Like it wasn't some in your face skunk funk. But there was a strong pungent weediness to it that was soft around the edges. It was like a weird sour smell that was pungent and creamy. It was also a little fruity. The fruit smell came out more after you touched it, kind of like fruit-loops cereal but with added citrus notes here and there.
When washing for bubble hash, the smell was very pronounced. It was soo sweet, almost minty.
All in all, this was a good plant for me and I would not be against growing it again. However, I would like to grow other strains.
Show more
Translate
Spent 171 days
Ger Veg Flo Har
226.8 g
Bud wet weight per plant
114.95 g
Bud dry weight per plant
4
Plants
4.88 m²
Grow Room size
Easy
Difficulty
Euphoric, Hungry, Sleepy
Positive effects
Paranoia
Negative effects
Fruity, Mint, Pungent
Taste
Height
Day air temperature
Air humidity
PPM
PH
Light schedule
Solution temperature
Night air temperature
Substrate temperature
Lamp distance
1/170
DabbertGlobberfield For the Herbies contest - https://growdiaries.com/diaries/157348-grow-journal-by-dabbertglobberfield#gallery=6777378 - Grandmommy Purple is guilty multiple noise violations for being too loud and for stanky funk.
Harvest - 169 days / 66 days in flower
Well, we did it. I made it to the end. All I can think is...WOW that was A LOT of work. But I think I had very good results for a first time grower. I
For harvest, we took Plant B and D and prepared them for immediate freezing. Altogether, I ended up with 1212g wet on plant B and 1089g wet on plant D. I ended up freezing 1816g of this. There was some from each of these plants that was set aside from freezing because, for whatever reason, I thought they were not worthy of washing because of how progressed the leaf damage was from the root rot battle. So that was cut up and dried as nuggets instead of hanging like the rest. Sawtooth and Plant C were both harvested and hung in the tent to dry for 12-13 days. I think I overdried by 1-2 days because when I jarred them they struggled to raise up to 55%. So I am using rh% packs.
After drying Sawtooth and plant C, I ended up at 459.8g for dried flower and 170.8g in dried trim. So just over 1lbs between the 2 plants and 4.15lbs wet between the other 2 plants that was washed for hash.
So... are you for real with the effort involved with washing bud for bubble hash? I don't think I would do this in the warmth. I only pursued doing bubble hash cause it's cold right now and I figured that would really help. Even in the 30s(fahrenheit) stuff would stick. It's hilarious how sticky of a process this is. I hope you have a bunch of gloves, water, and ice to burn through. I went through over 60 gallons of distilled water and 80lbs of ice to wash the 4 lbs. I am envious of people in videos using a hose to collect, clean, and refill. Also, doing this as a 1 person show is the definition of insanity.
I broke the washings up into 3 parts. The first part was was the tester wash. I broke off 420g of plant D's 848gs available. I used 7 bags to see where I would end up. I used 220, 160, 120, 90, 73, 45, 25. What I determined was that if I was hunting a specific micron with a lot of material this would help find what you can get. But for the next washing I reduced the amount of bags to 4; 220, 160, 45, 25. The time, with the 4 bags, I washed with 809g. I had a much more favorable experience and return this second time but I had green fast and probably used too much ice. The 3rd wash was the remaining 631g and I found an extra 137g I added of sugar leaves and trim, brining the 3rd wash to 768g. I used 5 bags this time; 220, 160, 73, 45, 25.
By the 3rd wash I have become an expert in collection but also never want to do it again. lol.
2 of the 3 washes have dried and I have 43.4g of bubble and 2.8g of dry sift. 37.4g of that bubble is able to be pressed into rosin. I will probably press that dry sift as well. The other stuff is 25u or 160u that I will experiment with or cook with. The other stuff is drying so I can't add it all in.
I pressed a bunch of trim and some flower. The trim presses nice and the dab is decent. I am working out a good temp for the flower. But the problem with all these tests to find the sweet spot is that I have all these testers to go through but want to keep pressing and trying that! I think I will need to work on a better storage solution.
I can't wait for the fresh frozen bubble hash rosin pressing... I have over 20gs of bubble to put in one bag. I am really looking forward to this. But I will need to work up to that pressing since I have never pressed hash/kief/bubble before in my rosin press. So this should be really fun.
I will 100% post an update of the hash pressing once I do that and also after the 3rd wash session is done drying.
In closing, saying I learned a lot from this grow would be an understatement. I fully expect to start it back up in a few weeks after some R&R then some R&D. There's some things I will need to work on before I start again, such as: having a single external reservoir that feeds multiple plants, hard to clog and easy to use ebb and flow system, miscellaneous final run stuff like space for drying. So thanks everyone for hanging out and perusing the photos and or reading all my huge rambling updates and thanks to those for the help along the way.
@BarneyRumble420, Thanks so much! 💪 I saw your photo of the month Dec win, congrats! Then I saw you did GMP, too. I loved that little survivor flower baby. 😌
I really am looking forward to watching these girls develop further with colors. I am excited for the smells to kick in. They are so tame in their smell right now. I'm looking forward to comparing to your description 😁😁
@DabbertGlobberfield, thanks man yeah she was tiny haha 🤣 was terrible weather was raining for months and we copped really bad flooding so she's the only one that survived was a good session worth once dried, if you've ever tried musk stick lollies it tasted like them but more intense almost like gassy citrus fruitloops haha only way I could describe it, it was so nice 🙌 I'll be following along with your grow man keep up the good work
@Herbies_Seeds, Thanks! I think it went well overall. I am really looking forward to growing some other genetics from Herbies. This was a great strain for my first time that helped me learn about the versatility of the plant.
Good stuff from my point of view. What press do you own? I have a shit ton of questions I’d like to ask you but it seems you’re at the same stage as me. It’s gonna be my first time bubble hash run myself. I got a larger press and was thinking bubble hash was the way to go til I read this lol. Maybe I’ll dm you so I don’t take up comment space, but then again it’s a way to build likes and others can learn from us…
@FrontRowAG_BrianG, Lol, all good. Ask me anything. What do you want to know? I will answer pretty much anything. However, I have a grudge against the manufacturer of my press so I will not be saying the name of it as to not give any kind of press for them at all. But it is a premade press, probably midrange in terms of size.
Typically it's Silica first, CalMag second, then everything else third. Silica and CalMag are heavy and can precipitate the others out of solution. If I forget to add them, then I make sure to dilute beforehand.


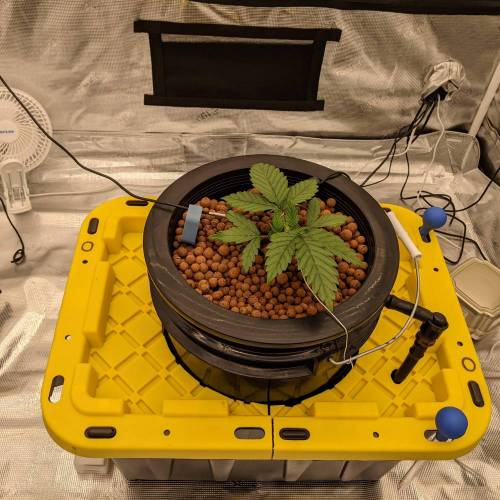
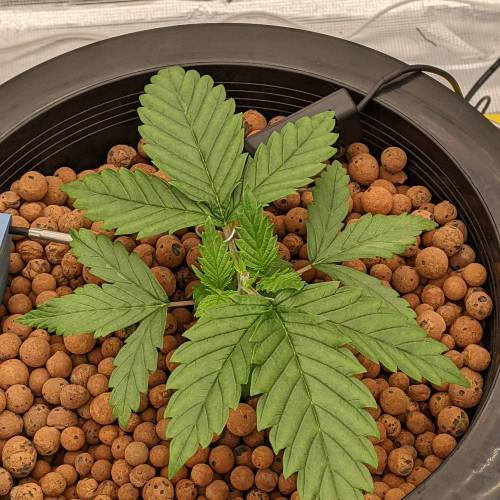


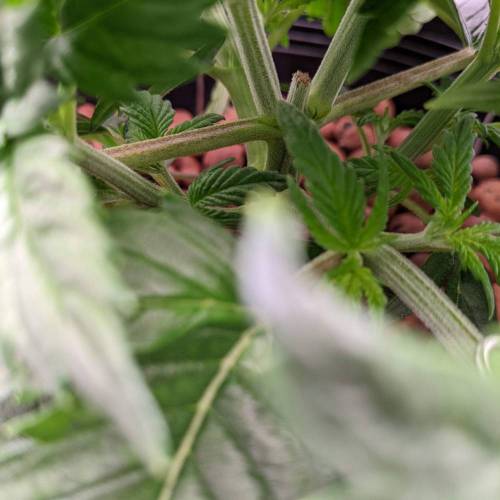


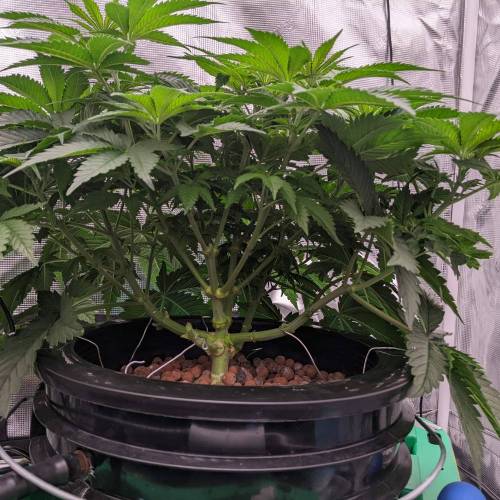

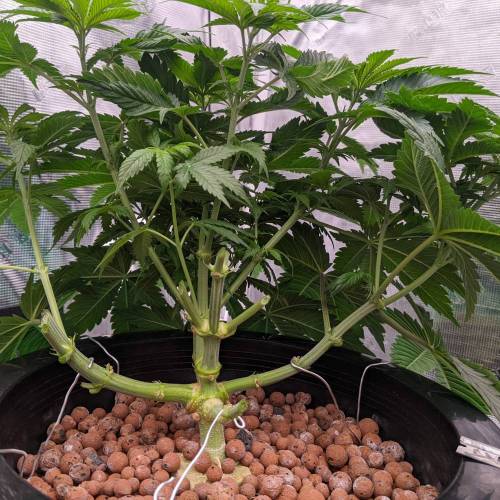
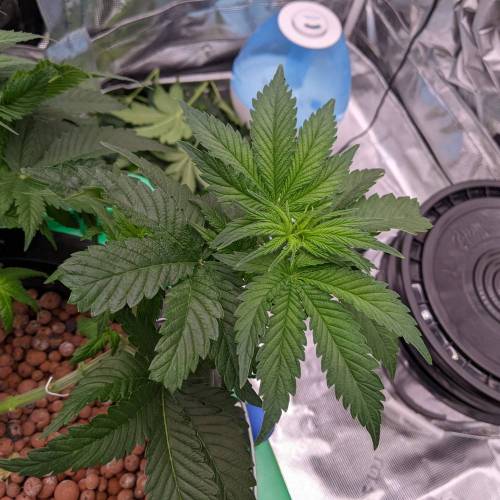
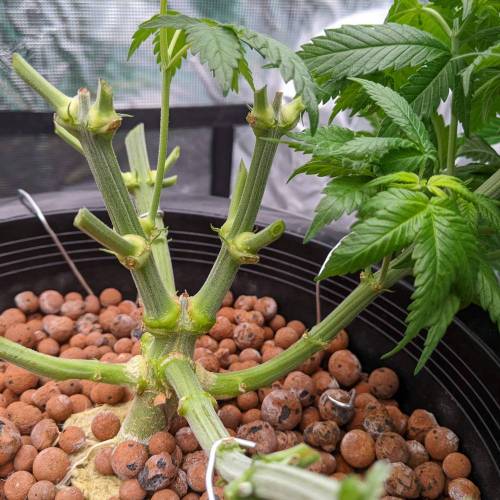


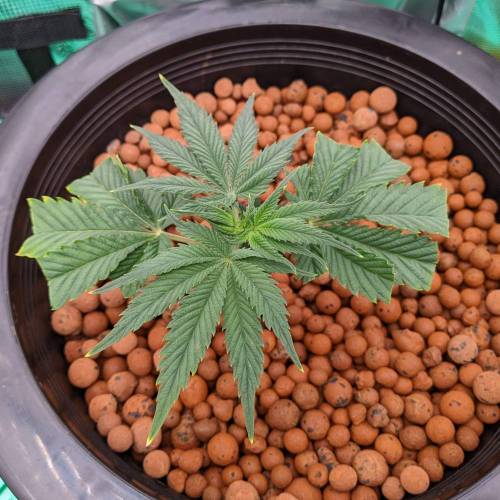
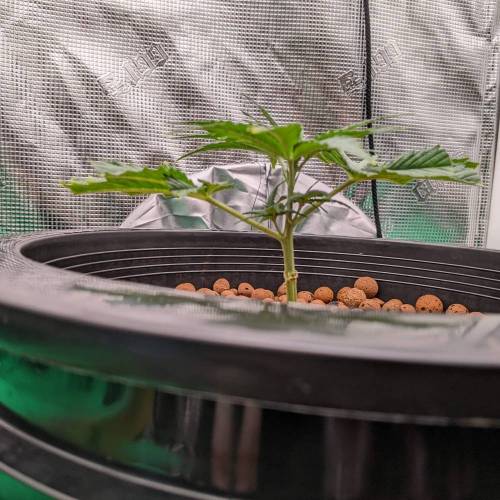

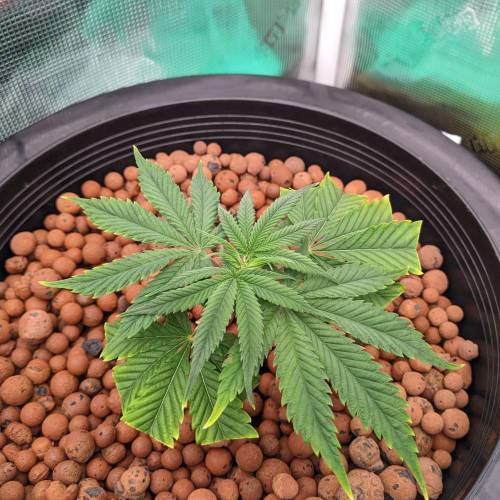
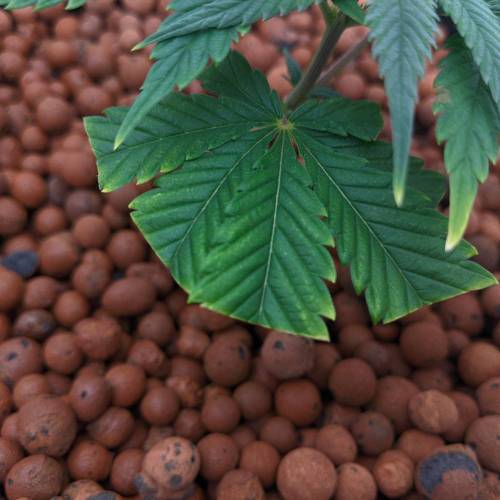


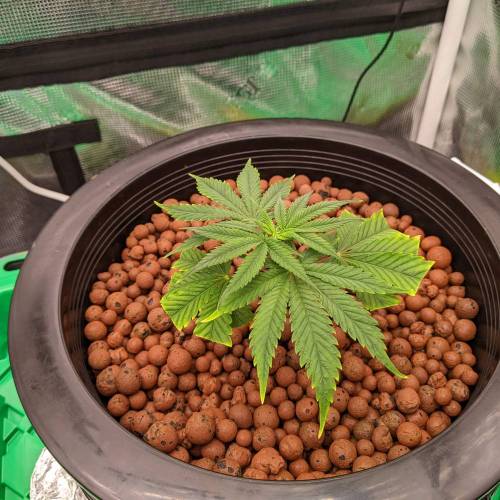
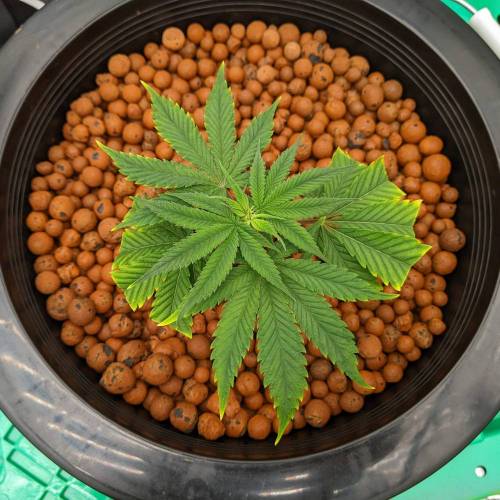

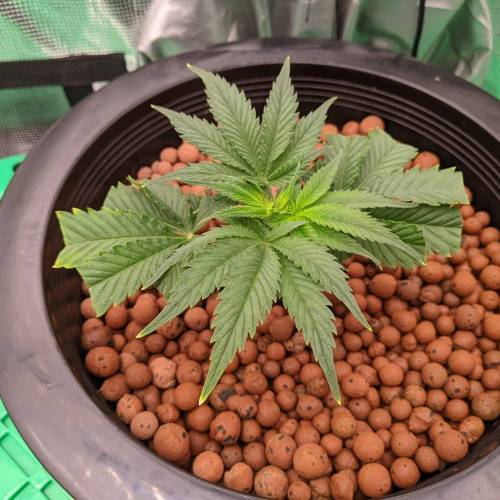

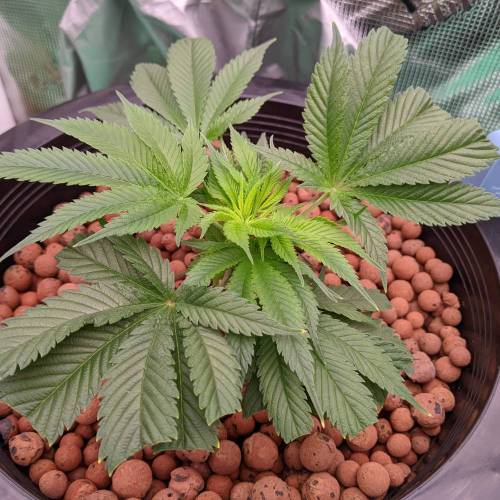


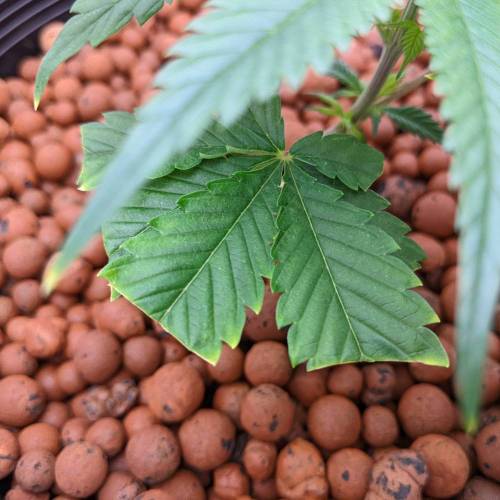
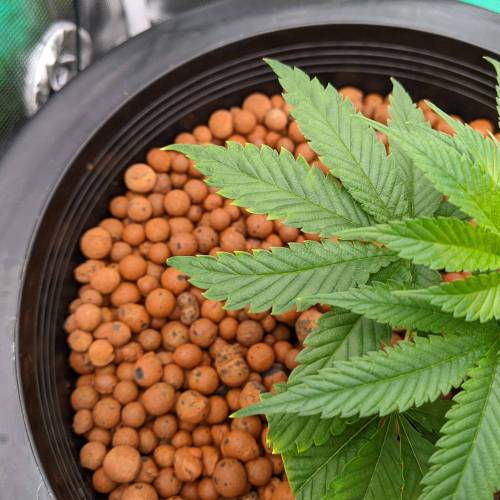
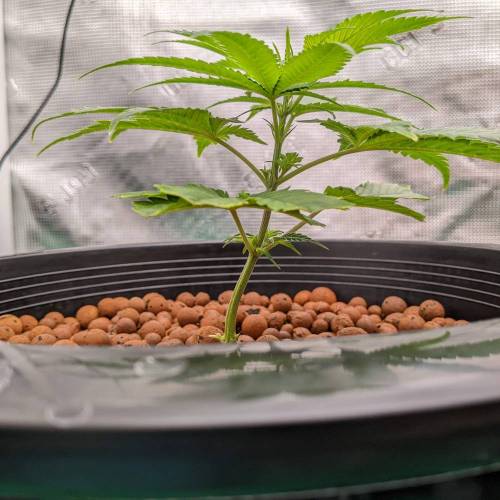
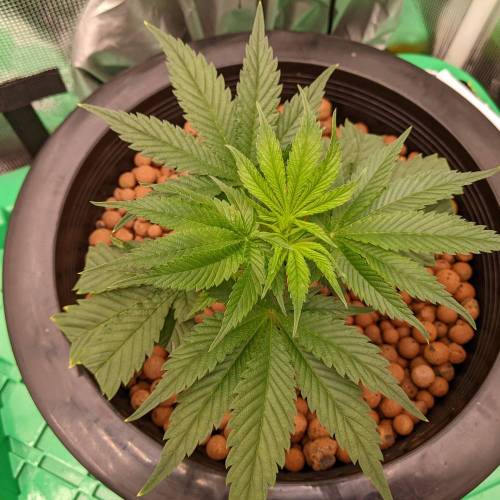


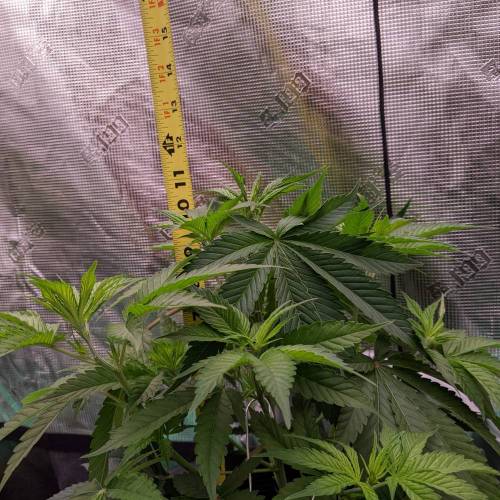

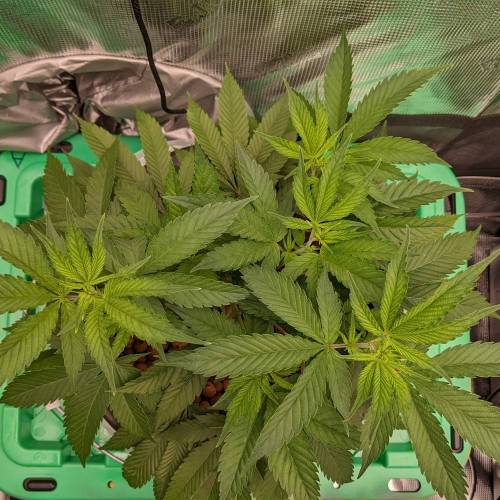
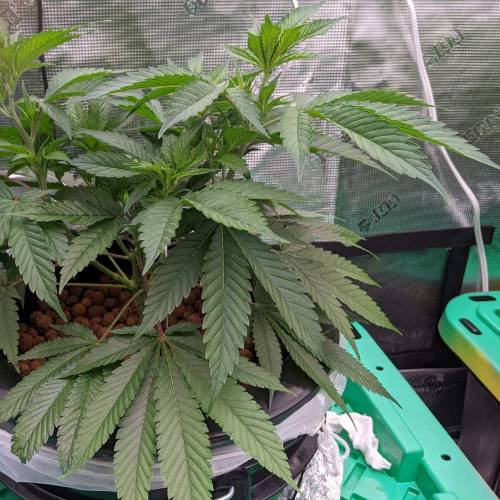


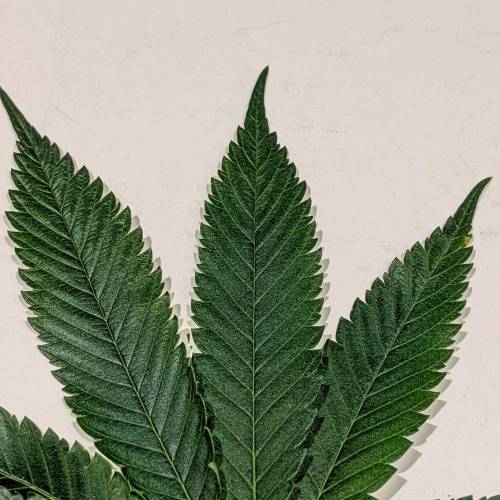
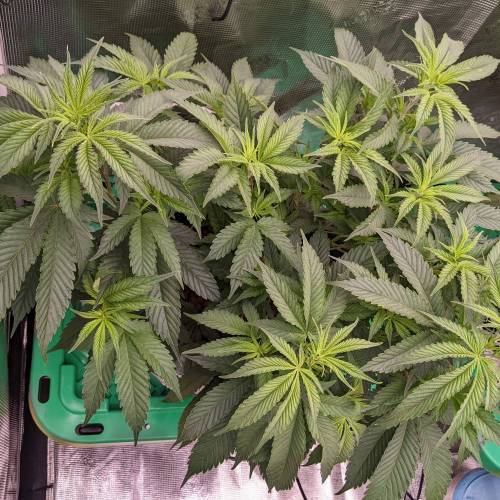
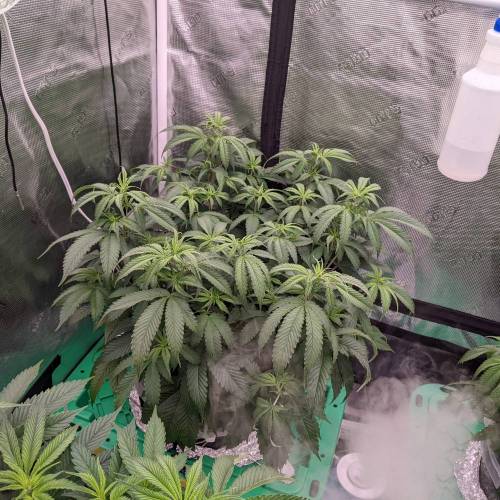
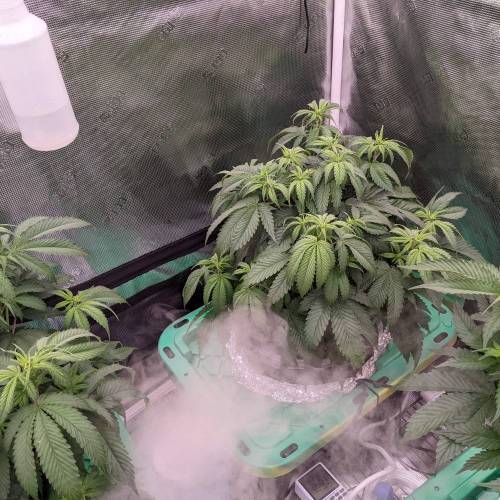
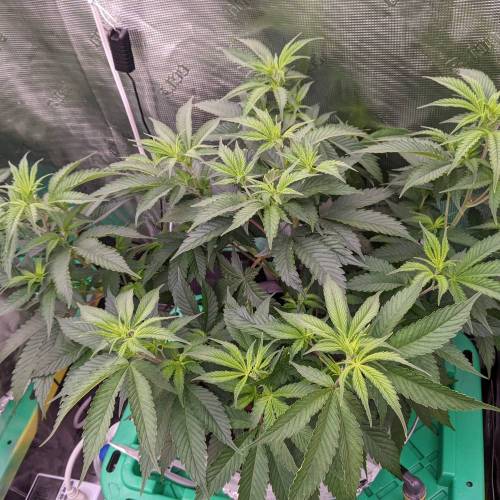
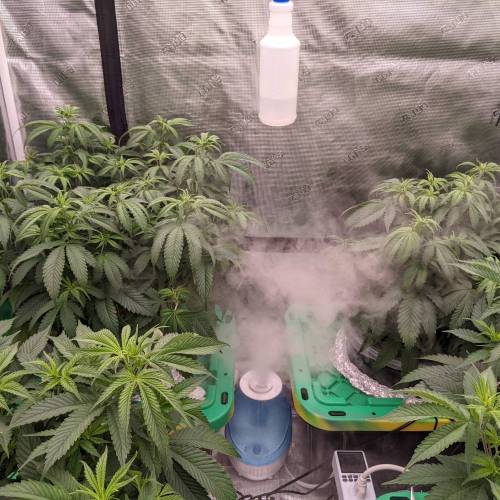
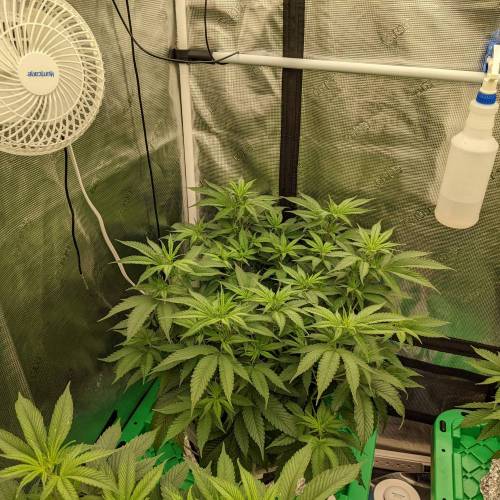
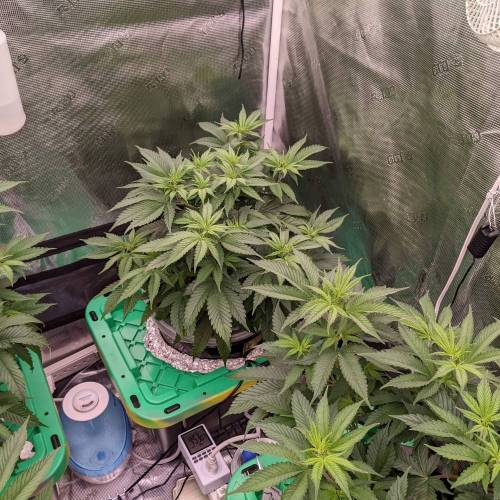
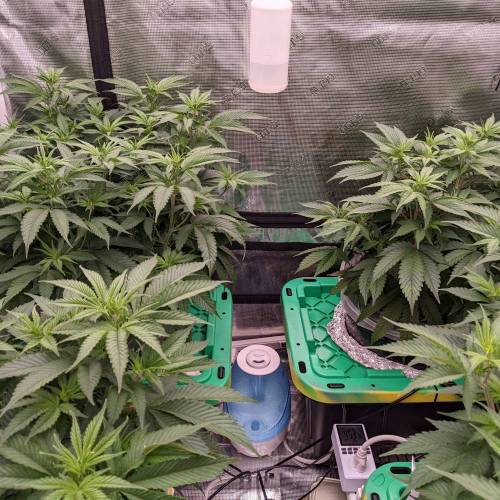
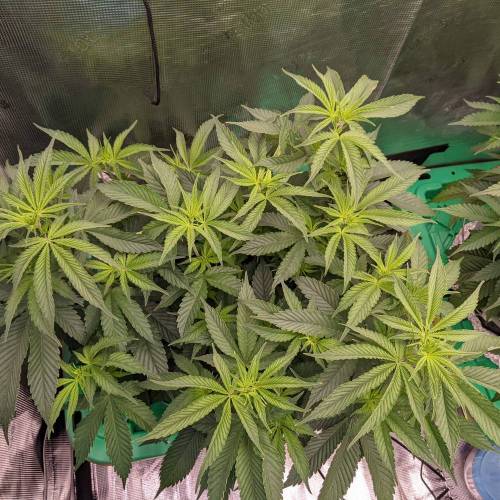
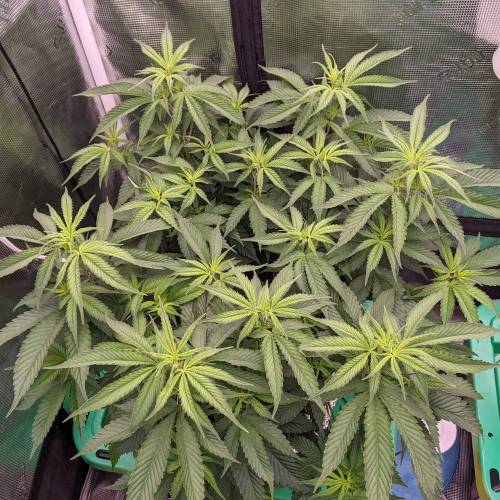
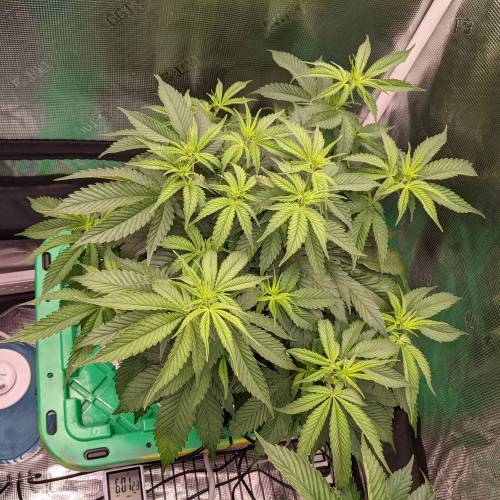


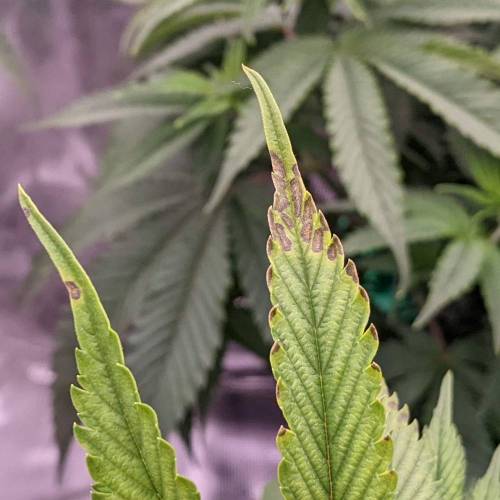

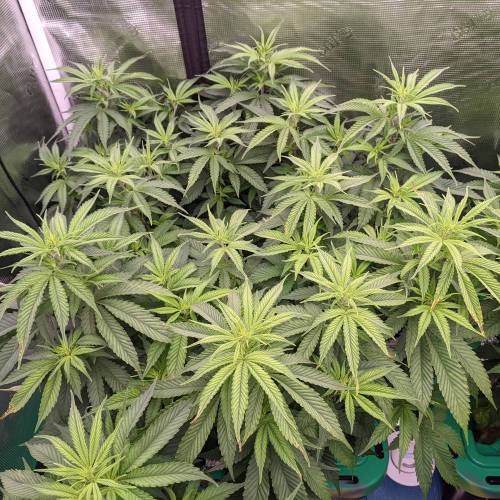
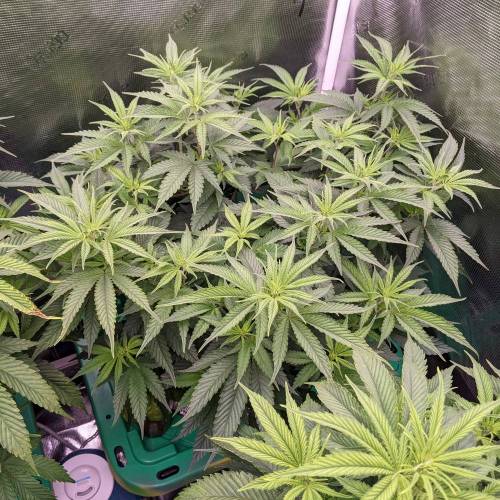
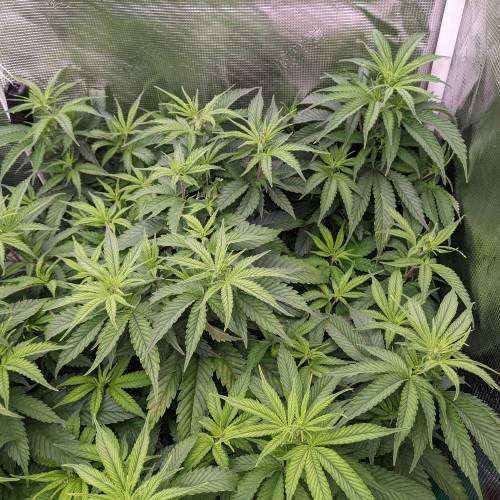


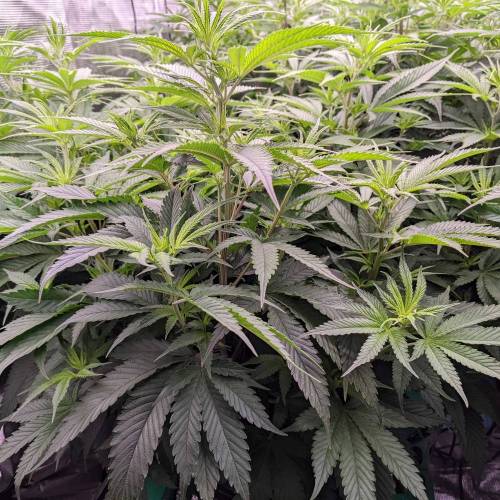
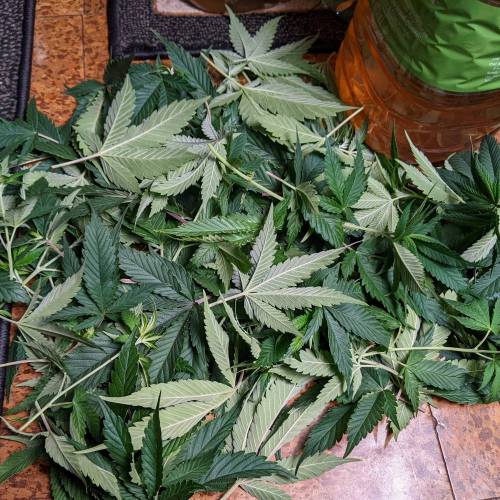


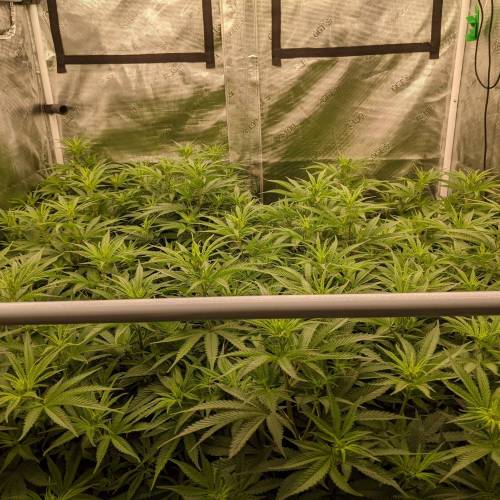


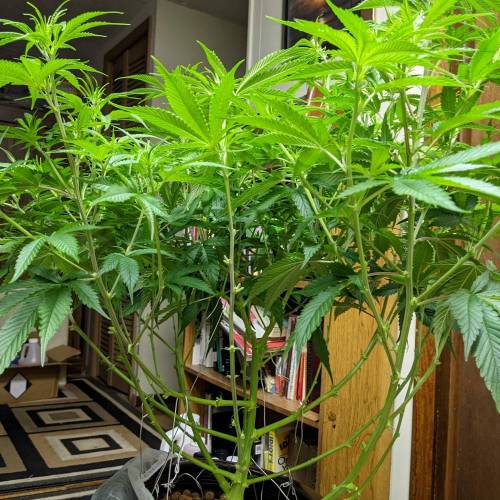


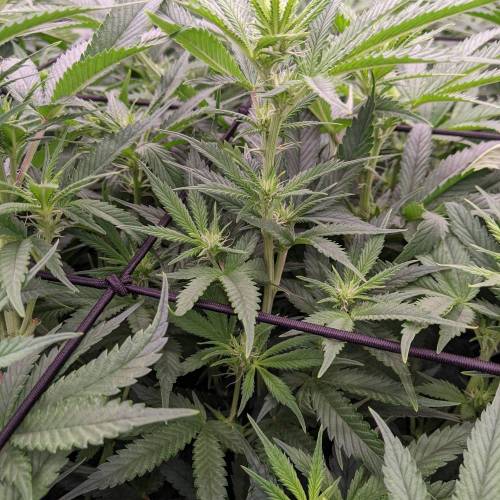
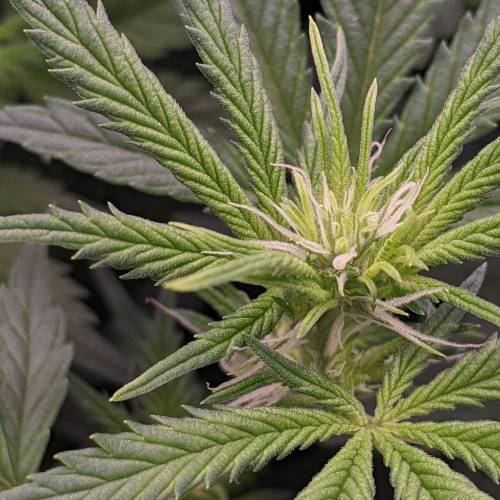
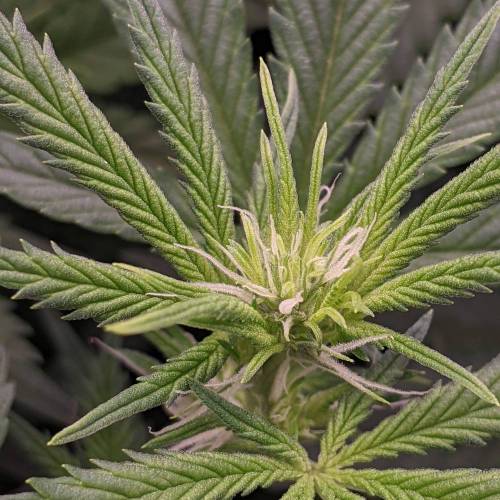
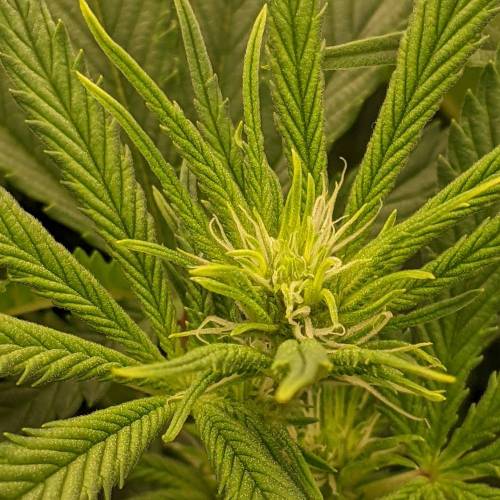
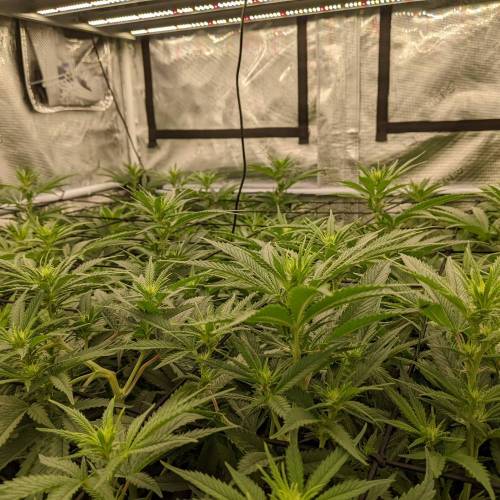
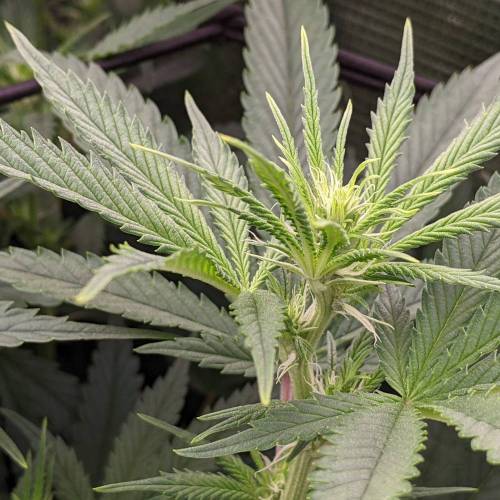
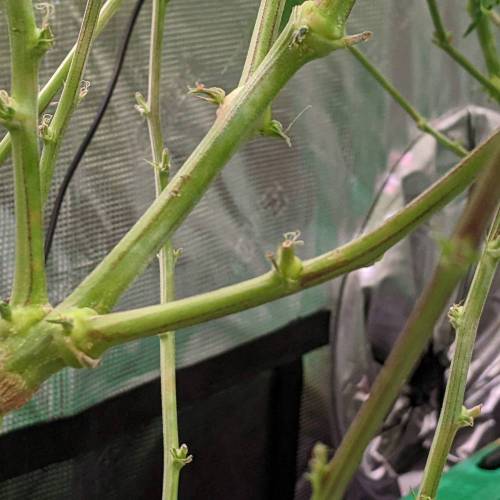
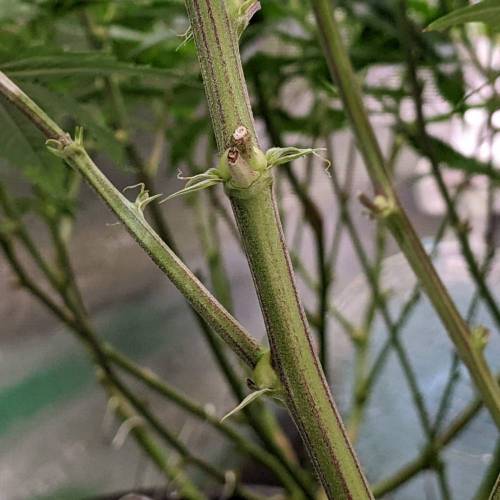
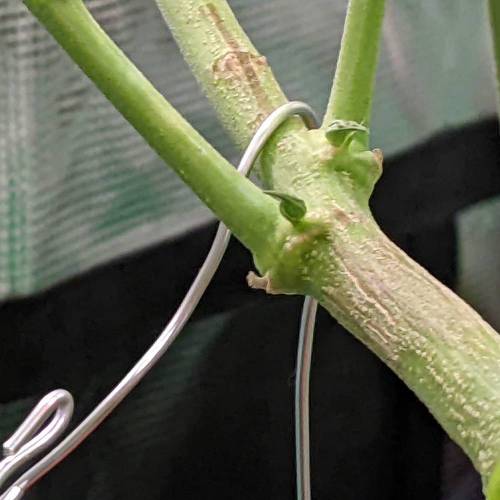


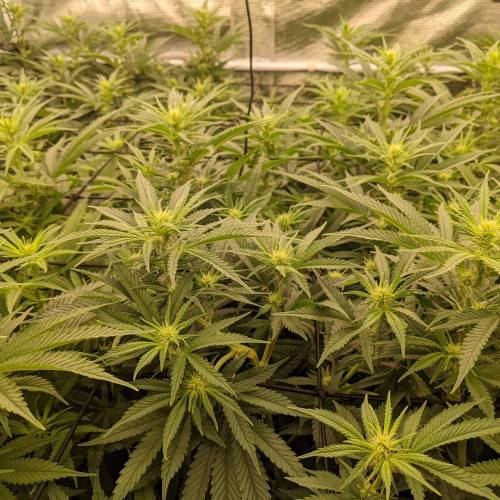
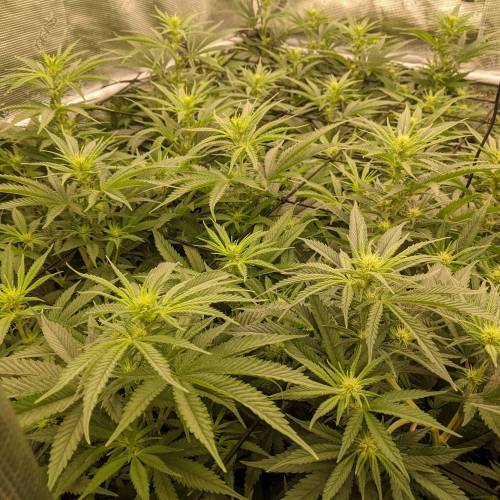
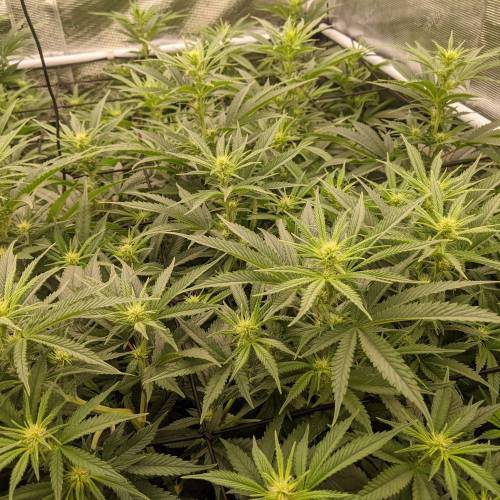


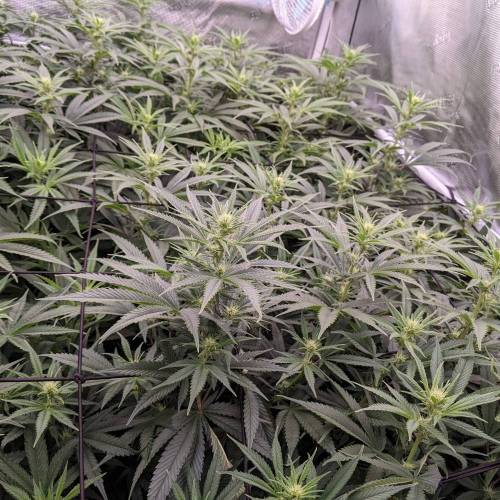
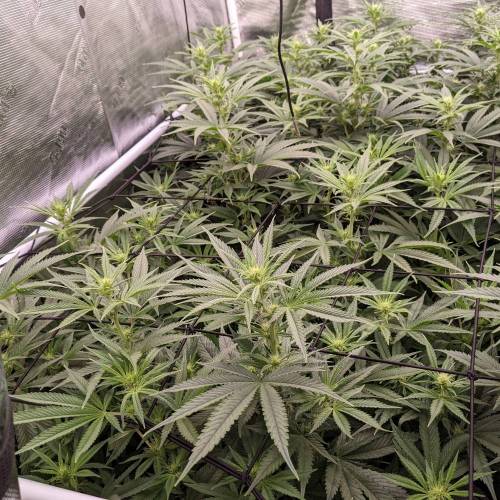
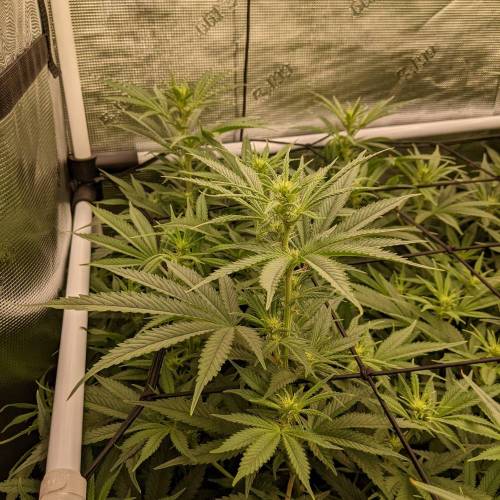
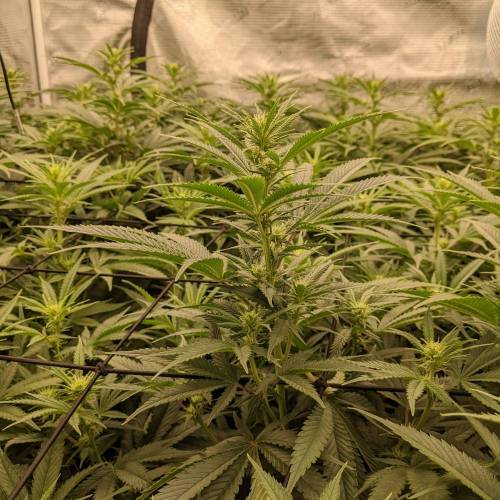


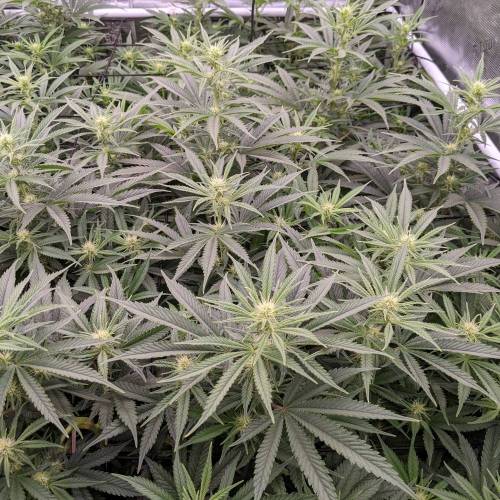

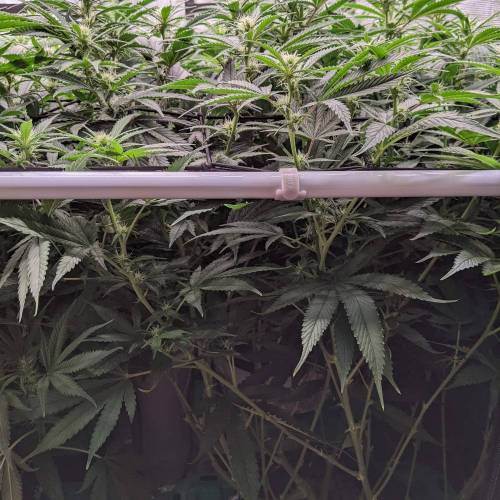
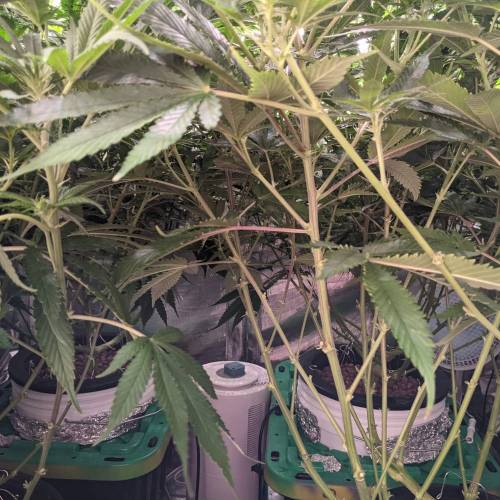
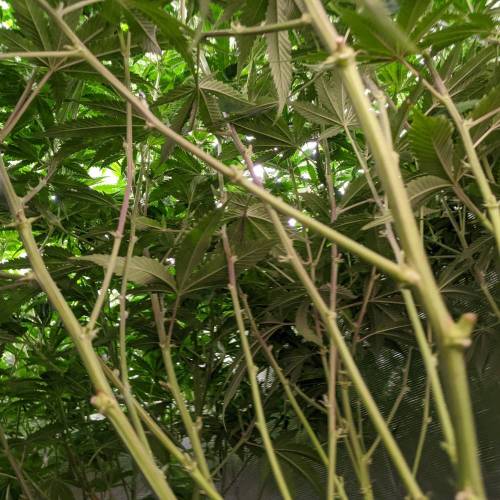


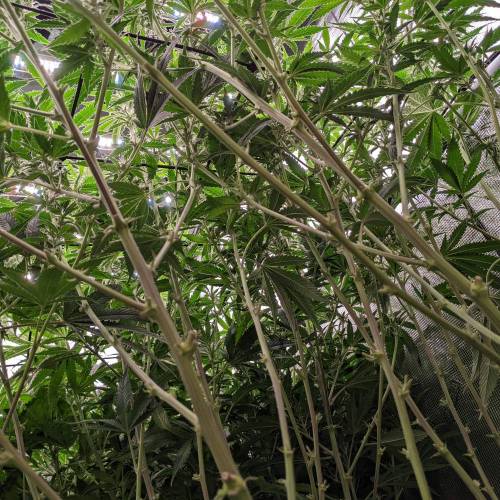
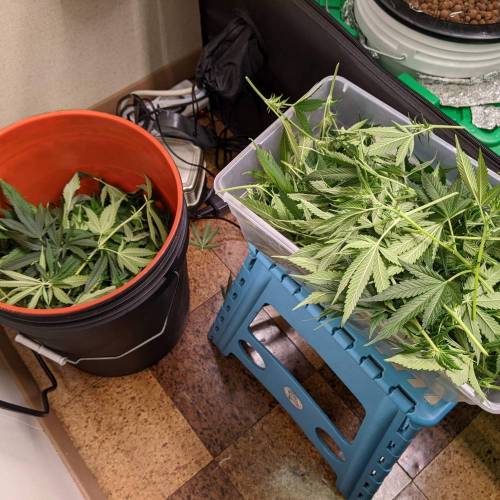
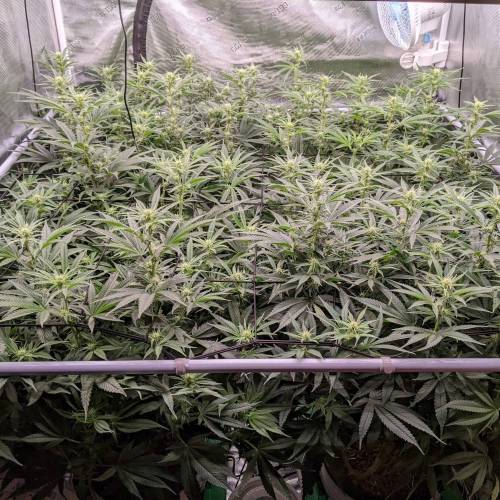
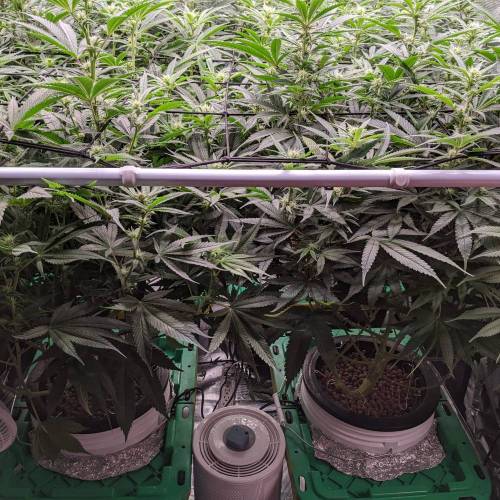


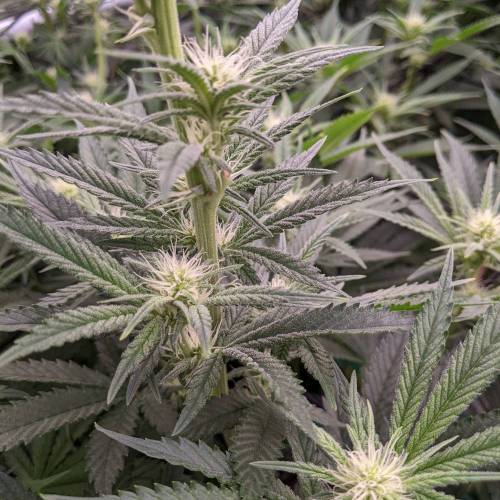
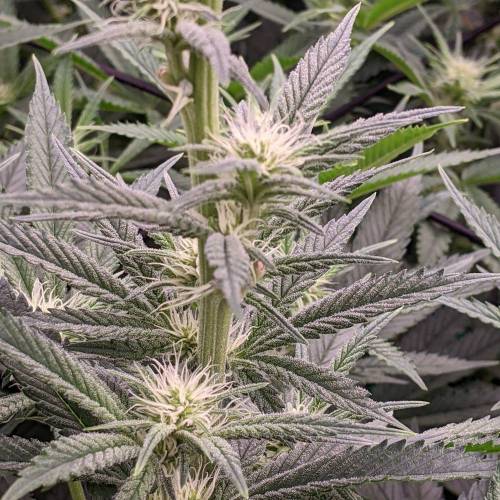
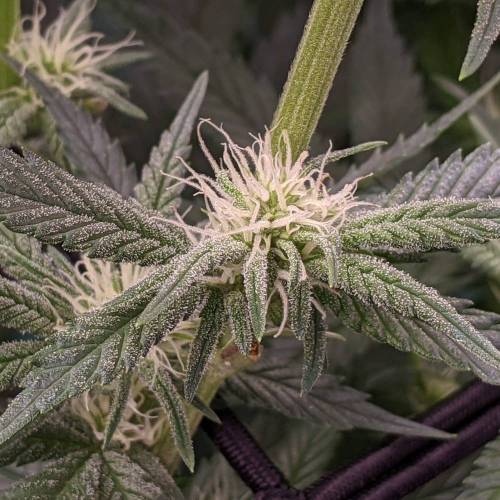

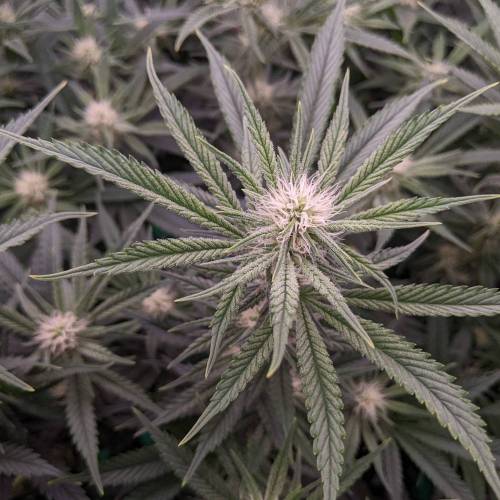
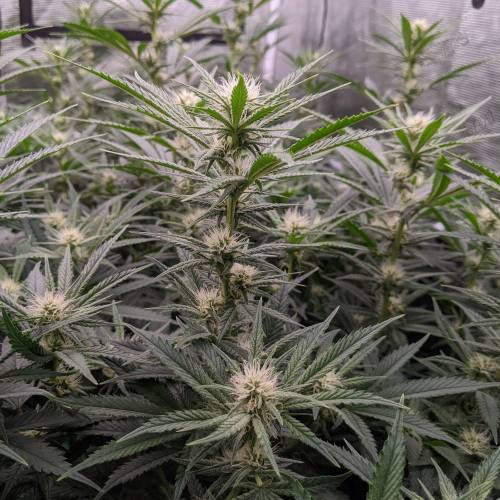
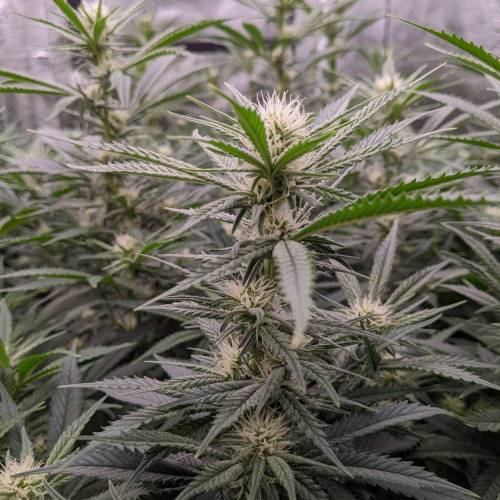

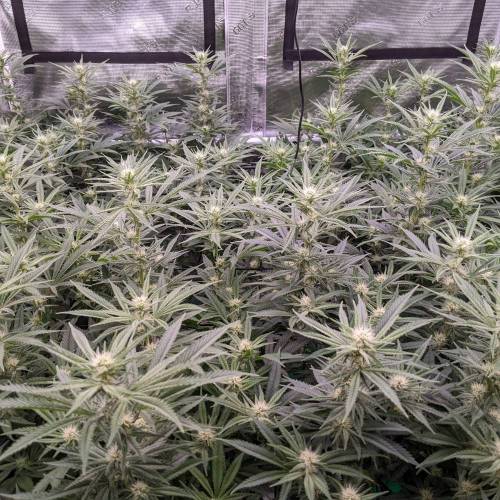
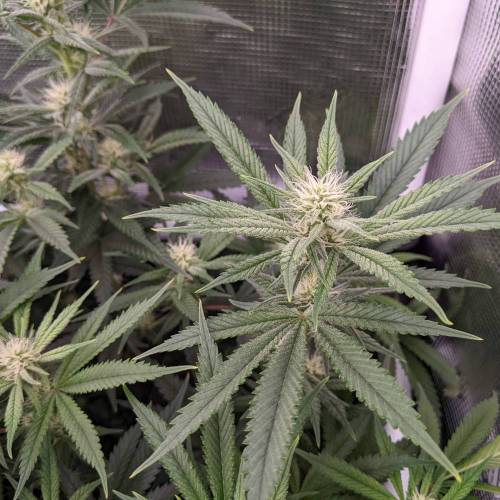
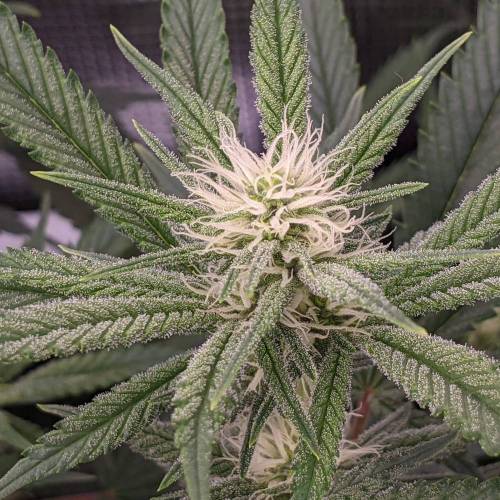


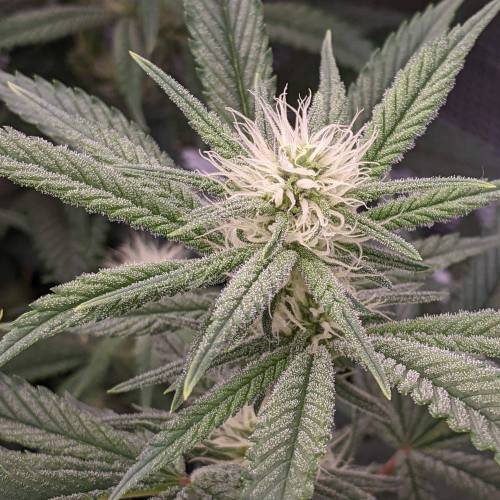

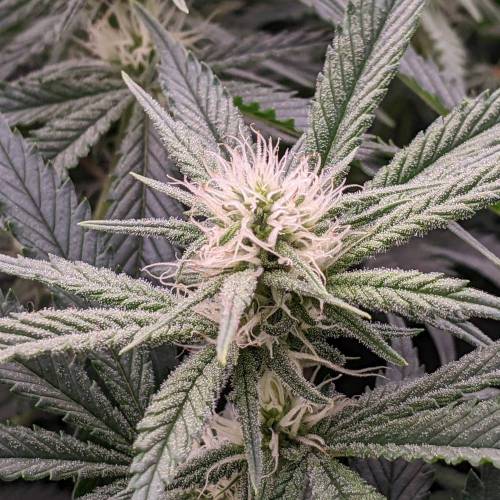
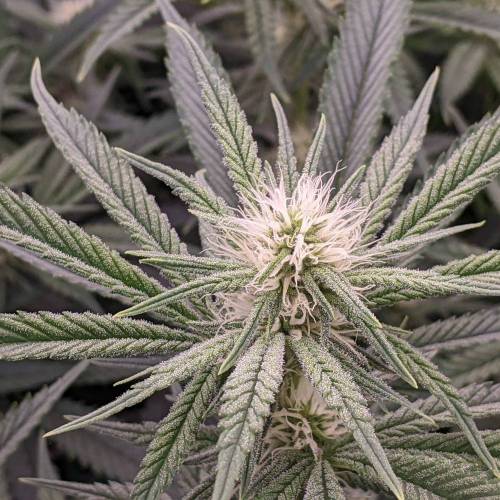


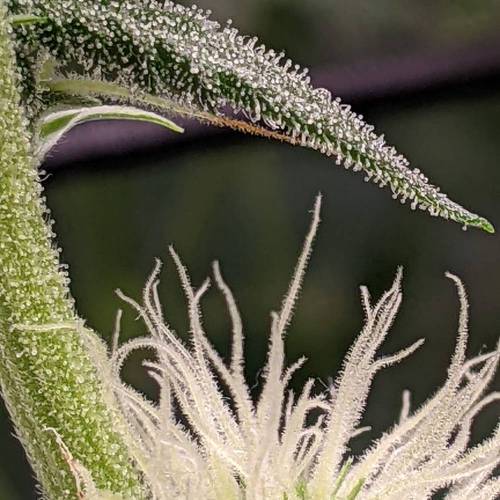
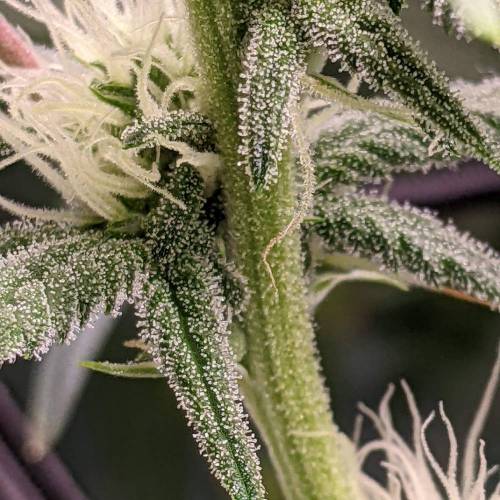
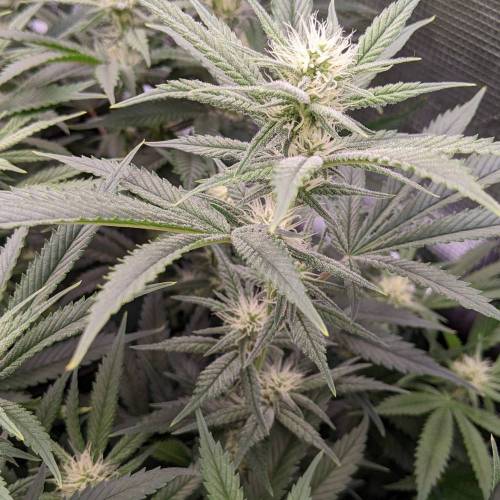

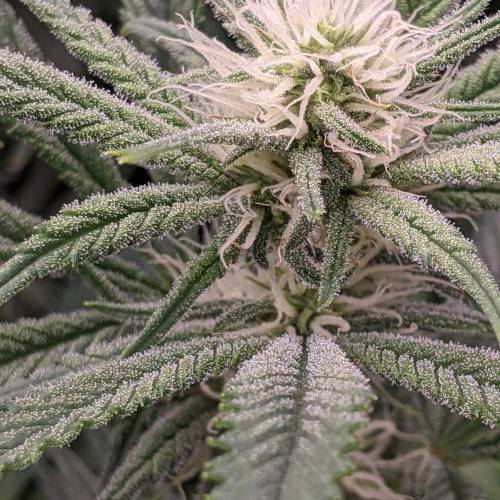
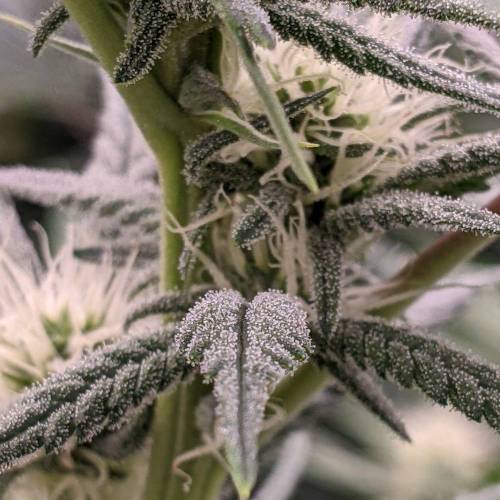
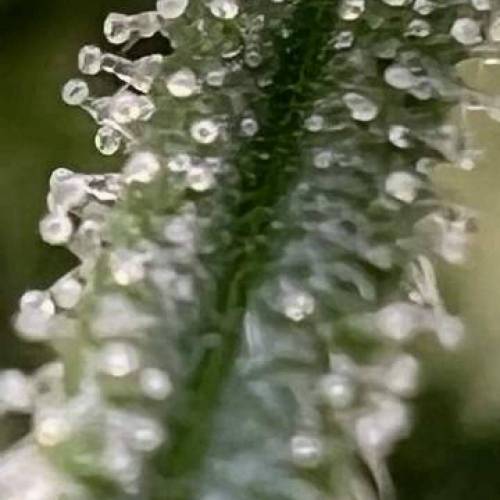

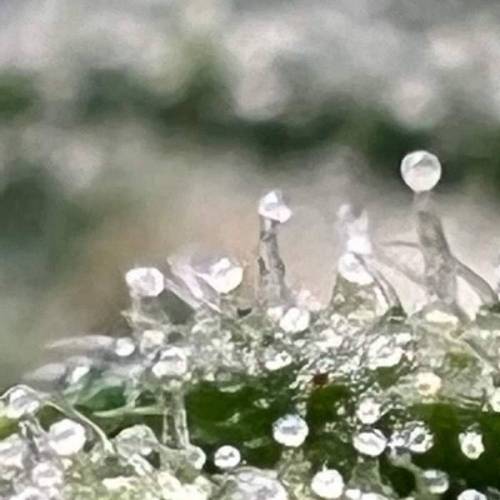
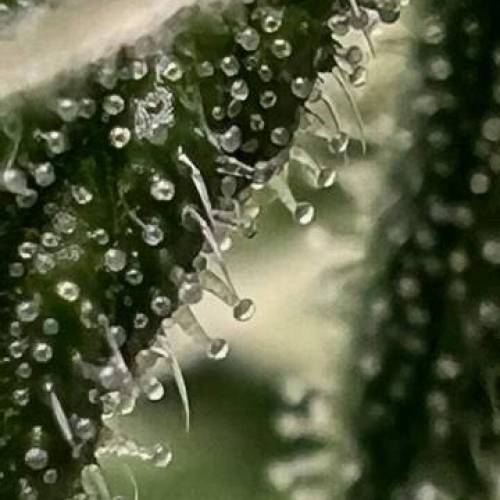

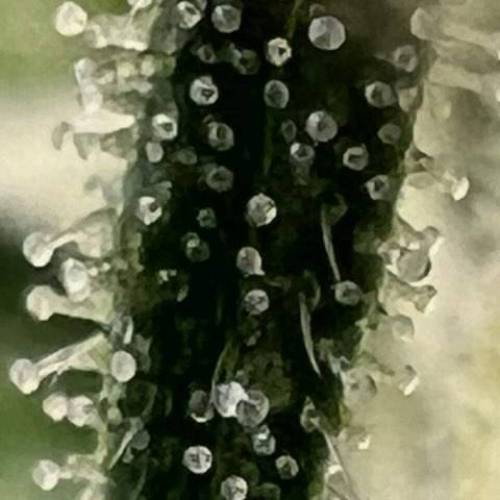
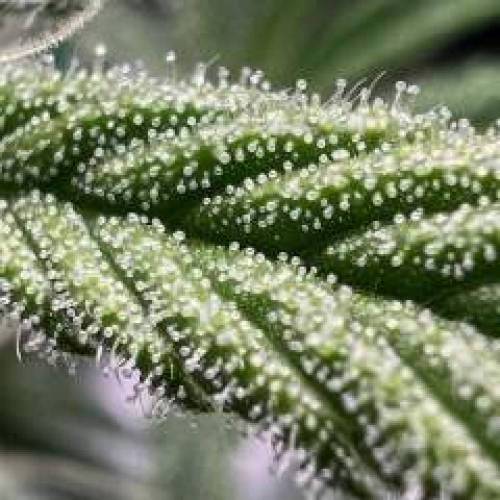
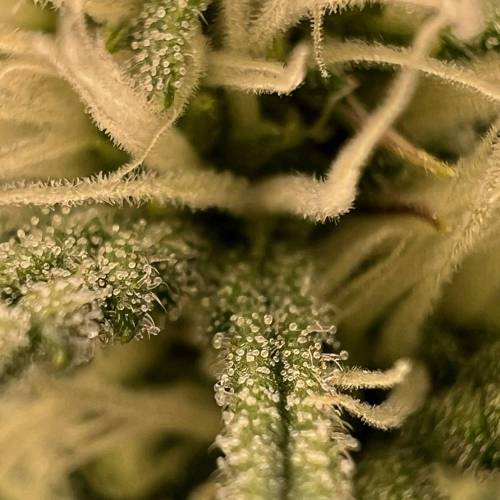


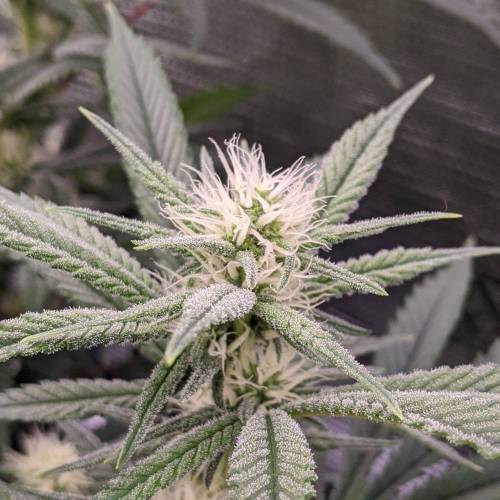
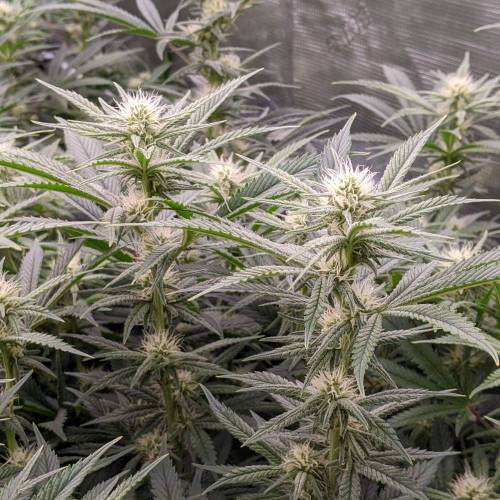
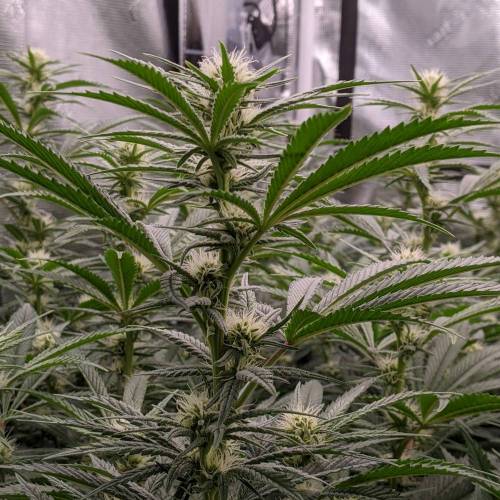
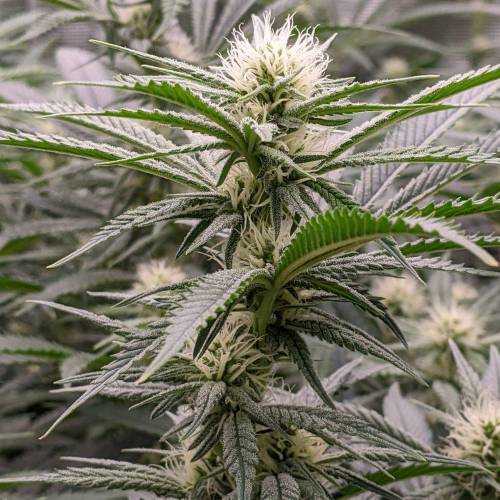
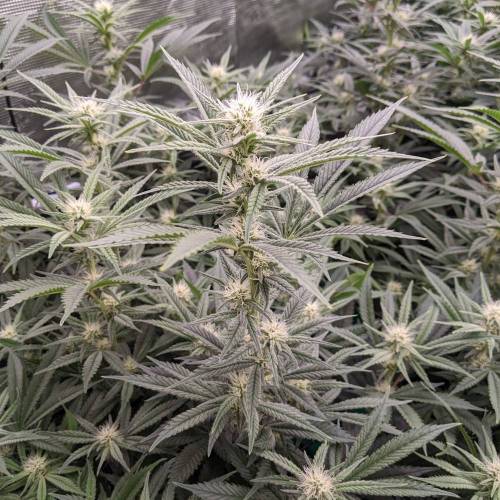
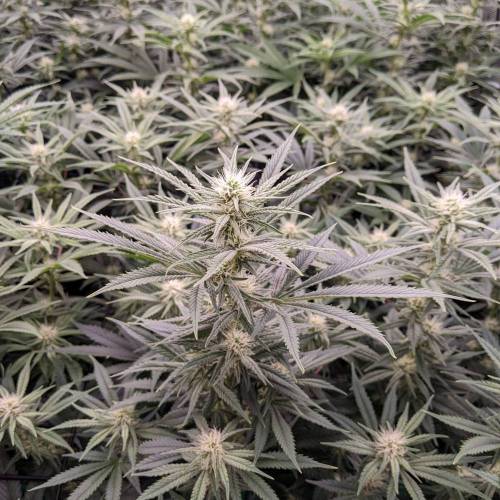


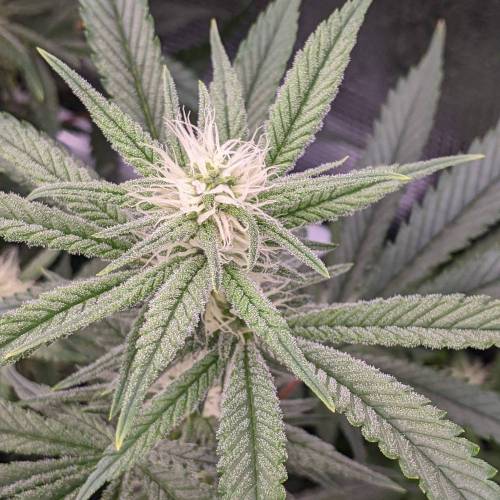
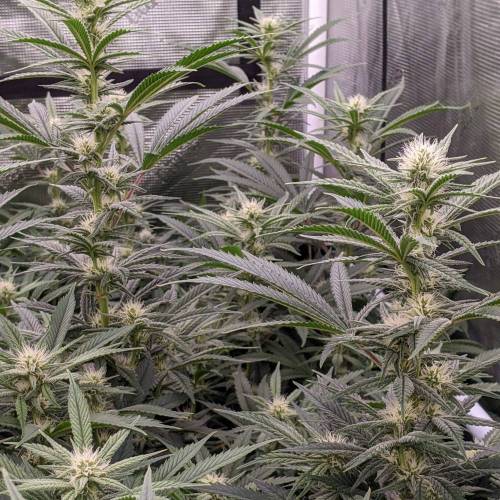
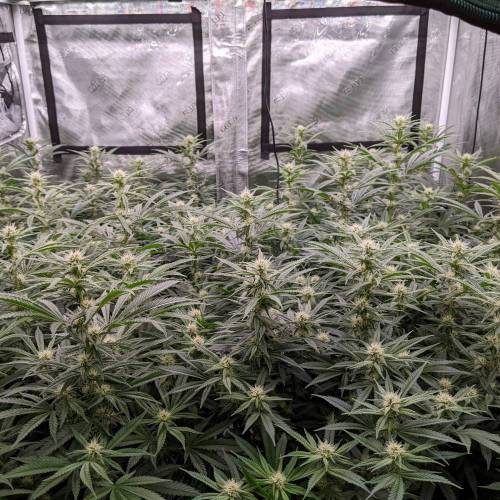
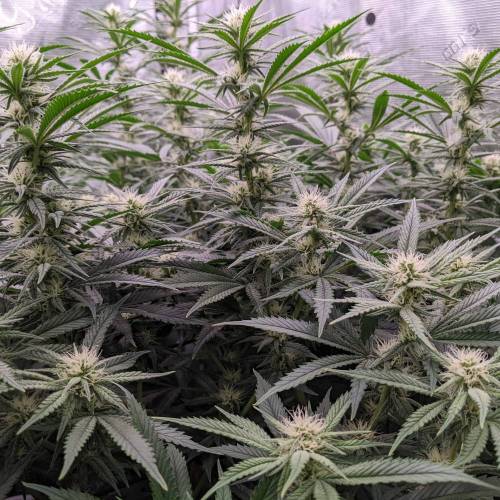
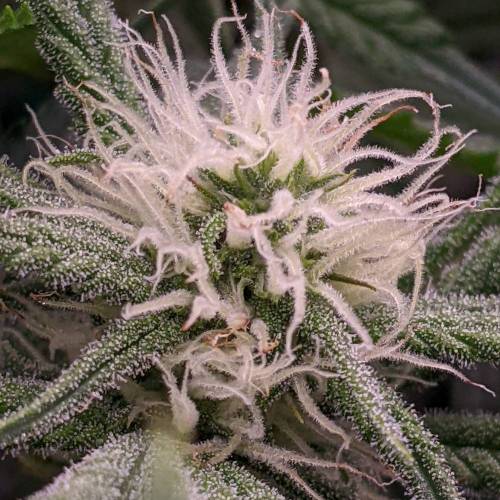
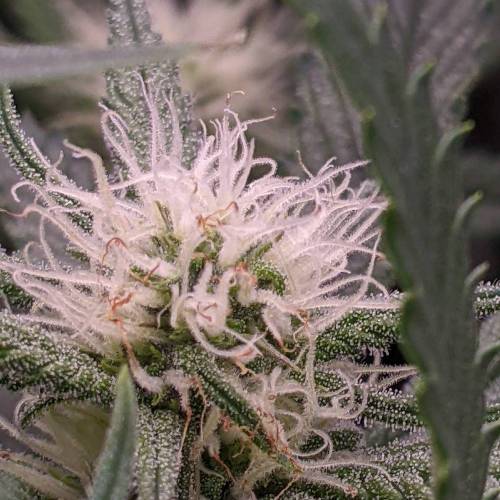
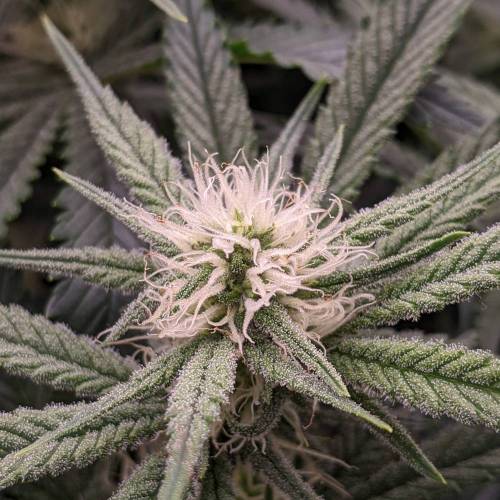
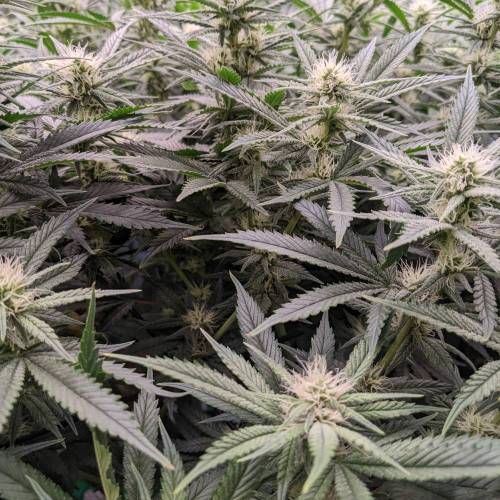

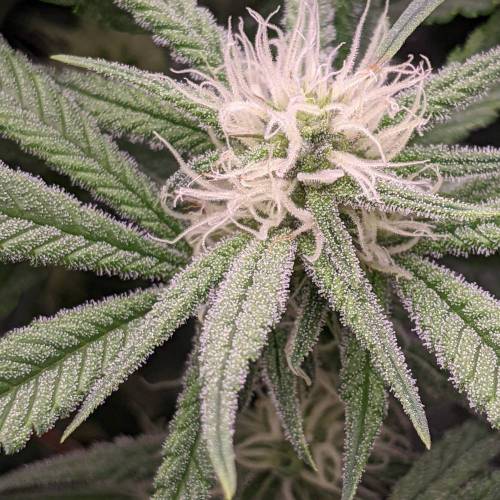
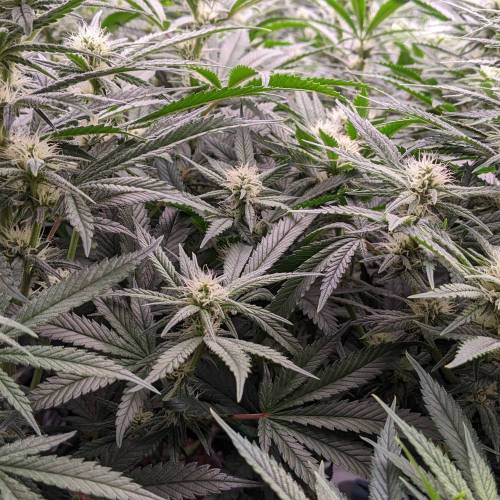
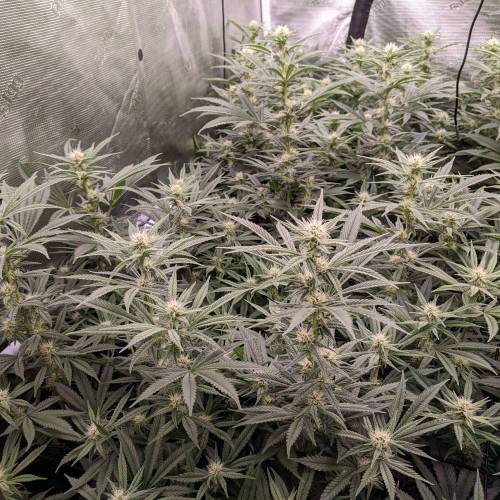
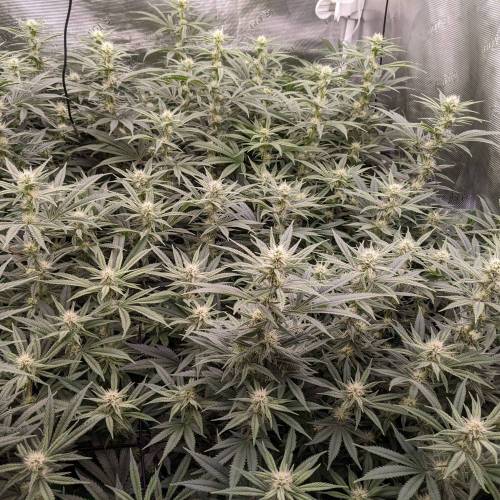

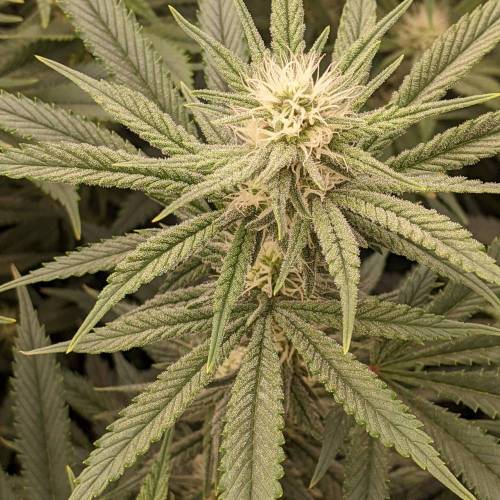
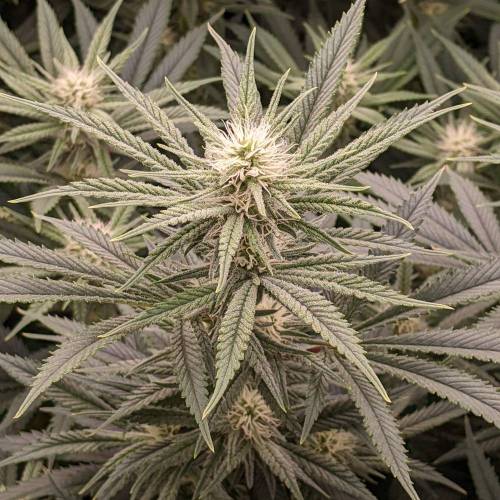

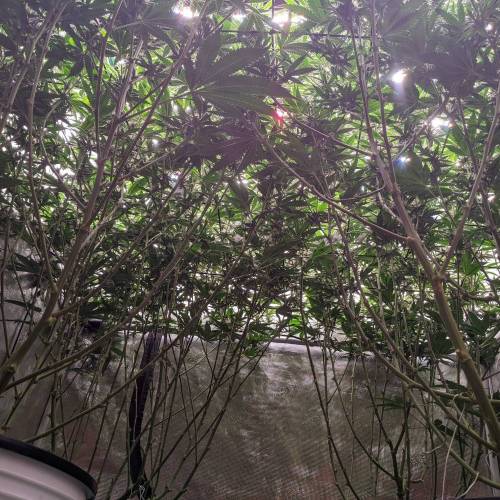
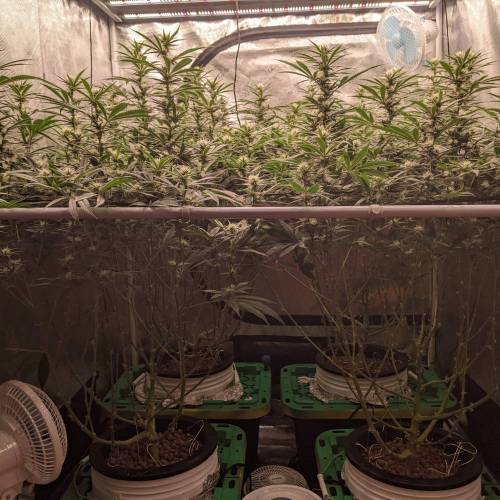
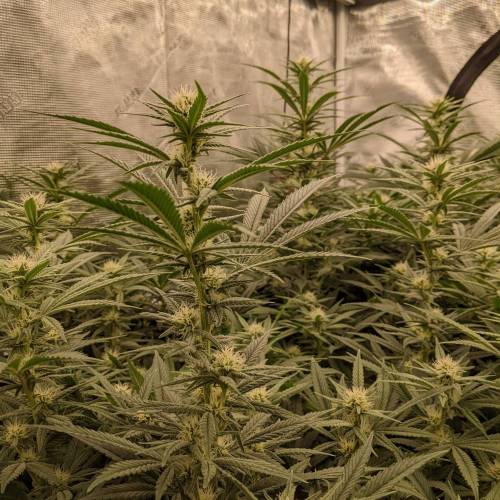
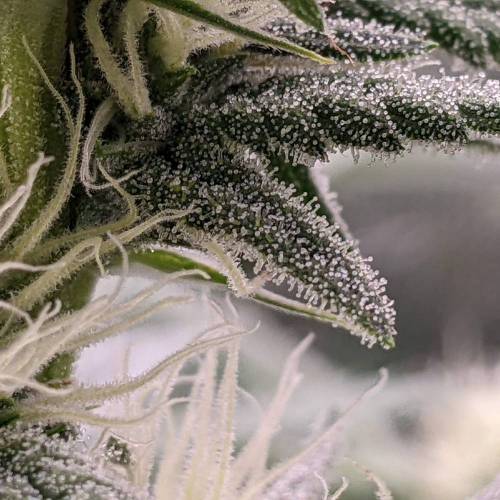

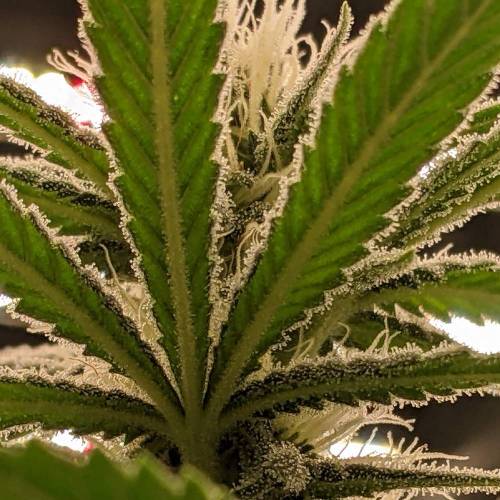
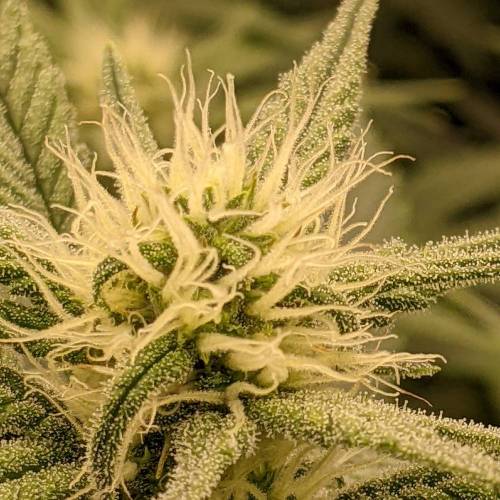


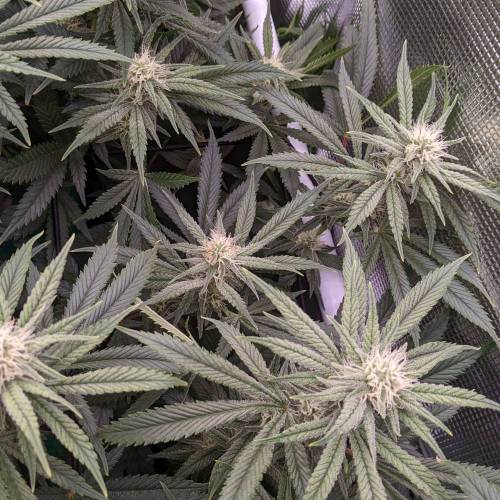
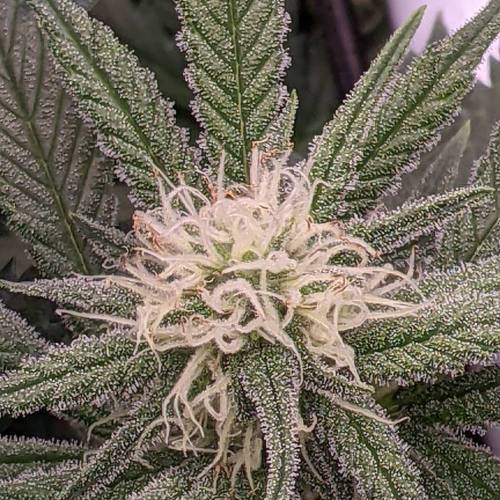
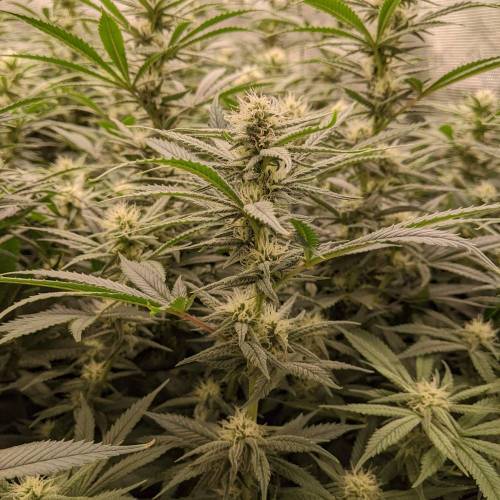
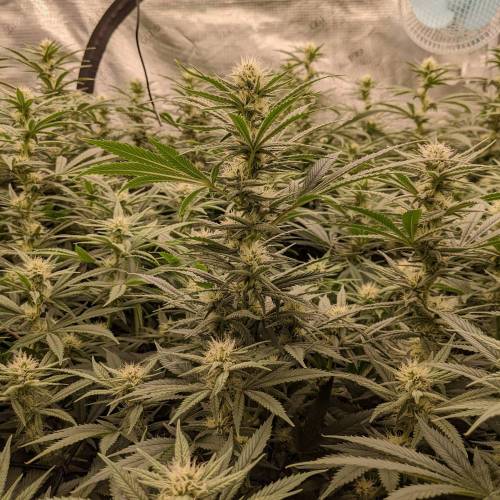

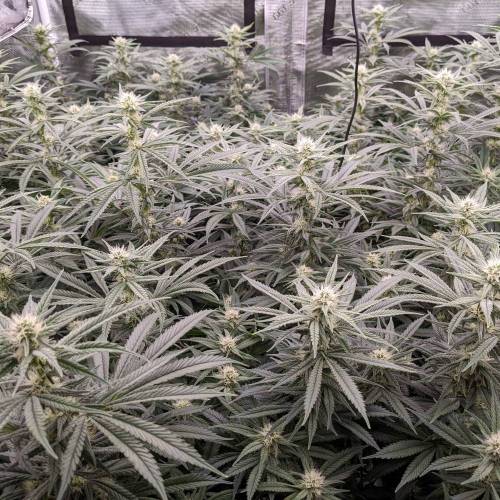

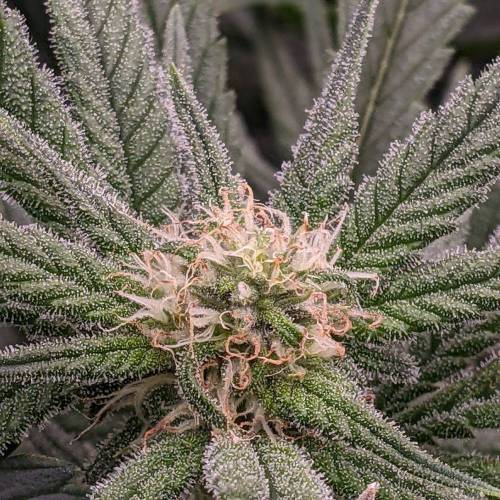
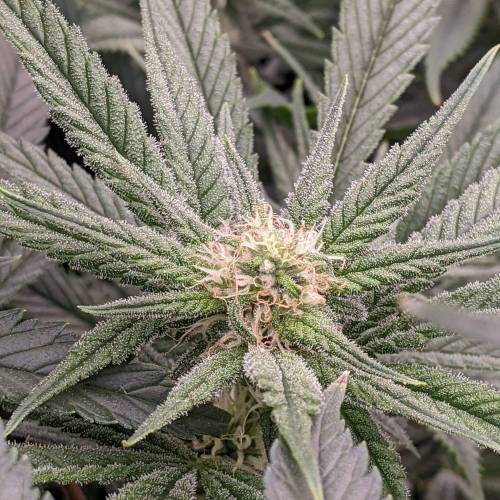
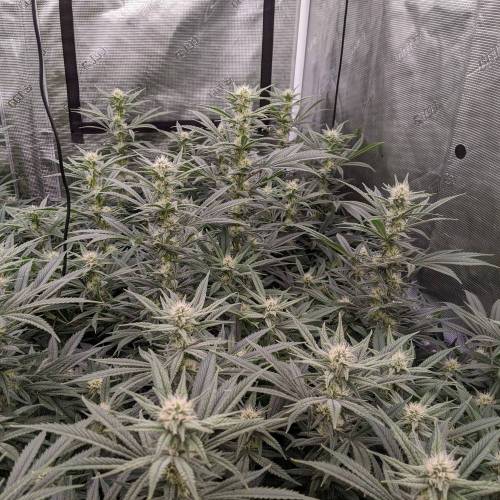
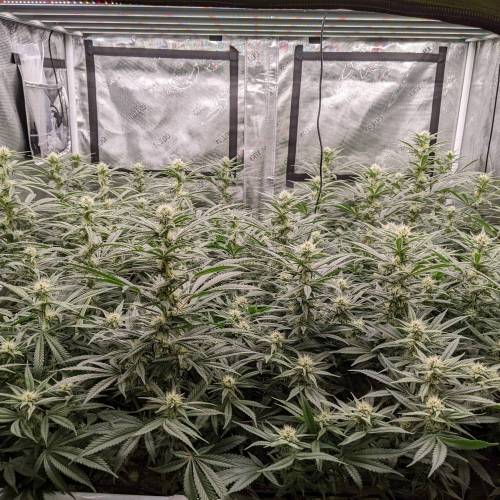
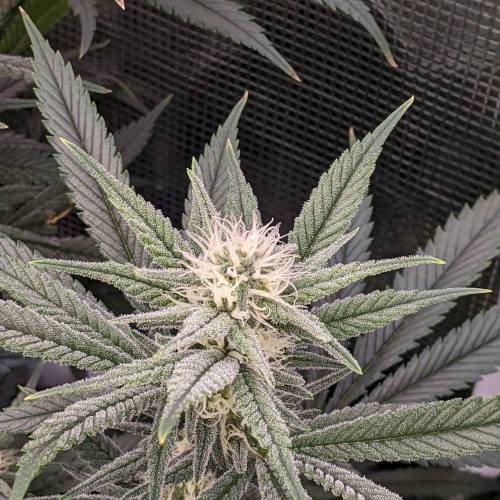
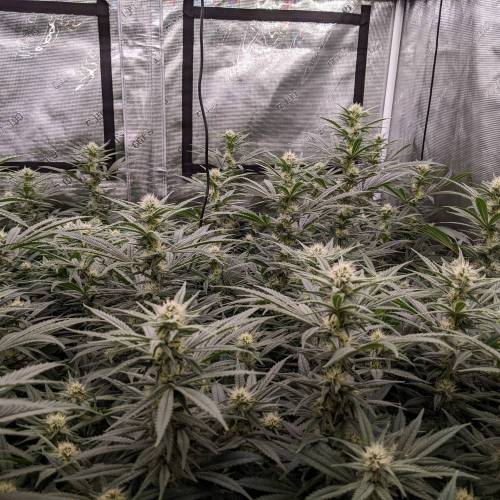
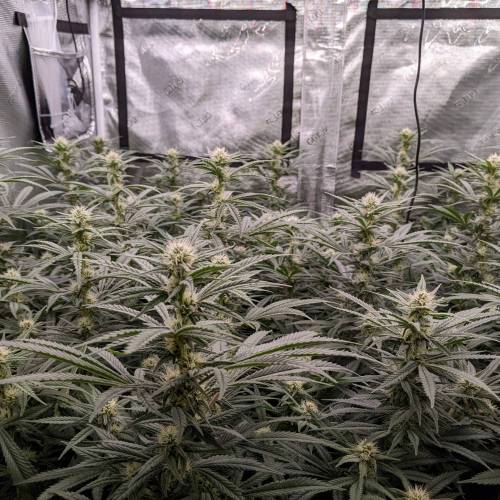
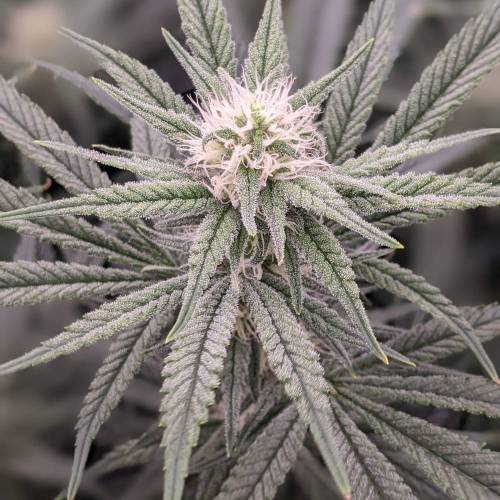
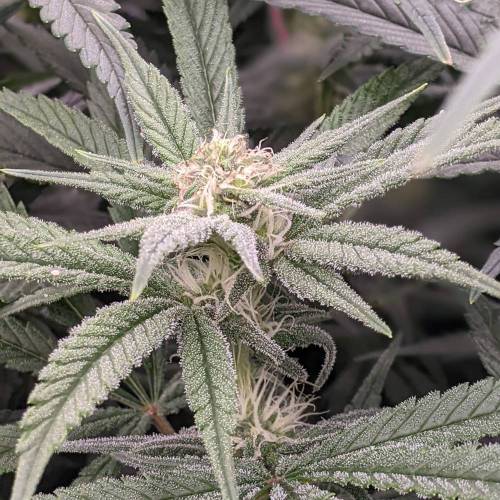
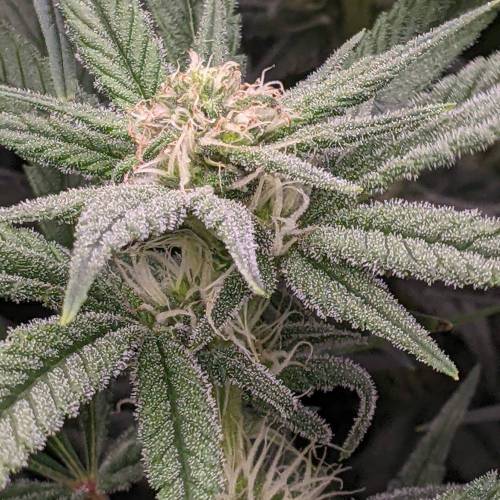
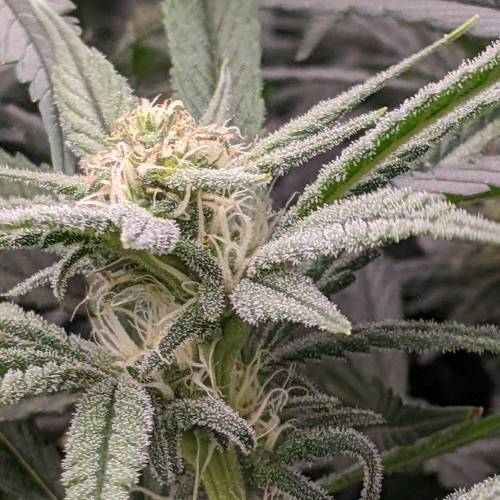
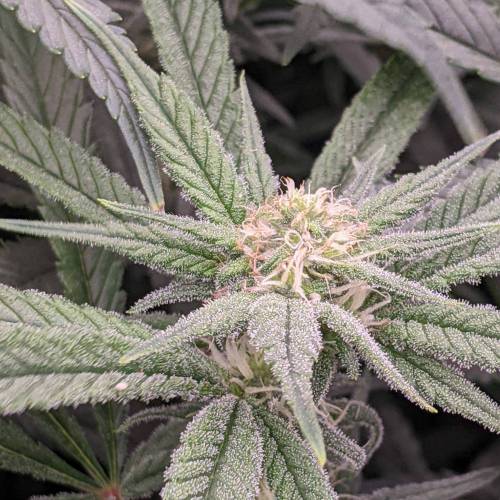
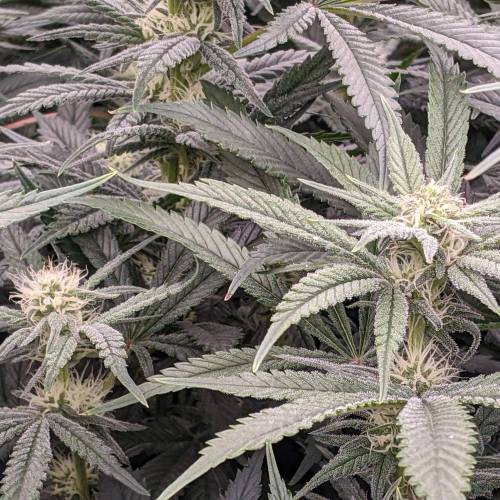
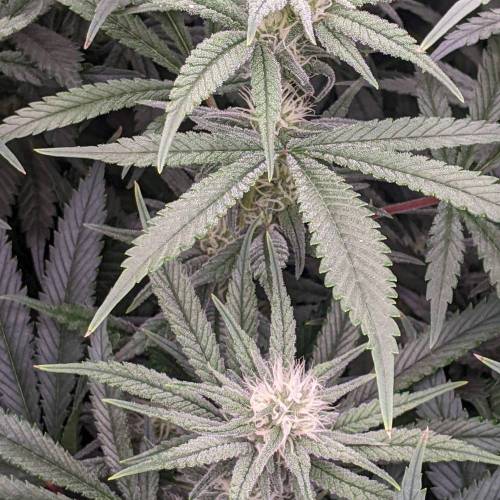
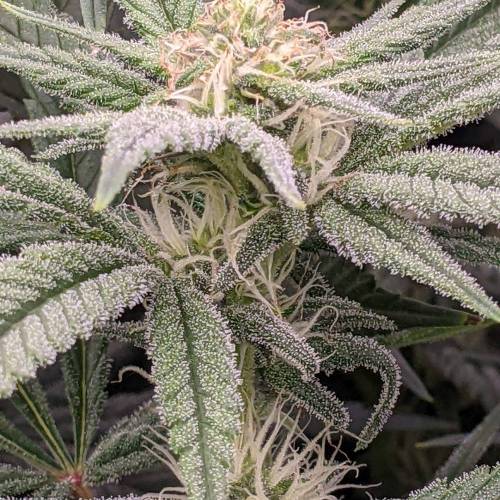
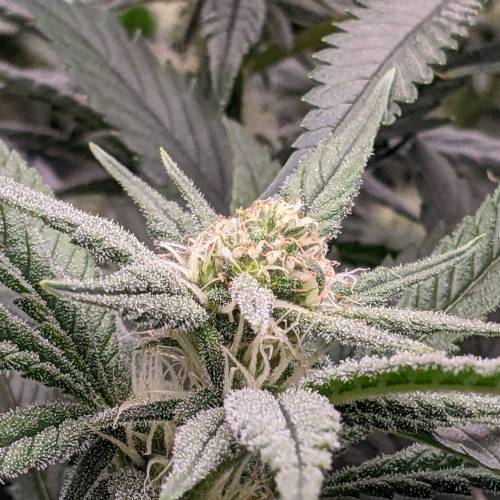
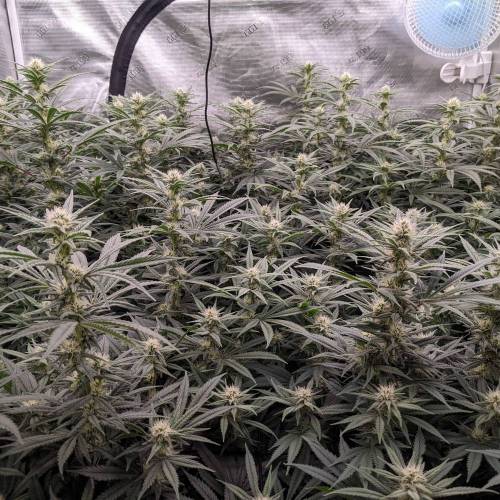

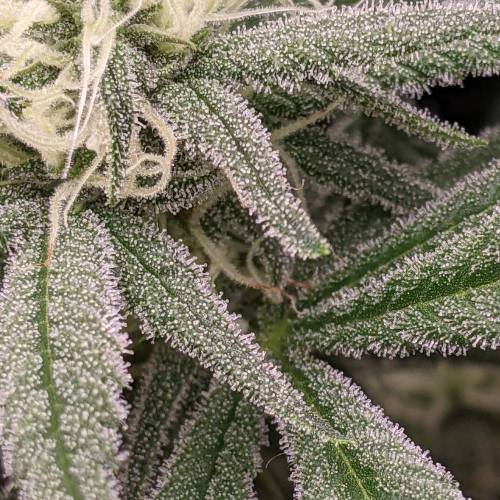
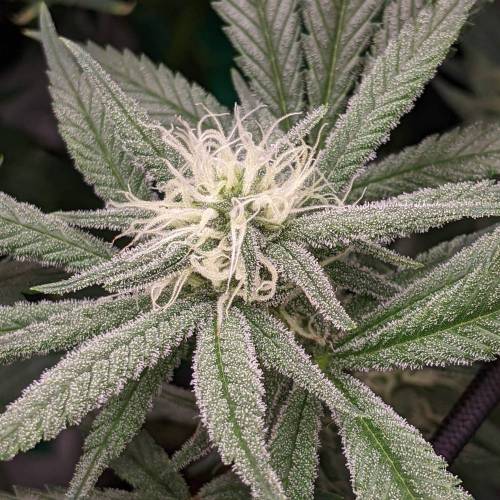
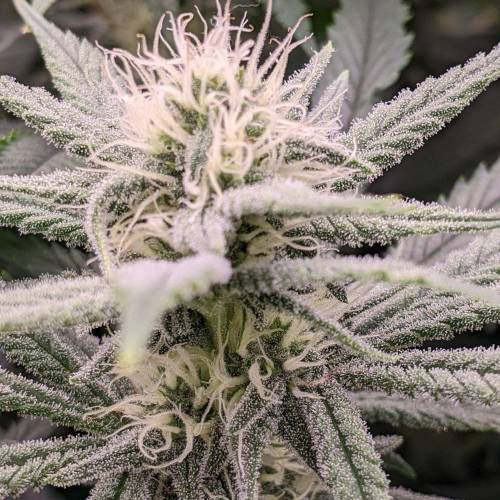
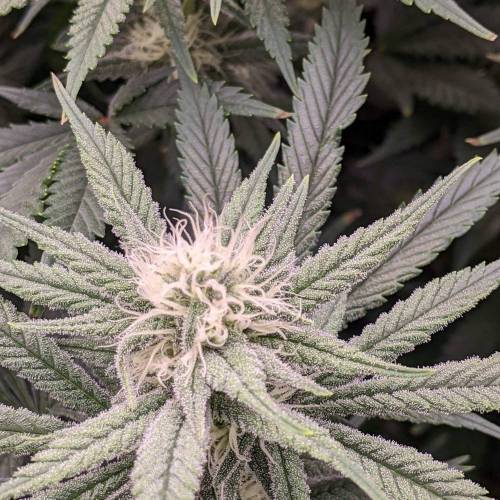
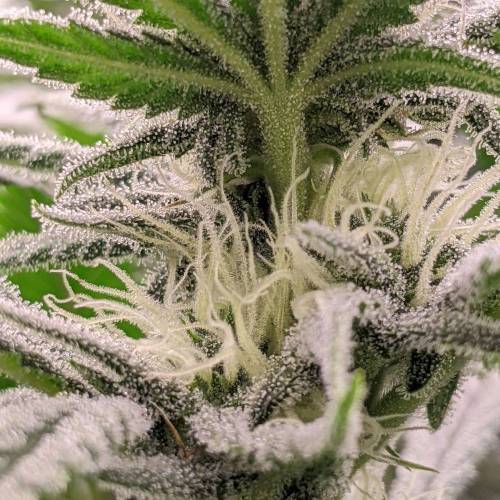


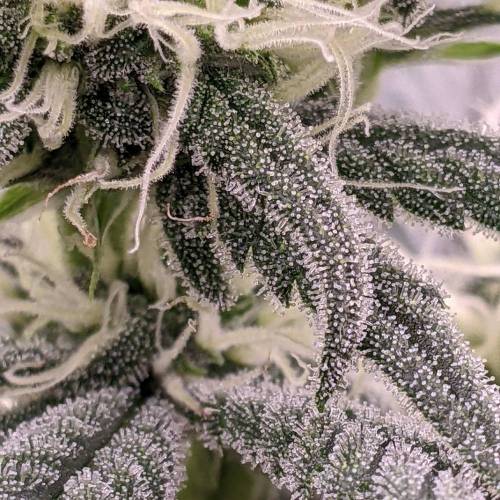
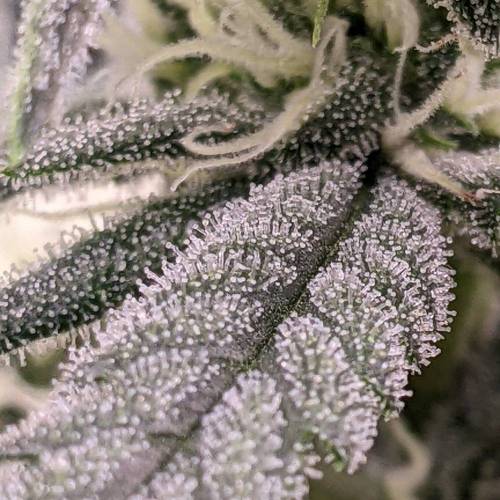
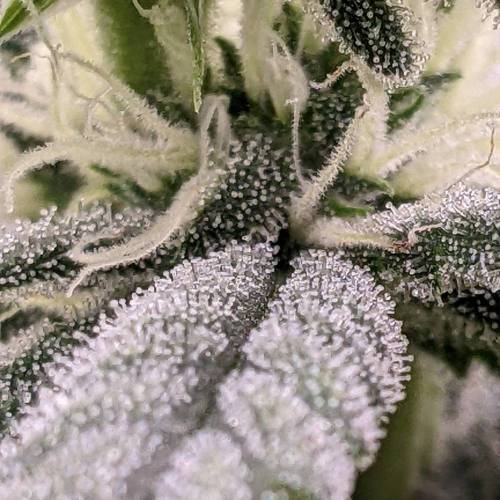


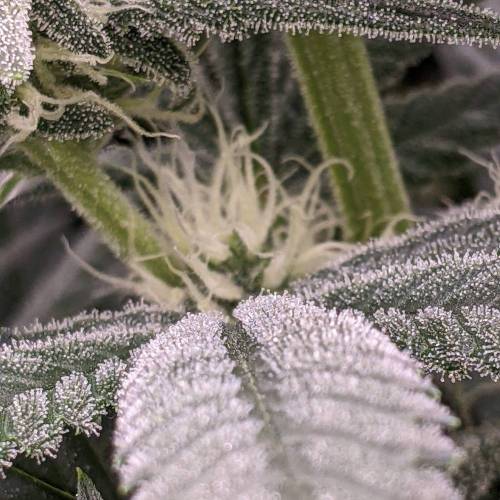
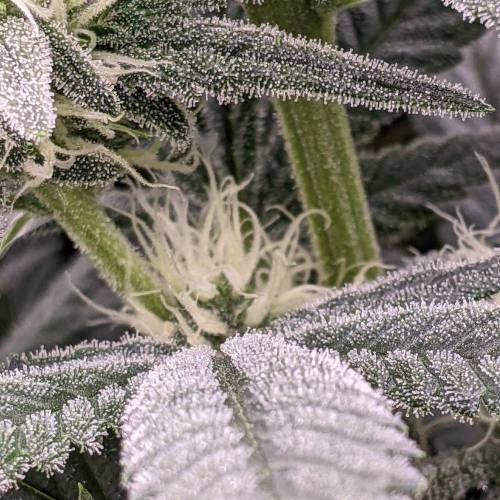

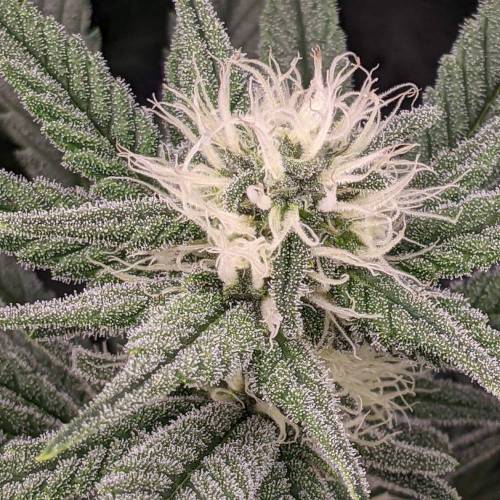


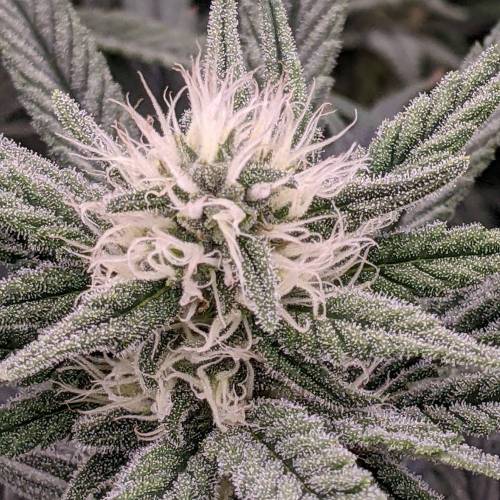
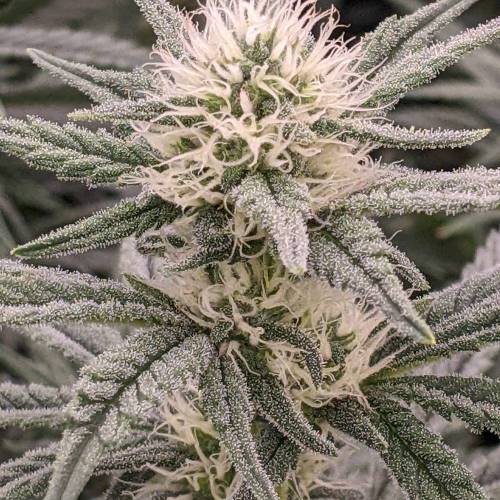
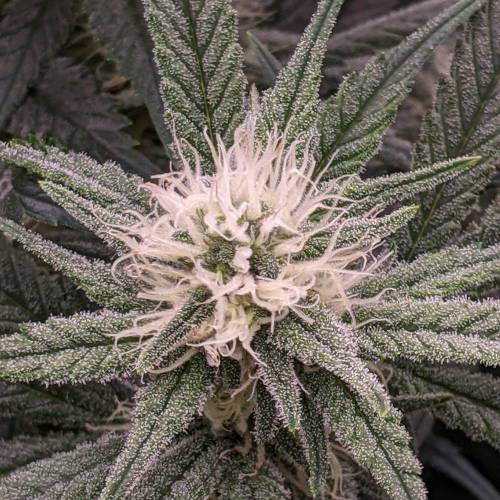


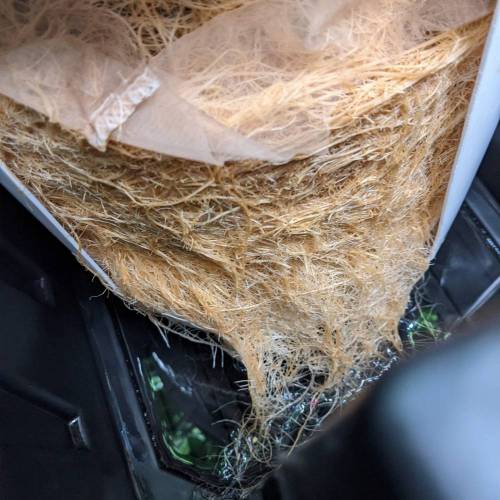

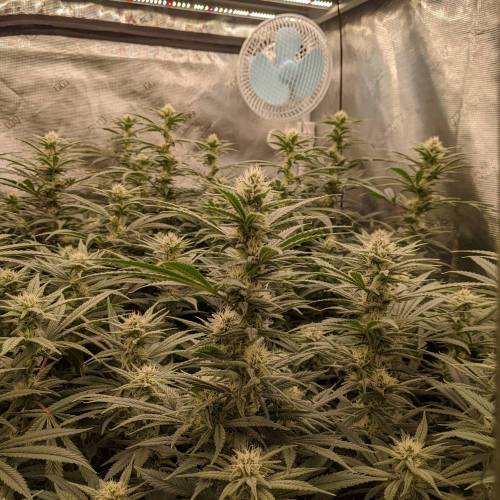
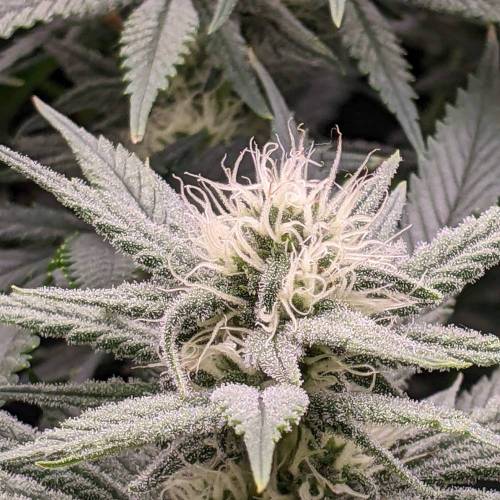


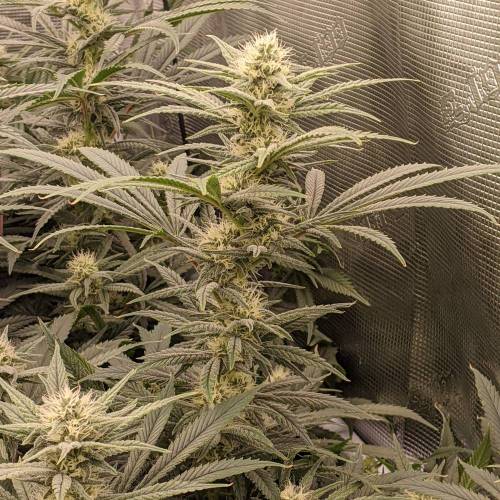

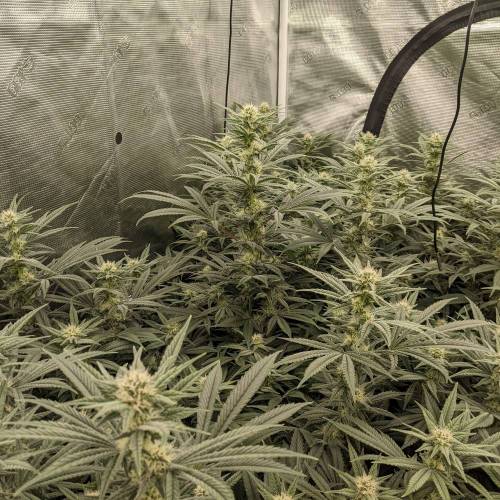
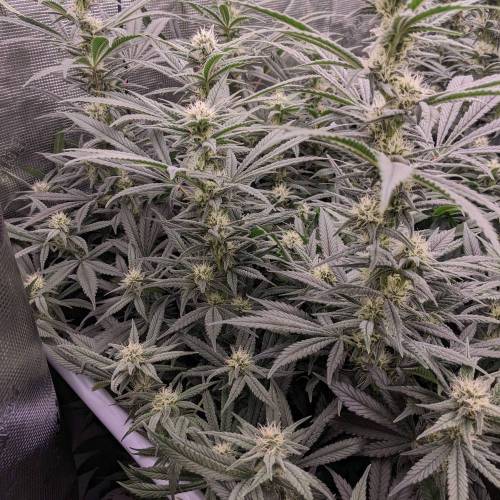
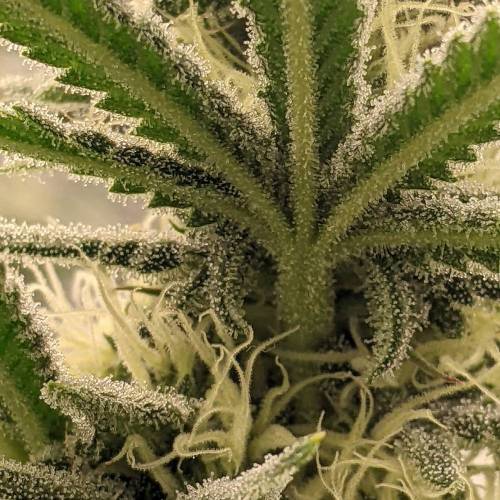
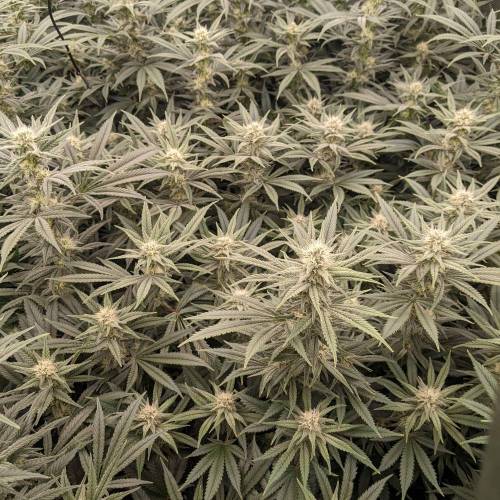

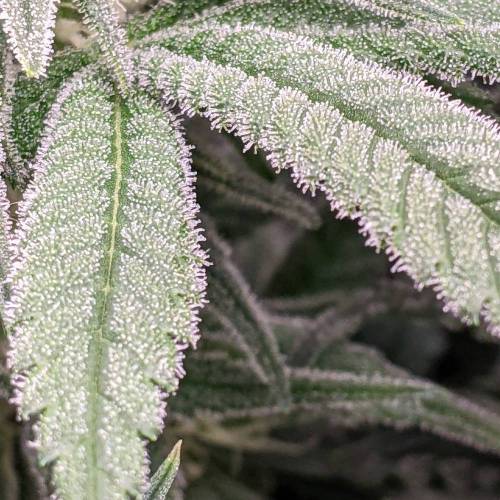
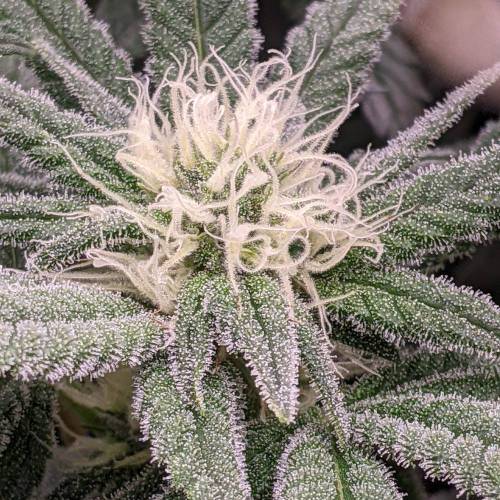
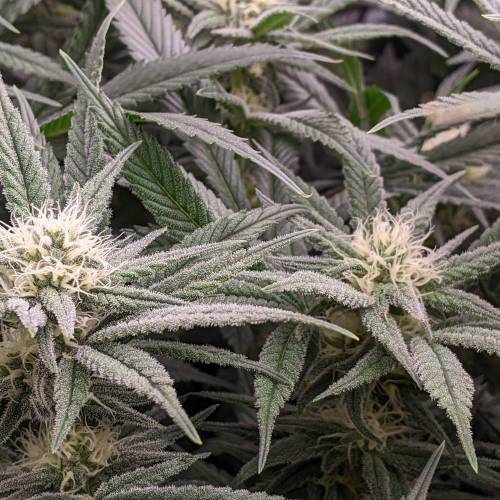
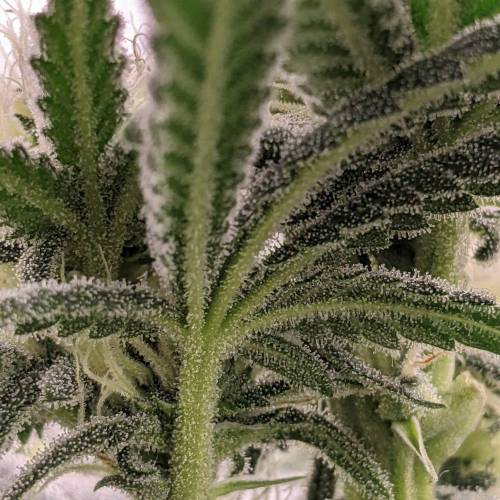
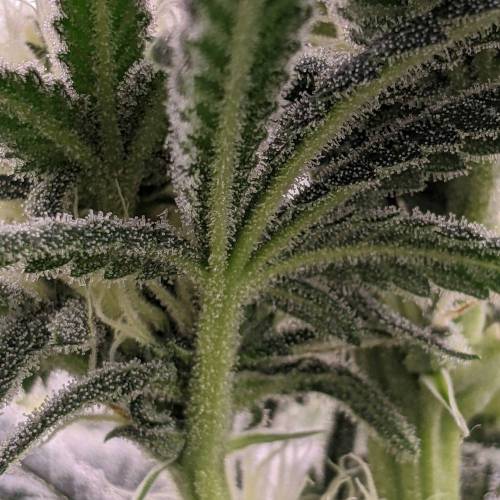
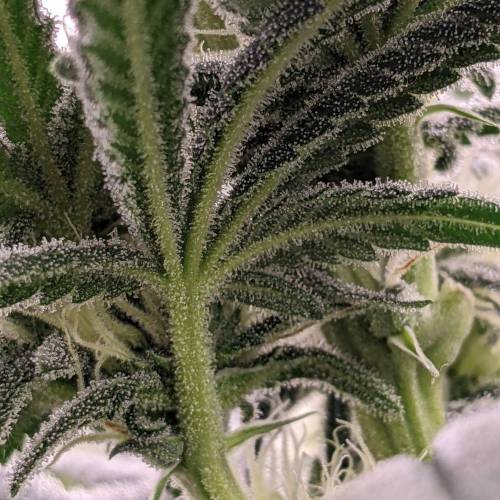
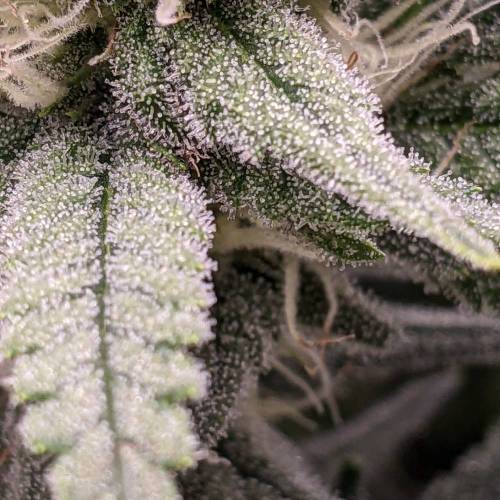
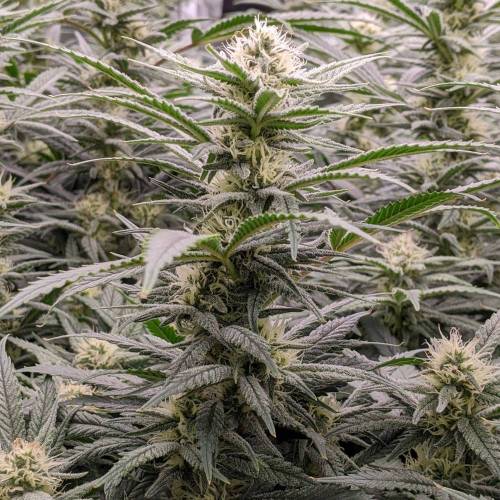


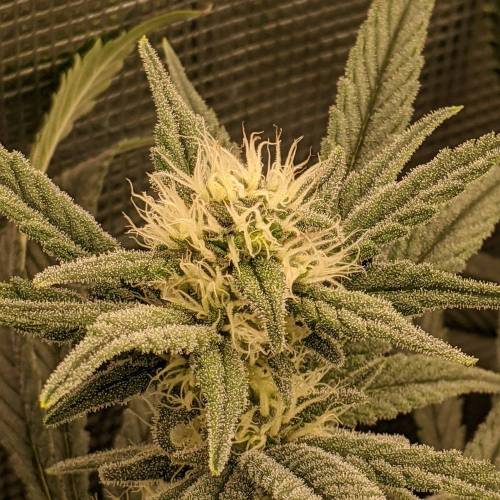

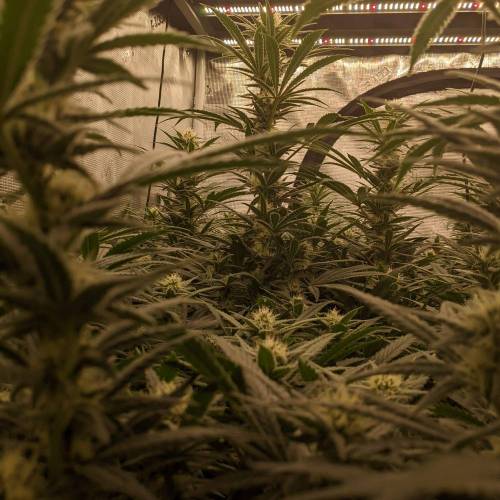


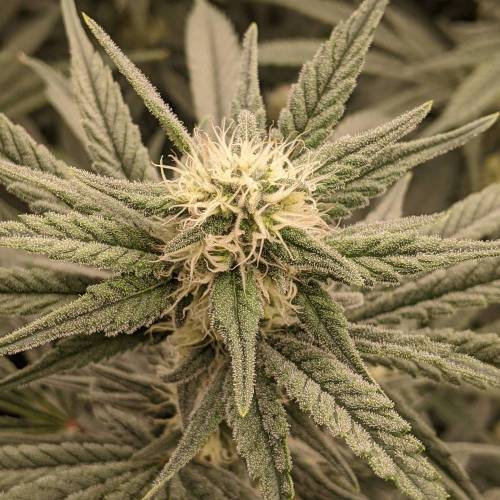

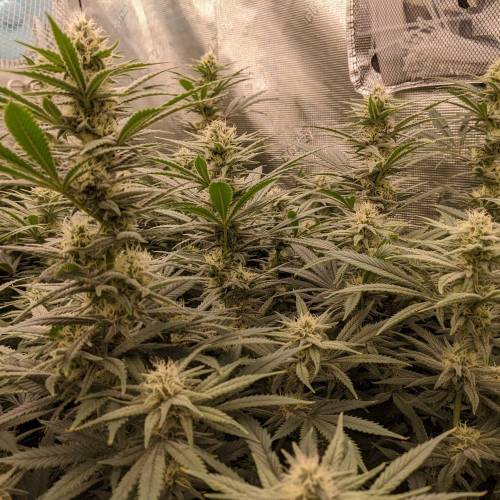
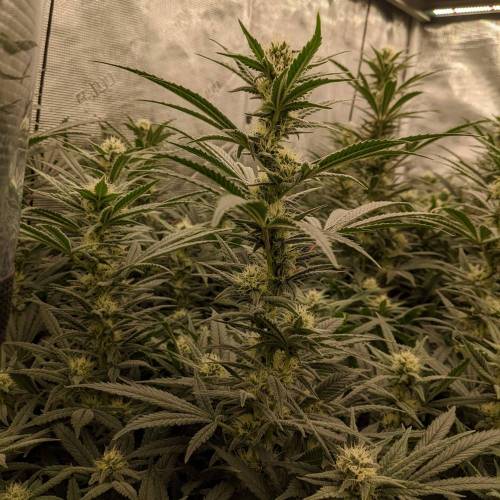
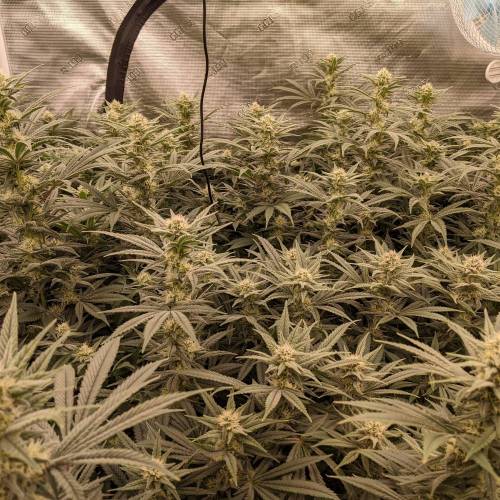

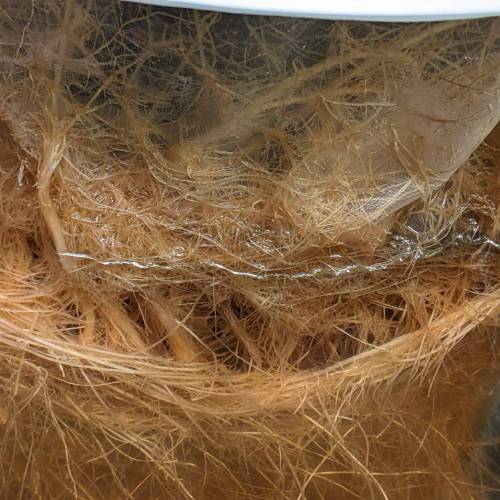


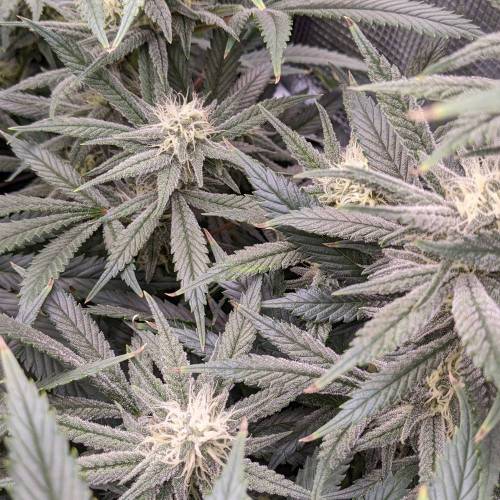


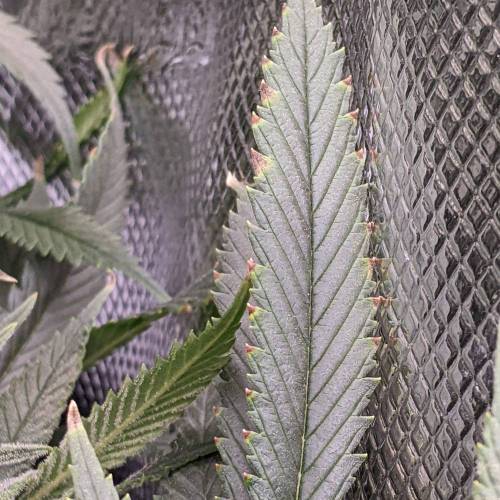
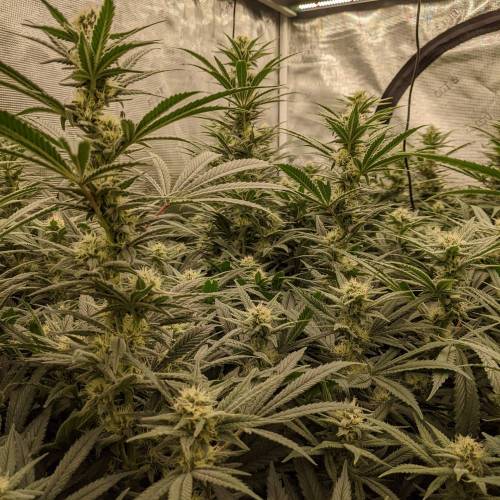
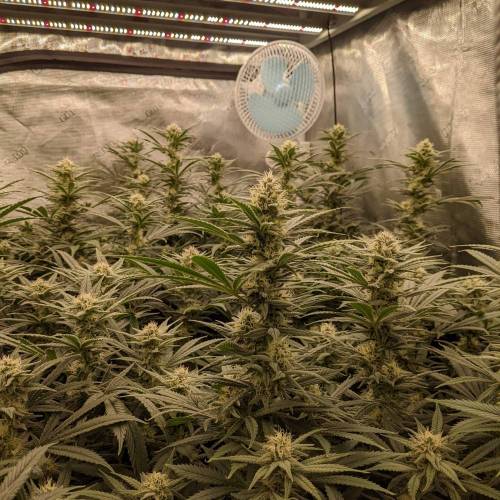

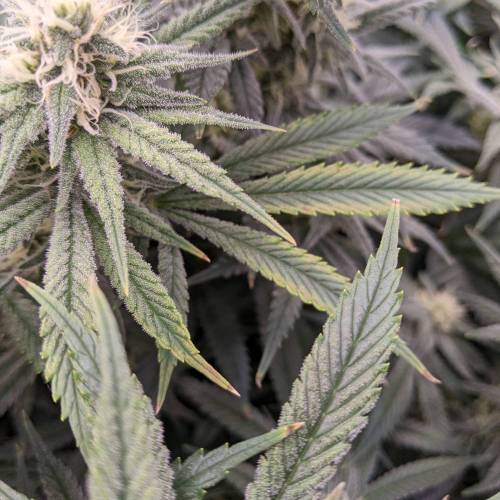
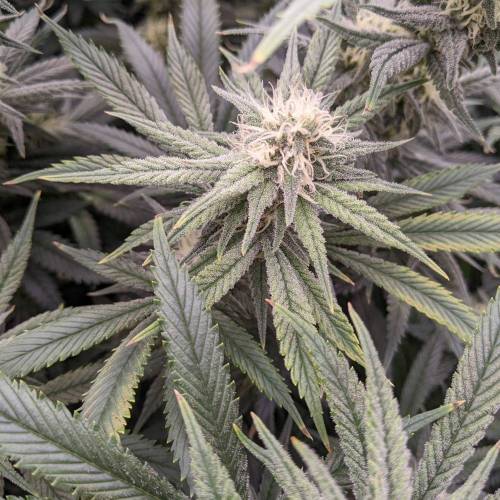

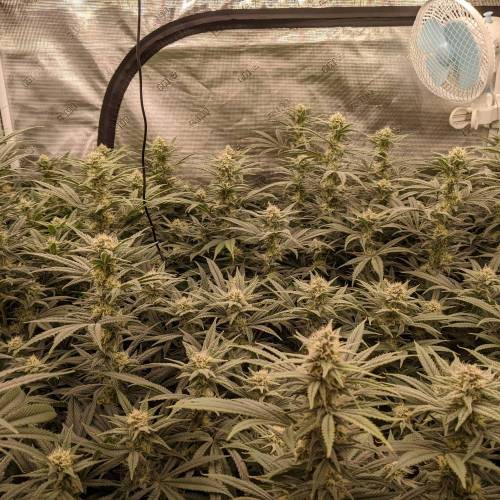
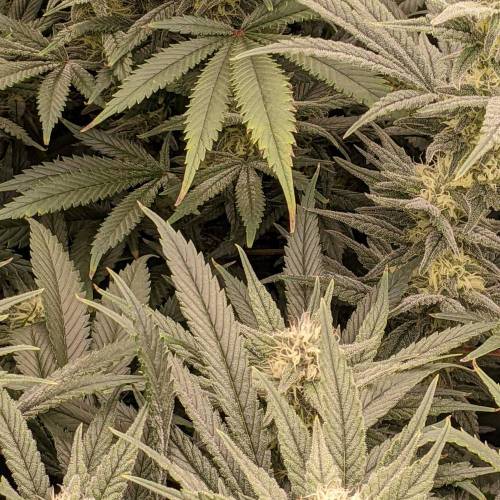


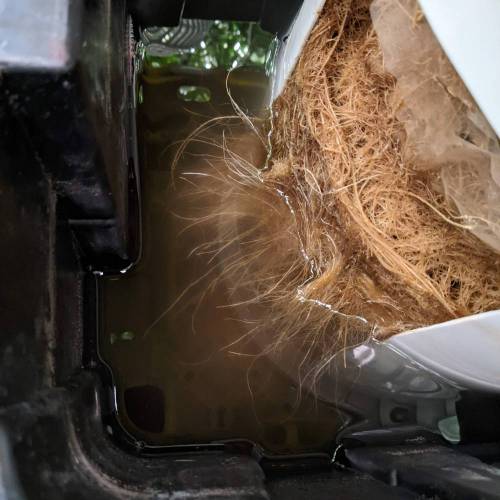
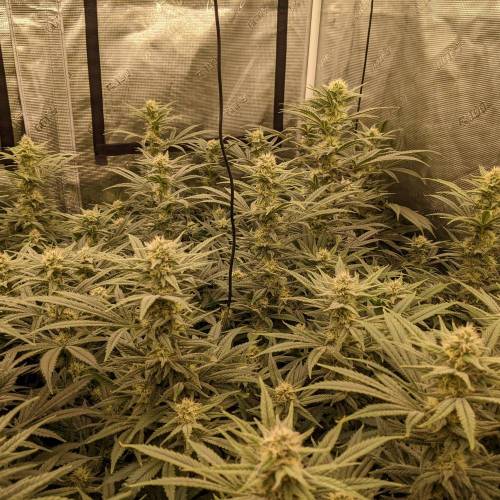

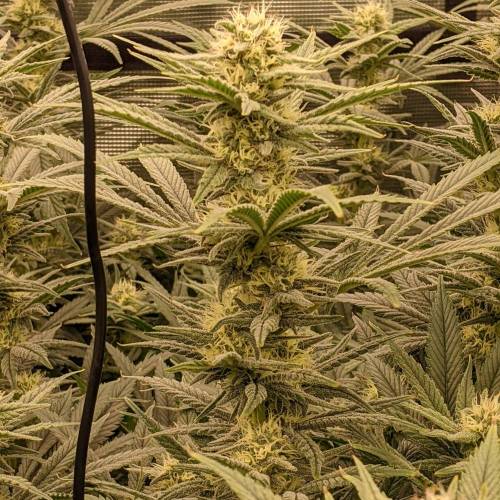
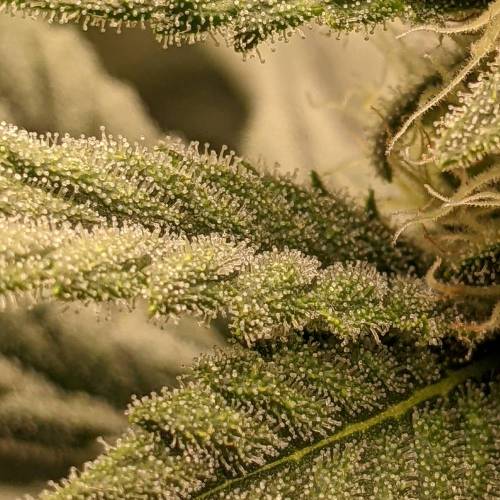
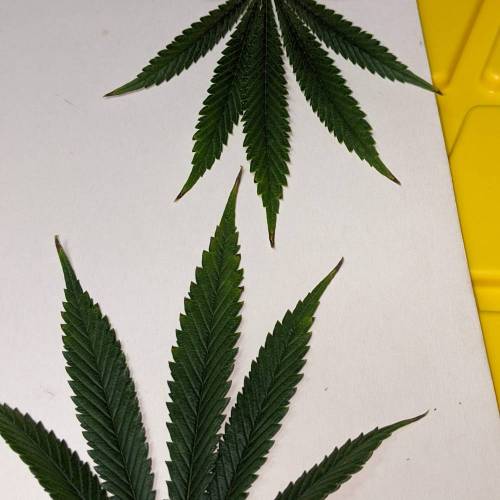


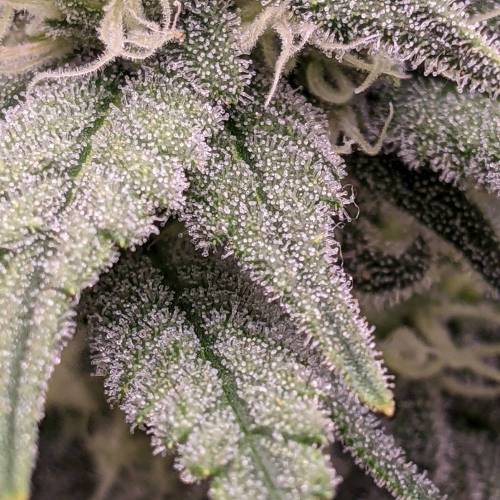


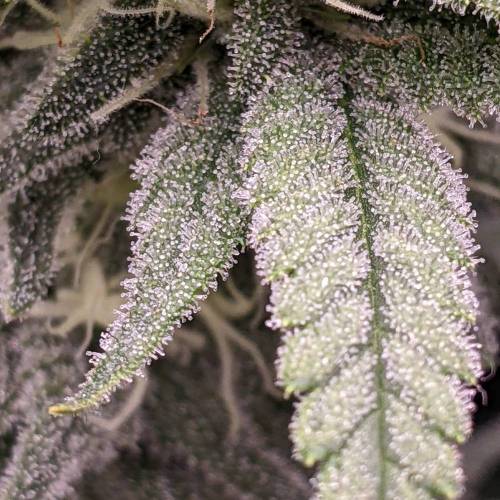
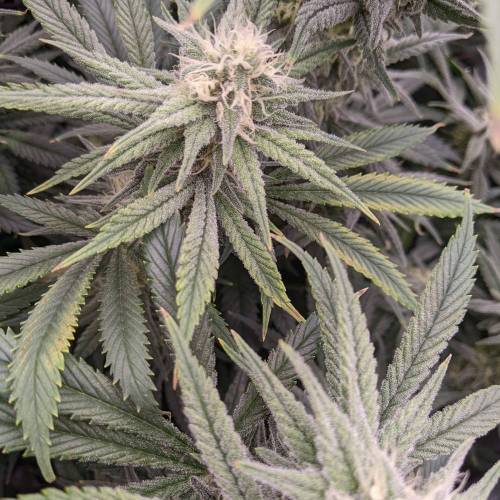
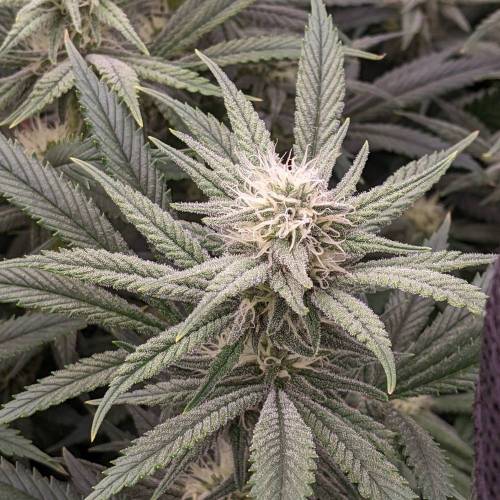

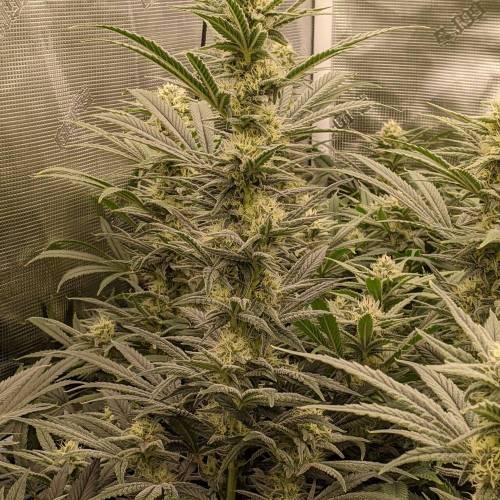

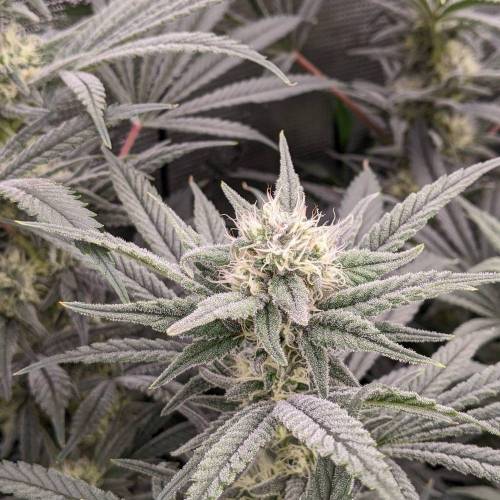
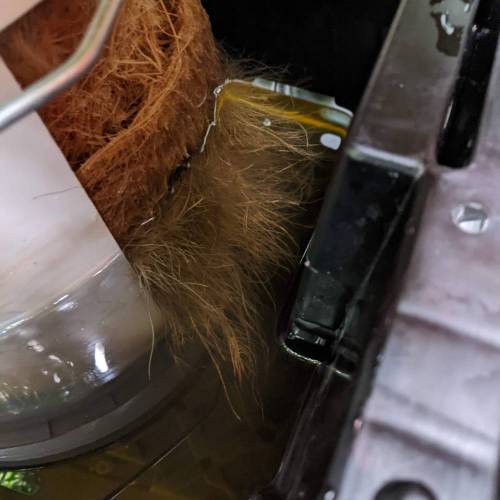
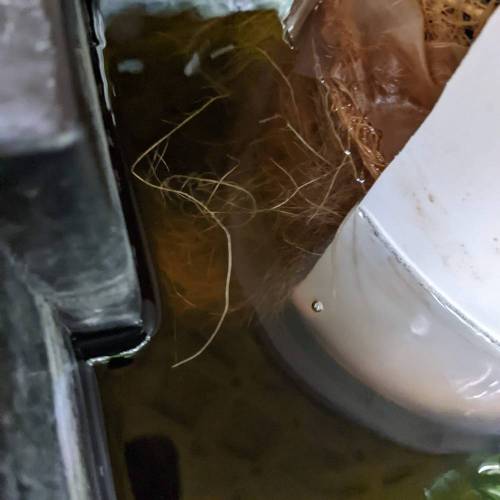

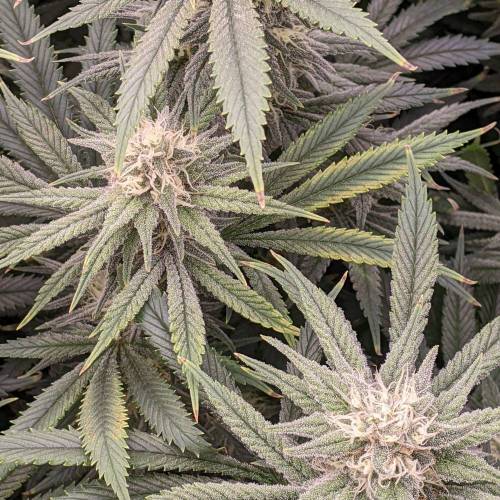
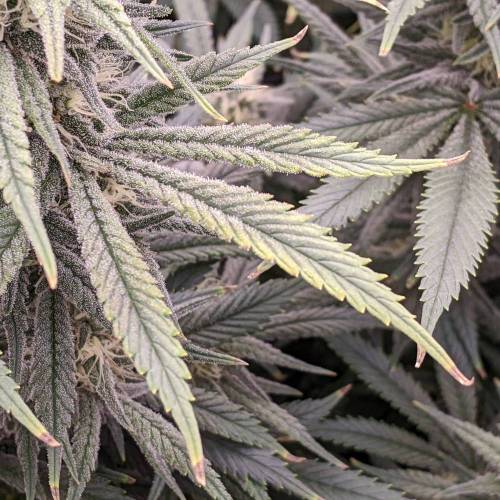

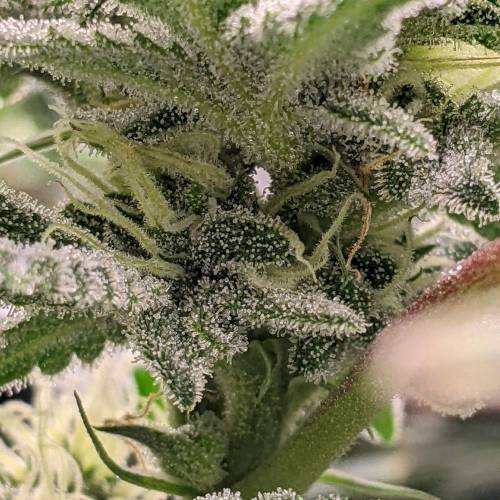
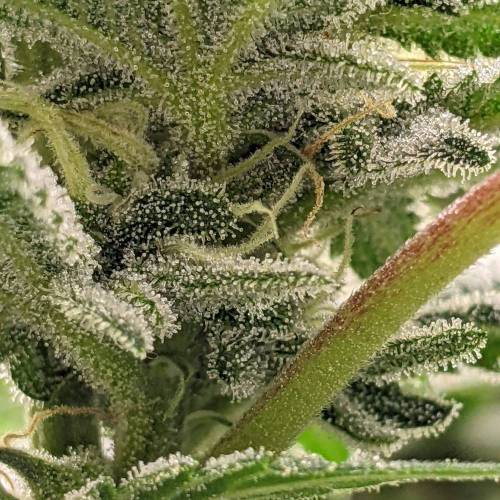
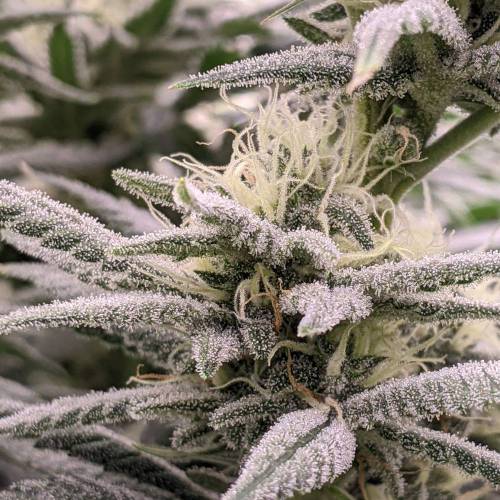
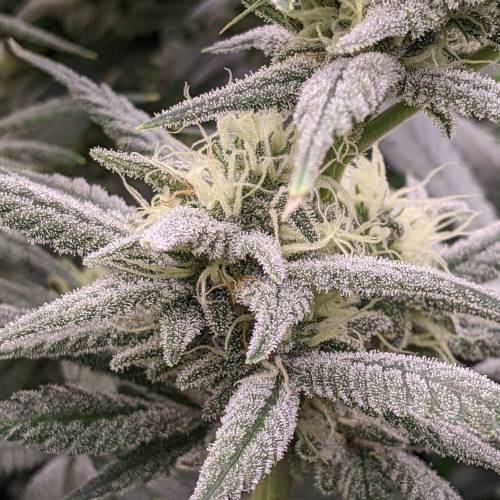
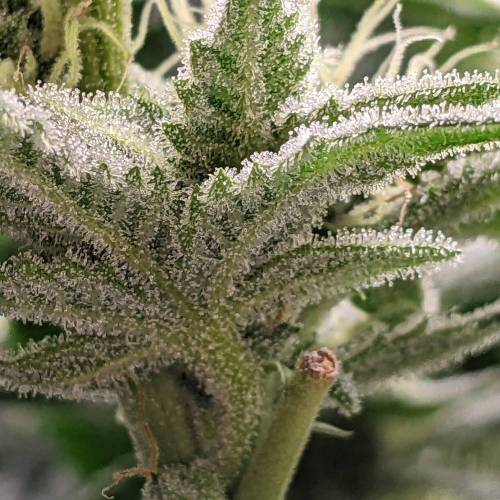
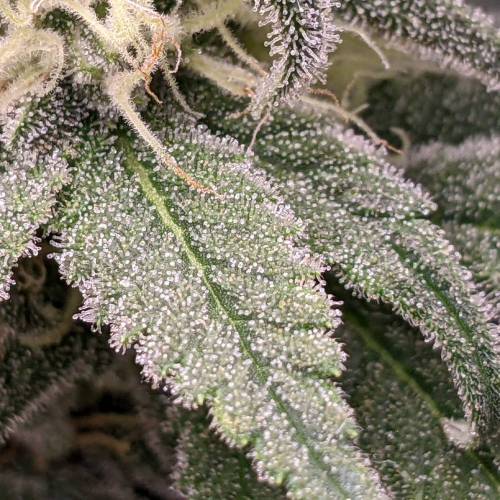

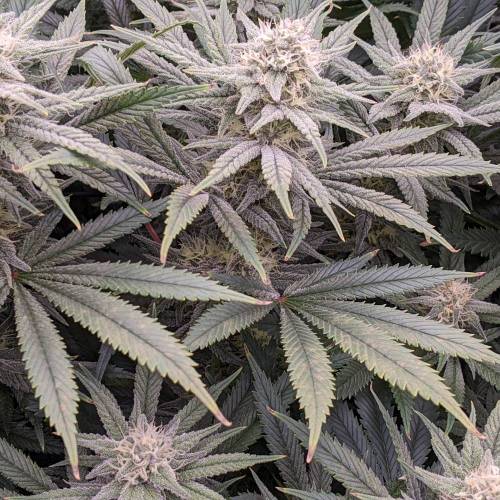
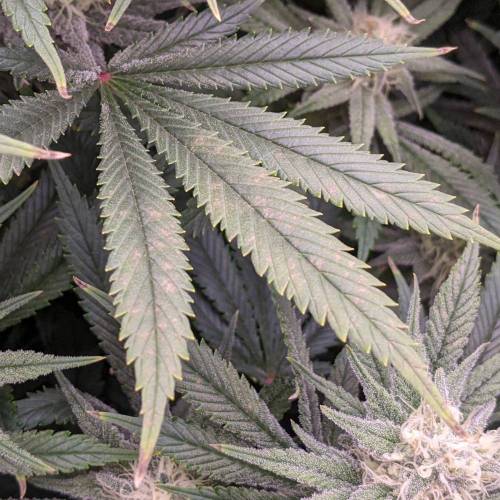
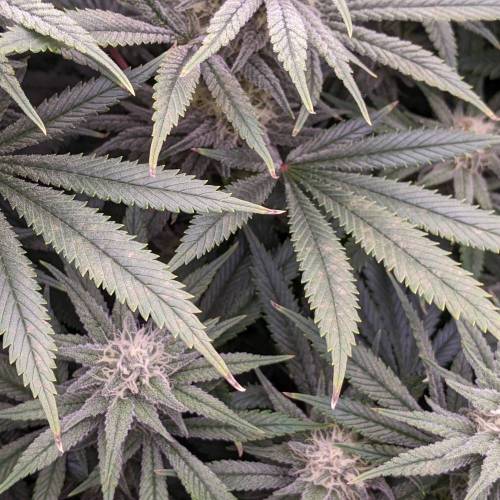
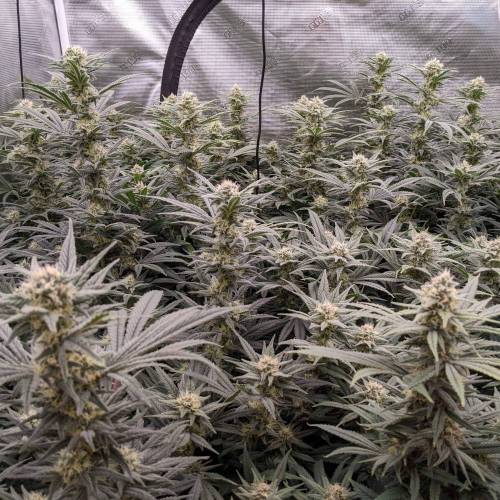

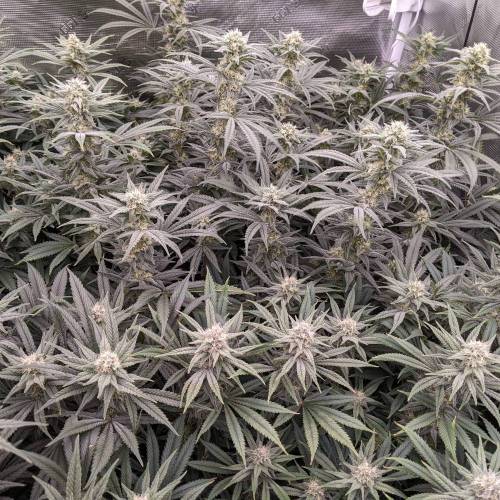
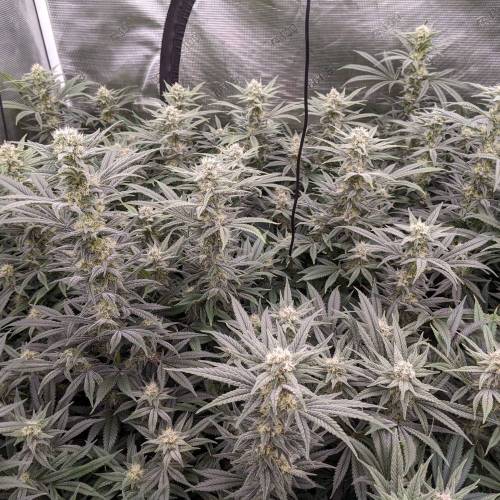

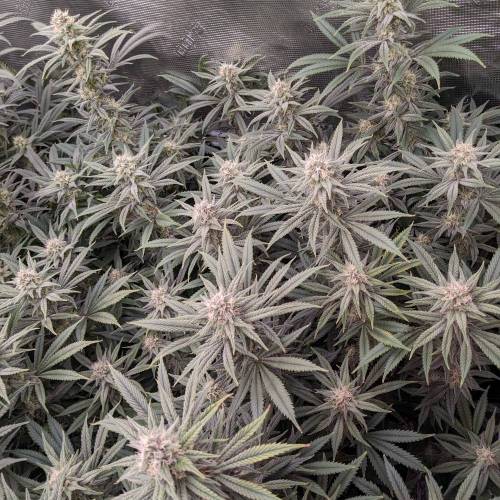

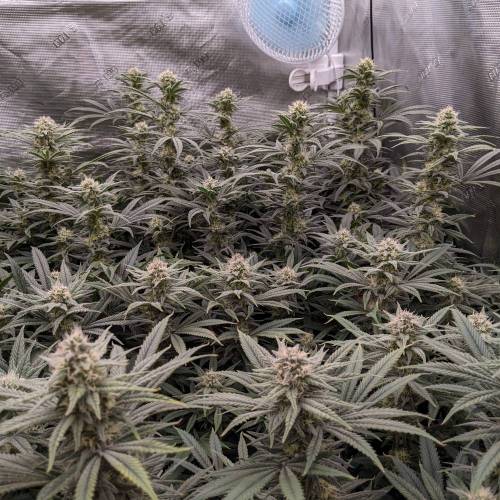
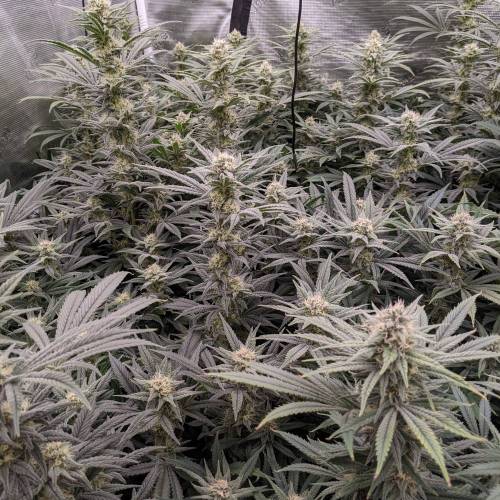
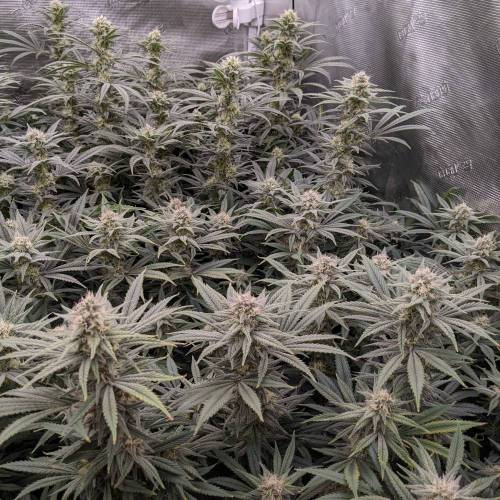
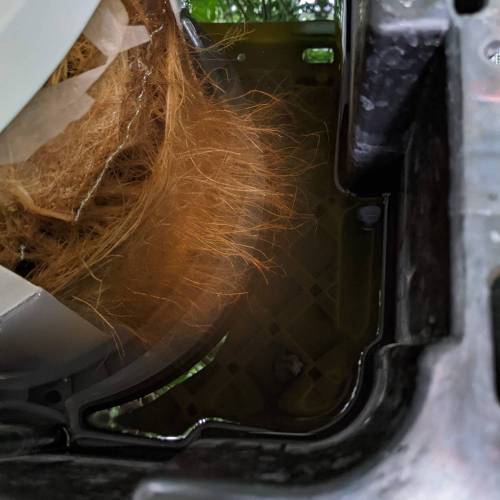

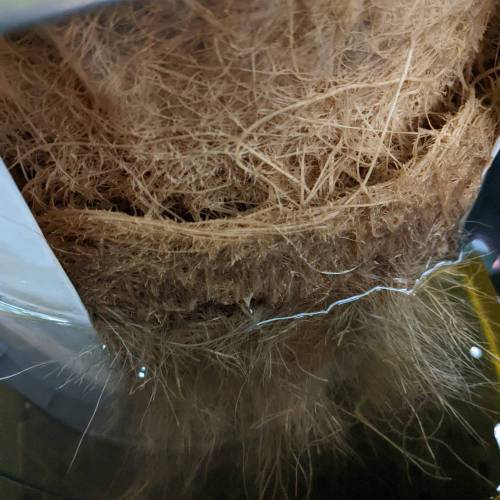

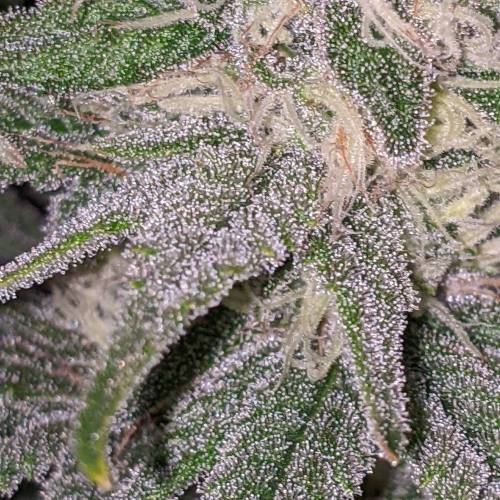
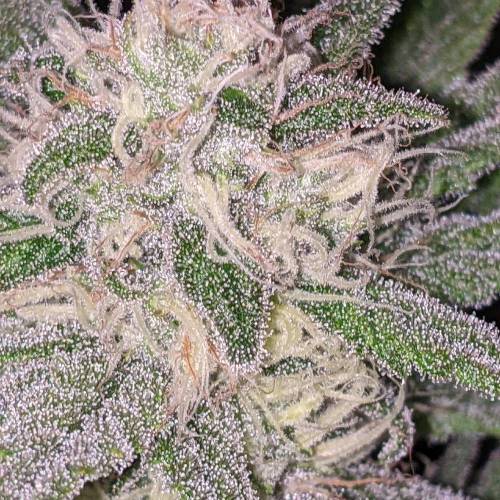

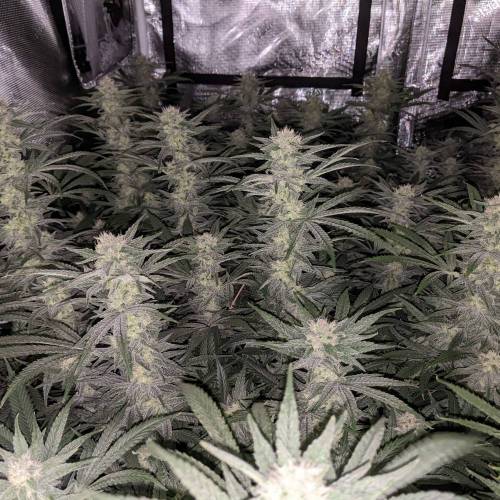
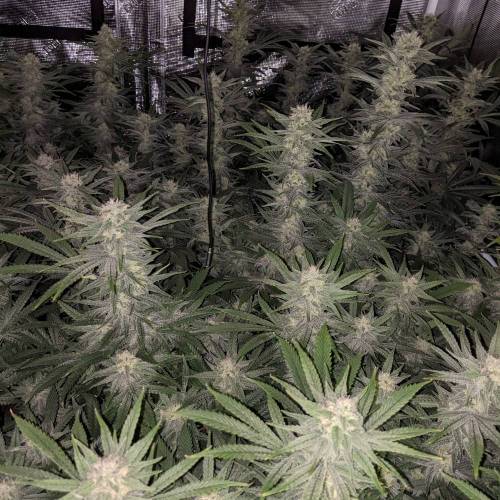


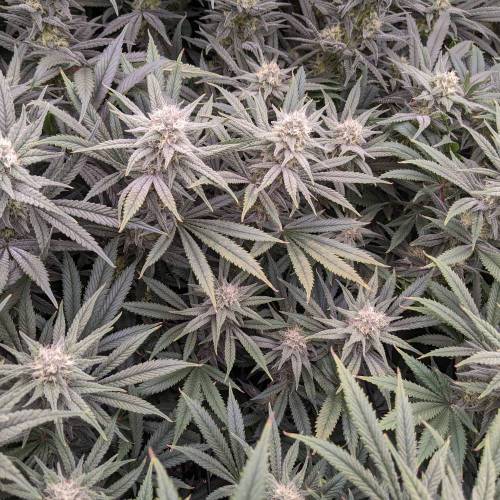


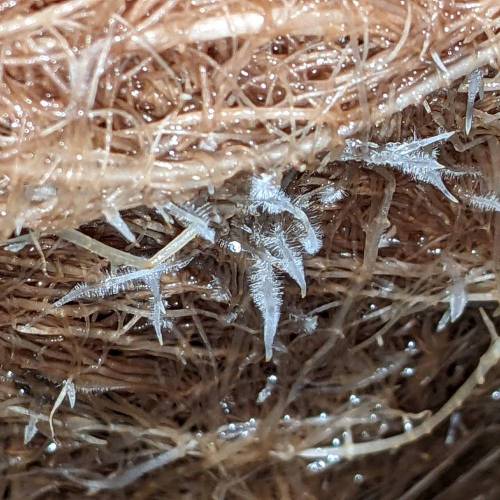
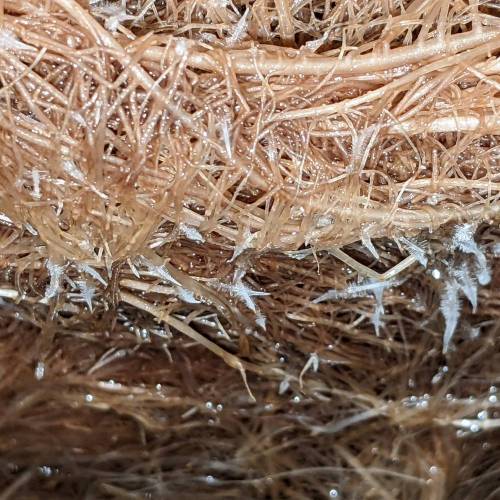


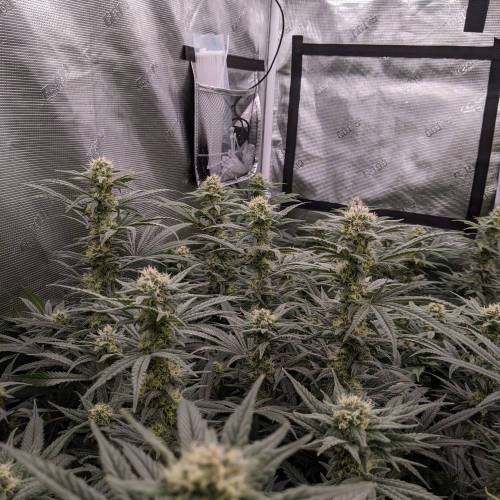

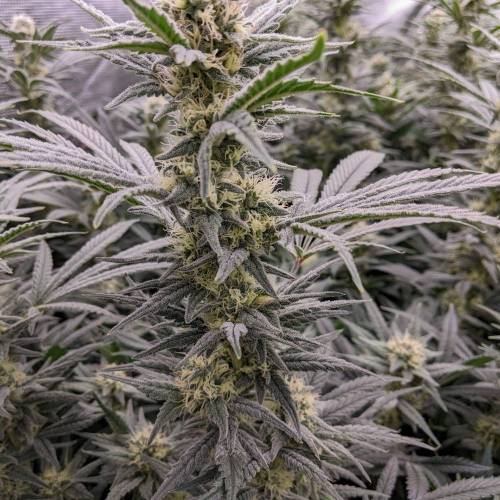


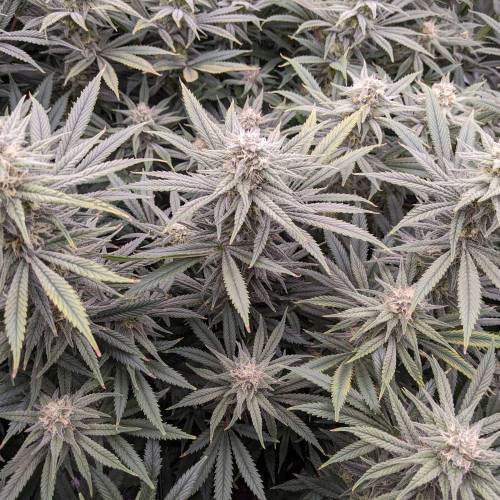


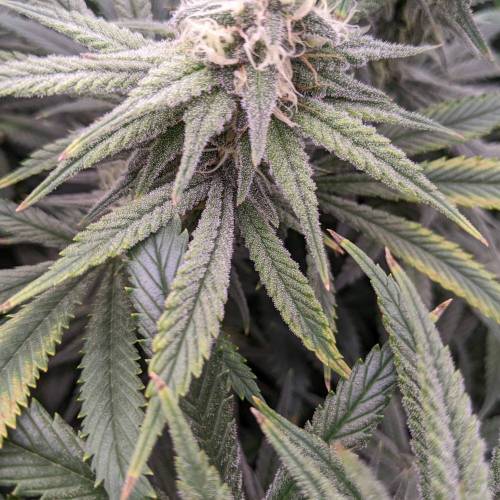

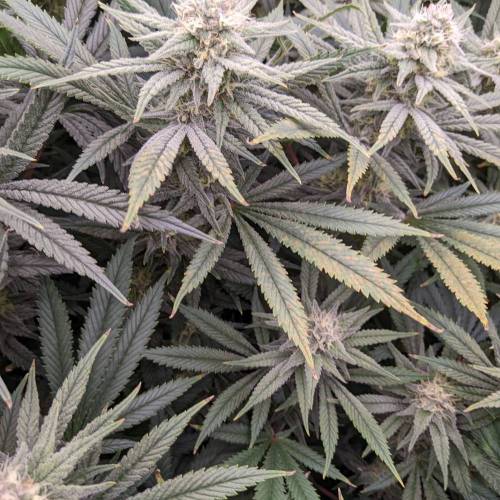

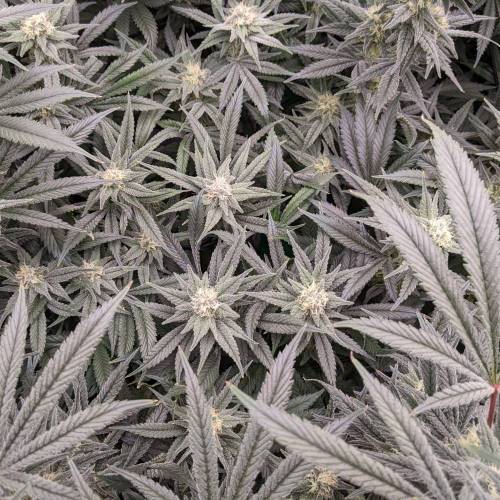
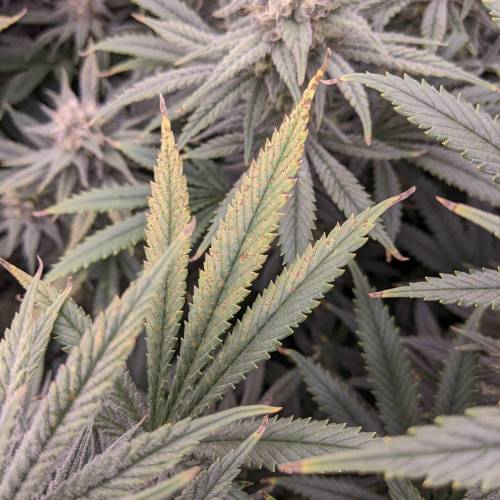
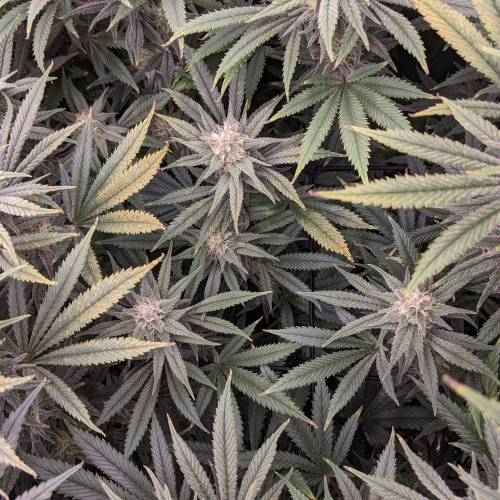
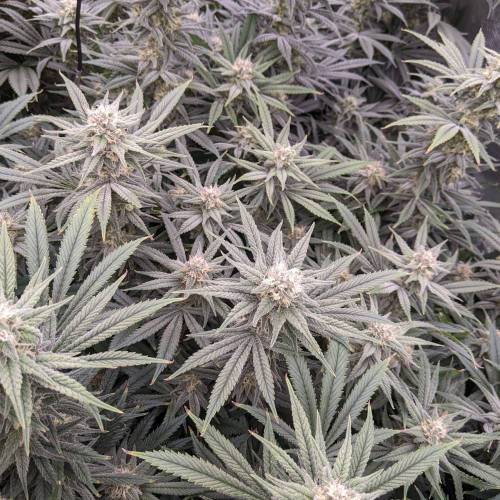

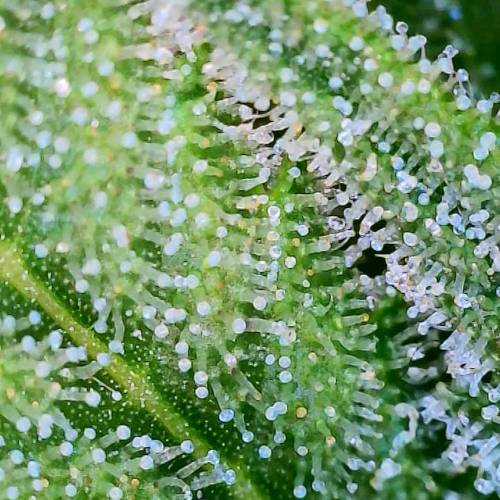

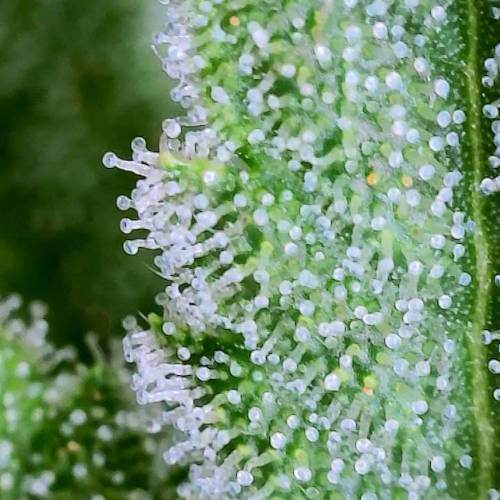
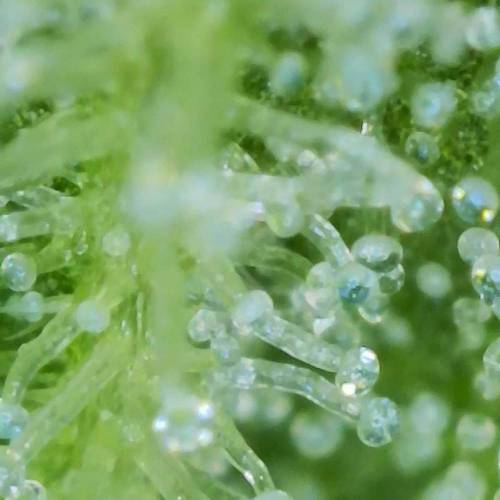

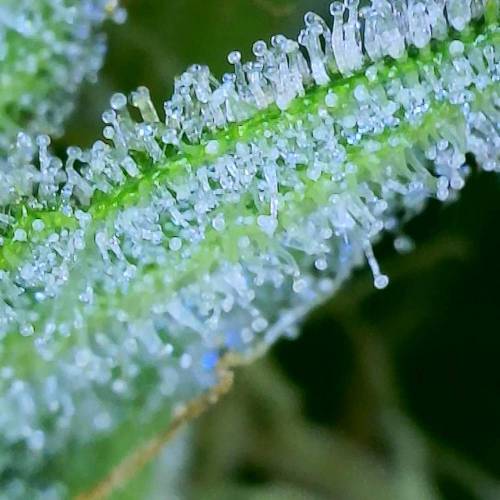
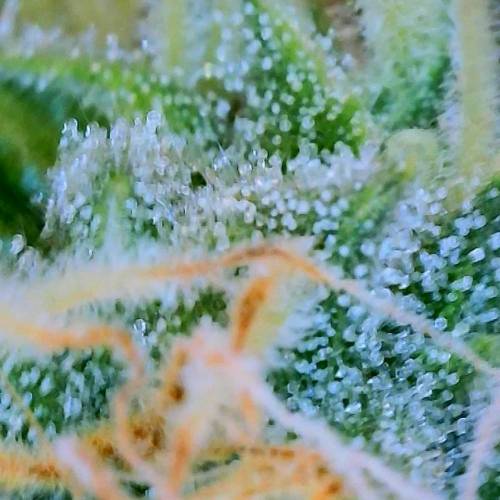

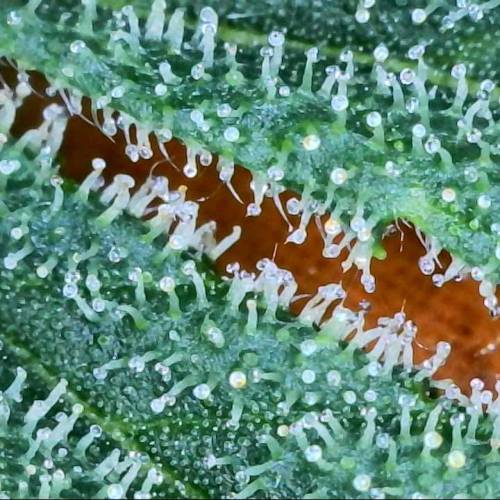

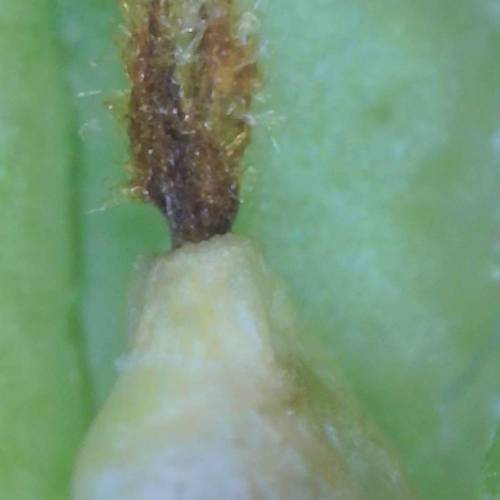


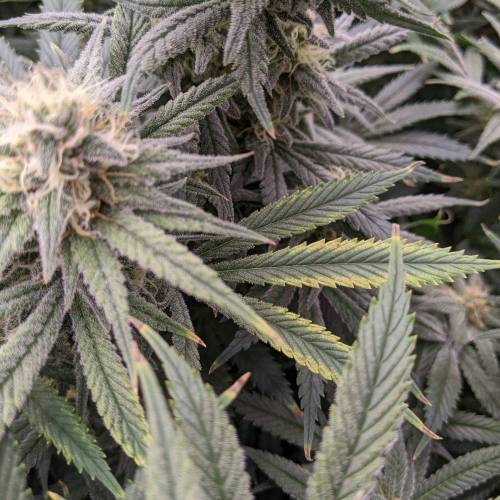
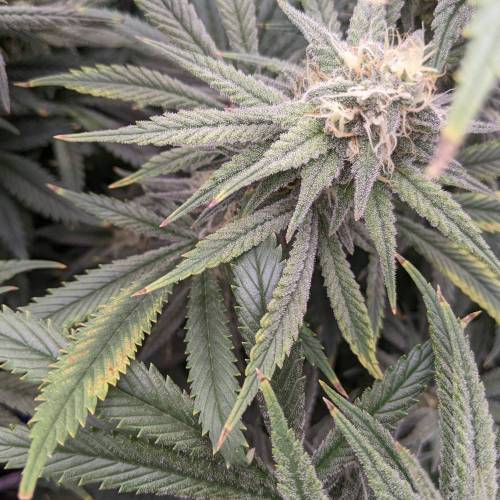
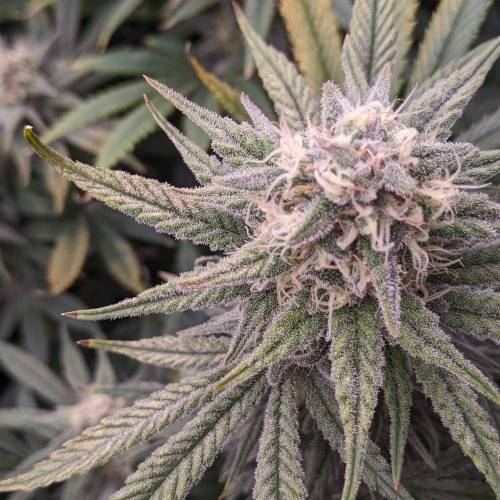
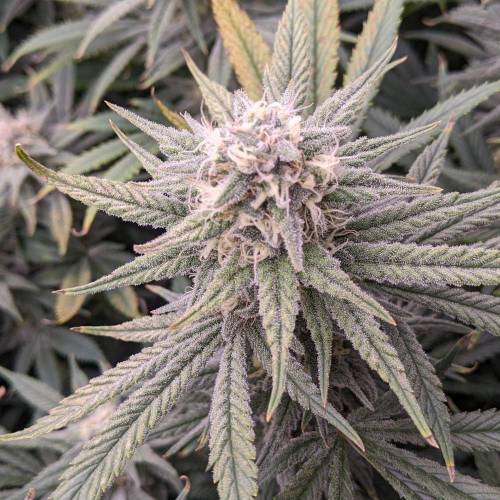
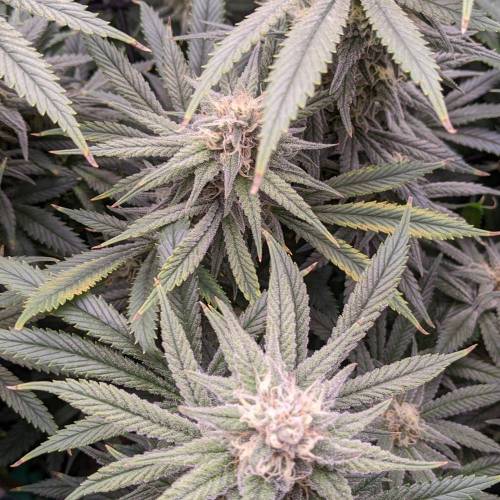
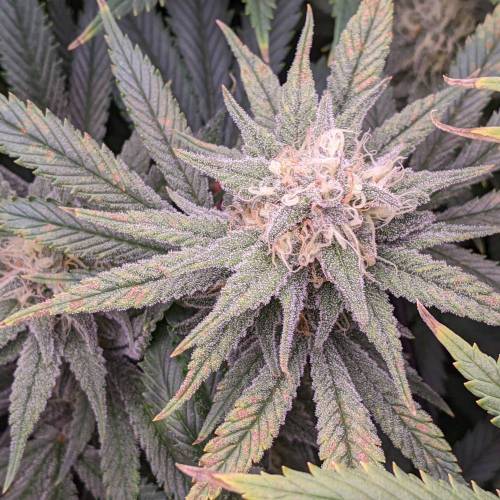
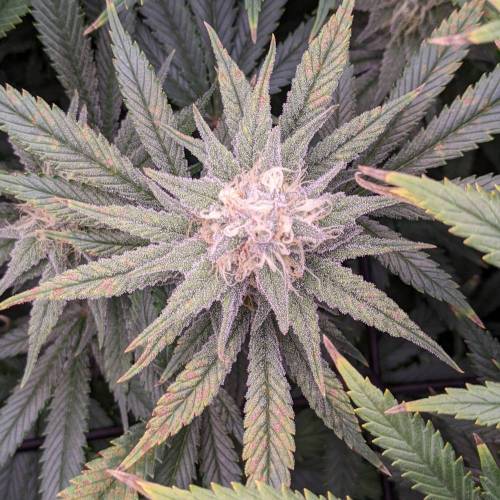
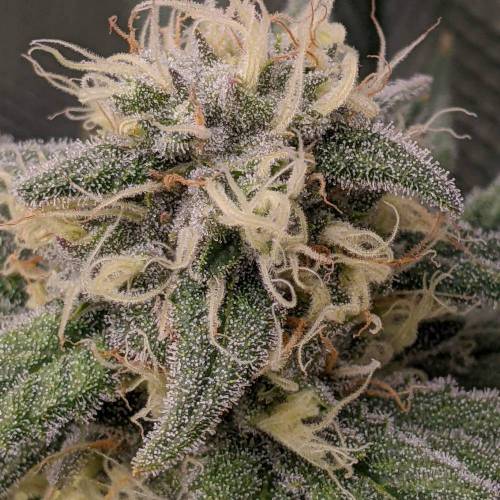
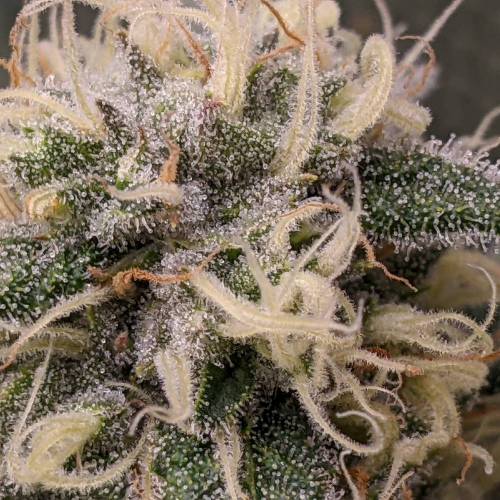

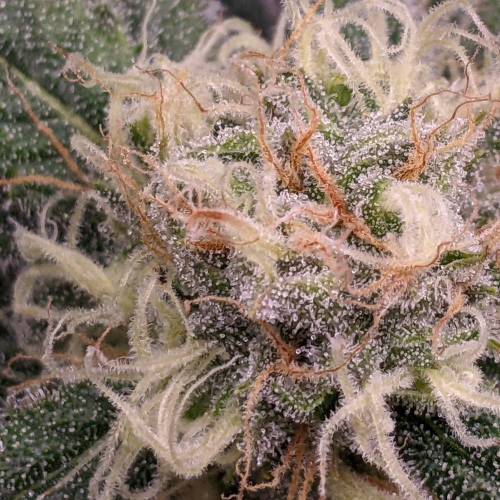

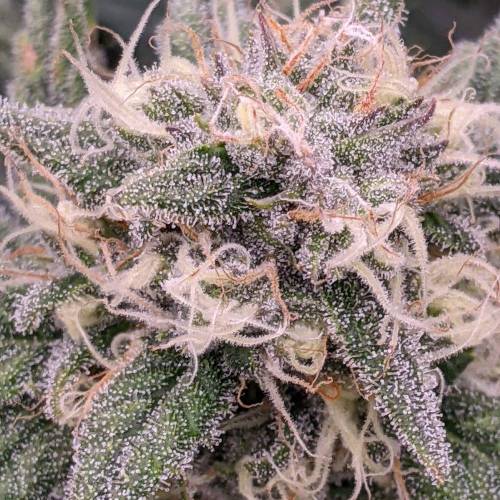
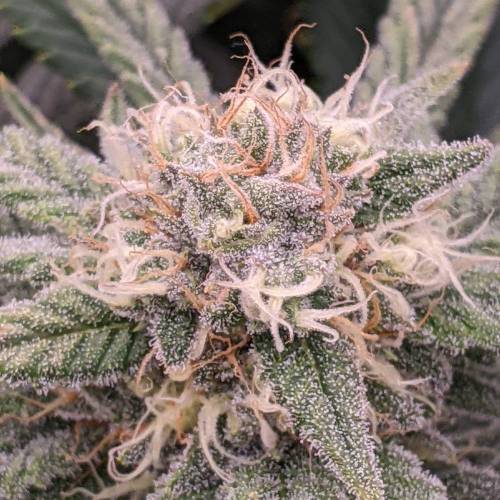

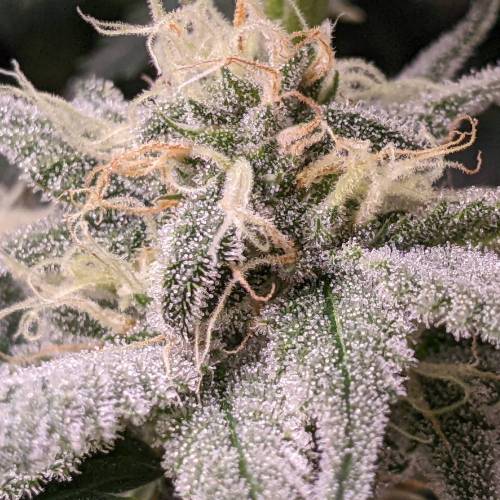
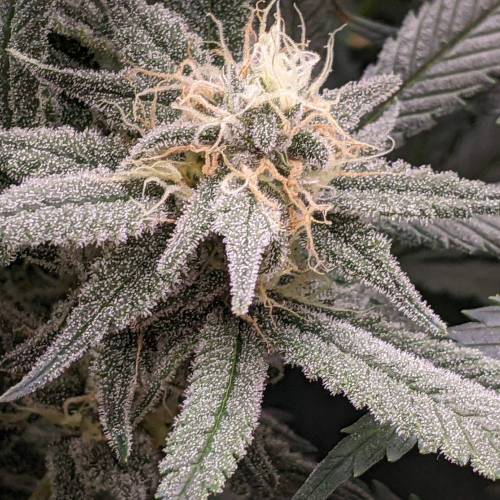
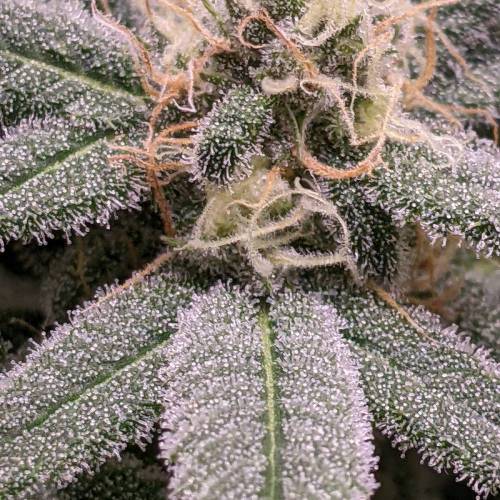
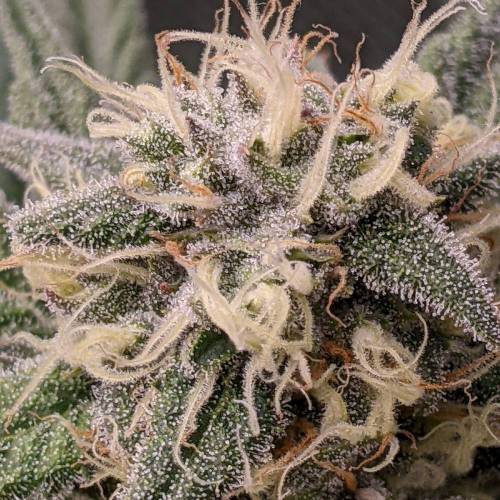
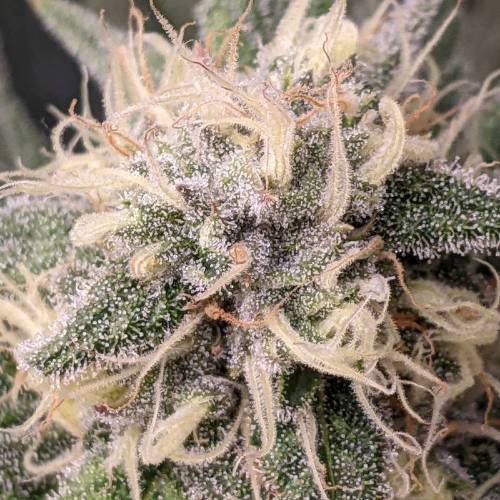
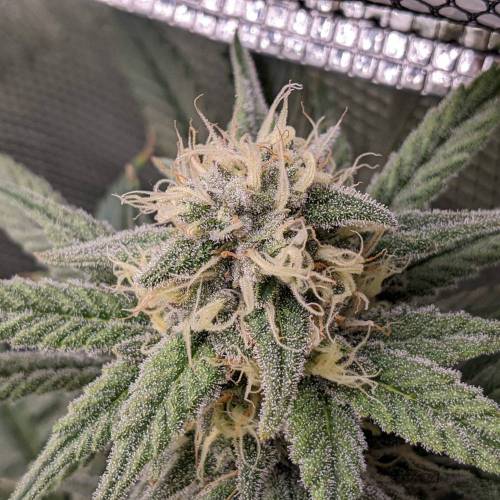
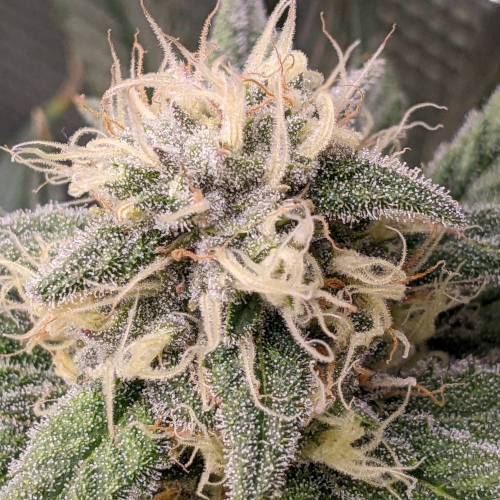
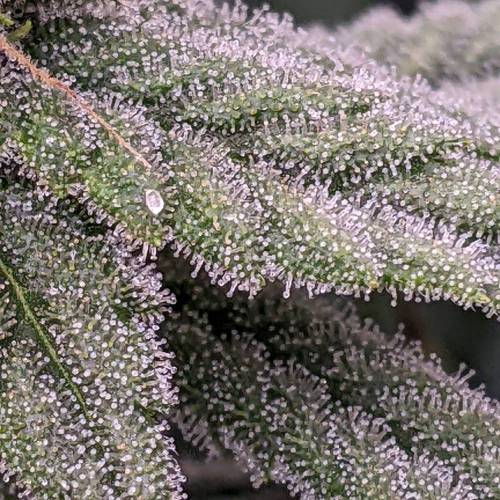
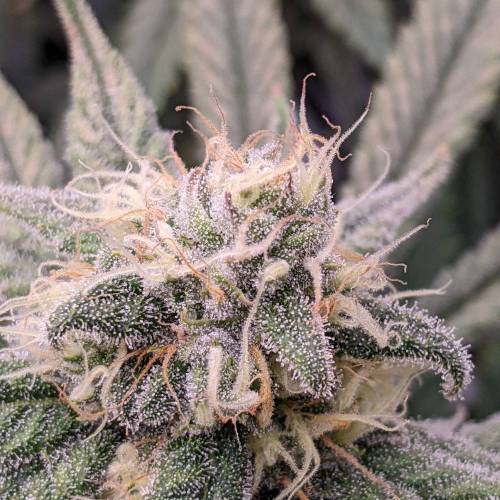
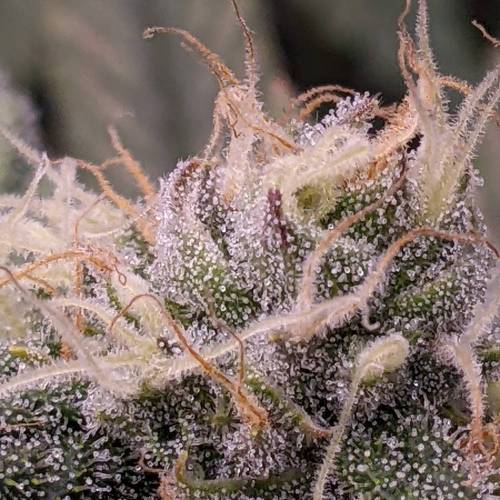
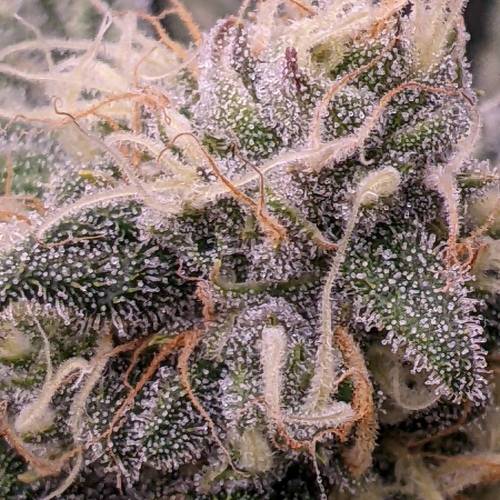
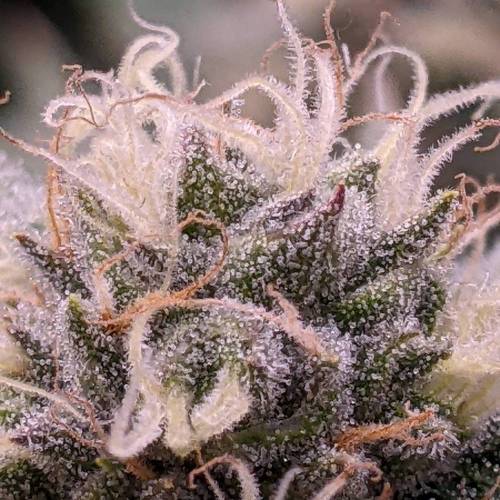
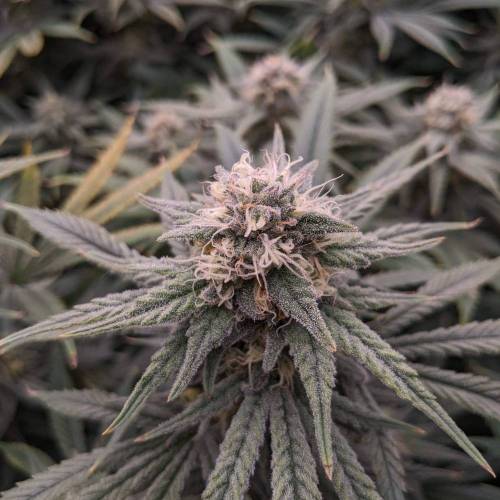
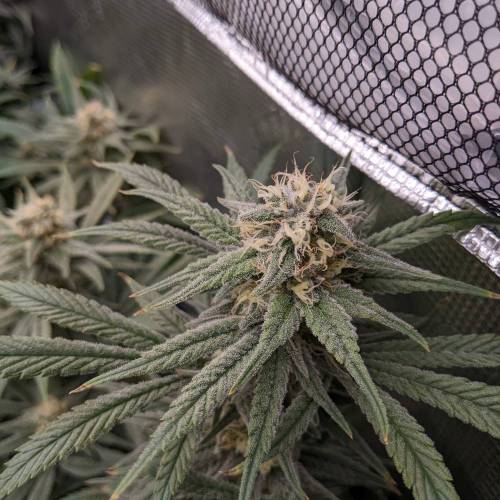
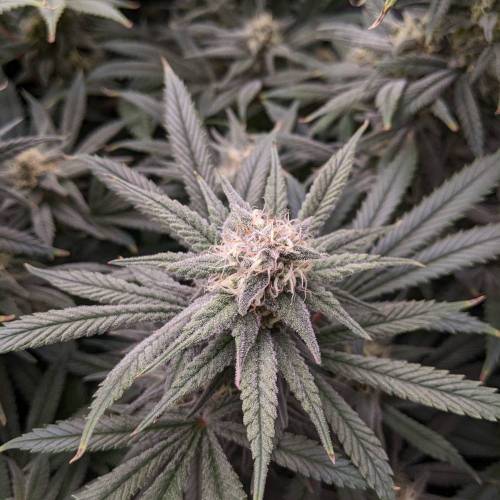
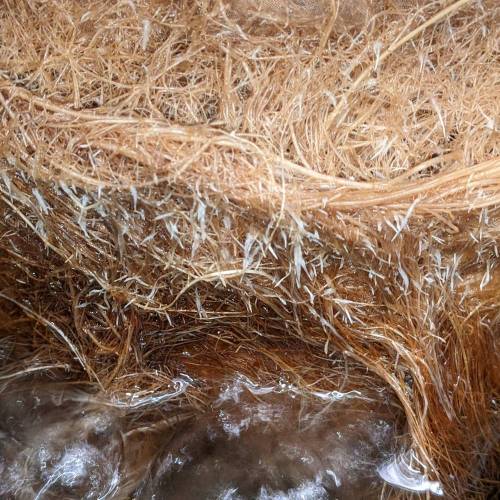
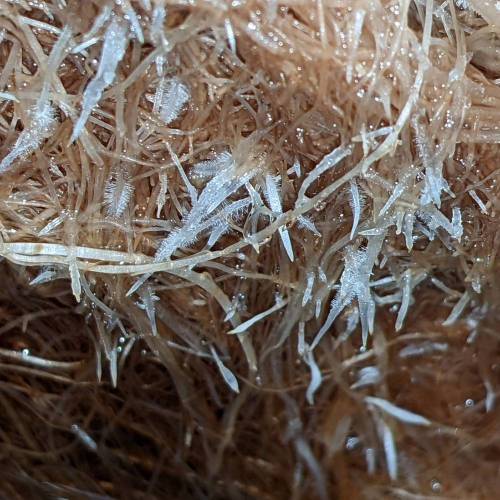
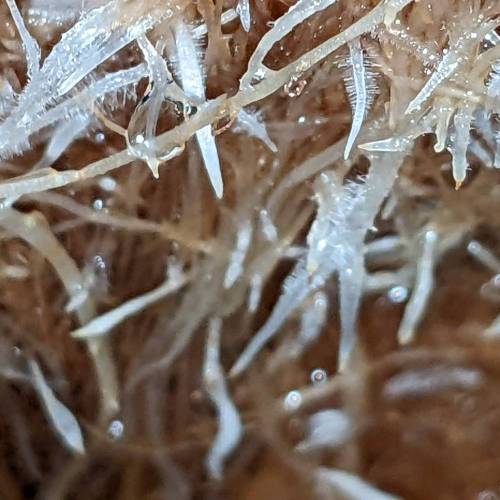

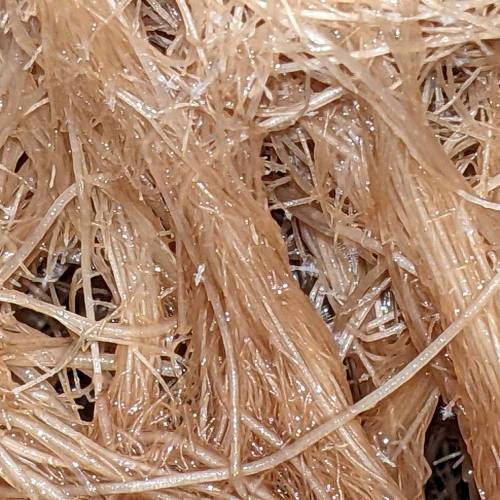
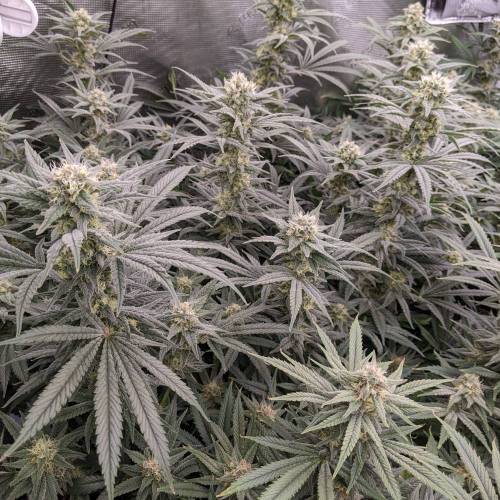
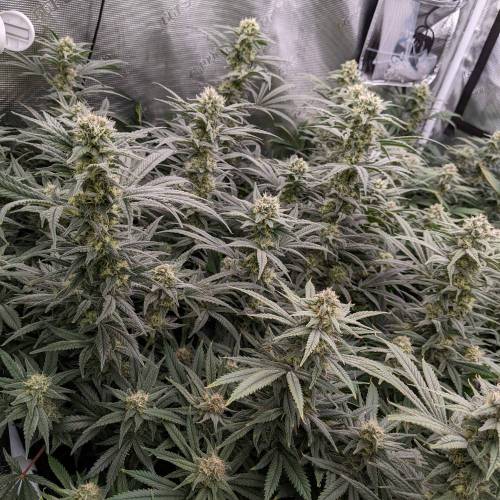
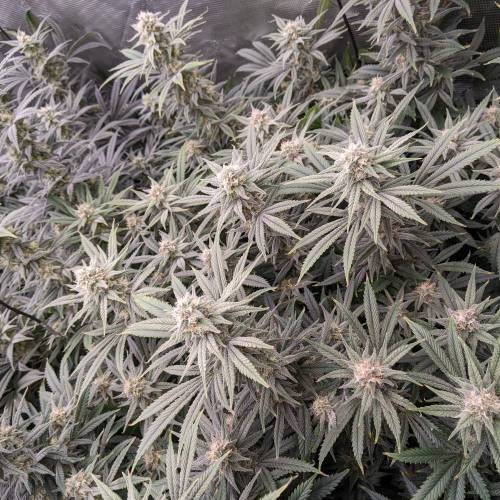

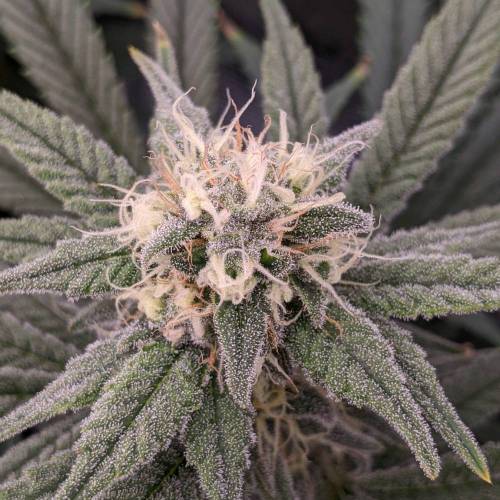
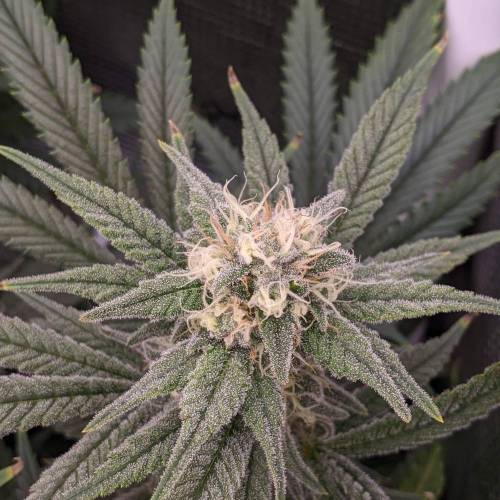
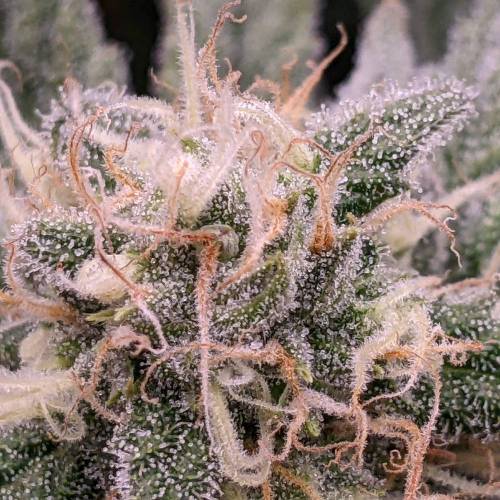
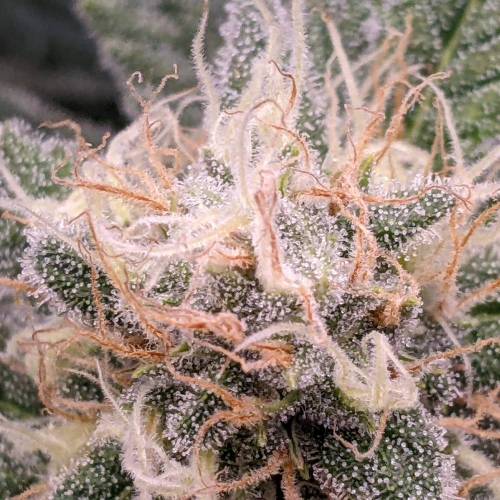

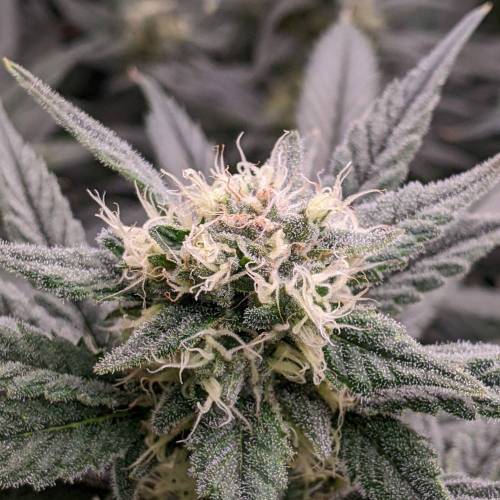
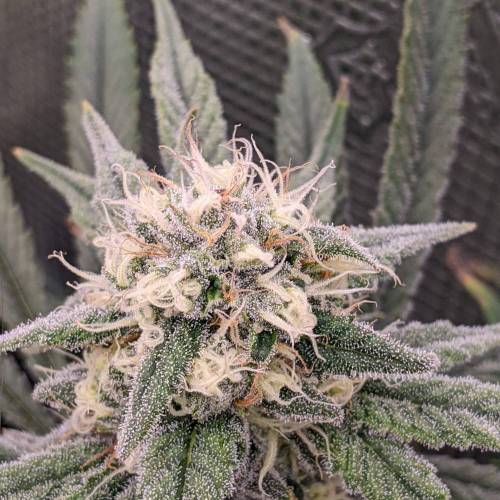
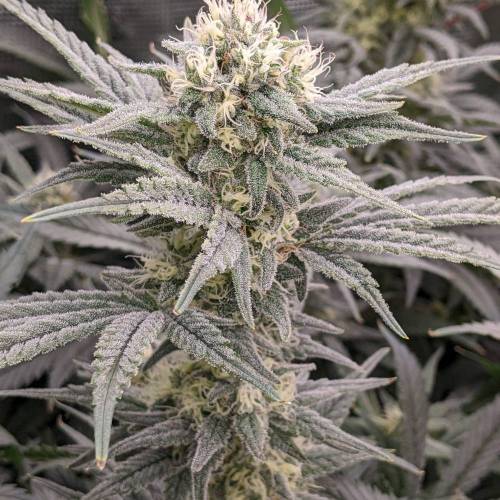
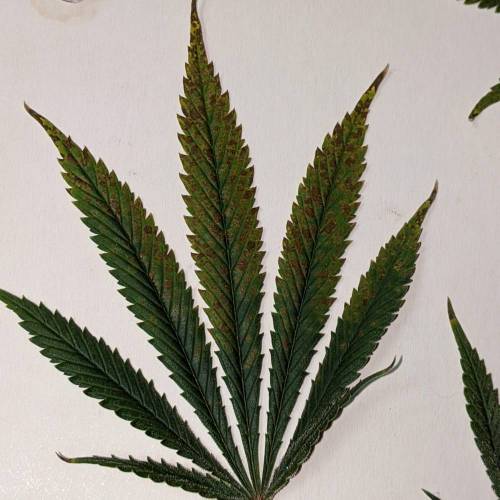
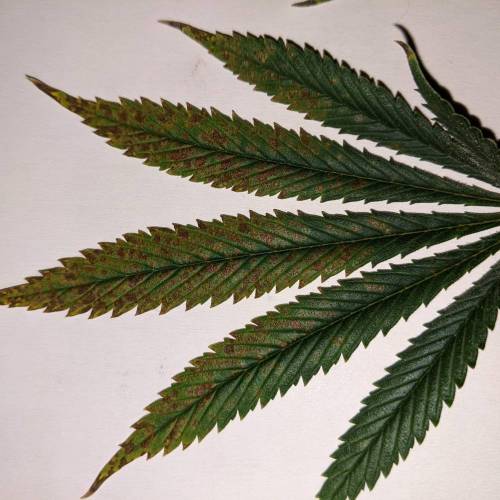
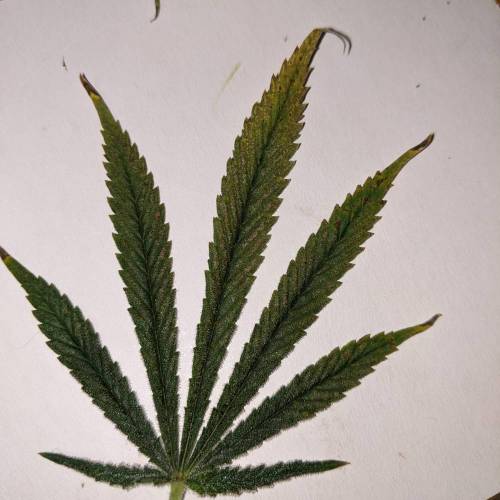


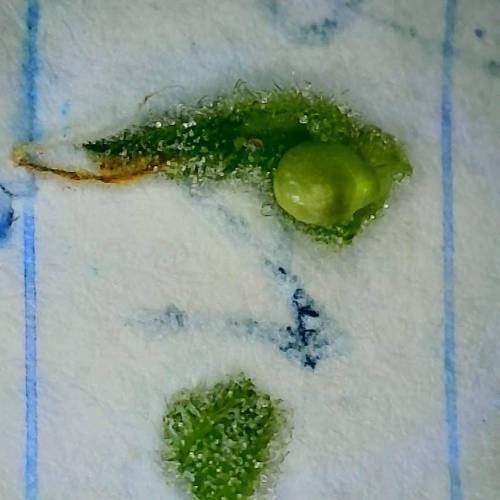
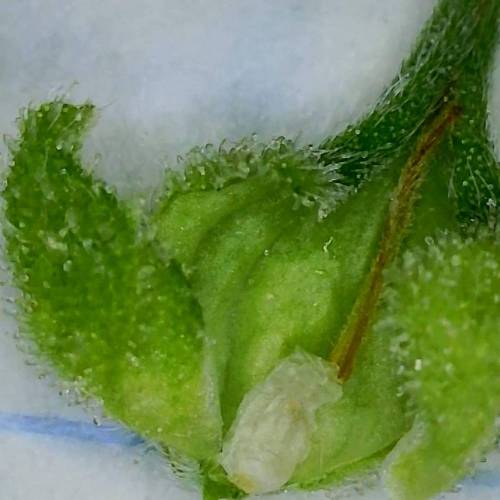


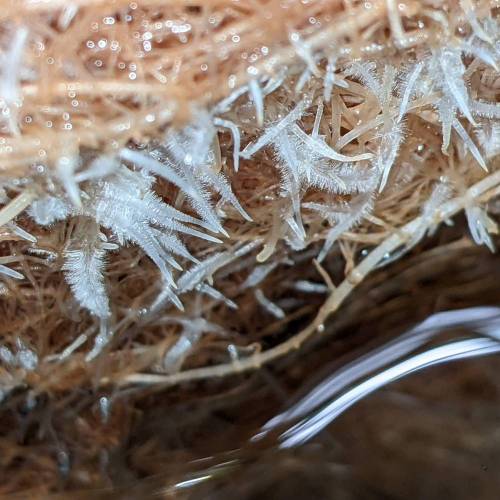
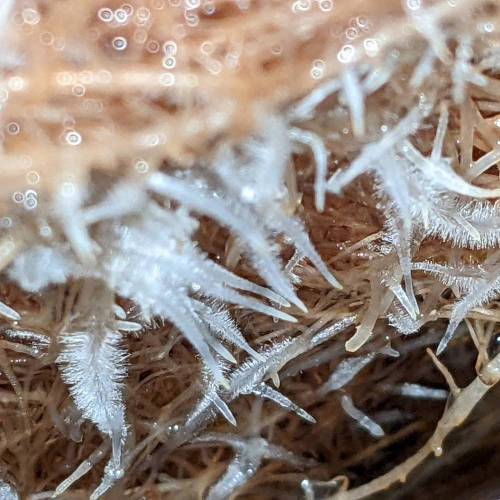
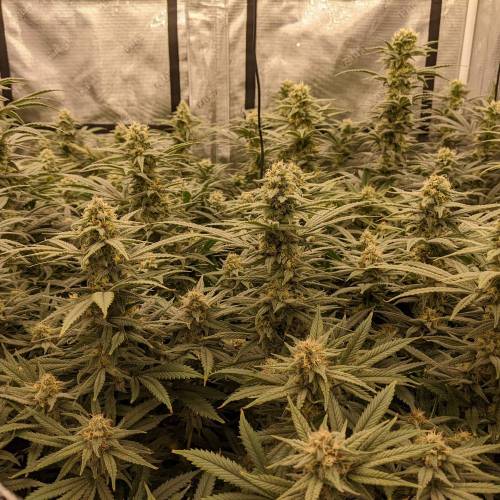
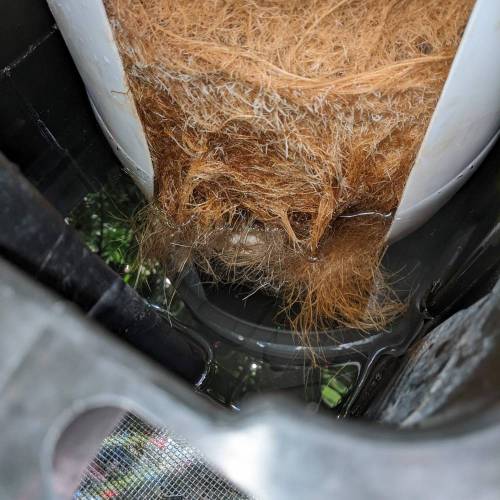
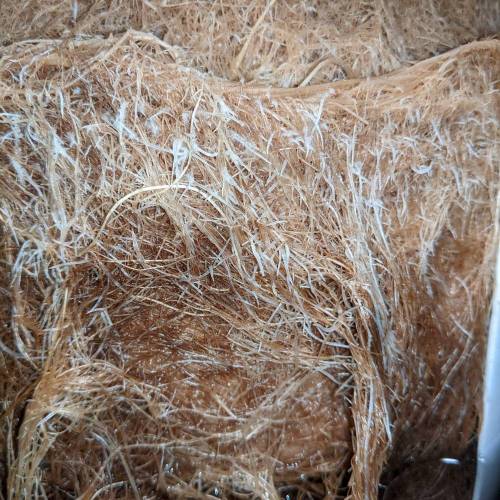


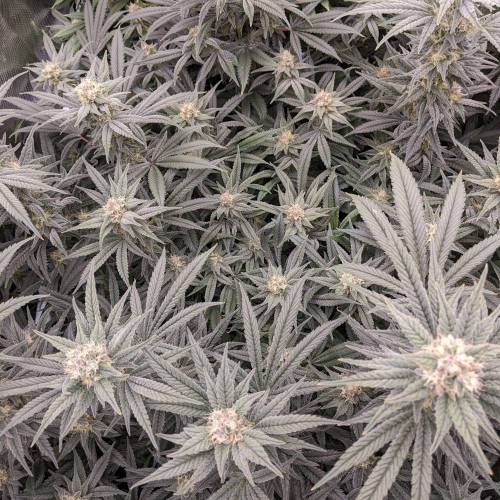
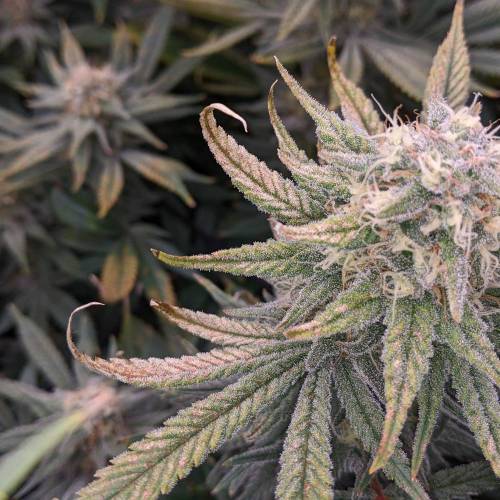
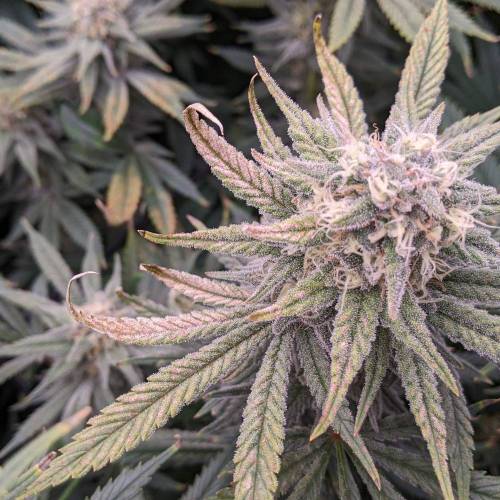
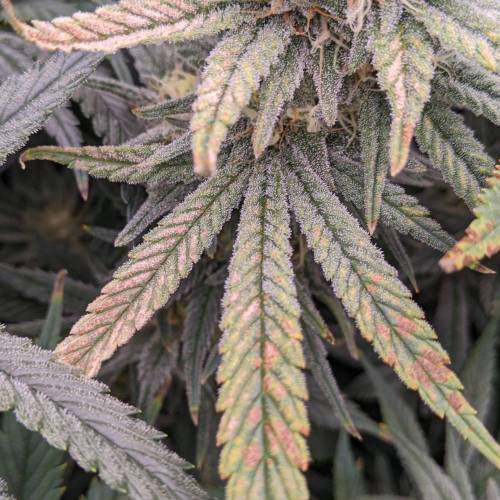

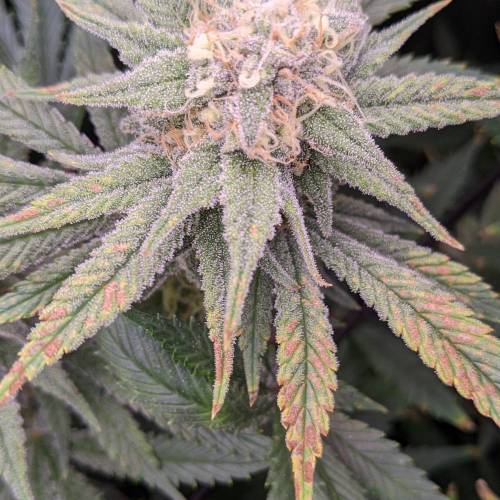
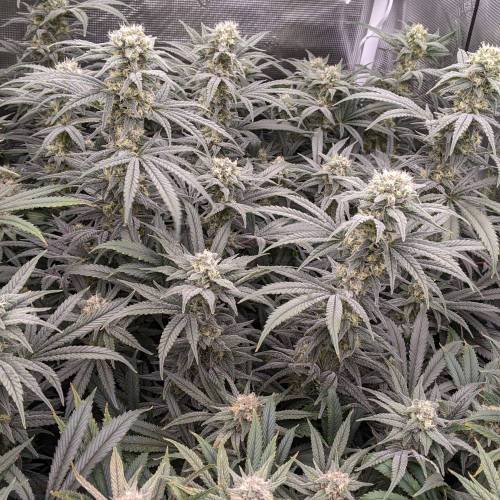
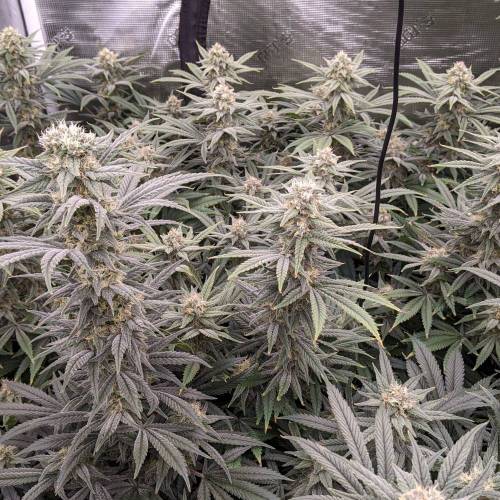
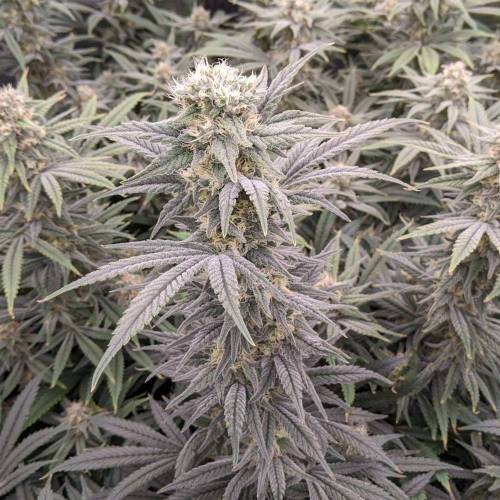
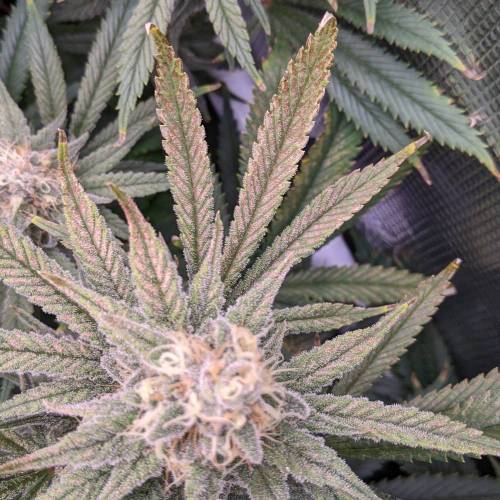
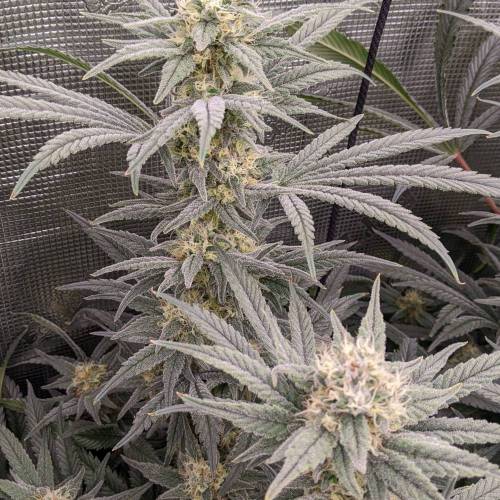

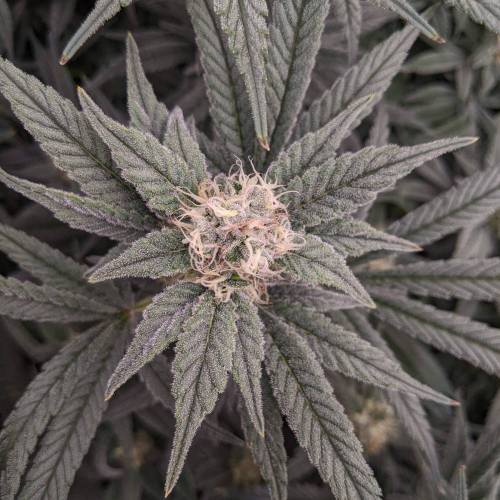
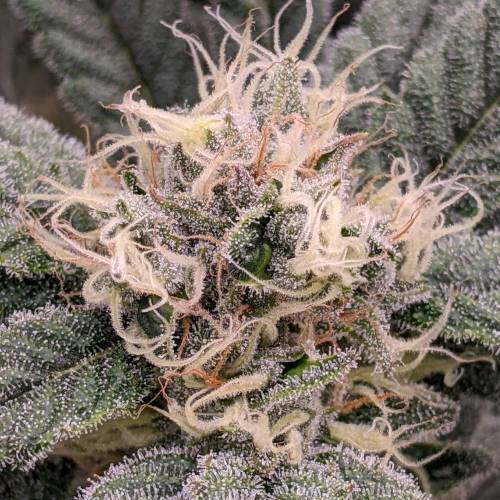

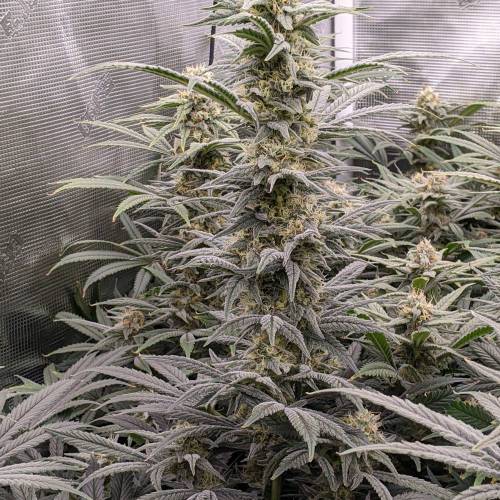
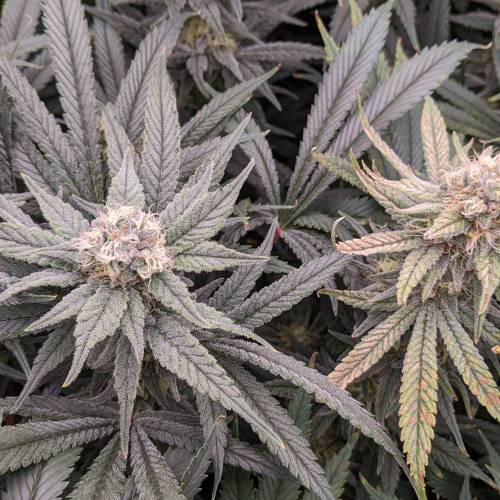
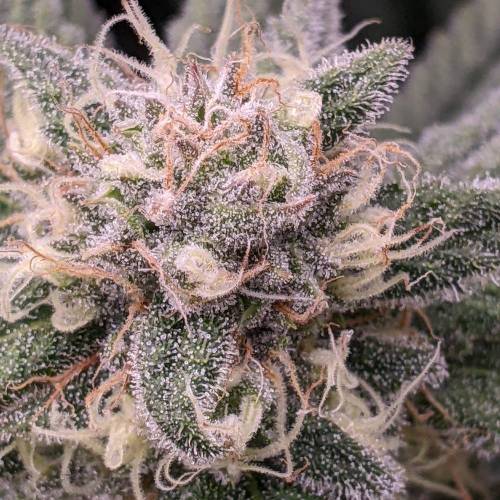


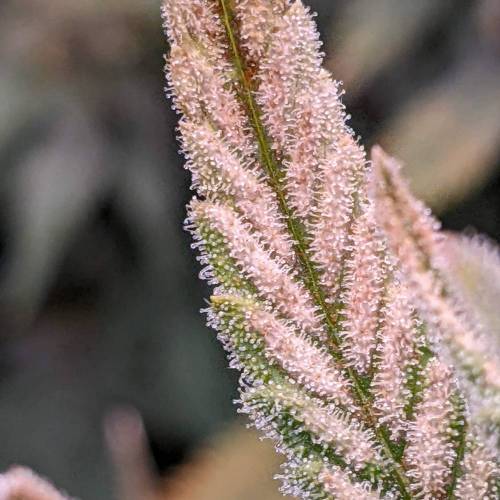
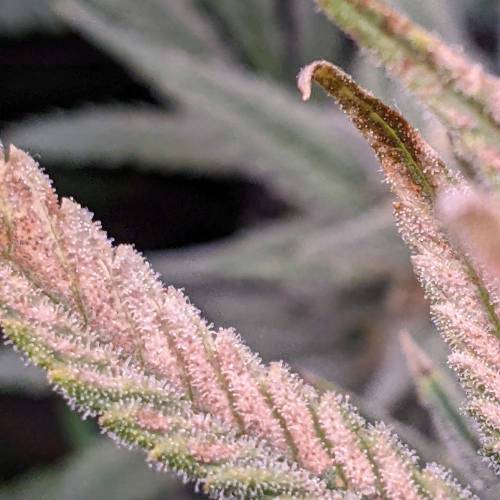


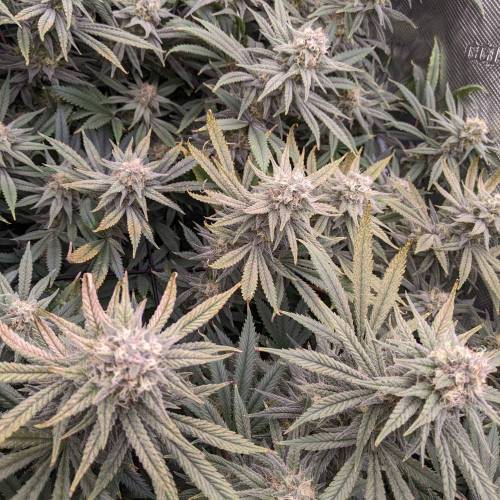
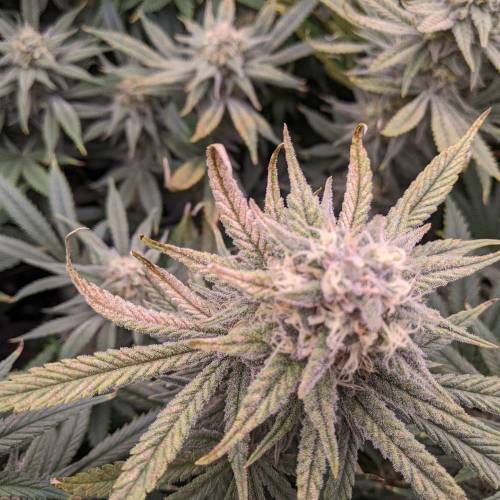
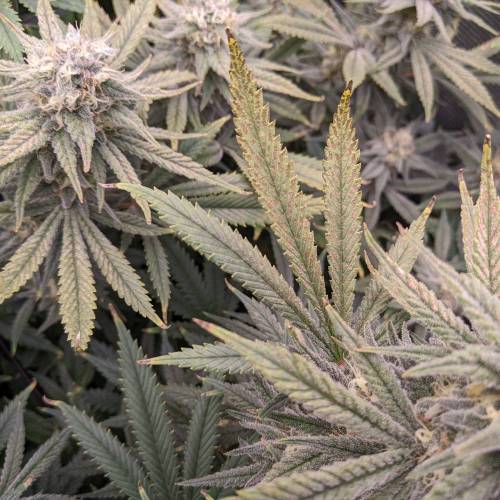

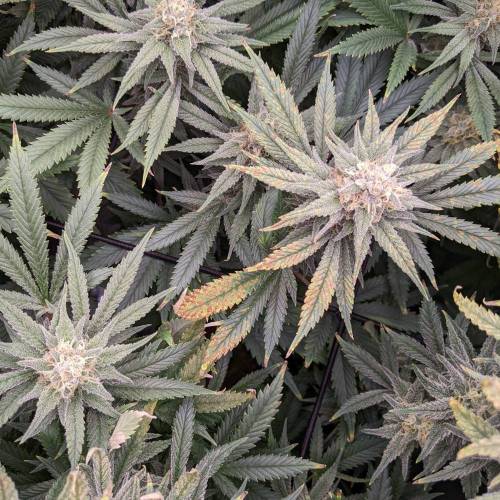
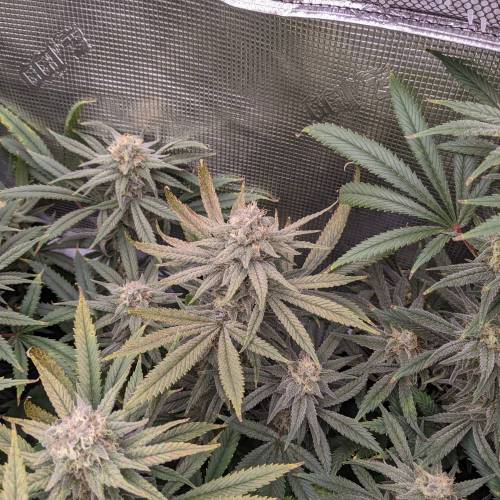
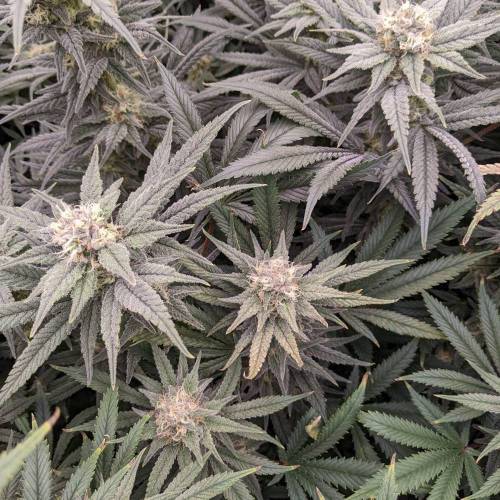
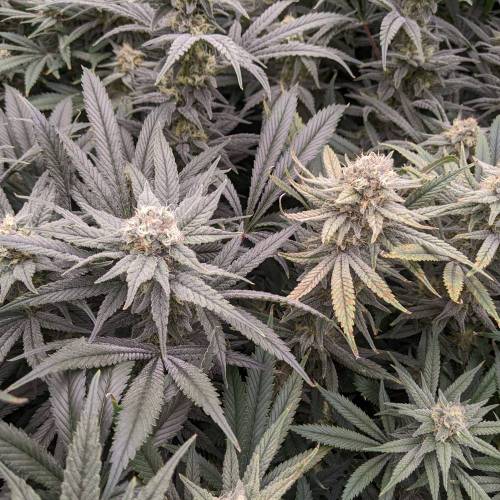
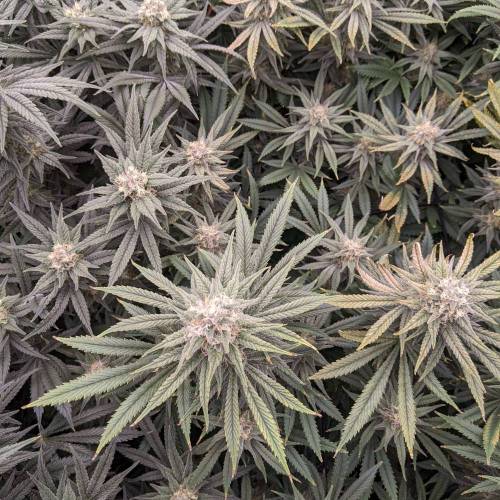
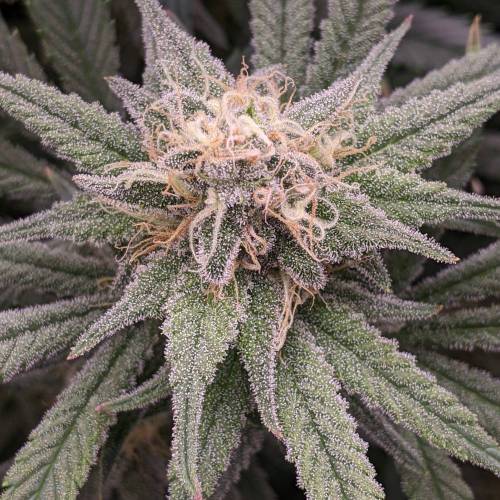
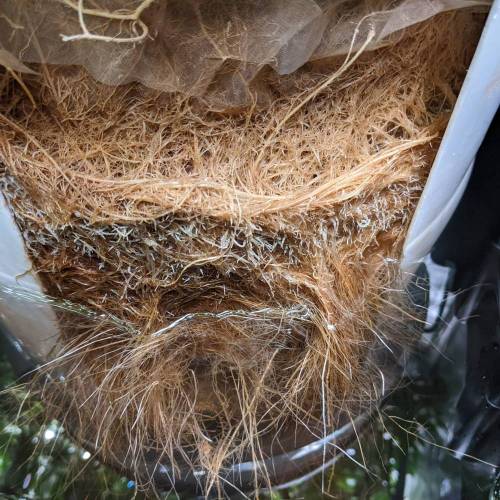
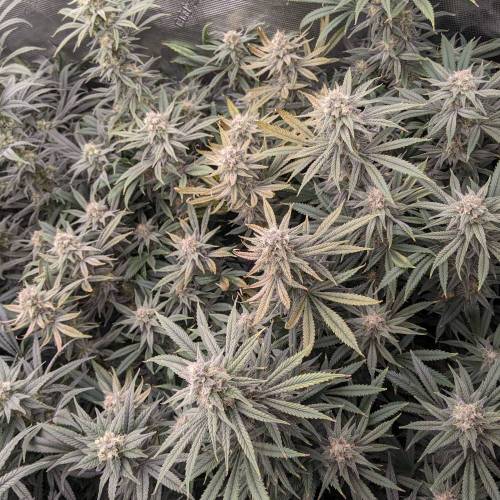

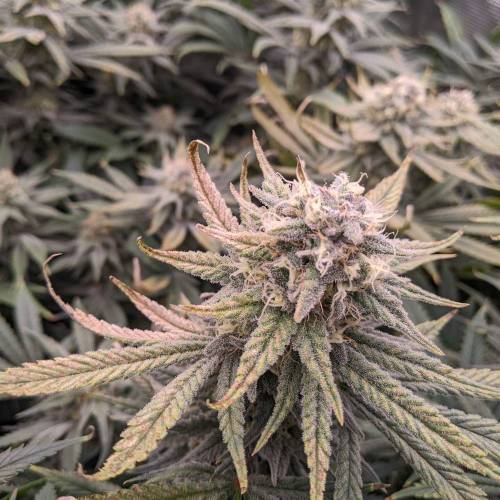
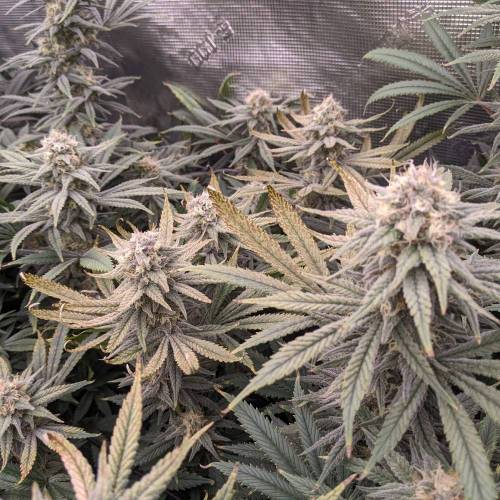
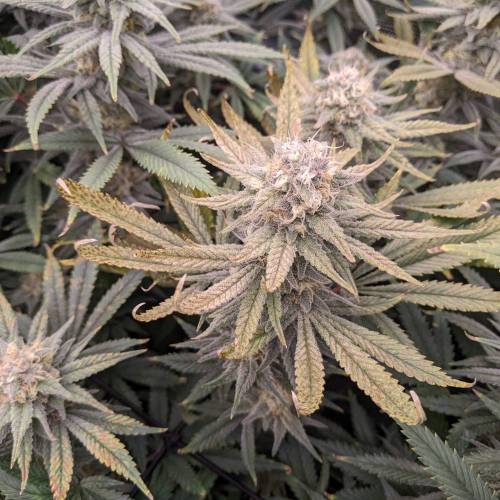
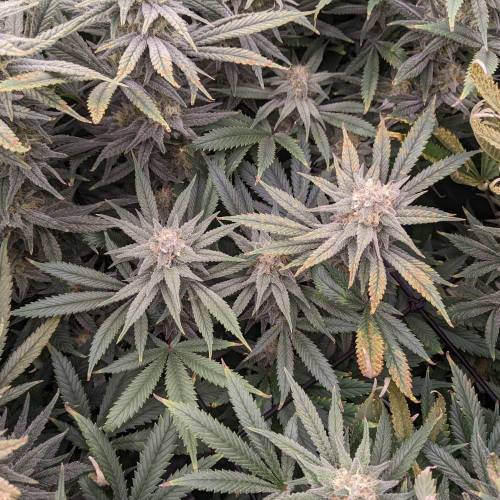
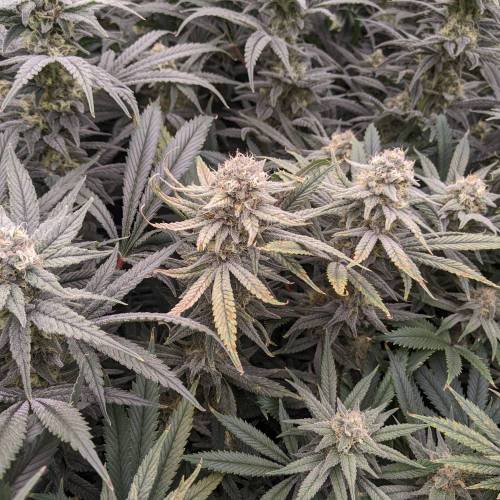
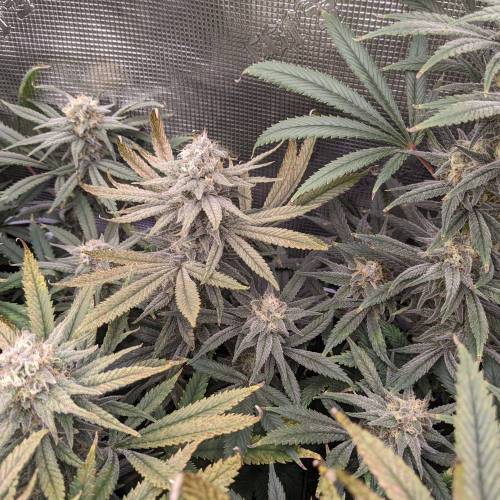

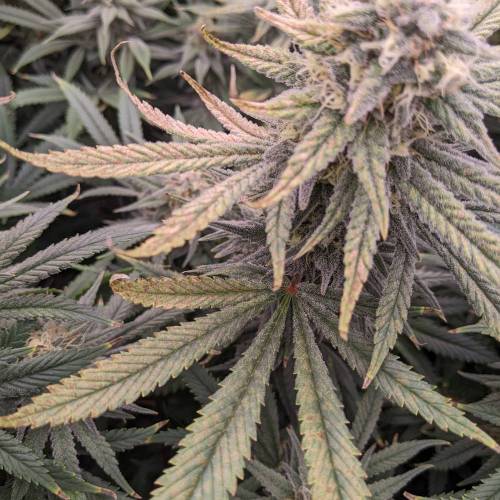

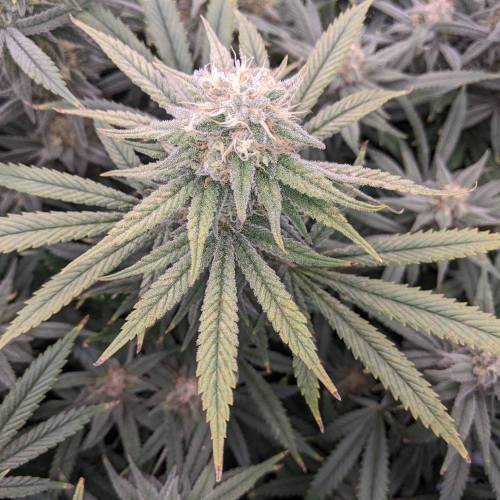
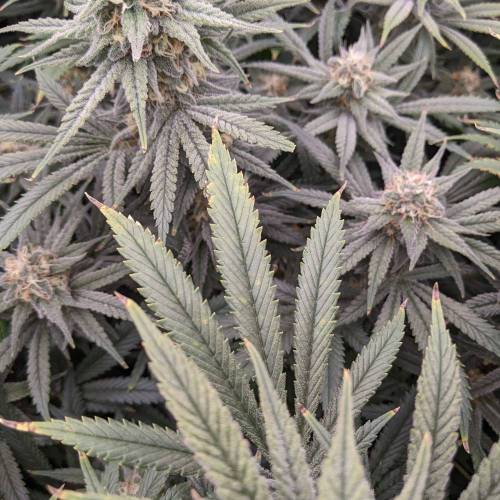

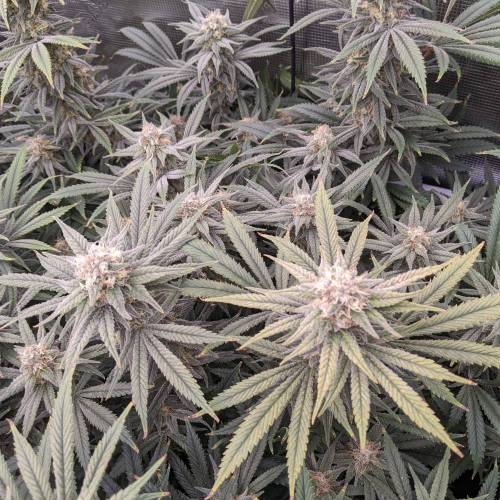

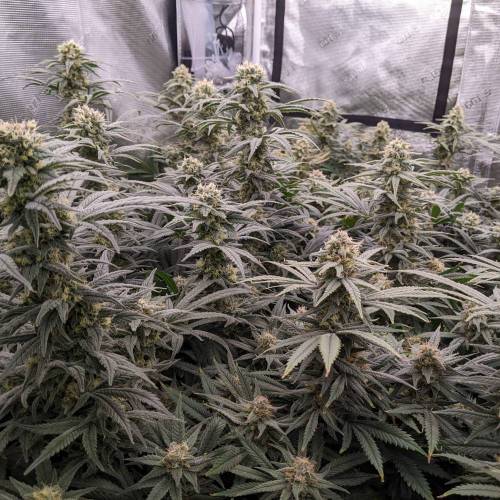


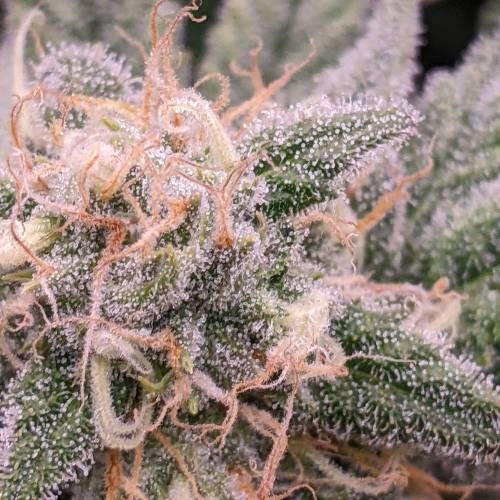
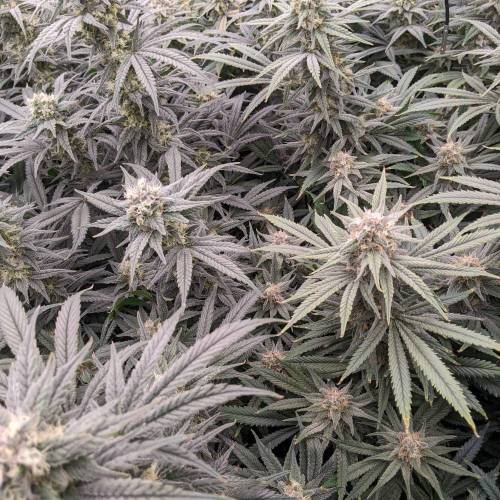

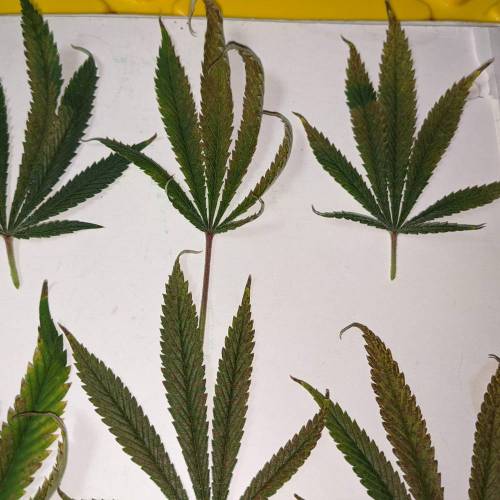

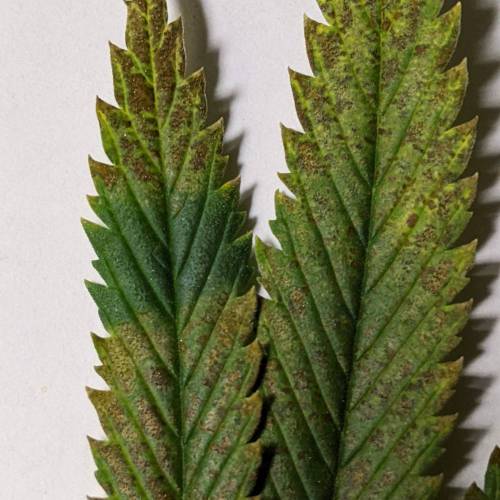
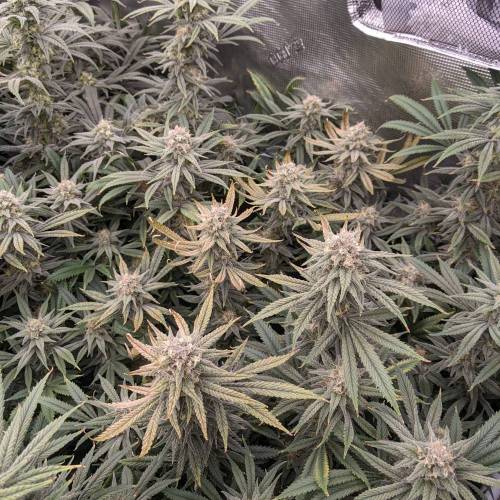
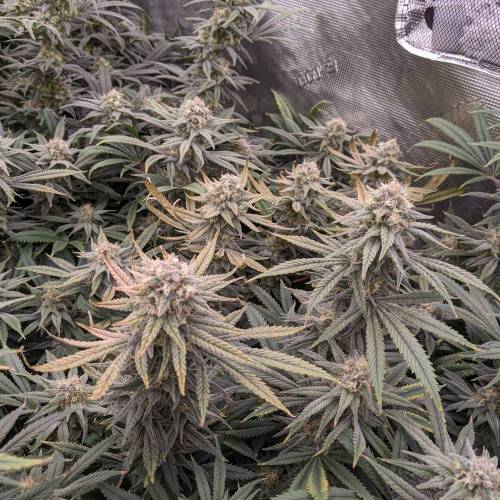

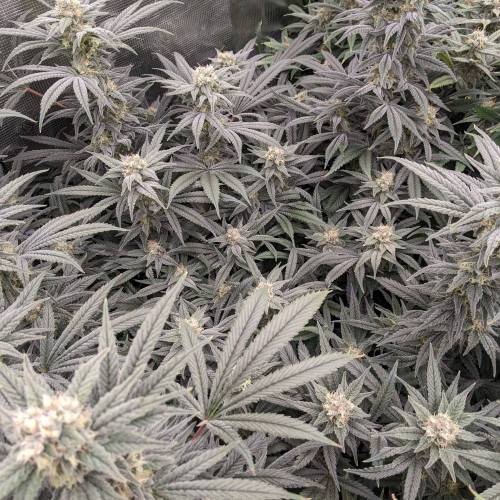


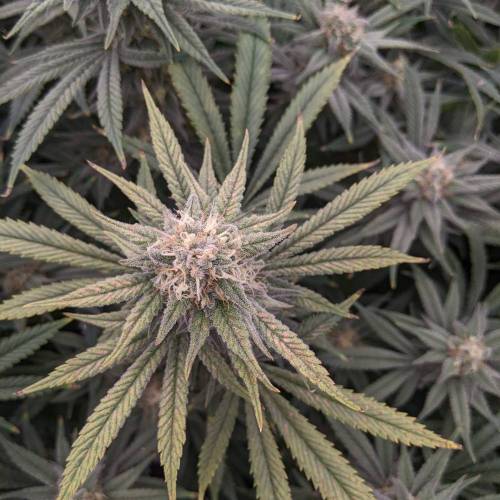
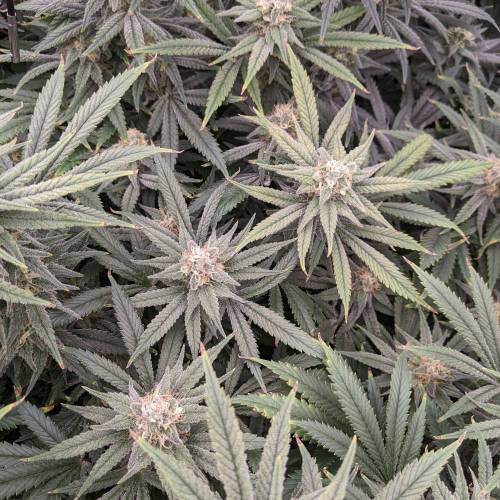


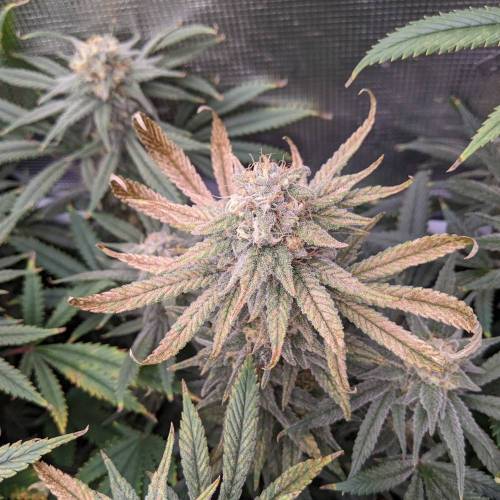


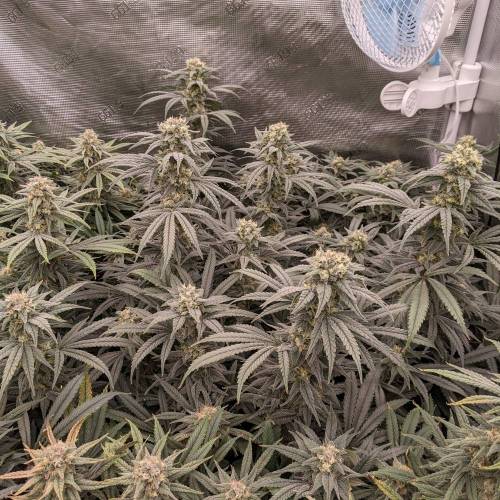


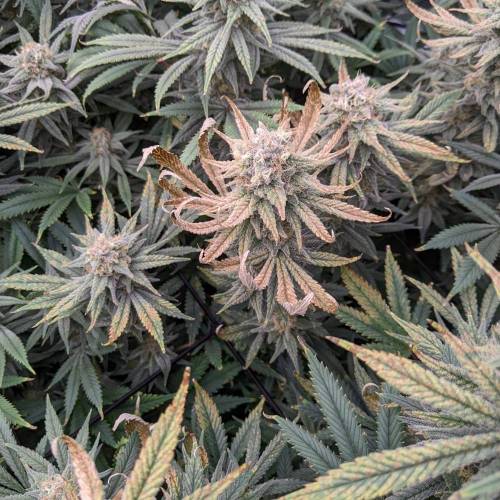
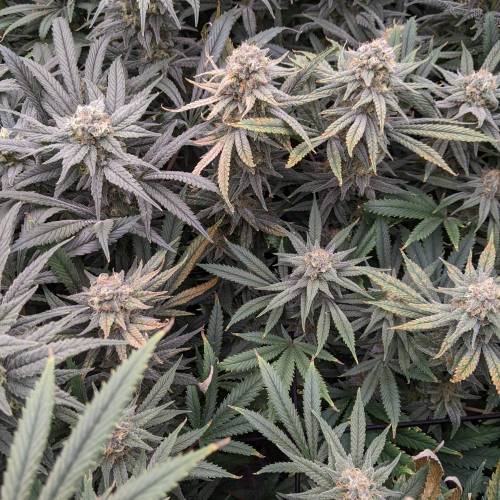
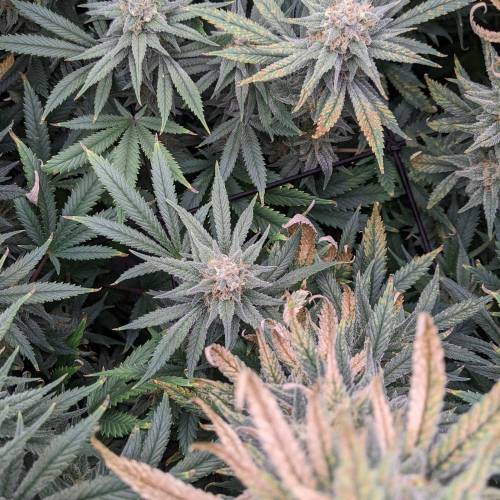


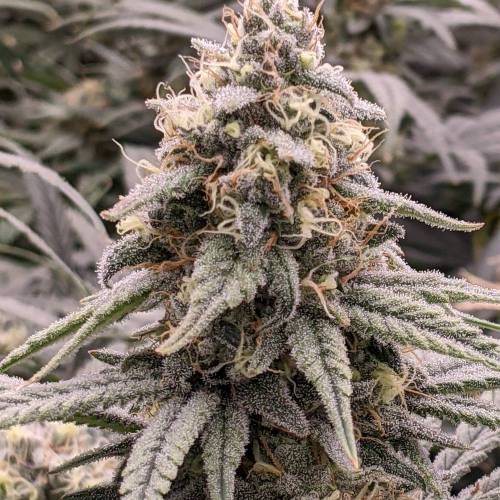
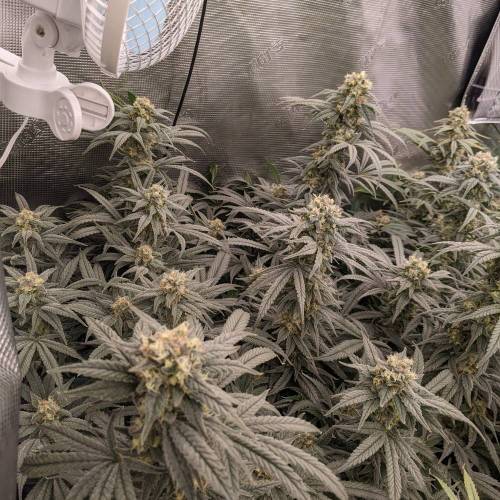


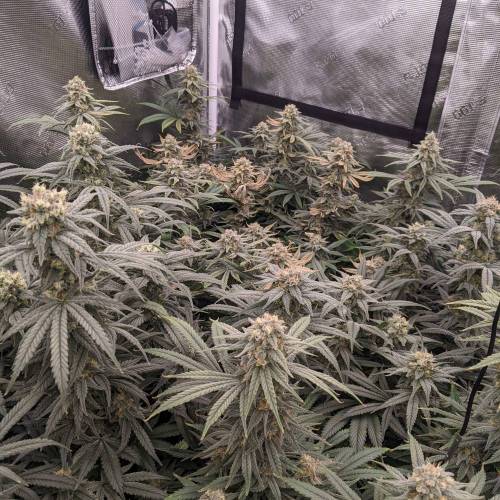

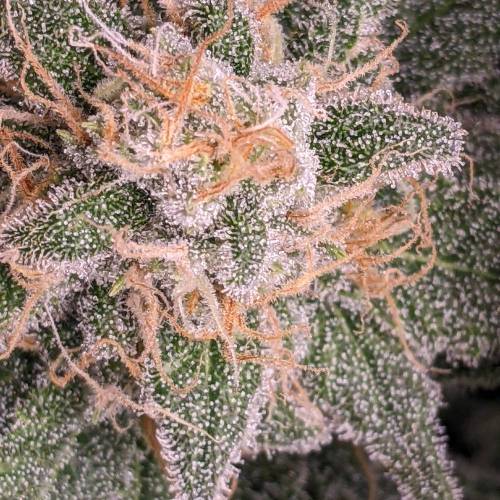
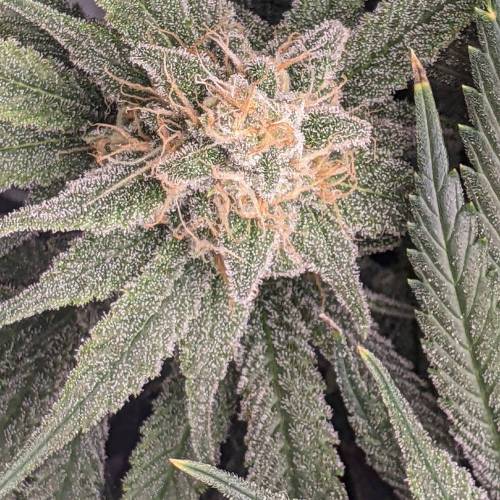
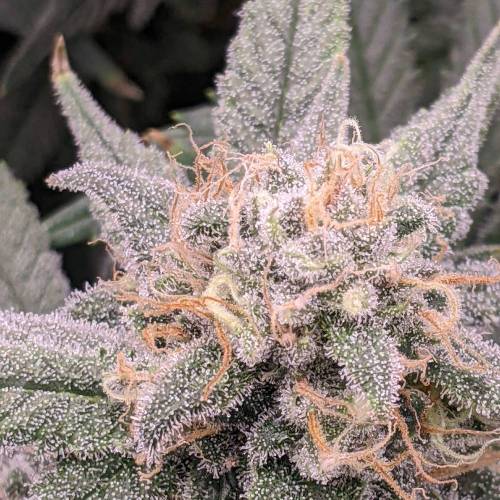
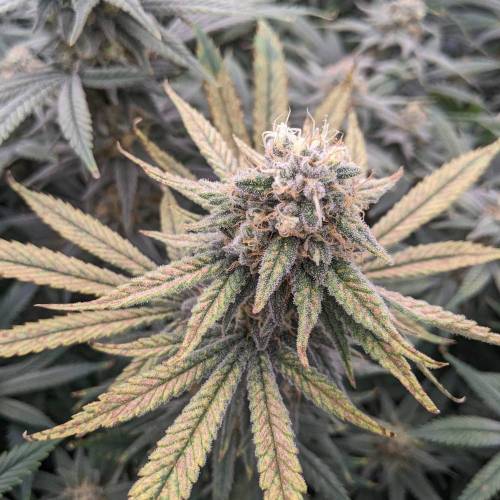
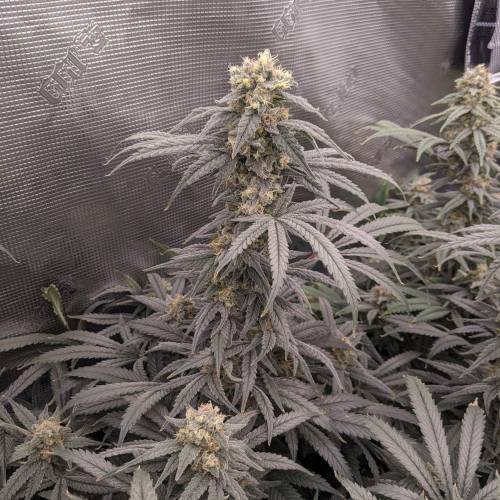
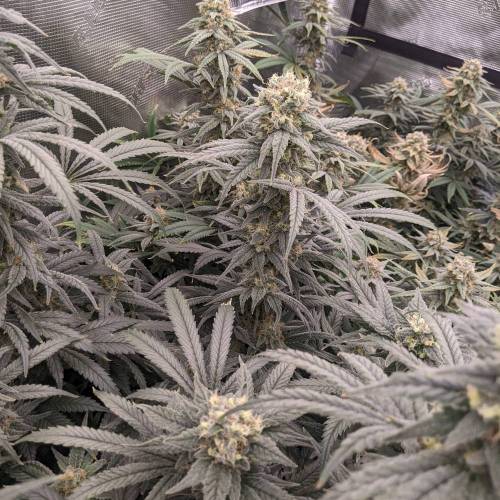

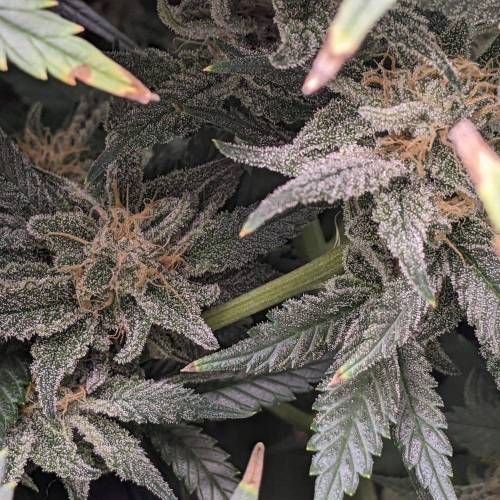
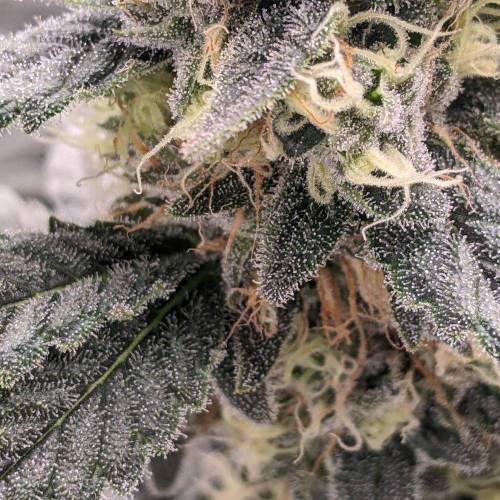
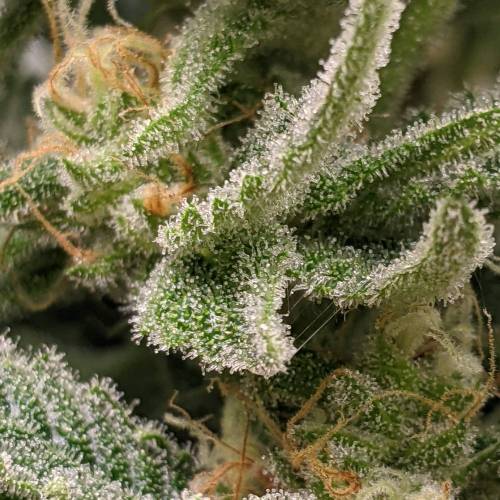


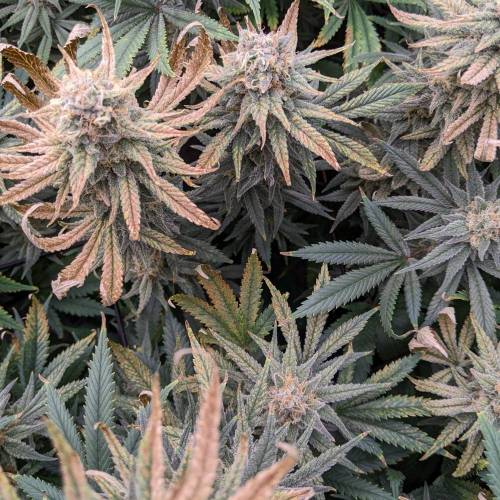
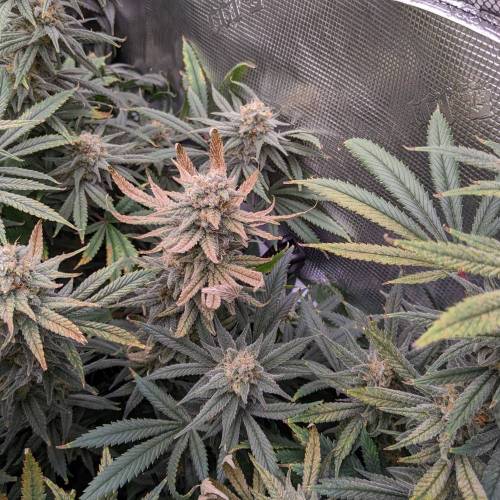


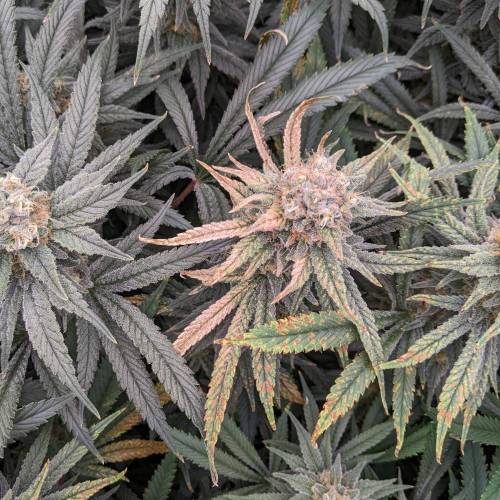


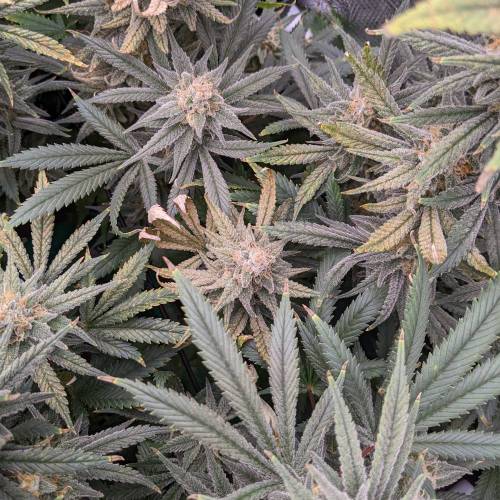


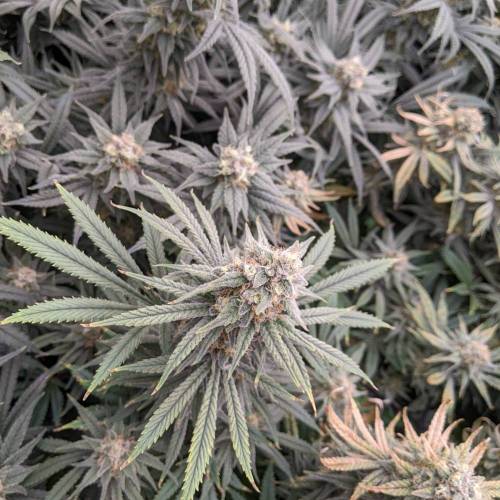


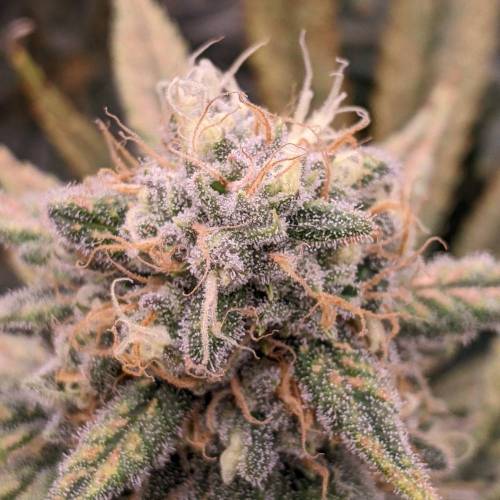

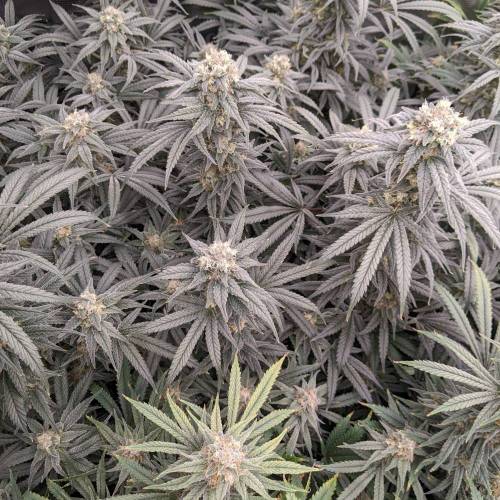

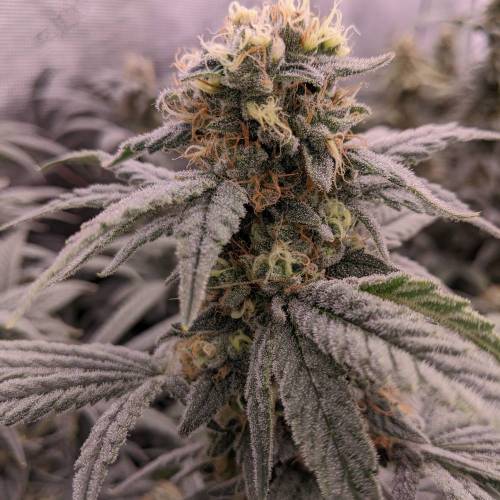
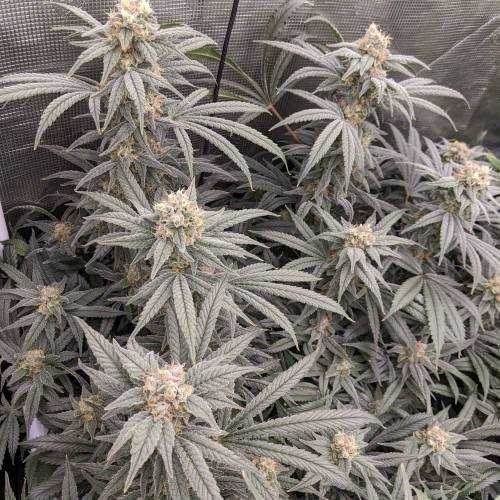
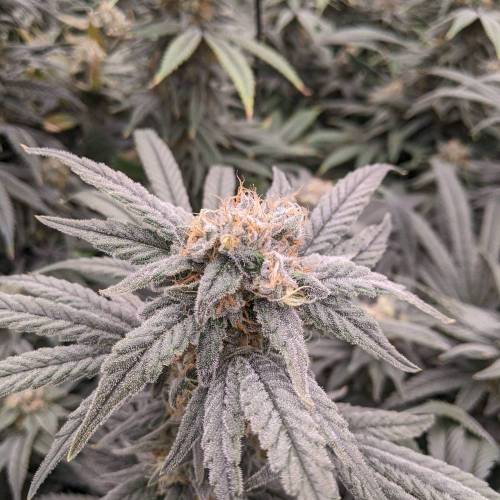


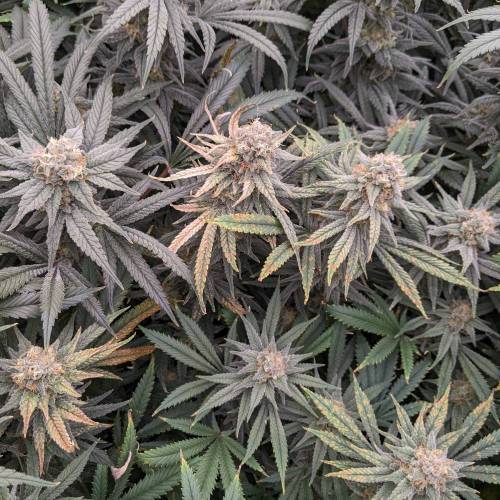
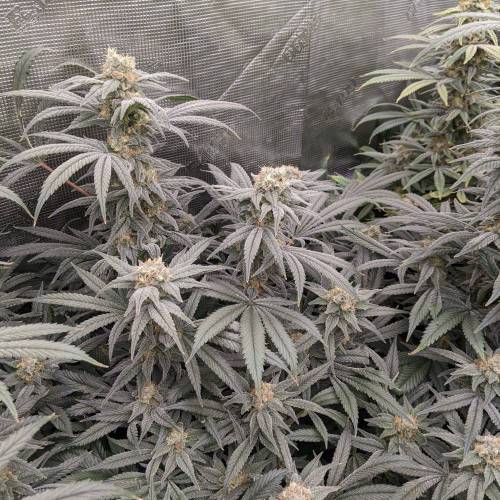


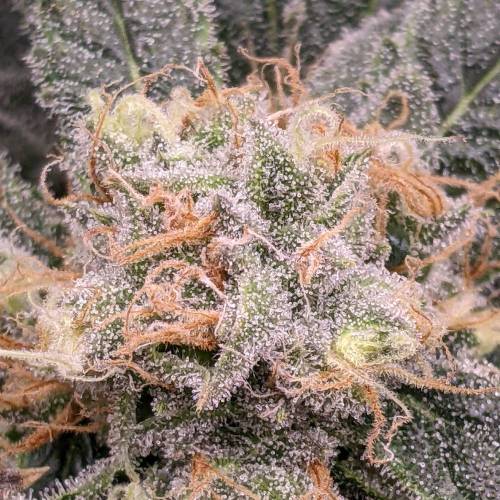


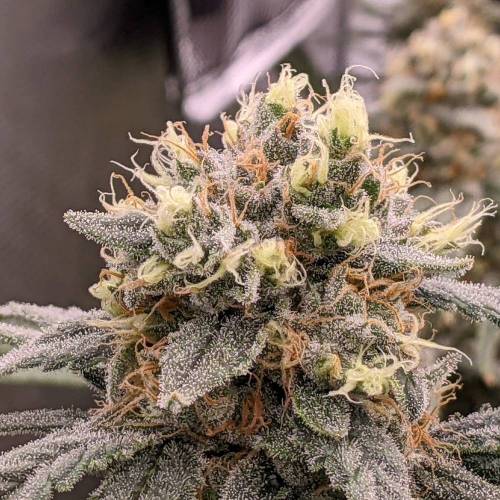
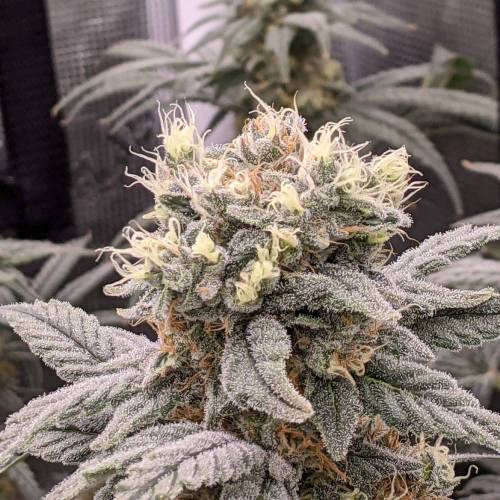
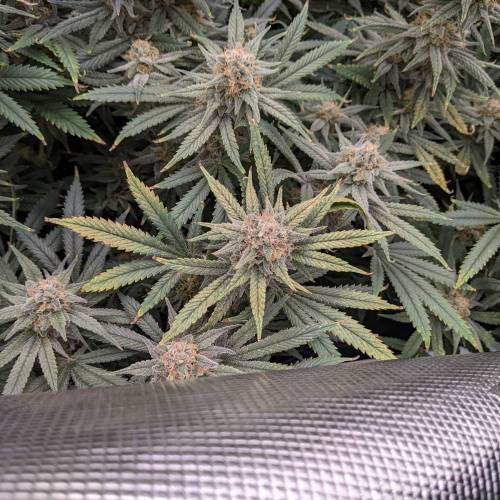


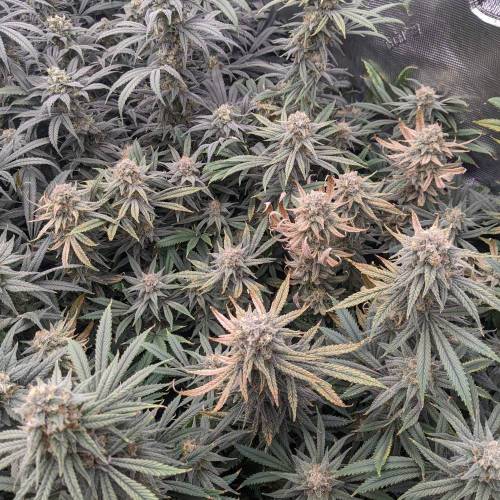
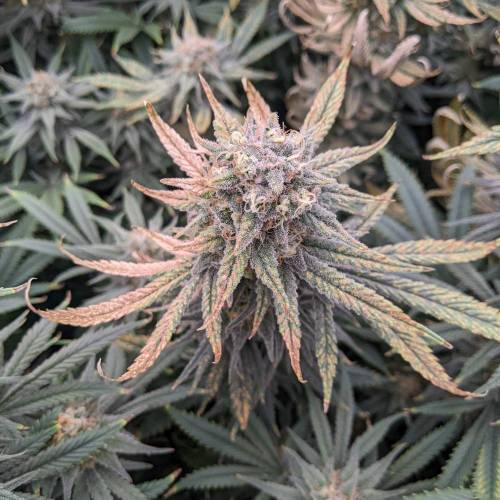

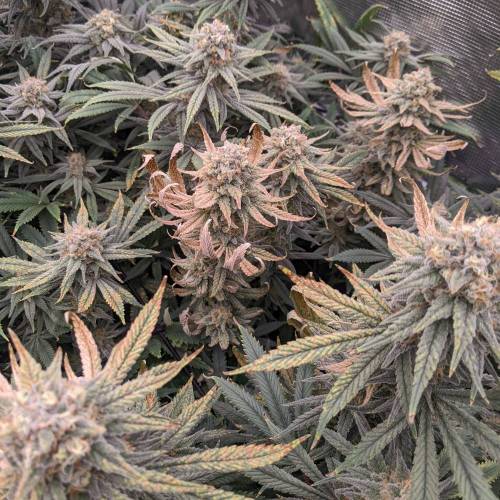
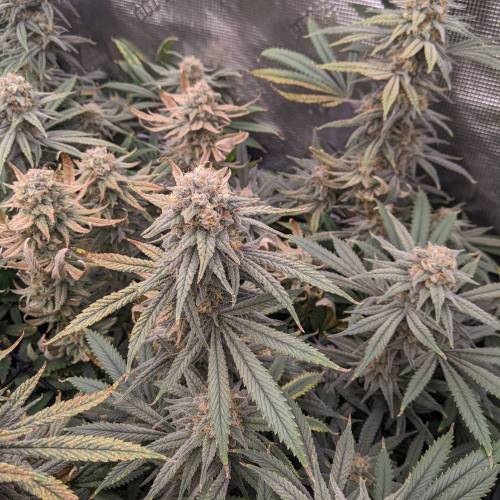


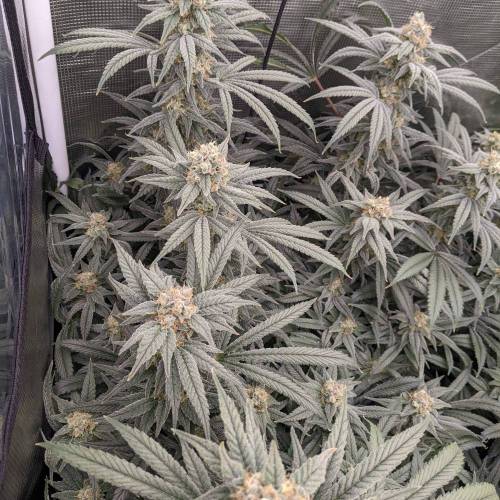
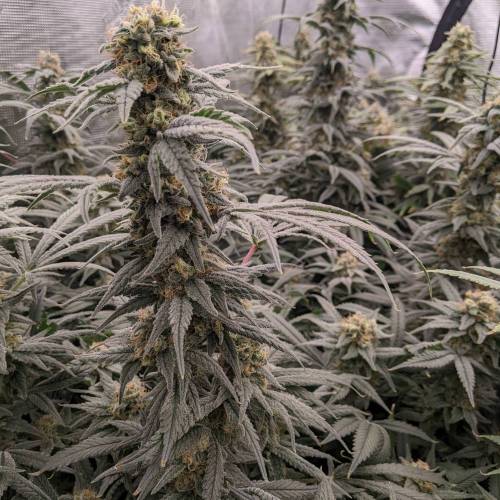

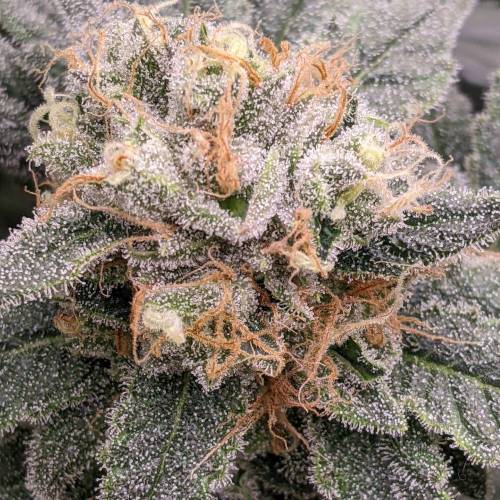
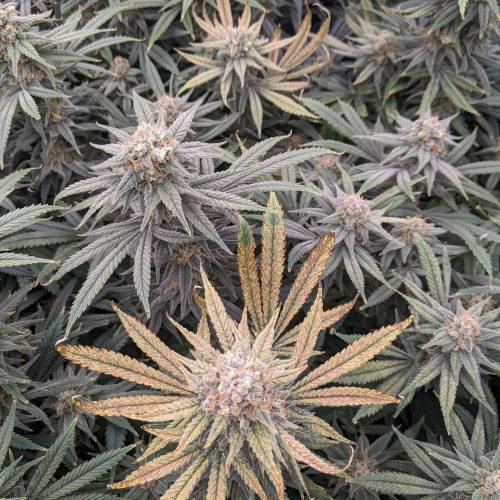
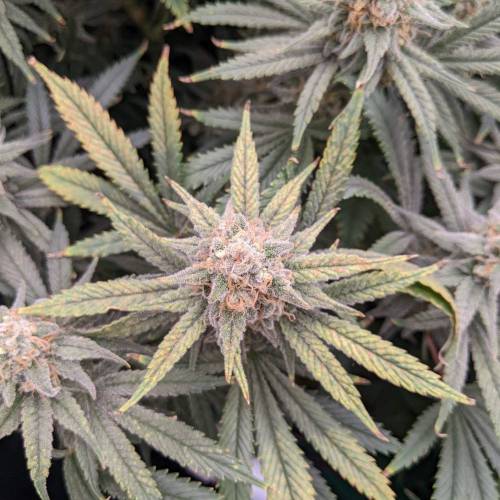
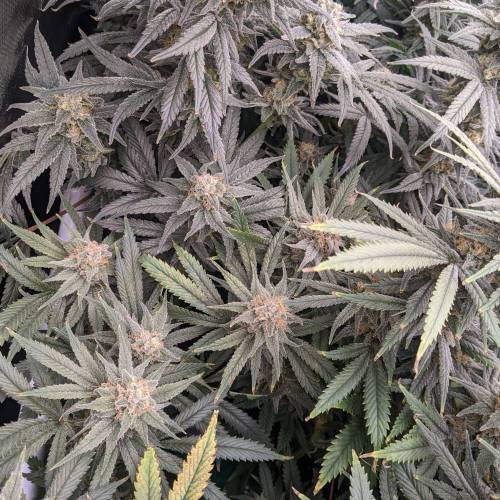


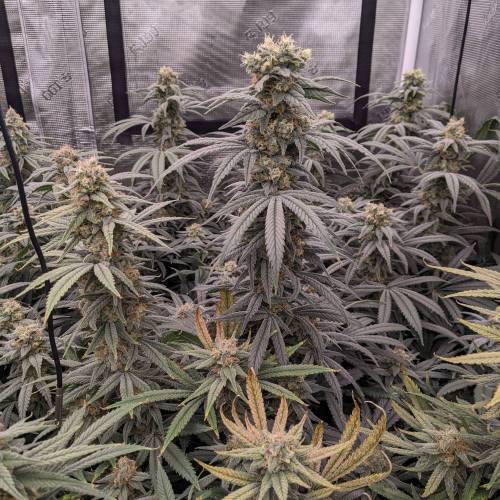
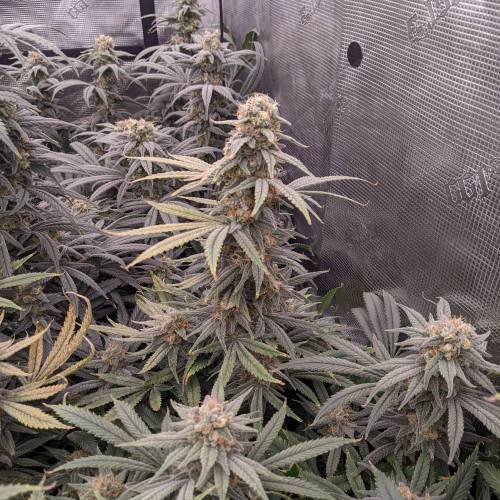

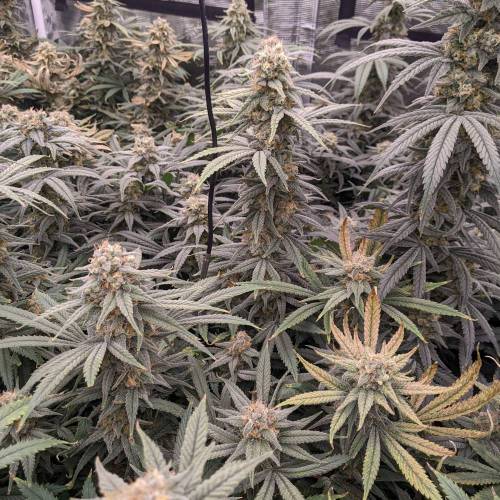


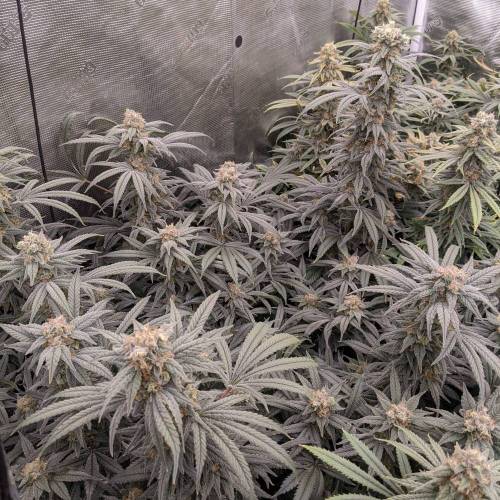


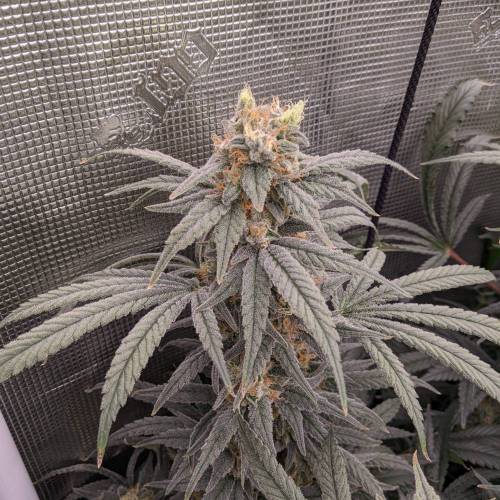
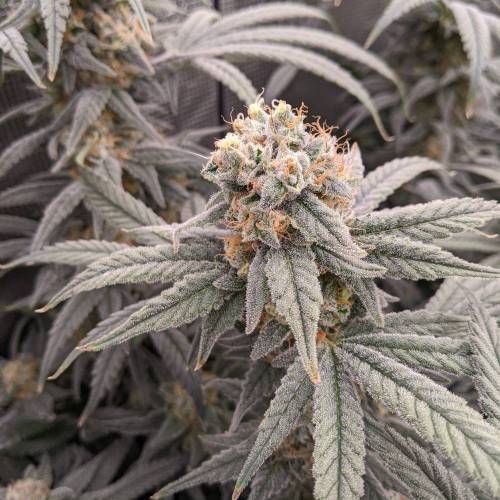
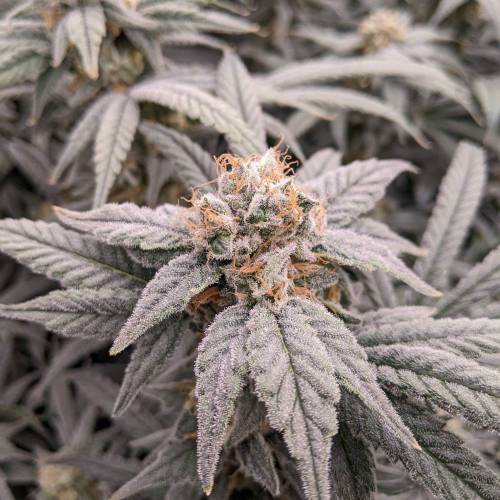

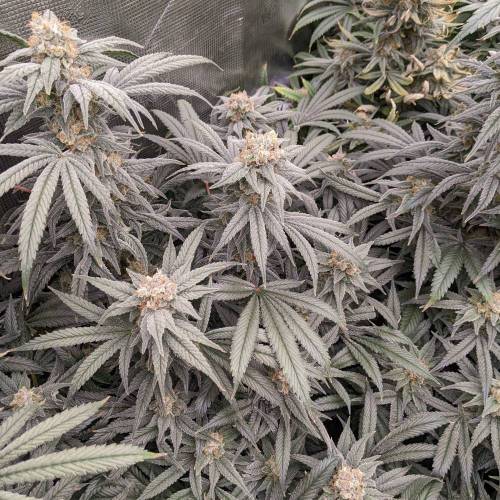

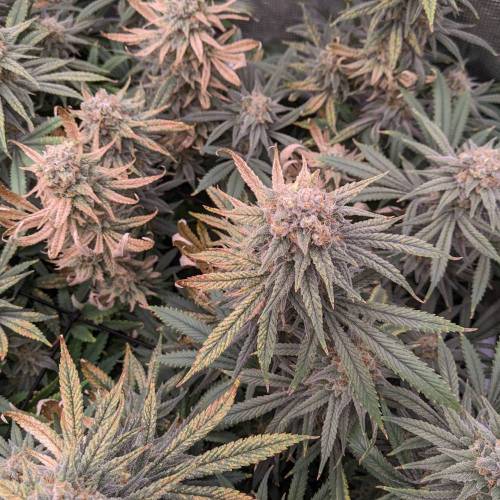

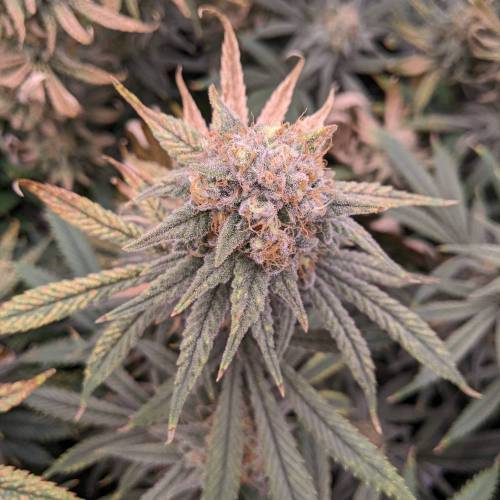
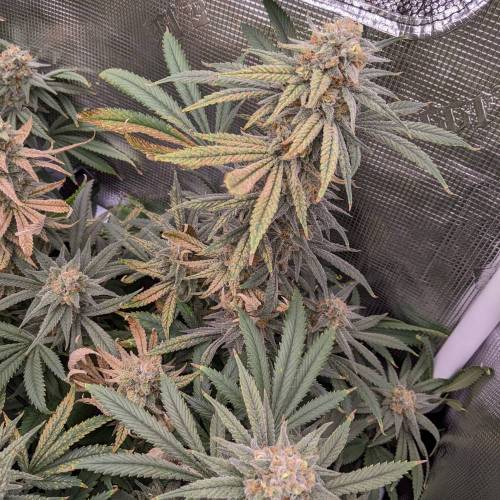
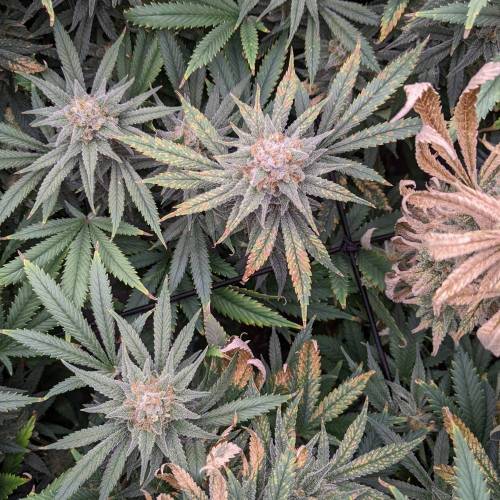


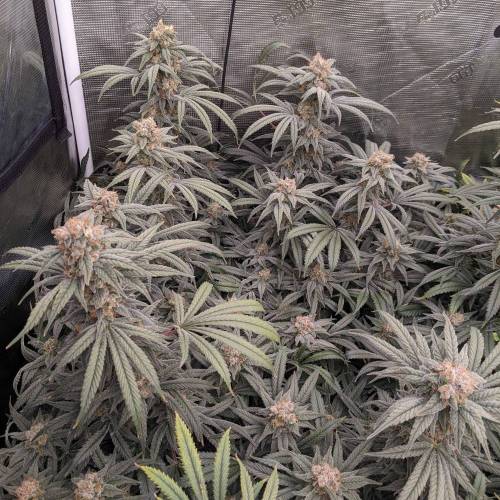


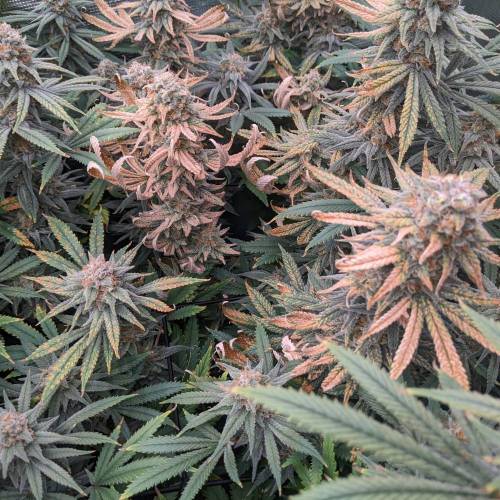
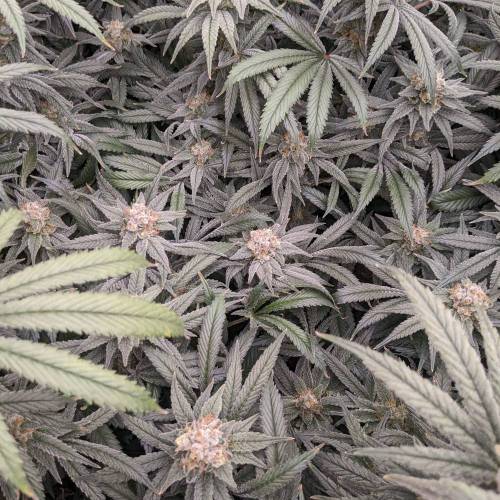
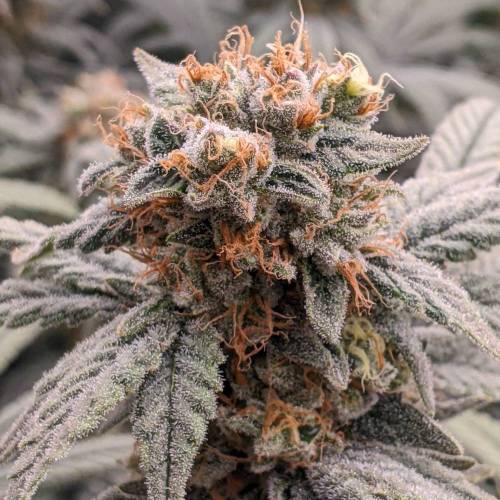
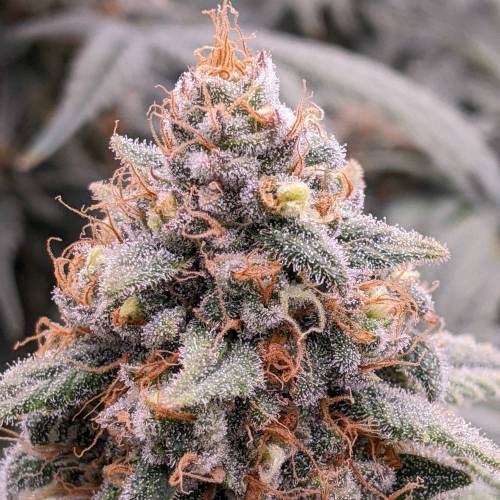

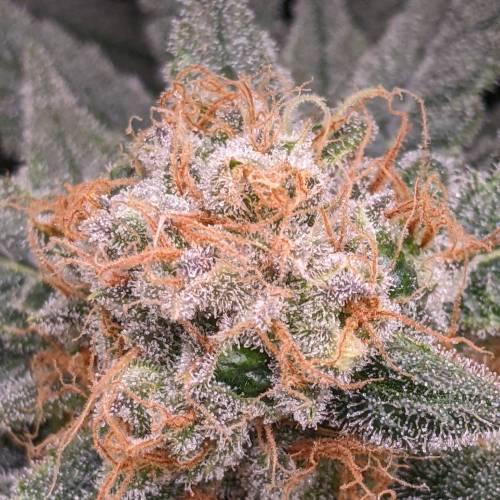
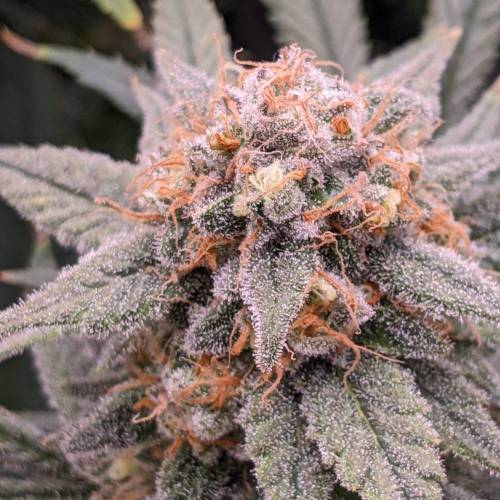
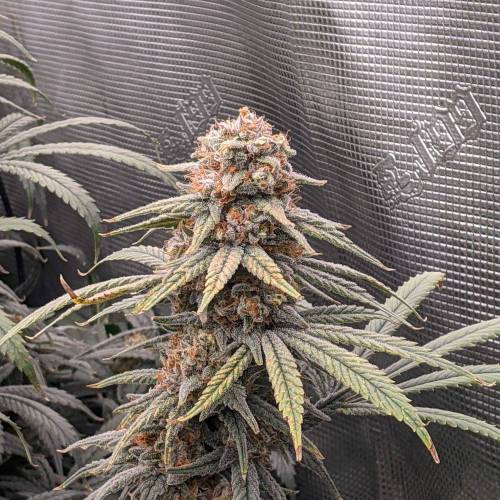
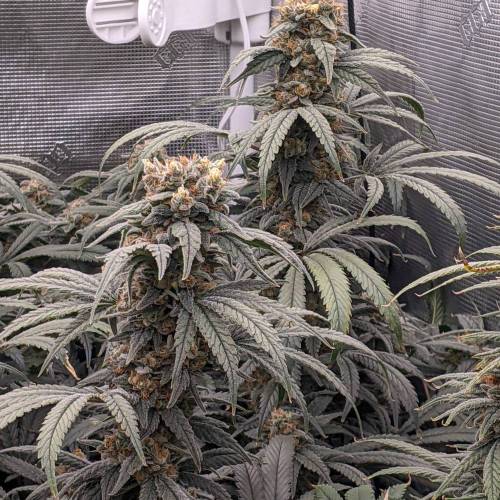
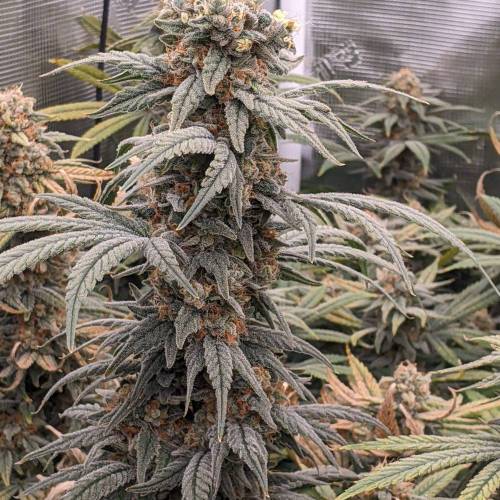
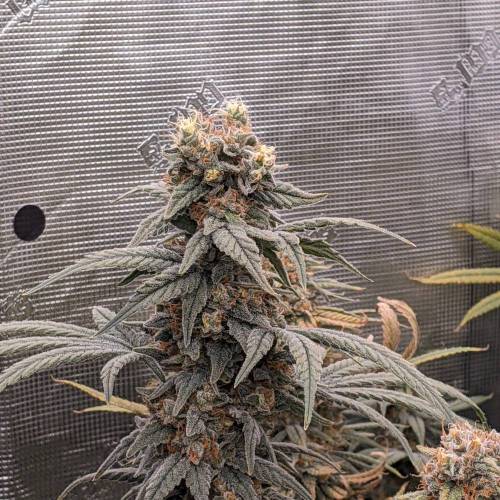


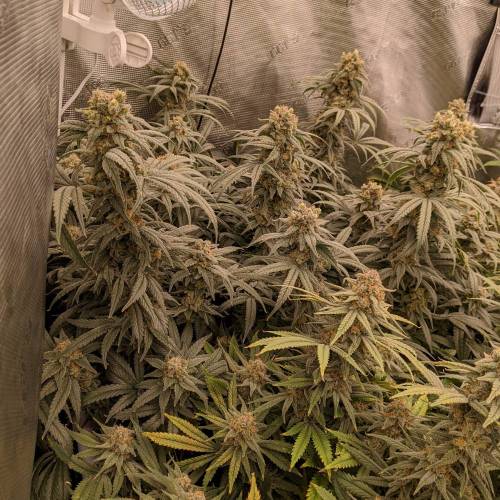
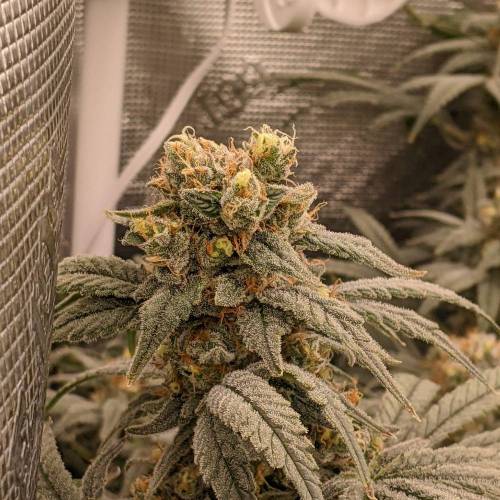
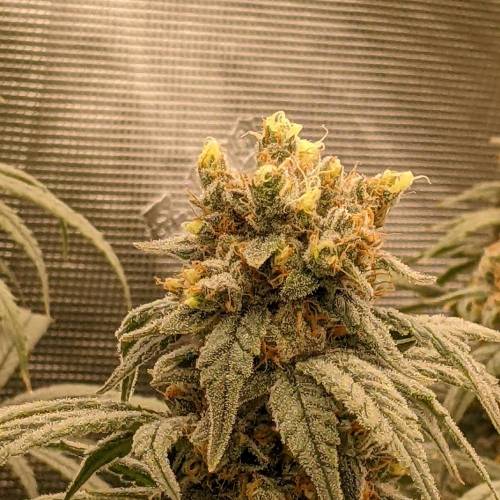
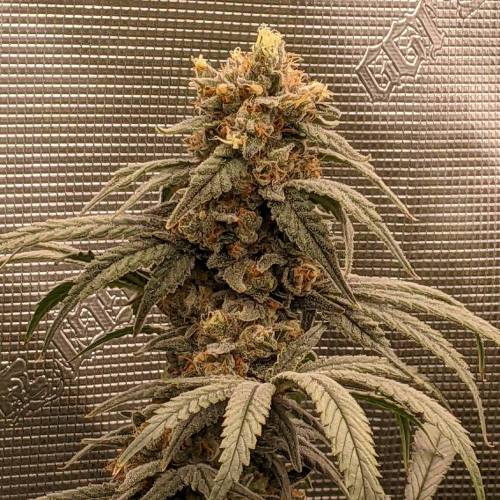
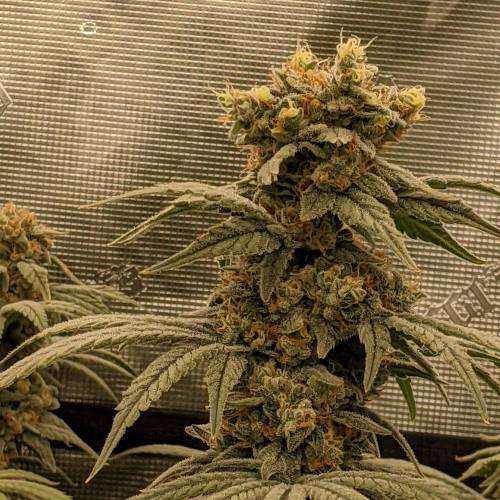
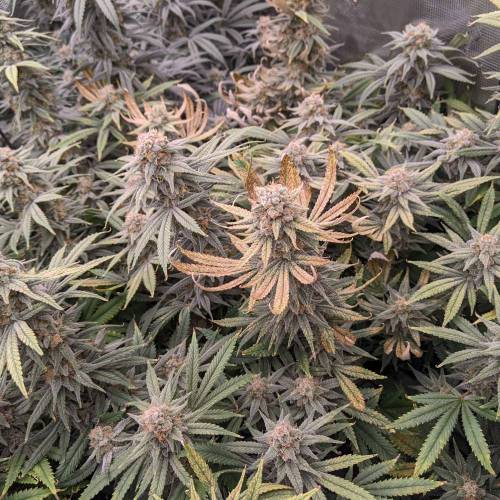
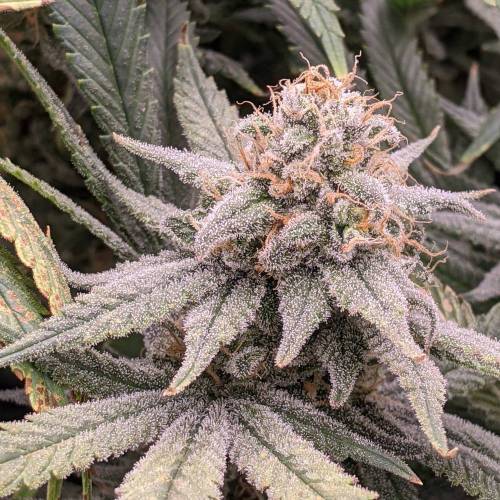
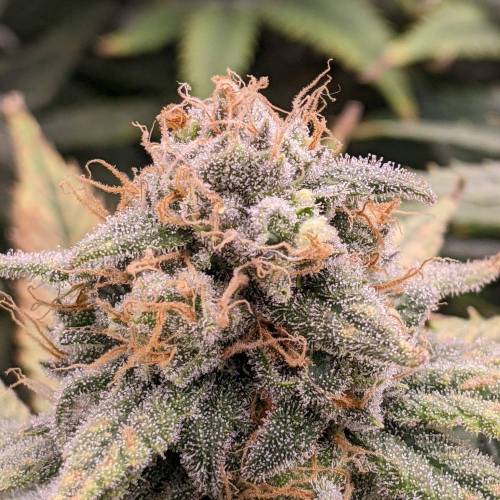
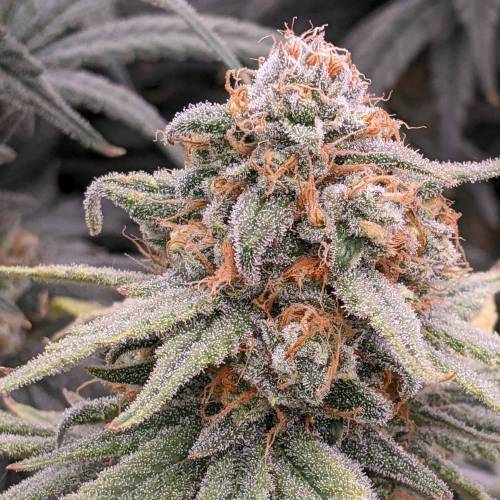
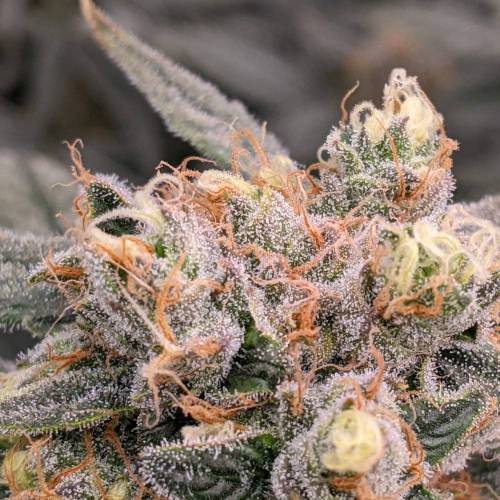
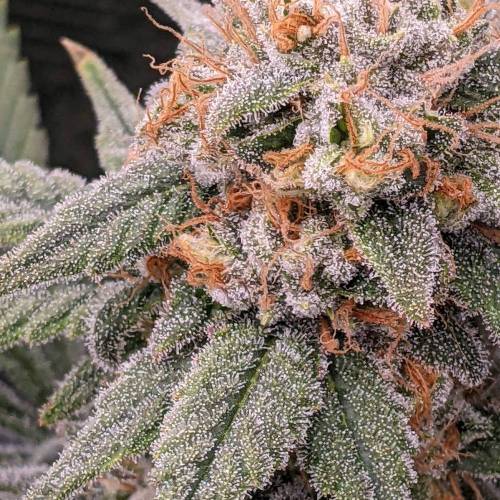
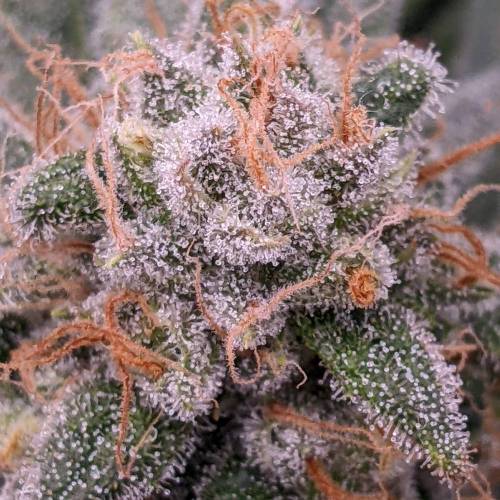

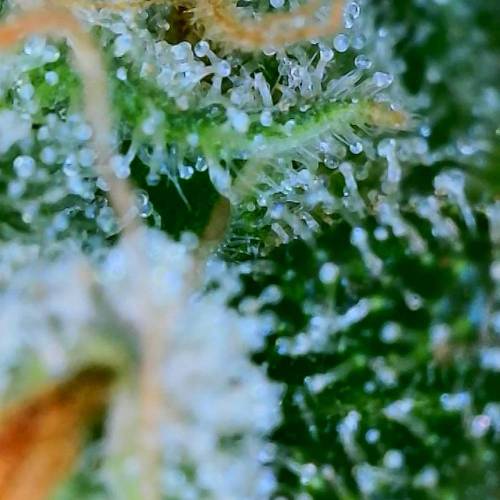
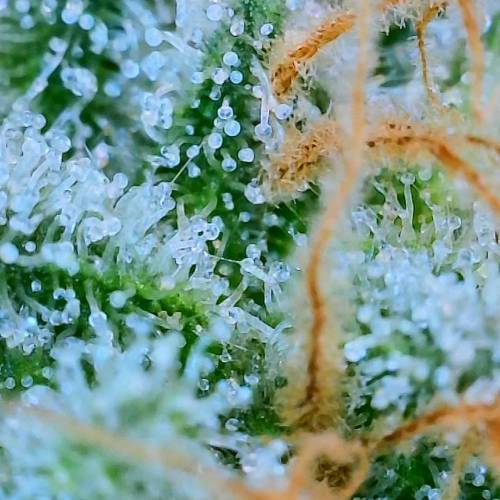

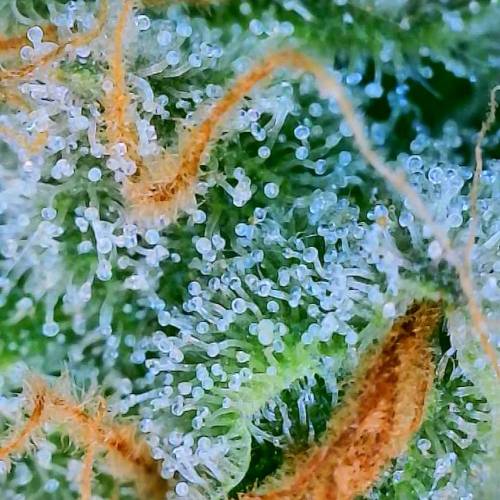
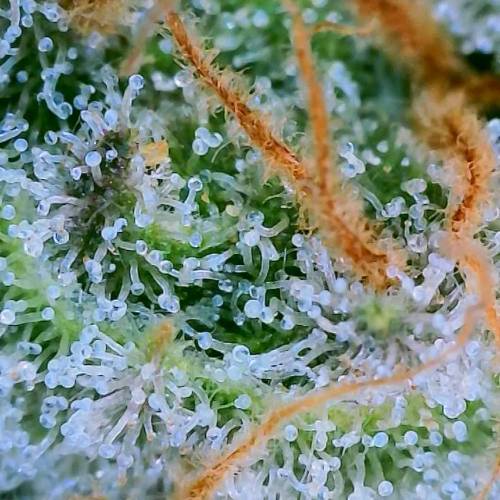
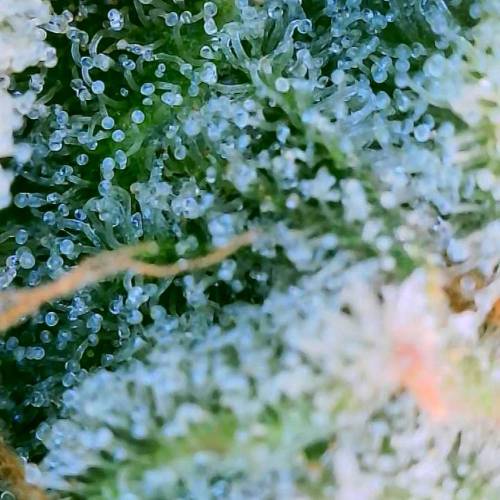

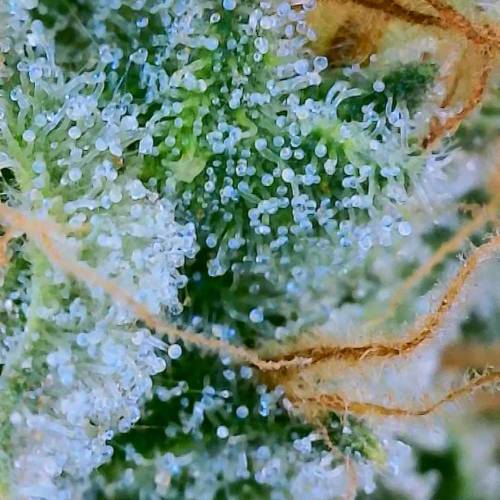

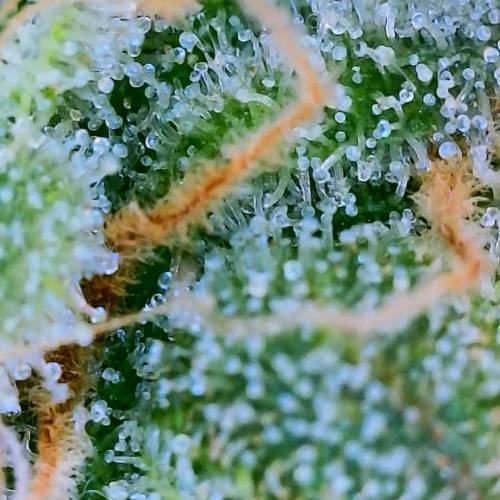
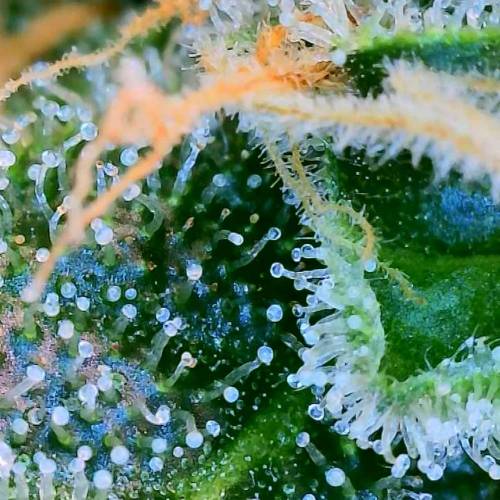

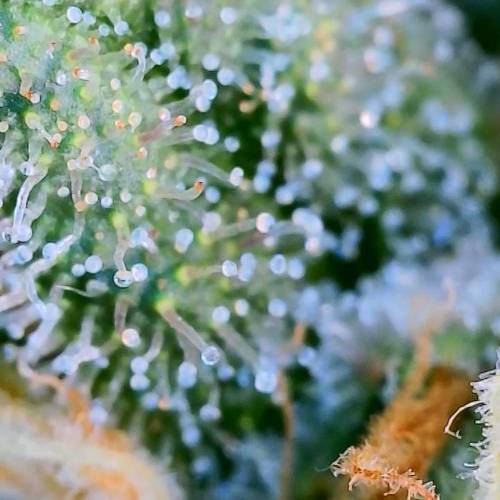
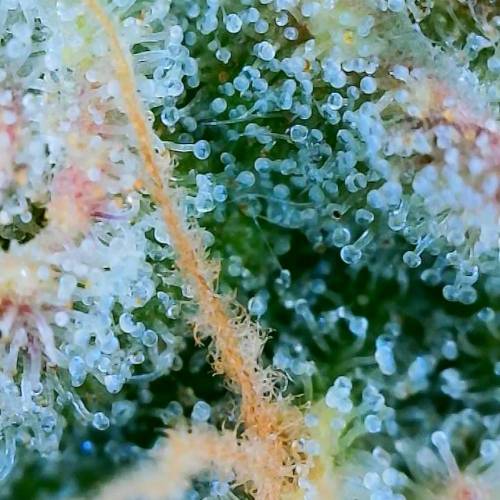


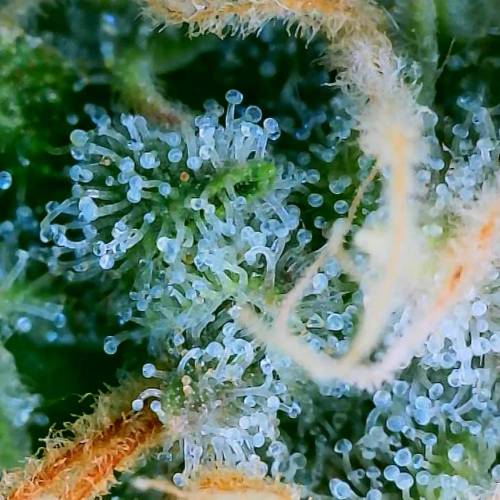
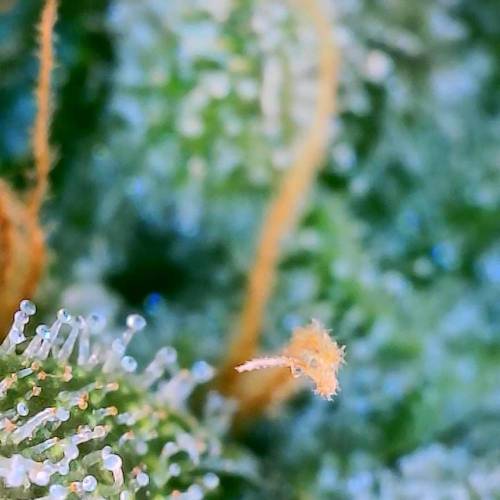


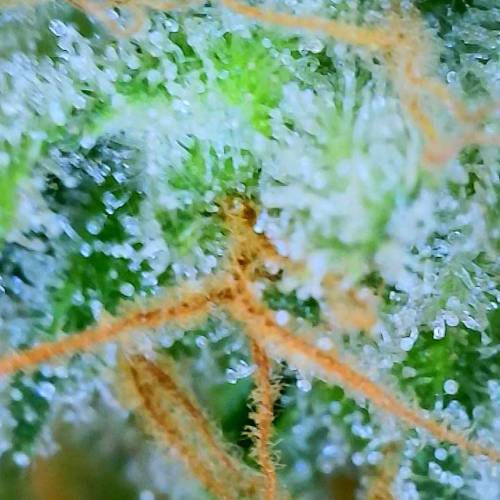


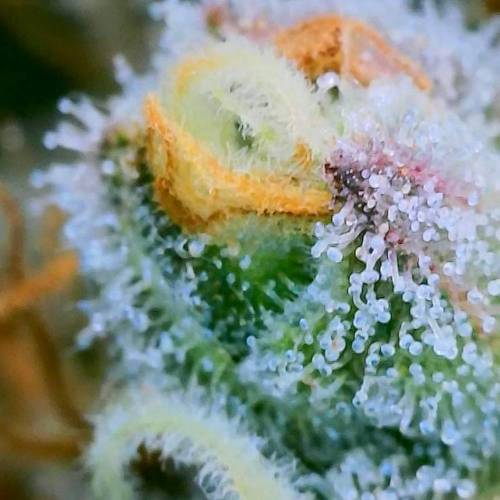


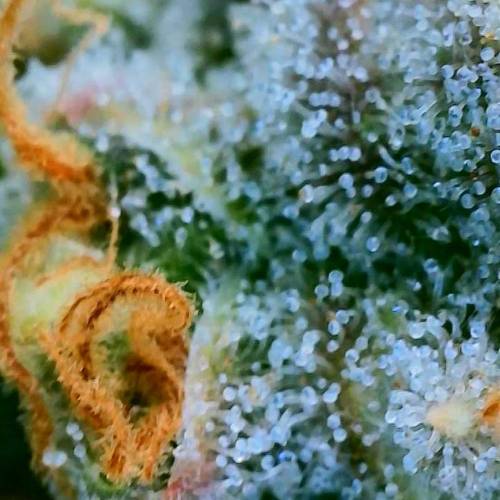


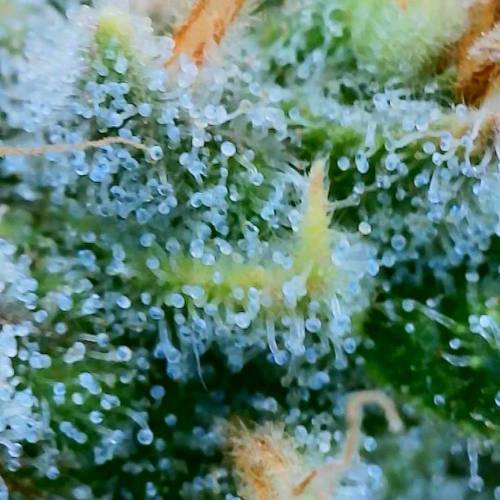
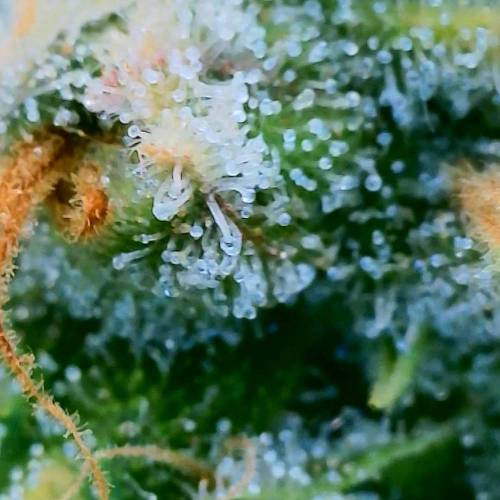

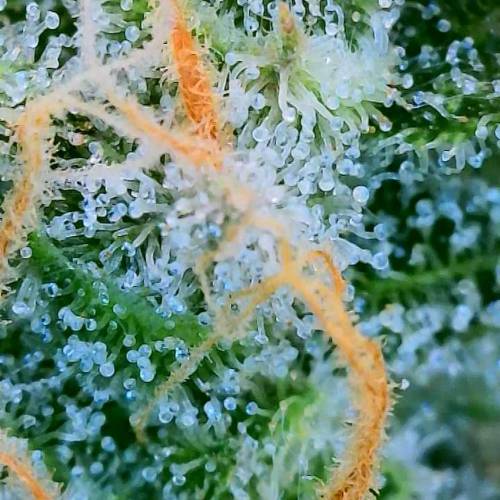


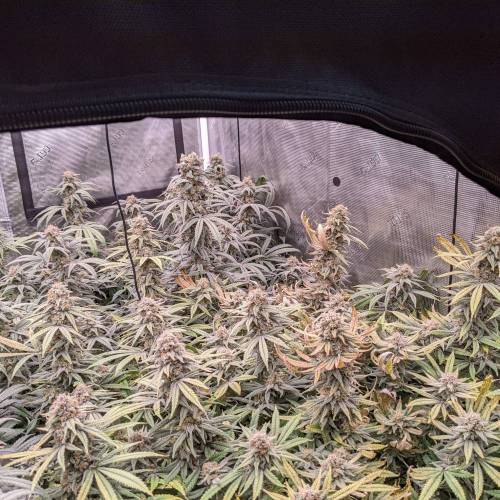
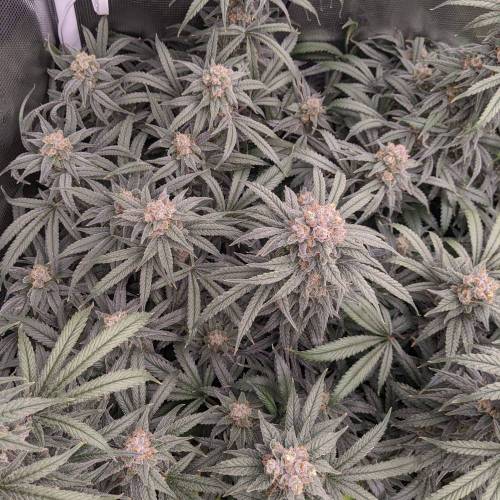


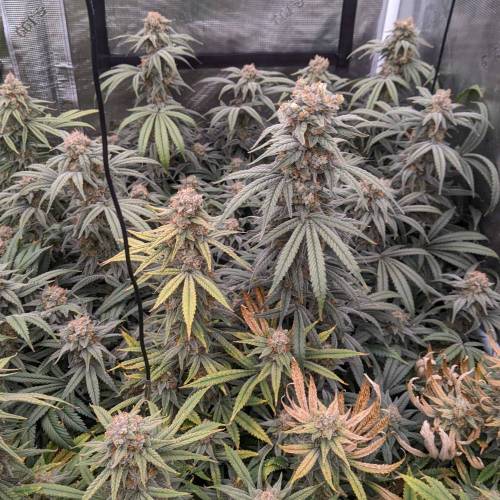
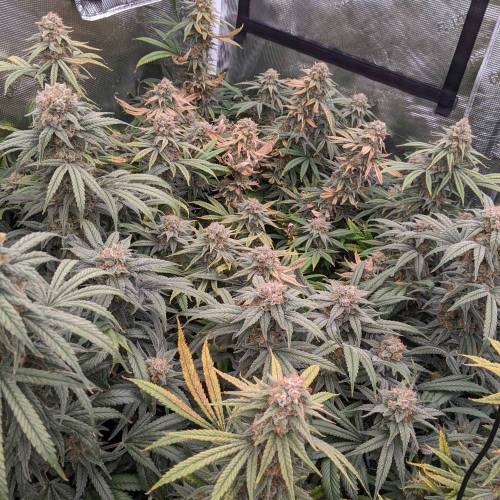


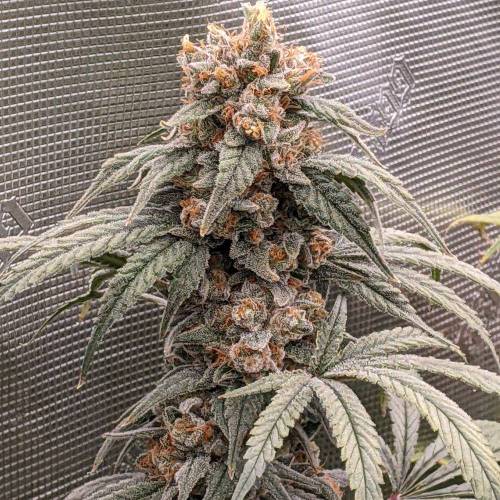
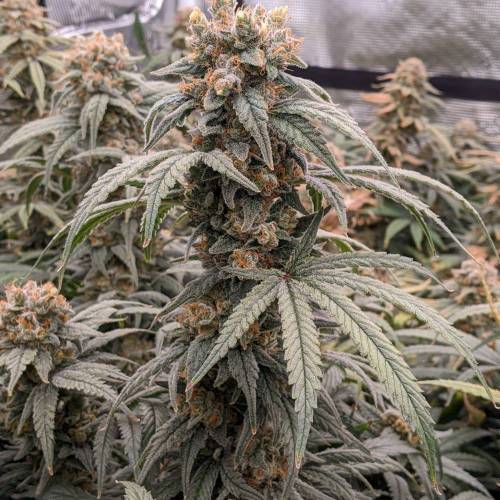
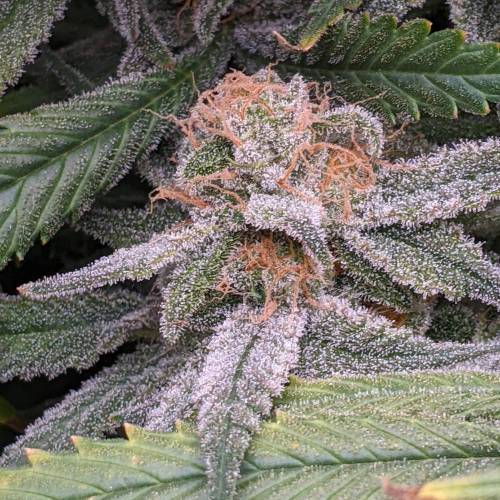
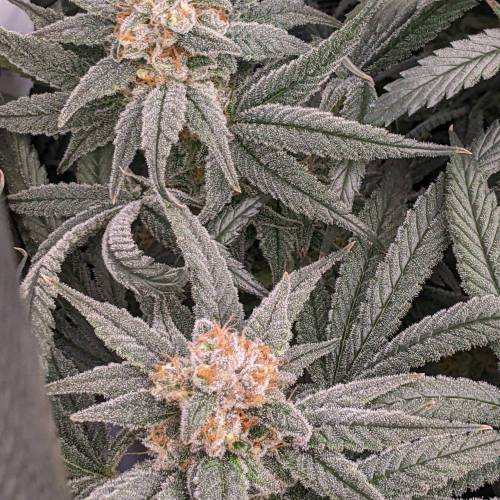


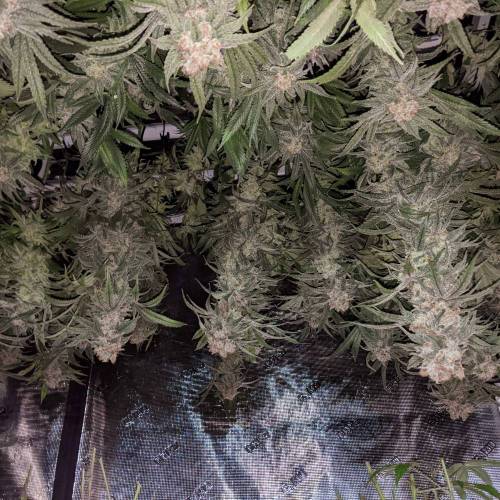
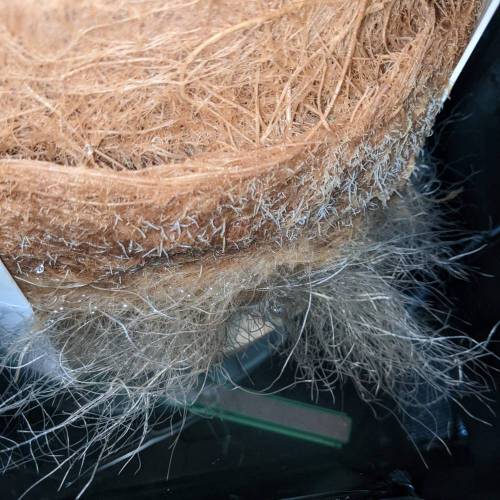

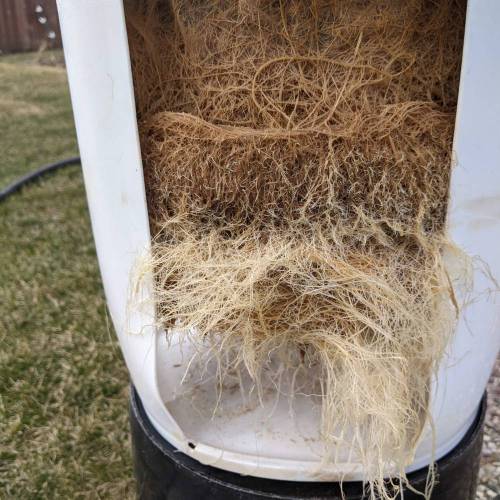
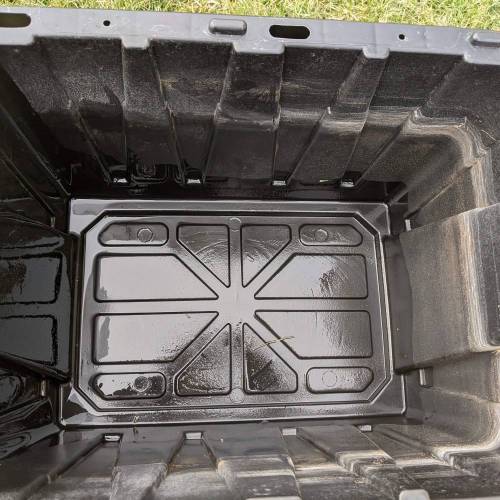

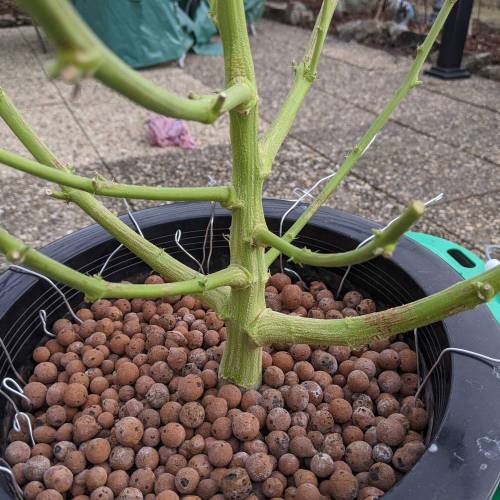
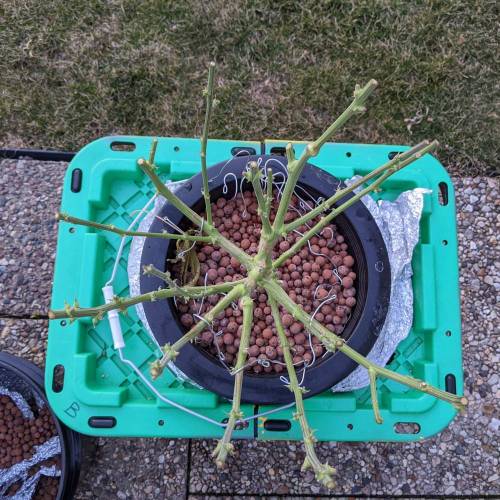


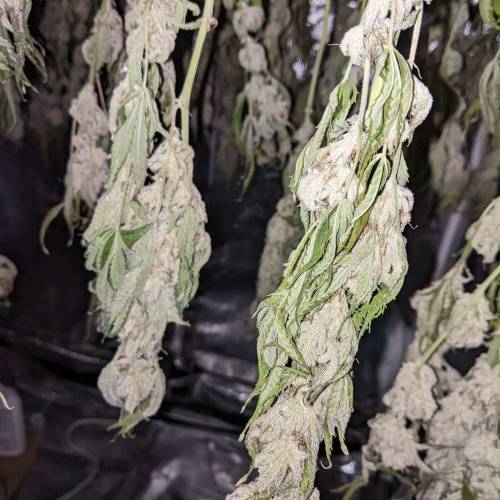
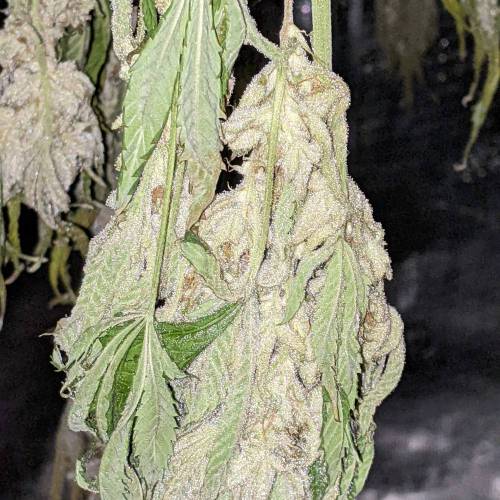
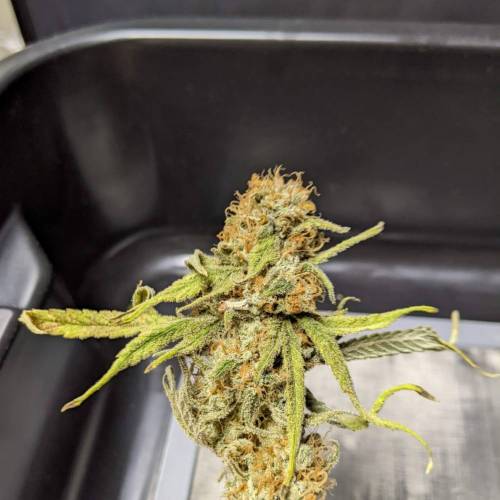


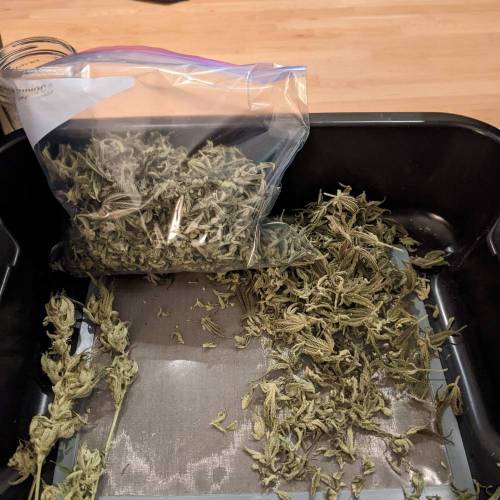


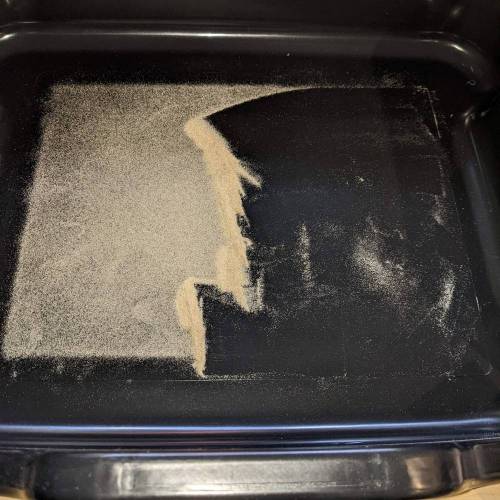
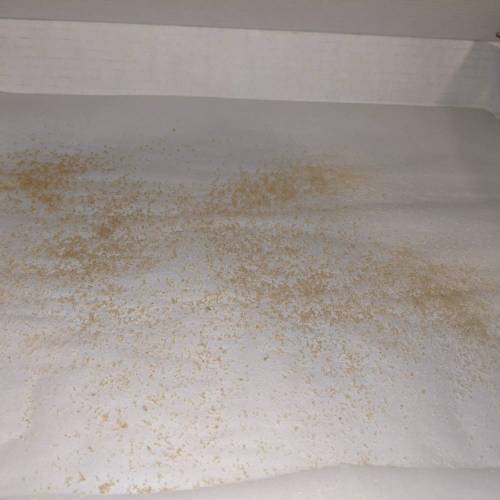
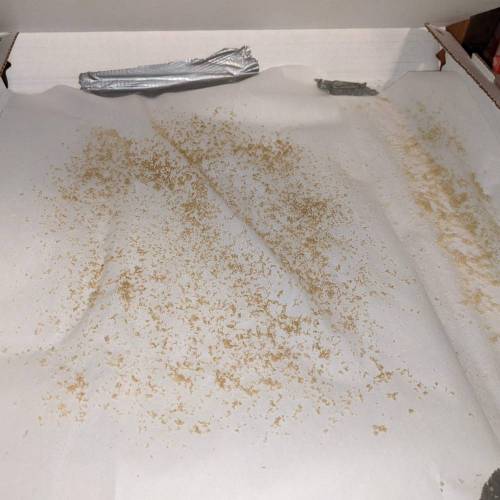
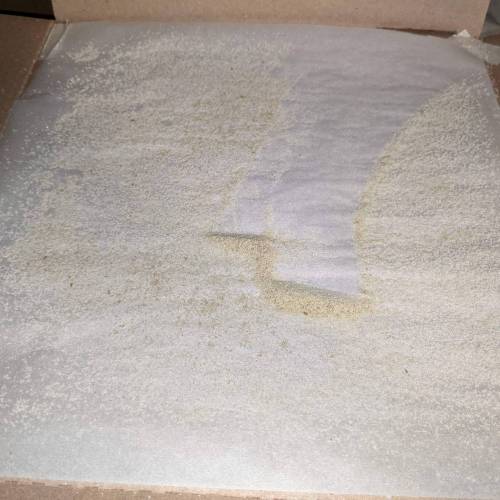
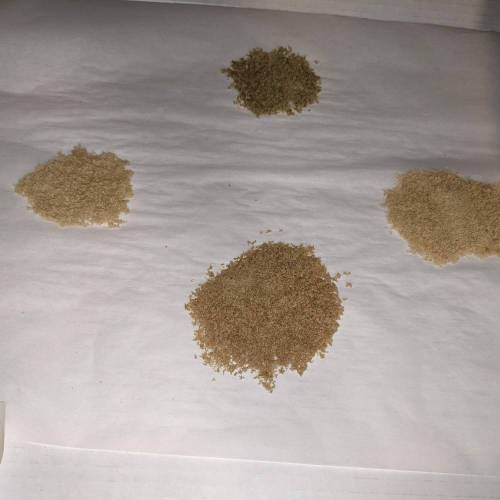
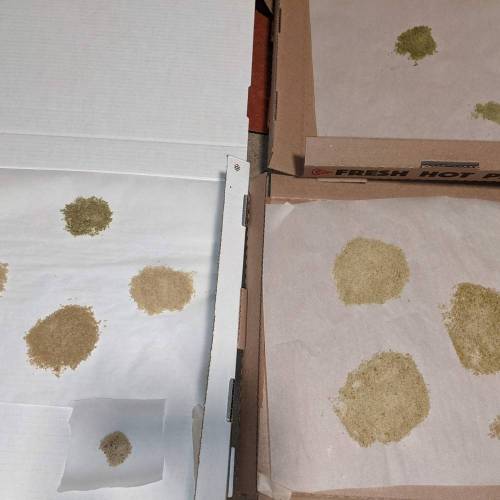
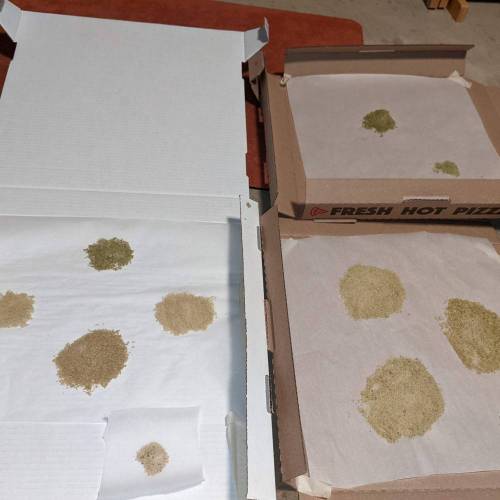
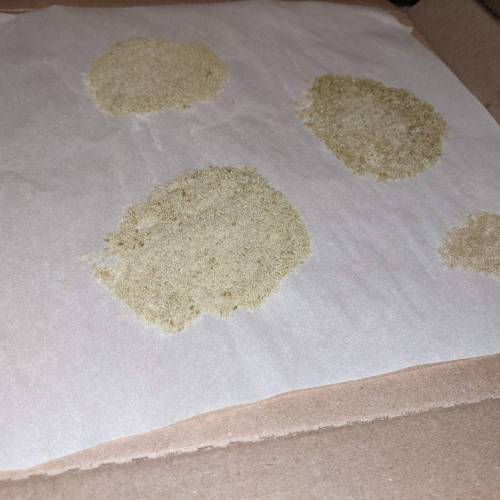
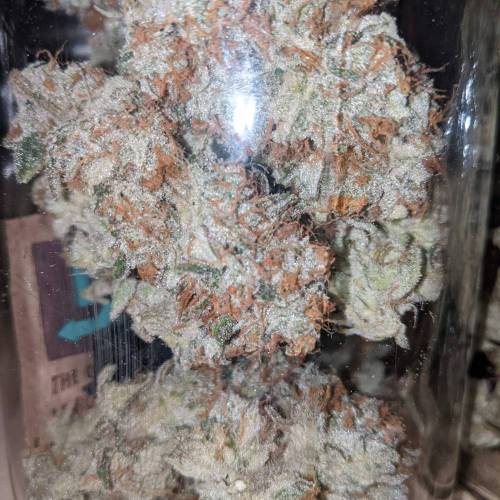
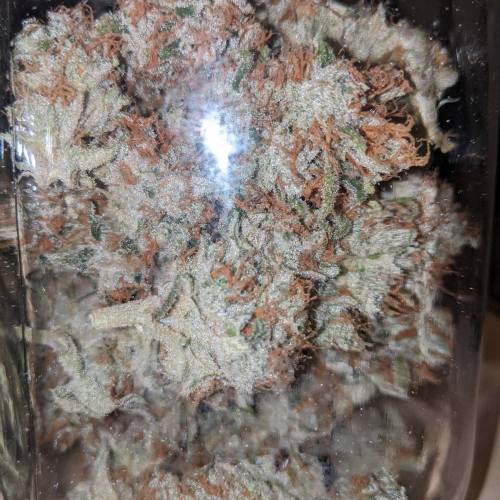

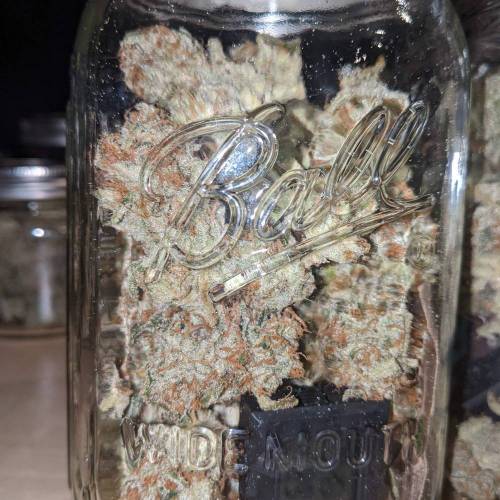
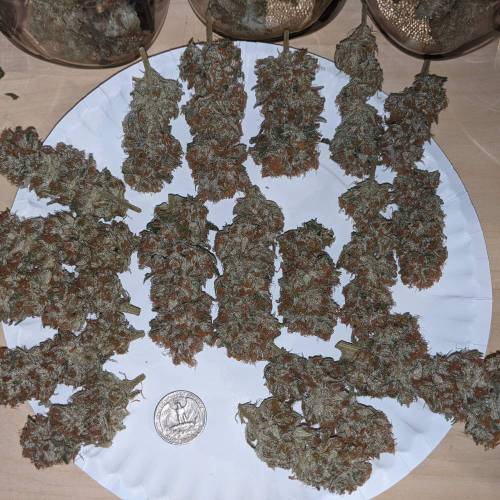
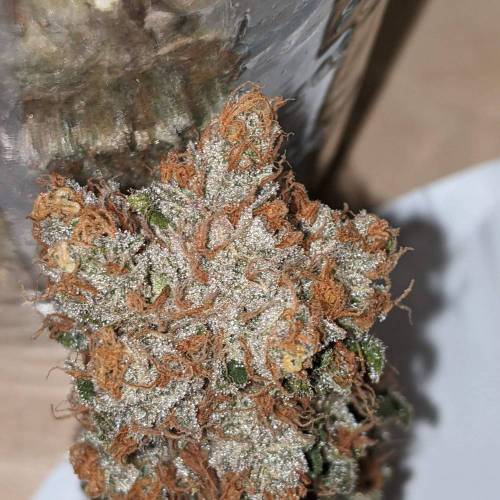

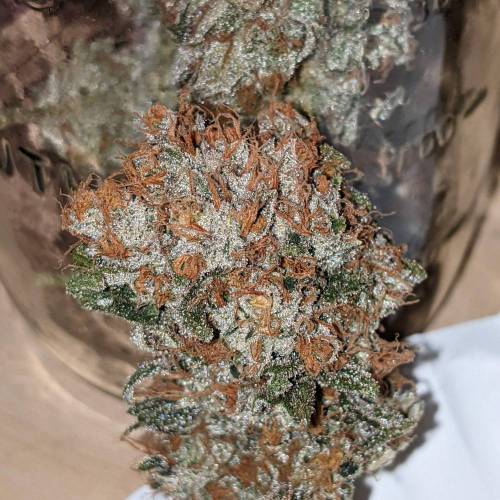
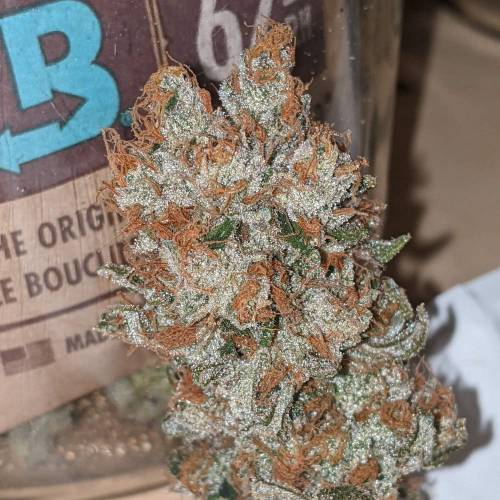
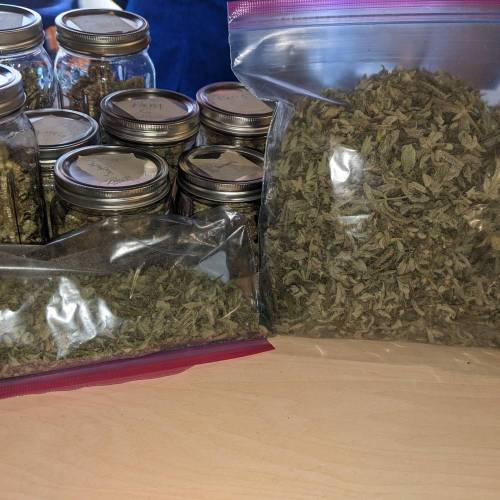


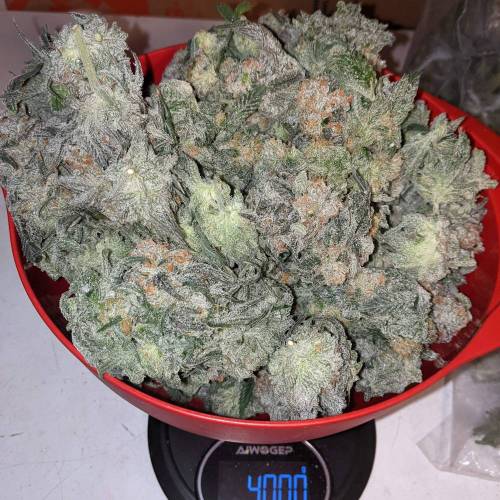
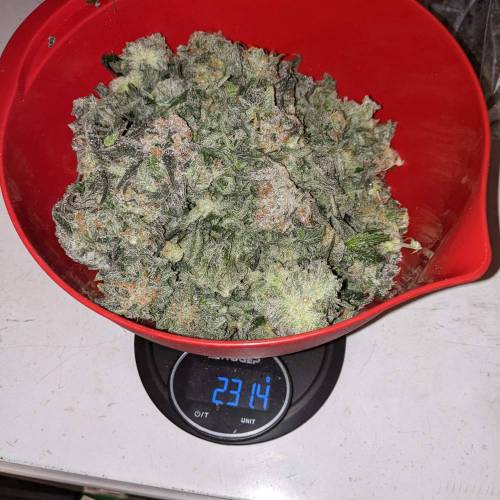
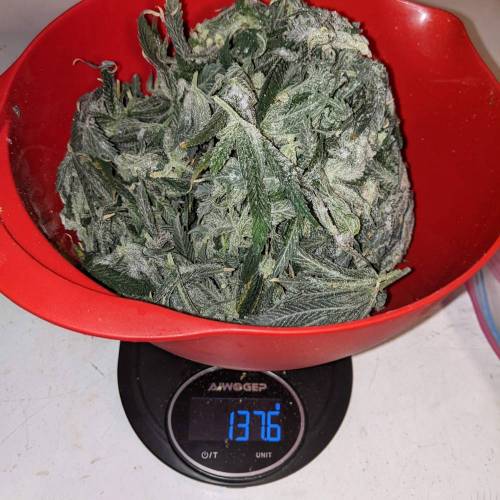


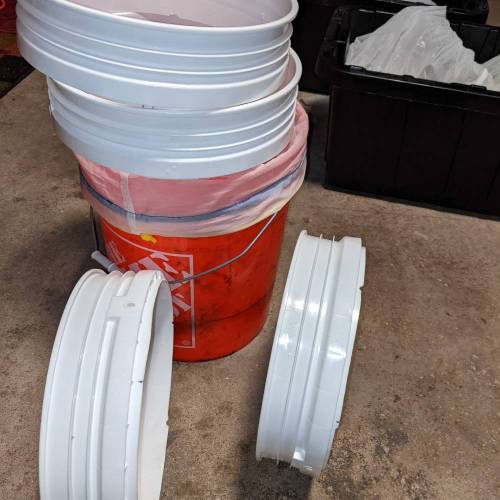


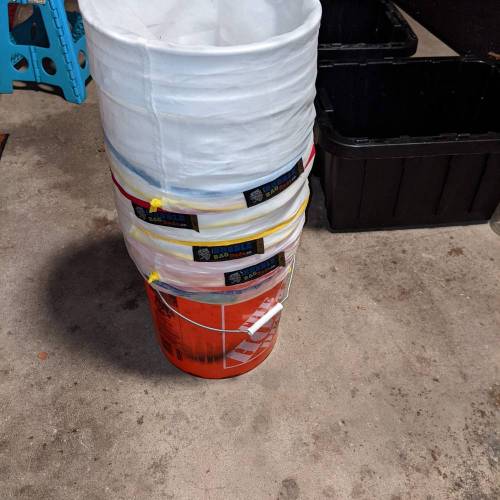

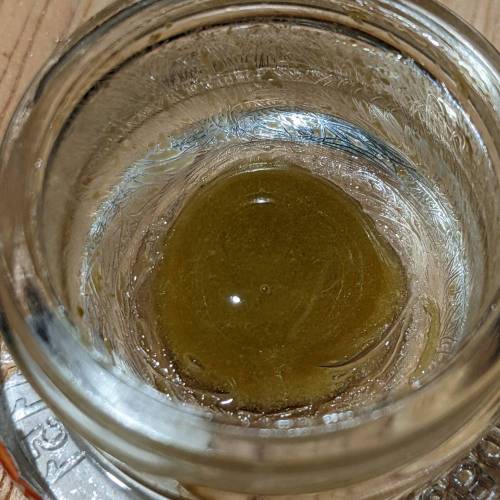
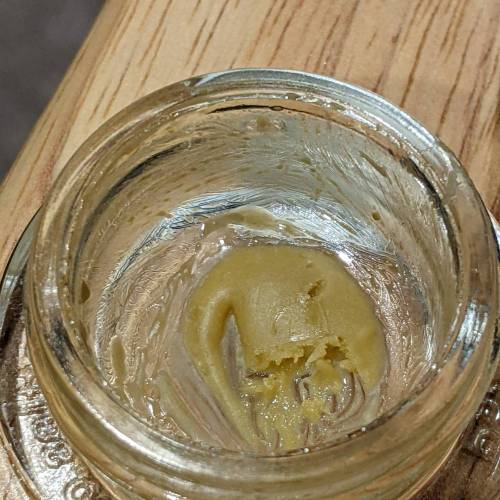
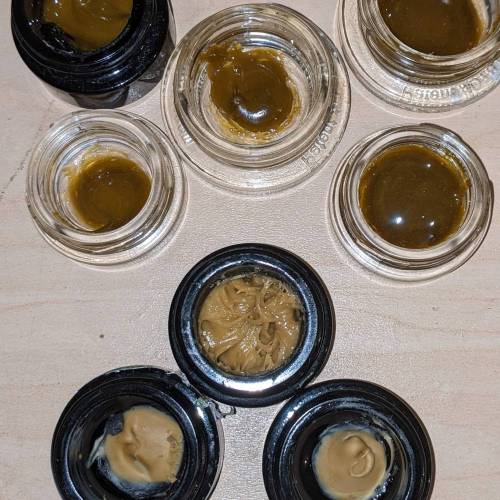
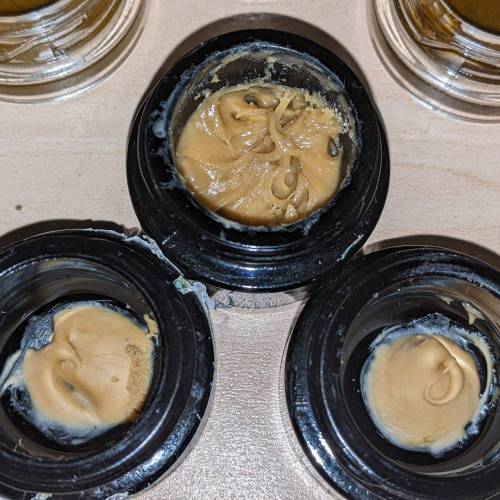
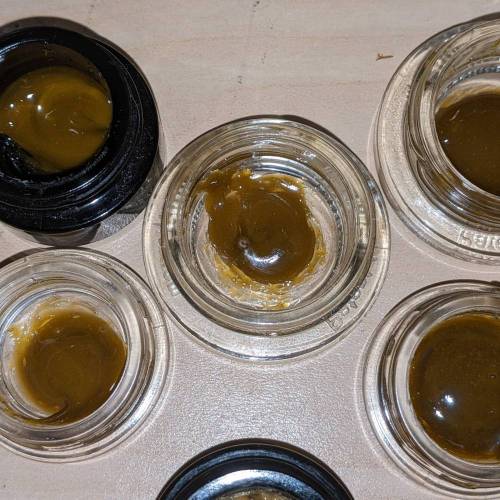
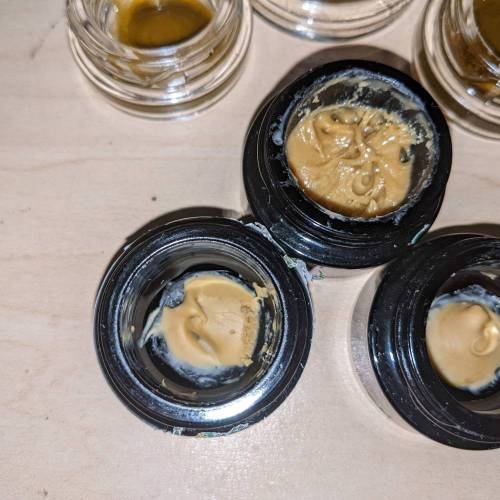
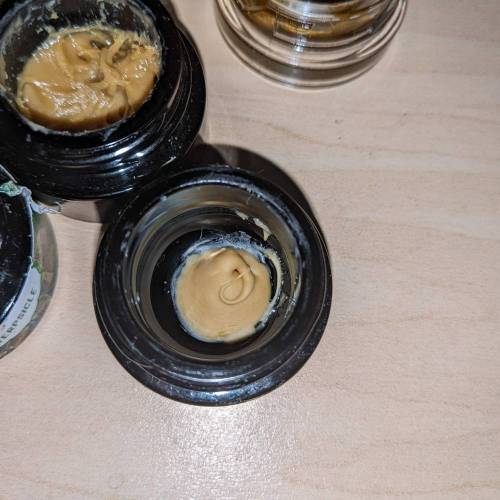
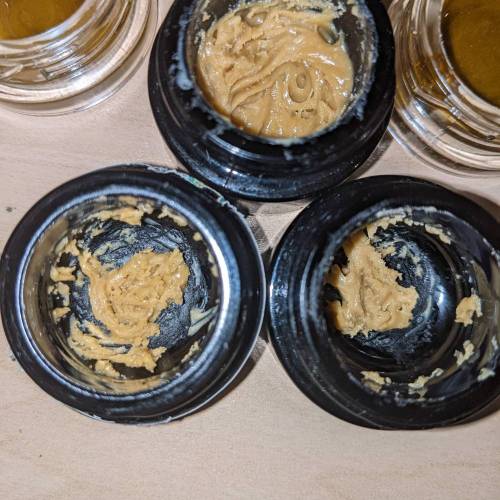


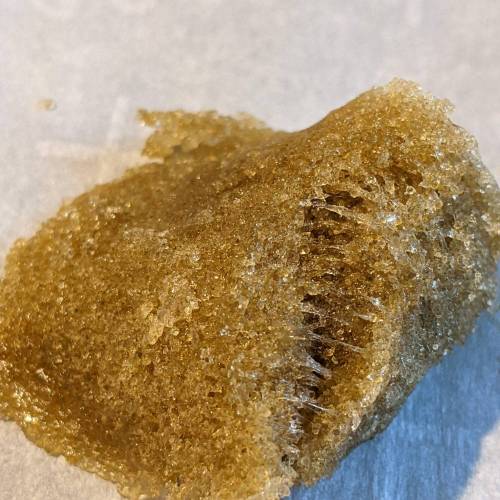
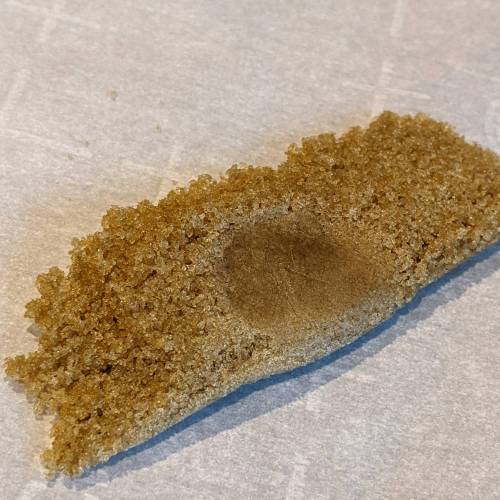
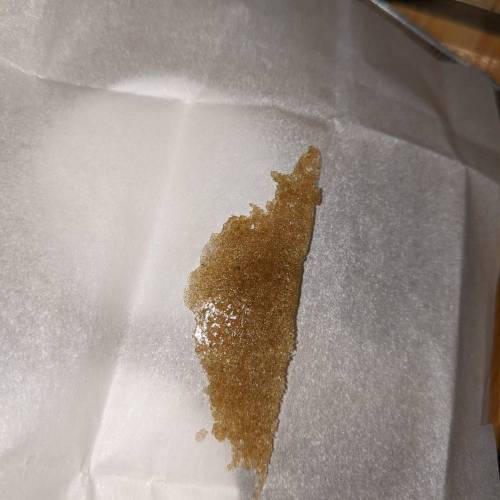
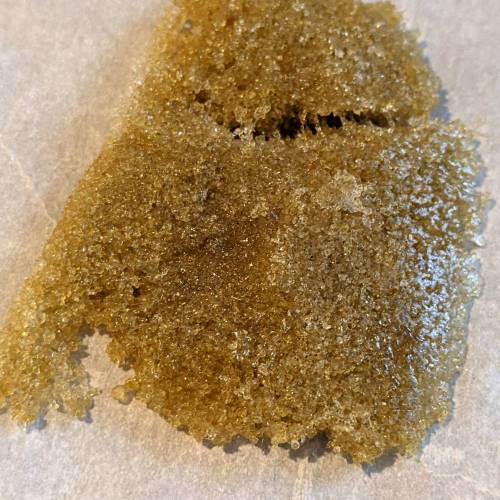
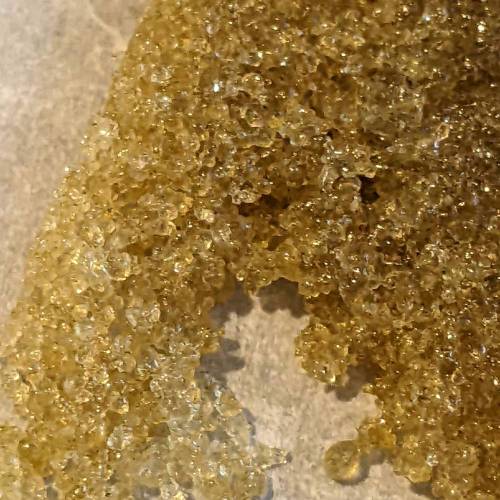
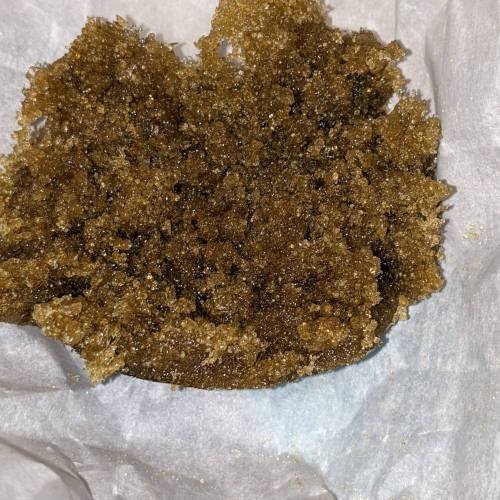
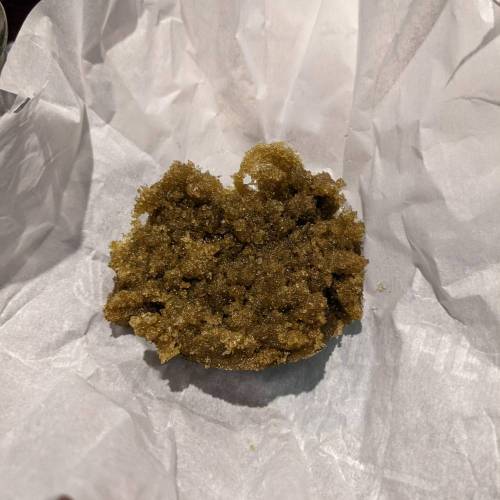
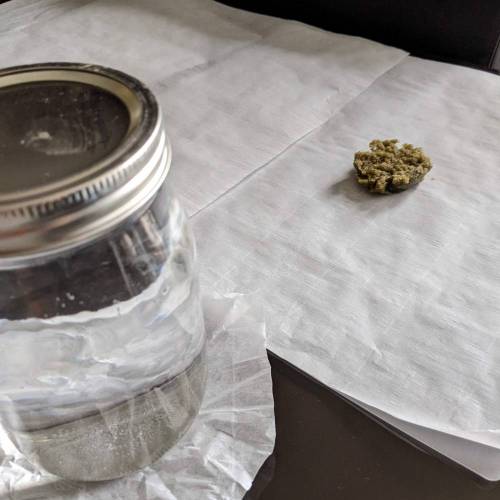
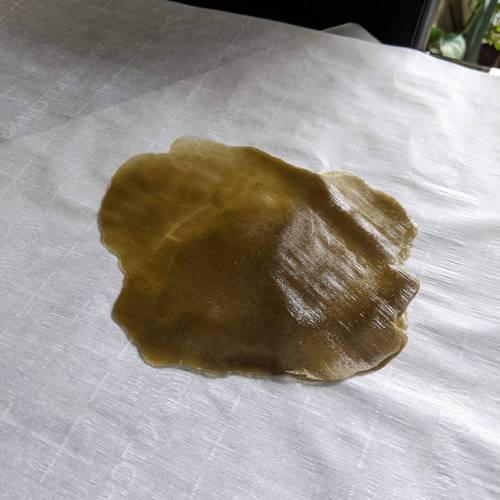
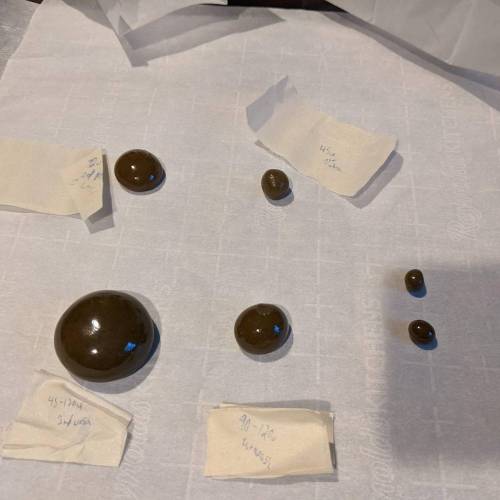

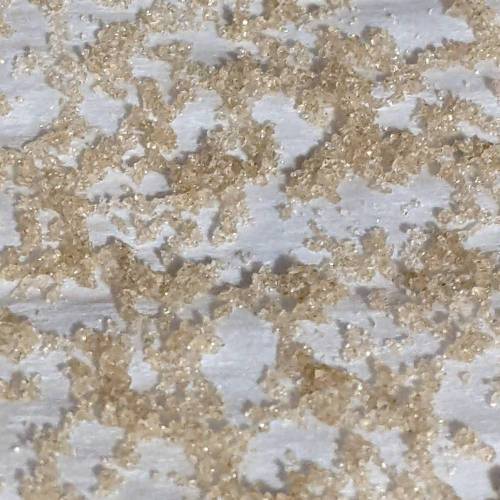
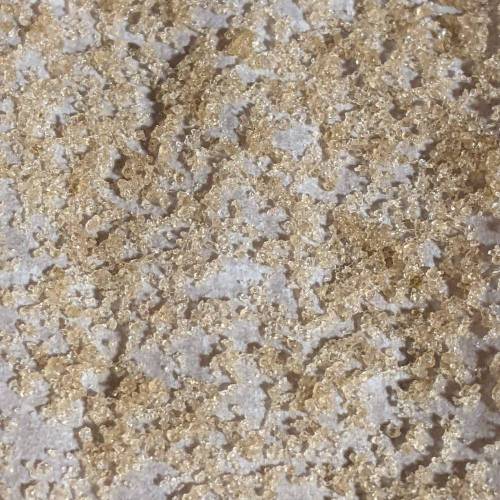
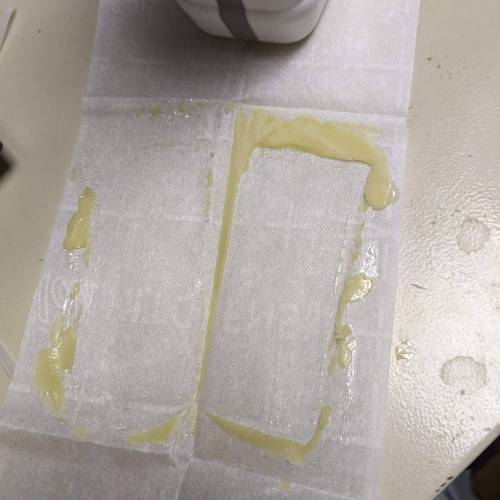
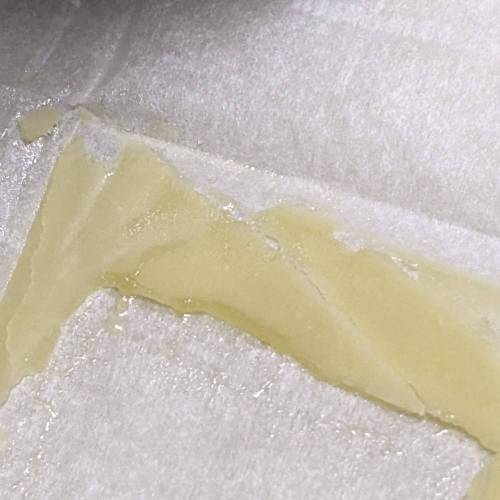
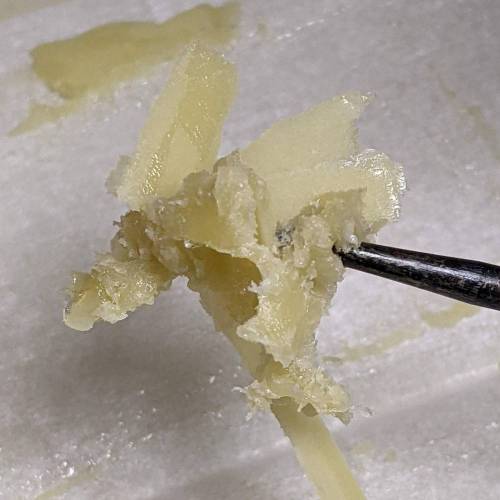


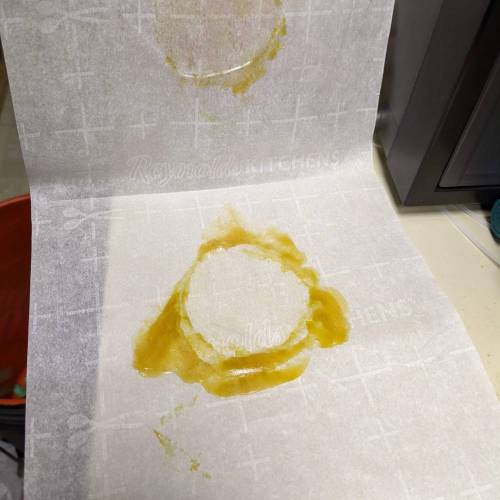
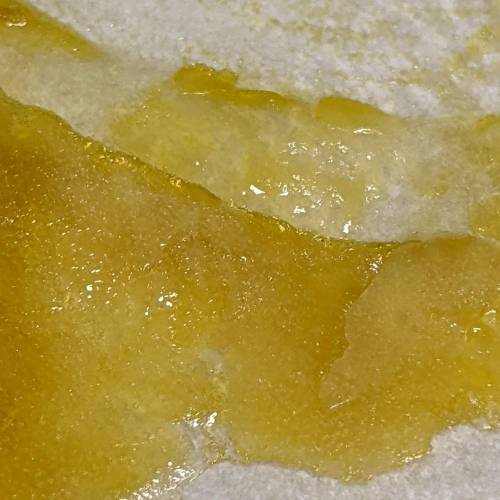
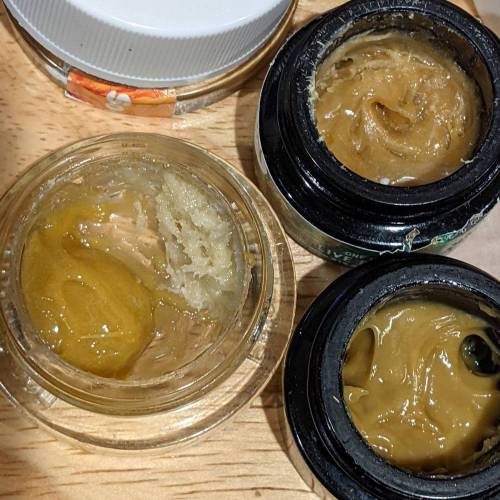


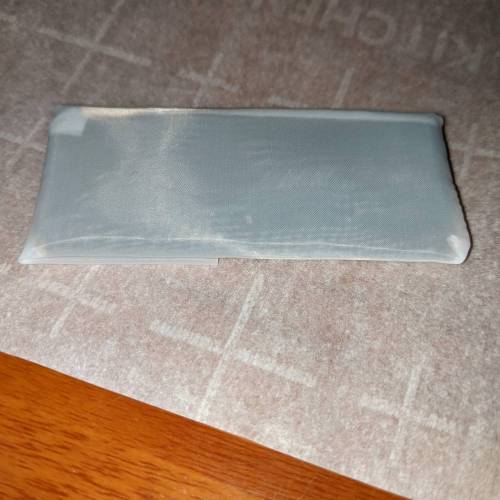

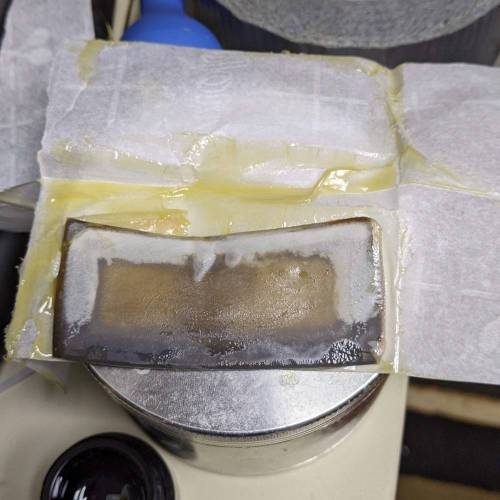
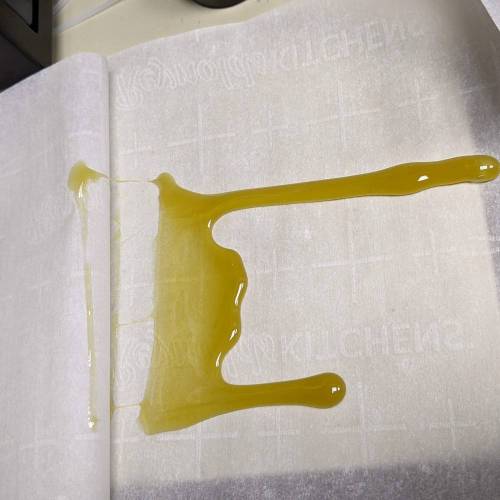
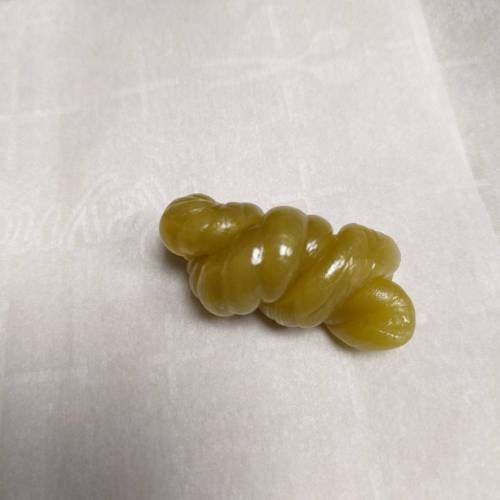

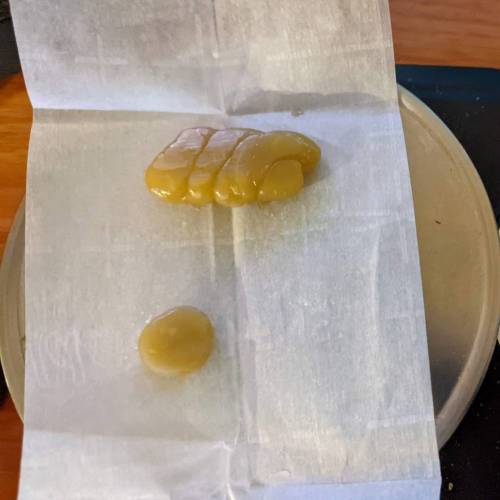
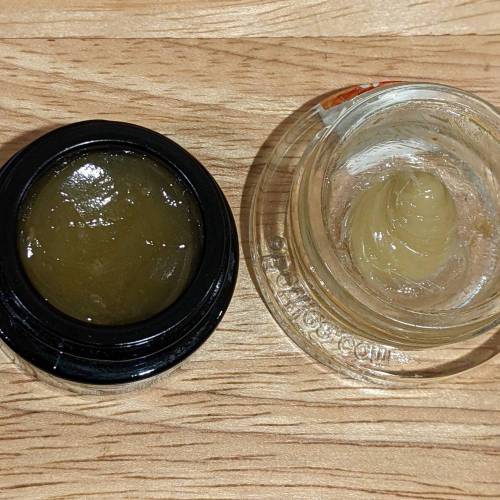
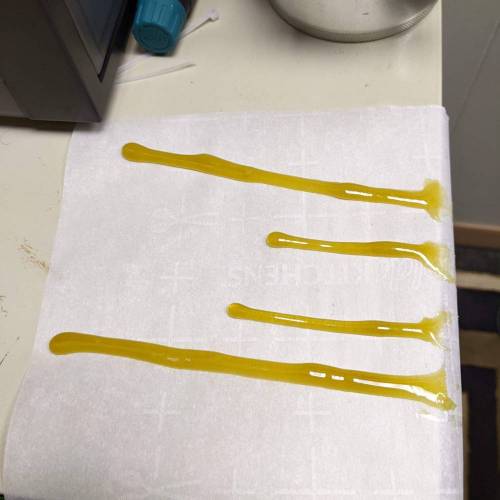

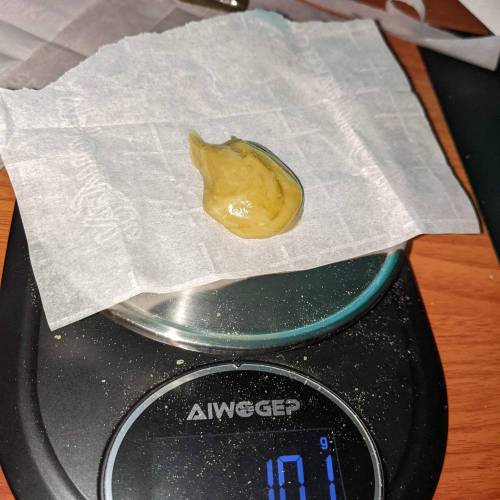
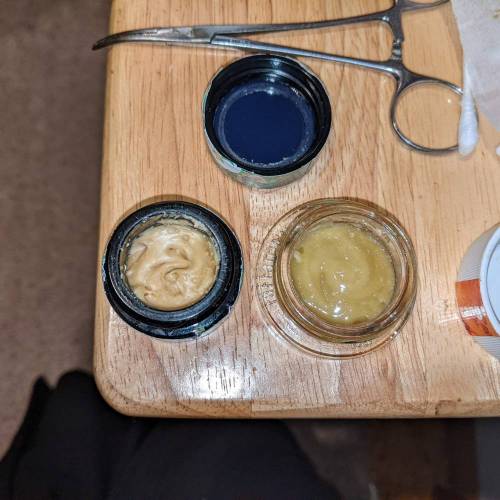
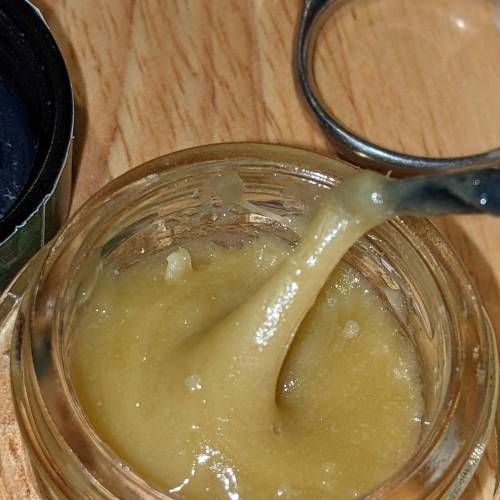


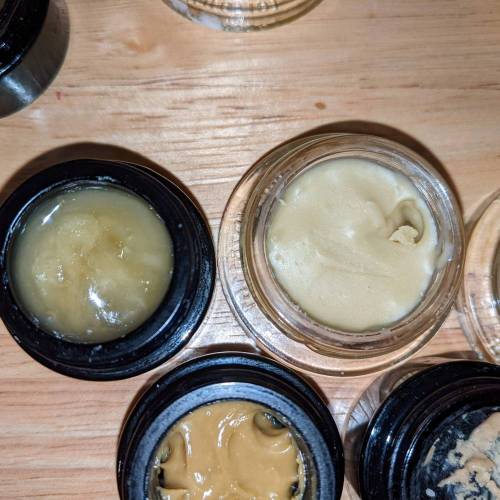


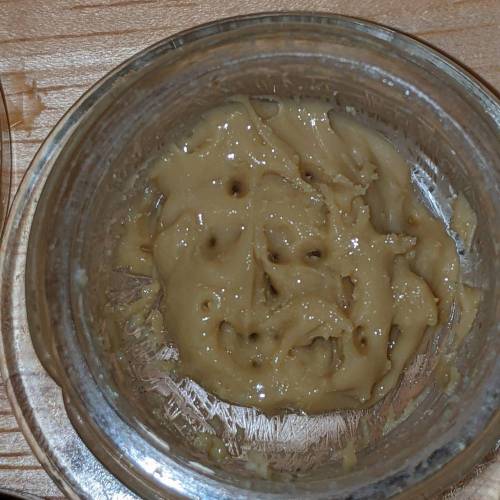
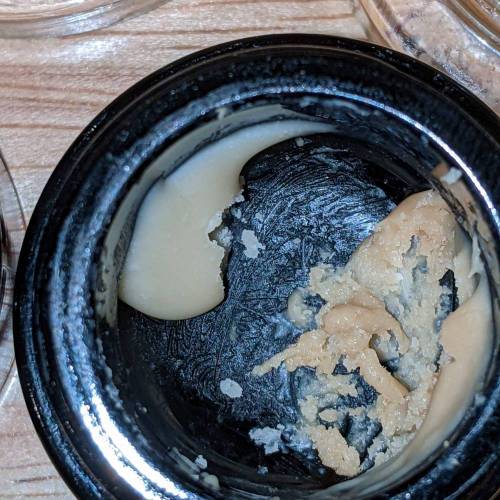
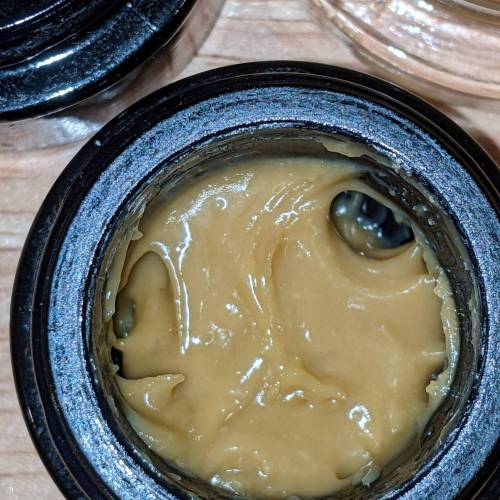
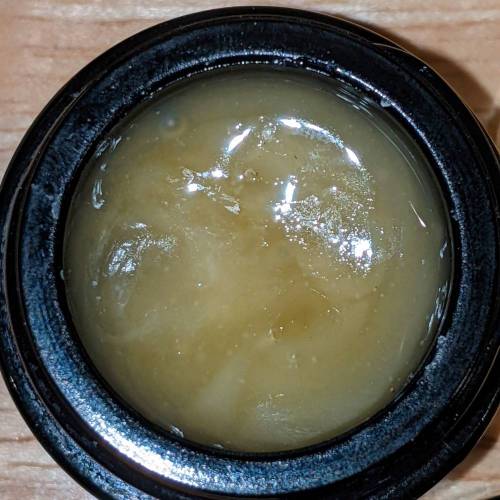
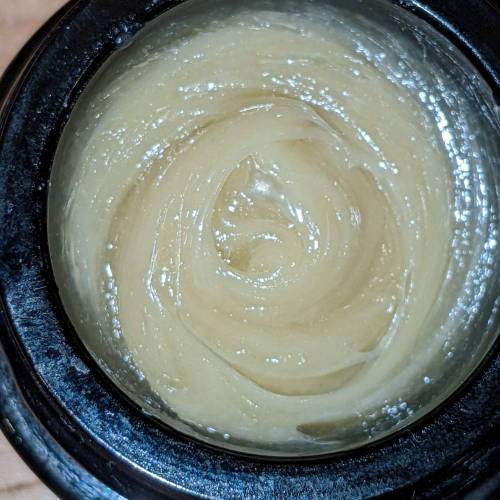
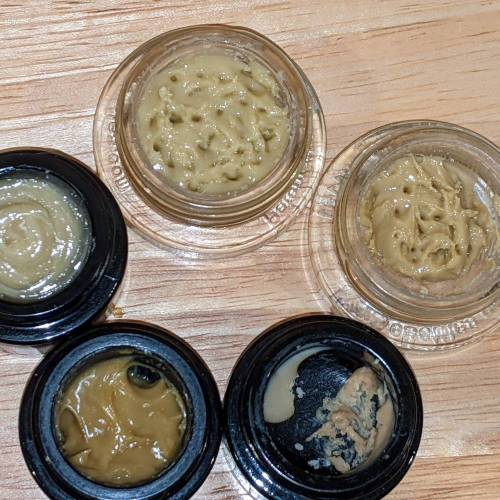

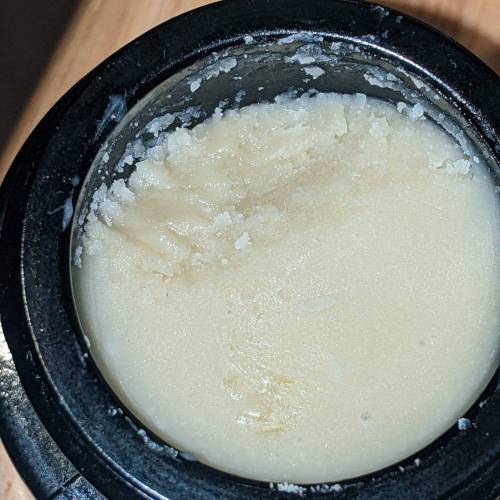


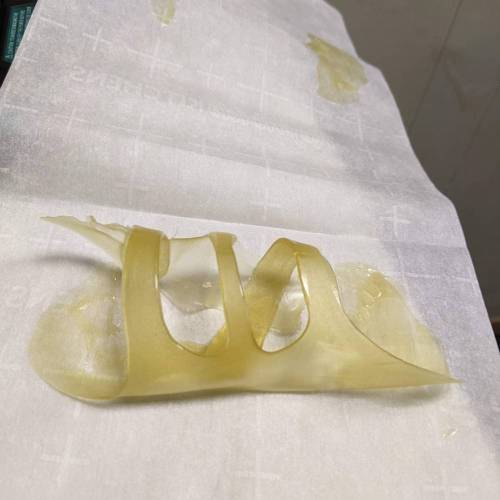
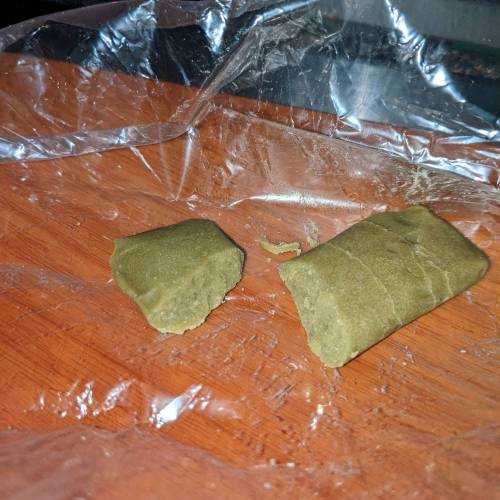


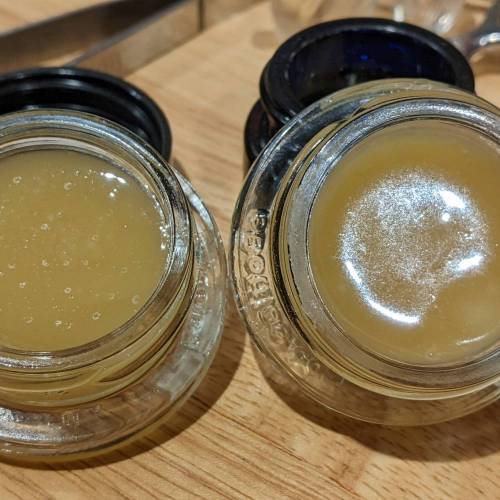

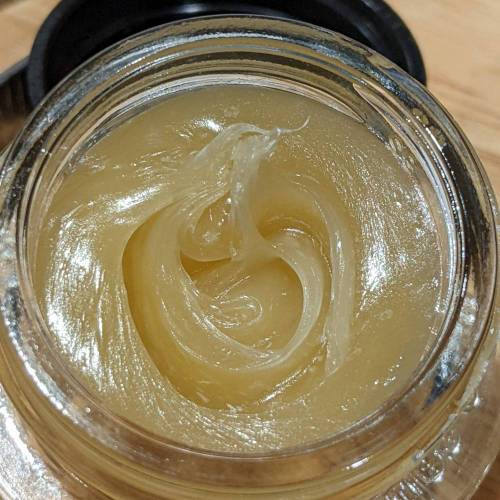


 commentedweek 243y ago