
Apple Fritter Fritz


Lamp
AC Infinity Ionbeam U4 11in UV
Light
Lamp
Ionbeam U4 11in UV
Light
FLO
Ionbeam U4 11in UV Light Emitting Diodes/48W


Hydro
6.6 Gallon pot and 12.4 Gallon reservoir
Autopot

Indoor
Room Type
Topping
weeks 2
LST
weeks 3-7
Defoliation
weeks 3, 5, 7
ScrOG
weeks 7
lollipop
weeks 7, 11
4 l
Pot Size
Start at Harvest
G
Germination8mo ago
Nutrients 1
Calmag
0.264 mll
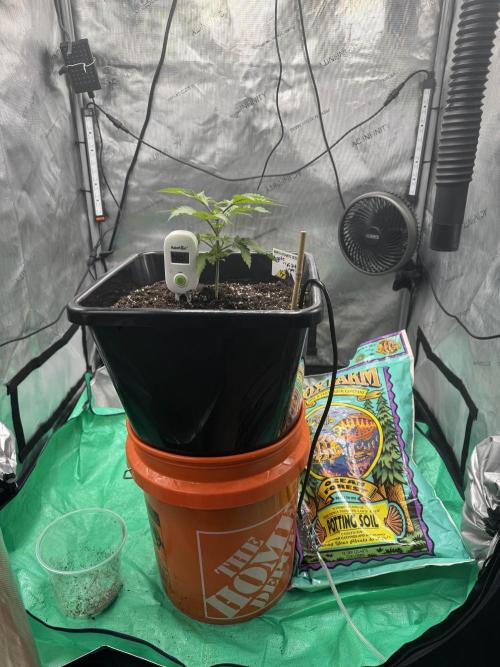
Laezu Back again for my sixth grow with Apple Fritter. This is going to be my first dirt grow so I'm excited to see what happens and keep track of it to improve on future grows. That's really why I keep these diaries, just to learn from past mistakes and push forward. All of my previous grows have been DWC and as much as I enjoy that process of fine tuning the nutrients, there is ALWAYS 2-3 weeks throughout the grow where I'm just not able to spend the time, and it ends up affecting the end product.
That's why I decided on going dirt instead of coco or another medium. Dirt definitely has a more set it and forget it attitude, especially when paired with an autopot. I'm still going to be feeding from the autopot, but only to boost growth and combat deficiencies. I'm hoping this takes the best of both worlds :)
I'm excited to try out the autopot too. Hopefully it will help curb any fungus gnats that may be in the soil already since we'll be bottom watering this beauty. The only thing that's got me a bit worried is draining this thing each week. I went ahead and added on a drain tube that's going straight into a drain pipe not far from the tent, but the OD of this pipe is 1/4 in. It's going to take over an hour to drain a 12.4 gallon reservoir through this thing. Instead of doing that, I'm going to go with the tried and true battery operated water transfer pump. If you don't have one of these, I HIGHLY recommend getting one on amazon, they're -30 and worth every penny when you're dealing with any kind of hydroponics.
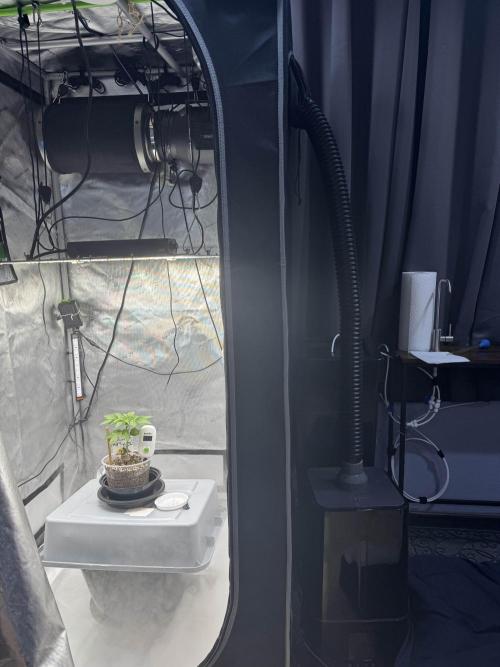
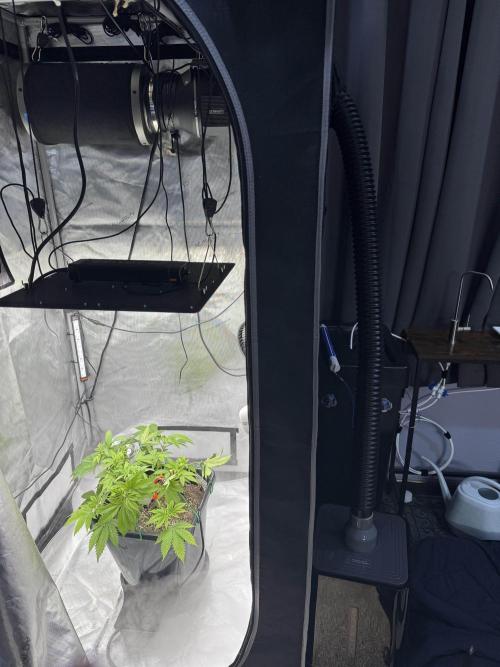
I'm also going to focus a bit more on lighting throughout this grow. The last few grows I worked on dialing in humidity inside the tent, but this time I'm going to keep track and focus on the lighting to get that dialed in. I do like the ACInfinity light that I have, but I also went ahead and bought some UV lights to help with the flowering. I'll be focusing a lot more on light penetration, PPFD, distance to the canopy, etc.
If any of that sounds interesting to you, feel free to follow along :)
2 likes
comments
Share
Used method
Paper Towel
Germination Method
1
Week 1. Vegetation8mo ago
20.32 cm
Height
18 hrs
Light Schedule
24 °C
Day Air Temp
6.0
pH
No Smell
Smell
55 %
Air Humidity
21 °C
Night Air Temp
3.79 l
Pot Size
55.88 cm
Lamp Distance
Nutrients 1
Calmag
0.264 mll
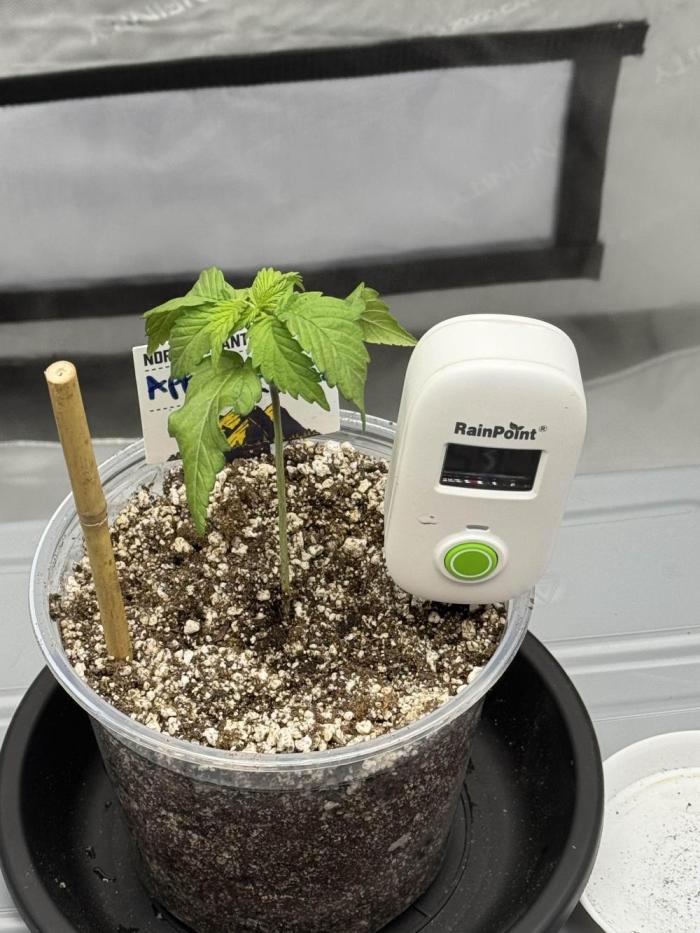
Laezu First week of veg and the seedling has bounced back nicely from the light change. I also had a bit of fun and decided to branch off my reverse osmosis system from upstairs and bring it to my basement grow room. Should make the upcoming water changes for the autopot a bit easier :) I'm not going to feed her any nutrients other than the calmag until she asks for it. I'd like to see her grow another 5-10 inches before I put her in her permanent home in the autopot. Next week I'll top her on her next node. Happy farmin!
3 likes
2 comments
Share
2
Week 2. Vegetation8mo ago

22.86 cm
Height
18 hrs
Light Schedule
24 °C
Day Air Temp
6.0
pH
No Smell
Smell
55 %
Air Humidity
21 °C
Night Air Temp
3.79 l
Pot Size
55.88 cm
Lamp Distance
Nutrients 1
Calmag
1.057 mll
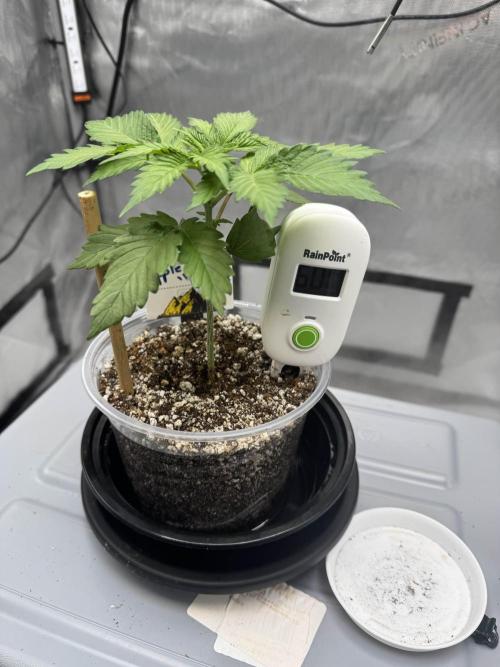
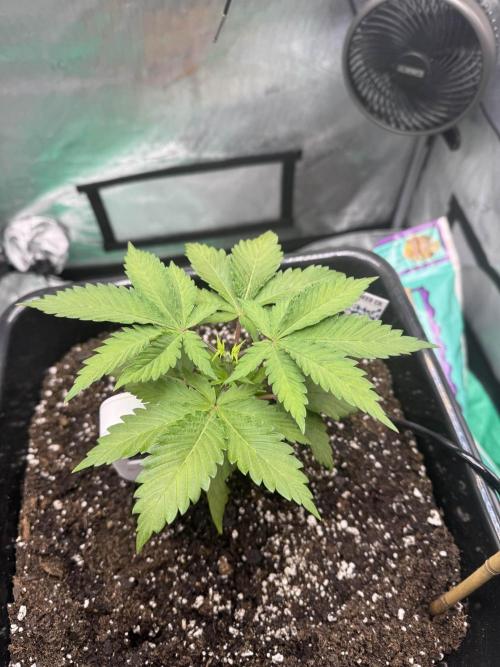
Laezu Alright! She was topped a little earlier this week and then she went into her permanent home in the Autopot today. Using a blend of perlite #3 and Fox Farms Ocean Forest. I gave her a drink until it began to drip out into the bucket and let her sit in it until she stopped. She was also topped and showing off those new nodes already. I'll give her 14 days until I turn on the water for the Autopot, and another 14 days after that before I start the airstone. She's off to a good start but I am seeing early signs of calcium deficiency so I'm upping the dose. Happy farmin folks :)
3 likes
comments
Share
Used techniques
Topping
Technique
3
Week 3. Vegetation8mo ago
22.86 cm
Height
18 hrs
Light Schedule
24 °C
Day Air Temp
6.0
pH
No Smell
Smell
55 %
Air Humidity
21 °C
Night Air Temp
3.79 l
Pot Size
55.88 cm
Lamp Distance
Nutrients 1
Calmag
1.321 mll
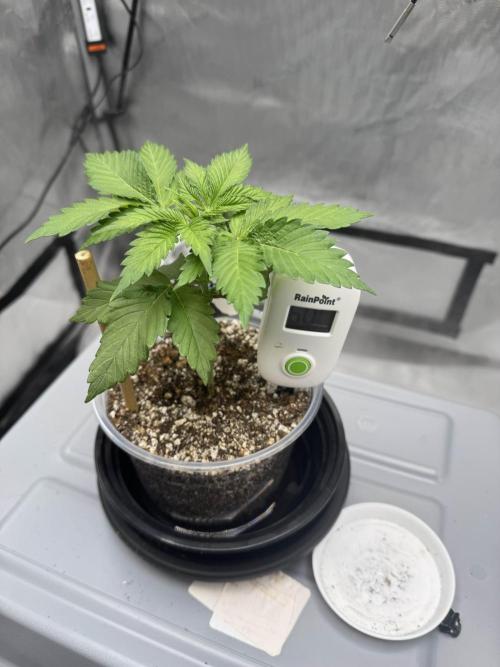
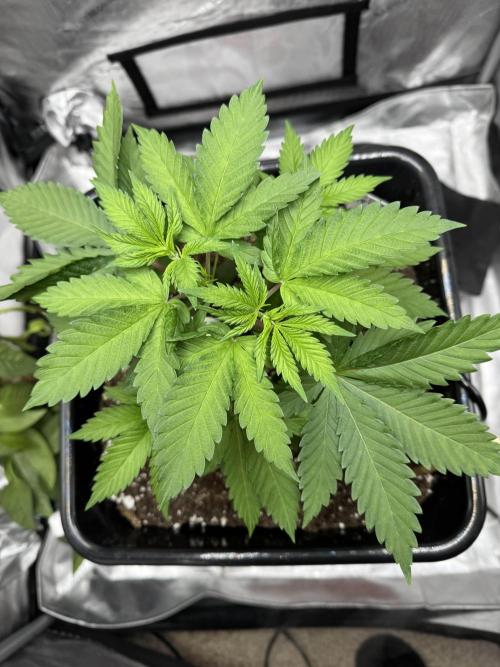
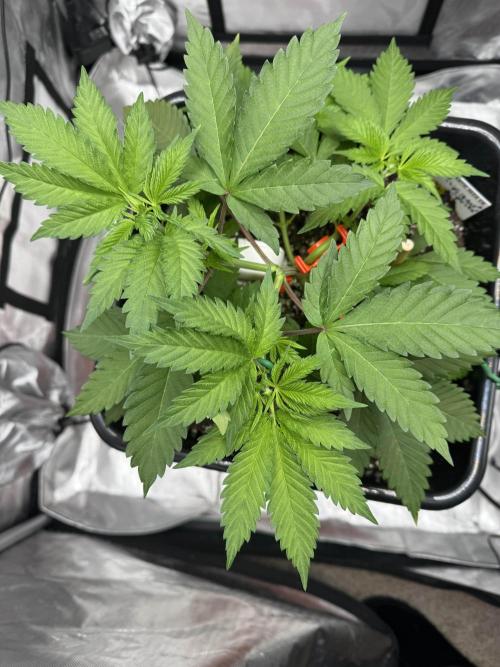
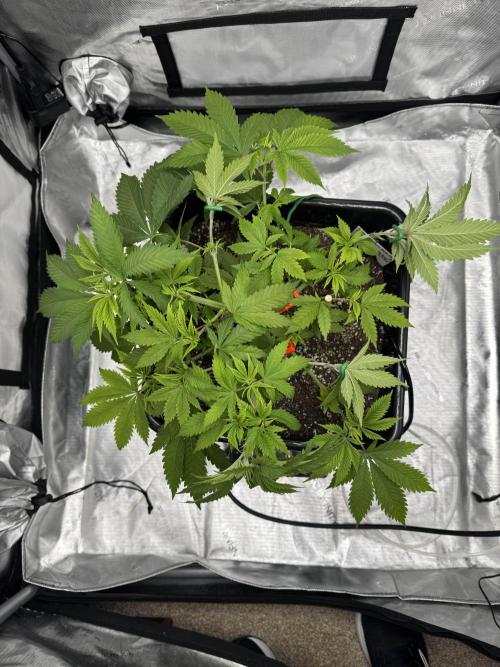
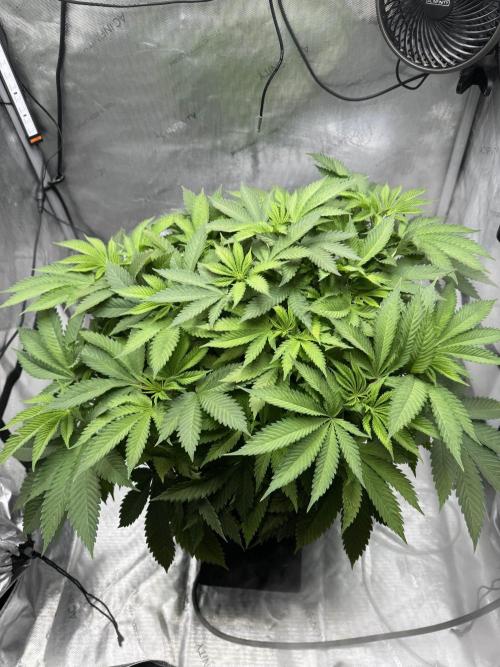
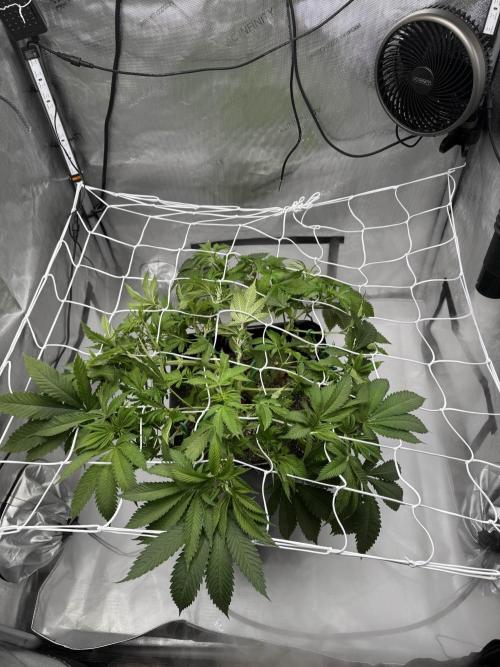
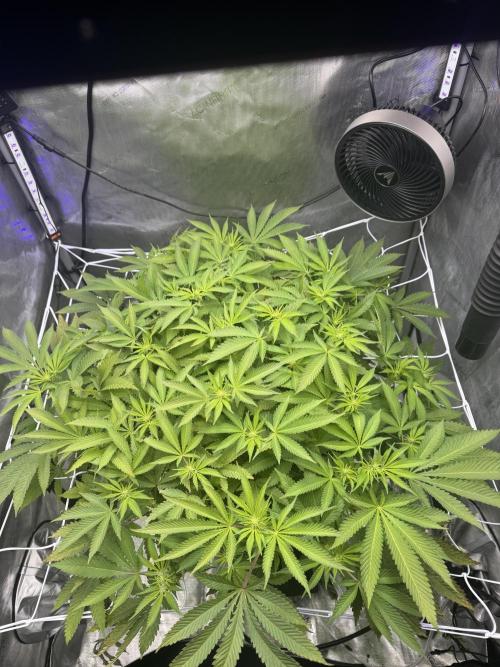
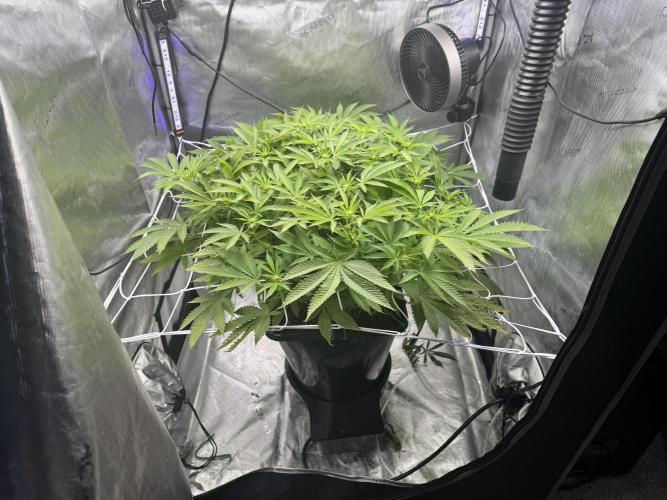
Laezu Very happy with how things are looking at week 3. The calmag deficiency is gone and I'm seeing fresh growth throughout the canopy. I did go ahead and cut off the lowest nodes since they were already having a very hard time competing for light. I'm taking my time with this veg cycle. I want to have one bushy plant come harvest time :) I started LST as well, but just to try and get the nodes to start stretching away from eachother. Next week I'll add in some hooks to the plastic container so I can expand on this.
Autopot should be starting next week as well but I'm not sure if I'm going to add anymore ferts aside the calmag suppliment yet. Happy farmin!
3 likes
comments
Share
Used techniques
LST
Technique
Defoliation
Technique
4
Week 4. Vegetation8mo ago


22.86 cm
Height
18 hrs
Light Schedule
24 °C
Day Air Temp
6.0
pH
No Smell
Smell
55 %
Air Humidity
21 °C
Night Air Temp
3.79 l
Pot Size
55.88 cm
Lamp Distance
Nutrients 1
Calmag
0.793 mll
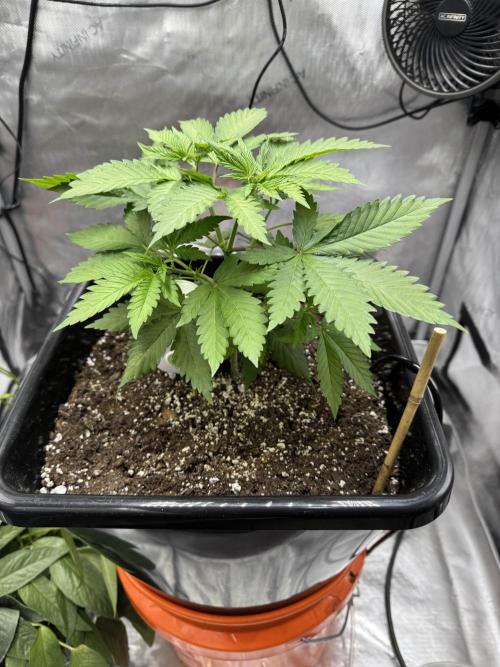
Laezu Week 4 is in the books and shes really started to take off. I still havent turned the autopot on, but that will happen this week. Checking on her every day to get some LST adjustments in. I want a big bushy girl so I'm shooting for a 16-18 week.
3 likes
comments
Share
Used techniques
LST
Technique
5
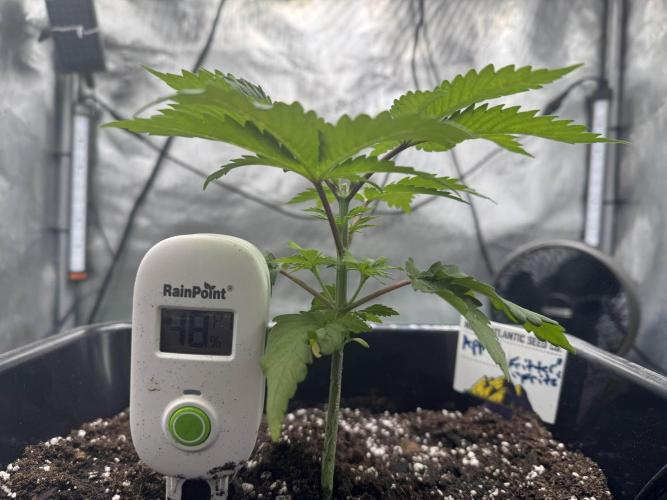
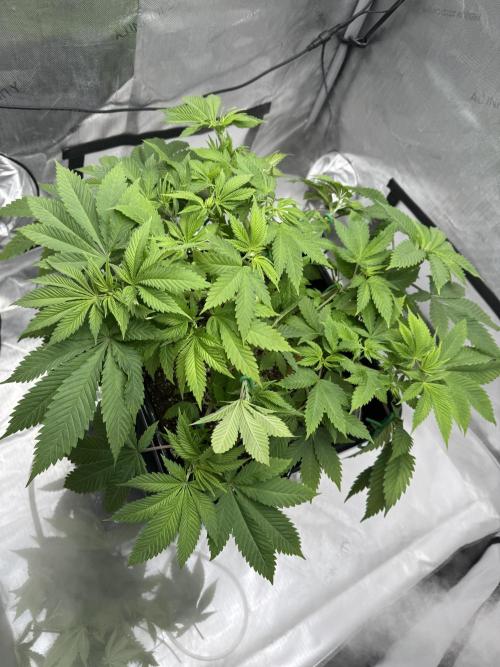
Week 5. Vegetation7mo ago


30.48 cm
Height
18 hrs
Light Schedule
24 °C
Day Air Temp
6.2
pH
Normal
Smell
55 %
Air Humidity
21 °C
Night Air Temp
3.79 l
Pot Size
55.88 cm
Lamp Distance
Nutrients 3
Calmag
1.057 mll

Big Bloom
2.113 mll

Grow Big
0.66 mll
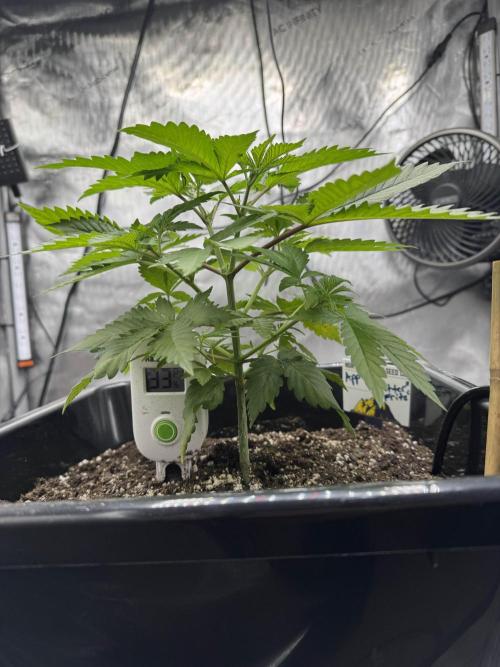
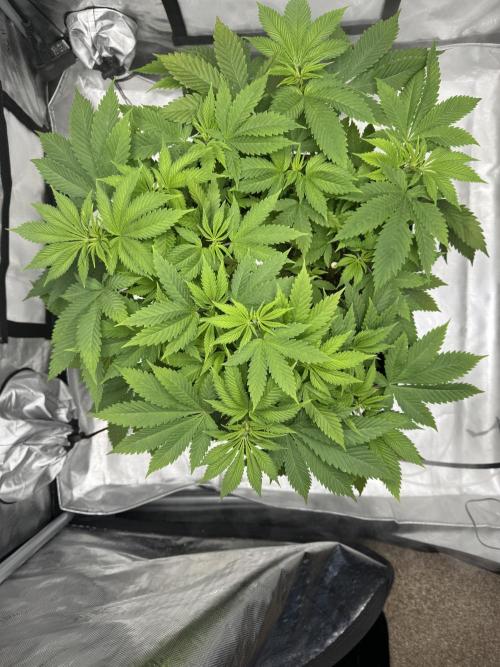
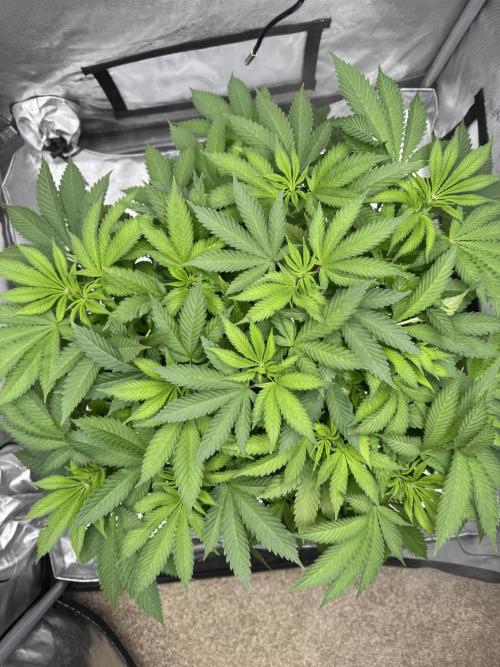
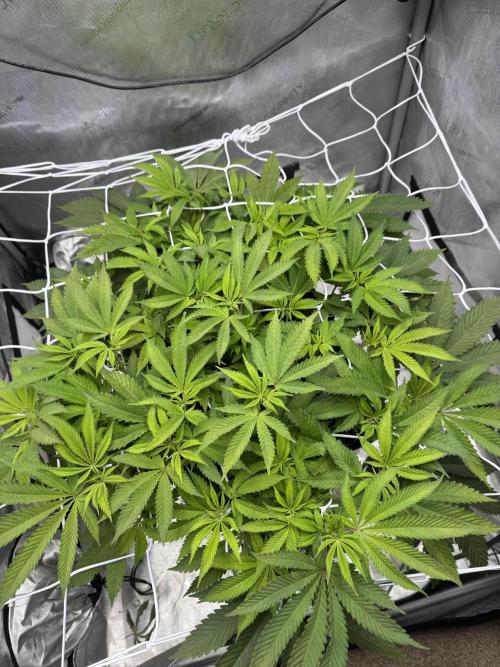
Laezu This grow is really starting off strong, my main stem is almost already an inch thick she seems to be thriving. I'm definitely still combating the RO/Calmag and I keep increasing it each week while cutting off old fan leaves. I'm gonna find that sweet spot damn it. There's also some pretty bright lime green in my new leaves, but that should be due to the increase in light intensity. I was at around 250 and I've bumped it to 400. 400 is where she'll stay at until i switch to flower. I'm not going to switch to flower for at least 2more weeks. My goal is a big bushy girl and I'm not in any rush.
Autopot has been switched on for about 5-6 days now and the top soil has dried out significantly, but she isn't showing any signs of thirst so I'm calling that a successful switch to the reservoir.
I've also added a small 90GPH pump to the autopot reservoir and have it mixing the nutrients once a day for about 10 minutes to try and keep the sediment down.
Dosing has also changed and the new screenshot has my upgraded plan. This will probably keep changing but yea, we'll see where we get :)
I've cut about 24 fan leaves this week between two cutting sessions. Trying to keep some good lights on the bud sites. Increasing the LST to try and cover as much area as possible. I want a nice thick top :)
Thanks for reading and happy farmin :D
2 likes
2 comments
Share
Used techniques
LST
Technique
Defoliation
Technique
6
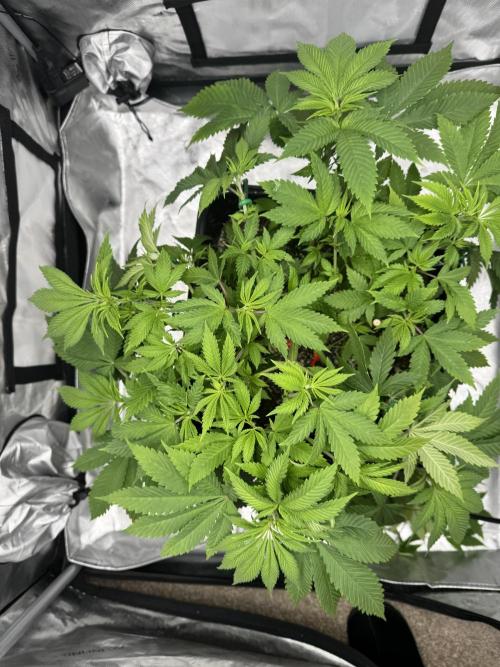
Week 6. Vegetation7mo ago
30.48 cm
Height
18 hrs
Light Schedule
24 °C
Day Air Temp
6.2
pH
Normal
Smell
55 %
Air Humidity
21 °C
Night Air Temp
3.79 l
Pot Size
55.88 cm
Lamp Distance
Nutrients 3
Calmag
1.057 mll
Big Bloom
2.642 mll
Grow Big
0.66 mll
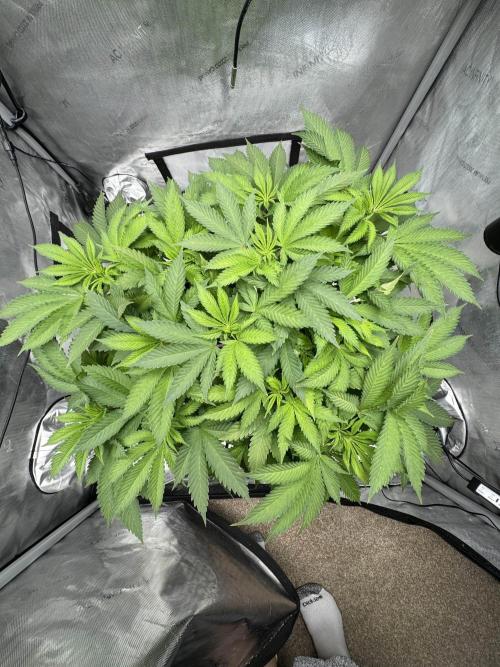
Laezu Alright I'm starting to feel happy with how much she has spread out so now I'm going to let her grow upward. I'm going to give her at least one more week of veg and then I'm going to flip and let the good times role. No real changes this week other than some light LST adjustments, getting rid of fan leaves that were covering nodes, and a slight increase in the big bloom. I also wasn't getting enough mixing going on in my autopot reservoir. There was too much sediment from the Big Bloom fert so I switched out the tiny 90gph for a wave maker. I run it for 10 minutes a day.
Also filled the reservoir for the first time today with the new RO setup and it took about 14 min to fill 6 gallons. That is a HELL of a lot better than waiting around for hours for the RO water tank to refill. Happy farmin folks :)
2 likes
comments
Share
Used techniques
LST
Technique
7
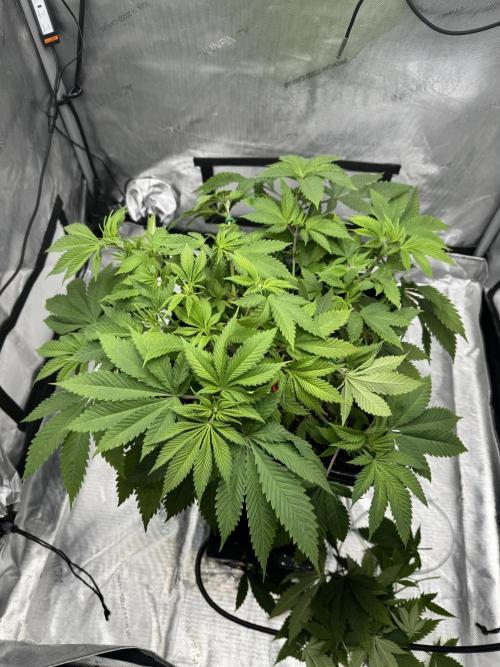
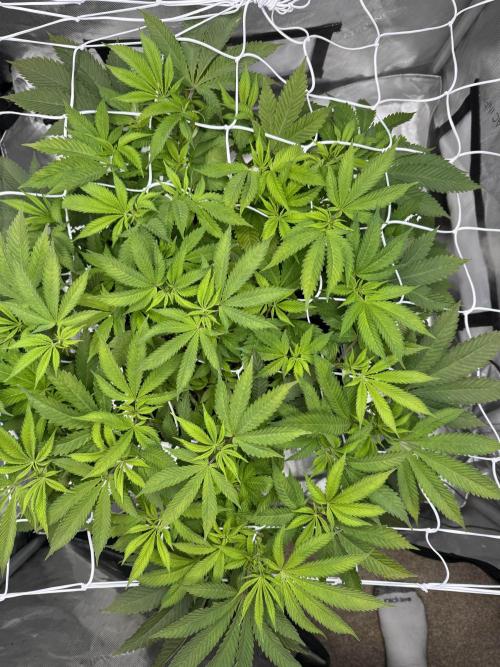
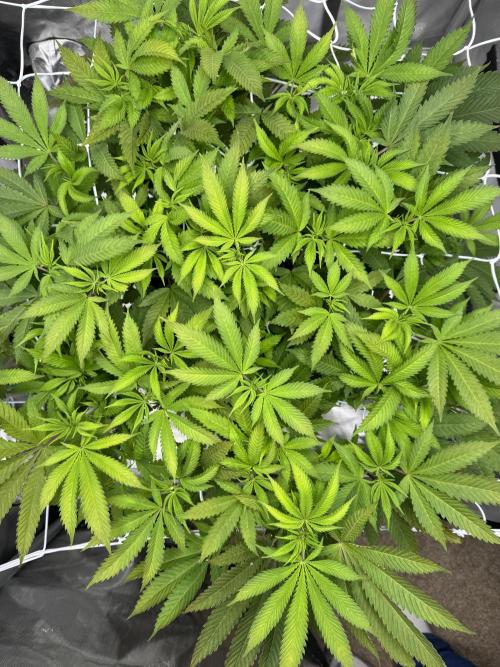
Week 7. Vegetation7mo ago
40.64 cm
Height
18 hrs
Light Schedule
24 °C
Day Air Temp
6.2
pH
Normal
Smell
55 %
Air Humidity
21 °C
Night Air Temp
3.79 l
Pot Size
55.88 cm
Lamp Distance
Nutrients 3
Calmag
1.057 mll
Big Bloom
3.17 mll
Grow Big
0.396 mll
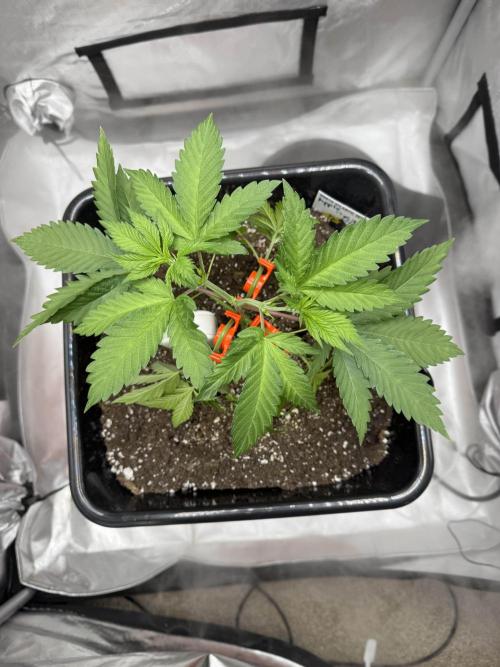
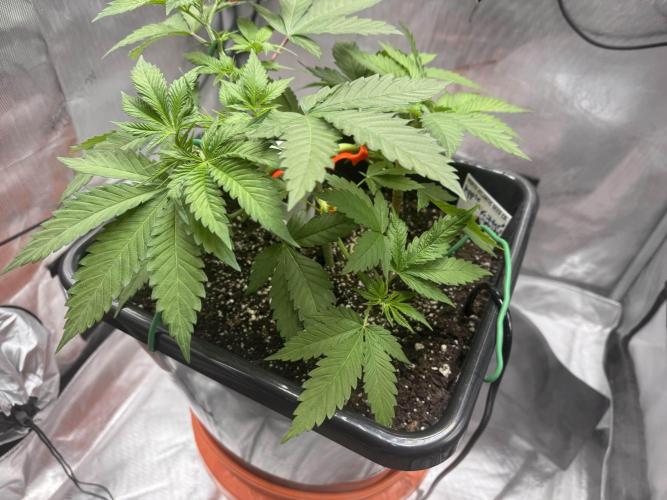
Laezu Alright, one last week of recovery after this last LST and then I'll flip to flower. I may have gone a bit too hard on her this week but she'll bounce back :D Also did some lower branch cleanup of young nodes that weren't going to be able to compete with the main canopy. She is heavily drinking from the reservoir too, just under 4 gallons this week.
3 likes
1 comment
Share
Used techniques
LST
Technique
Defoliation
Technique
lollipop
Technique
ScrOG
Technique
8
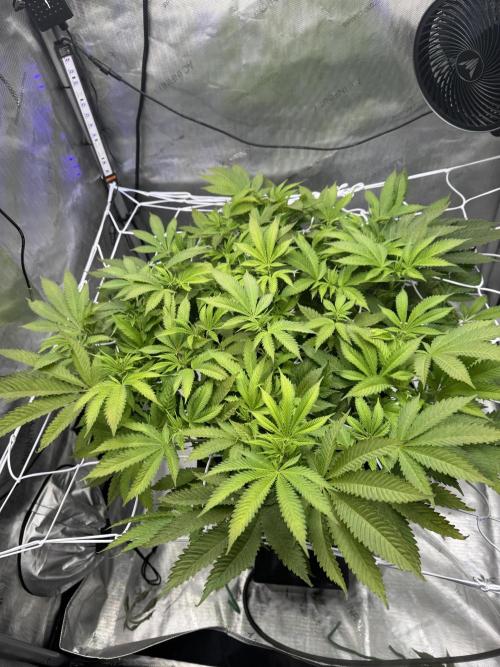
Week 8. Flowering7mo ago
40.64 cm
Height
18 hrs
Light Schedule
24 °C
Day Air Temp
6.2
pH
Normal
Smell
55 %
Air Humidity
21 °C
Night Air Temp
3.79 l
Pot Size
55.88 cm
Lamp Distance
Nutrients 3
Calmag
1.057 mll
Big Bloom
3.963 mll

Tiger Bloom
1.057 mll
Laezu Time for some flower! I'm increasing my nutrients from their baselines as it looks like my soil is about used up for nutrients already and I'm starting to see some deficiency. I've switched over to Tiger Bloom and have the dosing at 24 ml/g for my 6 gallon reservoir. Gonna keep a close eye on her the next 3-4 days, I might need to increase the calmag further to 30ml/g. RO water always makes things fun :)
2 likes
comments
Share
9
Week 9. Flowering7mo ago
40.64 cm
Height
12 hrs
Light Schedule
24 °C
Day Air Temp
6.2
pH
Normal
Smell
55 %
Air Humidity
18 °C
Night Air Temp
3.79 l
Pot Size
55.88 cm
Lamp Distance
Nutrients 3
Calmag
1.321 mll
Big Bloom
3.17 mll
Tiger Bloom
1.321 mll
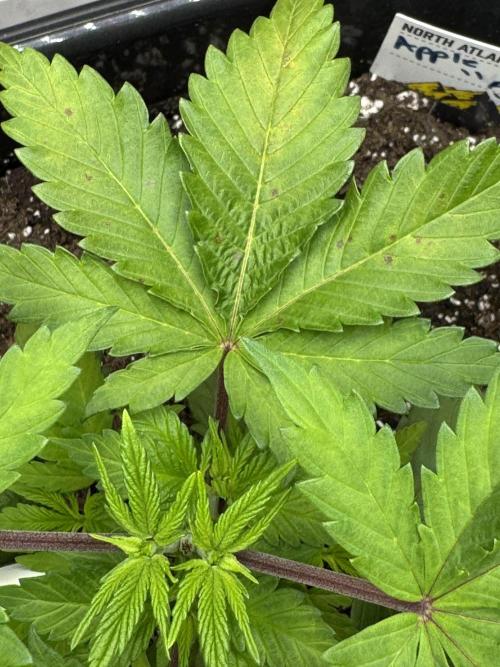
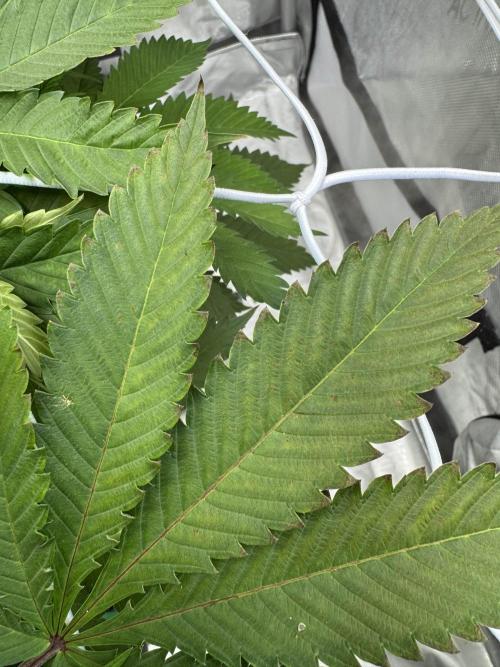
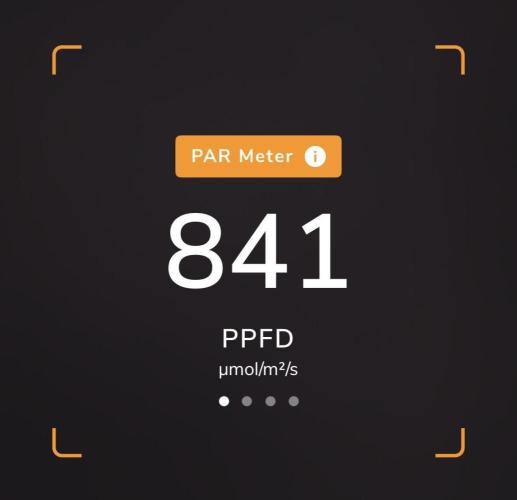
Laezu Still a little bit of edge burning going on but not nearly as bad as it was. My big whoops of this grow and my last, I have never really paid attention to VFD during my grow. Looking at my last grow stats in the ac infinity app, my last plant was exposed to prolonged exposure to 1.9VFD. My current plant was also hitting these levels. Whooooops. I was starting to have the same issues in this grow that I was in the last where nutrients should be dialed in perfectly but I'm getting random rust spots and my leaves were tacoing. It's been about 5 days since I have corrected this (between 1.3-1.45)and I'm already seeing a great change and no new rust spots. Here's hoping I found the right issue :)
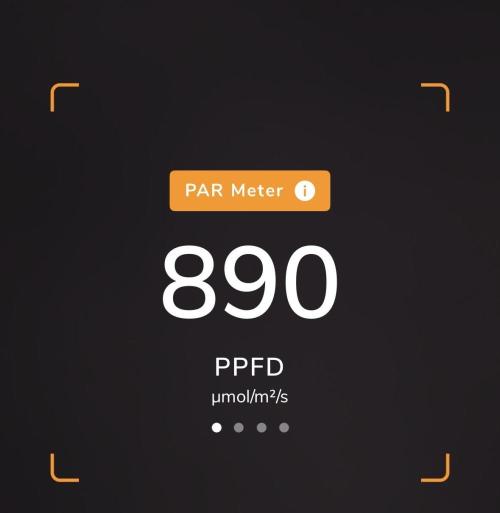
EC = 1.2
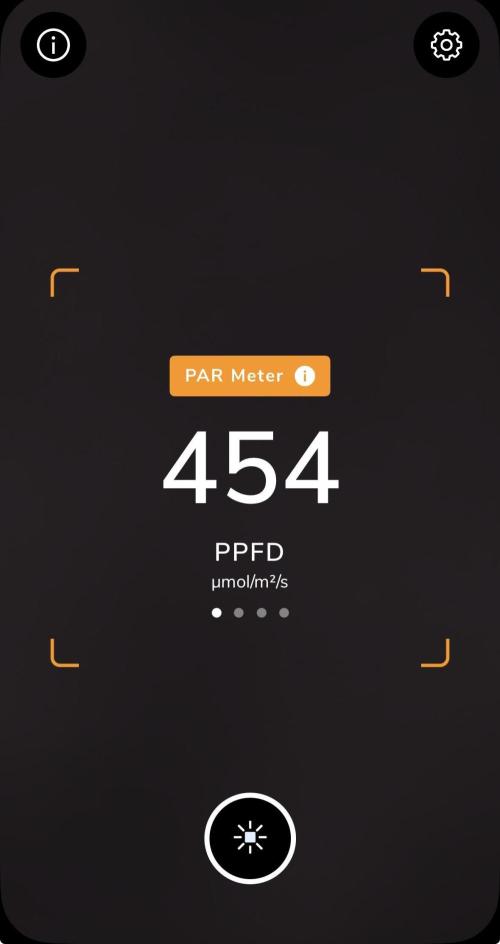
PPFD = 550
Humidity = 50-55%
Temp during the day = 75*
Temp at night = 63-66* (Thinking hard about adding a heater)
2 likes
comments
Share
10
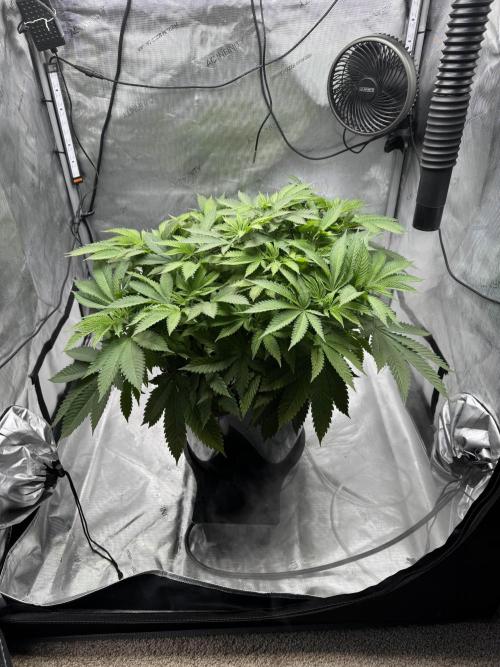
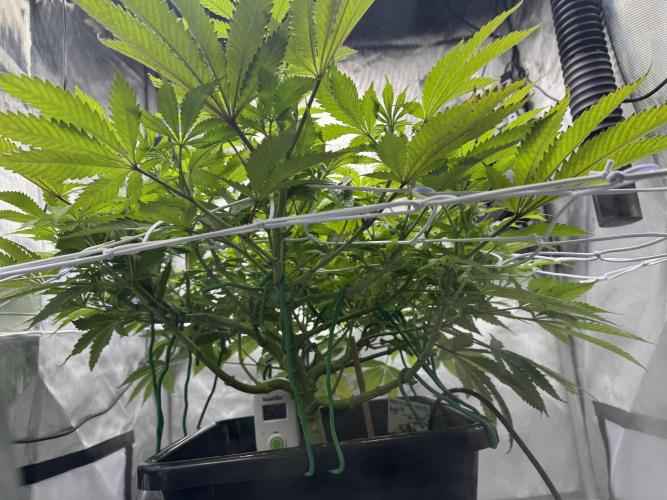
Week 10. Flowering6mo ago
55.88 cm
Height
12 hrs
Light Schedule
24 °C
Day Air Temp
6.2
pH
Normal
Smell
55 %
Air Humidity
18 °C
Night Air Temp
3.79 l
Pot Size
55.88 cm
Lamp Distance
Nutrients 5
Calmag
1.321 mll
FloraMicro
1.057 mll
FloraGrow
1.057 mll
Laezu I had to flush this week due to salt build up and to switch brands of fertilizer. My first couple of grows I used general hydroponics, but after this site took them off and went back to the original name, I decided to try some other brands to see what my results would be. Honestly, I never found another brand that I liked as much and FoxFarm just has way too much mineral build up for trying to grow in an autopot.
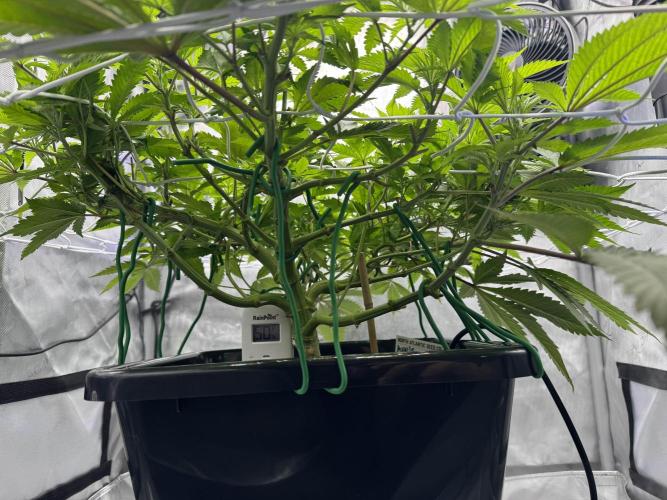
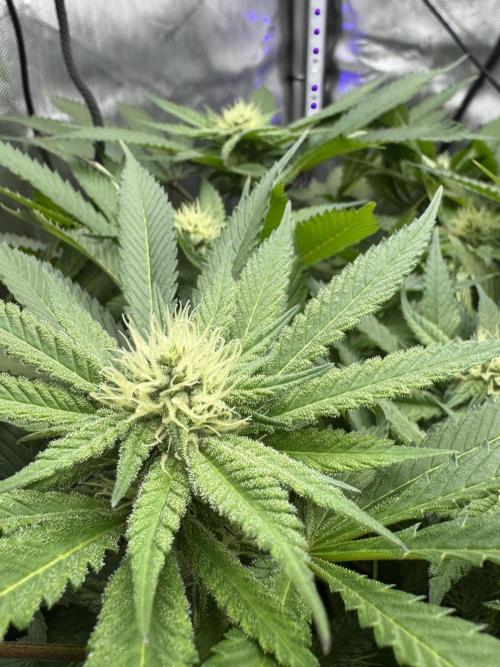
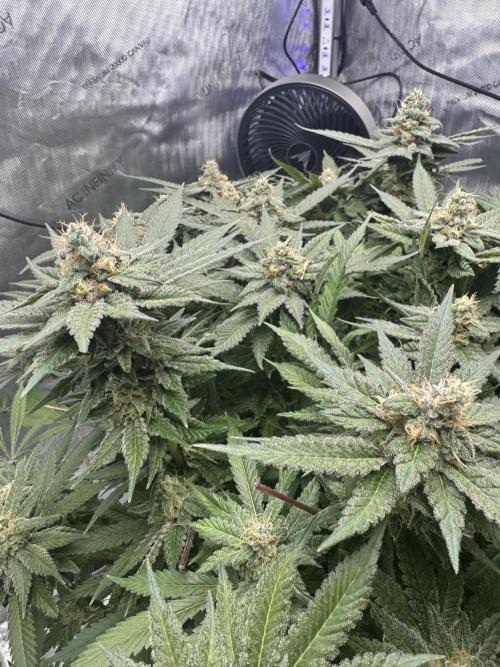
It has been 3 day since I turned the water back on and she drank up over two gallons of water in that time so the flush was a success :) New feeding schedule has been added for anyone curious. She's also stretched about 6+ inches throughout the canopy over the past two weeks.
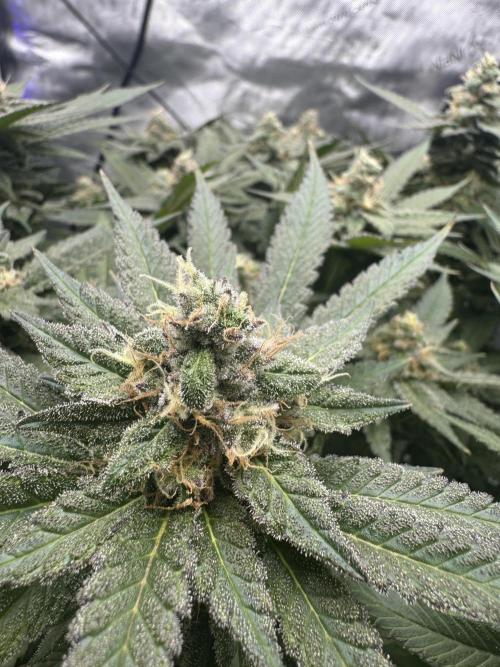
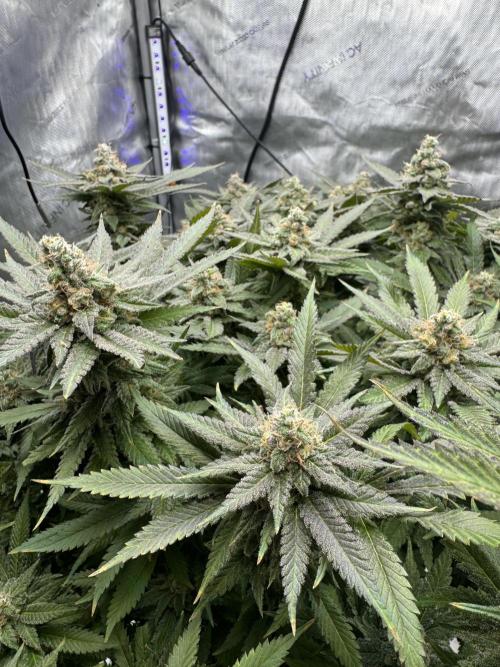
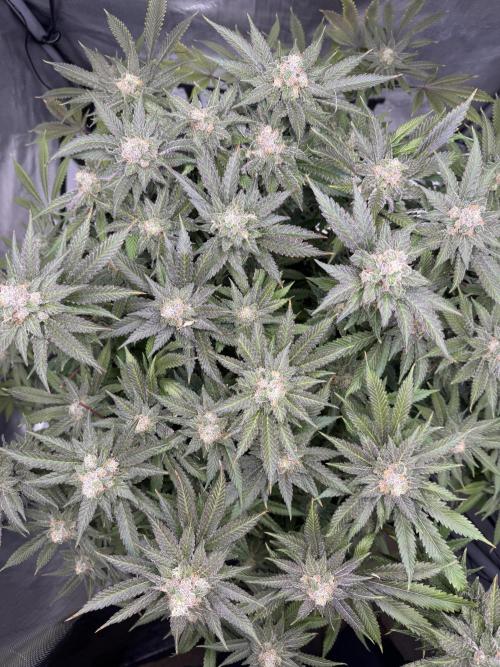
Bud sites are looking great and I'm honestly not going to do too much defoliation from here on out unless there's a branch that I know won't turn into anything, or fan leaves start covering nodes.
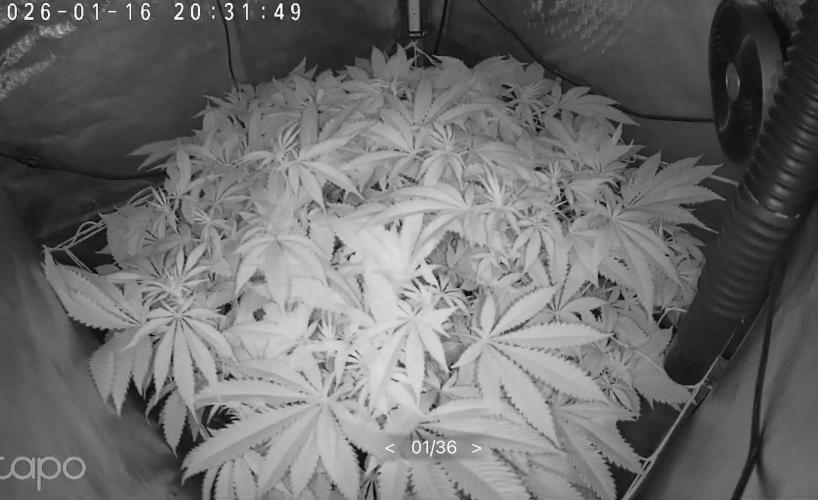
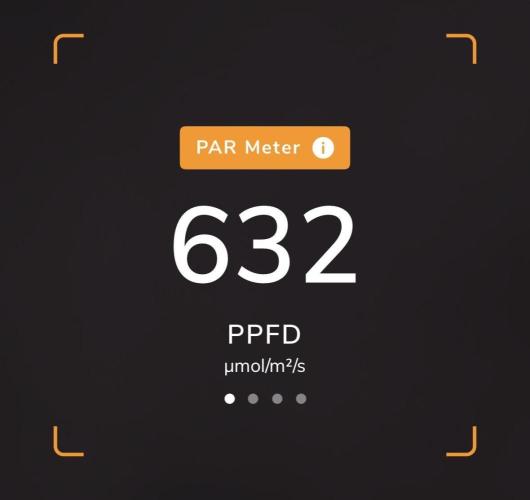
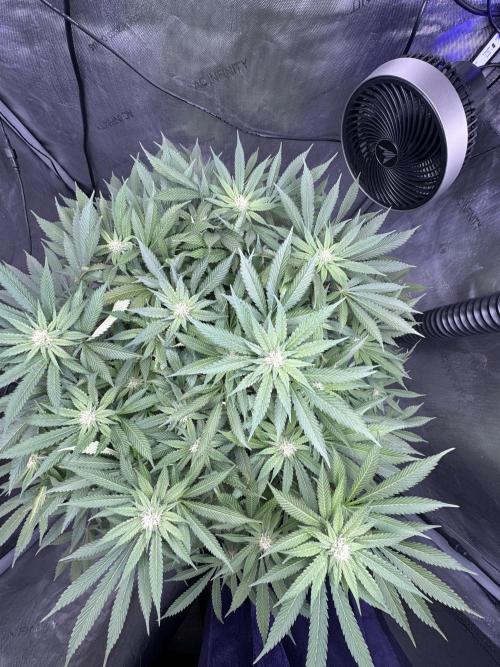
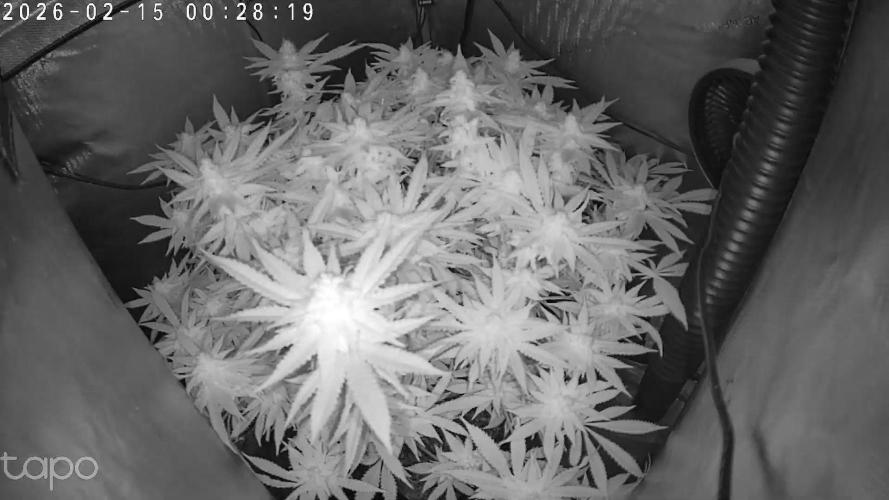
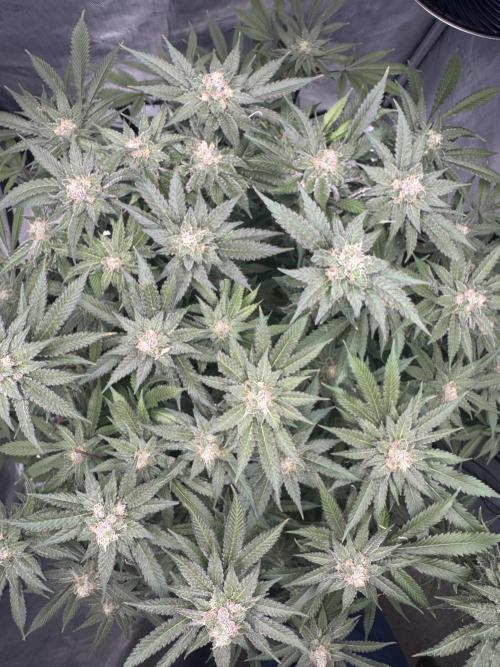
I took a night shot and added it because I thought it was interesting how the nodes pop out in the pic.
EC 1.5
PPFD 632
VFD 1.3
RH
5 likes
2 comments
Share
11
Week 11. Flowering6mo ago

68.58 cm
Height
12 hrs
Light Schedule
24 °C
Day Air Temp
6.2
pH
Normal
Smell
750 PPM
TDS
55 %
Air Humidity
18 °C
Night Air Temp
3.79 l
Pot Size
55.88 cm
Lamp Distance
Nutrients 4
Calmag
1.321 mll
FloraMicro
1.057 mll
FloraBloom
1.585 mll
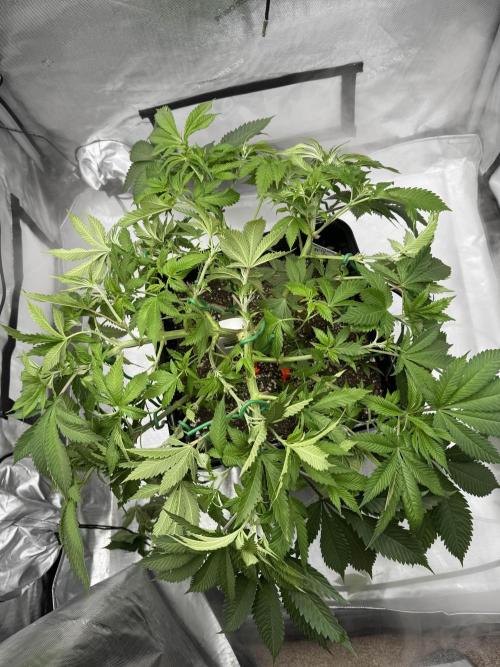
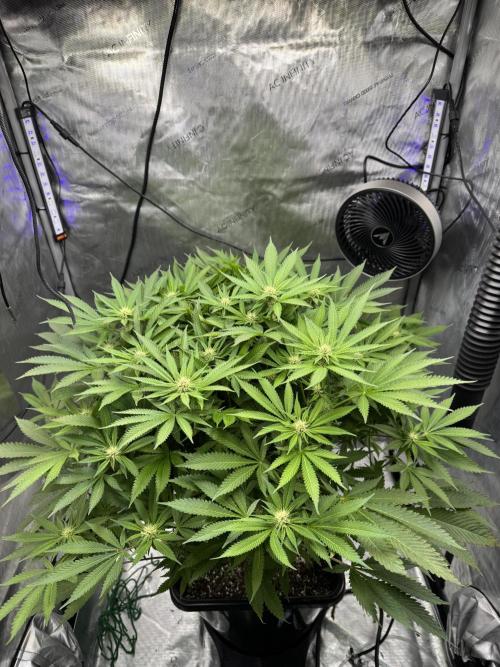
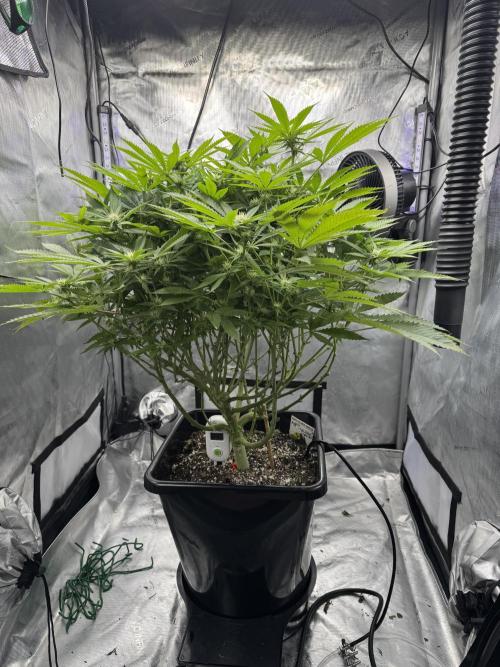
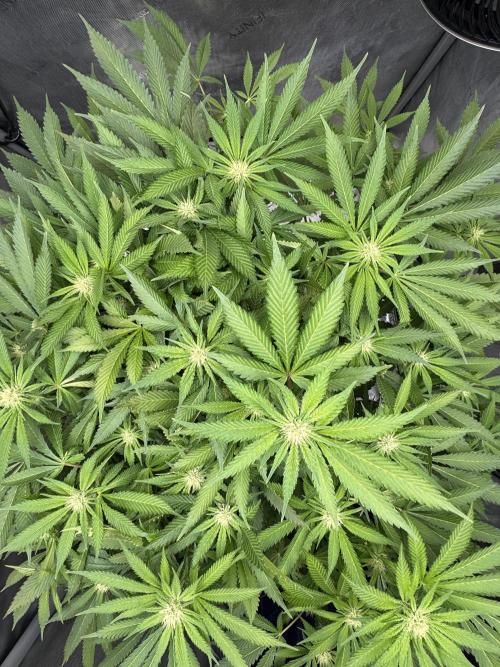
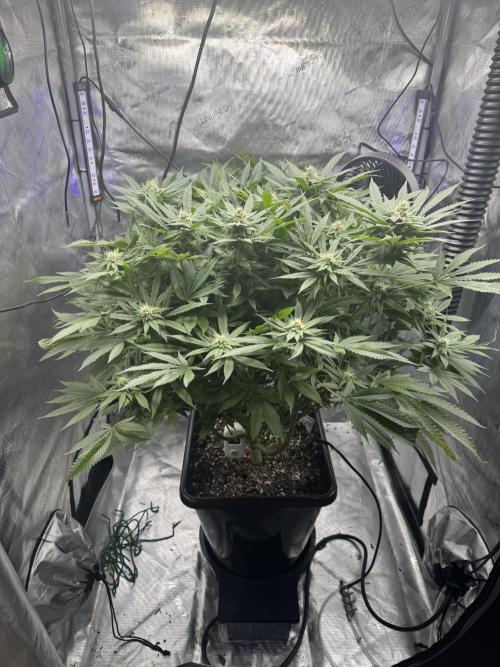
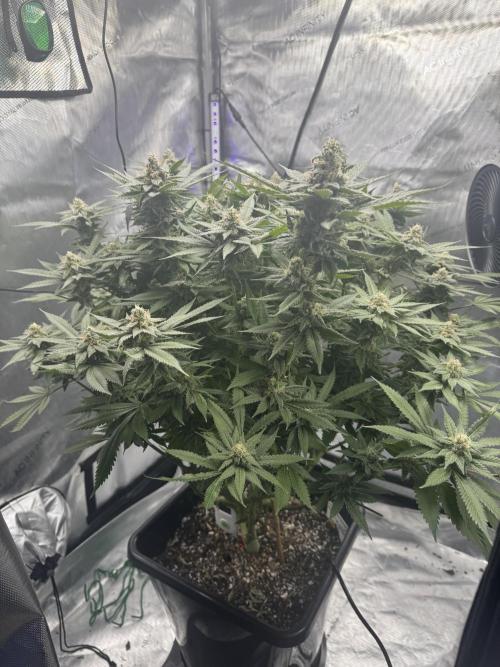
Laezu Shes looking great! This week I went ahead and lollipop'd a bit more and hoping it doesn't stress her out too much. I guess we'll see next week if the buds grew or stunted, but I had a lot of popcorn buds forming in the lower section stealing energy and gambled. This week she drank just about 4 gallons from the reservoir. I can probably clean up the top canopy a bit more, but so far I'm getting by just tucking the fan leaves.
Happy growing!
7 likes
comments
Share
Used techniques
Lollipop
Technique
12
Week 12. Flowering6mo ago
68.58 cm
Height
12 hrs
Light Schedule
24 °C
Day Air Temp
6.2
pH
Normal
Smell
750 PPM
TDS
55 %
Air Humidity
18 °C
Night Air Temp
3.79 l
Pot Size
38.1 cm
Lamp Distance
Nutrients 4
Calmag
1.321 mll
FloraMicro
1.057 mll
FloraBloom
1.849 mll
Laezu I might have had a littttttttle bit of stress from last week's late lollipop but not too bad. I only saw it in the water uptake, she drank about a gallon less, but that could also be because shes not gulping in nitrogen anymore and the stretch has slowed considerably. The buds themselves look great so I'm not worried.
5 likes
1 comment
Share
13
Week 13. Flowering6mo ago

68.58 cm
Height
12 hrs
Light Schedule
24 °C
Day Air Temp
6.2
pH
Normal
Smell
750 PPM
TDS
55 %
Air Humidity
18 °C
Night Air Temp
3.79 l
Pot Size
38.1 cm
Lamp Distance
Nutrients 4
Calmag
0.528 mll
FloraMicro
1.057 mll
FloraBloom
1.849 mll
Laezu Oooooeee here I go again, deciding to do something near the end that could screw up the whole grow :D I'm seeing my leaves darken too much and I'm getting burnt tips in the sugar leaves. I know it's because of my calmag supplementation since I've completely stopped the FloraGrow two-three weeks ago. This is my first grow with RO only water and dialing in the calmag has been an absolute pain in the ass. Earlier in my grow I was getting a whole lot of rust spots so I was dosing at 5ml/gallon (6gal reservoir) and I've kept that dose until now.
The plan right now is to CLOSELY monitor and the plant over the next 3-4 days and only give her RO water to do a light flush. I also dosed 6ml of calmag for the reservoir as a little bit of a safety net to try and keep the PH stable. I want strong buds and the last thing I want is a nutrient lockout so I'm going give her a break until the leaves start to lighten.
I'm keeping the PPFD at around 800 for the rest of the grow. PH is about 6.3.
4 likes
comments
Share
14
Week 14. Flowering5mo ago

76.2 cm
Height
12 hrs
Light Schedule
24 °C
Day Air Temp
6.2
pH
Normal
Smell
750 PPM
TDS
55 %
Air Humidity
18 °C
Night Air Temp
3.79 l
Pot Size
38.1 cm
Lamp Distance
Nutrients 3
FloraMicro
1.057 mll
FloraBloom
1.849 mll
Kool Bloom
0.793 mll
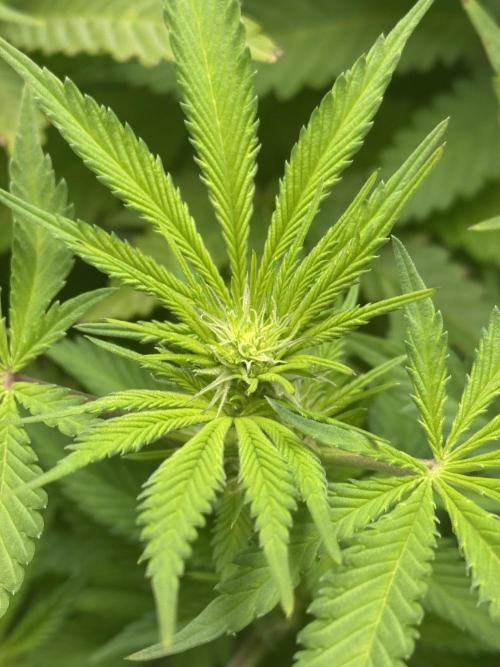
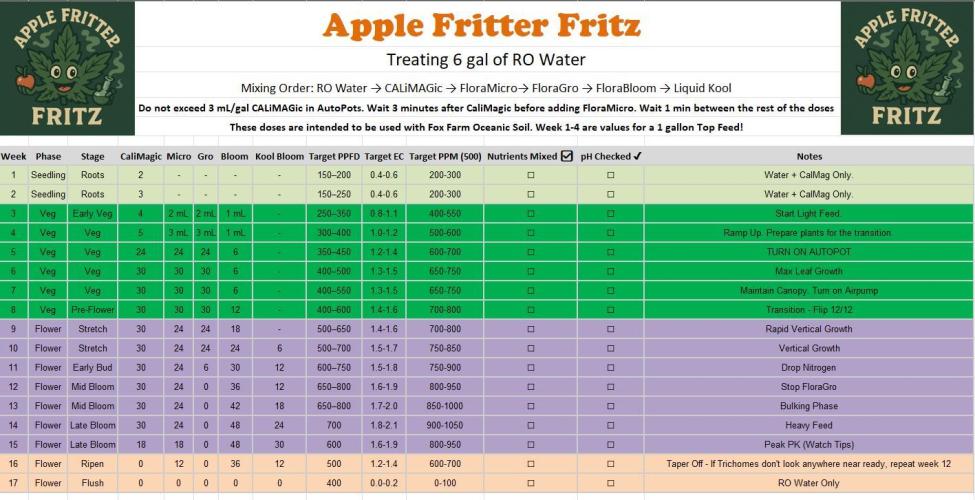
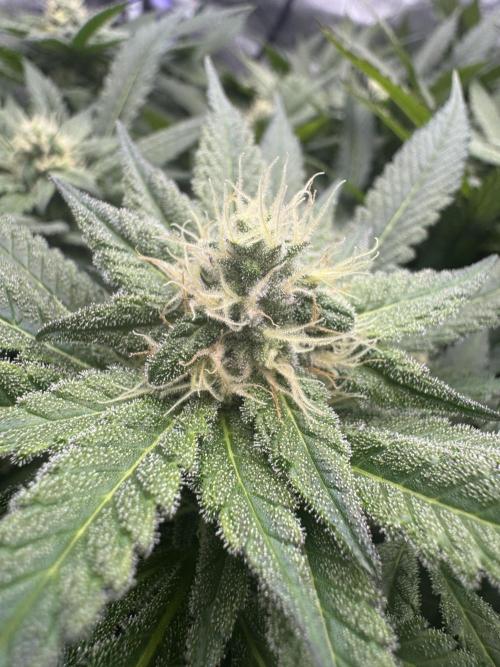
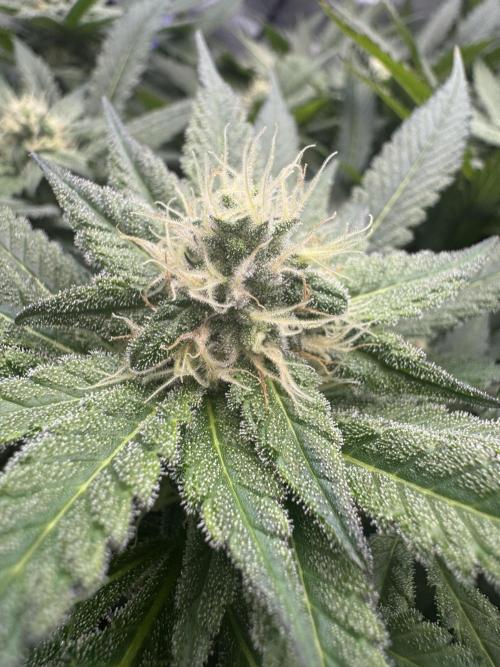
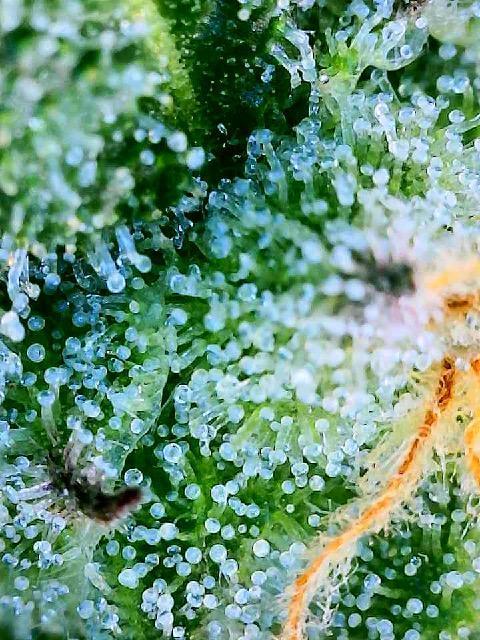
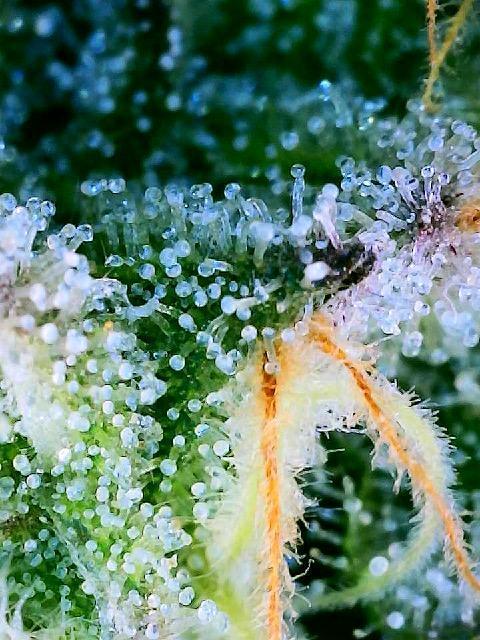
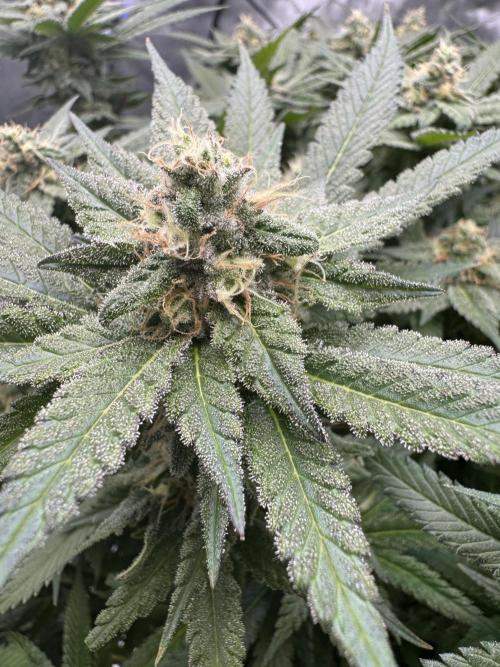
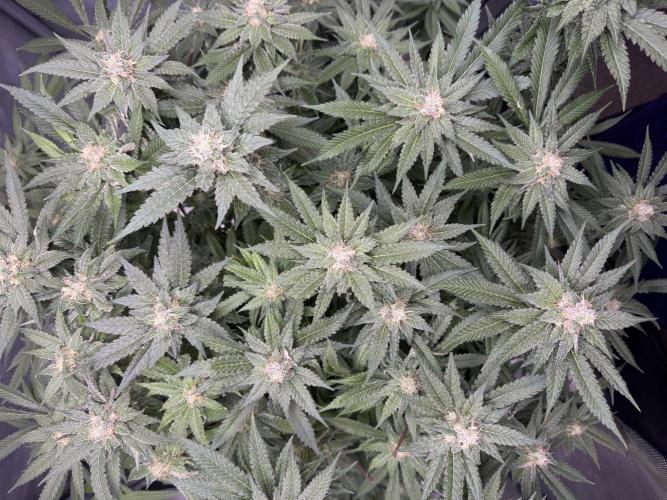
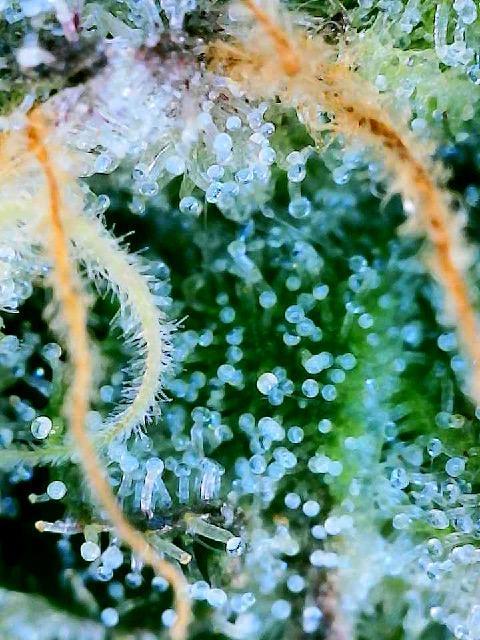
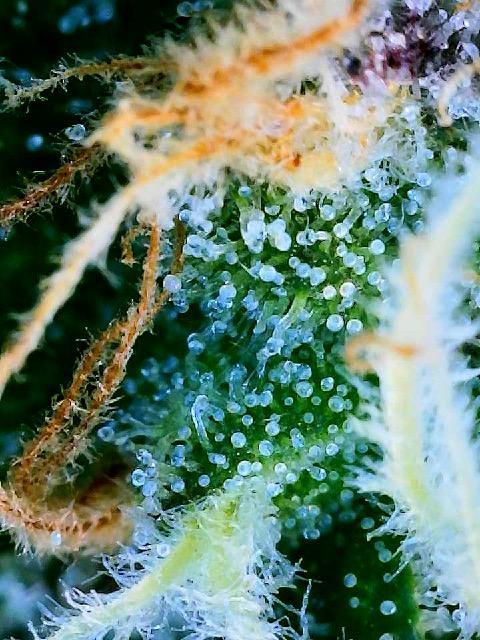
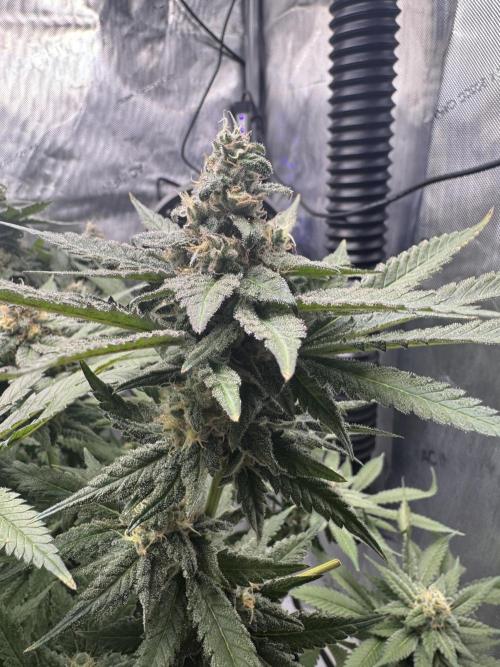
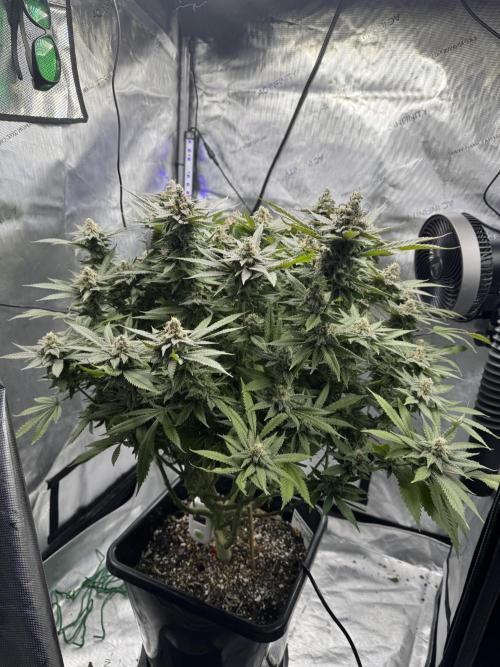
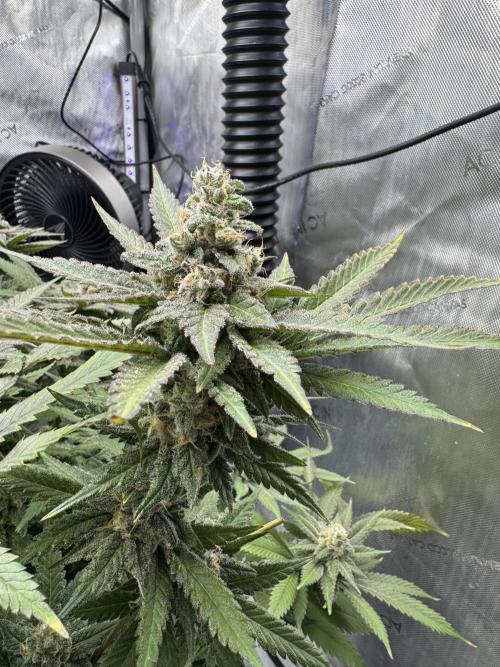
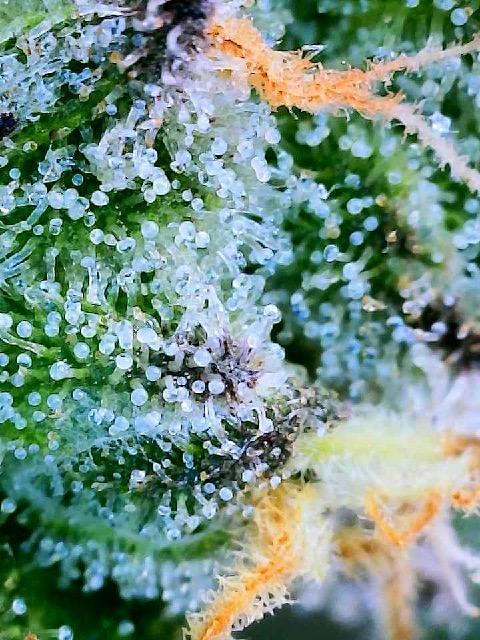
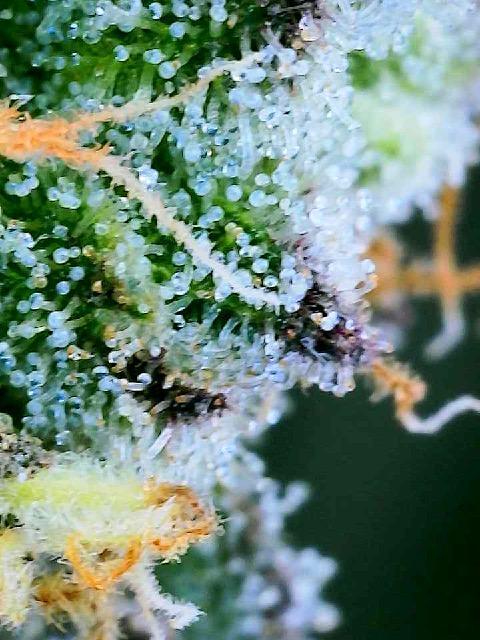
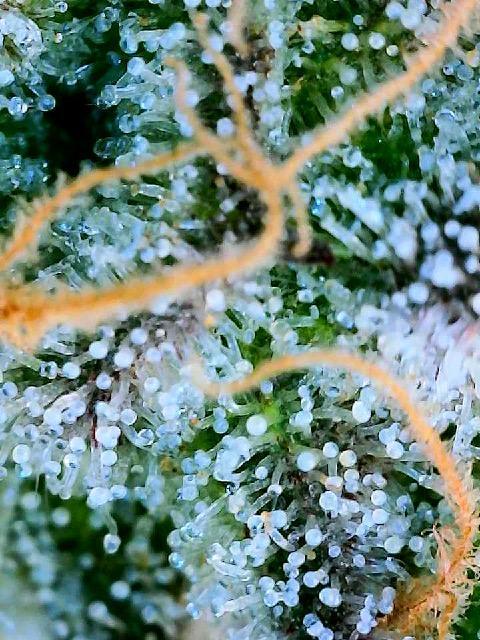
Laezu Another week in the books and she's on track to finish here in a couple weeks. I'm trying to get photos of the trichomes on the buds and to me they have some time to ripen, which is great because I want to see a little more bulk before we finish her off :) I accidentally cut one of the leaves in one of my photos and have been watching it turn purple all week. I'm anxious for the fade to kick in, I definitely want to see that in the final product :)
Shes still drinking heavily and the leaves lightened up a little bit from the dark green they were giving off last week. PH is still around 6.3, PPFD around 800, and I've lowered the humidity to 45. It's hard to keep it this low and my exhaust fan is kicking in all of the time.
What do you guys think? When would you give her the chop?
3 likes
1 comment
Share
15
Week 15. Flowering5mo ago
76.2 cm
Height
12 hrs
Light Schedule
24 °C
Day Air Temp
6.2
pH
Normal
Smell
750 PPM
TDS
55 %
Air Humidity
18 °C
Night Air Temp
3.79 l
Pot Size
38.1 cm
Lamp Distance
Laezu Inching closer to harvest time! Just going to be giving straight RO water the rest of the grow and keeping an eye on the trichomes.
3 likes
1 comment
Share
16
Week 16. Flowering5mo ago

76.2 cm
Height
12 hrs
Light Schedule
24 °C
Day Air Temp
6.2
pH
Normal
Smell
750 PPM
TDS
55 %
Air Humidity
18 °C
Night Air Temp
3.79 l
Pot Size
38.1 cm
Lamp Distance
Laezu We're at the finish line! 1-3 more days and I'll give her the chop :)
4 likes
comments
Share
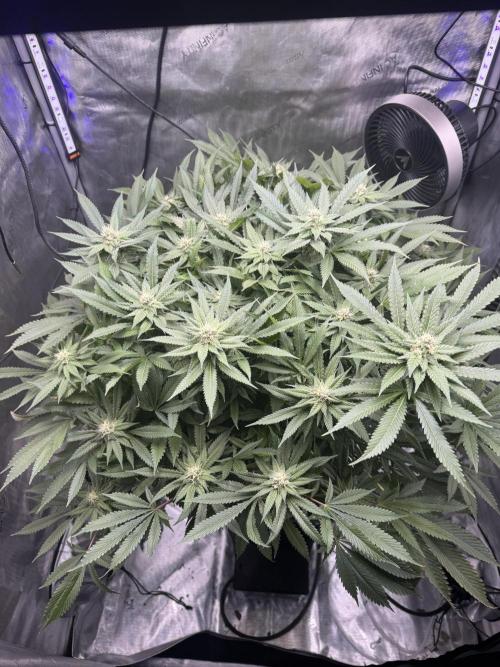
17
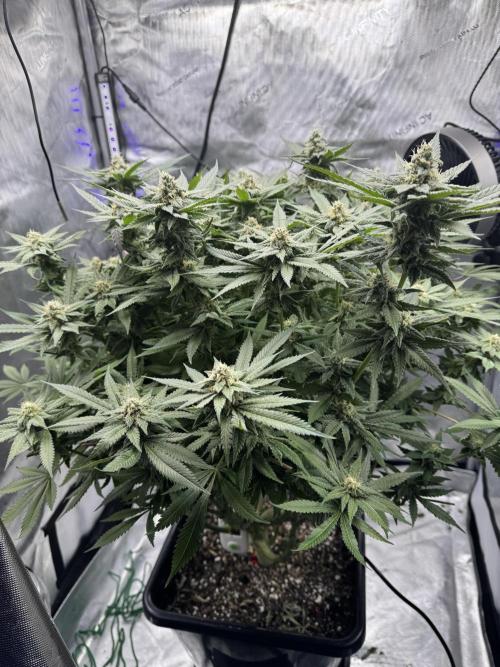
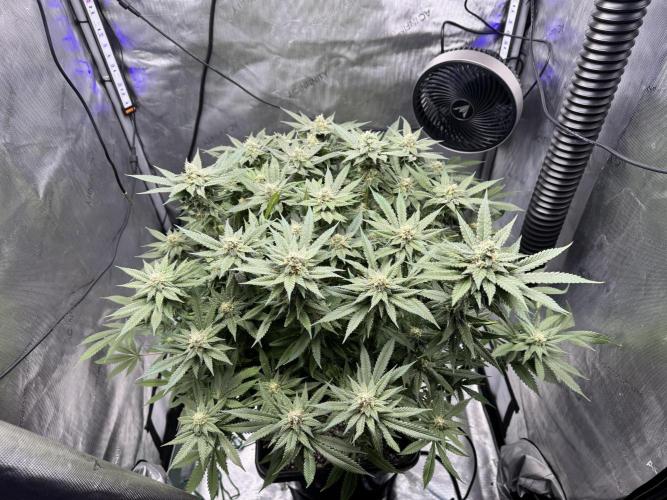
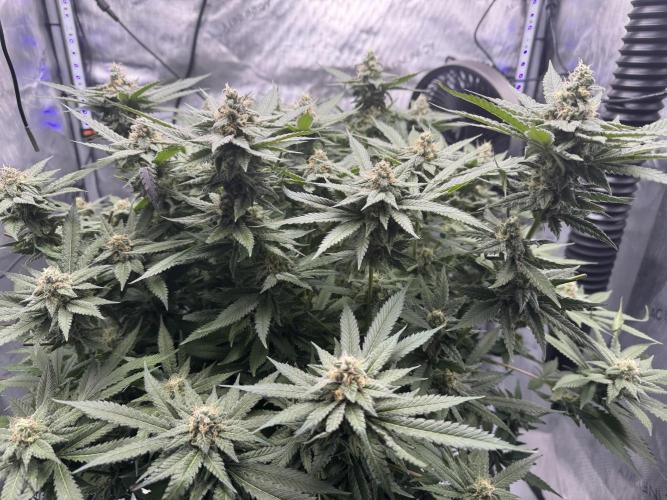
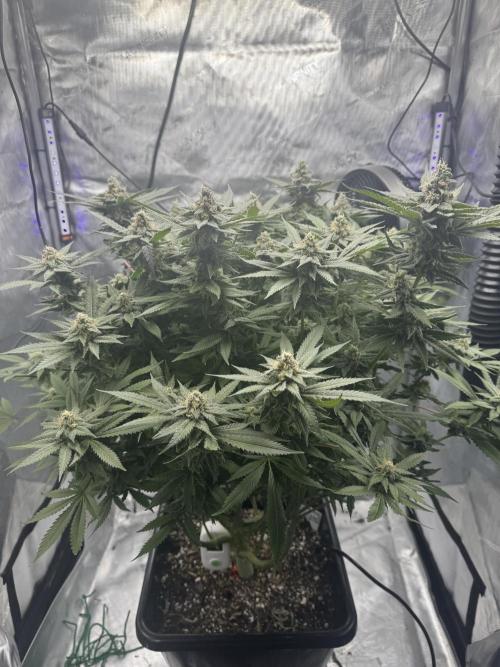
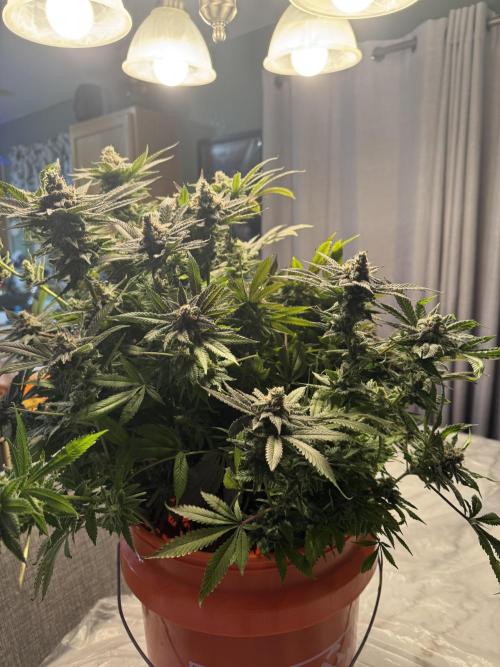
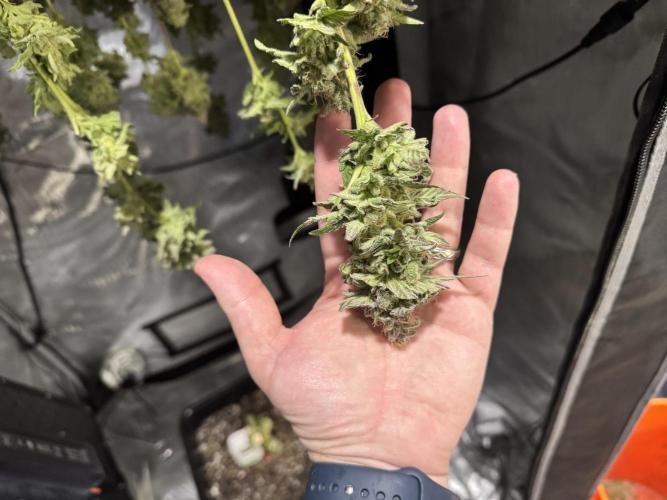
Week 17. Harvest4mo ago
Happy Harvest Day!


10/10
Rated
Absolutely 0 complaints when I harvested this much! Easy to grow, can't wait to smoke it once the curing is done :)
Show more
Translate
Spent 114 days
Ger Veg Flo Har
133.24 g
Bud wet weight per plant
1
Plants
22.86 m²
Grow Room size
Normal
Difficulty
Height
Day air temperature
Air humidity
PPM
PH
Light schedule
Night air temperature
Pot size
Lamp distance
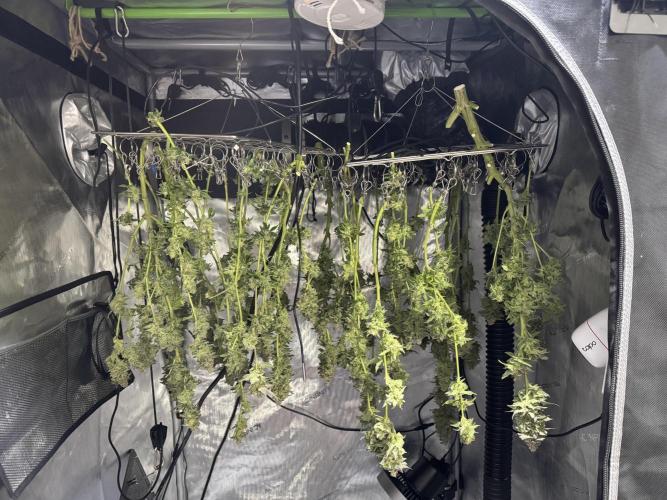
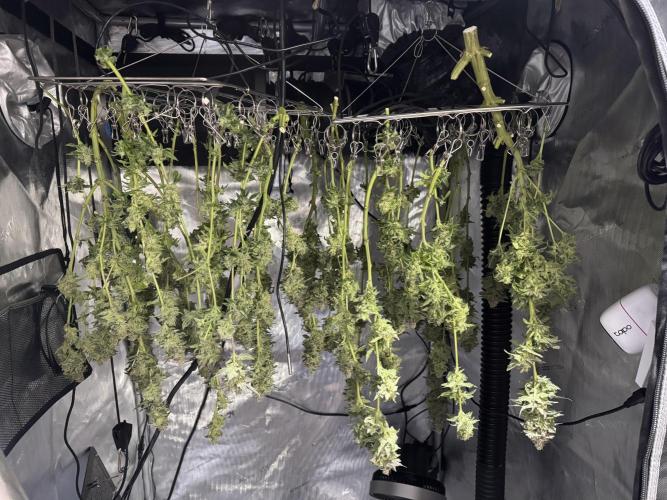
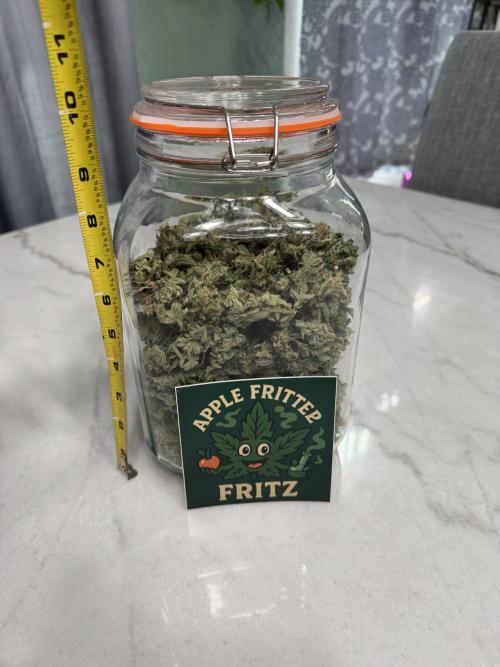
Laezu And we're in the cure! Haven't smoked any yet but my god what a yield. I didn't go crazy with trimming buds because most of this I will turn into gummies. Thanks for all the comments / likes, very much appreciated :) I'm already itching to get my next grow started!
2 likes
comments
Share
Equipment Reviews


10 comments
Sort by
popularity
popularity
newest
oldest

MemesTV commentedweek 106mo ago
Yoo that night camera is sick! Also good luck on the rest of the grow!
likes 2

Laezu commented6mo ago
@MemesTV, Thank you!
like 1

sir_root commentedweek 15mo ago
I love your mention of running the reverse osmosis system down. I have been thinking of installing one in my basement for that exact same reason. Getting tired of dragging 5 gal buckets of water down to air out. She looks great!
like 1
Laezu commented5mo ago
@sir_root, Adding to RO line downstairs made this grow infinitely easier, highly recommend it :)
likes 2

FUNBUDZ commentedweek 145mo ago
What really helped me with preventing nutrient issues, related to cal/mag, I would add cal/mag to my water until it was 200ppm. Then add your grow or bloom nutrients until you get to your desired outcome. I feed mine at 1200ppm but 200 of that is cal/mag, the remainder is all my other nutrients.
like 1

ADjahrasta commentedweek 57mo ago
Hi, I'm currently working on the same strain from the same seed bank. I'm new to LST and I'm seeing more and more of those little clips for LST. I'd like to know your opinion on this product and who sells it.
likes
Laezu commented7mo ago
@ADjahrasta
, Awesome man, good lucky with your grow :) LST is pretty straightforward, but you do want to be a little careful to not snap off a branch. You want to use the clips when the branches are pretty young because they are far easier to shape. I like to do it when there's about 2-3 inches of length between the freshest node and the previous one. Once you have it in the direction/shape you want you can just leave it alone and the plant will take care of the rest. I do take mine off after about 4 weeks because the stem has hardened to the shape and if you keep them on too long the stem can burst from being restricted.
Since the top node will immediately start growing upward toward the light when it's able, I also use the green plant ties as a secondary with the goal of giving some more spacing between the stems so the fan leaves don't block out the light from bud sites.
Overall I like the clips for stretching out the stems from the main branch, but I do feel like I get better results in later growth from the plant ties. Links to both -
https://www.amazon.com/dp/B08KSL7BN4?th=1
https://www.amazon.com/dp/B079Y718HQ?th=1
likes
ADjahrasta commented7mo ago
@Laezu, 👍
likes

Kinglens commentedweek 155mo ago
Every month start earning more than ,000 by doing very simple Online job from home.i m doing this job in my part time i have earned and received 429 last month .I am now a good Online earner and earns enough cash for my needs. Every person can get this Online
job pop over here this site… www.today.earn54.com
likes
ADjahrasta commentedweek 125mo ago
Salut je suis sur la même variété de chez barney's j'attaque la 9ème semaine et oui moi aussi j'ai eu un léger blocage avec l'azote réglé attend sa commence à faire des beaux calises et les arômes sont vraiment très intense déjà avec gros développement de la resine 🙀 pour le moment je touche du bois
likes

the end.
Enjoying this diary? Follow for more updates!


Prefer the old Diary view?
Go back to the old Diary view