
Deep Water Culture Tutorial for Newbies


VEG
Fission 300W Light Emitting Diodes/150W
Custom
FLO
Fission 300W Light Emitting Diodes/150W
Custom

Indoor
Room Type
LST
weeks Technique
10 l
Pot Size
Start at Harvest
1
Week 1. Vegetation7y ago


24 hrs
Light Schedule
25 °C
Day Air Temp
5.8
pH
No Smell
Smell
100 PPM
TDS
65 %
Air Humidity
17 °C
Solution Temp
25 °C
Night Air Temp
10 l
Pot Size
35 cm
Lamp Distance
Nutrients 1
Room Temperature H2O
99 mll
DILLIGAF Welcome to My Budget DIY DWC Bubble bucket grow
I have had a few questions from other growers regarding DWC and the costs involved etc so I thought I would do a
Grow diary showing how you can make up a DWC Bubble bucket at a fairly low cost.
I will also list the Tools needed with aprox costings (prices will be different where I live to where you live)
Hydroponic TDS and PH Measurement meters How to use and keep in top condition
So first of all you need a Bucket that has a fairly tight fitting lid , I have chosen two 10 litre buckets for this tutorial
which were $8 each so we have spent $16 so far.
Next up is the net cups I have chosen the smallish ones & cost is 0.99 x 2 = $2.00
Two Aquarium air pumps one for each bucket with 3metres air tubing and airstones @ $14 each = $28
Two rockwool cubes 0.49 cents each =$1
*** Now to make your bucket you will need the use of a cordless drill * a drill bit the same diameter as the air tubing and a hole cutting drill attachment that is a fraction smaller than the diameter of your net cup.
*Simply cut a hole in the middle of the buckets lid and insert the netcup so it fits snugly and cannot fall thru into the bucket.
*Drill a hole with the drillbit thru the lid at the edge to push the air tubing thru.
*Clean bucket of any shavings created from making the holes
* The air stone goes on one end of the air tubing and is best suspended halfway into the bucket, the other end goes thru
the small hole in the lid and then to the aquarium pump.
## So now you have the details on how to make a couple of bubble buckets for under $50 the next part is to decide what to grow. I have decided to Try Blue Cheese Automatic From Barneys Farm simply because it sounds Amazing.
So i got myself a shot glass filled with room temp H2O and popped to seeds in and they sank straight to the bottom which
is usually a good sign of healthy seeds.
That concludes week 1's tutorial next week I will go over some basic water chemistry and the need to have certain testing equipment. 👌👌👍
8 likes
4 comments
Share
2
Week 2. Vegetation7y ago


2 cm
Height
24 hrs
Light Schedule
25 °C
Day Air Temp
5.8
pH
No Smell
Smell
100 PPM
TDS
65 %
Air Humidity
20 °C
Solution Temp
25 °C
Night Air Temp
10 l
Pot Size
10 l
Watering Volume
35 cm
Lamp Distance
989899008 PPM
CO₂ Level
Nutrients 3
seasol
0.5 mll

Go Green
0.5 mll

Silica
0.5 mll
DILLIGAF #################WEEK TWO ################## WATER CHEMISTRY##################
The seeds have germinated and are now in their final homes inside the net cups with a weak highly aerated nutrient
solution awiting those thirsty young roots.
So now you have seen how I made the buckets, This week I will try to explain some basic water chemistry
so that you will know how to care for your plants.
I am far from an expert at this just someone with a strong passion for growing and sharing knowledge
1. First of all is PH - when growing with hydroponics , Cannabis prefers a ph range of 5.5-6.5 however a lot of experienced
growers tend to keep their ph at around 5.8 . It is important to keep your ph within this range as important nutrients will
be locked out if ph gets too low or too high.
It is more important to keep your plant within the 5.5-6.5 range than it is trying to keep your ph at a certain number as
plants will dictate the ph they prefer according to their nutritional needs.
2. Next is TDS or total dissolved solids . This is the way in which the nutrient solution strength is determined.
TDS can be measured in either PPM (parts per million) or EC which is electrical conductivity .
I use PPM so all my measurements during the grow will be in those units.
3. The optimum temperature for your hydroponic nutrient solution is 68-72 f or 20-22 c
but you can either way a couple of degrees , but keep in mind at 25 c dissolved oxygen levels are very low and you run the risk of developing root rot or similiar problems.
4. Dissolved oxygen is imperative when using hydroponics otherwise your plants would drown.
The easiest way to add dissolved oxygen is with the aquarium air pump mentioned last week. this pumps air thru
tubing that is attached to an airstone inside your DWC Bucket. The air stone diffuses the oxygen thruout the nutrient solution much easier and quicker than having the air just bubble out the end of the tube.
5. The quality of the water you are using is very imortant If you find that your water supply already has a high ppm reading
You should really consider using filtration such as Distillation or Reverse osmosis .
Or you could purchase pre filtered water but if it is available.
Chlorinated tap water should be left to stand for 24 hours until the chlorine has dissipated .
6. During the vegetative stage you can get away with changing out your nutrient solution every 2 weeks but once flowering
starts this should be done weekly and ph/ppm levels checked daily.
#### That's it for this week ## Next week is ph and tds meters and how to use them / maintain calibrate etc ##
*******************👌👌👈👉👌👌 Update 3rd july Plants got new leaves coming thru and has quite a long tap root
that has extended well into the bucket.
6 likes
4 comments
Share
3
Week 3. Vegetation7y ago


6 cm
Height
20 hrs
Light Schedule
24 °C
Day Air Temp
5.8
pH
Weak
Smell
200 PPM
TDS
65 %
Air Humidity
20 °C
Solution Temp
9797982 °C
Substrate Temp
20 °C
Night Air Temp
10 l
Pot Size
10 l
Watering Volume
35 cm
Lamp Distance
989899008 PPM
CO₂ Level
DILLIGAF ###########Welcome to week three of my DWC Buckets guide #####################
This week I will try to explain TDS and PH meters and how to keep them accurate .
But first a quick update on the Plant.
The Blue cheese is going as well as can be expected and has developed a very long tap root that has grown well down
into the bucket full of aerated nutrient solution. The strength of this mix is still quite low but she will be getting a full resevoir
change and new nutes with Professor's A&B nutrient's will be used. 😀
Now back to Ph and TDS meters.
When starting out with hydronics or growing in general it can be daunting for newbies when looking at equipment needed
They see more experienced growers using this brand or that light etc etc but this is because they have had the experience
to know what works for them.
For new growers just starting out I would reccomend getting one of the more budget friendy TDS and Ph meters
available and learn how to use these well before buying the more top ended brands such as bluelab etc.
Vivosun makes such budget models as well as many other poular brands you can find on Amazon or ebay.
When purchasing the meters it's important to also get some Ph 7 and 4 buffering solution as you will need to
calibrate your Ph meters atleast once a month whilst they are in use.
It's as simple as placing the ph meter's probe into some buffer 7 solution wait until the reading settles on 7 press calibrate then repeat with the buffer 4 solution.
Now a quick guide to what your plant needs during each stage of growth. This is a General guide only.
Week1 -3 Early vegetative stage 150-300 ppm
Weeks 4-8 Late vegetative 600- 800 ppm
Weeks 9-10 Transition (stretch) 800-1200 ppm
Weeks 11-13 Early flowering 1000-1200 ppm
Weeks 14-16 Mid flowering 1000-1300 ppm
Weeks 15-17 Late flowering 1000-1300 ppm
Weeks 18-20 Ripening 1000-1300 ppm
Week 21 Flush 0-400 ppm
Remember that as a rule of thumb guide always halve the nutrient companie's reccomended dosage as their
growing under ideal conditions and those strengths will be too hot for your plants.
Well that concludes this weeks guide Next week's topic is nutrient mixing See you then 👌
9 likes
1 comment
Share
4
Week 4. Vegetation7y ago


13 cm
Height
18 hrs
Light Schedule
24 °C
Day Air Temp
5.8
pH
Weak
Smell
200 PPM
TDS
65 %
Air Humidity
20 °C
Solution Temp
9797982 °C
Substrate Temp
20 °C
Night Air Temp
10 l
Pot Size
10 l
Watering Volume
35 cm
Lamp Distance
989899008 PPM
CO₂ Level
Nutrients 4
Seasol
0.5 mll

Professors Original Nutrient Part A and B
1 mll

Professors Original Nutrient Part A and B
1 mll
DILLIGAF ##################Welcome to week 4 #################################
This week I will briefly discuss nutrient mixing.
*The first thing I do before making a nutrient mix is to make sure everything Im using is cleaned such as
the ph and tds meters, Mixing bucket/s and measuring cup/s
*Next I use only natural rain water as my H2O base, you can also use RO filtered or distilled water or even plain tap
water provided you let it sit for atleast 12 hours to let any residual cholrine dissipate.
* First thing I mix in is the Cyco silica which will raise the ph to about 9
I then use a few drops of ph down to bring it to as close to 5.8 as I can , the silica seems to act as a buffer
because you can now mix in the remaining nutrients one by one and the ph will stay very close to where you set it after
adding the silica. Amazing right !! 😀
It's important to always thoroughly mix your nutrients into the water and never mix nutrients together always add them
one at a time mixing well between each part added.
The 10 litre Mix of nutrients for this weeks growth are as follows
2mls / litre Cyco Silica
2drops ph down
1ml / litre Professors nutrients A + B
0.5mls / litre Seasol
PPM 450 PH 5.8
That Concludes the Hydro how to part for now Next week will focus on the Plant itself as she has been showing signs of some sort of nutrient deficiency and I will attempt to rectify it.
##### Update 18/7/19 The Rust looking stuff on the leaves is not a cal mag or any other nutrient deficiency as I first thought, It turns out it is Rust fungus 😱 Fuckity Fuck fuck!! Anyway I am attempting to fix the problem and will update
again at the End of the Week
5 likes
3 comments
Share
5
Week 5. Vegetation7y ago


20 cm
Height
18 hrs
Light Schedule
24 °C
Day Air Temp
5.8
pH
Normal
Smell
400 PPM
TDS
70 %
Air Humidity
20 °C
Solution Temp
9797982 °C
Substrate Temp
13 °C
Night Air Temp
10 l
Pot Size
10 l
Watering Volume
35 cm
Lamp Distance
989899008 PPM
CO₂ Level
Nutrients 4
Seasol
0.5 mll
Professors Original Nutrient Part A and B
1 mll
Professors Original Nutrient Part A and B
1 mll
DILLIGAF Welcome to another week of my introduction to DWC diary
This week I was planning on discussing the General caring of the Plant from week to week However due to a fungal attack
on the Blue cheese seedling I will need to adress that issue instead.
To get readers up to speed , last week I noticed rust like spots on the plants leaves.
So doing what I usually do is research the possible cause of this and all thoughts were that it was a nutrient related
problem , calcium or even magnesium. So I dosed up on Cal mag and the problem not only persisted it spread 😟
So back to the drawing board and more research. After checking thru a lot of material I came across a disease called
Rust fungus and after comparing photos and symptoms I have found my culprit.
There are a few treatments mentioned online however I have gone with sulfur spray as I had some on hand.
Time will tell if It works and I will obviously update in this diary.
It is situations like this that can crop up during a grow that will test your skill and patience.
It is a good idea to carry a few remedies for such occasions like sulfur spray and hydrogen peroxide for fungal attacks
Neem oil or Diatomaceous earth spray for bug attacks And keep the grow area as clean as possible at all times
So hopefully by next week The plant will have recovered and the fungus eradicated I will continue with the planned weekly plant care guide 👊
6 likes
3 comments
Share
6
Week 6. Vegetation7y ago


40 cm
Height
20 hrs
Light Schedule
24 °C
Day Air Temp
5.8
pH
Normal
Smell
700 PPM
TDS
54 %
Air Humidity
20 °C
Solution Temp
9797982 °C
Substrate Temp
13 °C
Night Air Temp
10 l
Pot Size
10 l
Watering Volume
45 cm
Lamp Distance
989899008 PPM
CO₂ Level
Nutrients 4
Seasol
0.5 mll
Professors Original Nutrient Part A and B
3 mll
Professors Original Nutrient Part A and B
3 mll
DILLIGAF Welcome to another week of my Diary
Last week we spoke about the rust fungus that was attacking the leaves of the Blue cheese plant .
I have been working hard to fight it with the use of powdered sulfur and hydrogen peroxide and touch wood but I seem to be slowly getting her back to full health. There are a couple of remaining spots on some leaves and if they continue to spread I will then try some copper spray during the lights off period as a last resort.
Weekly Care Guide for New Growers
Last week I was going to write about the weekly care you need to give your plants and growing area but was sidetracked by the rust fungus issue. However that issue actually highlights the need for all growers to pay special attention to their plants on a weekly basis . It is important to keep a clean grow area so once a week it's a good idea to wipe surfaces down with a damp cloth to remove any unwanted residues. Whilst doing nutrient changes I like to scrub the buckets and rinse several times before I add the fresh liquid. All equipment such as measuring cups etc get a good clean as well .
If you keep a clean environment it reduces the risk of problems arising later in the grow cycle.
Weekly plant inspections are also extremely important You need to check the leaves both top and bottom for things like spots ,bite marks or discoloration which could all be signs of imminent trouble.
Discoloration is often a sign of a nutrient deficiency or general poor health so you will need to refer to a Troubleshooting symptoms chart to match the colour of your leaf problem to what is on the chart.
Spotting can also be caused from deficiencies or diseases The same principle applies for troubleshooting as leaf colour
Bite marks or signs of insect attack are self explanatory And you will need to identify the culprit and act accordingly
to eradicate them. There are several organic pest deterrents on the market and I recommend you carry at least one of them in your Growing Kit.
So now we have discussed what you need to do on a weekly basis You have an idea of what is required to maintain
your plants health thru out the grow cycle you will eventually begin to get a feel for what your plant needs and you will
be able to provide it for them. I hope you have enjoyed the diary so far and maybe even learnt something which is the reason I have created it.
The next few weeks I will be concentrating on the Plant's health and hopefully nursing her back to full vitality
and thus the Diary will be devoted to that. 29/7/19 I got my new toys today a humidity/dehumidity controller and a small dehumidifier I got both for under $100 delivered I have uploaded pics to show you all.
Until I update again
Happy Growing Everyone 👊
6 likes
2 comments
Share
7
Week 7. Flowering7y ago


60 cm
Height
20 hrs
Light Schedule
24 °C
Day Air Temp
5.8
pH
Normal
Smell
1400 PPM
TDS
54 %
Air Humidity
19 °C
Solution Temp
9797982 °C
Substrate Temp
13 °C
Night Air Temp
10 l
Pot Size
10 l
Watering Volume
45 cm
Lamp Distance
989899008 PPM
CO₂ Level
Nutrients 5

CALiMAGic
1 mll
Professors Original Nutrient Part A and B
3 mll
Professors Original Nutrient Part A and B
3 mll
DILLIGAF Welcome To another Week of my DWC How to for beginners like Me
This Week I will discuss the ideal Indoor environment conditions for Growing cannabis and what you can you use to manipulate the conditions if they are not at the desired levels .
It is very important that your Grow room conditions are in the idal range .
Key elements include relative humidity, Co2 , air circulation and temperature.
** Ideal humidity levels in your grow room is from 40-60% RH any higher ( especially poorly ventilated rooms ) and you
run the risk of mold and fungus problems.
** Ideal temperature is between 66 and 76 f or 18 - 24 celcius
High temperatures can cause stress and damage to plants and also raise the nutrient solution in your DWC buckets
leading to root rot issues
Too cold temps can do the same thing as well as stunting plant growth You can get some budget type temp and humidity
meters from online shops
** Co2 additions are expensive and best left to the more experienced growers However there is no doubt to the benefits
of a Co2 system for generating very fast growth
** One of the most important aspects but often overlooked is adequate air flow and air circulation
Poor air movement inside your grow space can lead to bud rot which is devastaing and often leads to total crop losses
You need an exhaust fan preferably with a carbon type filter to remove the odours before they can leave the tent
Secondly a small intake fan that sucks fresh air into the tent at a slightly slower rate than that being sucked out by the exhaust fan. Thirdly but just as important is to have an oscillating type fan blowing directly across the plants canopy
This not only helps circulate the air around the grow room but it can also help keep potential insects from landing on the leaves and establishing themselves there.
** There are a couple of other additional items that you may or may not benefit from having in your grow room
firstly a small fan heater may help keep your plants warm during winter and/or when the lights are off
it is important to use one with a built in thermostat so it shuts off when it reaches the desired temperature.
An alternative is to use a temperature controller as pictured above in this weeks images .
#Second item is a portable air conditioner , often in summer your grow room can potentially reach catastrophic temps
that can harm or even kill your plants . The only resort is to rapidly cool the grow area . This is where a portable air con
comes in . You can get ones with built in thermostats or otherwise use a temperature controller so that you are not
running it when it's not needed. A quick note some of these portable air conditioners generate heat to cool the air down
It is imperative that you also exhaust the extra heat otherwise your aircon will be struggling to work efficently.
#Next item is a water chiller , fairly expensive units they basically pump your nutrients thru the chiller which cools it a cpl of degrees and pumps it back in a recirculating manner. As I said fairly expensive and for smaller grows a frozen bottle of water
popped into each bucket will suffice.
# Next up Humidifiers and Dehumidifiers Both are handy things to have in your grow room and there use is
self explanatory. I also recommend the use of a specialised controller for both humidifiers and Dehumidifiers
If you take a look at the images above there are many models and sizes to suit grows of all sizes
I personally own the inkbird controller in the pic and one of the small dehumidifiers both work fine for my little grow tent
and i have the controller hung up in a very visible space outside the grow tent so I can monitor the RH at a glance .
A Quick note on the plants feeding this week
Cyco silica @ 2mls litre (Used the last of it)
Professors nutrients A+B @ 3mls / litre
Seasol @ 0.5mls /litre
Ozi Magic Ozi Tonic @ 5mls / litre
She seems to have recovered from the rust fungus attack and a slight potassium deficiency and she has now
transitioned into flowering so I will need to keep on top of her needs and provide exactly what she wants from now on
4th August Update I changed her nutes today
GT Silica @ 5mls per litre
Professors nutrients A+B @ 2.5 mls each per litre
Ozi magic Bud swell @ 5 mls per litre
PPM 1400 Ph 5.8
Thanks Once again for taking the time to look at my Diary and to the newbies reading I sincerely hope you are learning
something from this grow and tutorial. See you all next week for pests and diseases 👊
12 likes
12 comments
Share
8
Week 8. Flowering7y ago


65 cm
Height
20 hrs
Light Schedule
24 °C
Day Air Temp
5.7
pH
Normal
Smell
1400 PPM
TDS
54 %
Air Humidity
19 °C
Solution Temp
9797982 °C
Substrate Temp
13 °C
Night Air Temp
10 l
Pot Size
10 l
Watering Volume
45 cm
Lamp Distance
989899008 PPM
CO₂ Level
Nutrients 6
Natures own Super bloom
4 mll
CALiMAGic
1 mll
Professors Original Nutrient Part A and B
3 mll
DILLIGAF Welcome to another week of my Intro to DWC for Beginners Diary
Things are progressing nicely, I decided to remove a few of the older fan leaves to increase
Air flow in and around the plants structure.
I will also need to use some soft plant ties to help with the branch support as the buds get heavier
towards harvest. I have introduced a little Ozi magic Bud swell and Super bloom guano into this last weeks feed and she seems to like this combination. She is still drinking a lot of nutes so will slowly increase
feeding strengths until about the 5-6th week of flowering before tapering off again.
Feeds this week were
Professors nutrients A+B @ 3mls / litre
GT Silica @ 5 mls / litre
Ozi magic Bud swell @ 4mls / litre
Natures own Super bloom Guano Organic @ 4 mls / litre
Seasol @ 0.5mls / litre
PPM 1200 Ph 5.7
Now For this weeks Tutorial which is Pests and Diseases in the Grow Room
Firstly I will list the most common pests found in the indoor grow environment
Aphids, also known as plant lice, come in different colors like gray, black and green. Regardless of their color, aphids weaken plants by sucking the juices out of their leaves and turning them yellow. They can be found anywhere on the plant, but often congregate along its stems.
Spider Mites
Spider mites, at less than 1-mm long, are tiny arachnids with eight legs and oval bodies. Their mouth parts pierce and suck, causing damage by puncturing plant cells, resulting in fluid loss that eventually kills plants. Spider mites look much like grains of sand and are found mostly on the undersides of leaves. The type you’ll see most often is the two-spotted spider mite, which has a dark spot on either side of its body. An adult female can lay up to 20 eggs per day, causing infestations quickly. Eggs are round and clear and become a creamy color just before hatching. If you see webbing, you most likely have an infestation.
Thrips
Thrips are hard to see at a mere 5-mm long. They leave fecal droppings on plants that appear as black spots. Females bore holes in leaves where they lay their eggs. If your garden is infested with thrips, leaves will eventually look dry—not wilted—and have yellowish spots.
Fungus Gnats
Adult fungus gnats are small and black with thread-like antennae, long slender legs and clear wings. Their larvae feed on plant roots, causing weak, slow-growing plants. The larvae can be clear or cream-colored with shiny black heads that look like small black specks to the naked eye and grow about a ¼-in. long. The flying adults do not cause damage to the plant, but they lay eggs in the growing media. The larvae feed on the roots, making the plant weak and slow-growing, potentially leading to plant death.
Whiteflies
Whiteflies resemble small, white moths and are about 1-mm long. An adult’s mouth parts pierce and suck juices from plant leaves, causing white spots and yellowing. Females lay their eggs on the undersides of leaves. Another downside to whiteflies is that they secrete a sticky substance called honeydew, which is a breeding ground for sooty mold.
Next I 'll list the most common diseases that attack our plants
Downy Mildew
Downy mildew is caused by the fungus Plasmopora viticola. Early signs of a downy mildew infection are pale-yellow mottling on the tops of leaves. If left alone, the later signs of downy mildew show a patchwork of abrasions that are red, yellow and brown, also on the upper sides of the leaves. The fuzzy, white downy mildew appears mainly on the undersides of leaves.
Powdery Mildew
Powdery mildew is caused by a fungus related to downy mildew called Cleistothecia. If it looks like white powder has been sprinkled on the stems and leaves of your plants, powdery mildew could be the culprit. Other symptoms include stunted plant growth, leaf drop and chlorosis (the yellowing of plant tissues).
Gray Mold
Gray mold is caused by the fungus Botrytis sp. It starts out as spots on the leaves, which lead to fuzzy, gray abrasions that eventually become brown and mushy. AKA the dreaded bud rot
White Mold
White mold is caused by the fungus Sclerotinia sclerotiorum. An infestation looks like wet baking soda clinging to the plant. Plants wilt and leaves appear tattered and bleached. In later stages, the white mold becomes hard and black.
Root Rot
Root rot is caused by too much water and soil-borne pathogens. Plant growth will become stunted, and then plants will wilt and turn yellow. Roots may become mushy, but not always.
So now you have seen what can attack your plants let's discuss Preventions
Cleanliness is key to keeping garden pests and diseases at bay. It is imperative you keep floors, growing surfaces, substrates, tools and clothing clean and disinfected. Here are some more things to keep in mind when it comes to preventing pest infestations:
Disinfect Tools: A separate set of tools for the growroom is essential. Disinfecting tools with isopropyl alcohol and handwashing before moving from one plant to another will prevent pests and diseases from being transported via you and your tools.
Increase Air Circulation: Keep the air in your growroom well-circulated and the humidity around 50%, with daytime temperatures around 75°F and nighttime temperatures between 60 and 65°F, depending on what you’re growing.
Prune Plants: Give plants enough room to grow by pruning out dead or diseased leaves and branches. Remove any fallen leaves or other debris from the pots and the growroom floor.
Don’t Overwater: Make sure your growing media can adequately drain. If you’re growing using hydroponics, the water needs to be heavily aerated. Roots should never be kept soggy or sitting in stagnant water.
Now last but certainly not least is the treatment of the above problems
There are a few ways to go about treating a pest infestation, including using beneficial bugs, which is known as integrated pest management (IPM). Beneficial bugs are basically good bugs that eat bad bugs. You can purchase specific predators for a specific pest or general predators that will pretty much eat anything. As a general rule, specific predators are more costly than general predators, but the specific predators usually do a better job, especially if there is already an infestation.
Chemical and organic sprays are another way to treat pest and disease infestations. These sprays are toxic to beneficial bugs, so these two methods cannot be used together. There are also insecticidal sprays designed for use on edible plants. Sprays of insecticidal soap, neem oil, habanero pepper and pyrethrum are some examples of common non-toxic sprays, many of which work only if they come in contact with the pests. Sprayers help by creating a fine mist to help get under the leaves and into cracks and crevices. For safety’s sake—both yours and your plants—I suggest visiting your local hydroponics or indoor garden specialists for correct application methods and rates if you’re unsure.
When it comes to pest and disease control in the indoor garden, remember these three key factors: identify, prevent and control.
Well I hope You enjoyed This weeks Update and Tutorial Next week is a brief note on identifying problems
by looking at the colour of the leaves.
8 likes
3 comments
Share
9
Week 9. Flowering7y ago


65 cm
Height
19 hrs
Light Schedule
24 °C
Day Air Temp
5.9
pH
Strong
Smell
1400 PPM
TDS
54 %
Air Humidity
19 °C
Solution Temp
9797982 °C
Substrate Temp
10 °C
Night Air Temp
10 l
Pot Size
10 l
Watering Volume
45 cm
Lamp Distance
989899008 PPM
CO₂ Level
Nutrients 4
CALiMAGic
1 mll
Professors Original Nutrient Part A and B
5 mll
Professors Original Nutrient Part A and B
5 mll
DILLIGAF No Tutorial this week Very Busy so Just an update and pics
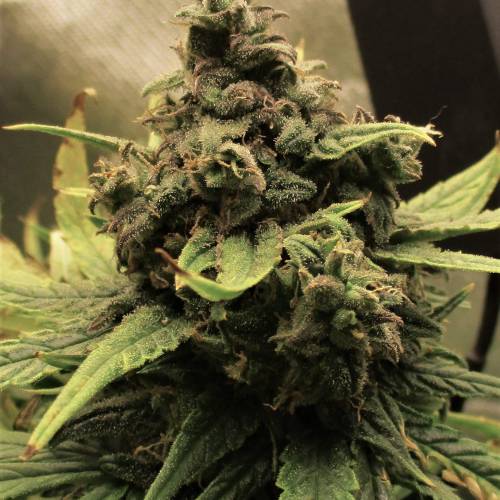
This Blue cheese auto is kicking into gear now and the buds are developing fast 💪
Distinct fruity smell so far but I'm hoping for some cheese to come thru before she's finished.
This girl is quite a fussy feeder she wasn't impressed with what I was giving her so stopped all the additives except
for the calmag and silica and upped the hydro A+B nutes to full strength . She now seems content so will leave it like that
for the time being.
Feeds
Silica @ 2mls / litre
Professors nutrients A+B @ 5mls / litre
Calimagic @ 1ml / litre
PPM 1400 Ph 5.7 then she swung to 5.9 and is steady
Was tempted to cut the main cola a week ago so that the canopy was level but bloody glad I didn't as that sucker is
fattening up everyday 😛 I got these handy little seed starting eazy plugs today Been having a hell of a time with the rockwool and jiffy pots Maybe these will be better
I will continue the DWC tutorial next update until then See ya round like a rissole 👊
9 likes
2 comments
Share
10
Week 10. Flowering7y ago


65 cm
Height
19 hrs
Light Schedule
24 °C
Day Air Temp
5.9
pH
Strong
Smell
1500 PPM
TDS
54 %
Air Humidity
19 °C
Solution Temp
9797982 °C
Substrate Temp
10 °C
Night Air Temp
10 l
Pot Size
10 l
Watering Volume
45 cm
Lamp Distance
989899008 PPM
CO₂ Level
Nutrients 6
CALiMAGic
1 mll

FloraNectar Fruit-n-Fusion
1 mll

Liquid Silicon
5 mll
DILLIGAF Welcome to another week of my DWC tutorial
Last week I was a little too busy to include a tutorial subject but this week I will be discussing Nutrient problems and deficiencies. I have sourced the information I'm about to write from a few different websites as well as my own personal
knowledge of what I have learnt so far. My plants progress report will follow the following Tutorial .
TUTORIAL
Deficiencies are not the only possible problems your plants could have with nutrients. They could also have too much of something, including the three essential nutrients (Nitrogen, Phosphorus, and Potassium, or N-P-K). So how can you identify it?How do you know if your plants are deficient? Well, if your plants seem unhealthy, there is a good chance they could have a nutrient deficiency. Usually, you can notice a nutrient deficiency by symptoms in the pH of the water and soil around the plant. A balanced pH is one of the ways you can ensure that your plants absorb all of the nutrients they need.
The pH scale is how growers measure the acidity or alkalinity of the soil and water around their plant. The scale ranges from 1 to 14, with 7 being neutral pH. 1 is the most acidic while 14 is the most basic (alkaline). When you are watering your plants, you want to be entirely sure that the pH levels are appropriate; otherwise, the plants can be damaged, and their health can deteriorate.
Adjusting the pH is simple: all you must do is make the environment (whether soil or water) more alkaline or acidic, depending on its current level. The pH for cannabis should be somewhere near the neutral middle of the pH scale, somewhere around 6 or 7. Although hydroponics systems can sometimes support a cannabis plant with a pH of as low as 5.5, the ideal range is somewhere around 6. Each of the different nutrients that you add or take away from the environment will affect the pH and the general absorption of nutrients by your plant. Understanding this relationship will help you grow the healthiest plants.The three deficiencies outlined below are not the only problems that your plant might encounter, but it is a good starting point to make sure your plants have the basic level of health that they need. As long as your plants have these three foundational nutrients (nitrogen, phosphorus, and potassium), they will at least be healthy enough to achieve a decent harvest.
As with any problems that might arise when you grow marijuana, early detection is the most essential factor in keeping healthy plants and having a successful harvest. Take a look at what each nutrient is responsible for and how to identify and solve a nutrient deficiency.
Nitrogen is one of the most essential nutrients for healthy plant growth, and because it’s so heavily used by cannabis, it’s not uncommon for plants to develop nitrogen deficiencies. Nitrogen is used for a wide variety of plant processes, from photosynthesis to the production of vital amino acids and chlorophyll. Chlorophyll is essential to the process of photosynthesis while amino acids are what make up proteins so you can understand why this nutrient is vital for a healthy plant.If your plant is experiencing a lack of nitrogen, its symptoms will be mostly seen in older leaves, starting between the base and middle of the plant. In general, the signs of a nitrogen deficiency are yellowing leaves. If the lack is left unchecked, the yellowing leaves can wither and die.
Your nitrogen-deficient cannabis plants will look perfectly green at the top but yellowing more as you look down towards the bottom. Although nitrogen deficiencies will usually begin in the bottom leaves of the plant, they will eventually spread up to the top. Your plant is at the greatest risk for a nitrogen deficiency when it is in its flowering phase. This is because cannabis plants store nutrients in its leaves, and the flowering phase will require this stored cache, thus using up all that it has.Nitrogen toxicity
Some growers describe seeing symptoms such as the leaves curling over like a claw, with the leaf stems going very brittle. The leaves may also turn a very dark shade of green. If it’s during the flowering phase, the flowering will likely have slowed down as well. In this case, it is probably a pH issue that is leading to nitrogen toxicity. That means that your plant actually has too much nitrogen, but not because you are feeding it too much; instead, it is due to a pH imbalance.Phosphorus
While not as common as nitrogen deficiencies, phosphorus deficiencies are a definite possibility, especially in hydroponics systems. Phosphorus is primarily responsible for helping your plant grow roots, as well as increasing the strength of its leaves and stems. It also aids in seedling germination, making it an especially essential nutrient during your plant’s flowering phase. In fact, many would say that phosphorus is actually most important during the flowering phase of growth. If your plant lacks phosphorus during the flowering phase, you will limit the potential yield. Don’t be dainty when providing your plant with phosphorus; it is usually necessary in hefty quantities.If your plant is not taking in enough phosphorus, its growth will slow down, and it will generally appear frailer and lacking life. The initial symptoms of a phosphorus deficiency are darkening foliage and slowing growth. The leaves’ edges on your cannabis plant will lose their vibrant green color – they may even turn brown – and will start to curl in. Other plant parts like petioles will also darken, possibly becoming more blue or red., but it also adds structural strength to the roots and stems of the plant.
These symptoms are more likely to appear during the coldest days of the growing season since this is the time when marijuana plants often have the most difficult time absorbing phosphorus from the soil. In addition to the cold, if the soil is too wet or too alkaline, the same problems will occur.Potassium
Potassium deficiencies are relatively common in the world of marijuana growing. This is because, with most fertilizers, potassium occurs in the lowest ratios. Compared to the other macronutrients, less potassium is required by the plant.
However, just like the other two nutrients of the primary three, potassium is vital for your plant to function properly. Potassium is primarily responsible for your plant’s water respiration and resistance of most diseases. Not only that, but it also is helpful in the photosynthesis production and conversion processes. Finally, potassium assists in the water circulation, helping to move water through the entirety of your plant, making it especially important for the flowering and vegetative phases.Magnesium
The purpose of magnesium is to encourage strong, healthy veins and stimulus on the creation of marijuana leaves. It also plays a role in producing chlorophyll and breaking down enzymes.
Magnesium deficiencies are a relatively rare occurrence for outdoor growers of cannabis, but it’s found indoors and with hydroponics systems. Usually, it will affect the lowest leaves of the plant at the beginning, causing them to yellow and weaken. Although it rarely occurs when growing outdoors, a magnesium deficiency can happen in any plant medium and hydroponic system.
When signs of deficiency occur if must be dealt with quickly or else it will become a major problem causing the plant to quickly lose many of its lower leaves. Magnesium is a nutrient that can move around so the plant can move it from the old leaves to new ones. This explains why magnesium deficiency has a tendency to show up towards the bottom of the plant and on the older leaves. Left unchecked, the leaves will die.
This deficiency can also work its way up the plant from bottom to top until it reaches the crown. Magnesium is a crucial element for the development of chlorophyll in the cannabis plant, so don’t let the problem worsen, especially in the early stages of growth.Signs of a magnesium deficiency
Symptoms begin in the lower leaves when they start to turn yellow and show chlorosis. The leaves start turning inward and will soon die. The outlining of the leaves will feel dry and brittle. The deficiency will move up to the middle and upper half of the leaf, and the growing shoots will start going from pale green to white. All of the petioles and stems will also become purple in color.
Sometimes you may notice light brown spotting on the edges if the issue continues to worsen, even though it is possible this could be a little bit of another deficiency that comes along with magnesium deficiency.
One surprising symptom that some growers notice is the development of red stems on their marijuana plants. If you see your plants starting to have stems that are red in color, you can be sure that it is due to a magnesium deficiency. One of the rarer deficiencies is boron. It’s not common for cannabis cultivation, but it can certainly damage the plant’s potential growth. The most visible signs of boron deficiency are when the growing tips of the plant begin to turn brown or gray.
The growth itself will slow significantly or stop if there isn’t enough boron. In addition to the damage experienced by the growing tips, the leaves may start to develop dead spots. They will be small and scattered and might go easily unnoticed.Calcium deficiencies are relatively uncommon for outdoor growers but are not uncommon for indoor growing and users of hydroponics systems. Some areas also have water supplies which don’t contain calcium, and if growers don’t add calcium to their irrigation reservoirs, there likely won’t be enough for the plants to thrive.
Additionally, if you’re growing in a hydroponics system and you’re only using water and nutrients in a solution, then you might be missing a good source of calcium. Calcium deficiencies will usually display symptoms of big dead patches on unusually dark leaves.
The symptoms of calcium deficiencies will usually first arise in the older growth. Branches may become weakened significantly, and any additional weight or stress could cause them to crack or break off. If you don’t address a calcium deficiency early, the plant may also develop some issues in the root systemCopper deficiencies in cannabis plants are relatively uncommon, but they can cause a lot of damage to new growth. The initial symptoms will be necrosis of the plant matter in young leaves. This will cause the leaves to look brownish or blue-gray at the tips. The new leaves, flowers and other new growth on the plant can also come in limp and weak if there isn’t enough copper.Iron deficiencies are not uncommon for cannabis plants. The first area growers will see evidence of an iron deficiency will be in the new growth of the plant, especially the leaves. The upper leaves will usually be the most affected, becoming discolored and yellowing distinctively.
The veins of the leaf will remain green, but the leaf itself just won’t have enough chlorophyll if the plant has an iron deficiency. Iron holds a vital role in the production of chlorophyll in cannabis plants.
Beware: an iron deficiency and a magnesium deficiency can look very similar to one another. The main difference is that an iron deficiency will primarily affect new growth on the plant. That means the top leaves will be affected far more than those at the bottom and middle of the plant.Manganese deficiencies are also relatively uncommon in cannabis cultivation. You’ll usually find them occurring in tandem with zinc and iron deficiencies, so remember to carefully test and analyze your plant’s environment when treating them.
A manganese deficiency will display symptoms in new growth, primarily in the leaves. The leaves will develop dead spots and begin to yellow. Molybdenum deficiencies are very uncommon, but if they do occur, they will cause some unpredictable and negative effects on your cannabis plant. Without enough molybdenum, the plant’s middle leaves will begin to yellow, and any new foliage will grow out warped or stop growing entirely.
The shoots will begin to curl, and the leaves can develop a strange crimson hue at the tips. Molybdenum aids primarily in the development and production of ammonia for the plant.Silicon deficiencies almost never occur in outdoor growing but are always possible in controlled indoor environments. Silicon itself is usually highly abundant in nature, as well as being well represented in fertilizers and nutrient solutions.
Silicon is necessary for plant production in general, so a deficiency will cause the branches and stems of your plant to become weaker than they should be, and the photosynthesis process may be inhibited. Silicon also deters insects and pests; you might notice that you have more issues with insects if your plant has a silicon deficiency.Sulfur deficiencies don’t occur too often since most fertilizers will have the requisite amount of sulfur already present. Symptoms of a deficiency include yellowing of new and developing foliage, as well as stunted growth.
The new leaves may also be narrower and more brittle than they should be. Sulfur plays an essential role in a number of different vital processes, including chlorophyll development and root system growth.Despite the moderately small amount of zinc required in the cannabis plant, zinc deficiencies occur fairly regularly. Symptoms of a zinc deficiency include twisted foliage growth and yellowing of the veins of the older leaves.
It’s also possible for the plant to begin to lose color and grow paler. When the flowering phase occurs, the same issue can crop up in the buds, and they might curl or become deformed. Zinc deficiencies often occur in tandem with iron or manganese deficiencies.
Zinc plays an essential role in many different plant processes, including plant development and the production of vital enzymes. Severe deficiencies can cause the plant to wilt or even break the stem. Because of the linkage between zinc, manganese, and iron, it’s important to be careful when trying to treat a zinc deficiency.
Well there you have an explanation of the common nutrient problems and deficiencies that can occur during a grow .
Next week I will try to explain trichome development and Optimal harvest times for maximum potency and hopefully
yields. Now for the Plant itself.
Barneys Farm Blue cheese auto is growing nicely but I am finding it very difficult to maintain healthy looking fan leaves
whether this has to do with nutritional problems or environmental I am not sure but whatever it is it doesn't seem to be effecting the flower development. I have a very thick main cola that is going to be a big ass bud if I can get it thru to
harvest without any mold issues. She smells fruity and sweet , no cheese aroma as of yet but I'm hoping it comes thru
eventually. Feeds are as follows
GT Silica @5mls/ litre
Professors Nutrients A+B @ 2.5mls / litre
Calimagic @1ml / litre
Ozi magic Bud swell @ 4mls / litre
Flora nectre @ 1ml/ litre
PPM 1400 Ph 5.8
Thanks for dropping by once again and I hope you have been able to gain some basic knowledge from this Diary so far.
👌🙏😎
8 likes
1 comment
Share
11
Week 11. Flowering7y ago


65 cm
Height
19 hrs
Light Schedule
24 °C
Day Air Temp
5.9
pH
Strong
Smell
1500 PPM
TDS
54 %
Air Humidity
19 °C
Solution Temp
9797982 °C
Substrate Temp
10 °C
Night Air Temp
10 l
Pot Size
10 l
Watering Volume
45 cm
Lamp Distance
989899008 PPM
CO₂ Level
Nutrients 6
FloraNectar Fruit-n-Fusion
1 mll
Liquid Silicon
5 mll
Go Green
2 mll
DILLIGAF 5 Weeks in and these buds (especially the main cola) are getting Very dense I am in one sense very happy about this
and in another I'm worried about bud rot . But hopefully with daily checking and plenty of air flow I will be able to get her
right thru without issue. She is still on a 1500 PPM nutrient mix consisting of :
Professors Nutrients Go Green @ 2mls / litre
Professors Nutrients A+B @ 1ml / litre
Ozi Magic Ozi Tonic @ 5mls / litre
GT Silica @ 5mls / litre
General Hydroponics Flora Nectre Pineapple @ 1ml / litre
Now for this weeks tutorial which is about What are Trichomes and How to determine optimum harvesting times
by observing Them.
First of all I recommend getting a handheld jewellers type loupe with around 20-30x magnification
This will allow you to check trichome development at the grow site .
Another handy tool is a USB Microscope to zoom in and study the trichomes of any bud samples you may take.
Some of the following information was sourced both online and from books which I need to use to adequately explain the Best way to Determine Optimum Harvest times .
Firstly What are Trichomes ?
In cannabis, trichomes function as a defense mechanism. When female cannabis plants begin to produce flowers in the wild, they often become vulnerable to various insects and animals as well as non-living environmental variables such as potentially harmful UV rays. Trichomes serve as a deterrent for animals because their bitter taste and strong aromas render cannabis flowers unpalatable. At the same time, they also serve a dual function in protecting their plants from damaging winds and even some varieties of fungal growth.Trichomes exist in many shapes and sizes, but there are three that appear most often on cannabis plants.
Bulbous trichomes are the smallest of the bunch, and they appear on the surface of the entire plant. Bulbous trichomes are as small as 10-15 micrometers, which is tiny enough to only be comprised of a handful of cells.
Capitate sessile trichomes are slightly larger and contain both a head and a stalk. These trichomes are quite a bit more abundant than their bulbous brethren, but cannot hold a candle to the bountifulness and size of the third trichome variety.
Capitate-stalked trichomes range from anywhere between 50-100 micrometers wide, meaning they’re much larger and can actually be seen by the naked eye. Their structure consists of a stalk comprised of epidermal and hypodermic cells that build up to a basal cell which attaches to a large gland head. This gland head, held together by a waxy cuticle layer, serves as the epicenter for cannabinoid and terpenoid synthesis.
All three types of trichomes produce cannabinoids, though it is the capitate-stalked trichomes that will appear in abundance in and around the calyxes of budding flowers, producing the highest concentration of essential oils due to their size.
Now Let's talk about the best trichome and pistil stage of development for harvest *
If white “hairs” are almost all sticking straight out and trichomes are all still translucent (clear) then your plant is too young and not ready for harvest. Harvesting now will result in low yield and non-potent harvests.
The beginning of the harvest window opens when your plant has mostly stopped growing new white “hairs” or pistils and at least 40% of the white hairs have darkened and curled in.
Highest level of THC is when many/most of the trichomes have turned milky white / cloudy (when viewed under a magnifier). Trichomes that are milky have the highest levels of THC are “ready to harvest” and contribute to more euphoric and psychoactive effects. At this point 50-70% of the pistils have darkened.
Some Sativa & Haze strains have trichomes that never really turn amber. If they’ve turned mostly white and don’t seem to be progressing further, it may be time to harvest now rather than wait longer.
The most sedating effect happens towards the end of the harvest window, when the trichomes have become a darker color (usually amber/gold). The best results from amber trichomes come from indica strains. The amber/yellow trichomes contribute to a ‘body high’. Some of the THC has converted into less psychoactive CBN, which has calming and anti-anxiety effects. If you harvest around when 20% have turned amber. At this point 70-90% of the pistils have darkened. Harvesting later will increase the sedating effects, but may also start reducing the psychoactive effects. 😲
So there you have it , A lot to take in and learn . I'll leave this weeks tutorial there and will see you Next Week 👍
11 likes
comments
Share
12
Week 12. Flowering7y ago


70 cm
Height
18 hrs
Light Schedule
20 °C
Day Air Temp
5.7
pH
Strong
Smell
1500 PPM
TDS
54 %
Air Humidity
19 °C
Solution Temp
9797982 °C
Substrate Temp
2 °C
Night Air Temp
10 l
Pot Size
10 l
Watering Volume
45 cm
Lamp Distance
989899008 PPM
CO₂ Level
Nutrients 6
natures own super bloom guano
10 mll
CALiMAGic
1 mll
Liquid Silicon
5 mll
DILLIGAF Welcome back once again to my DWC tutorial for beginners like Me.
As this grow is drawing to an end I decided that this week I'll run back thru the topics I
previously discussed for a bit of revision . Firstly I'll mention the plants progress.
The Blue cheese auto is almost ready to pick , The calyxes are swelling and the trichomes are
mostly clouded now with a few amber. I will let her run thru until monday the 9th before starting
the flushing process with some flawless finish. This go for aprox 2 days and then I'll just run
her on plain water until the end of week 7 Unless She's ready before then She's Drinking nutes still and I've dosed her up
with the last of the liquid guano concentrate .
Now for some revision of what we have already discussed .
*Week 1* I showed how to make some bubble buckets with full instructions and pictures
*Week 2 *Was all about water chemistry and that Cannabis prefers to be in a range from 5.5 - 6.5
when growing in hydroponics
*Week 3* Was about the importance of keeping your tds and ph meters calibrated and working properly
*Week 4* All about nutrient mixing and how to prepare a nutrient solution
*Week 5* was all about how the plant contracted rust fungus and how over the coarse of just one
week and the use of sulfur I overcame the issue and the plant won
*Week 6* Was the weekly care guide for new growers Basically explaining the care you must provide
from day to day to keep the plant healthy
*Week 7* Was all about the optimum environment and conditions your plants will need to thrive
We discussed the use of fans etc to keep the grow area cool etc
*Week 8* Pests and diseases that can attack your plants we discuss the ways to combat this
*Week 9* No tutorial just a full plant update with pics
*Week 10* was about nutrient problems and deficiencies how to read what your plants are telling
you and how to either prevent or fix any problems
*Week 11* was about the plants trichomes and how to tell when the optimum harvest times by
watching their development. Ideally you want them Clouded with a few amber . but this will
differ from user to user and from strain to strain.
*Week 12* was a revision of the previous weeks and next week will be
the final plant pics before harvest .
Thanks heaps to those who have been following this diary so far and I hope I have managed to help someone along the way
15 likes
comments
Share
13
Week 13. Flowering7y ago


70 cm
Height
20 °C
Day Air Temp
Strong
Smell
60 %
Air Humidity
7 °C
Night Air Temp
989899008 PPM
CO₂ Level
Nutrients 2
Water from the Sky
98 mll

Flawless Finish
2 mll
DILLIGAF Welcome Back to the 2nd last week of my Tutorial
I have chopped the plant now and it is currently drying in a nice dark spot in my shed and far out does it stink!! 🙀
Anyway I thought I would add one last bit of useful information for the newer growers so here is the last tutorial
which is just as important as any of the growing stages. What is it you ask??
Well it is how to properly dry and then cure your buds so that all of your hard work pays off in the form of aromatic stickiness. 😍
By drying and curing our weed we are essentially doing two things:
Reducing moisture inside the buds, breaking down chlorophyll and thus making the buds easier to smoke and store.
Increasing their potency, optimizing cannabinoid profile and most importantly, improving the taste (and the smell).
Step 1 Take off the fan leaves and trim the bigger sugar leaves.
Step 2 Hang the buds or place them in a herb drying rack like mine for aprox 5 to 7 days.
The ideal drying room conditions are 75° Fahrenheit (23° Celsius) with 50% humidity (use a Digital Humidistat to monitor your humidity levels)
Make sure to space out the branches so the air can flow between the buds
Your weed is dry enough to cure when the buds feel crispy to the touch, but they still spring back a little bit when pressed (be gentle when testing)
It’s better to over-dry the buds then under-dry them, as they can become moldy (which ruins the taste and even makes them toxic).
Once you are certain they are dry its time to start the curing process
Avoid zip-lock, plastic bags and other alternative methods of curing that you might have read about online. Wide mouth mason jars work the best. Make sure to leave some room for the buds to breathe.
Ideal conditions for curing are 70° Fahrenheit (20° Celsius) with around 60% humidity (you can put humidity packs inside the jars)
Cure your buds for at least 4 weeks to get the optimal potency and taste
For perfect buds, cure for 6-8 weeks
Open up the jars every day for 30-45 minutes to get the fresh air in (this process is also known as burping)
Keep the jars out of direct light, as it can breakdown cannabinoids which you don't want!!
Once you’re done with drying and curing, your bud will go from 80% moisture to around 10-15% if you did everything right.
You can use boveda packs to help keep humidity levels in check .
Both oxygen and light degrade THC so try to store your weed in a dark spot and within an airtight container. Room temperature (18-23°) should do just fine for most short to mid-term time spans.
So there you have the Final instalment of my DWC tutorial for beginners like Me
Really hope you have learnt something along the way and Good luck with your future grows.
Next week will be the final harvest pics and report Thanks for your support those who followed 👌
7 likes
4 comments
Share
13
Week 13. Harvest7y ago
Happy Harvest Day!


9/10
Rated
Blue Cheese Auto is a feminized autoflowering version of the classic Blue Cheese that was crossed with a ruderalis to get a productive and fast flowering variation. The plant is easy to grow, and it will flourish in most environments, Blue Cheese Auto provides typical indica effects and inherits earthy aromas of the original Blue Cheese.
BLUE CHEESE AUTO Cannabis Seeds Specifications
Type: FeminisedPhotoperiod: AutofloweringCultivation: Indoor/outdoorCharacterisics: .Genetics: Blue Cheese x Ruderalis
:Effect Relaxed, Happy, Cerebral, Peaceful, Soothing, Uplifting, Calm
:Indoor Yield (g):up to 500 gr/m²Average Yield (g): 500
:Autoflowering Harvest Time From Seed (days)
: 70 - 75Height (cm): 80/100cmHeight Indoor (cm): 100cm
:Indica %: 80%Sativa %: 20%Indica/Sativa: Mostly Indica
Taste: Spicy, Mild Creamy Cheese, Berries, Blueberry
Aroma: Mature Cheese, Sweet, Fruity, Skunky Tangy
Resistance to Mold (5=Best)
: 4Resistance Against Botrytis (5=Best)
: 5Resistance Against Cold (5=Best)
: 5Resistance to Powdery Mildew (5=Best)
: 4Resistance to Spider Mite (5=Best)
: 4Climate: HotStability
: StableGrow Difficulty (1=Easy, 5=Hard) 2
I Had a two small cones thru a bong before I started the curing process
Initial hit was a little intense and quite powerful, then gradually tapered off into a
very enjoyable and relaxing feeling I will add to this report after atleast 4 weeks of curing has been done .
Overall a great strain that I will definately grow again and can reccommend to anyone
Thankyou Barneys Farm
Show more
Translate
Spent 92 days
Ger Veg Flo Har
765 g
Bud wet weight per plant
154 g
Bud dry weight per plant
1
Plants
1 m²
Grow Room size
Normal
Difficulty

Euphoric, Happy, Relaxed
Positive effects

Dry mouth
Negative effects

Berries, Cheese, Fruity
Taste
Height
Day air temperature
Air humidity
PPM
PH
CO2
Light schedule
Solution temperature
Night air temperature
Substrate temperature
Pot size
Lamp distance


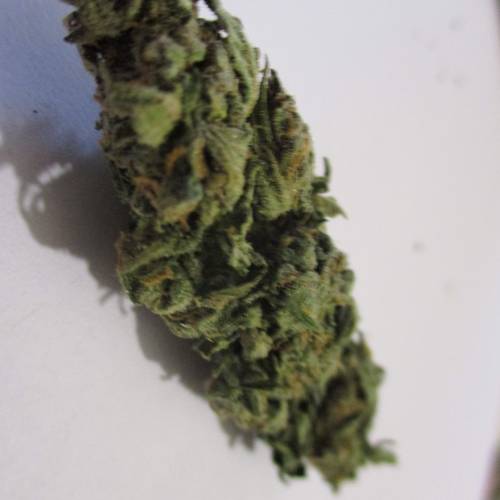


DILLIGAF Well here we are at the end of a fairly challenging grow.
The main cola ended up weighing half an ounce and measured 5 inches 👌
Most of the buds are now dried enough to trim and paper bag for two to three more days then the curing process can begin.
During the grow I was challenged
The rust fungus attack had me buggered for a couple of weeks but I eventually
overcame it with the use of some powered sulfur and eco fungicide spray.
She was also a bit fussy with her feeds and it was a constant juggling act to keep
the nutrient mixes to her liking, However I'm very happy with the results and the
Early smoke sample I had was impressive.
The plant produced good dense solid and sticky buds which take quite awhile to
properly dry so keep that in mind if Growing this strain.
The Main Purpose of this Diary however was to provide an easy to follow week by
week tutorial for newer growers to learn the basics of Hydroponics specifically
Deep water Culture.
Each week I included a topic that covered the principles and main facets of
Hydroponic growing that need to be learnt and understood to hopefully create
a successful growing environment.
Potential growers can Read the whole diary from start to finish or simply skip
to whichever weeks topic concerns their needs or interests.
Hopefully with this diary I'll be able to growers ease into a growing style
that is sometimes considered daunting for newer growers but worth the effort if
you can get it right. The Table of contents for Each weeks topics are as follows:
*Week 1* I showed how to make some bubble buckets with full instructions and pictures
*Week 2 *Was all about water chemistry and that Cannabis prefers to be in a range from 5.5 - 6.5
when growing in hydroponics
*Week 3* Was about the importance of keeping your tds and ph meters calibrated and working properly
*Week 4* All about nutrient mixing and how to prepare a nutrient solution
*Week 5* was all about how the plant contracted rust fungus and how over the coarse of just one
week and the use of sulfur I overcame the issue and the plant won
*Week 6* Was the weekly care guide for new growers Basically explaining the care you must provide
from day to day to keep the plant healthy
*Week 7* Was all about the optimum environment and conditions your plants will need to thrive
We discussed the use of fans etc to keep the grow area cool etc
*Week 8* Pests and diseases that can attack your plants we discuss the ways to combat this
*Week 9* No tutorial just a full plant update with pics
*Week 10* was about nutrient problems and deficiencies how to read what your plants are telling
you and how to either prevent or fix any problems
*Week 11* was about the plants trichomes and how to tell when the optimum harvest times by
watching their development. Ideally you want them Clouded with a few amber . but this will
differ from user to user and from strain to strain.
*Week 12* was a revision of the previous weeks topics
*Week 13* HARVEST
Thankyou To all of those that followed and supported me thruout the Grow
I hope I have been able to help provide some useful information that may even help you decide to give it a try and if you do, then I cant wait to see those DWC diaries & Good Luck
😀😀
Just a quick update on the curing of the Buds
Today 27th September 2019 I sampled another choice bud . After over 7 days of the curing process they have already lost all of the "Green"
taste that comes with freshly harvested buds. The cheese smell that the strain is known for is also more pronounced now and the flavour has evolved
into a floral , fruit and Cheese taste after the exhale. Very smooth to smoke and the only downside for me is the incredible munchies attack that followed
the smoke session I had. 😄 I will do another curing update in a few more weeks if anything changes . 27/9/19 Dilligaf
12 likes
8 comments
Share
Equipment Reviews


47 comments
Sort by
popularity
popularity
newest
oldest

Mrs_Larimar commentedweek 17y ago
yaaa,y,, kepp on going... i really want to start a dwc, but did not dare, was to lazy.. how ever... gonna follow this one and i hope i learn alot
likes 2

DILLIGAF commented7y ago
@Mrs_Larimar, did another update 😁
like 1
Mrs_Larimar commented7y ago
@DILLIGAF,seen it and already have been reading it
likes 2
Mrs_Larimar commentedweek 77y ago
Biiig cinema and alot to learn, thy for sharing that.....
likes 2
Mrs_Larimar commentedweek 67y ago
I picked out the same controller like you..... thak you for the tips to dehumidify
likes 2

Wicked_Stix commentedweek 77y ago
Nice info! This will help a lot of people starting out. That exhaust out the window like that on the ac is false advertising I think lol. There is a water hose that drains condensation from the cooling coil and it can't go up like that. It has to go down or it will leak.
like 1
DILLIGAF commented7y ago
@Wicked_Stix, Yes i see you have a handy lead Good luck hope you smash it 👊
like 1
Wicked_Stix commented7y ago
@DILLIGAF, Thanks! I Look forward to your next dwc update
likes
DILLIGAF commented7y ago
@Wicked_Stix, 👍
like 1
Show More (6)

Potagonia commentedweek 27y ago
bro I am a few weeks into my blue cheese autos. Follow me, who will get the biggest yield?
like 1
DILLIGAF commented7y ago
@Potagonia, Will check it out my blue cheese are from barneys farm what brand are yours ??
likes
Potagonia commented7y ago
@DILLIGAF,Dinafem
like 1
DILLIGAF commented7y ago
@Potagonia, awesome it will be interesting to compare each brands version 👌
likes

jollychap commentedweek 47y ago
Looking good man. So does silica in general help keep that PH where you want it, or just the brand your using. Also silica helps plants handle higher temperatures if I'm correct?
like 1
DILLIGAF commented7y ago
@jollychap, I think it acts as a buffer in all the brands of silica and yes it makes the plants cell walls stronger
so they can handle more stress like heat etc
likes 2
jollychap commented7y ago
@DILLIGAF, cool il keep following your progress and keep doing your thang!
like 1

Wachsemilian commentedweek 137y ago
congrat to your harvest 😎👍
like 1
DILLIGAF commented7y ago
@Wachsemilian, thankyou 👍
likes
Mrs_Larimar commentedweek 137y ago
Happy Harvesting, and thy for that nice tutorial diary......... ( i see some bling bling for the diary)
like 1
DILLIGAF commented7y ago
@Mrs_Larimar, Thankyou 😃
likes

ROM101 commentedweek 57y ago
Unlucky mate you'll turn it around I'm sure🙏🙏
like 1
DILLIGAF commented7y ago
@ROM101, thanks mate I just gotta kill the rust fungis first 💀
😆
likes 2

Sasirius commentedweek 17y ago
Wish you best luck also with your cheese 😁 Also i will watch this diary to get smarter. ✌️🏻
like 1
DILLIGAF commented7y ago
@Sasirius, Thankyou mate I'm not sure if you will get any smarter watching me 😅
But your welcome to 😀
like 1

WAWAWEED commentedweek 134y ago
nice💚🌱
like 1

Fitzwell commentedweek 137y ago
nice job
like 1

WeedTheNorth commentedweek 137y ago
👍👌👏🙏👊🇨🇦
like 1

Motherandson commentedweek 77y ago
been looking all over for a guide that hits the important points great to help me with my first grow ever Thankssssss
like 1

Buddha2 commentedweek 57y ago
I'm very interested to learn if you can manage your humidity issues with your new dehumidifier. I personally gave up on this. It will increase the temperature to unacceptable levels. Of course the humidity will decrease with the higher temperatures, but for me it is not worth it. Also the unit I have draws more power than all my lamps combined. Probably it is better to do an indoor grow in winter when it is so much easier to control the environment.
like 1
Buddha2 commentedweek 67y ago
Cool diary. In fact almost a tutorial. Thanks, will follow!
like 1
Sasirius commentedweek 37y ago
Sweet! ✌️
like 1
ROM101 commentedweek 17y ago
Good luck mate👌👌🤞🤞
like 1
Buddha2 commentedweek 137y ago
Great result! Congratulations and enjoy!
likes
DILLIGAF commented7y ago
@Buddha2, thanks mate
likes

Asa_Nouka commentedweek 137y ago
Thank you for the tutorial. And enjoy the harvest 👍👍
likes
DILLIGAF commented7y ago
@Asa_Nouka, Thanks mate I will certainly enjoy it 😃
like 1

the end.
Enjoying this diary? Follow for more updates!


Prefer the old Diary view?
Go back to the old Diary view