


Solo cup challenge



VEG
Lampwin Light Emitting Diodes/300W
Lampwin
FLO
Lampwin Light Emitting Diodes/300W
Lampwin

Main-Lining
weeks 3-5
LST
weeks 4-5
Topping
weeks 5
Defoliation
weeks 7
0 liters
Pot Size
Start at Harvest
1
Week 1. Vegetation7y ago


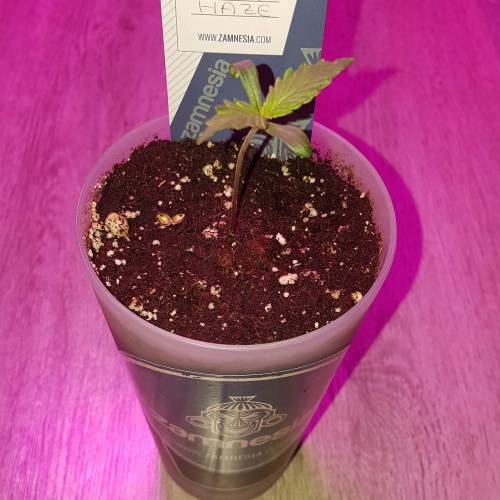


2 cm
Height
24 hrs
Light Schedule
25 °C
Day Air Temp
6.3
pH
70 %
Air Humidity
22 °C
Solution Temp
23 °C
Night Air Temp
0.47 liters
Pot Size
0.1 liters
Watering Volume
90 cm
Lamp Distance
Nutrients 1

BioEnhancer
0.6 mll
Master_weeda Hello to all the padawans and Jedi masters
First of all, thanks to Zami from Zamnezia and Greenhouse for allowing me to do this grow by providing the feeding greenhouse and seeds.
I remind you that I'm simultaneously growing 9 pots of 10 and 11 liters in a box designed for 4, and I'm only using the bare minimum of equipment necessary for a proper grow at the lowest possible price.
EQUIPMENT CONFIGURATION
Box 80×80×160
Lamp led Lampwin 300 watts ×2
Clip fan 15 watts
Xiaomi Deerma humidifiers 5L
Hygrometer thermometer
Extractor PROFAN 107 m3/h - 100
Programmable electronic socket ×2
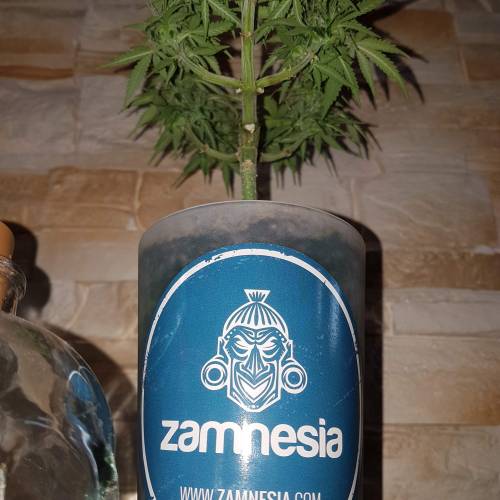
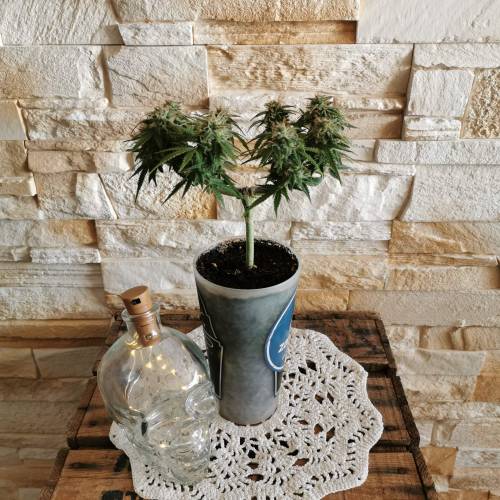
1 beer glass 0.47 liter
Greenhouse feeding enhancer
Greenhouse feeding biobloom
Greenhouse feeding biogrow
Biobizz lightmix substrate
Wire and cutting pliers
Microscope
Small precision scale
GROW STEP BY STEP
First, I germinated my seed with the easy start from Royal Queen Seeds, and I'm pleasantly surprised because honestly, the success rate is very high (17 seeds out of 19), easy to use, and very effective.
Once the seedling is out and about 2 or 3 centimeters tall, I gently take it and place it directly into its final pot.
The pot will have been pre-prepared.
So, I place the seedling in its final pot, which is a standard pot (0.47 liter) for the solo cup challenge, cover it with a bit of soil, lightly pack it down, and water it to keep the substrate moist, no more.
I place my 300-watt LED lamp about 90 centimeters above the seedling with a light cycle of 24/24 for a week. At the beginning of week 2, the light cycle will switch to 20/4 thanks to a timer because for me, that's the light cycle that offers the best yield for autoflowering.
Day 1: light watering
Day 2: light watering
Day 3: the seedling starts to become more vigorous, setting up ventilation to increase its root mass and light watering
Day 4: watering with water pH 6.3 to which I added 0.6 grams of greenhouse feeding enhancer per liter of water
Day 5: no special technique
Day 6: no special technique
A pleasantly calm week with no problems or apparent deficiencies.
May the force be with you!
38 likes
3 comments
Share
2
Week 2. Vegetation7y ago


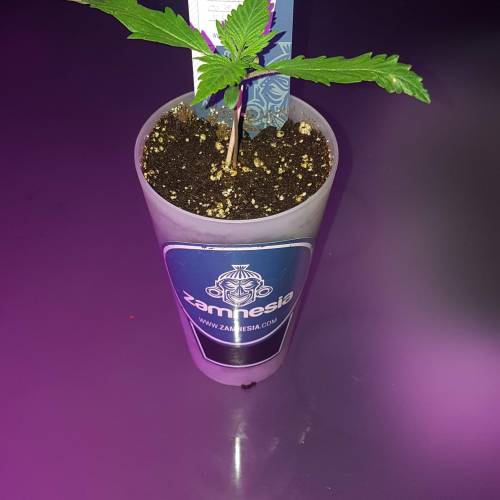


7 cm
Height
20 hrs
Light Schedule
24 °C
Day Air Temp
6.3
pH
70 %
Air Humidity
22 °C
Solution Temp
23 °C
Night Air Temp
0.47 liters
Pot Size
0.1 liters
Watering Volume
90 cm
Lamp Distance
Nutrients 1
BioEnhancer
0.6 mll
Master_weeda For this week 2, no techniques practiced, I'm switching my timer to a 20/4 light cycle because with some experience in autoflowering, I find that this cycle offers the best yield. If you're looking to save money on your electric bill, you can also do it on 18/6. I discourage the 12/12 cycle, which is not the best cycle for autoflowering, but it is still possible to get a decent yield with this cycle.
A little reminder:
It is not necessary to change the light cycle. Autoflowering plants will automatically flower regardless of the light/dark cycle. This means that there is no need to change the cycle to trigger flowering. You should simply maintain a stable cycle of 18/6 or 20/4 throughout its life cycle. Some growers, though few, will intentionally expose them to 24 hours of light from germination to harvest. However, this is not recommended because plants will need a bit of rest and time to recuperate, just like us. That's why I'm switching to 20/4, as I mentioned earlier.
Then I just monitored that the humidity stays at a rate of 70%. Why 70%? During this period, an ideal humidity level is 50-80%. Now that your plants are in their main growth phase, the humidity can vary much more. Your plants have a much larger surface area to transpire, which means that rapid transpiration causes less stress. However, this also means that your plants are transpiring at a faster rate and in larger quantities, and you need to keep a close eye on them. If humidity levels drop too low, your plants will transpire so quickly that they risk being overfed by consuming too many nutrients from the growing medium.
I perform a light daily watering because the pot capacity (0.47l) increases the risk of overwatering the substrate. 🤐 To mitigate this risk, I decide on a watering of 10 or 20 centiliters of water at pH 6.3 during the first 10 days of the seedling. On day 11, I water my pot normally with a quarter of its volume in water (for a 0.47-liter pot, 0.12 liters). For this watering, I water with 0.24 liters, still with a pH of 6.3, and I add 0.6 grams of greenhouse feeding enhancer per liter of water. 👍
Enhancer is a mix of humic acids, algae extracts, strains of Trichoderma harzianum, and Bacillus subtilis. It increases plant vitality, improves nutrient absorption, and enhances soil quality. 👍 I will perform a similar watering in 2 weeks. May the force be with you. 💪
34 likes
comments
Share
3
Week 3. Vegetation7y ago


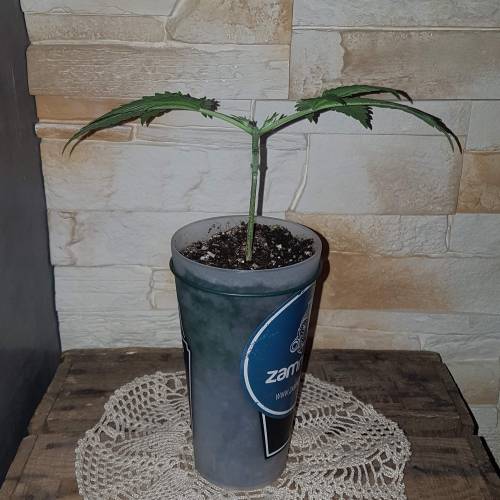


10 cm
Height
20 hrs
Light Schedule
23 °C
Day Air Temp
6.3
pH
70 %
Air Humidity
22 °C
Solution Temp
21 °C
Night Air Temp
0.47 liters
Pot Size
0.1 liters
Watering Volume
90 cm
Lamp Distance
Nutrients 1
BioEnhancer
0.6 mll
Master_weeda Hello to all the padawans and Jedi masters!
The growth of this strain is vigorous, the leaves are nice and green.
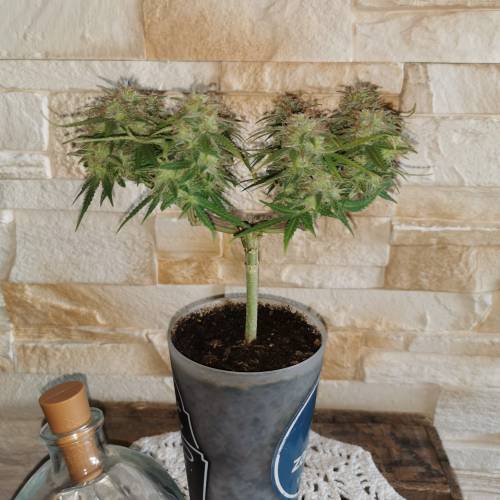
I decided to practice mainlining to make the solo cup challenge easier.
Mainlining is an apical doubling technique derived from fruit production that allows for linear plant development, similar to pear or apple trees. Its purpose is to limit the plant's growth while enabling symmetrical development. By making different cuts at specific spots and times, you will encourage similar growth of future buds.
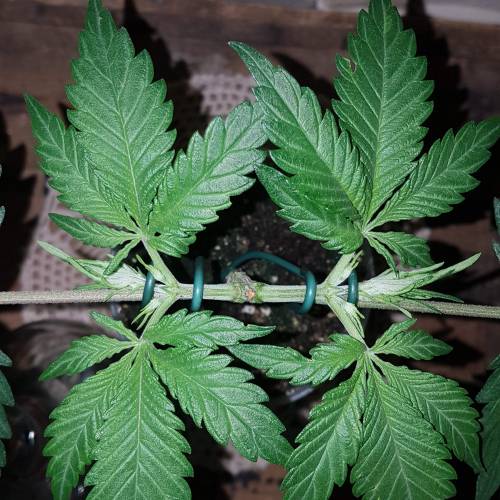
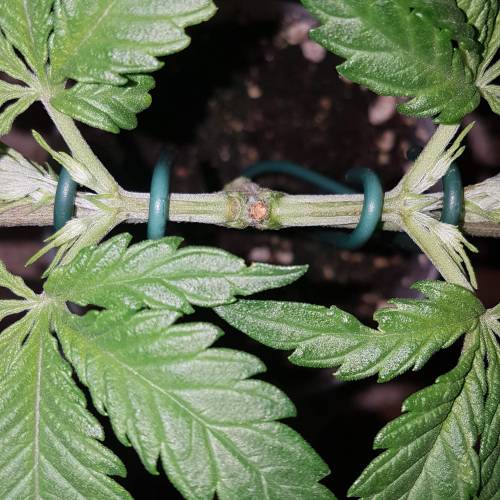
For this mainlining, I wait until my plant has five nodes, then I cut above and below the third one, keeping the leaves from the uncut node to serve as panels for better light spectrum absorption. Once it has recovered, for practicality and aesthetics, I will practice LST so that its trunk grows in a T shape.
I want to clarify that mainlining is not recommended for autoflowering strains, but for reasons of practicality and aesthetics, I prefer to use it. The combination of both techniques is, for me, the most appropriate way to have a beautiful solo cup challenge.
A little reminder and explanation about this technique:
Mainlining has always been a very popular technique among growers, as with simple adjustments during the first stage of growth, you ensure more than productive harvests. It involves growing the plant vertically and symmetrically to make the most of light and space, which are highly sought after in indoor cultivation. By guiding the branches with strings and a series of initial cuts, you will establish vigorous growth patterns for your plants.
HOW TO SET UP MAINLINING
Starting from the seed, wait until your plant has developed at least 5 nodes. Once they are formed, trim the plant at the third node. Remove everything that has developed below the third node. This will form the initial Y or T shape you are looking for. Allow your plant to recover from this imposed stress for a few days before moving on to the next step.
Your plant now has two main shoots (or 4 if you keep the second node). These should be tied with wire or string (or twine). This will direct the growth horizontally. Be very careful when tying the branches; do not break them. Be gentle.
Once the plant has developed a bit, you will end up with 4 main stems. You can repeat this process as many times as you wish, thus accessing larger yields. However, remember that the more you repeat this process, the longer the growth period will be.
Except for autoflowering strains, as given the additional time they need, mainlining is not compatible with autoflowering varieties. Autoflowering strains have very fast growth cycles, and by the time the technique is implemented, half of their development will already be over. This could potentially damage the harvests and affect the yield.
As soon as you have produced the desired amount of separations, it will only be a matter of time before uniform buds start to appear. A slight regular defoliation during the growth cycle will also ensure even light distribution and prevent your plant from wasting energy on large unnecessary leaves. Remove these leaves as soon as they start taking up too much space.
May the force be with you!
40 likes
1 comment
Share
Used techniques
Main-Lining
Technique
4
Week 4. Vegetation7y ago


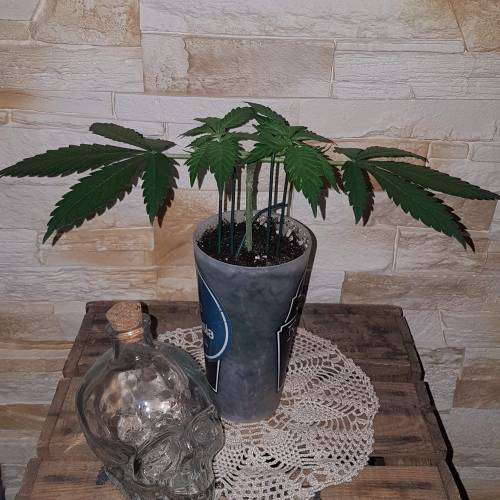



10 cm
Height
20 hrs
Light Schedule
23 °C
Day Air Temp
6.3
pH
70 %
Air Humidity
22 °C
Solution Temp
21 °C
Night Air Temp
0.47 liters
Pot Size
0.1 liters
Watering Volume
90 cm
Lamp Distance
Nutrients 2
BioEnhancer
0.6 mll

BioGrow
0.6 mll
Master_weeda Hello to all the padawans and Jedi masters!
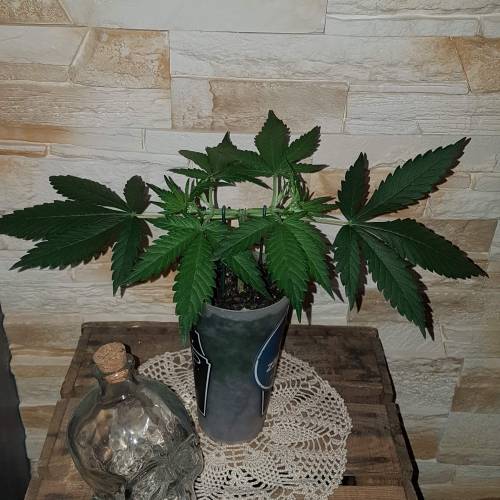
To kick off week 4, my plant quickly recovered from its mainlining, so on day 21, I decided to practice some LST. For this, I’m using galvanized wire that I plant directly into the substrate, being careful not to damage the roots because let’s not forget that what grows above also grows below. I’m shaping my plant into a T, which I find to be the most aesthetic trunk shape, but also the most practical for this solo cup challenge. On day 23, I water my plant with just over a quarter of the volume of its container (0.20cl) using water at pH 6.3, to which I added 0.6 grams per liter of feeding enhancer greenhouse to stimulate root mass and enrich the soil. More roots mean better nutrient absorption, which will result in a larger yield.
On day 24, I refine my LST to give the trunk of this Amnesia its final shape. I will continue my mainlining and LST until I achieve eight buds and the plant structure has the shape I want.
Day 25: light watering and LST. I let the plant recover well; I will finalize my mainlining during week 5, which will be a crucial week for completing the mainlining.
I’m surprised by the recovery ability of this autoflowering strain, which handles the mainlining quite well.
May the force be with you 💪
36 likes
2 comments
Share
Used techniques
LST
Technique
Main-Lining
Technique
5
Week 5. Vegetation7y ago




10 cm
Height
20 hrs
Light Schedule
23 °C
Day Air Temp
6.3
pH
No Smell
Smell
70 %
Air Humidity
22 °C
Solution Temp
21 °C
Night Air Temp
0.47 liters
Pot Size
0.1 liters
Watering Volume
90 cm
Lamp Distance
Nutrients 2
BioEnhancer
0.6 mll
BioGrow
0.6 mll
Master_weeda Hello to all the padawans and Jedi masters!
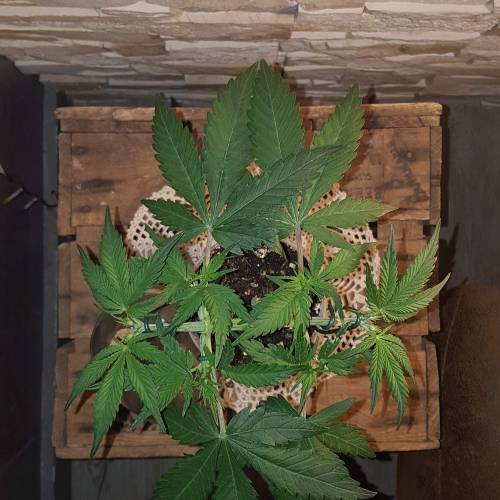
This week is crucial as it will determine the structure of the plant and its final shape. The main-lining is going wonderfully; the recovery ability of this autoflowering strain is impressive and surprising.
Day 28, as usual, I monitor my plant's water needs. I weigh my container, it's light, so I water my plant with just over a quarter of the pot's volume using pH 6.3 water. I let it recover from the stress of the main-lining it experienced the previous week.
Day 29, it has already recovered from its stress, and I continue my main-lining to give it the shape I want.
Day 30, I take advantage of my container being light to add 1.3 grams of Biobloom feeding from the Greenhouse fertilizer range by scratching the substrate.
I waited until the fifth week to add fertilizer for fear of over-fertilizing.
I perform one last apical cut, which will allow me to obtain the eight desired colas (explanatory video), and I refine my LST for symmetry and aesthetics.
Day 31, well-deserved rest.
On day 32, I finalize my LST and water again, still with a quarter of the pot's volume in pH 6.3 water, to which I add 0.5ml per liter of Topmax Biobizz.
Day 33, the main colas have recovered from the cut, and I train them to form a T shape.
Day 34, the main-lining is finished; I just need to adjust it next week.
May the force be with you 💪
36 likes
6 comments
Share
Used techniques
LST
Technique
Topping
Technique
Main-Lining
Technique
6
Week 6. Vegetation7y ago





10 cm
Height
20 hrs
Light Schedule
23 °C
Day Air Temp
6.3
pH
No Smell
Smell
55 %
Air Humidity
22 °C
Solution Temp
21 °C
Night Air Temp
0.47 liters
Pot Size
0.1 liters
Watering Volume
60 cm
Lamp Distance
Nutrients 3
BioEnhancer
0.6 mll
BioGrow
0.6 mll

BioBloom
1 mll
Master_weeda Hello to all the padawans and Jedi masters!
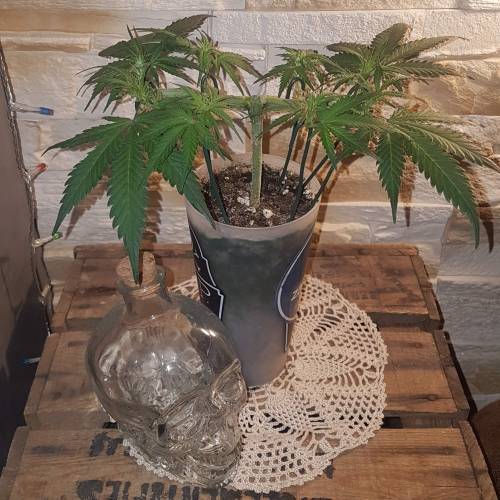
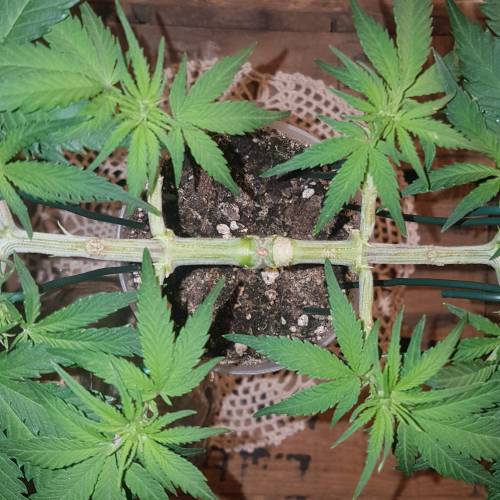
The plant has recovered well from the various toppings done.
I’ve decided to set my humidity to 55% since my plant will soon enter flowering.
Once your cannabis plants are in flowering, you need to significantly lower the humidity levels. This is to reduce the risk of mold. Ideally, your growing space should be at a relative humidity level of 40-50%.
Closely monitoring and controlling the humidity in your growing space is important if you really want to get the best out of your plants. This is another important factor that is often overlooked by less experienced growers. Now that you have a better understanding of its impact, you should be able to use this knowledge to improve the quality of your crops.
Day 35 watering with 20 centiliters of water to which I add 1ml per liter of Biobloom water.
I’ve decided not to practice any particular technique this week; I will adjust my LST until I achieve the desired shape. I’m leaving all the leaves for this week; defoliation will be for next week.
A little reminder about topping or FIMing:
Topping and FIMing are two cannabis plant trimming techniques that involve “pinching” or cutting a part of the plant. These techniques are designed to give you a free way to achieve a better plant shape (to better utilize the available light), create more colas, and get better yields.
Topping: Cut the top of the plant between the nodes.
FIMing: Remove the most recent growth; this involves pinching and not cutting. (but do not cut between the nodes)
All plant trimming techniques are designed to help growers achieve a more desirable plant shape and better yields without changing other aspects of their growth.
For example, cannabis plants do not naturally grow in a way that fully takes advantage of indoor grow lights; a lot of light is wasted indoors when cannabis plants grow naturally.
For this reason, cannabis plant pruning techniques (like topping and FIMing) are particularly effective for increasing yields in indoor growing setups.
Topping and FIM are very similar to each other because they create a plant with additional colas; the differences are slight.
By cutting the main stem, topping and FIMing encourage the plant to provide more energy by producing many colas instead of focusing on just one.
The lower growth nodes will become new colas once they are exposed to light and air, and they will develop much faster when the dominance of the main cola is cut by topping or FIMing.
In either case, whether you use topping or FIMing, you will get a wider and bushier plant that won't just grow one main cola.
If you cut too early, it will be difficult for the plant to recover. You will get the best results, and your plant will recover faster if you wait until the plant has enough nodes.
Wait until the plant has at least 3-5 nodes (FIM) or 4-6 nodes (topping).
Cutting a plant too young will significantly slow down its growth.
Topping and FIMing techniques should only be used during the vegetative phase. In fact, any technique that involves cutting or pinching your plant should be optimally performed during the vegetative stage of cannabis growth, before the flowering stage begins.
At the flowering stage, only gentle techniques such as LST (Low Stress Training) or other types of bending should be used to modify the plant's shape.
A plant with many colas can only be achieved by shaping a plant early in the vegetative phase.
Cannabis plants are much less resilient during the flowering period, and they no longer grow vegetatively once they reach the sixth week.
If you observe a plant at the flowering stage, you will see that it does not grow and does not develop any more growth nodes after the sixth week. It focuses solely on making buds.
Topping or FIMing at this stage will have no positive effect. Cutting your plant during the budding phase will often result in a reduction of your final yields because you are simply removing more buds and causing unnecessary stress during the crucial bud-building phase.
When your plants are in the flowering phase, a large part of the growth structure has already been created, and you generally need to try to manage as best as possible if your plant has grown into a shape you don’t like.
What to do if my plant is already too tall in the flowering phase?
If your plant is already too tall in the flowering phase for your growing setup, you need to take immediate action to prevent the plant from getting any taller.
My suggestion is to use the LST technique to control future growth height. You can also use supercropping if you have a stem that is much taller than the others.
Once flowering is fully underway, the plant will not grow much taller.
These thickened connections demonstrate that your cannabis plant is distributing energy more evenly throughout the plant.
This means the plant is strengthening the “internal system” of the stem. This leads to faster growth, bigger colas, and increased yields for each of the affected stems.
The thickening that occurs at the base of the stems is a sign that the plant is diverting energy to the new colas (where previously it was putting most of its energy into the main cola).
If you remove 10% of the plant, it will have much less effect than if you removed 30% of the plant.
Topping and FIMing are two excellent choices, and the best technique depends on what you are trying to accomplish!
May the force be with you 💪
39 likes
8 comments
Share
7
Week 7. Flowering7y ago




10 cm
Height
20 hrs
Light Schedule
23 °C
Day Air Temp
6.3
pH
No Smell
Smell
55 %
Air Humidity
22 °C
Solution Temp
21 °C
Night Air Temp
0.47 liters
Pot Size
0.1 liters
Watering Volume
60 cm
Lamp Distance
Nutrients 5

Top-Max
1 mll
Top-Max
1 mll
BioEnhancer
0.6 mll
Master_weeda Hello to all the padawans and Jedi masters!
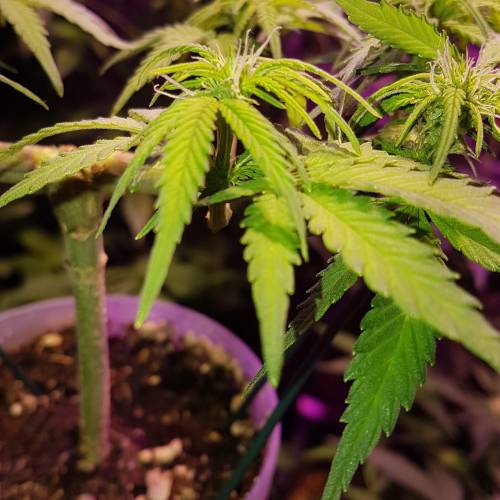
Day 42, my plant is really entering the flowering stage. I'm practicing defoliation on it to allow the buds to get light.
The flowering of cannabis plants
The cannabis plant goes through different life stages before reaching harvest. These stages are: germination, pre-growth, growth, and flowering.
For autoflowering varieties, there’s no need to change the light cycle; they automatically enter flowering, which is where they get their name "autoflowering."
The origin of autoflowering comes from the subspecies "cannabis sativa ruderalis," which originally produced very low levels of THC. It was by crossing this marijuana variety with others that produce higher levels of THC that this wonderful compromise of autoflowering varieties with very satisfying THC levels came to be. At the same time, this has improved the yield of these varieties, which were initially exceptionally low.
For optimal results in outdoor cultivation, I recommend that the germination of autoflowering marijuana seeds takes place between April and August.
In indoor cultivation, the ideal photoperiod for both growth and flowering is 20 hours of light. Don’t forget that these seeds are not dependent on the photoperiod to enter flowering.
It’s better to use pots with a capacity of 10 to 20L from the start, given that their life cycle is shorter; autoflowers don’t need more volume to develop. Given their small size (and discretion), they are a good choice for growing cannabis on balconies.
The first autoflowering variety, Lowryder, was created from cannabis indica sativa crossed with cannabis sativa ruderalis genetics by the marijuana seed bank "The Joint Doctor." Then came White Dwarf from "Buddha Seeds," Roadrunner from "Dinafem," Auto Stoned from "Autofem," Speed Devil from "Sweet Seeds," Maxi Gom from "Grassomatic," Flash, Gnomo from Kannabia, and many others.
Day 42 defoliation (video)
First of all, let’s not forget to properly disinfect our tools and wash our hands.
What is defoliation?
AMATEUR GROWERS, BE CAREFUL, BUT DON’T BE AFRAID
Defoliation involves removing leaves from indoor cannabis plants to increase the final yield. The amateur grower must be vigilant when they start applying this pruning technique. Despite the endless debate between those who advocate for this technique and those who denigrate it, there’s no reason for an amateur not to try it out to see if it suits them or not.
HOW TO DEFOLIATE
Whether you’re trimming the leaves or branches of cannabis plants, it’s best to use a sterile pair of scissors that feels comfortable in your hand. Pulling leaves off by hand lacks finesse and often accidentally tears layers from a stem along with the leaf. The main goal of defoliation is to allow better light penetration and promote the production of larger buds. Shade-casting fan leaves should be removed. Trimming the main stem and/or secondary shoots is not defoliation.
The golden rule when giving your plants a refresh is to start with the largest and broadest nutrient leaves, trimming from the bottom up. It’s important to remove leaves strategically and not randomly. Also, keep in mind that you should limit your refresh to approximately 10 to 20% of the total leaves on your plant. It’s very easy to get carried away during trimming and end up with bald plants. Excessive leaf trimming will hinder photosynthesis and paralyze your plants.
WHEN TO DEFOLIATE
It’s quite rare to apply defoliation as the sole technique for achieving a high yield. Leaf trimming is generally associated with other pruning and training methods for better yield, such as topping, FIMming, LST, manifolding, supercropping, and ScrOG. Growers using the ScrOG method will need to remove all lower growth as well as leaves and stems located beneath the net.
Cannabis plants can be defoliated as soon as they transition from the seedling phase to the vegetative growth phase. However, it’s recommended that amateur growers allow the plants 1 to 2 weeks of vegetative growth before tackling their defoliation. Additionally, some varieties are more sensitive to trimming than others and will thus be more stressed by leaf trimming. Monitor your plants' behavior closely after trimming. A recovery period of at least 3 to 7 days before resuming defoliation is strongly recommended to avoid stressing the plants too much. Growers can also defoliate during the flowering phase, which will allow the plant's energy to be focused on bud production while limiting shade and excess moisture. However, it’s important not to defoliate too late, as it may unnecessarily harm your plants.
THE ADVANTAGES OF DEFOLIATION
Obviously, the number one advantage of defoliation is the increased yield potential of this pruning technique for all types of cannabis, from photoperiod to autoflowering varieties. It’s no secret that flowers receiving more light become larger and wider than those hidden in the shade of leaves. Furthermore, removing inner leaves from bushy plants helps prevent any mold threats. Very leafy plants with dense inner foliage will produce a significant amount of popcorn buds. In the worst-case scenario, dense bud branches and buds will succumb to rot.
If you see water droplets forming on the surface of the leaves, it’s high time to consider defoliation. Clearing the lower and middle areas of leaves is an excellent way to improve air circulation.
THE DISADVANTAGES OF DEFOLIATION
Indoor cannabis plants benefit from defoliation for two reasons. The first is that they receive light from a stationary source above them, and the second is that the environmental conditions are controlled by the grower and not Mother Nature. Outdoor plants, on the other hand, gain little from it, as the sun moves across the sky, illuminating different portions of the plant from sunrise to sunset.
Outdoor growers don’t need to manipulate the plants to grow them into a flat structure since the sun is infinitely more powerful than any grow light and, moreover, it is always in motion. Trimming the leaves of outdoor plants also makes them more vulnerable to humid conditions and breaks their natural barriers against pests.
Many indoor growers can, and unfortunately often do, reduce the final yield due to defoliation done at the wrong time and/or excessively. Trimming seedlings is not advisable and often results in stunted plants. Scalping mature plants is even worse, and instead of getting long bud branches, you’ll probably end up with even fewer flowers. Similarly, trimming sick or unhealthy plants at any stage of growth risks stunting growth rather than encouraging the formation of dense flowers.
Day 44 Watering every other time with Biobizz Topmax
Day 46 Watering with pH 6.3 water to which I add 0.8g per liter of water of Greenhouse feeding enhancer.
Day 47 Light watering.
Day 48 Light watering.
36 likes
1 comment
Share
Used techniques
Defoliation
Technique
8
Week 8. Flowering7y ago




10 cm
Height
20 hrs
Light Schedule
23 °C
Day Air Temp
6.3
pH
No Smell
Smell
55 %
Air Humidity
22 °C
Solution Temp
21 °C
Night Air Temp
0.47 liters
Pot Size
0.1 liters
Watering Volume
60 cm
Lamp Distance
Nutrients 5
Top-Max
1 mll
Top-Max
1 mll
BioEnhancer
0.6 mll
Master_weeda Hello to all the padawans and Jedi masters
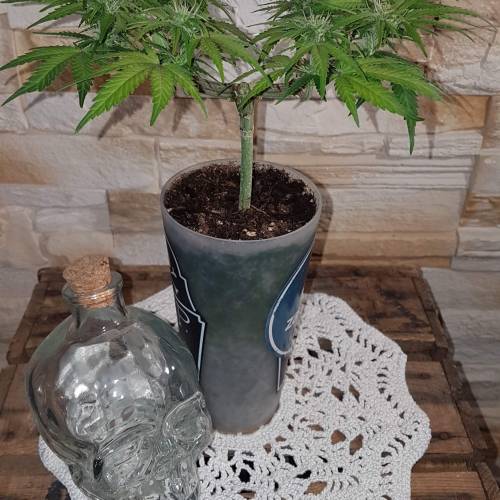
Day 49 watering with 20 centiliters of water pH 6.3
Humidity is at 55%
Humidity levels should be lowered to 40-50% (extremely important)
You can get away with 55% (above 60%, it's very bad)
It's better to slightly lower the temperatures during flowering
Light-on temperatures: 20-26°C (avoid high temperatures)
WAYS TO LOWER HUMIDITY
Run your extractor more empty, or switch to a higher model (exhaust from the tent AND the room!)
Increase the intake of fresh/cold air (e.g., an air intake with 140mm PC fans)
Try watering your plants after turning on the lights
Invest in a decent-sized dehumidifier (small ones don't hold enough water)
WAYS TO LOWER TEMPERATURES
Just like lowering humidity: increase the total airflow in your room by exhausting more air and bringing in more fresh air (faster fan, or bigger)
Always have the "lights off" during the day, and the "lights on" at night
When growing with HPS bulbs, consider a cooltube
Install an air conditioner (AC also lowers humidity)
May the force be with you 💪
33 likes
4 comments
Share
9
Week 9. Flowering7y ago


14 cm
Height
20 hrs
Light Schedule
23 °C
Day Air Temp
6.3
pH
No Smell
Smell
55 %
Air Humidity
22 °C
Solution Temp
21 °C
Night Air Temp
0.47 liters
Pot Size
0.1 liters
Watering Volume
60 cm
Lamp Distance
Nutrients 5
Top-Max
1 mll
Top-Max
1 mll
BioEnhancer
0.6 mll
Master_weeda +4 centimeters
Day 56 Light watering with pH 6.3 water
Day 57 watering with 25 centiliters of pH 6.3 water
Day 58 light watering
Day 59 watering with 25 centiliters of pH 6.3 water
35 likes
10 comments
Share
10
Week 10. Flowering7y ago




14 cm
Height
20 hrs
Light Schedule
23 °C
Day Air Temp
6.3
pH
Normal
Smell
55 %
Air Humidity
22 °C
Solution Temp
21 °C
Night Air Temp
0.47 liters
Pot Size
0.1 liters
Watering Volume
60 cm
Lamp Distance
Nutrients 5
Top-Max
1 mll
Top-Max
1 mll
BioEnhancer
0.6 mll
Master_weeda Hello to all the padawans and jedi masters
Watering 30cl of water ph6.3
Day 66 watering with 25 centiliters of water ph6.3 to which I add one gram per liter of water of feeding enhancer greenhouse
Day 68 watering with 25 centiliters of water ph6.3
26 likes
8 comments
Share
11
Week 11. Flowering7y ago





14 cm
Height
20 hrs
Light Schedule
23 °C
Day Air Temp
6.3
pH
Normal
Smell
55 %
Air Humidity
22 °C
Solution Temp
21 °C
Night Air Temp
0.47 liters
Pot Size
0.1 liters
Watering Volume
60 cm
Lamp Distance
Nutrients 5
Top-Max
1 mll
Top-Max
1 mll
BioEnhancer
0.6 mll
Master_weeda Hello to all the padawans and Jedi masters
Day 70 watering with 20 centiliters of water pH 6.3
Day 72 watering with 30 centiliters of water pH 6.3
Day 74 watering with 20 centiliters of water pH 6.3
Day 76 watering with 40 centiliters of water pH 6.3
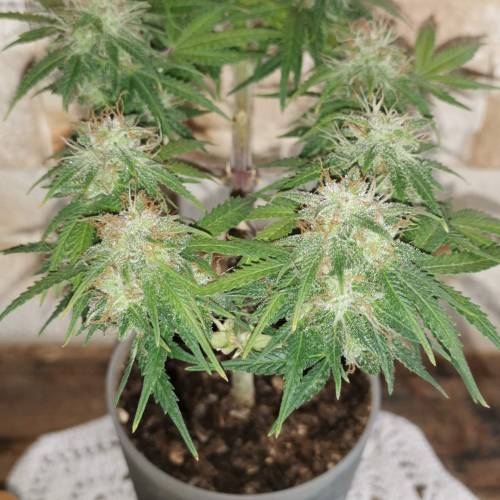
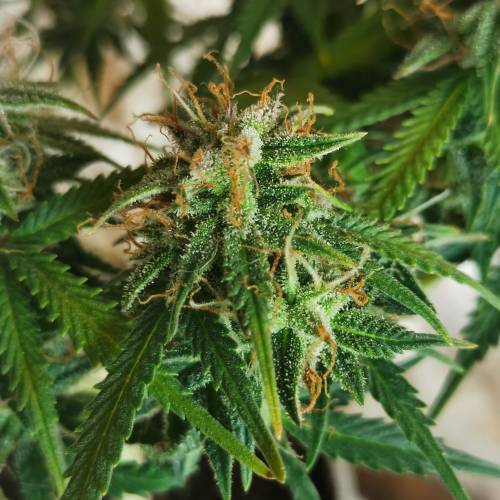
This week went well, the buds are growing slowly but surely. I think I’ll practice the split trunk technique a week before the harvest, which shouldn’t be too far off.
I’ll provide a complete explanation during the week when I practice it (with video tutorial).
33 likes
7 comments
Share
12
Week 12. Flowering7y ago






15.01 cm
Height
20 hrs
Light Schedule
23 °C
Day Air Temp
6.3
pH
Normal
Smell
55 %
Air Humidity
22 °C
Solution Temp
21 °C
Night Air Temp
0.47 liters
Pot Size
0.1 liters
Watering Volume
59.99 cm
Lamp Distance
Nutrients 5
Top-Max
1 mll
Top-Max
1 mll
BioEnhancer
0.6 mll
Master_weeda Hello to all the padawans and Jedi masters
Day 77 watering with 30 centiliters of water pH 6.3
Day 80 watering with 40 centiliters of water pH 6.3
Day 82 watering with 30 centiliters of water pH 6.3
Day 84 watering with 25 centiliters of water pH 6.3
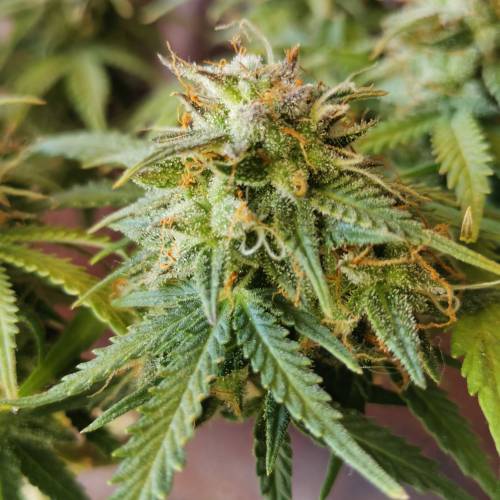
I estimate the harvest to be in about 10 to 12 days. How can I roughly know when to harvest in order to do a flush? Or simply if the plant is flushed of any excess nutrients when it comes time to harvest?
The best way to judge the maturity of the plants is to look at the resin glands, also known as trichomes. By using a microscope ideally with 100x magnification, you can easily determine the state of the resin glands and avoid having to guess. The trichomes go through 3 different stages:
1. CLEAR
Clear trichomes contain only precursor cannabinoids that are not psychoactive. Harvesting at this stage will not give you a very potent product.
2. MILKY
Milky resin glands contain fully mature THC. To get the most potent buds possible, you need to get as close as possible to 100% milky trichomes. Note that it is impossible to achieve 100% milky trichomes, as new resin glands are continuously produced. Similarly, even after harvest, the trichomes will continue to develop.
3. AMBER
Amber-colored resin glands indicate that THC has been converted into CBN, a degraded form of THC. This means that your product has lost a significant amount of its potency. CBN is not desirable in any crop, as its effects are more narcotic than a true high.
Personally, I like to harvest around 15 to 30% amber, but that's just a preference.
May the force be with you 💪
29 likes
8 comments
Share
13
Week 13. Flowering7y ago


15 cm
Height
20 hrs
Light Schedule
23 °C
Day Air Temp
6.3
pH
Normal
Smell
55 %
Air Humidity
22 °C
Solution Temp
21 °C
Night Air Temp
0.47 liters
Pot Size
0.1 liters
Watering Volume
60 cm
Lamp Distance
Nutrients 5
Top-Max
1 mll
Top-Max
1 mll
BioEnhancer
0.6 mll
Master_weeda Hello to all the padawans and Jedi masters! Day 84 watering with 25 centiliters of water pH 6.3
Day 87 watering with 30 centiliters of water pH 6.3
Day 88 practicing the split stem technique (explanatory videos) and watering with 20 centiliters of water pH 6.3
HOW TO SPLIT THE STEMS OF YOUR CANNABIS PLANT
To split the stems of your cannabis plant, you will need:
A clean, sharp blade (a utility knife blade works well)
A measuring tape
A string or tape to mark the cuts you will make along the stem
A pencil, stick, or skewer to separate the stem once split
1. First, start by measuring the part of the stem you are going to split. You need to make an incision about 10–20 cm just below the lowest branch of your plant. Use tape or string to mark the start and end of the incision.
2. Next, take your blade and make a cut across the stem, starting from the top. Be careful to make a clean cut, down to the center of the stem.
3. Use your blade to cut downwards, all the way to the lower mark of the measurement you took earlier. Try to cut as straight as possible. Once you reach your lower mark, leave the blade in the center of the stem, then use a pencil/stick/skewer to open the cut part, then remove your blade.
WHAT IS THE BEST TIME TO SPLIT THE STEMS?
There are many theories about the best time to knife your stem, but most growers suggest doing it in the last week of flowering. While some growers recommend doing it in the last 3 days before harvest, we recommend doing it a bit earlier (7–10 days before harvest).
WHAT ARE THE RISKS OF SPLITTING THE STEMS?
Splitting stems is a high-stress technique that is very aggressive and we only recommend it for experienced growers. We also do not recommend splitting stems on autoflowering varieties, as it can be way too intense for them.
DOES SPLITTING STEMS REALLY WORK?
There is a solid group of experienced growers who claim that splitting stems can produce good results. Unfortunately, there is little qualitative data to prove it. However, it seems that stem splitting originated in the Netherlands, where it has been practiced by expert Dutch growers since the 1970s.
34 likes
8 comments
Share
14
Week 14. Flowering7y ago






15 cm
Height
20 hrs
Light Schedule
23 °C
Day Air Temp
6.3
pH
Normal
Smell
55 %
Air Humidity
22 °C
Solution Temp
21 °C
Night Air Temp
0.47 liters
Pot Size
0.1 liters
Watering Volume
60 cm
Lamp Distance
Nutrients 5
Top-Max
1 mll
Top-Max
1 mll
BioEnhancer
0.6 mll
Master_weeda Hello to all the padawans and Jedi masters
Day 91 watering with 30 centiliters of water pH 6.3
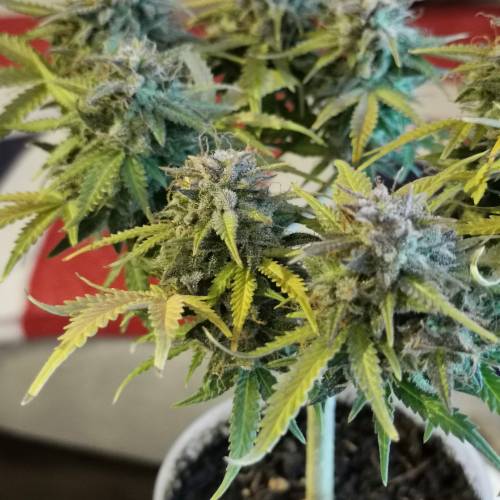
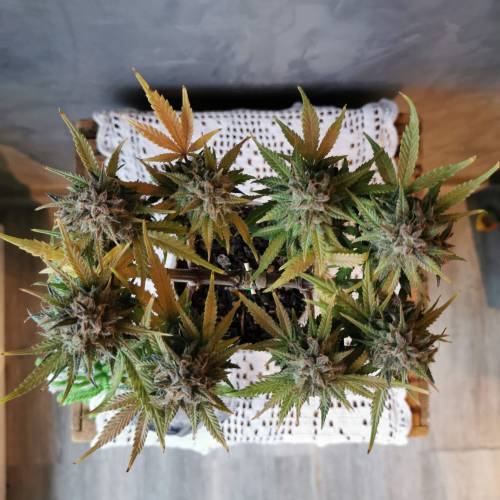
Trichome inspection (30% amber) senescence is clearly visible which means I will harvest on Thursday at day 95 after it came out of the pot...
The fact that senescence is becoming more and more visible shows that the plan I set up to split the trunk on day 86 is impeccable. The trichomes will be amber as I wish.
I had set a dry weight goal of 16g, I think I'm relatively far from that, but I'm still satisfied with this diary that is almost at its end and has brought me a lot of pleasure.
Day 92 watering with 30 centiliters of water pH 6.3 and then I will put it in the dark for 48 hours
This method is controversial within the grower community, and there are only anecdotal reports regarding its effectiveness. Most growers who have tried it have not noticed any difference in terms of potency of the buds. Some even argue that since it takes several months to grow the plant, 1 or 2 days before harvest won't change the process at all. But hey, if you're the adventurous type, give it a try.
May the force be with you, 💪
47 likes
25 comments
Share
14
Week 14. Harvest7y ago
Happy Harvest Day!


10/10
Rated
Bonjour à tous les padawans et maîtres jedis
Quel plaisir énorme de cultiver cette souche autofloraison d'une incroyable robustesse je la recommande vivement !!!
Pour ce run mis à par le faible rendement qui je le rappelle n'était pas le but de cette culture tout c'est relativement bien passé.
La germination de la graine c'est effectué sans problème grâce au easy start RQS en moins de 48h.
J'ai préparé mon substrat (ligth mix biobizz) auquel j'ai mélangé 1,5 gramme de feeding biogrow greenhouse.
Pour le contenant je me suis servi d'un verre à bière en plastique d'une capacité de 47 centilitres (0,47 litre) avec l'aide d'une perceuse j'ai fais un trou dans le fond du verre pour que le surplus d'eau puisse s'écouler et que le substrat ainsi que les racines respirent. J'ai ensuite transplanté la plantule dans son pot définitif.
Après avoir légèrement arrosé et tassé le substrat j'ai placé mon solo cup à 90 centimètres d'une lampe Led 300watts cycle 24/24 pour une durée d'une semaine. Je passe ensuite mon cycle de lumière en 20/4 car pour moi c'est le cycle qui offre le meilleur rendement pour une autofloraison.
Pour le premier arrosage j'utilise 0.7 gramme par litre d'eau ph6.3 de feeding bio enhancer de greenhouse, je mélange énergiquement et arrose mon solo cup avec 20 centilitres. Cela permettra à la plante d'avoir une masse racinaire plus importante ce qui aura pour conséquence une meilleure assimilation des nutriments ce qui en résultera sera une plante saine et robuste.
J'arrose ma plante normalement jusqu'au jour 18 (tout les 2 jours) à l'apparition de son cinquième nœud je pratique une coupe au dessus de son troisième noeud en vue d'un futur main-lining.
J'attend que ma plante récupère et je commence un LST pour lui donné une forme en T. Je laisse ses 2 plus grandes feuilles qui lui serve de panneaux que je supprimerais par la suite.. Je laisse pousser ma plante en forme de T en ajustant soigneusement mon LST et ce jusqu'à ce que j'obtienne 4 nœuds de chaque côté. Je garde mon premier nœud supprime le second et coupe au dessus du troisième, une fois cela accompli il ne me reste plus qu'à continuer mon LST pour donné à la plante la forme de sa future structure finale !
Pour moi ce sera huit buds car étant donné que la souche choisi est une autofloraison je n'ai pas le temps ni le contenant pour en faire plus.
Le main-lining fini j'ajuste mon LST avant que les branches ne deviennent rigide.
Tout est expliqué en détail semaine par semaine.
Pour finir je recommande cette souche qui a une bonne capacité de récupération pour une autofloraison ce qui en fait pour moi une souche idéale pour les nouveaux cultivateurs.
Merci à tous ceux qui mon suivis aidé et soutenu.
Smoke test report 👍
Quel plaisir mes amis et quel goût (sans curing) Le goût de l’Amnesia est très intense et très délicat. C’est une formidable combinaison très agréable avec un soupçon de cèdre en arrière-goût qui rappelle un peu la myrtille et des épices sucrés qui captivent ceux qui la goûtent. Un regal pour les papilles !
Pour l'effet c'est tout aussi plaisant que le goût c'est très corporel est relaxant 😊
Elle produit une herbe à la fumée très douce et agréable qui stimule et élève l'esprit, améliore l'humeur et vous permet de voir les choses en perspective. Les premières minutes sont très relaxantes un régal le voyage est court mais le paysage est exceptionnel (métaphore) 😋
Que la force soit avec vous 💪
Show more
Translate
Spent 99 days
Ger Veg Flo Har
41 g
Bud wet weight per plant
5 g
Bud dry weight per plant
1
Plants
0.8 m²
Grow Room size
Easy
Difficulty

Relaxed, Sleepy
Positive effects

Dry eyes
Negative effects

Berries, Pungent, Woody
Taste
Height
Day air temperature
Air humidity
PH
Light schedule
Solution temperature
Night air temperature
Pot size
Lamp distance


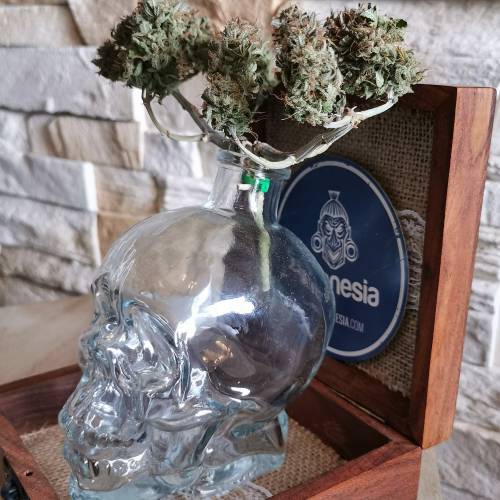


Master_weeda Hello to all the padawans and Jedi masters
What a pleasure, my friends, everything is in this diary!
Except for the yield 😁 but well, that wasn't really the goal since I made the task even harder by attempting the solo cup challenge with main-lining on an autoflowering.
Thank you for all your compliments, your support, and your kindness.
I really had fun and enjoyed this diary a lot, but I especially learned a lot. May the force be with you 💪
125 likes
80 comments
Share
Equipment Reviews



171 comments
Sort by
popularity
popularity
newest
oldest

WisdomCulture420 commentedweek 147y ago
Nice work my brother, a very pretty plant, and a nice experience those Solo cup with those trunk founding which was done in the rules of art.
Well done my brother nothing of her that self-taught and learn visually.
Continue to make me dream, I wish you a sweet smoke and you will give me a report of smoke, it would be cool and I also wish you all the best my brother 😉 👊
likes 10

Master_weeda commented7y ago
@BigDjesusWeed, thank you for all my friend you are advice but especially your kindness 🙏 🙏
likes 8

Bouleuss commented6y ago
@Master_weeda, 👍 👍 🙏 🏻 🙏 🏻 🙏 🏻
likes 2
WisdomCulture420 commentedweek 57y ago
WOW WOW WOW Awesome my brother very good job.
Beautiful Main-lining 👍 👋
likes 8

WILLIAMSII_Fr_Farm commentedweek 67y ago
It's super clean your mainlining. Nice buddy, I wish you success with your SOLOCUP. 💪 👌 😉
likes 7
Master_weeda commented7y ago
@Williamsii, Merci poto 🙏 🙏 🙏
likes 10

JP148 commented7y ago
@Williamsii, thanks man for looking in. Will be browsing your grows. Nice work
likes 2
Master_weeda commented7y ago
@JP148,always with pleasure buddy 🙏
likes 6

Castafunk commentedweek 147y ago
Very nice bonsai, the buds may not be very big but they're quite decent. For a solo cup, it's magnificent, well done master 🙏
likes 7
Master_weeda commented7y ago
@Castafunk, thank you very much my friend for your kindness and kindness 🙏 I really had fun doing it in tt case and the main thing 😊
likes 8
Bouleuss commented6y ago
@Master_weeda, 👍 👍 🙏 🏻 🙏 🏻
likes 2
WILLIAMSII_Fr_Farm commentedweek 147y ago
I confirm it, my friend, your solo cup is magnificent!
likes 7
Master_weeda commented7y ago
@WilliamSii, 🙏 🙏 🙏
likes 8
Bouleuss commented6y ago
@Master_weeda, 👍 👍 🙏 🏻 🙏 🏻 🙏 🏻
like 1

Mrs_Larimar commentedweek 147y ago
Congratulation to ypur GOLDCUP, very well deserved
likes 7
Master_weeda commented7y ago
@Mrs_Larimar, Thank you very much 🙏 I am happy coming from you 😊 You are someone here 💪 Thank you for your kindness 🙏 ❤️
likes 7

YoungSmoke commentedweek 147y ago
Who would’ve thought a plant so beautiful could grow in a cup, lol. 👌
likes 6
Master_weeda commented7y ago
@YoungSmoke, an extra autoflowering 😁 thanks my buddy 👍 🙏 🙏
likes 8
YoungSmoke commented7y ago
@Master_weeda, you have the plant shaping skills of a bonsai tree master.
likes 5
Master_weeda commented7y ago
@YoungSmoke, it's a very nice compliment that touches me 🙏 thank you very much
likes 7

Autoduck commentedweek 146y ago
Absolutely awesome in my eyes hands down winner of the cup challenge 🙌 in a cup with training 😮
likes 5

HiddenColorado commented6y ago
@Autoduck, to bad it was a 22 ounce cup, got to be 16 oz solo cup
likes
Master_weeda commented6y ago
@HiddenColorado,you can't have it all unfortunately 😁 😉 👊
likes 4
Master_weeda commented6y ago
@HiddenColorado,my solo cup it's good 16oz 👌
likes 3
Show More (1)

Secretflower commentedweek 146y ago
Hello Master Jedi, your plant is beautiful, congratulations. 🙏
I wish you good luck in the contest, I also contest, Peace and Grow.. 🙏
likes 5
Master_weeda commented6y ago
@Secretflower, thank you very much 💚🙏 good luck for what’s next 🤞
likes 5
Secretflower commented6y ago
Merci Master_weeda.. 🙏
likes 4
Castafunk commentedweek 137y ago
I love it
likes 5
Master_weeda commented7y ago
@Castafunk, thanks Casta 😁
likes 6
Bouleuss commented6y ago
@Master_weeda, 👍 👍 🙏 🏻 🙏 🏻 🙏 🏻
like 1
Castafunk commentedweek 57y ago
It's great
likes 5
Master_weeda commented7y ago
@Castafunk, my friend! Thanks bro, I hope you're doing well 😉
likes 9
Bouleuss commented6y ago
@Master_weeda, 👍 👍 🙏 🏻 🙏 🏻
like 1

Ferenc commentedweek 146y ago
Any time when I see this one just makes me wa oooooo. Mr @Master_weeda more than amazing and beautiful and etc what we can use for these kind of things. I hope that you won that challenge with this one. 🤪
likes 5
Master_weeda commented6y ago
@Ferenc, what a nice compliment especially coming from a grower of your quality 👍
thank you my friend 🙏
likes 5

Warzouz_grass commentedweek 117y ago
It's super beautiful you applied well on the main-lining, 👏 hat
likes 5
Master_weeda commented7y ago
@Warzouz_grass, thanks for the compliment my friend 👍
likes 8
JP148 commentedweek 67y ago
This is one of a few training grows I took pointers from to try my mainline. Mine is not as nice. Following this grow is like a training lesson thanks to you and all those other growers that help me hone my skills.
likes 5
Master_weeda commented7y ago
@JP148, we are all masters and all students here! If you need advice do not hesitate I am at your disposal buddy 👍 👊
likes 12

Tom_Jay commentedweek 87y ago
i luv the solo cups =D and nice ma(i)nline!
I wish you continued success! May the force be with you 🙏
a try in French :D:D lol* I was better at this in school xDDD 👊
likes 5
Master_weeda commented7y ago
@ Tom_Jay, nice attempt! 😉 Thank you my friend 🙏 🙏 🙏
likes 9

EZgrower commentedweek 67y ago
Happy WEED-MAS!
watching your grow . 👍
check out my Xmas Video Contest 2019!
likes 5
Master_weeda commented7y ago
@ EZgrower, Thank you too my brother 🙏 🙏 🙏 I'll see that
likes 10

Cheezy commentedweek 67y ago
Beautiful manifold you have created! That will definitely supply the buds with GRATUITOUS AMOUNTS OF ENERGY!!! 💪 💪 🤜 ☀️ 🤛 👊
likes 5
Master_weeda commented7y ago
@ Cheezy, I hope so and do everything for thank you my friend for your interest in what I do 🙏
likes 11

Crazyweedpt commentedweek 47y ago
steady and firm Main-Lining... Master Weed 👌 🙌
likes 5
Master_weeda commented7y ago
@CrazyWeedPT, 👊 👍 🙏 😉
likes 12
Tom_Jay commentedweek 127y ago
c'est une petite beauté! still loving the SoloCup Minis =D and this one ofc 👊 👌
...may the Force and Stuff <3 Growmie
likes 4
Master_weeda commented7y ago
@Tom_Jay, for my next run I will try a hand lining of 32 colas on a pure sativa from paradise seeds this one was for training and aesthetics 😉
likes 10
Tom_Jay commented7y ago
@Master_weeda, 32 sounds good. i will count them =D 💪 🙏 😸
i must start my Photorun with Cuttings from BarneysFarm HoneyB... the seeds i've ordered had a hard time on Mailway or the RQS fem-seeds are (will not say crap)
...it was the low temp that harmed. ;) =D
but its time to move on and discover other Breeders.
the one that popped is to weak and unstable for any kind of training 😭
likes 5
Master_weeda commented7y ago
@Tom_Jay,ssai sensiseeds is the basis to try 👍 especially their super skunk which is a real wonder it's stable robust and easy to see grow 👊 👍
likes 9
Show More (2)
JP148 commentedweek 107y ago
Sweet little weed bonsai
likes 4
Master_weeda commented7y ago
@JP148, 😂 👏 👏 👏 👏 👍
likes 9
JP148 commented7y ago
@Master_weeda, 🌱 can I ask you to take a look at my WW+NL. Is the mainline right? Don’t know if I isolated the cola branches correctly.
likes 3
Master_weeda commented7y ago
@JP148,no problem with pleasure bro 👊
likes 8
Show More (2)

the end.
Enjoying this diary? Follow for more updates!

Prefer the old Diary view?
Go back to the old Diary view