
Processing
Likes
19
Share


@BigBuds95
Follow
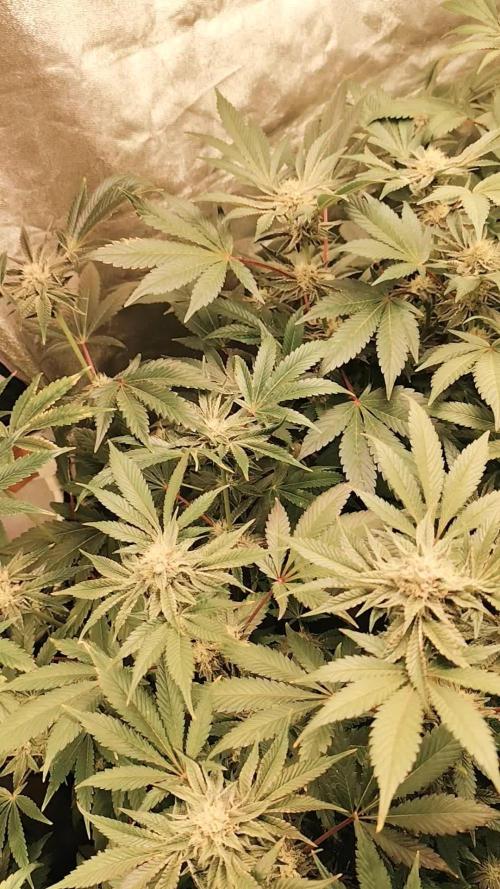
Day 33, ordered a new 1000W(400W actual draw) that's been on them about a week as theyve exploded into my small 24"x48"x60" tent, it started to get a slow light burn at day 30ish the same day I did a pretty heavy defoliating and was NOT happy, since I've l turned the VEG switch off, leaving only the Red BLOOM lights on (manufactors state 200W with BLOOM only) until my new 32"x60"x80" tent arrives then I'll hang appropriately and turn to full power! Took the time between yesterday AM and today to clip off 90% of the light damage tips and fed a light Cal-Mag and Tiger Bloom and she seems to be perking up, (significantly more even since the video) Been LST like a mother****er, hoping she really packs on the weight and recovers smoothly from the light burn.

Likes
30
Share


@Silverback_Guerilla
Follow
9/18:
New week...fed with Boomerang and Kangaroots
9/19:
Applied Axiom harpin proteins and boomboom spray
9/20:
Fed full strength TPS One...decent growth. This strain really likes the Nitrogen..they were starving...
9/21:
Tucked a few leaves and took some photos and a video.
Looking good. Just a couple more days of 24/0...
9/22:
Switched out the 560w of 5000k CCT lighting for 720w of 3000k CCT lighting and set the timer for 12/12.
Decided against 13/11 with emerson effect...trying to save a few bucks on electricity.
I'm keeping the lights at 30" from the tops for a day or two.
9/23:
The girls loved their first night of sleep...so perky!

Likes
38
Share


@PiusWaxis
Follow
After 4 weeks she finally managed to recover the volume of the flowers, a couple of more weeks and she should have reached the end of the harvest.

Likes
28
Share


@MadeInGermany
Follow
Flowering day 3 since time change to 12 / 12 h
Hey guys .
My cutting heating broke 3-4 weeks ago, which was fixed immediately and everything went wonderfully.
Now, 3 days ago, the central heating broke down in the entire room, so that at night I only have temperatures of around 13 degrees :-( .
One or the other lady is slowly starting to see a phosphorus blockage, as this can no longer be absorbed at temperatures below 15 degrees, like many other nutrients :-( .
A friend looked at the heating yesterday and came to the conclusion that a real company had to do it, which is by no means possible for a stranger to enter my room.
I quickly ordered heating mats for all the boxes so that the ladies could at least get warm feet.
That's all I have this winter full can do .
Let's hope everything will be fine 🙏🏻.
As soon as the heating mats are attached in the coming days, I will post them in the pictures.
Now for the update.
Despite the severe cold, the ladies are still doing well and have made good progres .
The ladies only had to be watered once this week, each time with 1 l, because it absorbs the water very slowly because of the cold and I don't want to overwater it.
I took every single plant in the pot to take a close look at their roots.
These are snow white and look very healthy 🙏🏻.
It was also the last time neem oil sprayed so that the last trips are finally gone.
Otherwise everything was checked and a lot of planning was done, like I do with the heating mats.
Since a friend had the same problem in one winter and the heating mats got 10 degrees plus on the pots, I am very confident that it will at least bring something for the last cold month 😃
🙏🏻.
I've started flowering even if some are still a bit small, but otherwise they'll get too wide from training and end up taking up space :-)
until then have fun and stay healthy 🙏🏻
👇🏼👇🏼👇🏼👇🏼👇🏼👇🏼👇🏼👇🏼👇🏼👇🏼👇🏼👇🏼
You can buy this Nutrients at :
https://greenbuzzliquids.com/en/shop/
With the discount code: Made_in_Germany you get a discount of 15% on all products from an order value of 100 euros.
👇🏼👇🏼👇🏼👇🏼👇🏼👇🏼👇🏼👇🏼👇🏼👇🏼👇🏼👇🏼
Water 💧 💧💧
Osmosis water mixed with normal water (24 hours stale that the chlorine evaporates) to 0.2 EC. Add Cal / Mag to 0.4 Ec Ph with Organic Ph - to 5.8 - 6.4
MadeInGermany

Likes
21
Share


@Felloffthegrid420
Follow
Good week looking good very proun
proud to be running in house the mannn

Likes
17
Share


@ganzigunnu
Follow
runoff ec measured 2.0 this week. they went to bathroom and now they are around 1.5

Likes
25
Share


@BudHaks
Follow
Week 13!
I have decided to stagnant harverst her in two parts as there is fresh growth in her lower half that the light cannot reach and the top buds are mature now and at the optimal cloudy trichomes I'm looking for are present.
Look at all those trichomes heavy leaf and buds!
She is heavy and smelling amazing with hints of fruit and cookies.
I will also be flushing her next week!
What an amazing journey, coming to an end!

Likes
5
Share


@Do_it_Dan
Follow
This week I have seen an explosion in growth, this lady is rather young and taking over majority of the other ladies, either way I ain't complaining, had a few humidity spike problems in the tent due to intake packing in, ordered a new one so fingers crossed next week is a better week for the garden.


Likes
5
Share


@Tidzs
Follow
12/12/2022 Inizio della quarta settimana di fioritura, le piante sembrano in salute
13/12/2022 Irrigato 1 litro d'acqua del rubinetto con ph a 6.5 e senza fertilizzare
15/12/2022 Irrigato di nuovo con un pò meno di 1 litro d'acqua per pianta, fertilizzato a 1/4 delle dosi
17/12/2022 Eseguita una leggera defogliazione e montata la rete per Scrog, se tutto procede per il meglio la prossima settimana ho intenzione di switchare 12/12


Likes
41
Share


@Santica_Garden
Follow
Just a quick video showing how the ladies are looking at the end of their 1st week of life. So far so good. Not much to update. Any questions just ask away.
Happy Growing guys 👍🏾💚🌱🔥

Likes
22
Share


@m0use
Follow
***Sponsored Grow*** = Medic || https://medicgrow.com || Grow = ***Sponsored Grow***
Plants still looking good from last week, the yellowing has seemed to stop spreading, still some dull green in some leaves, I think I was under feeding them, but runoff says otherwise. Noticed some more pink/purple stems on the plants and decided to increase the phosphorus content in the feed by mixing in half grow and half bloom from the nutrient lineup. I'd use the PK booster I have but its to high in K for my liking. The entire lineup is very high in K. mixing grow and bloom gives a NPK ratio of 7-7-14 then done 1:1 equal parts.
Grow=8-4-15
Bloom=6-10-14
Boost=1-15-30
Run off was a bit high for my liking but only seeing minimal signs of nutrient burn. Still watering once with feed and runoff and then later in the week with water and no/little runoff for my watering cycle.The number in the nutrient section are wrong but the EC and ratio are correct. Also impressed the roots have started popping out the bottom of the container already after only being transplanted for a week. Good root growth on these ones.
Lights doing well. The V1 spectrum is good on the medic grow mini sun-2's 240w. No issues so far, dimmed at 80%
.
Till next week.
***Sponsored Grow***
Official Website:
https://medicgrow.com/
+
https://www.kannabia.com/en
Facebook:
https://www.facebook.com/medicgrowled
+
https://www.facebook.com/kannabiaseed/
Twitter:
https://twitter.com/medicgrow
+
https://twitter.com/kannabiaseeds
Instagram:
https://www.instagram.com/medicgrow420/
+
https://www.instagram.com/kannabiaseedsint
YouTube:
https://www.youtube.com/channel/UCNmiY4F9z94u-8eGj7R1CSQ
+
https://www.youtube.com/c/KannabiaSeedCompany
Growdiaries:
https://growdiaries.com/grower/medicgrowled
https://growdiaries.com/grow-lights/medic-grow
+
https://growdiaries.com/grower/kannabia
https://growdiaries.com/seedbank/kannabia

Likes
2
Share


@Bluemels
Follow
Tag 40: Ich habe die Pflanze entlaubt und ein Netz zum scroggen eingebaut. Jetzt wird es spannend wie die Pflanze das alles wegsteckt.


Likes
17
Share


@Grindlife219
Follow
Turned my lights up to 50% this week continued to lightly defoliate excited to see what comes of this


Likes
12
Share

@cultivars
Follow
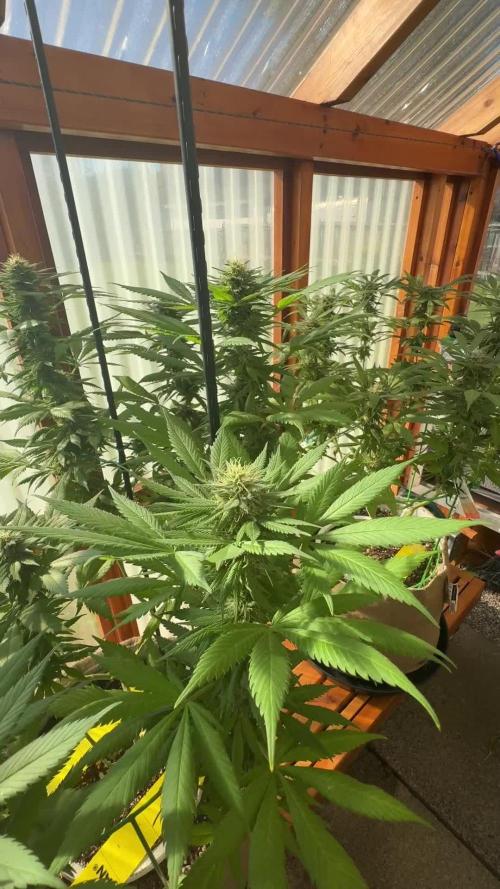
OCTOBER 11h to OCTOBER 17th
Sunrise: 08:20 | Sunset: 19:03 | Total Daylight: 10:43
This was another pretty good week for weather, however the last couple of days have been cloudy with rain, causing some spikes in greenhouse humidity. Temperatures for the most part have been good, with one overnight low in the greenhouse of 13C.
Purple Romulan is doing well but is the furthest behind in reaching maturity of all specimens in garden. Flowers are of decent size, with adequate trichome production.
Greenhouse is emitting very strong smells now, mostly a sweet skunk scent.
Weather forecast appears as though it will be adequate and manageable temperature wise for the next week.
DAY 155
Greenhouse 13C in the morning, with outdoor temperatures down around 3C (frost evident on rooftops in area). 500mL drip of plain rainwater to all specimens.
DAY156
1L hand water BTI treated rainwater (no additives); Greenhouse held to 18C overnight, humidity a little high (51%) but dropped as sun rose; Overcast day.
DAY 157
Beautiful sunny day, with warm temps; Greenhouse was 18C in the morning.
DAY 158
-1C in the morning outside, 13C in the greenhouse, which is fine. Nice sunny day.
DAY 159
Overnight low outside 5C, 17.5C in greenhouse, which is ideal. Humidity in check, at 41%. Cloudy, overcast day, with greenhouse heater working to maintain day-time temps of 21C (no solar energy to drive heating).
DAY 160
Greenhouse 14C in the morning, 3C outside. Humidity at 41%; Clear morning, with some sun, turning cloudy with light rain in the afternoon, resulting in a humidity spike in greenhouse to 50%.
DAY 161
Lots of rain overnight, causing spike in greenhouse humidity to over 60%; Will require monitoring; Temps in the morning 18C in the greenhouse, mild outdoors.