


Likes
9
Share


@Staffedition
Follow
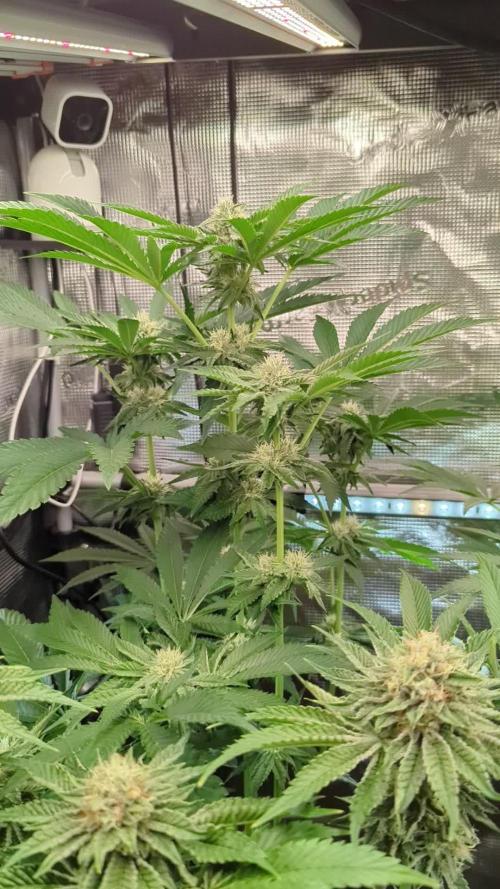
Привет друзья.
Наше знакомства продолжается с новым сортом автоцветущих растений от Smail_Seeds сорт ORIGINAL AUTO CHEMZKITTLEZ F1 reg.
Сегодня растению 97 дня.
Шишки налились очень хорошо😀
Вы всё сами видите.
Скоро будут феминизированные
Сорт выводим сами.
Смотри мой профиль, у нас всегда есть что то интересное.
Не забудь поставить лайк❤️, если понравилась как прошла неделя
И читайте наш TELEGRAM: https://t.me/smail_seeds
#Smail_Seeds 😀


Likes
16
Share


@Symbiosis_420
Follow
She is doing great. This is the week 10 of flowering already! I can't believe that I've been taking care of her for about 4 months already!
Her trichomes are getting milkier by the day. I am waiting for there to be some amber and many milky trichomes to harvest her, that's all...
Same care and same nutes as always.
------->
Update day 109. I decided to harvest her today. I see some trichomes going amber already in many of the buds, and the rest are mostly cloudy. I could leave her growing those buds for a week or maybe more... However, the blueberry indica that I harvested before planting this girl had a very strong body high, so I am looking to get a very head high from this girl. Actually, I've sampled this girl twice already, once three weeks ago, and another two weeks ago, and both were a decent high, very much how I remember it from this strain. Actually, the effect of the last sample reminded me much of the high I got the first time I smoked Amnesia Haze! So, a week after that I suspect the high will be on point, for what I want from it.
------>
The end?
I decided to try to reveg this girl just as an experiment... Actually, I am even going to try to make one of her clones produce pollen to create my own feminized seeds from this absolutely delicious genetics :)

Likes
21
Share


@darb35
Follow
Day 22 - The girls are very healthy and very green, they have huge fan leaves
Hopefully no trimming, just leaf tucking, and they should be good 🌱

Likes
1
Share


@Adm023
Follow
Ojalá pueda revegetarla así hago una buena madre e revegetando muchas pero aveces no me sale tengo varias madres
Likes
14
Share


@LokalGrenz
Follow
The Amnesia haze 2 is turning light green yellowish some told me it could be deficiency or it could be just flowering taking energy from the leaves but I’m not sure I used Gaia green bloom recently thinking it would help I’m going to too water that haze from here out the other have and sour I’m going to continue to bottom feed
I took some trichome pics I don’t think there ready yet but I think I’m getting close to the date I feel the the amnesia haze 2 is going to hit 90+ days tho kind of hope not cause the other haze and
sour are probably going be done sooner I want to fry them all at the same time
March 7th I think the haze #2 and Sour d is ready but the other Haze is not I’m pretty sure I have another week pre maybe even two for it to be near ready I need the tent to harvest and dry what’s ready I’m going try leave the ready ones in for another week in hope it doesn’t mess them up

Likes
29
Share


@Wrongholn519
Follow
I've started decreasing my CO2 dosage as I have reduced my nitrogen load.
I'm going to slowly keep removing any unnecessary vegetation.
I have turned off my space heater at night to get colder temperatures.
I started feeding extremely heroic doses of calmag (Rooted Leaf 0-0-0 CalMag plus)
These buds are extreeeemely dense and covered in trichomes with a really gassy smell. Some pistils are starting to change colour to a deep amber.

Likes
5
Share


@Chubbs
Follow
These girls are progressing absolutely beautifully. I'm excited to see as it looks like there might be a purple pheno as I've never had that one grow before. No issues and the flowers are getting bigger daily. I did a defoliation and lollipopped up to maybe the 2nd-3rd node. All in all Happy Growing.


Likes
13
Share


@GreenleafSWO
Follow
Monday
Gave her a good dose of sugar Royal, and a bit PK and pure zym, touch of alg a mic, all looks good, buds are filling out nicely 😀
Tuesday
Small feeding today, heavy on the PK 13/14 I'm fighting the humidity but it's manageable so far
Wednesday
Got a very small pruning, I don't want to touch it too much plus i only have a 60cm × 60cm tent its hard to work in it and this is a big f##king plant, to be honest I didn't think it would get this big but its my first grow! I've read that's it's not good to prune autoflowers too much but this things getting pretty dense so I cleared out the bottom a bit for air flow. Buds are really swelling now, and I think they are turning blueish purple?! I can see it on all the big colas and they are starting to get sticky!
Thursday
No feeding/watering today, I'm starting a flush as of now, today is a dry day for the plant so fresh water only from tomorrow on. Today all I have to do is look at it, and she's beautiful! Smell is really picking up inside the tent, carbon filter is earning his keep now, super good those rhinos and I only have the hobby one!
Friday
Gave her a hard flush today, it took a LOT of water! Just clean water from now on, it think I'm well within 2 weeks of cutting so fingers crossed it keeps going
Saturday
Absolutely no work done on it today, its a waiting game now and I think I'm going to win soon!
Sunday
I decided to take a chance and discard some of the small lower branches, I think I should have trimmed a lot more off much sooner, however my inexperience with a scrog net coupled with the small size of the tent and how big the thing grew its become impossible to move it out of the tent and its very difficult to get into the back of it to lollipop it! 🤣 next one will be much better, this is still going to be a big yield I suspect but lots of smaller popcorn nugs will make up most of the weight, there's still about 3 dozen nice colas tho that will hopefully bulk up more, any feedback and tips would be appreciated!

Likes
1
Share

@PapaTerps
Follow
Zhampagne - Compound Genetics
Day 70 - watered with 2l of RO tap water, with defined nutrients, mixed in order and then pHd to 6.3. She's into her fourth week of bloom now, she has finished her stretch and is now working on developing her bud sites! 💪🏻 No work on her this week, just letting her grow 🙏🏻


Likes
22
Share


@Spliffi
Follow
Week 6 👍🤙👍🌱
I see signs of flowers!!!
Jon Dabs
Check them out here:
https://jondabs.com
@jondabs Instagram
The Sponsors
Check them out here:
Dutch Passion
https://dutch-passion.com/en/
Hydroponic.co.za
https://hydroponic.co.za/hydroponic/harvesting-and-growing-accessories/
Bud Juice
https://www.gohydro.co.za
The Best Grow
https://thebestgrow.co.za
Dynomyco
https://www.dynomyco.com
Nuclear Roots
https://www.nuclearroots.co.za
Photronic
https://shop.photronic.net
Special Thanks to Hydroponic.co.za. I buy all my products from them. Best service.
Daily updates coming...
Likes
13
Share


@NordicClosetGrower
Follow
The strain has proven to be extremely sturdy compared to the autoflower version. The smell has been a bit problematic. Some terpenes just can't seem to be tamed even with a brand new carbon air filter. I hope this pays off in terms of aroma quality :)


Likes
3
Share


@Earthsower
Follow
She has suffered with light stress from the week pria to this which caused deficiency. I repotted her after keeping her in natural sunlight for most of the week and will continue to keep her there until she recovers. I have not fed her a two weeks and will continue the draught until the pot almost completely drys!
Processing
Likes
20
Share


@eldruida_lamota
Follow
Que pasa familia, actualizamos la semana de la farm cheese, la trasplantamos a su maceta definitiva, utilizamos sustrato Plagron.
Ph controlado en 6,5 humedad algo baja pero pronto pasaremos a floración, temperatura ideal, el led hace si función y aparte no da calor.
Los nutrientes los seguimos echando en dosis muy bajas para que no sobre fertilize.
Hasta la semana que viene fumetillas.


Likes
2
Share


