
Likes
Comments
Share


@BearBuds
Follow
WHAT A HARVEST!!! My largest ever to date. After drying and curing the final weight is ~10.5 ounces of total flower and an additional 2 ounces of golden keif made from dry ice and bubble bags. I am SO STOKED right now. Thanks for checking out my grow diary. I will be back next season to continue to improve my technique.


Likes
9
Share


@Velasko240
Follow
Here we are with some new photos and videos. We're halfway through Week 5.
As you can see, I went a bit overboard with the PK.
All the leaf tips are burned. Whoops.
Next watering will be a bit heavier, and I'll only give a half dose of Bioflores plus a full dose of Cannazym. Then I'll start with the Rokzbastic (Bloombastic?)* hoping it doesn't throw things too far off balance. I think by the end of this week I'll also stop the Bud Factor X – from what I understand, it could leave metallic residues in the smoke later, which would really bother me xD.
I admit I've given Bloombastic with every watering except one, always at low doses, but I should have been more careful and pushed less, or at least alternated it more.
Temperatures have risen slightly with peaks of 28°C (82°F), though most of the time it stays between 26.9°C and 27.5°C (80.4°F - 81.5°F) (lights on).
With lights off, I can't get below 26°C (78.8°F) (except for rare dips to 25.8°C / 78.4°F).
Right now the ventilation is maxing out, with humidity sitting between 55-60%. It’s on the high side, but this is the best I can do.
The plants seem resilient though, even in these less-than-ideal conditions, and seeing them outside the tent with the lights off gives me hope.
Any advice is always welcome! Everything I’m putting into practice comes from others' experiences, carefully followed, and info from friends both online and offline.
Stay tuned!
Peace.

Likes
16
Share


@1juan420
Follow
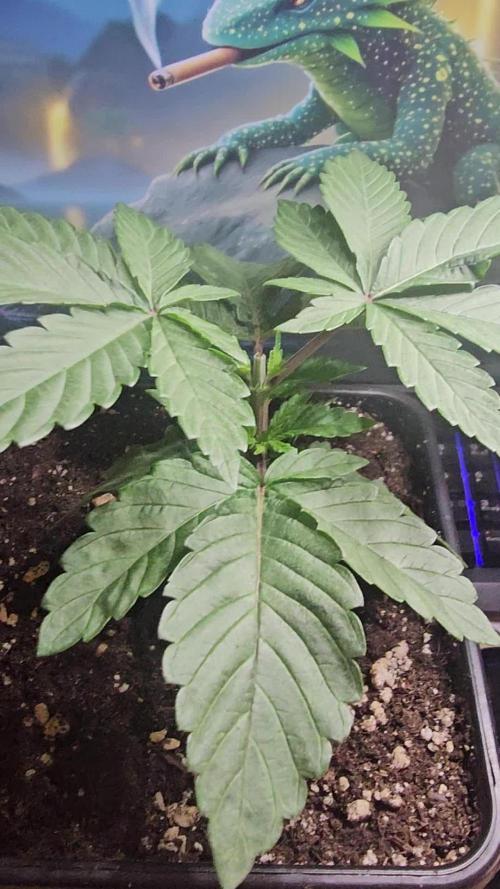
All pictures were taken on day 37
I tied her main branch down with a metal hook early this week
She is starting to show first signs of flowering
I will start feeding nutrients soon

Likes
7
Share

@Fireproof
Follow
Alles gut. Die Blüten werden immer kräftiger. Riecht inzwischen sehr stark, wenn ich das Zelt das im Keller steht öffne riecht es danach gerade noch stundenlang nach Gras im Hausflur 😇


Likes
7
Share


@brapzky
Follow
I figured nothing could go wrong with 50% amber / 50% milky trichomes.
Harvest day, Medical Mass: Huge buds and no traumas but got bud rot because of too high temps. The best I've ever smoked.
Harvest day, Pineapplex Express: Got an early trauma when transplanting but handled it beautifully. Potent smoke.
Pretty satisfied for a first grow, and I have a lot of changes for my 2nd grow!

Processing
Likes
5
Share


Likes
33
Share


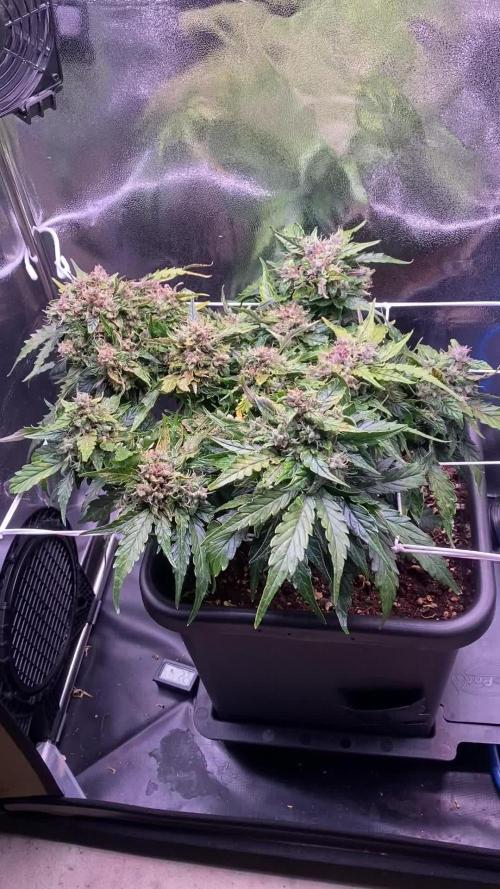
@BADKUSS
Follow
Hello everyone ,
Here is the phase of completed stretch, and the fertilizer fertilizer contribution are 100%, flowering starts very well and the appearance of the first pistil are visible everywhere.
For the height of the plants I find it reasonable and thus keeping all this world a good size the luminous penetration will be excellent ... until now hene no sign of problem for my plants I think that the flowering will follow its rhythm .. to see in the coming weeks ...
now place to photos ...
Likes
23
Share


@greenAF
Follow
Lights 40%
Feed Listed above then PH/EC adjusted
D7 So the girls looks healthy they should blow up after the next feeding. Should be able to shed it's travel scars soon.
D11 starting to pick up the pace 😁
Likes
27
Share


@Stigghiola
Follow
Salve a tutti, scusate l'assenza dopo 2 settimane torno con delle notizie ottime ho risolto il problema di umidità grazie al nuovo deumidificatore, inoltre ho comprato una barra riscaldante da 135w.
Prossima settimana sarà l'ultima settimana e metterò tutto a essiccare,
Le 2 black cream hanno già prodotto più di 80g secchi, in allegato c'è una foto di un fiore.
Nonostante nel video si vedano alcune foto prese di umidità, ora l'aria sembra essere ottima.

Likes
69
Share


@PEAKYPLANTERS
Follow
LADIES AND GENTLEMEN ,
MASTERS AND BEGINNERS FARMERS,
IT IS WITH GREAT HONOR THAT I HAVE THE PLEASURE TO INTRODUCE YOU ....
HULKBERRY AUTO ..
THIS WOMAN DESTROY ME BY KEEPING ME VERY COMMITTED TO HER .... HER BRANCHES, DUE TO EXCESSIVE HEAT, WERE NOT ABLE TO STAND AND THIS REQUIRED A LOT OF ATTENTION DURING THE ENTIRE FLOWERING.


Likes
44
Share


@Cogollo_eu
Follow
**Encontrarás la traducción a español al final de la descripción**
From/Desde: 29/03/19 || To/Hasta: 04/04/19
From day/Desde día: 36 || To day/Hasta día: 42
You can find the Money Maker Diary here:
** Podéis encontrar el diario de las Money Maker aquí:**
https://growdiaries.com/diaries/25667-gorillamakingmoney-gorilla-vs-money-m
-----IMAGES & VIDEOS-----
Video 1:
Exactly the same video as 2 but accelerated +206% to fix it to 1 minute for instagram.
Video 2:
7 days (36~42) TimeLapse, 1 image each 60 secs @ 30 fps (I think there's a missing day in the middle, GoPro things...)
Photo 5:
Nutrients Used this Week
-----WEEK SUMMARY-----
I must apologize myself for the lack of pictures this week.
I raised a bit the amount of water this week, anyway as you can see at the end of the timelapse video the babies are drinking much more now, and I'm not using enough water. Starting from the next week i will water in shorter periods alternating nutrients and additives.
I finally decided to switch to flowering the first day of the next week, i want to see what size of colas they can generate from this size of plant. I don't wan't to try to create monsters at time, and i think my pots are small for too big plants i think. With this growing i'm just introducing myself to growing techniques and to indoor photoperiod strains.
The day 1 i switched the lights to flowering mode, and as i said the day 5 (1rst 7th week day) i will switch to 12/12.
-----WATERING CALENDAR-----
29/03/19 - 1.000 ml with all week nutrients @ 0.9 E.C. PH5.8
02/04/19 - 500 ml. Just water @ PH6
*****ESPAÑOL*****
-----IMAGES & VIDEOS-----
Video 1:
TimeLapse, exactamente el mismo vídeo que el 2 pero acelerado al 206% para ajustarlo a 1 minuto para Instagram.
Video 2:
7 días (36~42) TimeLapse, 1 image each 60 secs @ 30 fps (Creo que falta un día entre medias, cosas de GoPro)
Photo 5:
Nutrientes usados esta semana
-----WEEK SUMMARY-----
Tengo que disculparme por la falta de imágenes esta semana, y es que no siempre uno dispone de todo el tiempo que desearía.
A pesar de haber incrementado un pelín la cantidad de agua con respecto a la semana anterior, en el final del video timelapse se hace evidente como ya empiezan a beber bastante más agua y lo que les vengo echando ya no es suficiente, a partir de la semana que viene regaré cada menos días alternando nutrientes y aditivos.
He decidido que esta va a ser la última semana de crecimiento, quiero ver que tal se forman la colas con este tamaño de planta, hay que tener en cuenta que las tengo en tiestos pequeños/medios y tampoco es mi intención crear monstruos por el momento. Con este cultivo simplemente me estoy introduciendo a las técnicas de cultivo y al cultivo de fotodependienes en interior.
Con respecto a la luz, el día 1 he cambiado el modo de la luminaria a floración, y el día 5 (primer día de la semana 7) voy a hacer el cambio a 12/12.
-----CALENDARIO DE RIEGO-----
29/03/19 - 1.000 ml con todos los nutrientes semanales @ 0.9 E.C. PH5.8
02/04/19 - 500 ml. Sólo agua @ PH6


Likes
1
Share

@FlowerOasis420
Follow
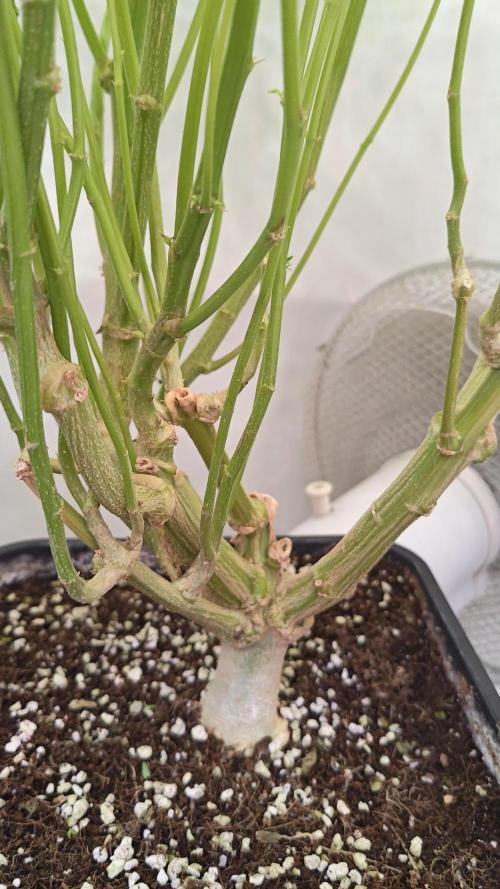
Das erste und letzte mal getoppt, angestrebt ind 6 Haupttriebe pro Pflanze.
Gelato Kush macht mit Abstand den besten Eindruck.

Likes
9
Share

@Kevs_Best
Follow
Blütewoche 1 – Start | Crimson Clay Clone 🌸
Blütewoche eins beginnt – und der Wechsel ist klar sichtbar.
Die Pflanze reagiert sofort auf den Photoperiodenwechsel: Die ersten Stretch-Bewegungen setzen ein, neue Spitzen drücken nach oben und die Struktur richtet sich langsam auf die kommende Blütenphase aus.
Dieser Run basiert auf einer ursprünglich gereveggten Mutterpflanze, die aus einem feminisierten Seed von Wizard Trees selektiert wurde. Nachdem der Phänotyp im ersten Run identifiziert wurde, wurde die Pflanze erfolgreich revegged und anschließend als Mutter weitergeführt.
Die Vegetationsphase dauerte etwa 2,5 Monate.
Während dieser Zeit wurden mehrere neue Mutterpflanzen und Klone gesichert, um die Genetik langfristig zu stabilisieren und zukünftige Runs vorzubereiten. Erst nachdem die nächsten Backups gesichert waren, wurde die ursprüngliche reveggte Mutter schließlich in die Blüte geschickt.
Man merkt dieser Pflanze die lange Vegetationsphase deutlich an:
Kräftige Verzweigungen, stabile Hauptstämme und viel gespeicherte Energie im gesamten Aufbau.
IPM & Pflanzenpflege
Während der gesamten Vegetationsphase wurde konsequent nach dem Athena Plan gearbeitet.
Stack und IPM wurden regelmäßig zwei bis drei Mal pro Woche angewendet.
Aufgrund eines früheren Kontakts mit Spinnmilben wurde das Präventionsprogramm bewusst konsequent gefahren und die Dosierung zwischen minimaler und maximaler Empfehlung gehalten, um stabile Bedingungen zu gewährleisten.
Die Pflanze hat sich dementsprechend sehr sichtbar entwickelt – dichtes Blattwerk, kräftige Struktur und eine stabile Gesamtvitalität.
Natürlich wurde während der Vegetationsphase die Grow-Formel statt Bloom verwendet.
Aktuelles Schema zum Start der Blüte
• tägliche morgendliche Bewässerung mit der Standard-Nährlösung
• Stack + IPM alle drei Tage
• dieses Programm wird voraussichtlich bis maximal Ende Blütewoche drei weitergeführt
Gerade während der Stretch-Phase ist das Ziel, die Pflanze weiterhin stabil zu halten, Stress zu minimieren und gleichzeitig ein konsequentes präventives Schädlingsmanagement aufrechtzuerhalten.
Gesamtbild – Start Blüte
Die Pflanze startet massiv in die Blüte.
Kräftiges Blattgrün.
Saubere Blattspannung.
Stabile Struktur mit viel gespeicherter Energie aus der langen Veg-Phase.
Die Grundlage ist gelegt.
Jetzt beginnt die Phase, in der Stretch, Budsite-Bildung und genetischer Ausdruck der Crimson Clay Genetik sichtbar werden.
Blütewoche 1 hat begonnen.
EN – Flower Week 1 | Start
Flower week one begins – and the transition is immediately visible.
The plant reacts quickly to the photoperiod change: early stretch movement starts, new tops push upward, and the structure begins shifting toward full flowering mode.
This run originates from an originally revegged mother plant, selected from a feminized Wizard Trees seed. After identifying the phenotype during the first run, the plant was successfully revegged and maintained as a mother to preserve the genetics.
The vegetative phase lasted roughly 2.5 months.
During this time several backup mothers and clones were taken, securing the genetic line and preparing for future runs. Only after those backups were established was the original revegged mother moved into the flowering cycle.
The extended vegetative phase is clearly visible in the plant’s structure:
strong branching, thick main stems and significant stored energy throughout the canopy.
IPM & Plant Care
Throughout the entire vegetative stage the plant followed the Athena schedule.
Stack and IPM were applied two to three times per week.
Because of a previous encounter with spider mites, the preventative program was maintained carefully, keeping the dosage between the recommended minimum and maximum range.
The plant responded extremely well, developing dense foliage, strong structure and overall healthy vigor.
Naturally, during vegetative growth the Grow formula was used instead of Bloom.
Current schedule at the start of flower
• daily morning irrigation with the standard nutrient solution
• Stack + IPM every three days
• this program will likely continue until the end of flower week three at most
The goal during the stretch phase is to keep the plant stable, minimize stress and maintain consistent preventative pest management.
Overall impression – Start of Flower
The plant enters flowering with strong momentum.
Healthy deep green color.
Good leaf tension.
Stable structural framework with energy built during the long veg phase.
The foundation is set.
Now the phase begins where stretch, bud site formation and the full genetic expression of the Crimson Clay phenotype start to appear.
Flower week 1 has begun.
Likes
269
Share


@JohnnyBlaz3
Follow
Day 23 of flower, 50ish remaining.
Alright, another smooth week 😁 Got some sugar forming on the leaves that looks pretty and is getting me excited 😁 I started using the Co2 this week as well as the terpinator. Might invest in an oscillating fan to help distribute the co2 better. Got some colas forming (I counted very roughly 75ish main colas). The leaves also really have that distinctive sativa appearance. The trash basket to hang the co2 is a great idea if your thinking of one in the future. Not much of a smell really yet.
I DO have one question this week tho. Should I do a little defoliation on some of the lower fan leaves as its getting quite bushy in there again but I dunno if I should mess around with the buds forming now.
Thanks in advance for the help and thanks for following along fam, I really enjoy the chit chattin about the ganja.
Likes
7
Share


@Naujas
Follow
I'm happy :) I couldn't do it as it should have been, my ph meters broke and ruined everything :( well, but I'm very, very satisfied with the result :) a big thank you to my teacher :)@AsNoriu you are super :) without you it wouldn't have been possible :) I learned a lot of useful information from you :) the house is full of lemon aroma :)


Likes
4
Share


@ThatsmyGrow
Follow
She's developed very well. I think there are already many amber trichomes, but also many light hairs. So I'll keep her for another week.
Likes
72
Share


@Fatnastyz
Follow
1-17
Seems silly to start a week, but she is alive. For now 😱
Locked her up at sleep time today. I'll check on her Sunday.
She is figuring out whats going on. 😂
Since last night was her last light night,( say that one 5 times fast 😂) I let Guy and Luna say their farewells. August just wanted to play.
Made for some fun pictures. 😁🤘