


Processing
Likes
9
Share


@mirillas1
Follow
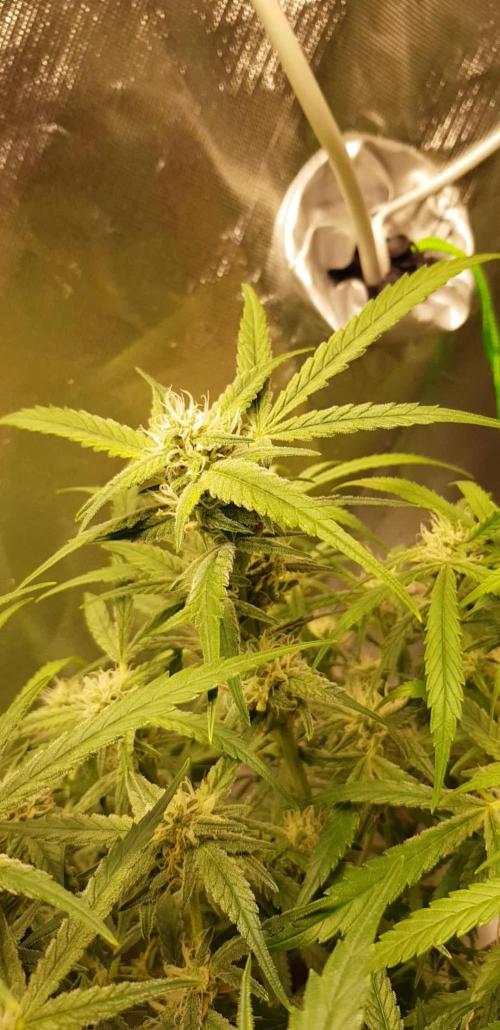
29º *29 del 10. luz 1 led grow 140w 1 luz led 7w led ultravioleta 30cm
tem 26 hum. 73% hum. tierra 40% tds tierra 1200
giro 90º maceta
30º *30 del 10. luz 1 led grow 140w 1 luz led 7w led ultravioleta 30cm
tem 26 hum. 73% hum. tierra 35% tds tierra 900
31º *31 del 10. luz 1 led grow 140w 1 luz led 7w led ultravioleta 30cm
tem 26 hum. 73% hum. tierra 30% tds tierra 600
32º *01 del 11. luz 1 led grow 140w 1 luz led 7w led ultravioleta 30cm
tem 26 hum. 73% hum. tierra 25% tds tierra 400
33º *02 del 11. luz 1 led grow 140w 1 luz led 7w led ultravioleta 30cm
tem 26 hum. 73% Riego 4 litros. hum. tierra 50% tds tierra 1500
34º *03 del 11. luz 1 led grow 140w 1 luz led 7w led ultravioleta 30cm
tem 26 hum. 73% hum. tierra 45% tds tierra 1250 Realizó scrog
35º *04 del 11. luz 1 led grow 140w 1 luz led 7w led ultravioleta 30cm
tem 26 hum. 73% hum. tierra 40% tds tierra 1000
CO2
333 gramos de azúcar 8 gramos levadura 1,5 litros agua sin cloro a 26º de temperatura
1 botella 2l asta el día 10
2 botella 2l asta el día 20
1 botella 6l asta el día 30
1 botella 30l asta el final

Likes
11
Share


@ChefSpliff
Follow
Nothing amazing other than some swelling we are here on our last week will be chopping her down in the next week or so im tooo excited for this yield. Hoping for a a 3oz min.

Likes
21
Share


@gr3g4l
Follow
la semana empiezan mostrando un estado muy bonito y gozan de humidificador nuevo.
Primeras comprobaciones de temperatura y humedad con el humidificador al mínimo, como puede verse en la foto del dia antes, dia 15, apenas no ha cosumido nada de agua por lo que aumentaremos el caudal y tiempo en el temporizador analógico. Así aumentaremos también un poco más la humedad sin tantos altos y bajos
Pasados unos 5 dias volví a podar dejando únicamente un nudo por planta y un doblado de ramitas.
A los 21 dias volví a podar del primer nudo de cada rama, hojas y yemas.

Likes
6
Share

@GERGrowDesigns
Follow
Welcome to Flower Week 4-5 of Divine Seeds Auto Fractal
I'm excited to share my grow journey with you all as part of the Divine Seeds Autoflowering Competition 2025. It's going to be an incredible ride, full of learning, growing, and connecting with fellow growers from all around the world!
For this competition, I’ve chosen the Feminized Automatic strain: Auto Fractal
Here’s what I’m working with:
• 🌱 Tent: 120x60x80
• 🧑🌾 Breeder Company: Divine Seeds
• 💧 Humidity Range: 50
• ⏳ Flowering Time: 60 Days
• Strain Info: 23%THC
• 🌡️ Temperature: 26
• 🍵 Pot Size: 3
• Nutrient Brand: Narcos
• ⚡ Lights : 200W x 2
A huge thank you to Divine Seeds for allowing me to be a part of this amazing competition and Sponsoring the Strains. Big thanks for supporting the grower community worldwide! Your genetics and passion speak for themselves!
I would truly appreciate every bit of feedback, help, questions, or discussions – and of course, your likes and interactions mean the world to me as I try to stand out in this exciting competition!
Let’s grow together – and don’t forget to stop by again to see the latest updates!
Happy growing!
Stay lifted and stay curious!
Peace & Buds!


Likes
1
Share


@Hix57
Follow
Le 42e jour ce passe très bien.
Les plantes sont au milieu de la prefloraison et ne vont pas tarder à arrêter leurs croissance pour se concentrer sur les bourgeons ainsi j'adapte l'alimentation au circonstances.
J'ai rattrapé l'erreur de pH même si cela reste précaire les plantes se portent dans l'ensemble très bien 🌱🙏

Likes
22
Share


@coriander
Follow
Day 99 - Finally got to chop a plant! Chopped the cheese, did a rough wet trim and hung it all in my diy drying chamber (see video above). I knew I was going to be chopping one before the other, so I threw together a cheap unit out of a garment box I bought from a moving company.
-It came with a cross bar, so I cut the box and re-taped it the way I wanted it, to conceal everything proper.
-Then, I drilled some holes in the sides for ventilation and taped some carbon filter from my air purifier overtop to keep pests and dust out.
-Outside of the box, I've got a Coway air purifier pulling out the smell and adding a bit of air circulation (pulls air passively through the vents in the sides) .
-For added flair 😉, I threw some velcro on the flaps and built a thermometer/hygrometer into the front to keep an easy watch.
They will hang from some clip hangers I grabbed, for a week or so, or until they're ready. Then I'll do a dry trim and time to cure!
Super Lemon Haze is still plugging along and getting dense. Smells great, and although the leaves show a past of issues, the buds are looking amazing. Can't wait 'till she's done! It's really nice to have the extra space in the tent now too. It was getting a little cramped.
Day 105 -
Cheese is doing well in the drying tent. Stems aren't snapping quite yet, so will need a day or two more. Drying chamber is working great. No smell whatsoever.
Super Lemon Haze is STILL GOING and looking good. Done with nutes now and watching trichs everyday. Buds are beefing up. The leaves are starting to fade, but the look and colour of the flowers is wild. Can't wait for it to finish up. Should be sometime in the next week or so.
Will post a final harvest for the cheese soon!
Thanks for stopping by! 🥦


Likes
84
Share


@Wastent91
Follow
Cosa posso dire, sono impressionato dal risultato ottenuto, Nell insieme è uscita una grande erba, mi aspettavo molto meno sinceramente e RQS mi ha stupito! Grandi ragazzi 💪😸😻💜💖


Likes
19
Share


Likes
77
Share


@DogDoctorOfficial
Follow
Week 10 Flower — The Beauty Before the Finish
This week marks a very special chapter in the Eternity Grow Cup. As we approach harvest, the garden is simply glowing with beauty. Every corner, every canopy, every branch tells a story — and this week, I’ve taken the time to slow down and capture that story as best I can through the lens of my camera.
All the photos you’ll see in this update were taken with care and intention. I use my Sony camera in full manual focus mode, and I don’t just snap and go — I spend time with each plant, each angle, waiting for that perfect moment when everything aligns. These are not just photos to document — they’re my attempt to reflect the feeling of the room, the energy of the grow, and the soul of each plant.
Just like with the videos, I don’t shoot randomly and decide later. I record what matters, and what I record, I use. It keeps me focused, organized, and deeply connected to the process — and I believe it helps me tell the story more clearly, whether through stills or moving pictures.
All five Runtz phenos are finishing beautifully. Each one expressing unique traits, but all carrying the same stunning quality — dense, clean, colorful, resin-rich flowers that fill the room with pride. This garden is finishing spotless, and I couldn’t be happier.
This week’s YouTube episode will reflect that beauty. If you’re seeing this here on GrowDiaries, I highly recommend checking it out in full 4K once it’s live — there are moments that simply can’t be translated in photos alone, even though I try my best. But for those who love the details, the full spread of pictures is right here, as always.
t this point in flower, the girls are not eating — they’re just drinking clean water with nothing but System Clean in the reservoir, at a rate of 0.25 ml per liter. This is part of a gentle, prolonged flush phase I like to implement, giving the plants a chance to metabolize and fade naturally. The goal is to promote clean, vibrant flowers that finish with optimal expression, without rushing the process. No forced flush, just time and care.
Lighting-wise, the spectrum has been tuned with precision — we’re currently running 40% on the whites, with reds and UVs at 100% to drive trichome development, resin production, and color expression in these final days. The plants are loving it — they’re soaking in the deeper wavelengths that signal the end of their life cycle and responding with a final push of energy.
And yes — we’ve been running 11 hours of light and 13 hours of darkness from the very start of flower. It’s not the usual 12/12, and it comes with its pros and cons. On the upside, it helps speed up ripening slightly, encourages more compact flower formation, and mimics the natural seasonal decline in daylight. On the flip side, it slightly reduces the overall DLI (daily light integral), so you need to ensure your PPFD and spectrum are dialed in just right to avoid sacrificing yield. For me, the trade-off is worth it — the plants are expressing themselves beautifully, finishing strong, and packing on the final magic.
Now it’s your turn — I’d love to hear from you. Which phenotype is standing out the most to you in this garden? Which one is catching your eye with its colors, its fade, its structure, or just that vibe that speaks to your soul? Is it the frost? The density? The posture? Each of these girls has her own personality, and I know many of you have been following closely — so drop a comment, let me know: which one is your favorite? Which one would you take home?
This run has officially earned the Dog Doctor Official Wax-Sealed Stamp of Approval. These genetics are beautiful — expressive, vibrant, clean. It’s been a joy to grow them, and an even greater joy to share this journey with all of you. Of course, we still have the final word coming after harvest, drying, and curing — that’s when the full picture reveals itself. But until then, based on everything we’ve seen and lived in this grow… this is the real deal.
To everyone following the journey — thank you. To the sponsors, the community, the silent observers, the passionate growers, the haters, the lovers — I see you all, and I appreciate every bit of energy you send.
This cup has been about more than just growing. It’s been about sharing. Connecting. Creating something beautiful together. And we’re almost there.
Next stop: harvest? provably yes lets see !
Growers love always 🌿❤️
DD
Genetics - Runtz https://www.zamnesia.com/6000-zamnesia-seeds-runtz-feminized.html
Nutrients - Plagron https://plagron.com/en/hobby
- Aptus Holland https://aptus-holland.com/
Controls - Trol Master https://www.trolmaster.eu/
LED - https://www.futureofgrow.com/en
LED - https://www.thinkgrowled.com
Soil - https://www.promixgardening.com/en
Germination - Cannakan https://cannakan.com/?srsltid=AfmBOopXr-inLXajXu3QFgKXCXXos4F1oEvScjMKIB5MR5dk8-GJ-F49
DOGDOCTOR 15% off
Smoking Papers - https://ziggioriginal.com/
Terpene saver - https://grovebags.com/
As always thank you all for stopping by, for the love and for it all , this journey of mine wold just not be the same without you guys, the love and support is very much appreciloved and i fell honored with you all in my life
With true love comes happiness Always believe in your self and always do things expecting nothing and with an open heart , be a giver and the universe will give back to you in ways you could not even imagine so
As always, this is shared for educational purposes, aiming to spread understanding and appreciation for this plant. The journey with nature is one of discovery, creativity, and respect. Let’s celebrate it responsibly and continue to learn and grow together!
Growers Love To you All 💚
#EternityGrowCup #RuntzHunt #GrowersLove #CannabisCommunity #AptusHolland #ProMixSoil #TrolMaster #Zamnesia #Plagron #ZiggiPapers #Grovebags
Likes
89
Share


@nonick123
Follow
Dia 20 (05/02) Han pasado 8 días desde el ultimo riego. El sustrato de PRO-MIX HP se encuentra esponjoso al tacto a pesar de que está seca la parte superior
Riego 1 Litro H20 + Wholly Base 1,25 ml/l + Solid Green 0,5 ml/l + Rise Up 1 ml/l de Gen1:11 - pH 6,23 TDS 660 PPMs
Día 22 (07/02) Vamos a probar a hacer este ciclo con LST
Día 23 (08/02) A +24 horas la planta ha reaccionado muy bien al LST. Se han estirado las ramas inferiores y la rama apical se sigue estirando
Día 25 (10/02) Sigo con ajustes de LST para abrir la canopia. La planta está reaccionando con mucho vigor 😍💥
Este día añado a la carpa el sistema TrolMaster TCS-1 Tent-X
Día 26 (11/02). Riego 1 Litro H20 + Wholly Base 1,5 ml/l + Solid Green 0,75 ml/l + Rise Up 1,25 ml/l de Gen1:11
TDS 780 PPMs - pH 6,36 (mínimo ajuste con pH+ para subirlo desde 6,2)
La planta avanza vigorosa. En una semana pasamos a 12/12 😁
Nutrients by Gen1:11 - www.genoneeleven.com
Substrate PRO-MIX HP BACILLUS + MYCORRHIZAE - www.pthorticulture.com/en/products/pro-mix-hp-biostimulant-plus-mycorrhizae
Controlled by TrolMaster TCS-1 Tent-X System Main Controller - https://www.trolmaster.com/Products/Details/TCS-1

Likes
3
Share


@Downunder90
Follow
🌿 Yo, Have You Seen This Grow? Gorilla Cookies FF by Fast Buds Is Looking Fire! 🔥
Man… Gorilla Cookies FF is lookin' like it’s about to go off. You ever smoke Gorilla Cookies? It’s like a sweet punch in the face — in the best way possible.
So check this — it's not your regular autoflower. This one’s Fast Flowering — a photoperiod strain that flips quick. 7 weeks of bloom and boom, you’re lookin' at frosty nugs with that dank cookie-diesel funk. Straight Fast Buds magic.
Genetics That Slap
This strain's a mashup of two absolute legends:
Gorilla Glue × Girl Scout Cookies
That means crazy resin production, chunky buds, and that earthy-sweet-gassy flavor combo that hits different. Like, we’re talking up to 29% THC. Yeah. That strong.
🌱 The Grow So Far (Weeks 1–3)
Organic soil in a 15L pot
300W HID light on 25% power
Perfect temps (23–25 °C) & humidity (~65%)
Bio feeding with Green House nutrients
Already transplanted — and she’s stretchin’ up nice
I checked the pics — she’s still a baby, but those leaves are lush. That deep green, wide fan leaf vibe… no signs of stress, no stretch too early. You can feel the potential just lookin’ at her.
📸 First Glance = Big Promise
Honestly, this one’s got that look. You know the look — when a plant’s just ready to explode into a frosty jungle. I’m tellin’ ya, if she keeps goin’ like this, we’re lookin’ at a full-on terp storm in a few weeks.
Likes
7
Share


@Forestry420
Follow
All in all it's a good high but the light I used sux . I barely got 2 ounces off 8 plants. Time for round 2!!!
Likes
4
Share


@brosef_b_baggin
Follow
The indoor plants are developing a mobile nutrient deficiency(newer growth is pulling from older leaves)in the lower leaves. Nutrients are being locked out(too much of one nutrient is locking out the others in the soil, or temperatures are too cold in the soil) or they are being tied up in solution whenever I mix the lotus nutrients(I’m adding bloom and boost into the same gallon, so maybe the chemicals are reacting with each other and becoming unavailable to the plant). On top of my nutrient dilemma, fungus gnats have found their way to my moist soil and are being a nuisance. From what I found they’re surviving off of my woody material in the soil and will soon try to establish it as a home so I’ve got to go get some IPM.
Outdoors is vibing with the pest pressure so I’ll continue to let it do it’s thing.
Processing
Likes
11
Share


@GreeneRecluse86
Follow
Such a great week watching these ladies bulk up!
It's looking like the gorilla zkittles won't get a full week on its current food schedule before I start it on its winter frost and flushing. The Red diesel and Phantom will probably take another two weeks on there food schedule.
Happy growing people!
I wish I would've started this grow sooner, then I wouldn't of ran out of stash during this quarantine!

Likes
24
Share


@3lementa1
Follow
I realized there may have been a bit of a light leak in the late morning. I taped everything up more. In the future I want to maintain better reflective integrity on the inside of the tent.
Everything looks good. The buds are still growing a little taller and filling out. The CBD Blue Shark is super frosty. It's actually absurd. Orange hairs are coming out in all plants.
I was hoping to be able to keep the exhaust window open overnight to let the overnight temps drop 10 degrees to encourage the purples in the WC genetics, but it's too humid now to have the window open without the grow light on. Otherwise the rh goes up to 70% overnight and it's not worth the risk. Next year I'll flip earlier when it's still colder and drier out for the harvest window.
This flowering period has been really cool. I've really been noticing the process of flowering. The calyxes open up and turn into pistils and sugar leaves, and more keep appearing and popping every day. It's awesome.
March 04 watered again with straight water. They're finally drinking more than once a week! The pistils seem more red today than yesterday. I got a $30 micro camera to check trichromes, they all seem clear for now (there is some glare in the pics). No amber for now at least.
March 05 found some amber trichromes
March 06 lots of leaves are going yellow. We're definitely in the home stretch.
March 06 I've been a little worried about the size of the colas. There's not much sticking out past the canopy. I've also noticed a bunch of new leaves that have started popping out and I was a little worried that the buds were foxtailing or herming. I've had temps go up to 30 a couple times in the morning before I open the window. But it seems that the buds are filling out more and getting fatter, not just foxtailing, and I think they're getting ready for one last push, not just getting full of leaves for no reason.
It changes a lot every day. Tomorrow is the 23rd week of the grow. I switched the lights on a Thursday so this Thursday will mark 8 weeks of flowering time and the beginning of my harvest window (8-9 weeks for both strains).
Likes
2
Share


@regionallystoned420
Follow
Didn’t record footage of veg stage but it was in veg for just over 7 weeks and flowered at just spot on 8 weeks . Nice tight buds. Heavy stone but won’t make you too lazy to get about your day like a cheese almost