
Likes
Comments
Share


@GYOweed
Follow
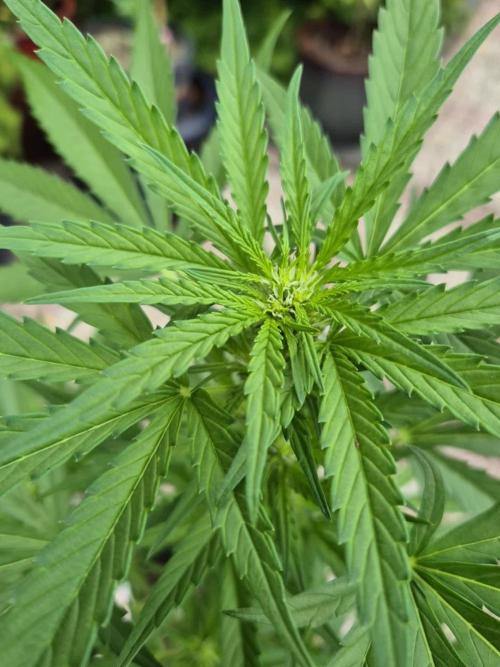
Two Chile Verde clones by HBK genetics 🙌🙏 from Buds N Roses.
Will be testing some natural pgrs and BAP to mid flower one one clone and test my DIY K Citrate krebs cycle stimulator.
Will also see the difference when using immune triggers like chitosan foliar and harpin vs none.
11/20 ph runoff was 6.5 and 1250ppm

Likes
19
Share


@growbville
Follow
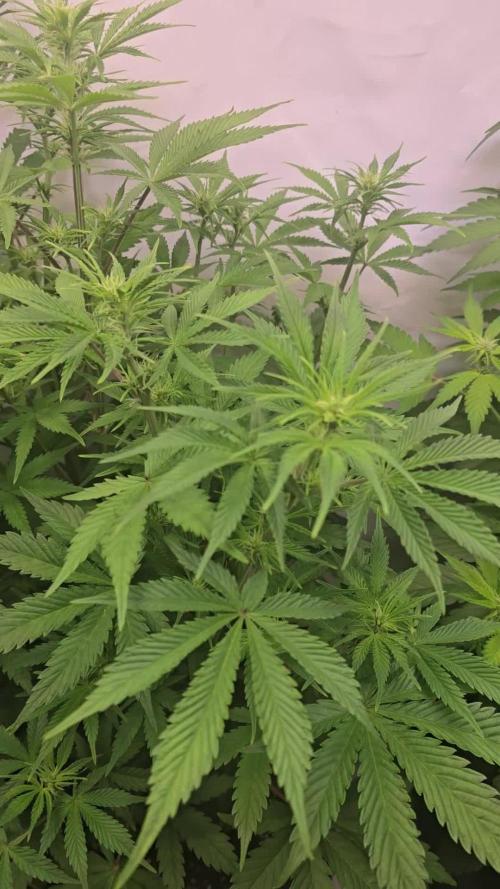
Week is looking good so far. Kaya's Coffee is a taller plant with less leaves than other strains. Where it lacks in leaves it adds in height. I have been removing damaged leaves from light burn slowly but surly.
day 13
have leaves getting yellow on the ends... Adjusted my PH down from 6.0 to 5.5. I was keeping the PH high for the plants to take up more Cal-Mag. So I'm thinking the PH is keeping them from taking up Nitrogen causing the plant to take it from other leaves.


Likes
24
Share


@eh_eh_eh_buds
Follow
so this was the last week before harvest.. i intended to cut her down christmas day but decided to put her in 2 days of darkness before the chop.. she is now harvested an sat for a few days be4 entering jars for a curing.. the smell and these nugs is so yummi 😅
Processing
Likes
10
Share


@yaron
Follow
starting week 6,the wedding cheesecakes are in flower for a couple of days now and the gg are starting to flower.
alot of wind and clouds and rain these past two weeks but the girls are looking good in my opinion.
update:after 4 or 5 days of rain and low temperatures finally the re is sunlight so the girls have to recover a bit.
but things are looking better wheatherwise.
cheers!

Likes
1
Share


@Pierrougarou21
Follow
Debut de semaine 6
Arrosage a l enhancer .
L odeur se fait plus présente
Les differents sites floraux se couvrent de trichromes et commencent a gonfler de jours en jours certaines filles commencent une sénescence précoce. J aurais du ajouter 1 ou 2 G de biobloom a la troisieme semaine de floraison. Ayant des clones des differenets filles je saurais lors d un prochain run comment tirer le meilleur et agir pour chacune d entre
Processing
Likes
15
Share


@Luv2Grow
Follow
Day 64 - Starting another week and she’s definitely frosting up pretty nicely. He being closer to the light is also helping her fatten up quite a bit. She’s looking amazing! She will be getting another two gallons of water either Sunday or Monday.
Day 65 - She’ll be needing some water for sure tomorrow and will give her another light defoliation as well, some of the fan leaves are getting huge and blocking light.
Day 66 - Should of gave her some water and nutes yesterday because she was seriously droopy today. She took another 2 gallons of water so she should be perked back up in a couple hours. Other than that, she is frosting up beautifully.
Day 67 - She’s really been bulking up lately and she’s perked up after getting some water and nutes yesterday. Did a little defoliating today to get some of the giant leaves off and out of the way. She’s definitely still got a few weeks left so will continue feeding her nutes, at leas for the next couple of feedings and then see where she’s at.
Day 68 - All still looks great and starting to smell kinda fruity. Other than that, just watching her chug along everyday. She’ll need some water on Friday.
Day 69 - A lot of trichs are really clouding up and everything is looking great with this girl. She’s gonna have nice, fat and dense buds and can’t wait to harvest this girl. Will be giving her some water and nutes tomorrow, the pot is starting to get pretty light.
Day 70 - She got her next feeding of nutes today. I thought she could probably go another day but last time I did that, she was really droopy so trying to avoid that.

Likes
422
Share


@Crashoverite
Follow
Hi everyone.
Welcome to my🍌💜👊 week update.
Hope everyone keeping well and having a great week.
Daily updates and uploads so if week not over yet. Please revisit to see full week content😊
Thank you all for such amazing support 😊🤗💜
So far everything is going great. No issues at all. Both girls started preflower on Tuesday and already I can see that they started stretching nicely. Scrog net will be installed by the end of this week.
Week 5
13-19 Nov.
13/11 day 36
First runoff experience for girls. Loaded both pots with approx. 2.5 ltr each in 4 stages of 500-700ml. Runoff 100-150ml from each. Runoff PH 5.9. Nutrients for this watering were same as on previous week and added only calmag. Next watering possibly Friday but with new measurements.
14/11 day 37
Both 🍌💜👊 girls started preflower on same day. Xena is catching up quick to her larger sister and possibly soon they will be sharing this growing space 50/50
15-16/11 days 38-39
Just happy and healthy days 😁 nice steady growth.
17/11 day 40
Second watering for this week. 5.5l beetwen both. Runoff Ph 6.1
19/11 day 42
Most busiest day so far. Both girls got very bushy in last few days and they stretched enough to install scrog net. Before installing net applied selective defoliation on both girls. 8-10 fan leaves from each.
It's the end of this amazing week 😁
Thank you all again for such a great support 🤗✌️💚
Likes
11
Share


@greenvibez
Follow
Todas las semillas salieron perfectamente ! Como siempre un placer de hacer colaboración con PEV seeds !
Espero tener más mano con este cultivo … saludos


Likes
41
Share


@Compassionate_Gardener
Follow
My grow of 8 plants in 4 cups (-->2 girls in a cup) of BANANA KRUMBLE (=Banana Punch x OG-Kush) from GREENHOUSE SEEDS is now in week 14 (counted from germination). This means they have been growing for 6 weeks and then flowering for 8 weeks. They have a VERY NICE reddish to almost purple coloration as you can see in the pics. The buds are COVERED in TRICHOMES with a thick white layer of crystals...its AWESOME to see. The plants are STICKY AS HELL, if I accidentally touch a bud my fingers stick together like they are SUPERGLUED! 😜 All side- and mainbranches have grown into BIG COLAS and are filled with hard and compact buds...simply DANK! 😎 The AROMA of the Banana Krumble plants is now even SWEETer and FRUITier than before! It reminds me of ripe bananas with a hint of cinnamon...simply DELICIOUS! The sweet smell has a 'gassy' or 'fuelly' undertone, which comes from the OG-Kush parent...very ENTICING! The strength of the smell is overwhelming strong and it surprises me each week that it can get even stronger!
The 8 plants fill out the whole area of my HOMEBOX AMBIENT R120 grow-tent and have grown to 80 cm of size. The fan-leaves are starting to wilt now and turn red and yellow already, which means the plants are getting ripe now. My two layers of trellies hold up the plants well, I am glad I put them in earlier. The BIOTABS nutrients are still working well, the only thing I have to do, is give the plants PURE TAB-WATER (no need for measuring EC- or ph-value or do a ph-correction!). Its SO SIMPLE AND CONVENIENT...I LOVE IT! The nutrients are precisely measured to last the FULL CYCLE, but also not too much, so they are gone at the end. At harvest time you do NOT want any nutrients left in the plants, since that makes the smoke harsh and scratchy in the throat. A good tell-tale is the yellowing of the fan-leaves, once that starts you know the plant uses its own sugars now and all nutrients in the soil are gone. Ay havest time you WANT YELLOW leaves, a green plant mostly has NOT BEEN FLUSHED properly and then it will hurt when you smoke the dried bud! My three SANlight LED-lamps are still hanging at 40 cm distance to the top of the plants. The two outer Q4W-Gen.2 lamps are dimmed to 100% (=three green lights on dimmer ON) and the Q3WL-Gen.2 in the center is dimmed to 80% (=two green lights on dimmer ON). The plants LOVE the spectrum and light-intensity of the SANlights, its amazing to see them flourish! Until now this round is developing FANTASTICALLY and I am totally happy with the genetics from GREENHOUSE SEEDS...👍😎


Likes
2
Share


@fabialien
Follow
13 Agosto 2024. selección de semillas y colocación en vaso con agua ph 6.0 con agua Oxigenada.
14 de Agosto se ponen en agua las semillas por 24 horas para hidratación.
15 de Agosto, con las semillas con muestra de radicula procedemos a pasarlas a papel absorbente.
16 de Agosto se muestra la radicula avanzada.
17 de Agosto en la mañana se puede apreciar el crecimiento de la radicula.
17 de agosto en la noche trasplantamos a "Peat Pallet" y una a maceta de cartón ya que la radicula creció bastante.
18 de agosto ya en los "Peat pallet" se pueden mostrar qué las semilla se cayo por completo e iran abriendo en el transcurso de las horas, las tenemos en un domo germinador dentro del Indoor.
🌡️ 27.1 ⁰C
💨 75% Humedad
🌫️ 0.9 VPD kPa.


Likes
7
Share


@Mr_nugs_lover_David
Follow
As always it's just a pleasure to grow this sativa dominant strain which definitely reminds me of a great indica with her extremely fruity and tropical sweet terpenes, very happy to have her in my garden and to be able to smoke such a high quality strain once again, hope you guys have enjoyed as much as me!

Likes
225
Share


@The_Projexx
Follow
We on the cusp of the end ! Starting my flush this week to get that ultra super smooth smoke and flavour . The ladies have displayed quite the amount of purple on the leafs and some nugs . GG#2 is displaying far far more purple then GG#1 they are indeed different pheno's its gonna be quite the treat to taste the difference between the two . I've watered them already twice now with Flawless finish . Now it's just straight PH corrected water till we reach home base !
A special thank you goes out to everyone who comes down to the diary . You guys rock and I wish you all the best . Another thank you goes out to all my followers that I've gained along my journey ! Stay tuned for them daily updates and weekly video's guys much love !
-Happy Growing!

Likes
4
Share


@losgrowershermanos
Follow
1 - Gelato 41 - Somente água (only water)
2 - Big Buddy - Somente água (only water)
3 - Gelato 41 - Somente água (only water)
4 - Ak-47 - Somente água (only water)
5 - Generic Auto - Somente água (only water)


Likes
11
Share


@Crwfz1
Follow
Long hard life for this babby nearly died inside under scrog due to ph problems put her out side early summer and it cane back slowly but shurely so couldnt expect as much as usual love it tho all the way around goood stuff packed with crystals it really didnt appreciate cold climate either i dont think but turnout was great

Likes
5
Share

@ThatsmyGrow
Follow
It's not as resistant as I'm used to. Therefore, next time I would only grow it under good conditions and constant observation.
Likes
75
Share


@DogDoctorOfficial
Follow
Epic Harvest Chronicle: The Journey of Panty Punch Auto
In the annals of our cultivation journey, there exists a tale of unparalleled growth, resilience, and triumph. Join me as we embark on an epic chronicle, tracing the extraordinary journey of Panty Punch Auto from a humble seed to a majestic harvest, overcoming obstacles and defying expectations at every turn.
Our saga begins with the planting of a single seed, filled with the promise of potential and the whisper of destiny. From the moment she emerged from the soil, Panty Punch exuded an aura of vitality and vigor, her roots delving deep into the earth as if driven by an ancient force.
As Panty Punch grew, so too did the challenges that beset her path. With each passing day, she stretched towards the heavens with an insatiable thirst for light and life, threatening to outgrow her confines. It was then that we intervened, bending and securing her with sticks and glue, a testament to our determination and ingenuity in the face of adversity.
Rooted in organic soil enriched with Aptus nutrients, Panty Punch flourished under the gentle care of nature-inspired solutions. From seedling to harvest, she received a balanced diet of essential minerals and organic compounds, fueling her growth and vitality. It's a testament to the power of soil and nutrients in cultivating robust and vibrant plants, and Aptus has undoubtedly played a pivotal role in our success.
In all my years of cultivation, I've never beheld anything quite like Panty Punch Auto. She stands as a towering testament to the potential of autoflowering genetics, defying convention and surpassing all expectations. From her towering height to her abundant foliage, she is by far the largest auto I've ever had the pleasure of growing. It's a testament to the marvels of modern breeding and the boundless possibilities that lie within the realm of autoflowering cannabis.
Guided by the radiant glow of the Lumatek Zeus LED, Panty Punch thrived under the sun-like spectrum of light that bathed her in brilliance. From vegetative growth to flowering, the results spoke for themselves, with dense buds and resinous trichomes adorning her branches like jewels in a crown. The Lumatek Zeus proved to be the cornerstone of our success, providing the perfect balance of intensity and efficiency to fuel Panty Punch's journey to harvest.
Throughout her growth cycle, Panty Punch was under the watchful gaze of the TrolMaster Tent-X, a marvel of modern cultivation technology. With precision control over every aspect of her environment, from temperature and humidity to lighting schedules, the Tent-X ensured that Panty Punch had everything she needed to thrive. It's not just a controller; it's the key to unlocking the full potential of our cultivation endeavors.
Rooted in the rich genetic lineage of her parents, Panty Punch Auto is a testament to the breeding prowess of Seedstockers. According to the breeders, she is the progeny of select auto-flowering genetics, carefully bred to exhibit exceptional vigor, potency, and yield. With each generation, her lineage has been refined and perfected, resulting in the awe-inspiring specimen that stands before us today.
As we bid farewell to Panty Punch Auto, we do so with a sense of awe and reverence for the journey we've shared. From seed to harvest, she has been a beacon of resilience and vitality, a testament to the power of nature and human ingenuity. And as we savor the fruits of our labor, we extend heartfelt thanks to Aptus Holland for their unwavering support, to TrolMaster for their innovative technology, to Grow Diaries for the platform that connects us all, and to the vibrant community of growers for their endless inspiration and camaraderie.
In the end, Panty Punch Auto stands not just as a plant, but as a symbol of what is possible when we dare to dream and nurture those dreams into reality. May her legacy endure for generations to come.
#PantyPunchAutoAdventure #RootsAndFruits #TrolMasterControl #GrowDiariesCommunity #CultivationExcellence
Genetics - Panty Punch Auto - https://seedstockers.com/
Plant nutrition - Aptus Holland - https://aptus-holland.com
LED Photons - Lumatek - https://lumatek-lighting.com
Controls - Trol Master - https://www.trolmaster.eu/
Watering - myself
Love and attention - Me, myself and i
As always thank you all for stopping by, for the love and for it all , this journey of mine wold just not be the same without you guys, the love and support is very much appreciated and i fell honored and blessed with you all in my life, With true love comes happiness. Always believe in your self and always do things expecting nothing and with an open heart , be a giver and the universe will give back to you in ways you could not even imagine so
More info, the ocasional give-away and exclusive updates from all my adventures can be found - links in the profile description
Friendly reminder all you see here is pure research and for educational purposes only
Growers Love To you All 💚 💚 💚
