


Likes
10
Share


@PurelySly
Follow
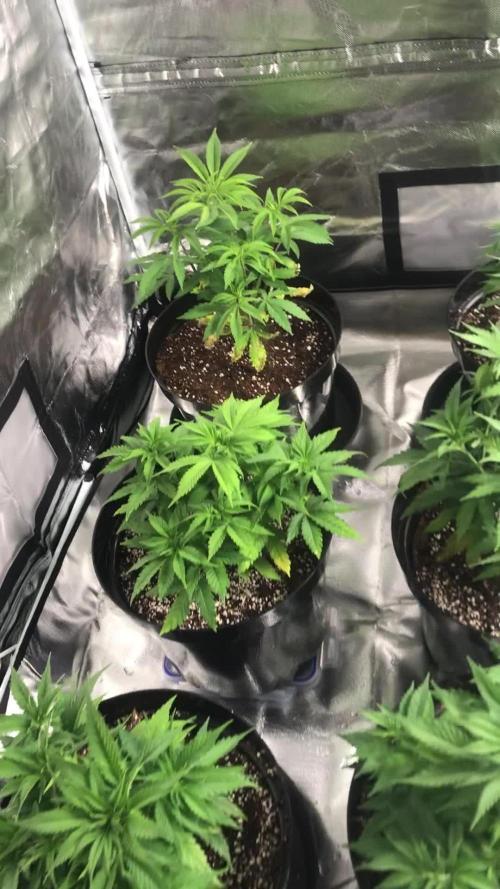
Lookin good so far still feeding them almost every watering. Lotus nutrients at about 75% concentration.

Likes
18
Share


@BrownsBuds
Follow
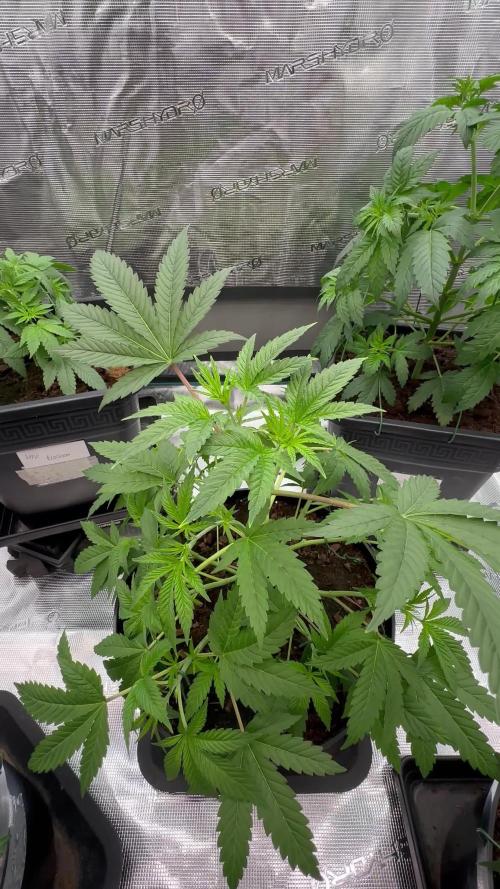
Three plants are continuing to grow well and starting to grow a lot more in size. The Dr jack strain is still showing curled folding leaves and marble effect on leaves.

Processing
Likes
18
Share


@Cannibalgardens
Follow
Boy she has been through a lot but it doesnt slow her down she pushes on . The tent set up was so off that she just took a huge hit and is just getting better now and starting upwards growth again .. The genetics are good but I'm stressing this baby out the last two weeks and looking forward to her future growth and success ..cheers family

Likes
3
Share

@MartianFarmer
Follow
13 days in till I switch over to 12/12 flower time whoop in the meanwhile I will be fitting a scrog net for plants. ✌️👽


Likes
Comments
Share

@Budhunter
Follow
Week 4 Veg - day 36
I did some lst this week.
Been giving to her 2l water + fertz each 3-5 days depending on how dry it is.

Likes
40
Share


@Secretflower
Follow
Hello my friend,
...May 16 2022..Day N°55..
...Flowering day N°9...
Second week of flowering for my 2 Feminized Runtz Gum, 2 Feminized zkittzy Gorilla and 2 Feminized Banana Sherbet. They are fine and they growing healthy and stretching good.
I gave them water with some Hybrid powder from Green House Feeding.
I saw beginning of Cal/Mag deficiency so I gave them Cal-Green from Metrop, it's a super concentrated product, I got that bottle since 2 years.
My babys are under a Mars-Hydro SP 3000 at 50% of power and at 40 cm of the canopy.
www.originalsensible.com
www.mars-hydro.com
That's all for now my friends, thx for passing through here.
Wish you the best with your green projects.
See you soon..💨💨💨

Likes
8
Share


@madlangs
Follow
All going well. No problems.
Smoothie and strawberry nuggets have about a week left and looking nice


Likes
23
Share


@Bongtokinalkoholik1605
Follow
Everything is going very well no deficiency or over feeding I raised the ppm from 650-800 area to right at 1000 plants really seemed to appreciate that the best thing about this entire grow is the day to day progress you can very easily see this strain has been awesome and fun . Just did probably the last major defoliation the girls will see from here on out im just going to let them do there thing well thats all I got til next week 😎😎😎

Likes
38
Share


@Danger90946
Follow
Day 106 12/25/2021 being of a new week and this will be more than likely the last week this lady gets any nutrients thinking Wednesday. After that will start flush with collected rain water. After checking trichomes they were about 85% cloudy about 10% clear and 5% amber which is right where she should be since the end is coming fast.
Day 110 12/29/2021- Started flush today and will continue to just feed rain water until next Wednesday. Will cut her down next Friday 01/07/2022.

Likes
91
Share


@Salokin
Follow
Hi Growmies,
Not much to report, other than that her buds are coming along very nicely, filling the colas and starting to cover herself in trichomes. She is extremely thirsty, finishing up to 1.8—2l a day. I fed her the last tester of rokzbastic and will afterwards go down with the nutes. Still defoliated slightly as I wanted to get the colas a bit separated for aeration and light penetration.
I have also added a pic of the orca bottle I use, just in case ;)
Thanks for stepping by and hope to see you next week.
Likes
241
Share


@Still_Smoq
Follow
📆 Week 18, 21-27 May 2024
21-27 May - Observed and let the plant mature.
📑 At this point in the grow there is nothing much left to do except observe the plant and let it finish maturing. Although the bud size is somewhat smaller than anticipated, they appear tight and very uniform. The trichomes overall are 80% milky/10% amber/10% clear. Almost all pistil hairs are dark, and her smell has peaked with a sweet pine, gas, fruity scent. This was the last week of flower and she’s ready for the final week of flush and harvest.
🍶 21 May changed nutrient solution
🍽️ 21 May updated feeding schedule
💧 Using reverse osmosis water with EC/TDS at 0
🐉 Nutrient Solution EC .9 at 70 degree F
🔆 Light power: one at 75%, and one at 50%, DLI 35-40 canopy coverage at 12hrs
😤 Using General Hydroponics, HGC728040, Dual Diaphragm Air Pump, 320 GPH
That is it for this week. Thanks for the look, read and stopping by.
Likes
150
Share


@RussianGrower
Follow
Hello, again in touch Russian grower. Today my girls 70 days, 10 weeks. The fruits make me very happy, and the smell knocks me down. Soon I plan to make the harvest Bubblelicious Auto, my patience is not enough, and in appearance we can say that this is a full Mature flower.
Despite the additional air filtration and automated odor neutralizers for bathrooms, the smell is coming out the door. But it remains to endure quite a bit, so I'm not afraid. The most difficult is behind, but a lot of pleasant in the future.
Bubblelicious Auto - The smell of these plants has become simply stunning, like a hammer blow to the face, I hope the quality of the final product will not be worse. They look like beautiful porn Actresses 😍 In the microscope I see amber trichomes.
Neville Haze Auto-lives up to my expectations. They do not have enough space for full flowering, but soon they will be spacious. Because of their neighbors, I can't really smell them. The plant is very cheerful, progressing, but I think it will bloom for at least three weeks.
I also have some good news, mail delivery brought me measuring instruments, so now my diaries will be more accurate.
I Express my gratitude to all those who follow my progress and support me. Your moral support is very important to us. I'm not going to stop, and promise to please you with new and more interesting diaries. Hope all goes well and the police pass by me! 😎


Likes
31
Share


@Grey_Wolf
Follow
Super Skunk Kush GOG Autumn Cup
18th January 2022
She is looking good 😀
should start to see some stretch now that flowering is getting very close .
I'm hoping it fills the wire cage by the time it is in full bloom we shall see 😎
Waiting on some guano for the bloom booster as well as a few jars of molasses .
I am enjoying this grow so far and hope I can do well in this comp by getting some frosty bud at the end 👊
Thanks once again for stopping by 👍


Likes
422
Share


@Crashoverite
Follow
Hi all 😁
Hope everyone keeping well and having a wonderful week!
Thank you all for such amazing support on this bananas journey 💚💚💚
Will be updating this week journal daily so please remember to revisit to see full week content.
So far this grow it's going great. Girls are stretching by hour. Great health, nice green colours, more and more squares taken on the netting, flowering nicely progressing, I'm very happy 😁
Planning to apply more selective defoliation, especially to Xena. No changes to nutes except few extra drops of calmag just in case and will try to fill the net entirely.
Week 7
Nov 27- Dec 3
Nov 27
Selective defoliation applied on Xena. 8-10 mainly small fan leaves. She is still a bit shy to open as much as her sister. No rush my girl. You still doing great!
Nov 28
First watering for this week.
7ltr beetwen them both with 4h spread. Runoffs. Xena 300ml PH 6.1 Athena 250ml PH 6.4 😁. So far the largest amount of my magic mixture consumed by my 🍌💜👊 girls. Well done👏
Nov 29-30
Leaves tucking and joyful observation🤓
Dec 1
Selective defoliation and first stage of lolipopping on both girls. Decided to go a bit heavier as tomorrow heading for trip and wont see my girls until Tuesday! They will be all alone without any supervision so hopefully they will behave and I will be nicely surprised of their development on my return. Watered with 2tr mixture and sprayed with water and fish mix solution right after defoliation. Planning to feed them tomorrow as much possible 6-7ltr before heading off to our voyage to Amsterdam 😎 do anyone know ls if any of coffeeshops have Fastbuds strains available? Would love to try 🍌💜👊🤤😋
Dec 2
Girls watered as above and both PH 6.4 on runoffs.
Dec 3
Girls are unsupervised until December 5th.
Thank you all for such amazing support on this journey 😊 love you all!!, 💚💚💚
Stay tuned for upcoming week update right after my return.
Peace and love brothers and sisters ✌️💚
Likes
2
Share


@Barzenegger
Follow
Nothing much happened since last week. The foxtailing continues on the NYC and BJ. Mostly white pistils still. Found another banana on the SAD.
It's definitely going to take a few more weeks.
Likes
79
Share


@Targona
Follow
57 days since my little girl sprouted from seeds🌱
Eighth week of growing my Red Pure Auto CBD 💚❤️💚❤️
Nutrients:
As I mentioned last time, I switched to mostly organic nutrients from Plagron and Biobizz💓 -
Plagron Alga Bloom - is a complete fertilizer designed exclusively for the flowering phase. It contains all the important substances that the plant easily absorbs 🌸🌾
----------------------------------------------------------------------------------------------------------------
Plagron Sugar Royal - Sugar Royal is a supporting enzymatic fertilizer designed exclusively for the flowering phase. It contains hormones, enzymes, vitamins and trace elements necessary for proper flower development🍭🍭🍭
----------------------------------------------------------------------------------------------------------------
Plagron Green Sensation - Green Sensation is a professional flower stimulator and activator. It contains all the necessary ingredients to support flowering and also the formation of sugars, and thus the overall yield 🌊🌿
----------------------------------------------------------------------------------------------------------------
Plagron Power Buds - is a biostimulant for greater bud formation and accelerated flowering 💚🏵️💮
----------------------------------------------------------------------------------------------------------------------------
JUNGLE X Environ is a highly effective complex preparation for stimulating flower formation. 🌸🏵️
---------------------------------------------------------------- -------------------------------------------------
BioBizz Bio pH - is an organic pH regulator. An aqueous solution of citric acid, which is naturally found in citrus fruits 🍋🍋 - I did not use it this time because the pH of the dressing was 6.5+
---------------------------------------------------------------- -------------------------------------------------
BioBizz Calmag - 100% vegan and certified product Calmag is made from calcium carbonate and magnesium sulfate, supplemented with humic acid. Unlike other products, the all-natural Biobizz CalMag does not contain any nitric acid and therefore does not affect the NPK or EC values of the solution 💩💩
-----------------------------------------------------------------------------------------------------------------------
Terra Aquatica pH Test Kit - Very reliable, easy to use and inexpensive. The pH test kit conveniently replaces expensive pH meters. It contains a wide range from 4.0 to 8.5. 🌈
Overall:
Red Pure Auto CBD 💚❤️💚❤️ - The girl is still beautiful, the buds are getting thicker and bigger. The color is really dark purple and from the tops of the buds reaches up to half the leaves 💜💜🍃🌿 They are slowly starting to shine as they are covered by a layer of trichomes, which look like a snowy landscape on the tall buds and some of them already have a brown b ❄️🌨️🗻🗻
Training:
This little girl does not need training at all, she keeps a beautiful shape. It's not too tall and still looks like a Christmas tree 🎄🎄 I just cut off a few extra leaves last week 💚🌞🌞
Light: Mars Hydro TS1000
The plants respond effectively and the light is technically very well managed - I try to have 50 cm between the light and the plants, so I move it up regularly 💡💡💡
Thanks for the likes :)
See you soon 😍😍
Likes
15
Share


@SamDo
Follow
Hello,,, semaine 8, floraison 4.
Les plantes se portent bien pour le moment malgré le manque de place. Le stretch est fini, elles ont leur taille final je pense, à plus ou moins 90cm pour les plus grandes.
Maintenant, ce sont les buds qui commencent à se développer en taille. Les trichromes continuent leurs apparitions. L’odeur commence aussi à être bien présente.
Voilà pour cette semaine...
Happy grow... 😎

Likes
8
Share


@reirrac1
Follow
Slowly but surely these purple, chunky buds have taken shape! Plus they’re hard as a rock, and they smell like cologne and sweet fruity candy. Extremely excited to chop her down within the next couple weeks as she ripens.