
Likes
Comments
Share


@DRO420
Follow
About a week away from flipping to flower , going to scrog them very soon. Looking super healthy.


Likes
4
Share


@KCChiefers
Follow
Day 65 Update: Watered both plants with almost a gallon until runoff. Plant #2's water was dosed with Terpinator at 25ml/gal. 11 days left of flushing on Plant #1. This will be Plant #2's last nutrient watering, as she will start the flushing process next watering. Also added two yoyo hangers and two stakes to Plant #2 as her branches are getting heavy (not complaining 🤷♂️)
Day 68 Update: Starting flush on Plant #2 today. Plant #1 has 8 days left of flushing. Watered both plants with almost a gallon of pH balanced water until runoff.

Likes
19
Share


@adam_pawloski87
Follow
Let’s Go Day 67 from seed !! So this week went real great! 2 Ogreberrys an Bruce Banner started getting flushed! The rest will follow up and start flush next week ! Today the 3 will continue getting flushed while the 3 others get there dose of nutrients, PHd at 6.5! Let’s grow lil ladies let’s grow!!! You all have an amazing productive day as well as a a great safe week !! Peace love and positive vibes to y’all Cheers 😶🌫️💨💨💨💨🤙🏻If there’s any questions please ask, I’ll be opened up to answer at best of my knowledge! Thank you all have a dank day !!


Likes
12
Share


@2Stones1Bird
Follow
Checkout my Instagram @smallbudz to see the Small budget grow setup for indoor use, low watt, low heat, low noise, step by step.
01/11/2019 -
Started using BioBizz Alg-a-Mic on spray, using it once per day at lights off, 1 or 2 puffs to create a light mist, only on non feed days,
I mixed 0.1ml on 100ml water 6.4 PH.
03/11/2019 - Gave her 250ml plain water with 6.4PH
05/11/2019 - Gave her 0,15ml of each BioBizz Grow, Max and Bloom on 300ml water 6 PH didn't manage to get it higher to 6.3 at least.
06/11/2019 - She started to show some pistols, probably entering pre-flower.
07/11/2019 - Soil was to dry due to 2930c temps gave her 0,500ml of 6.5PH water with 0,25ml Grow, 0,25ml Max, and 0,45ml Bloom BioBizz.

Likes
97
Share


@AsNoriu
Follow
Day 106. Trim jaiiiiiilllllllll !!!!
First done, think it could reach my record 240. Insane quality. 4 rows of solid buds hanging ....
Next one ....
Both finally finished and honestly, that's my plants to be proud of !!!
Day 114. All is done, no doubts its my best grow.
Happy Growing !!!

Likes
8
Share


@Professor_Daank
Follow
Pushed EC a bit this week.
EC Target
1300-1600
1730 1679 1637 1831 1852 1991
Things is growing well. Bud nodes are tight and getting hairy!
Likes
8
Share


@KushKingOrganics
Follow
* Day 43- watered with recharge. And sprayed with neem oil + half a teaspoon of dish soap. As a preventative measure to pests and pm. Will give another spray of this the day I flip to 12/12. Also changed light cycle to 18/6. Will flip to 12/12 on day 49.
* Day 44 defoliate lower part of all plants. Continued with more lst by pulling down the tops.
* Day 49 got it’s last spray before switching to 12/12.


Likes
8
Share


@Black_Widow
Follow
Привет садоводы !
Началась новая неделя
растение чувствует себя хорошо
сегодня я приготовил ей новый компот, а на днях сделал реактор CO2 из сахара и дрожжей
будем наблюдать дальше , как пойдут дела .


Likes
4
Share


@Gorey
Follow
mid next week it will be the harvest, the trichoms are very milky. the smell is excellent. on the video in order: cbg, thc then cbd

Likes
2
Share


@Ninjabuds
Follow
Unrefined wild structure but super dank small buds with some cool colors and there super dense


Likes
17
Share


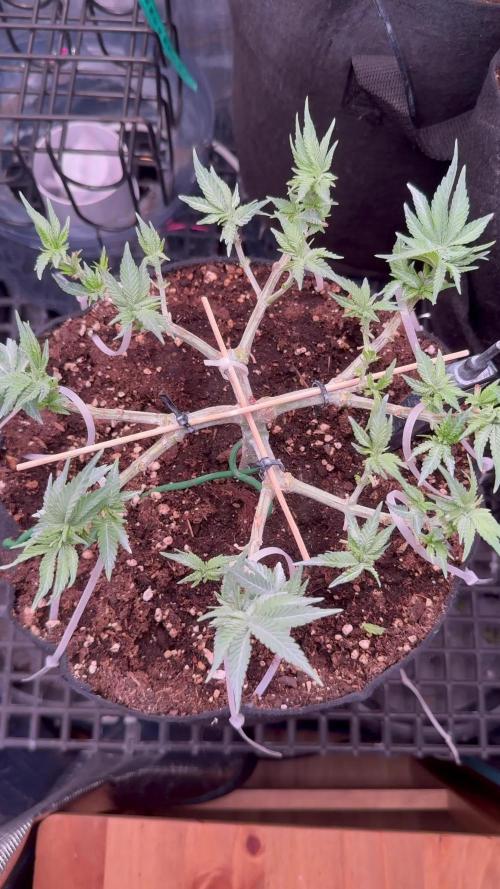
@Huntress007
Follow
This particular plant seems to be growing well! Has been defoliated over the week and toped a second time! As well as mainlining her! Looks very healthy and happy 😊 🌸💕


Likes
5
Share


@Lagriculteur420
Follow
This week plant continue growing and Blooming, i Can see the very first small pistil, i've reworked my lst and made a top crop superguano top dresses


