The Grow Awards 2026 🏆 


Likes
Comments
Share
@DevilsBud
Follow
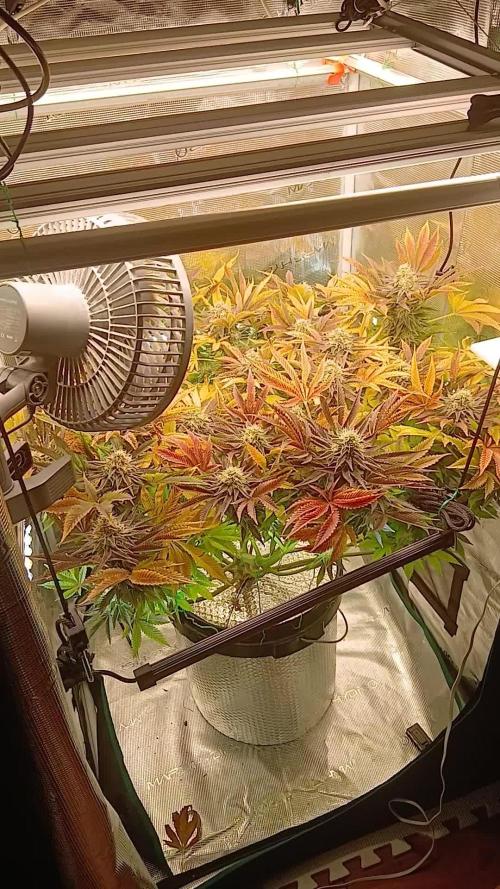
Flushing the last bits out off the
Maybe one to go for last drying down of the pots and the. Lights out for 24 hours chopping time almost upon us
CBD spliff Berry
Afghani Gold
Hyper Glue
There other ones have to go little longer so they will get longer there not done showing off 🤘🏻
Captain future
Imperium X
Blackberry moonrock
28/12/21
Chop chop 1 CBD spliff berry 1 Afghani Gold from @spliffseeds and 1 hyper glue from @anesiaseeds
One of each strain left to chop good time
29/12/21
Top to bottom
1X hyper glue wet weight 369gr
1x Afghani Gold wet weight 277gr
1x CBD spliff berry wet weight 203gr
I don't weigh big branches because i don't smoke it and it's not in the end result either
3 more to go these 3 where wet trimmed and being drying in Dry rack first time doing the wet trim and i probably prefer dry trimming for sure CBD spliff berry is very leafy and fluffy and covered in thricome so i probably keep wet trimmings them to prevent mold when drying the Afghani Gold and Hyper Glue are Rock solid and can easily be wet ore dry trim so These next 2 i probably dry trim good times after these 6 will be done and drying then i have 4 still too chop 👌🏻👌🏻👌🏻 loving my hobby
visit www.marshydro.eu
for your best gear and use the PROMO CODE: DEVILSBUD
Some info about the Marshydro FC-4800
Superb Quality LED Chips: The whole light is composed of 1206 pcs Samsung lm301b and Osram 660nm chips. More than two times as many LEDs are used to drive the grow lights at low currents and to avoid overdrive. Quality is guaranteed and efficiency is up to 2.8 μmol/j.
Even PAR Distribution and High PPFD Output: The multi-light bar design and the densely distributed light chips enable the LED grow lights to achieve the optimum PPFD required for plant growth over the entire effective coverage area.
Specifically Designed Spectrum: To ensure even plant growth, blue and red light are enhanced on the basis of a full spectrum combination. Not only does this accelerate plant growth, but it also improves the yield and quality of the plants at the same time.
Dimming Daisy Chain Function: The dimming function saves on electricity costs and enables brightness from 10% to 100% for the different stages of plant growth. A single master light can connect up to 30 lights in a daisy-chain system.
Business LED Grow Light: The light's wavy heat sink dissipates heat quickly and the IP65 waterproof allows the light to operate in humid conditions. 180° collapsible feature for easier installation. All these features provide favorable assistance for commercial cultivation.
And some tent info
●【Lock All Light Insid】MARS HYDRO Grow Tent Interior is made of diamond mylar. Non-toxic to the environment, no harm to plants. High-quality 1680D canvas being double stitched, (ALL OTHERS BRAND grow tent is 601D canvas) which is tear-proof for perfect light locking, No light leaks or rips at all.
●【Durability Grow Tent】Stable Metal corner adapters and poles are the trustful supporters of the tent. No rusting nor paint-falling. Quick easy tool-free installation. Carries strong heavy-duty SBS zippers, double layer lining to create a light-proof seal.
●【Easy Observation of your Plants】Special peeks window made by double layers of cloths. Observe the growing conditions of your plants without opening the tent and avoid disturbing plants. The peek window also serves to dissipate heat and ventilate air.
●【Removable Tray Keep Clean】The package includes a removable waterproof floor tray to hold soil and fallen leaves. The tray can be taken out easily to wash. Removable and water-proof makes cleaning easy.
●【Good Ventilation&Fast Assembly】 Circular double-sleeved vent holes with adjustable nylon strap for air circulation by exhaust fan, ducting, carbon filter, or reflector. Better allows proper light, heat, and airflow. Quick tool-free installation. Reinforced by a sturdy metal frame to ensure security and stability, supports up to 140lb. Perfectly safeguard your plants to thrive even in winter


Processing
Likes
21
Share
@Siriuz
Follow
We started week 7
Day 44
We noticed a little bit of nutrient burnt
That's okay tho we went medium hard
Last time we fed them
It's okay, just the tip of 2 leaves not much to worry about.
We already flush a little with just plain water today so she could feel better just in case.
She's healthy and strong and developing tons of buds :)
Any suggestion? Please feel free to comment below and thank you for your support, happy growing guys!
Day 46
Great day outdoors from 7/7pm
Rainy, cloudy, sunny
But great after all, then we brought them back Inside for more CFL light
Day 47
Weather outdoor Kinda hot but humid
Only left them outdoors from
7/2pm then back inside for CFL
Day 48
Fed them up, ladies all set
All day outdoors great weather
Gave them a Lil flush to each one after nutes, they had a nice run off
Day 49
They looking even better today
But I snapped accidentally one of the stems that carried 3 flowers, I was tryna get her LST so she could come out of scrog better but she's too thick and I was not gentle I'm so sorry guys, since she's full of buds and super healthy and literally fed yesterday and since she's full of nutes I think she'd be able to replace that stems which has already another bud forming below, so I think she'd be ready to double the stem and produce like 4 times more Buds on that area, that's what I'm hoping since it's not the main stem, anyways, I will keep you guys posted.
I'm the mean time I'm taking that ripen stem with buds and hanging it so she can cure and dry and even tho it's so small hairs are already turning brownish so I guess I could smoke it and try it in several weeks I guess not sure but will keep you up to date and will open a grow question to see what's up with that
Day 50
Outdoors from 6.40am until weather gets too hot
DAY 51
Not much, everything good
Day 52
A little bit defoliation
Day 53
Outdoor and indoor comfort zone
She's great we expanded the net we were using and also watered them a little
End of week #7

Likes
17
Share
@Naujas
Follow
In fact, this is one of the most beautiful plants I have ever seen - it's fantastic :) FastBuds gorilla cookies auto with a small space, hot temperatures copes perfectly :) good luck to everyone :).

Likes
62
Share
@masterofsmeagol
Follow
9/12 Sprayed 1 tbsp K Bicarb with 1/4tsp dawn. Only had time to use a half gallon. I've used more but with all the defoliation this seemed to work and I was in a hurry. I can't ask those watching my plants to do actual labor when I'm not home. I wouldn't want anyone working on my plants but me anyway. I defoliated dead stuff. Still have this rusty looking leaves dieing on my ice cream cake. I need to finish a little defoliating. Broke out my 100x scope and checked a few buds. Things are exploding. Another nice sunny day today. Beastie bloom had no negative effects. I'll use it again and I'll probably use cha ching as well. Went back down to defoliate a little more. I'm getting excited. Still a lot of work left but it's nice to see the progression. Had to cut out a small nug last night that looked like it might start to rot. It was probably fine but I wasn't taking chances. It's so dank and crystally. One of my mystery seeds in the 5 gallon will be done soon. Milky trichs and hard as a rock. Im hoping they will beef up a bit. Little to no amber but things are progressing so fast. I mean nights are in the 40°'s.
9/13 No need to water as it had rained so much the bags need to dry out. Sunny day today. Plants are doing great. Buds increase in bulk on the daily. Took a few pictures and defoliated what needed it. A dog was added to the grow for security. It hasn't gotten used to me yet but it's extremely loud and annoying. Nothing will get past it though. I tried to last night. I shut down the motion sensors informed the other growers (except the person who's shift it was to watch) and I couldn't make it down there on foot let alone a vehicle. Hope the dog liked me but it's certainly useful. It APPEARS we will be having some good weather so I'm excited. I think my plants will be able to finish properly. At least I hope. Either way if I have to harvest early do to the weather so he it but I'll cross that bridge when it comes. Plan to do a preventative BT spray this week.
9/14 FED TODAY. LOWERED GROW BIG TO HALF TBSP. AND AGAIN used 1/4 TBSP Beastie Bloom. Buds are swelling with the sunshine that we've had. I defoliated what needed it and found more dead foliage. It's so weird this damage. I'm pretty sure it's earwigs but the only bother new shoots so that's a good thing. Things are getting close and looking good. I need to do another app of BT. I heard a storm may be coming I'll need to check the weather.
9/15 After a few good days of weather we are in for some rain. Supposably a big storm but it looks like I won't get the worst of it. No water obviously. Something (probably earwigs or jpn beetles) eating or lollipopping lower things. They seem to leave flowers alone. It's just low shoots. Everything is flowering incredibly. I checked trichs on one of my mystery seeds and it looks done. I'm considering taking it. It's in my garage for 24 hrs of darkness and to avoid rain until I make my decision. I also took the two lowest branches off on DJ Short blueberry to taste test and see where I'm at. I probably shouldn't but o do this every year. It will be good to try the mystery bud before I harvest it all. It's just a little guy but the buds are rock hard and with the weather and pm and stuff I'm not sure what I'm going to do yet. UPDATE: APPARENTLY WE HAVE SEVERE THUNDERSTORMS WARNINGS WITH GOLF BALL SIZED HAIL. I can move the other little ones in the garage but everything else is firmly rooted and have taken a beating already. I pray things will be ok.
9/16 No damage from the ridiculous storm last night. I need to spray ASAP. I have a fungal infection with just a few weeks to go. Looks like PM but I know some is a different fungal issue. I'll probably use the k bicarb or citric acid. So far no bud damage or damage up top. The things the earwigs ate were low like the lollipoped lower limbs. It's getting so close. I've been checking trichs and they look great but the buds have some filling out to do.
9/17 DID K BICARBONATE TREATMENT THIS AM. I didn't even look to see if I needed to water. Fuck. buds were soaking wet though so it must've rained. I have to go back down anyway to add a couple strings and do a little more defoliating. Did a treatment with k bicarb this morning.. 1 tbsp with dawn in a half gallon sprayer. I also need to address this earwig problem. They are ravaging some secondary lower branches and Im sure they are spreading disease. I only have a few weeks left and I want the best quality I can possibly get. I plan to put gorilla tape on the outside of the grow bag (double width) and petroleum jelly on the stems. That way they can't climb the bag. If they are in the soil of the bag hopefully the jelly will stop them. I'll also try beer as I've heard that works. I really don't want to resort to borax. Oh and I may have had a visitor last night. I'll have to check the cams. Nothing on the ones I checked but I have some game cams at different angles I haven't checked yet. It was probably just a nocturnal animal. Great to know that the dog announces though. This was at like 12:30 and I was out quick. I only have a few more weeks. I hope the cannabis gods are with me.
9/18 Whatever is eating my plants (earwigs I assume) are progressing from lower secondary or tertiary branches and new shoots to small buds. Looking at trichs some plants look ready. One seedling and the blueberries. I'd like the blueberries to go longer but I'd risk losing them. Fungal and mold issues aren't the greatest either. I was hoping for a big swell but if the weather stays raining and foggy like this it might be better to harvest a little early. I got a second opinion this morning and I'm leaning on taking the seedling and at least the one blueberry with the worst damage that dropped most of its leaves. I'll see how the bottom branch smokes this afternoon and make my decision then. Didn't feed for fear of lockout or if decide to cut. UPDATE: After the second consult with a different local grower I decided to harvest the blueberry that was furthest along and dropping it's leaves. It was done. Luckily it had been flushed with all this sheet rain we've gotten. It rains hard as I speak. Last year I think I had two strings the length of the huge garage and that lasted me all year. This one plant took an entire string to itself. If the weather cooperates this will be a good day. I also flushed the mystery seed I was going to take hoping it might fill out but trichs are very Amber and the bud is DENSE. Not risking mold or insect damage or theft. This took hours to harvest this ONE Blueberry plant. I had to harvest limbs. This was when I could see damage best. I also am curing the buds from the lower branch I took earlier and the other bud that is done. I plan on testing it out tomorrow. I could smoke now but Im already burnt and tired and want to try this with a clear head. I can't believe how long this took. One Big and one little down 10 more to go. Phone died so I couldn't take any pictures.


Likes
13
Share
@Trinidad
Follow
Gorilla Runtz
Seedsman
Day 98
Day 50 flower
4.11.25
Day 100
Fresh Reservoir change out today. 2 gals of water and 11 grams of Floraflex Full Till. Also took some fan leaves out.
Processing
Likes
21
Share
@Siriuz
Follow
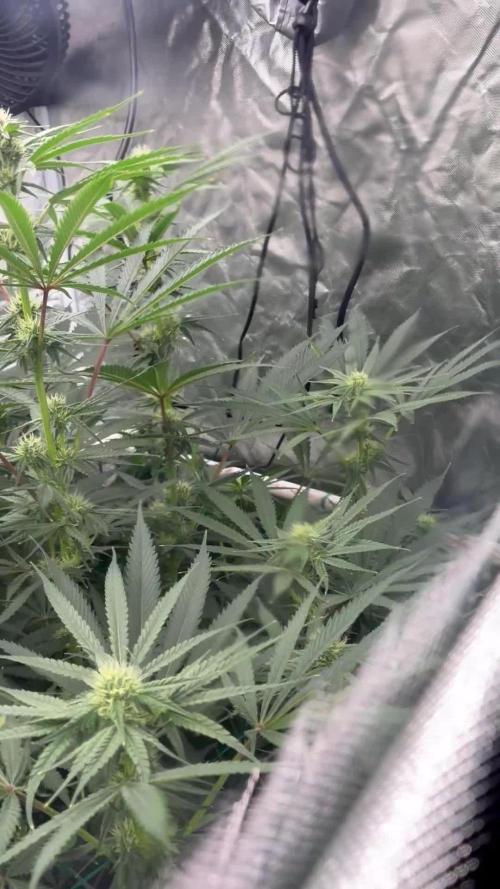
Alright so im gonna stop adding veggie nutes and just gonna keep adding bloom nutes from now on.
She is doing pretty good
I must say she's super XL
She keeps growing and growing
Starting to smell some citrus
Smell is not strong yet
I will continue using the LST technique
Fed them today last veggie nutes followed by bloom nutes and then some water
Day 61
She keeps growing strong and healthy,
They looking good
Day 62
She's doing great after applying HST
Day 63
Growing bigger and tomorrow we gonna add more nutes
Day 64
end of week 8 gotta add more nutes
This time will only add floranova bloom

Likes
5
Share
@ROY4L_GU4RD
Follow
Week 9 here! They started falling over from heavy buds. Gonna try and prop up as many as i can. Only using Ripen at half dose this week. Gonna chop around week 10.

Likes
80
Share
@Roberts
Follow
Pure Ice cream clone is doing well. I trimmed her up some. Took a lot of lower stuff off. I will likely do more soon. She is really needing a bigger potter. I need to do that soon. Beside that she is doing good. Thank you Pure Instinto, Medic Grow, and Spider Farmer. 🤜🏻🤛🏻🌱🌱🌱
Was transplanted 2 days after update.
Thank you grow diaries community for the 👇likes👇, follows, comments, and subscriptions on my YouTube channel👇. ❄️🌱🍻
Happy Growing 🌱🌱🌱
https://youtube.com/channel/UCAhN7yRzWLpcaRHhMIQ7X4g

Likes
2
Share
@smokeycropping
Follow
- LAS PLANTAS SIGUEN CON EL MISMO PLAN NUTRICIONAL
- NO SE VEN CARENCIAS NI EXCESOS
- el hps de 600 MANTIENE MI AMBIENTE SIN MAYORES INCONVENIENTES
-NO SE VEN PLAGAS NI MAYORES PROBLEMAS

Processing
Likes
29
Share
@Grey_Wolf
Follow
Ginger Nut Cookies & Aussie Music Videos
5 weeks of flowering completed
2nd April 2020
Hi Everyone , Welcome back to my diary
The plant I created is growing nicely
nothing much to report other than the smell has changed yet again...
Now it resembles yoghurt or slightly sour milk crossed with fruit.
Not an unpleasent smell by any means
just unusual. I'm not needing to feed
a lot as the soil seems to be providing most of her nutritional needs.
Now For the Aussie Music Videos
Because this plant is geeting closer and closer to harvest time I thought I had better start doing more than one video a
week lest I miss out on too many great videos I could add. So this week I have
picked three videos from three different
Artists all of which are very much loved here in australia.
First one is a Group called "Crowded House" with their hit song "Better be home soon" here is the link....
https://www.youtube.com/watch?v=AQOlwMKpmvQ
Second group is called the "Hoodoo Gurus" with "Like wow wipe out"
https://www.youtube.com/watch?v=vFnaNPGe4gQ
And the third for this week is a great
band actually from New Zealand but we claim them as our own "Mental as Anything" with "Live It Up"
https://www.youtube.com/watch?v=kK_eQImKnPA
As usual I have provided a short clip of each song as a preview in the above image and video section.
I hope you like this weeks update and please leave me a like if you did.
Please stay safe and well Everyone and
I will see you all back here next Week.
Likes
3
Share
@nowayReggie
Follow
week 1.
10.1
Day One.
Moved seedlings under SF-600 at 24 inches.
Will let plants adjust
10.2
Progress.
1/3 has helmet head
1/3 is starting to turn towards light
1/3 has shown strong growth the whole way
Likes
17
Share
@Rooflower
Follow
Hey there everyone ,
Im so happy to start this diary and this new project for this spring season.
I just received some seeds from Amsterdam Genetics seeds team and im really happy and thankful for this chance those guys gave me to grow their genetics 😁🙏
Due to limited space at the moment , I cannot go bigger than 60X60 grow tent and at the same time I cannot wait to grow at least one of them all so this can only be a multi strain grow under just 100W. So , I will be growing :
2 X FatKid's Cake
1 X Royal Choco (fresh one 2022 😋)
1 X Double Blue
Will be growing them in 3,5lt plastic pots in 100%coco enriched with mycorrhiza and will not transplant at all.
Thinking of keeping them in vegetation for 4 weeks maximum but the plants themselves will show me if they need some more time .
Germinated them using the paper towel old time classics method for me , 4/4 showed little root after less than 48 hrs so I stuck them in the substrate , straight in the 3,5lt pot of coco.
Decided to skip the germination in 0,5 lt cups, like I used to do because I had the feeling that I was just loosing time and adding a bit more stress in their early phase while transplanting. Coco is a well aerated substrate so lack of air/ oxygen won't be an issue, hopefully !
Germination date : 4-4-2022
Date in coco : 6-4-2022
Sprout date : 10-04-2022
Let's GROW then !
Will be updating this Diary at least once a week here and im really excited to share that one with you all!
Follow this Diary so you won't miss my updates 👻
BIG THANKS to AG team once more🙏
Wanna see more content? --> https://www.instagram.com/roof.lower/
UPDATE: 2/2 FatKids Cake seeds never sprouted, after some days I did a bit of digging in the coco and found both seeds still there with no visible roots or anything.
I still have some more seeds of them but decided to just grow those two for the moment and grow FCs on my next round.
Although, considering that fact, I will keep those two in vegetative schedule for more time to cover up the canopy as much as possible!

Likes
18
Share
@Pokan187
Follow
Everything is going smoothly, the buds are getting bigger day by day
All the girls are bug free, they are still looking green
The G13 has the strongest smell followed by the Runtz and the GDP doesn’t smell like anything for now

Likes
13
Share
@ernest_twwg
Follow
May 2nd:
She seems to be growing strong. She's trying to grow vertically!
Just natural well water.
Light intensity is at 75%.
No nutes, yet.


Likes
Comments
Share


Processing
Likes
5
Share
@Lotuspro
Follow
Realy stepped up the nutes and trying out snoops nutrents they came late but 1 bottles of a and b bloom only was enuf for 1 water change because I'm using the flow and grow and the res is like 50gal at 17mil a gal that's 850mil a week or 2 in bloom forget that but I have to say that 2weeks I did use it the plants realy looked amazing I think I should just move in to my grow room I cant even remember what my girlfriend and kids look like I found a new love and passion I can work 18hrs straight like it's nothing if I'm not looking after my new babys I'm building a new grow system or water filter system. I now have 2 familys and there both beautiful if my girlfriend makes me choose shes out the door .

Likes
6
Share
@DogDoctorOfficial
Follow
Week 4 (12/12 from seed, veg phase)
Quick clarification before we continue:
Last week, while putting the reports together, I mixed in a few photos that actually belong to this week. That one’s on me — I went with the flow and didn’t double-check the dates as carefully as I should have.
To keep everything clean and accurate, this update resets the timeline properly. From here on, photos and notes will match the correct week so everyone can follow the run clearly and confidently. Thanks for the understanding — now let’s get back to the girls 🌱
Quick recap for newcomers (Week 4 – 12/12 from seed)
Where we are
• Week 4 of vegetative development
• Light schedule: 12/12 from seed
• Plants are still fully in veg behavior (no true flower yet)
What defines this stage
• Structural building phase
• Root mass expanding rapidly
• Branching patterns being set
• Energy focused on framework, not buds
What we’re seeing
• Excellent vigor
• Balanced nutrient uptake
• No visible deficiencies or toxicity
• Genetics expressing clean morphology
⸻
What to expect this week
• Continued vertical and lateral growth
• Slightly faster node stacking
• Plants preparing hormonally for pre-flower
• Leaves staying broad and healthy
• Training responses (if any) remaining gentle and controlled
What not to expect
• No real flower formation yet
• No heavy stretch just yet
• No need for aggressive defoliation
• No panic adjustments — stability is key here
Community Note
Due to YouTube community guidelines, our educational channel was taken down.
While we firmly believe the content was purely educational, we respect YouTube’s decision and are actively exploring alternative platforms to continue sharing this work.
📡 Please stay tuned.
🙏 Thank you for your patience and continued support.
FOR DISCOUNT CODES AND MORE JUST FOLLOW THE LINK https://website.beacons.ai/dogdoctorofficial
📲 Don’t forget to Subscribe and follow me on Instagram and YouTube @DogDoctorOfficial for exclusive content, real-time updates, and behind-the-scenes magic. We’ve got so much more coming, including transplanting and all the amazing techniques that go along with it. You won’t want to miss it.
GrowDiaries Journal: https://growdiaries.com/grower/dogdoctorofficial
Instagram: https://www.instagram.com/dogdoctorofficial/
YouTube: https://www.youtube.com/@dogdoctorofficial Deleted by Youtube
Vimeo : https://vimeo.com/dogdoctorofficial Under construction stay tuned ⸻
Explore the Gear that Powers My Grow
If you’re curious about the tech I’m using, check out these links:
🔆 Lighting & Environmental Control
• Future of Grow — Advanced LED lighting technology
https://www.futureofgrow.com/
DISCOUNT CODE: DOG20
• Lumiflora — Under-canopy LED lighting
https://lumiflorade.com/
• TrollMaster — Environmental controllers and automation gear (past collaboration)
⸻
Genetics
• Zamnesia Seeds — Genetics used in this project
https://www.zamnesia.com/
⸻
🌱 Soil, Substrates, Boosters & Root Support
• Plagron — Substrates, bio mixes, and supportive products
https://plagron.com/en/
⸻
🎒 Storage, Curing & Preservation
• Grove Bags — Curing and storage solutions
https://grovebags.com/
⸻
📸 Photography Equipment & Tools
(Not sponsors, but part of my creative toolkit)
• Sony A6700
• Sony full-frame macro lens + few more
• Stacking photography workflow - learning
• iPhone (for behind-the-scenes shots)
We’ve got much more coming as we move through the grow cycles. Trust me, you won’t want to miss the next steps, let’s push the boundaries of indoor horticulture together!
As always, this is shared for educational purposes, aiming to spread understanding and appreciation for this plant. Let’s celebrate it responsibly and continue to learn and grow together.
With true love comes happiness. Always believe in yourself, and always do things expecting nothing and with an open heart. Be a giver, and the universe will give back in ways you could never imagine.
💚 Growers love to all 💚
📸 P.S. – The Eye Behind the Lens
All photos in this diary (for now — except for the ones showing the camera, which I took with an iPhone) are taken with a Sony A6700 paired with a Sony full-frame macro lens and a few more.
Photography is part of the story — it’s how we share the fine textures, the glow, and the quiet details that words can’t always capture.
I’ve also started experimenting with photo stacking — a technique where multiple images, each taken at a slightly different focus point, are layered together to create one perfectly sharp image from front to back.
It’s not digital enhancement or AI; it’s pure photography — a way to reveal the plant’s beauty in microscopic depth, from trichome to petal.
You’ll even see a few shots of "ghost me" capturing the shots — camera, lens, setup — because every grow deserves not just to be cultivated, but documented like art.
FOR DISCOUNT CODES AND MORE JUST FOLLOW THE LINK https://website.beacons.ai/dogdoctorofficial
NEW DISCORD - Official Server Invite Link : https://discord.gg/ksjAkA5T74

Likes
3
Share
@Rodburn
Follow
Went out of town for the weekend, things nearly got out of control. Stretch should be near over. Defoliating tomorrow, healthy girls
Likes
Comments
Share


Likes
10
Share
@Beardacious_buds
Follow
Packing it on. Starting to color up. Anvil already showing her beautiful colors. Aliens Berries is a shorty and not getting as much light and starting to get a little airy… way she goes.

