
Likes
Comments
Share


@Crwfz1
Follow
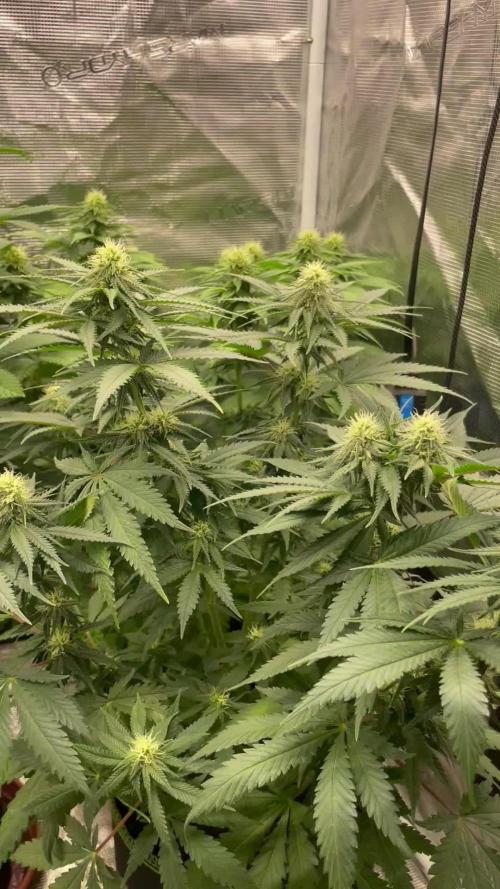
She's doing damn great starting to die off tho I think I let pH get a little too high but it's good she'll pull out ajdusting for it she's almost done gonna havrest slightly early I normally prefer about 20 percent amber trics gonna check with microsope end of the week nugs are absolutely hard as rocks this bàbby is gonna go out with a bang that's for sure ! Soon to start diarie on my other two babies I got on the side


Likes
16
Share


@Symbiosis_420
Follow
Well, this strain is surely flowering for a long time, it's still stretching. I wonder if it will stop stretching and start fattening the buds this week...
Anyhow, one of the reasons why I don't defoliate much is because the plant does that by itself. When the lower leaves receive almost no light (because all the light is blocked by the thick growing canopy) they start to send their nutrients to the top. When they are donez they just fall off on their own. You see, leaves are like solar panels AND nutrient reserves!
Just make sure this process is slow and the leaves that receive light are still very healthy and green. If many leaves are falling or if they fall really fast you gotta make sure is not a deficiency or nutrient lockout!
...
Again just water your plant with bloom formula (and a bit of calmag) to an EC that allows you to maintain the plant heathly and the runoff not to high (in my case 1mS/cm). Remember to alternate nutrients and pHd tap water.
That's pretty much all left to do from here to harvest.
Obviously if you see something wrong try to correct it.
Day 66 update.
I dropped something on my plant. It bended one branch very badly and severed some leaves and a bud :(
Well, accidents happen. Luckily cannabis is a very very resilient plant, one might be surprised at how much this plants can take.
Anyhow, taped everything together loosely, pulled the most bent branches upwards with a thread and I will wait for it to heal...
If everything goes well, this branches should be even stronger than the others. Let's hope that's my fate!
Update day 69. Although I have been feeding with 1.0 mS/cm once, then pHd water then feed again, the run off from today measured 3.0 mS/cm ! It's climbing still. I flushed again, until the runoff was at 1.5 mS/cm.
I think I understand what happened, my theory is that the plant needs a lot more water now, but not as many more nutrients. So it takes the 2.5 daily liters of water, but it might only eat the nutrients in 1lt of water, so the rest stays on the roots and accumulates, raising the EC of the soil. So far, by checking EC on the soil once every week or two I have avoided nutrient toxicity and lockout.
I think there are two options, either lowering the concentration of nutrients I feed it (so 2.5 lts a day will contain less dissolved nutrients), or spacing out the feedings with more intermediate waterings of plain water.
I think I am going to go with the former, next week I will try feeding an EC of 0.8 mS/cm on 3L then tap water and so on from next week on. I prefer to underfeed than to overfeed, which is what I recommend for other boobs, it's better to have some yield than to risk killing the plant. We will get better with time...

Likes
14
Share


@Madd_Rez
Follow
Been a busy week! Topped and stripped quite a bit from all 4 plants, turned on the air pump or the Airdomes today since we're at 4 weeks from seed. Adding some supplemental CO2 sometime this week and hopefully get some LST in depending how fast they grow.
Likes
20
Share


@420DeepGrow
Follow
Gracias al equipo de MSNL y XpertNutrients sin ellos esto no sería posible.
💐🍁 Forbidden Fruit Auto:
Forbidden Fruit Autoflower, llamada así por sus deliciosos sabores, es un cruce entre Cherry Pie, Tangie y Siberian Ruderalis. Esta variedad ofrece efectos estimulantes y relajantes con un sabor afrutado, cítrico y a pino. Ideal para quienes buscan un dulce escape.
🚀🌻 Consigue aqui tus semillas:
💡TS-3000 + TS-1000: se usaran dos de las lámparas de la serie TS de Marshydro, para cubrir todas las necesidades de las plantas durante el ciclo de cultivo, uso las dos lámparas en floracion para llegar a toda la carpa de 1.50 x 1.50 x 1.80.
https://marshydro.eu/products/mars-hydro-ts-3000-led-grow-light/
🏠 : Marshydro 1.50 x 1.50 x 1.80, carpa 100% estanca con ventanas laterales para llegar a todos los lugares durante el grow
https://marshydro.eu/products/diy-150x150x200cm-grow-tent-kit
🌬️💨 Marshydro 6inch + filtro carbon para evitar olores indeseables.
https://marshydro.eu/products/ifresh-smart-6inch-filter-kits/
💻 Trolmaster Tent-X TCS-1 como controlador de luz, optimiza tu cultivo con la última tecnología del mercado, desde donde puedes controlar todos los parametros.
https://www.trolmaster.com/Products/Details/TCS-1
🍣🍦🌴 Xpert Nutrients es una empresa especializada en la producción y comercialización de fertilizantes líquidos y tierras, que garantizan excelentes cosechas y un crecimiento activo para sus plantas durante todas las fases de cultivo.
Consigue aqui tus Nutrientes:
https://xpertnutrients.com/es/shop/
📆 Semana 5:
Una vez vistas las preflores entran en floracion 💪.
Definitivamente se han adaptado muy bien a su hábitat natural, voy con dosis muy suaves de nutrientes ya que ellas tienen prácticamente todo lo que necesitan.
El canto de las aves las pone feliz.
Buen sol y buen tiempo esta semana 😍

Likes
33
Share


@AshBrand
Follow
7/4/21 - Happy 4th of July! They look great today. Just feeding them and letting them flower.
7/5/21 - They look really good. We are on track for a good harvest.
7/6/21 - Day 45 of flower. Looking good today. I need to plan a day to start giving only fresh water. Until then I’ll keep feeding.
7/7/21 - They look great. We are excited for harvest time. We can’t wait to try this smoke out.
7/8/21 - Getting close! We are very excited. A couple weeks left :) They look and smell great!
7/9/21 - These nugs are huge and getting very dense! See the video above for today. They are very sticky.
7/10/21 - They look so good. A couple more weeks before harvest.

Likes
5
Share


@Cowboy
Follow
Everything has went well this week no problems at all,lost power due to hurricane we had this week ,but had a generator to keep the lights on,I think she will go a full 12 weeks,,

Likes
Comments
Share


@BestenDank
Follow
The moniker Mother Superior is apt. Purple Wedding Glue stands a full two node spaces taller than her tent sisters and holds court while pontificating on the virtues of hard work and being a sexy bitch 💅. There’s argument to be made about genetics and structure but there’s also no denying that the Nun dug a little deeper and found something that her peers didn’t or couldn’t.
With the onset of pistils, Purple Wedding Glue saw a rehoming with an entirely different set of environmental parameters, namely slightly higher DLI and a crash in humidity to 50-55% that she accepted with grace and poise followed also by a jump in nutrition with the start of her flowering solution minus the first week of flower K dose. And that’s where the complications set in…
As I write this I’m looking at the start of leaf stress, inward curling on the new growth sans any burning or clawing, that I’m attributing to myself and my propensity to push the envelope in the name of frugalness. Bio diesel state very clearly on their foliar feed chart “we advise using Rhino K within the first 24 hours of mixing”… I did not lol, and I now believe that 72 hours is asking too much of the solution 🤣. So the foliar application of K brought with it a hiccup but nothing dramatic, lesson learned, only fresh foliar mixtures from now on. But that situation lead me to leave out the K from PWG’s first coco soak. In saying all that the K application did see a tightening and decrease in node spacing and subsequently a slow in vertical growth. A welcome and expected result as PWG was suffering from a slight case of scoliosis due to cramping in the nursery tent.
And smell. PWG now comes equipped with an olfactory experience. A deep waft of her admittedly early main cola site suggests a slight but evident dank on the front and burned coffee on the back, no doubt to change and evolve as she matures but any scent beyond planty chlorophyll gets a smile.
Probably way more that I’m leaving out but, hey, if you drop by and have grown Aeque Genetics before, drop me a link in the comments. Got love for the company and enjoy seeing their lines grown out.
Stay lifted, love and boomshanka 🤙
Booka @ BestenDank

Likes
4
Share


@The_Projexx
Follow
Welcome to week 5! Things are progressing along as some plants have started to display sex. I've removed some of the males that have shown themselves so far as we aren't looking to breed this run. Going to let them veg for this week and then I will be flipping the lights to get the flowering cycle started.
Huge shout outs go to @MarsHydroLED for allowing me to grow with their kick ass gear!
Huge huge shout outs go to all my followers and to the people who stop into the diary alike! Keep on inspiring.
-The Projexx
Day#29 Ladies are growing along and recovering nicely from the topping , Watered 1.5L from the bottom.
Day#30 Plants seem to be doing ok from the water increase. Things moving along nicely
Day#31 Pictures N/A. Plants are growing along remove 2 males
Day#32 Watered 1.5L from the bottom , Plants arent very happy. I think the issues is i'm not waiting long enough between waterings. I will have to practice the technique more for now I may go back to top watering.
Day#33 Pictures. N/A.Top fed 3.5 L each at 550PPM I knew I wasnt giving them enough water. Things are about to change heavy duty now
Day#34 Pictures. N/A Plants are ridiculously happy now. Im going to cut away all the dying leaves and flip the lights.
Day#35 Pictures N/A Last day of veg for this project. Im excited to see what these plants do in flower!
Recap: Things where ruff at the start of the week but by the end we were rocking and rolling again and ready for flower! Wont be long now till we see some real action!


Likes
4
Share

@Guerrilla_grower777
Follow
29/09/2025 18:50
Finally here after 10 full cloudy and rainy days,found out that the two Coco needs more water,the pots were dry like never even with rain almost every day
18.6 °C and 53%RH means only one thing,autumn is here and officially summer ended
Video #1 apricot auto 68 days from seed
Harvest Is near for this little auto,smell is the best by far Just like an apricot juice
Checked all the plant and didn't found any mold sign so i cut a little sample to have a better look at the trichomes
Video #2 Coco fresh 60 days from seed
This one is really focusing on the buds you can see the difference from the last time
Noticed that the buds below the apical are pretty dense i don't know if it's normal or if it's because of underwatering
Video #3 Coco Milk 72 days from seed
I think last time defoliation was a bit hard as i see not much difference on the buds as i think should be in 10 days
Smell of this Is like buttery really strange if you think It comes from a plant
At the end there are the first four branches of the gorilla z, these flowers are 94 days old and keeps going wtf
2nd of october now and Is raining again after a full day of heavy rain,maybe i will be back after a full week

Likes
2
Share


@Velk1
Follow
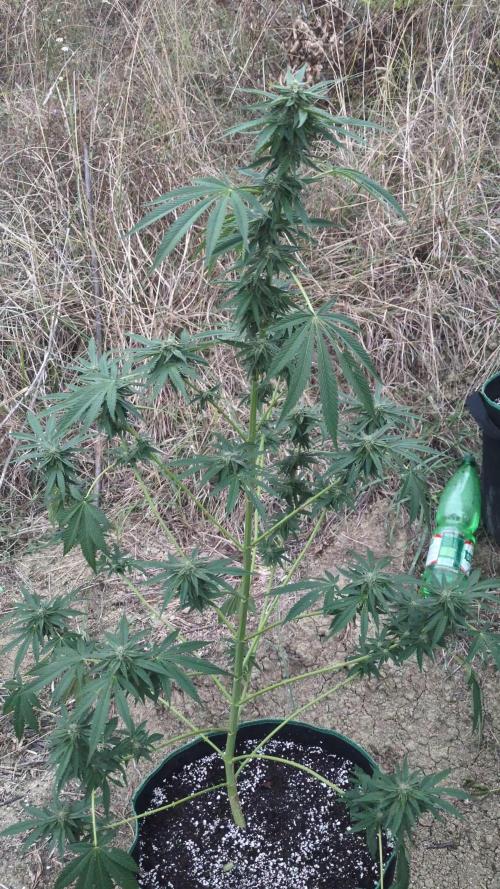
Plant grew out doing its thing , med feeder can handle rough conditions and heat ! Great for beginners
Likes
31
Share


@Wicked_Stix
Follow
She has been on 12/12 for 2 weeks now and transitioning to flower nicely. This bubble bomb might be the smallest of the bunch but she is stretching some and it looks like she is going to put off about 20 top buds so no complaints. Couldn't be happier with how these 6 girls are playing well together so far. Going to start them on some liquid Koolbloom next week.
Nutrients per gallon
.5 tsp maxibloom
.25 tsp maxigro
.5 tsp calimagic
.25 tsp armor si
.1 tsp 90/10 humic/fulvic acid.
Ph to 6.0

Likes
27
Share


@LSchnabel
Follow
This plant was amazing from start to finish.
I will update a final comment soon as well as final weigh and a review of the smoke once sent out to a group of testers.


Likes
5
Share

@GERGrowDesigns
Follow
GERGrowDesigns Welcome to Flower Week 1 of Divine Seeds Auto AK-47 XL
I'm excited to share my grow journey with you all as part of the Divine Seeds Autoflowering Competition 2025. It's going to be an incredible ride, full of learning, growing, and connecting with fellow growers from all around the world!
For this competition, I’ve chosen the Feminized Automatic strain: Auto AK-47 XL
Here’s what I’m working with:
• 🌱 Tent: 120x60x80
• 🧑🌾 Breeder Company: Divine Seeds
• 💧 Humidity Range: 60
• ⏳ Flowering Time: 59Days
• Strain Info: 21-24%THC
• 🌡️ Temperature: 26
• 🍵 Pot Size: 0.5l
• Nutrient Brand: Narcos
• ⚡ Lights : 200W x 2
A huge thank you to Divine Seeds for allowing me to be a part of this amazing competition and Sponsoring the Strains. Big thanks for supporting the grower community worldwide! Your genetics and passion speak for themselves!
I would truly appreciate every bit of feedback, help, questions, or discussions – and of course, your likes and interactions mean the world to me as I try to stand out in this exciting competition!
Let’s grow together – and don’t forget to stop by again to see the latest updates!
Happy growing!
Stay lifted and stay curious!
Peace & Buds!


Likes
9
Share


@joshehutch
Follow
Set up the tent cam to take a picture every 5 minutes during lights on so I can try and make a cool timelapse. I fed them kinda lightly and I think my EC might be a little low and thats why they're so light colored; they're hungry. I also had the light on 3 but now its on 2. Its sitting pretty high above them so I don't think it should be burning them. They show no signs of stretching however so they're definitely not getting too-little light at least.

Processing
Likes
10
Share


@Barcelona_Farmers710
Follow
Entramos en semana 4 de flora con un calor extremo con el Lec... a la espera de renovar equipo a led pero tendremos que acabar con Lec está tirada farmers, a pesar de todo tiene bastante resina y huele bastante bien sobre todo la Sweet Skitllez!🍁
Likes
1
Share


@MOTB666
Follow
Been pretty busy lately but these girls just keep at it. I did go several days with out topping them off this last week, probably only had a gallon left of water in thier buckets when I switched to transition. Only problems is a little bit of light burn and maybe a little bit of pest damage on one of them.
